About cookies on this site Our websites require some cookies to function properly (required). In addition, other cookies may be used with your consent to analyze site usage, improve the user experience and for advertising. For more information, please review your options. By visiting our website, you agree to our processing of information as described in IBM’sprivacy statement. To provide a smooth navigation, your cookie preferences will be shared across the IBM web domains listed here.
Tutorial
Orchestrating external agents using A2A standard on watsonx Orchestrate
A hands-on guide for importing external A2A agents into watsonx Orchestrate using the Agent Development Kit, enabling seamless cross‑service orchestration
On this page
Agents are becoming more than conversational frontends. They are expected to interact with business systems, exchange data with one another, and coordinate actions in a reliable way. A sales agent might need to check inventory before making an offer, a support agent may escalate an issue to a specialist agent, or a planning agent might bring together inputs from finance, HR, and IT before creating a recommendation. All of these require a standard method for agents to talk to each other.
That is where the A2A (Agent-to-Agent) standard comes in. Rather than each agent exposing a custom API or relying on brittle point-to-point integrations, A2A defines a consistent contract for discovery, request, and response. This means that once an agent is built with A2A, it can be reused in different orchestrations without modification.
A2A agents are particularly useful when the agent’s logic or purpose is highly specific. They shine in situations such as:
- When an agent contains its own reasoning process or rules that go beyond what standard Orchestrate capabilities can express.
- When an agent implements prescriptive, step-by-step interaction flows.
- When an agent must access systems or APIs that cannot be exposed directly to the main Orchestrate runtime.
- When the agent is provided by a third party and must be integrated securely through a common protocol.
In this tutorial, you will create a simple external agent, expose it using the A2A standard, and integrate it with watsonx Orchestrate. The steps are deliberately practical, so by the end you will not only understand the A2A concept but also have a working agent that you can adapt to your own use cases.
In practice, an A2A-enabled agent provides two key things:
- A manifest that describes what the agent can do, including its actions, inputs, and outputs.
- Standard request and response schemas in JSON format that all A2A agents use, so the supervisor or other agents don’t have to guess how to call them.
Within watsonx Orchestrate, A2A acts as the backbone for connecting external agents into workflows. When a user issues a query, the Supervisor Agent interprets the intent. If the task requires more than reasoning, the Supervisor Agent looks up which A2A agents are available, checks their manifests, and routes the request to the right one.
With A2A, developers and architects can design your agent once, expose it with an A2A manifest, and reuse it across different orchestrations. Because the inputs and outputs follow a shared contract, responses from different agents can be combined or chained together in multi-step workflows. The real power of A2A comes from interoperability. An agent written in Python and deployed on IBM code Engine can talk to another agent built in Node.js running on a private server, as long as both follow the A2A specification. This makes it possible to grow an ecosystem of agents gradually, mixing internal and external services, without worrying about compatibility.
In short, A2A is what allows watsonx Orchestrate to move beyond a single intelligent agent into a network of collaborating agents, each specialized, reusable, and easy to plug into enterprise workflows.
Architecture Overview
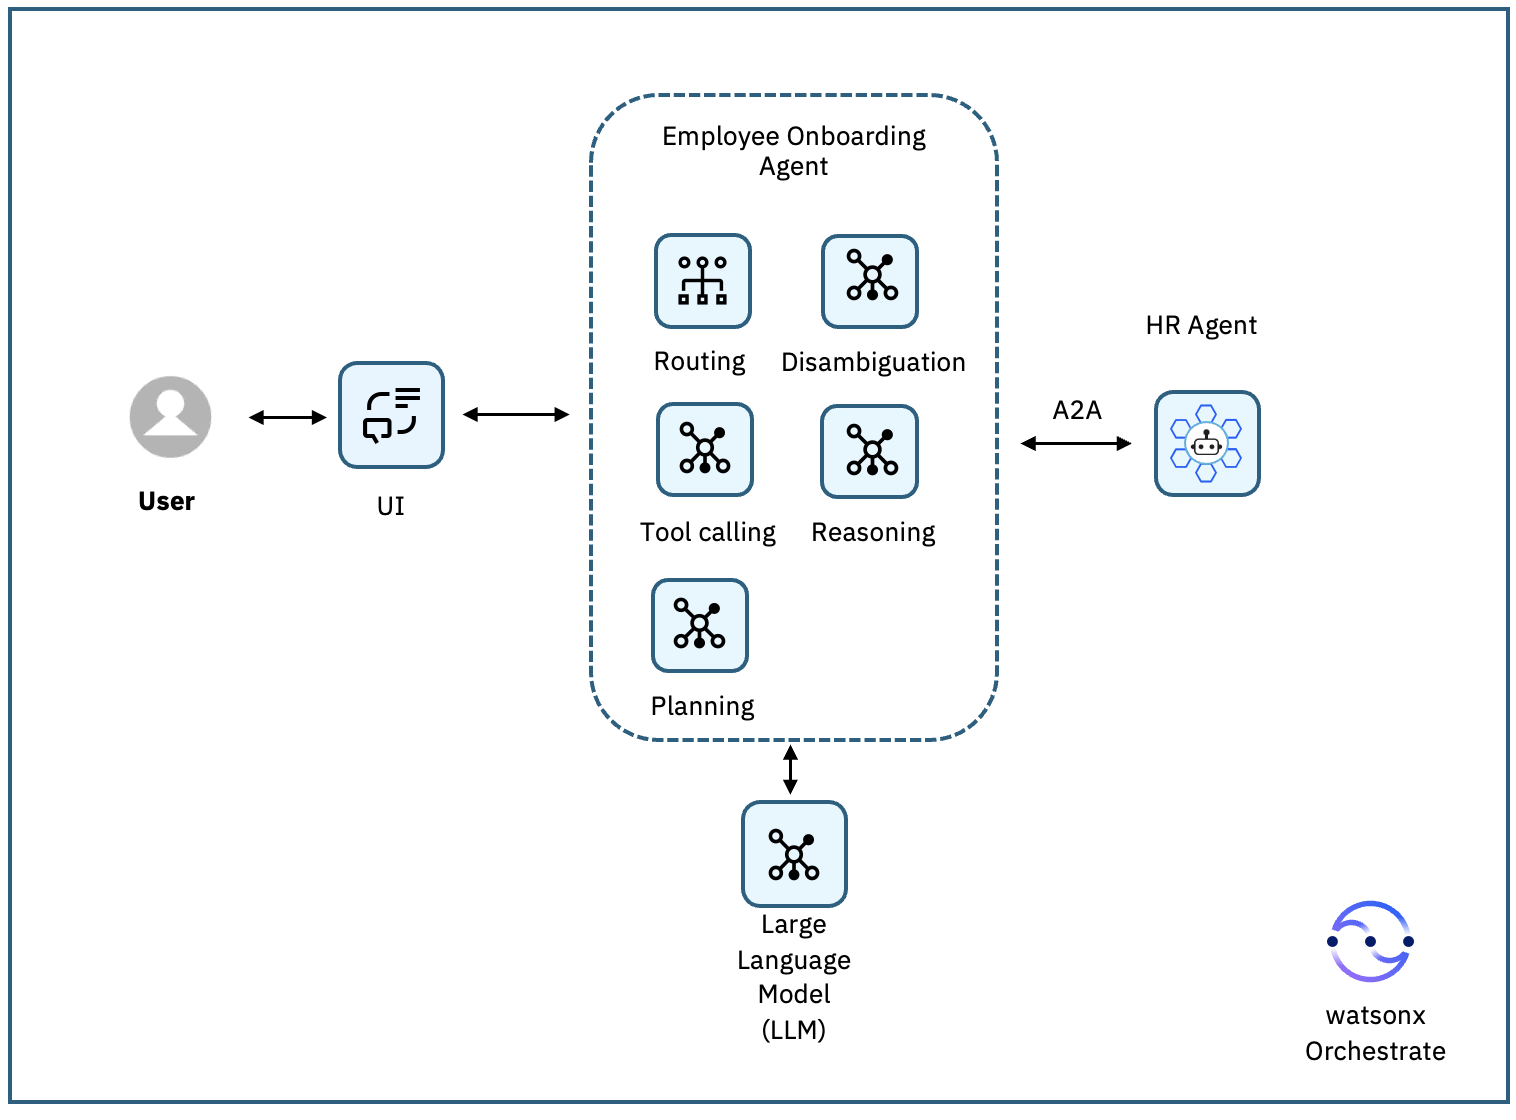
This sample agent architecture combines reasoning from watsonx Orchestrate with execution from the external HR Agent.
- A user asks to onboard a new employee.
- The Onboarding agent interprets the request.
- It calls the HR agent via A2A to validate and normalize the employee record.
- The HR agent responds with structured onboarding details.
- The Onboarding agent processes the response and presents it back to the user.
Prerequisites
This tutorial assumes you have a running local environment of watsonx Orchestrate Agent Development Kit (ADK) version 1.9 or above. check out the getting started with ADK tutorial if you don’t have an active instance. It has been tested and verified with ADK version 1.9 and 1.13.
Python version 3.12. It should work with later versions, but this tutorial has been tested with Python 3.12.
- An IDE such as Visual Studio code.
- An IBM cloud account and familiarity with IBM cloud code Engine.
- colima local environment. colima is an open-source tool that lets you run Linux containers on macOS (or Linux or Windows WSL2). This tutorial has been tested with colima version 0.8.1.
Step 1. clone the GitHub repository
In this step, you will clone the GitHub repository that contains the A2A specification and the configuration for the external agents used in this project:
- HR agent handles employee onboarding requests. It validates and enriches new-hire information, generating a structured onboarding record.
- HR Manager agent (optional) delegates user requests to the HR agent and returns a summarized response to watsonx Orchestrate.
The HR agent follows the A2A protocol using JSON-RPc 2.0. So, instead of exposing a custom REST API such as /v1/chat/completions, the HR agent exposes a single, standardized endpoint (/) that receives and returns structured A2A messages. The watsonx Orchestrate platform or any other A2A-compatible agent can send messages to this endpoint, and the HR Agent will reply with a well-formed task result.
Each folder in the repo is a self-contained agent that you can build, configure, and run on its own.
clone the repository locally:
git clone https://github.com/IBM/oic-i-agentic-ai-tutorialsNavigate to the a2a directory.
cd oic-i-agentic-ai-tutorials/a2a
Key components in the repository
Let’s review some of the key files in the repo:
app/main.py This Python script starts the Starlette-based A2A server. It loads the configuration from the YAML files, registers the HR Agent executor, and serves the following endpoints:
/- A2A JSON-RPc 2.0 entry point/.well-known/agent.json- Discovery card describing the agent/health- Lightweight liveness check
app/agent_executor.py This Python script implements the
AgentExecutorinterface from thea2a-sdk. It manages the task lifecycle, from working to completed, and then constructs the finalTaskResultobject that includes the onboarding summary as an artifact. It also supports streaming partial responses back to the caller ifstream: trueis enabled in the YAML.app/agent.py This Python script contains the core business logic. It parses the natural-language request (“Onboard Jane Smith as Data Analyst”), generates a normalized employee record, and formats the response as a structured artifact. Because this module is isolated, it can be extended easily to connect to real HR systems or databases.
hr_agent.yaml This YAML file defines how watsonx Orchestrate should call the agent. Key fields include:
provider: external_chat/A2A/0.2.1- declares the A2A protocol versionapi_url- points to the deployed code Engine endpointchat_params.stream: true- enables live streaming in Orchestratenickname/name- logical identifiers used during import
onboarding_agent.yaml This YAML file describes a higher-level agent that delegates onboarding to the HR Agent. It doesn’t re-implement business logic. It simply forwards the user’s request through A2A and reformats the reply for display inside watsonx Orchestrate.
Dockerfile – defines how to build and run the container image for the agent.
requirements.txt – lists the Python dependencies required by the agent.
A2A message flow
In this section, you will learn how watsonx Orchestrate and the external HR Agent communicate with each other. The A2A message flow walks through each step of the process from the initial request to the final response, showing how A2A ensures consistent and structured communication between agents.
- watsonx Orchestrate sends a JSON-RPc 2.0 request to
/with methodmessage/send. - The
A2AStarletteApplicationreceives the request and invokesHRAgentExecutor. - The executor calls the
HRAgentclass inagent.pyto process the request. - The agent returns a
TaskResultcontaining structured artifacts. - The response is serialized back to Orchestrate in the A2A standard format.
Example (simplified):
{
  "jsonrpc": "2.0",
  "result": {
    "kind": "task",
    "status": {"state": "completed"},
    "artifacts": [
      {
        "name": "onboarding_result",
        "parts": [
          {"kind": "text", "text": "Employee onboarded successfully."}
        ]
      }
    ]
  },
  "id": 1
}
Why this matters
This design makes the HR agent fully interoperable. Any other A2A-compliant agent, written in another language or hosted elsewhere, can discover it via the .well-known/agent.json card and communicate with it using the same message schema. That interoperability is what allows watsonx Orchestrate to build scalable, modular workflows without custom connectors.
Step 2. Run the A2A agent locally
In this step, you will build and run the HR Agent locally using the A2A protocol implementation.
Navigate to the hr-agent folder, and create a virtual environment.
cd hr-agent-pure-a2a python3 -m venv .venv && source .venv/bin/activateInstall the required dependencies for the agent.
pip install -r requirements.txtStart the HR Agent A2A application. The HR Agent runs as a Starlette-based A2A service.
The following command starts the local HTTP server on port 8080:
python -m app --host 0.0.0.0 --port 8080This command:
- Launches the A2A JSON-RPc 2.0 service
- Exposes the Agent card at
http://localhost:8080/.well-known/agent.json - Listens for A2A messages at
http://localhost:8080/ - Provides a health check at
http://localhost:8080/health
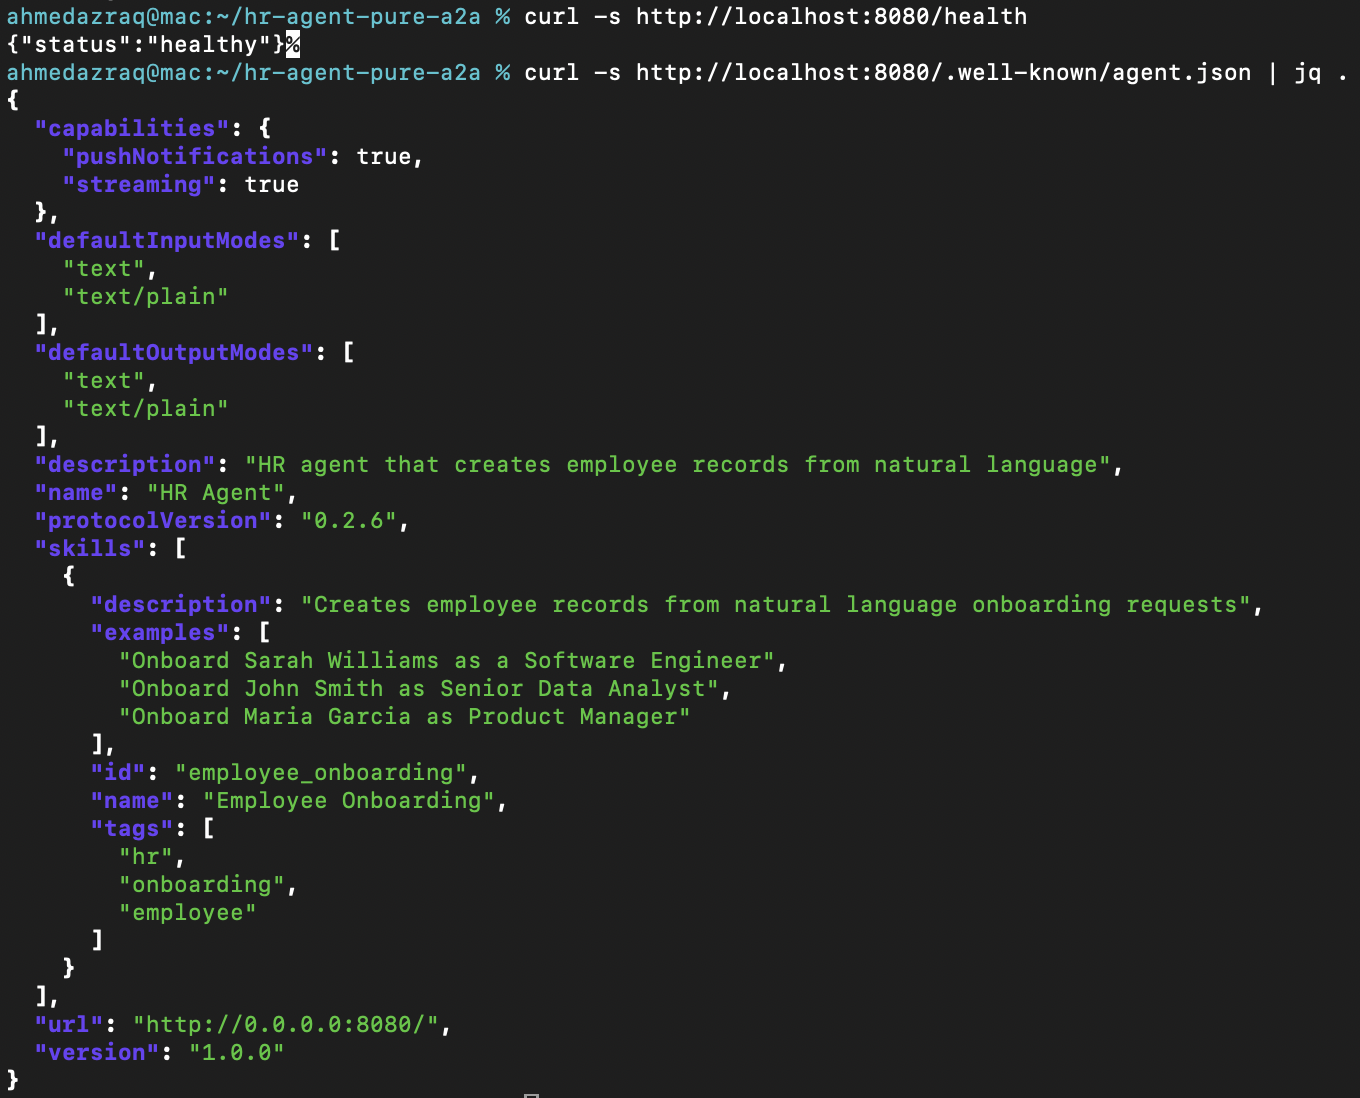
On a new terminal window, perform the health check for the HR agent. You should receive this response:
{"status":" healthy"}.curl -s http://localhost:8080/healthExpected output:
{"status":"healthy"}check the Agent card.
curl -s http://localhost:8080/.well-known/agent.json | jq .You should see the A2A card metadata (name, protocol version, skills, etc.).
Test an onboarding request.
curl -s -X POST http://localhost:8080/ \ -H "content-Type: application/json" \ -d '{ "jsonrpc": "2.0", "method": "message/send", "params": { "message": { "messageId": "test-001", "role": "user", "parts": [ {"text": "Onboard Jane Smith as Data Analyst"} ] } }, "id": 1 }' | jq .Expected output:
{
   "result": {
     "kind": "task",
     "status": {"state": "completed"},
     "artifacts": [
       {"parts": [{"text": "Employee onboarded successfully"}]}
     ]
   }
 }
Stop the server when finished by pressing ctrl+c.
Step 3. Deploy the agent to IBM cloud code Engine
In this step, you are going to containerize the HR agent and deploy it to IBM cloud code Engine for scalable, cloud-native execution. This is important because it enables your agent to run independently in the cloud, be accessible via public endpoints, and integrate seamlessly with other services. You do this by starting your local colima backend, logging into IBM cloud, creating registry namespaces, building and pushing Docker images, deploying applications via code Engine, updating them with the latest images, and verifying their health and discoverability using public URLs.
Start your local colima backend
colima startLog in to IBM cloud and select your resource group:
ibmcloud login --sso ibmcloud resource groups ibmcloud target -g <your-resource-group>create code Engine project or get the ID of an already created code Engine project and set it to the project.
ibmcloud ce project create --name a2a ibmcloud ce project list ibmcloud ce project select -n <your-ce-project-name>Login to IBM cloud container registry, and get an existing IBM cloud container registry namespace
ibmcloud plugin install container-registry ibmcloud cr login ibmcloud cr namespacesBuild and push image for HR Agent (substitute your registry namespace):
docker login docker buildx build --platform linux/amd64 \ --push \ -t us.icr.io/<your-namespace>/hr-agent-a2a:latest .create a pull secret for theregistry secret (once per project):
ibmcloud ce registry create \ --name icr-secret \ --server us.icr.io \ --username iamapikey \ --password <YOUR_IBM_cLOUD_API_KEY>create code Engine application to host the HR Agent, the result is an endpoint to use when testing or integrating your agent, and copy the result endpoint locally.
ibmcloud ce application create \ --name hr-agent-a2a \ --image us.icr.io/<your-namespace>/hr-agent-a2a:latest \ --registry-secret icr-secret \ --port 8080 \ --min-scale 1 \ --max-scale 1Expected putput:
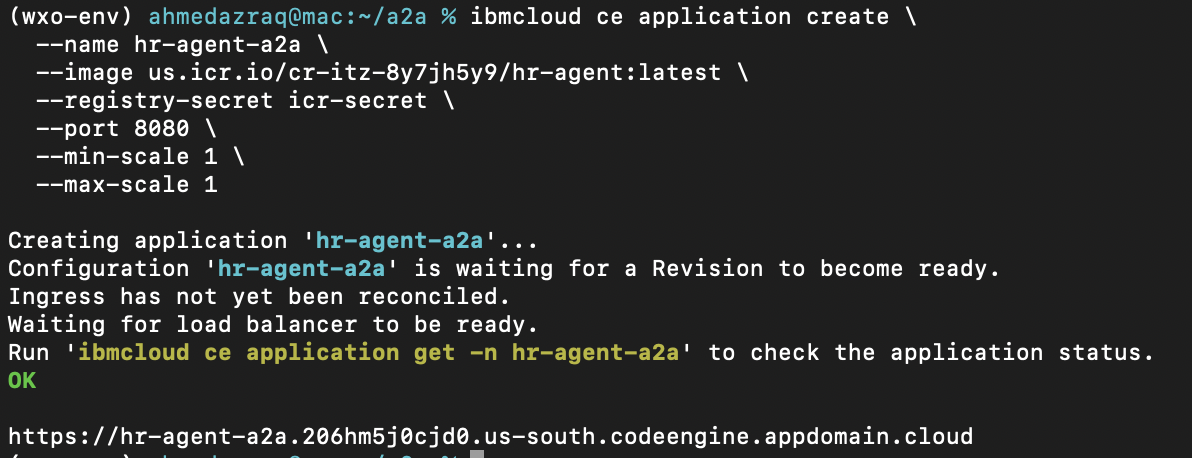
Verify health and agent discovery using the public app URLs printed by code Engine endpoints in the previous 2 commands outputs.
- confirm the liveness using
curl .../healthand returns{"status":"ok"}, making sure that each service is up and reachable. confirm the discovery of the each agent using
curl .../.well-known/agent.json. This returns each agent’s “card” that tells clients how to call it.HR_AGENT_URL=<replace_with_HR_code_Engine_App_URL> curl -s "$HR_AGENT_URL/health" curl -sS "$HR_AGENT_URL/.well-known/agent.json" | jq .Expected output:
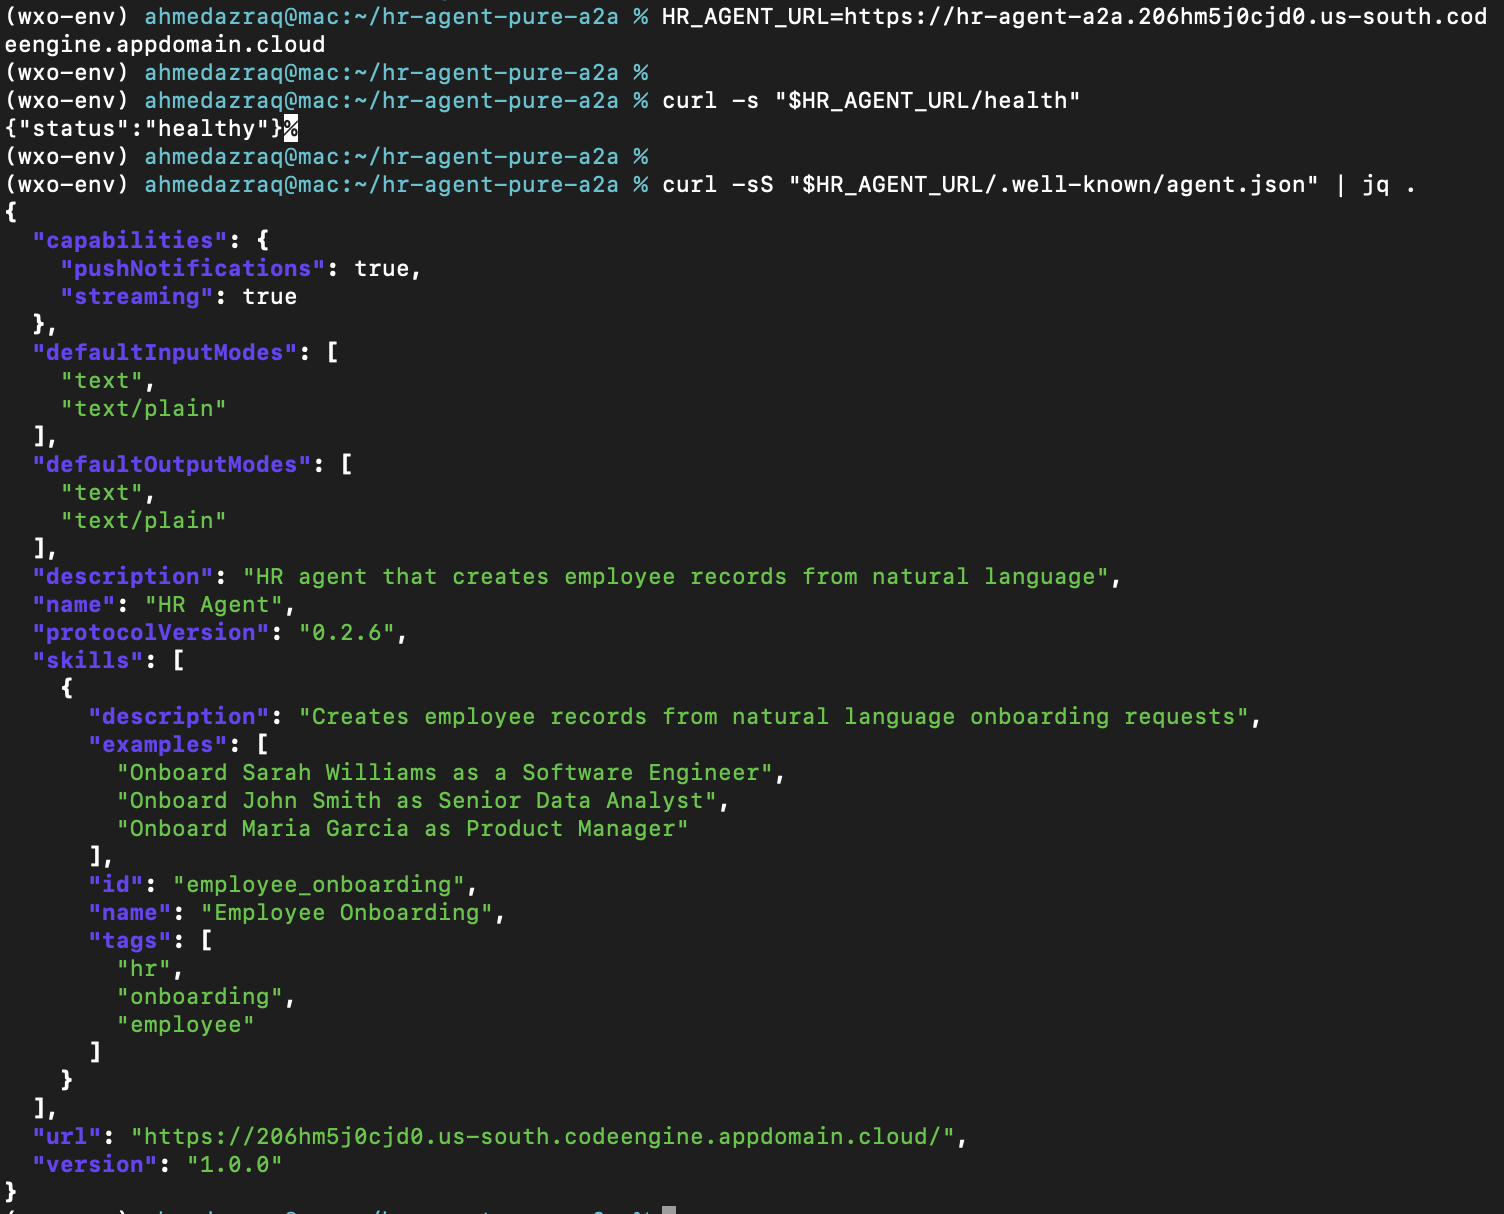
Once the agents are deployed to IBM cloud code Engine, you can verify that they are healthy and discoverable through the A2A discovery endpoint located at
/.well-known/agent.json. The screenshot shows how the HR the A2A manifests. Each manifest includes:name: identify the name of the agent.
- protocolVersion: specifies the A2A protocol version the agent follows.
- url – provides the base endpoint that other orchestrators or agents use to invoke it.
description – offers a concise explanation of the agent’s purpose.
This confirms that the agent complies with the A2A specification and can be automatically discovered and invoked by watsonx Orchestrate or any other agentic or LLM frameworks that support the A2A protocol.
- confirm the liveness using
Step 5. Import the agents into watsonx Orchestrate using the ADK
In this step, you will register your HR Agent in watsonx Orchestrate as an external A2A agent using the Agent Development Kit (ADK), and you will onboard a native agent Onboarding Agent to call the HR agent using the A2A protocol. By registering the agent in watsonx Orchestrate, it can discover and call agents that are hosted outside its native environment.
Make sure you are in the
hr-agent-pure-a2adirectory (the one that contains the YAML files).Open the
hr_agent.yamlfile and set theapi_urlto your deployed HR Agent URL on code Engine by replacingHR_AGENT_A2A_ENDPOINT.Import the agents definitions using the ADK.
# Import HR Agent
 orchestrate agents import -f hr_agent.yaml

 # Import Onboarding Agent
 orchestrate agents import -f onboarding_agent.yaml
Step 6. Test the agents in watsonx Orchestrate
In the previous steps, you deployed an agent in IBM cloud code Engine using the A2A specs. In this step, you are going to communicate with it using the A2A protocol in watsonx Orchestrate.
In this step, you are going to test the onboarding agent and see it in action communicating with the HR Agent through A2A protocol.
Open watsonx Orchestrate.
On the watsonx Orchestrate home page, click Manage agents to access the Agent Builder.
Open the Onboarding agent, and verify that it has the A2A agent as a collaborator agent in the agent section.
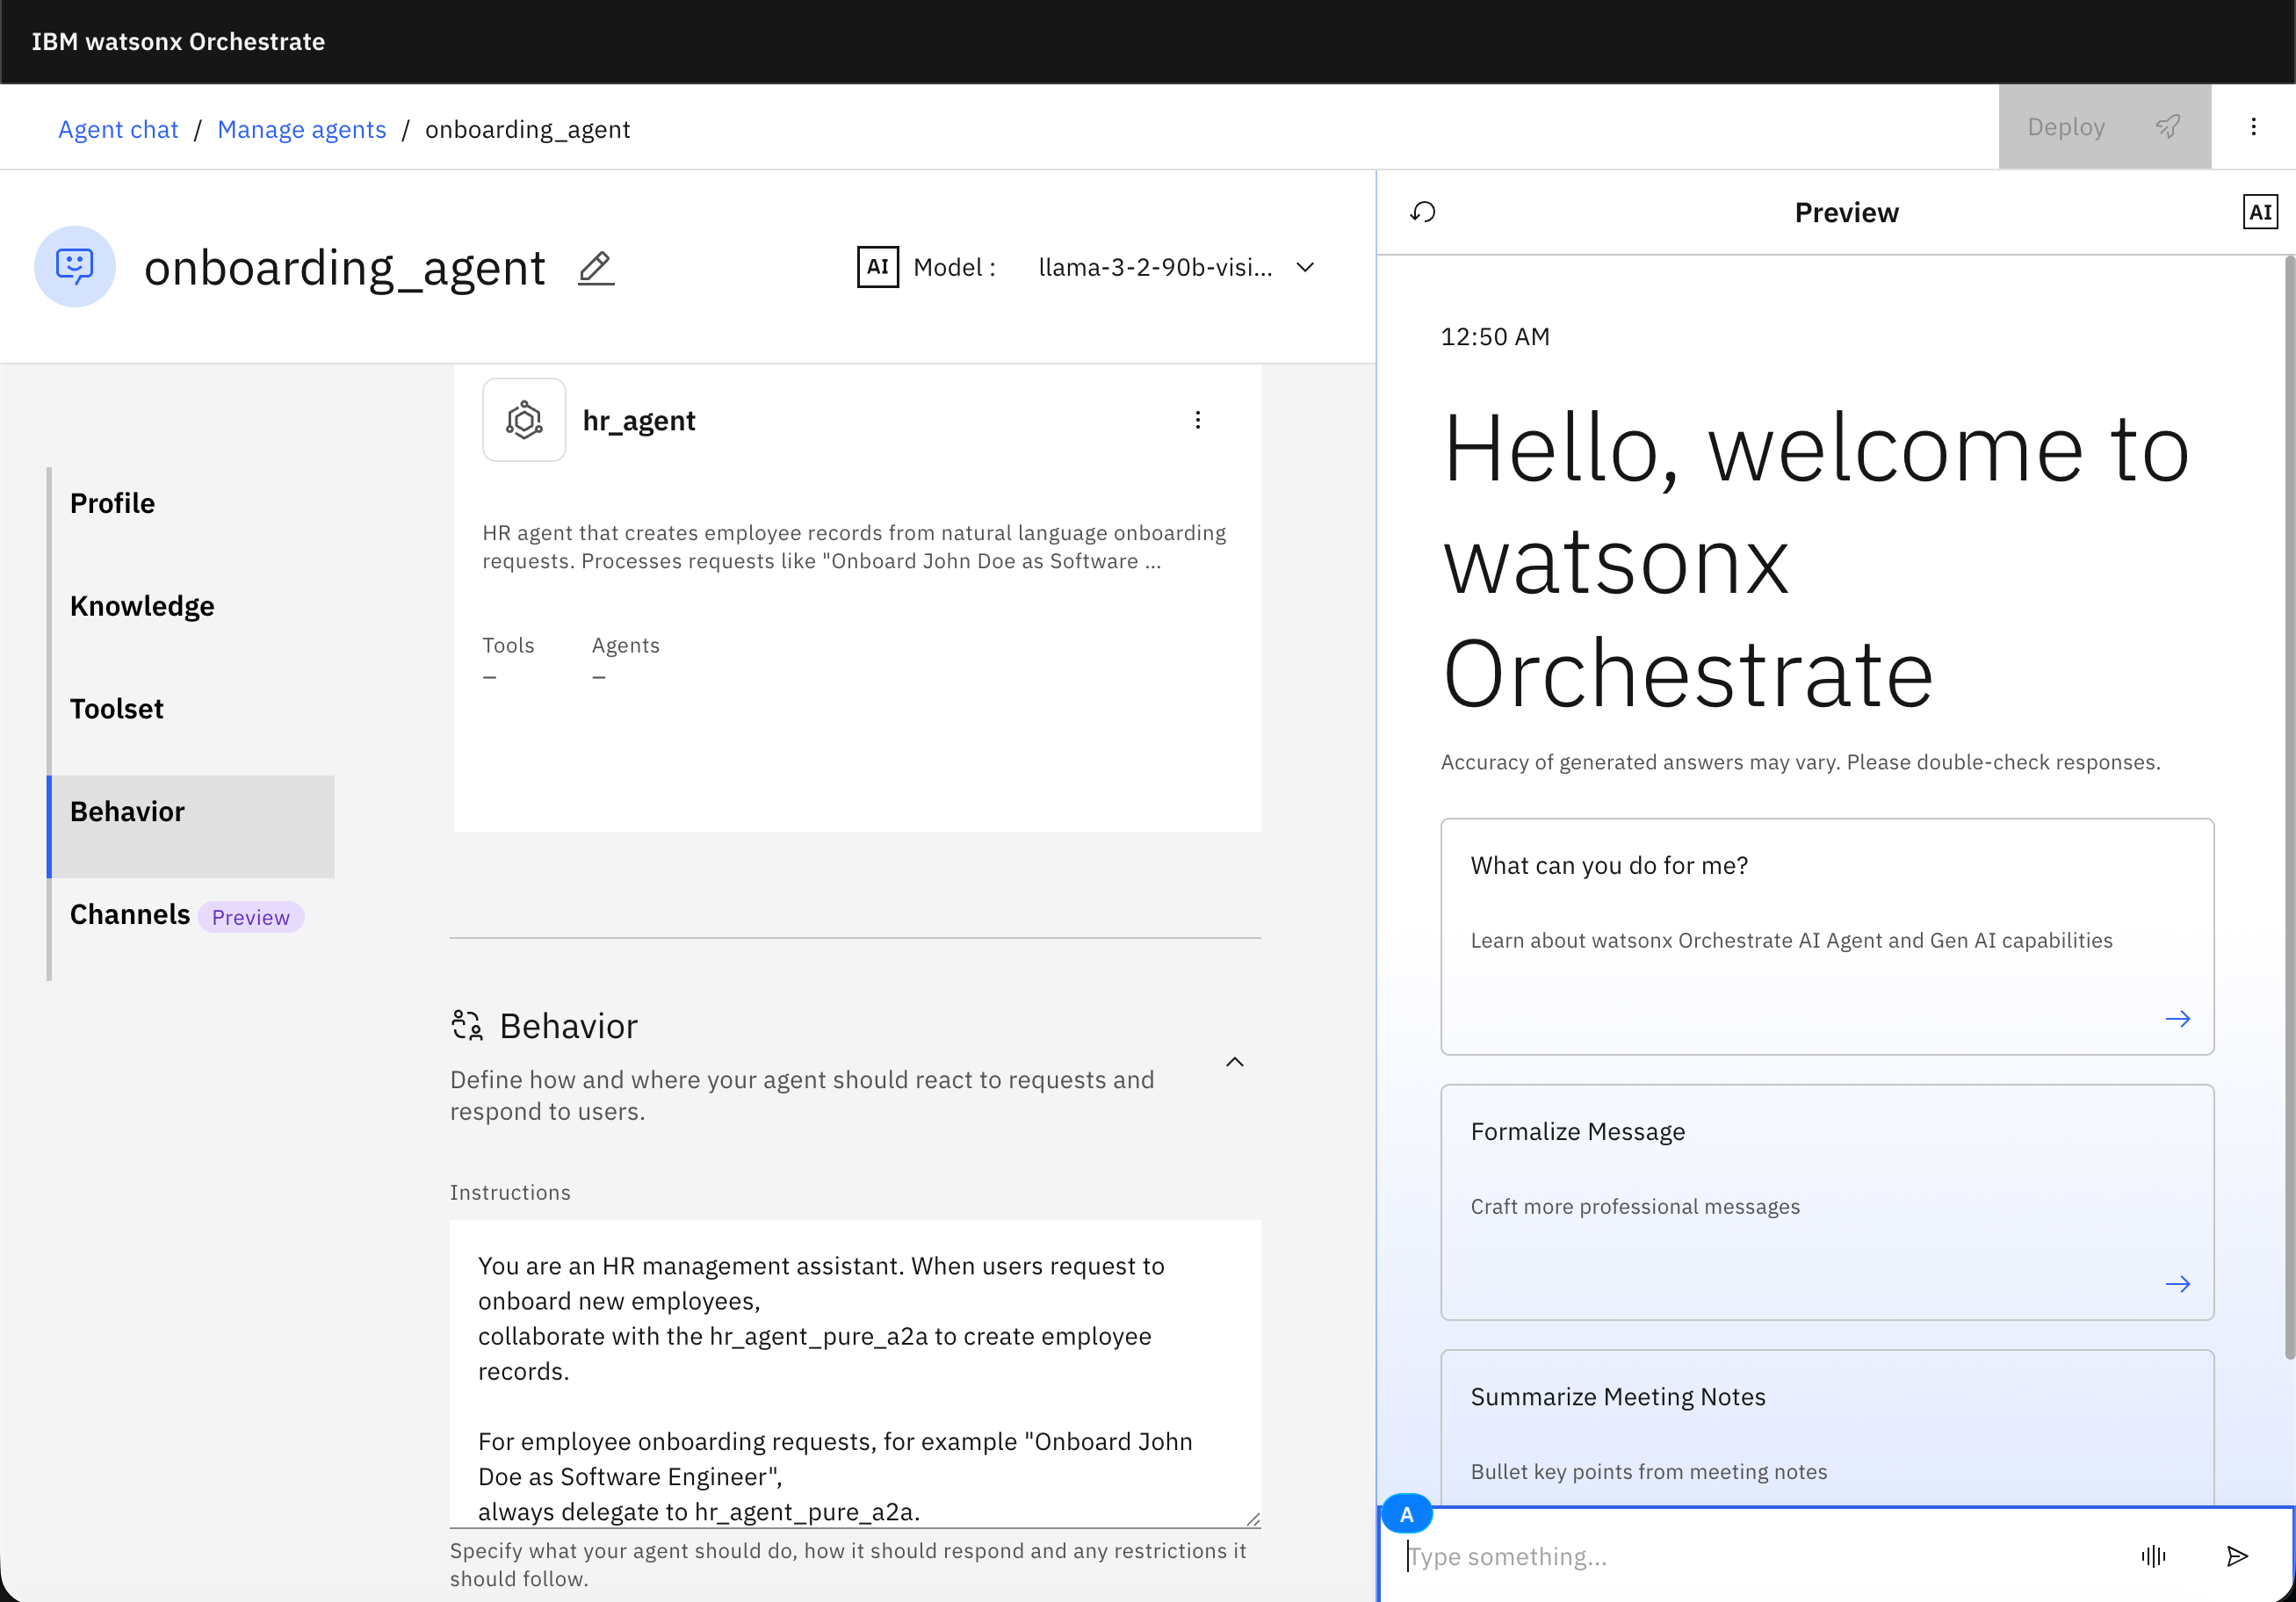
Now test the agent with this prompt:
Onboard Sandra Williams as a Software Engineer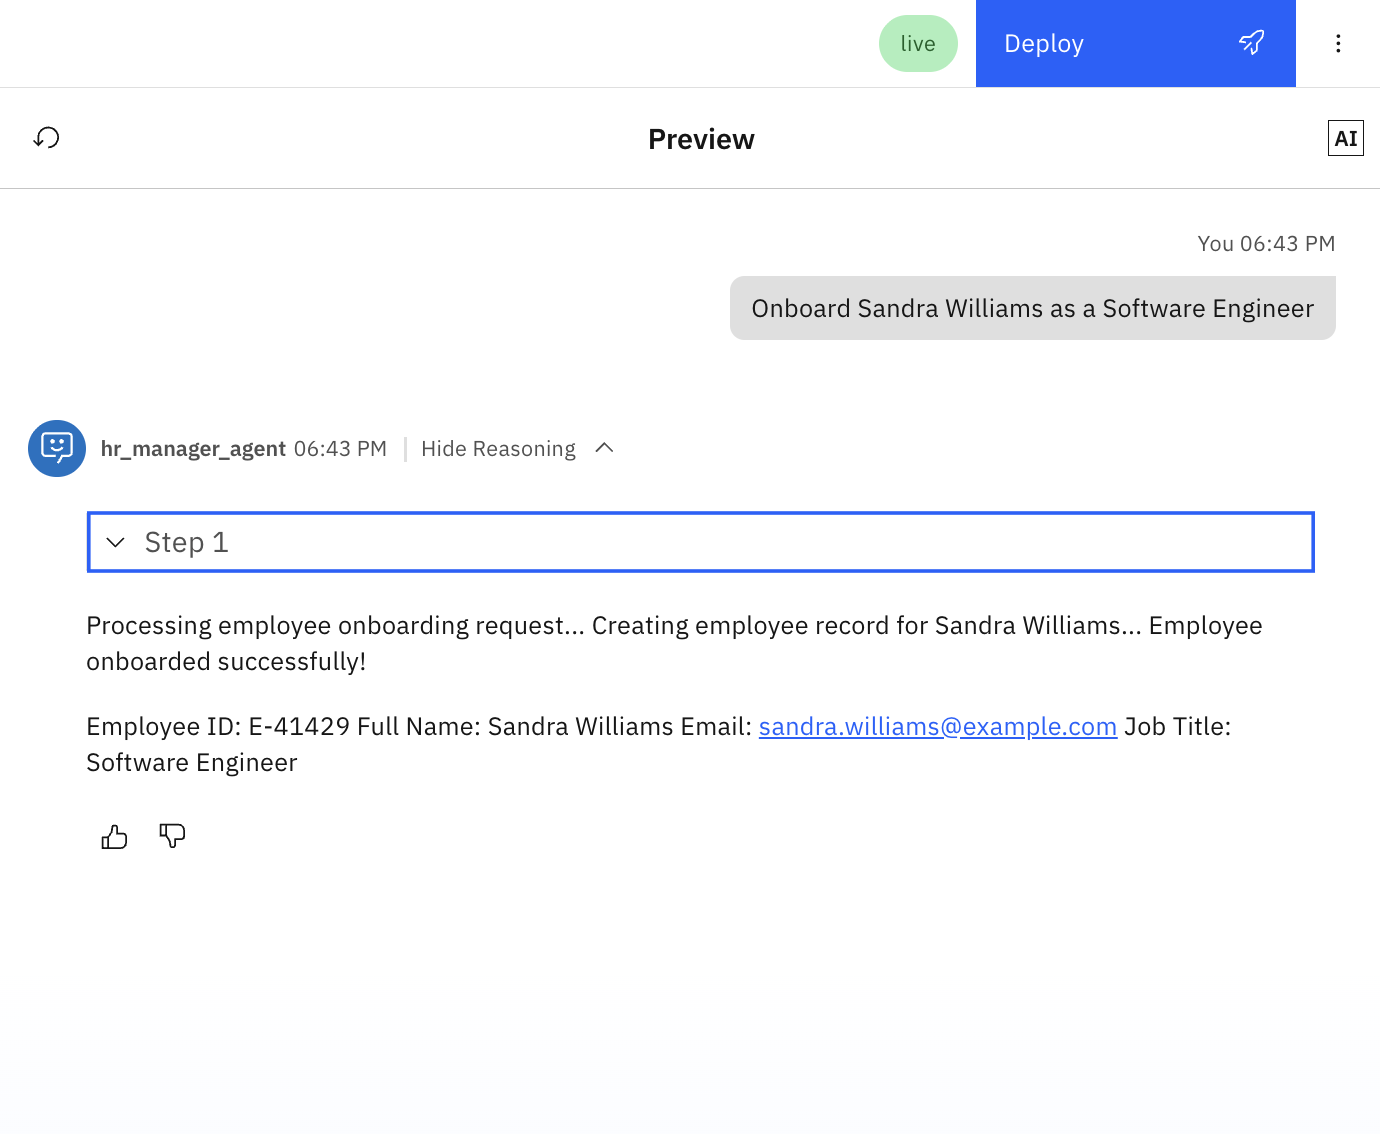
This image shows a fully functional A2A pipeline, where reasoning, data exchange, and task execution flow across independent agents. The user experiences a simple conversational interaction, while watsonx Orchestrate manages the coordination, state, and interoperability behind the scenes.
Summary
This tutorial explored how the A2A standard enables agents in IBM watsonx Orchestrate to collaborate seamlessly. Instead of relying on custom APIs or rigid integrations, A2A provides a shared language for agents to discover one another, exchange information, and coordinate their work.
Through a practical example, you built and deployed an external HR Agent and then connected the agent to an Onboarding agent in watsonx Orchestrate. Together, they automated an onboarding scenario: the HR Agent validated new-hire details, and the Onboarding Agent coordinated the response presented to the user.
This exercise demonstrated how A2A promotes clarity of roles. Each agent remains independent yet fully compatible within a larger orchestration, allowing organizations to scale their automation step by step.
As a natural next step, you can replace the mock logic with real enterprise integrations such as Active Directory or ServiceNow.
In essence, A2A transforms watsonx Orchestrate from a single intelligent assistant into a connected ecosystem of specialized agents.
Next steps
This guide demonstrated how to build a raw A2A agent from scratch using the base protocol and JSON-RPc format. In real projects, developers can accelerate this process by using dedicated A2A SDKs that provide higher-level abstractions for message handling, lifecycle management, and streaming, such as this official Python SDK for the A2A protocol.
You can also review several ready-to-run examples in the A2A Project repository.
Acknowledgments
This tutorial was produced as part of the IBM Open Innovation community initiative: Agentic AI (AI for Developers and Ecosystem).
The authors deeply appreciate the support of Monisankar Das, Jerome Joubert, and Michelle corbin for reviewing and contributing to this tutorial.