About cookies on this site Our websites require some cookies to function properly (required). In addition, other cookies may be used with your consent to analyze site usage, improve the user experience and for advertising. For more information, please review your options. By visiting our website, you agree to our processing of information as described in IBM’sprivacy statement. To provide a smooth navigation, your cookie preferences will be shared across the IBM web domains listed here.
Tutorial
Deploying IBM Sterling Intelligent Promising Containers on Minikube
Deploy IBM Sterling Intelligent Promising Container and dependent stack on a desktop-sized machine via Minikube using the SIP Operator for simplified management and configuration
This tutorial demonstrates how you can deploy IBM Sterling Intelligent Promising(SIP) Container and the dependent stack (Elasticsearch, Cassandra, and Kafka) through the operator on a desktop-sized machine by using Minikube.
Introduction to SIP
SIP helps retailers manage their inventory and delivery promises efficiently. It is a smart system that shows what's in stock and makes good decisions about how to send out orders.
This system is made up of different parts that work together. It's flexible, so businesses can choose which parts they need. The function of each part follows:
- Inventory Visibility: This part tracks all the inventory, even if it's spread out. It helps avoid running out of stock or promising more than what's available.
- Promising Service: This gives customers realistic delivery dates quickly, considering different shipping methods and costs.
- Catalog Service: The catalog service provides item catalog data in the IBM® Sterling Intelligent Promising configuration platform.
- Carrier Service: Configure the carrier service to provide shipping and delivery options to fulfill orders at customer destinations. Optimize your post-purchase fulfillment by using advanced algorithms.
- Optimizer Service: This provides a cognitive solution that integrates with an existing Order Management System (OMS) to determine the most cost-effective option for fulfillment based on your business priorities
All these modular services are further complemented with microservices, such as rules service and common services.
Implementing SIP operator
The SIP Standard Operator simplifies deployment when using containers. An Operator is a custom Kubernetes controller that uses custom resources to manage applications and their components. High-level configuration and settings are provided by the user within a custom resource. The Kubernetes operator converts the high-level directives into the low-level actions, based on best practices that are embedded within the Operator's logic.
The IBM Sterling Intelligent Promising Operator follows the Kubernetes operator paradigm to simplify management of a Sterling Intelligent Promising environment by using custom resources. A primary custom resource that is named SIPEnvironment is introduced to act as a single window of configuration for setting up a Sterling Intelligent Promising environment. All the necessary configurations, such as images, storage, Cassandra, Kafka, Elasticsearch, network policy, ingress, and more, are accepted through the SIPEnvironment custom resource to set up a fully functional, integrated SIP environment.
For more information, see deployment architecture.
This tutorial explains the steps required to deploy SIP and the related stack such as Cassandra, Elasticsearch, and more by using the SIP operator.
- Minikube brings a minimal vanilla Kubernetes(k8s) cluster and docker container runtime locally, and provides minimal environment for development and testing purposes. Minikube targets to run on developers' desktops.
- The sample file demonstrates how to deploy SIP as a standalone application for POC, developer, or desktop environment.
- The minikube cluster and samples provided in this tutorial are for development and testing purposes only. Do not use it for production.
- For SIP production deployment, compatible databases and other supported software see the documentation website.
- For SIP operator and container image tags, see the compatibility report.
Prerequisites
Hardware requirements
- 100 GB+ of storage
- 24 GB+ of memory (preferably 32+)
- 8 available virtual CPUs (preferably 16)
Stack used for demonstration purpose
- OS version: Red Hat Enterprise Linux release 8.9 (Ootpa)
- minikube version: v1.32.0
- SIP operator version, image: 1.0.5, 10.0.2403.1-amd64
Estimated time
This tutorial should take a few hours to complete.
Deployment Steps
Step 1. Installing Minikube
Create a non-root user
a. Create a non-root user and grant Sudo permissions
sudo useradd -m -s /bin/bash supportuser sudo passwd supportuser sudo usermod -aG wheel supportuserb. Switch to the non-root user
su - supportuser sudo groupadd docker sudo usermod -aG docker $USER && newgrp dockerInstall dependent packages
a. Install kubectl - Kubectl is the essential command-line tool used for interacting with Kubernetes clusters. Here's how to install it:
Update your package manager's repository information
sudo yum updateDownload and install kubectl
curl -LO "https://dl.k8s.io/release/v1.28.3/bin/linux/amd64/kubectl" chmod +x ./kubectl sudo mv ./kubectl /usr/local/bin/kubectlVerify the installation by checking the version
kubectl version --clientb. Install Minikube - Minikube is a tool that allows you to run a Kubernetes cluster locally. Here's how to install it:
Download and install Minikube
curl -LO https://storage.googleapis.com/minikube/releases/latest/minikube-linux-amd64 sudo install minikube-linux-amd64 /usr/local/bin/minikubec. Install Docker and dependent packages
Install conntrack
Conntrack is a utility used to view and manipulate the network connection tracking table in the Linux kernel, which is essential for Kubernetes. Install it with the following command:
sudo yum install conntrackInstall crictl
Crictl is a command-line interface for the Container Runtime Interface (CRI). To install it, follow these steps:
- Determine the latest version of crictl on the GitHub releases page.
Download and install crictl (replace
$VERSIONwith the latest version):export VERSION="v1.26.0" curl -L https://github.com/kubernetes-sigs/cri-tools/releases/download/$VERSION/crictl-${VERSION}-linux-amd64.tar.gz --output crictl-${VERSION}-linux-amd64.tar.gz sudo tar zxvf crictl-$VERSION-linux-amd64.tar.gz -C /usr/local/bin rm -f crictl-$VERSION-linux-amd64.tar.gzNote: Remove any conflicting versions of runc and re-install:
rpm -qa | grep runcsudo yum remove <output of above>For example:
sudo yum remove runc-1.1.12-1.module+el8.9.0+21243+a586538b.x86_64and thensudo yum install runcInstall socat, a utility for multiplexing network connections
sudo yum install socatInstall cri-dockerd by downloading the latest RPM for your OS and installing it:
Note: Run this command to install
libcgrouponly if you are on RHEL version 8.x. You can skip if you are on 9.x.sudo yum install libcgroupInstall the Container Networking Interface (CNI) plugins:
Find the latest version at https://github.com/containernetworking/plugins/releases
CNI_PLUGIN_VERSION="v1.3.0" CNI_PLUGIN_TAR="cni-plugins-linux-amd64-$CNI_PLUGIN_VERSION.tgz" CNI_PLUGIN_INSTALL_DIR="/opt/cni/bin" curl -LO "https://github.com/containernetworking/plugins/releases/download/$CNI_PLUGIN_VERSION/$CNI_PLUGIN_TAR" sudo mkdir -p "$CNI_PLUGIN_INSTALL_DIR" sudo tar -xf "$CNI_PLUGIN_TAR" -C "$CNI_PLUGIN_INSTALL_DIR" rm "$CNI_PLUGIN_TAR"Install Docker
Docker is required for container runtime support. Use the following commands to install Docker on your system:
Install required utilities and add the Docker repository:
sudo yum install -y yum-utils sudo yum-config-manager --add-repo https://download.docker.com/linux/centos/docker-ce.repoInstall Docker and related packages:
sudo yum install docker-ce docker-ce-cli containerd.io docker-buildx-plugin docker-compose-pluginStart Docker
sudo systemctl start docker sudo systemctl status dockerd. Start Minikube
Now that you have installed all the necessary components, you can start Minikube:
minikube start --driver=docker --cpus=<> --memory=<> --disk-size=<> --addons=metrics-server,dashboard,ingressFor example:
minikube start --driver=docker --cpus=14 --memory=56000 --disk-size=50g --addons=metrics-server,dashboard,ingressValidate the installation:
`minikube status`
> minikube
      type: Control Plane
      host: Running
      kubelet: Running
      apiserver: Running
      kubeconfig: Configured
Step 2. Accessing Minikube dashboard remotely
The Minikube dashboard is a powerful web-based interface that provides insights into the state of your Minikube cluster. As a user-friendly graphical user interface (GUI), it offers various functionalities for managing Kubernetes resources. Here's what you can do using the Minikube dashboard:
Overview of Cluster Resources: The dashboard provides an at-a-glance overview of your Minikube cluster's nodes, pods, services, and more. This makes it easy to monitor the overall health of your cluster and quickly identify any issues.
Managing Deployments: You can create, scale, and manage deployments directly from the dashboard. This simplifies the process of launching applications and ensures they are running optimally.
Inspecting Pods and Containers: The dashboard lets you explore the details of pods, containers, and their associated logs. This is particularly valuable for debugging issues and analyzing application behavior.
Services and Ingress Management: Manage services and expose them via Loadbalancer, NodePort, or ClusterIP. Additionally, you can configure and manage Ingress resources to control external access to services.
ConfigMaps and Secrets: Create and manage ConfigMaps and Secrets, which store configuration data and sensitive information separately from application code.
Event Tracking: Stay informed about events in your cluster. The dashboard displays events related to pods, deployments, services, and other resources, aiding in identifying problems.
Cluster and Namespace Switching: If you're working with multiple clusters or namespaces, the dashboard allows you to seamlessly switch between them, streamlining management tasks.
Pod Terminal Access: With a single click, you can access a terminal directly within a pod's container. This is invaluable for debugging and troubleshooting.
Let's explore how to access the Minikube dashboard remotely and manage Kubernetes resources with ease:
Install the
NetworkManageservicesudo yum install NetworkManagerStart the
NetworkManagerservice to manage network connections:sudo systemctl start NetworkManagerAllow access to the Minikube dashboard port (
8001/tcp) through the firewall:sudo systemctl start firewalld sudo firewall-cmd --add-port=8001/tcp --zone=public --permanent sudo firewall-cmd --reloadFrom the Minikube server, get the URL to access the Minikube dashboard:
minikube dashboard --urlAccess Minikube dashboard remotely:
Establish another terminal connection to the minikube server and start a proxy server that listens on all network interfaces:
minikube kubectl -- proxy --address='0.0.0.0' --disable-filter=trueAccess the dashboard using the URL provided earlier but replace the IP address with the public IP of the Minikube host.
The URL should resemble
http://<Minikube_Public_IP>:8001/api/v1/namespaces/kubernetes-dashboard/services/http:kubernetes-dashboard:/proxy/Additional troubleshooting for Minikube dashboard access:
If you encounter an inaccessible Minikube Dashboard URL and notice that the dashboard pods are in a crash loop backoff (
kubectl get pods -n kubernetes-dashboard), consider the following step to resolve the issue:Restart Docker: If Docker-related errors such as networking or iptables issues are observed, restarting the Docker service can help. Use the command
sudo systemctl restart docker. This action can reset Docker's networking components and often resolves connectivity and configuration issues impacting pod operations in Minikube.
Step 3. Installing the Operator SDK CLI and OLM
Download and install the Operator SDK CLI
RELEASE_VERSION=$(curl -s https://api.github.com/repos/operator-framework/operator-sdk/releases/latest | grep tag_name | cut -d '"' -f 4) sudo curl -LO "https://github.com/operator-framework/operator-sdk/releases/download/${RELEASE_VERSION}/operator-sdk_linux_amd64" sudo chmod +x operator-sdk_linux_amd64 sudo mv operator-sdk_linux_amd64 /usr/local/bin/operator-sdkInstall OLM
Run:
operator-sdk olm install --version=latestOutput should be similar to the following indicating successful install:
> INFO[0160] Deployment `olm/packageserver` successfully rolled out> INFO[0161] Successfully installed OLM version `latest`NAME NAMESPACE KIND STATUS catalogsources.operators.coreos.com CustomResourceDefinition Installed clusterserviceversions.operators.coreos.com CustomResourceDefinition Installed installplans.operators.coreos.com CustomResourceDefinition Installed olmconfigs.operators.coreos.com CustomResourceDefinition Installed operatorconditions.operators.coreos.com CustomResourceDefinition Installed operatorgroups.operators.coreos.com CustomResourceDefinition Installed operators.operators.coreos.com CustomResourceDefinition Installed subscriptions.operators.coreos.com CustomResourceDefinition Installed olm Namespace Installed operators Namespace Installed olm-operator-serviceaccount olm ServiceAccount Installed system: controller:operator-lifecycle-manager ClusterRole Installed olm-operator-binding-olm ClusterRoleBinding Installed cluster OLMConfig Installed olm-operator olm Deployment Installed catalog-operator olm Deployment Installed aggregate-olm-edit ClusterRole Installed aggregate-olm-view ClusterRole Installed global-operators operators OperatorGroup Installed olm-operators olm OperatorGroup Installed packageserver olm ClusterServiceVersion Installed operatorhubio-catalog olm CatalogSource Installed operatorhubio-catalog olm CatalogSource Installed operatorhubio-catalog olm CatalogSource InstalledNote: If the OLM install fails due to some reason, uninstall the previous version and then re-install.
To resolve this issue and perform a clean installation of OLM, you can follow these steps:
i. You need to uninstall the existing OLM resources from your Kubernetes cluster. To do this, you can use the
kubectlcommand. Here is a general approach to uninstall OLM:operator-sdk olm uninstall --version=latest kubectl delete crd olmconfigs.operators.coreos.com kubectl delete clusterrole aggregate-olm-edit kubectl delete clusterrole aggregate-olm-view kubectl delete clusterrolebinding olm-operator-binding-olm kubectl delete clusterrole system:controller:operator-lifecycle-manager kubectl delete -n kube-system rolebinding packageserver-service-auth-reader kubectl delete -n operators serviceaccount defaultThe above commands will delete OLM-related resources in all namespaces. If you want to target a specific namespace, you can omit the
--all-namespacesflag.ii. After running the commands to delete OLM resources, verify that there are no remaining OLM resources in your cluster:
kubectl get subscriptions.operators.coreos.com kubectl get catalogsources.operators.coreos.com kubectl get operatorgroups.operators.coreos.com kubectl get clusterserviceversions.operators.coreos.comIf these commands return empty lists, it means that OLM has been successfully uninstalled.
iii. After ensuring that OLM is uninstalled, you can proceed with the installation of the desired OLM version. Refer Step 2 above to re-install OLM.
After installing OLM, you can verify its installation by checking its resources
kubectl get crd -n olmNAME CREATED AT catalogsources.operators.coreos.com 2023-10-25T00:55:49Z clusterserviceversions.operators.coreos.com 2023-10-25T00:55:49Z installplans.operators.coreos.com 2023-10-25T00:55:49Z olmconfigs.operators.coreos.com 2023-10-25T00:55:49Z operatorconditions.operators.coreos.com 2023-10-25T00:55:49Z operatorgroups.operators.coreos.com 2023-10-25T00:55:49Z operators.operators.coreos.com 2023-10-25T00:55:49Z subscriptions.operators.coreos.com 2023-10-25T00:55:49Z subscriptions.operators.coreos.com 2023-10-25T00:55:49ZYou should see the new OLM resources related to the version you installed.
By following these steps, you should be able to uninstall existing OLM resources and perform a clean installation of the desired OLM version in your Kubernetes cluster. Be sure to refer to the specific documentation or instructions for the OLM version you are working with for any version-specific installation steps or considerations.
Overwriting PodSecurityStandards (PSS)
Kubernetes has an equivalent of SecurityContextConstraints (of OpenShift) called PodSecurityStandards (PSS) that enforces different profiles (privileged, baseline, and restricted) at a namespace level. When a restricted profile is defaulted on a namespace, pod spec is enforced to contain the
securityContext.seccompProfile.typefield with a valid value. In this case, the Operator installation fails because the namespace (olm) has restricted PSS, but the Operator controller deployment does not have the field.To overcome this, switch to baseline PSS that does not enforce the
securityContext.seccompProfile.typefield, by using the following command:kubectl label --overwrite ns olm pod-security.kubernetes.io/enforce=baselineDelete the oob olm CatalogSource:
kubectl delete catalogsource operatorhubio-catalog -n olm
 > catalogsource.operators.coreos.com "operatorhubio-catalog" deleted
Step 4. Creating IBM Entitlement Key Secret
An image pull secret named ibm-entitlement-key must be created with the IBM entitlement registry credentials in the namespace (project) where you are configuring SIPEnvironment. For more information, see the corresponding documentation.
Go to https://myibm.ibm.com/products-services/containerlibrary and copy your entitlement key.
Export the entitlement key and namespace variables.
export ENTITLEDKEY="<Entitlement Key from MyIBM>" export NAMESPACE="<project or Namespace Name for SIP deployment>"Create
ibm-entitlement-keyunder the namespace where you will be deploying SIP by running the following command.kubectl create secret docker-registry ibm-entitlement-key \ --docker-server=cp.icr.io \ --docker-username=cp \ --docker-password=${ENTITLEDKEY} \ --namespace=${NAMESPACE}Note: The Operator is from open registry. However, most container images are commercial. Contact your IT or Enterprise Administrator to get access to the entitlement key.
Step 5. Installing and deploying SIP
Preparing and configuring IBM® Sterling Intelligent Promising Operator and IBM OMS Gateway Operator catalog source.
i. Create a CatalogSource YAML named catalog_source_sip.yaml. A
CatalogSourceis a repository in Kubernetes that houses information about available Operators, which can be installed on the cluster. It acts as a marketplace for Operators, allowing users to browse and select from a variety of packaged Kubernetes applications.apiVersion: operators.coreos.com/v1alpha1 kind: CatalogSource metadata: name: ibm-oms-gateway-catalog namespace: olm spec: displayName: IBM OMS Gateway Operator Catalog # For the image name, see the following catalog source image names table and use the appropriate value. image: icr.io/cpopen/ibm-oms-gateway-operator-catalog:v1.0 publisher: IBM sourceType: grpc updateStrategy: registryPoll: interval: 10m0s --- apiVersion: operators.coreos.com/v1alpha1 kind: CatalogSource metadata: name: ibm-sip-catalog namespace: olm spec: displayName: IBM SIP Operator Catalog # For the image name, see the following catalog source image names table and use the appropriate value. image: 'icr.io/cpopen/ibm-oms-sip-operator-catalog:v1.0' publisher: IBM sourceType: grpc updateStrategy: registryPoll: interval: 10m0sii. Run the following command:
kubectl create -f catalog_source_sip.yaml -n olmValidate whether the
CatalogSourceis created successfully by runningkubectl get catalogsource,pods -n olm.Before you proceed:
Switch to the project (namespace) where you want to deploy the resources. You can change to your desired namespace with the following command:
kubectl config set-context --current --namespace=<your-namespace>In the preceding command replace
your-namespacewith the name of your namespace.In this tutorial, we have used the 'sip' namespace for demonstration purposes. The resources discussed can be deployed in the 'sip' namespace or you may modify the YAML files to install them in any namespace of your choice. If you are using the same Kubernetes cluster to deploy both IBM Sterling Order Management(OMS) containers and SIP, for better grouping, you can use separate namespaces.
Create an Operator Group. An
OperatorGroupin Kubernetes defines a set of namespaces where a particular Operator will be active. It controls the scope of the Operator’s capabilities, determining which namespaces it can observe and manage, thus facilitating multi-tenancy and access control within a cluster. It is crucial to ensure that only one OperatorGroup exists per namespace in Kubernetes. Having multiple OperatorGroups in the same namespace can lead to conflicts and may prevent Operators from being deployed correctly. This constraint helps maintain clear and managed access to the resources within the namespace.- Create an Operator Group YAML named sip-operator-group.yaml
Run
kubectl create -f sip-operator-group.yamlapiVersion: operators.coreos.com/v1 kind: OperatorGroup metadata: name: sip-operator-global namespace: sip spec: {}
Create Subscription. In Kubernetes, a
Subscriptionis used to track desired Operators from a CatalogSource and manage their updates. It ensures that an Operator is kept within a specified version range, automating the process of installation and upgrades as new versions become available.- Create a Subscription YAML named sip_subscription.yaml
Run
kubectl create -f sip_subscription.yamlapiVersion: operators.coreos.com/v1alpha1 kind: Subscription metadata: name: ibm-oms-gateway-sub namespace: sip spec: channel: v1.0 installPlanApproval: Automatic name: ibm-oms-gateway source: ibm-oms-gateway-catalog sourceNamespace: olm --- apiVersion: operators.coreos.com/v1alpha1 kind: Subscription metadata: name: ibm-sip-sub namespace: sip spec: channel: v1.0 installPlanApproval: Automatic name: ibm-sip source: ibm-sip-catalog sourceNamespace: olm
Validate the configuration by running the following commands:
kubectl get sub ibm-oms-gateway-sub -o jsonpath="{.status.installedCSV}"kubectl get sub ibm-sip-sub -o jsonpath="{.status.installedCSV}"
kubectl get pods
Installing SIP application
Create a Kubernetes Persistent Volume Claim (PVC) with the
ReadWriteManyaccess mode and a minimum storage requirement of 10 GB. This PVC should use thestandardstorage class provided by Minikube, which dynamically provisions a Persistent Volume (PV) during deployment. Ensure that this storage is accessible by all containers across the cluster. The owner group of the directory where the PV is mounted must have write access, and the owner group ID should be specified in thespec.storage.securityContext.fsGroupparameter of theSIPEnvironmentcustom resource. This PV is crucial for storing data from external services such as Cassandra, Kafka, Elasticsearch and mongodb when deploying SIP in development mode (createDevInstance=true). Additionally, the PV stores the truststore, allowing you to add trusted certificates.apiVersion: v1 kind: PersistentVolumeClaim metadata: name: sip-pvc spec: accessModes: - ReadWriteMany resources: requests: storage: 10Gi olumeName: storageClassName: "standard"Create a PVC YAML named sip-pvc.yaml by running the following command:
kubectl create -f sip-pvc.yamlCreate an ingress certificate YAML file named ingress-secret.yaml. This file holds a Transport Layer Security (TLS) certificate, which serves as the identity for ingress or routes. The ingress or route URL then presents the TLS certificate to the clients. Run
kubectl create -f ingress-secret.yamlapiVersion: apps.oms.gateway.ibm.com/v1beta1 kind: CertificateManager metadata: name: ingress-cert namespace: sip spec: expiryDays: 365 ostName: '*.replace_with_hostname_of_the_linux_vm' #subjectAlternateNames: []Create a JWT issuer secret using a public key, which is then used to verify tokens on incoming API calls. After verification, if the validation is successful, the gateway allows the calls to SIP services.
The OMS Gateway service requires the JWT issuers to be configured. It uses the issuer and its public key to verify the tokens on incoming API calls. This service requires only the public key (and not private key) to be configured for the verification purpose. One way is to use tools such as
opensslto generate the public-private key pair in PEM format.Create the public-private key pair by completing following steps:
- openssl genrsa -out private_key.pem 2048: Generates a 2048-bit RSA private key and saves it to private_key.pem.
- openssl rsa -in private_key.pem -pubout -out public_key.pem: Extracts the public key from the private key and saves it to public_key.pem.
- openssl req -new -key private_key.pem -out certificate.csr: Creates a Certificate Signing Request (CSR) using the private key.
- openssl x509 -req -days 365 -in certificate.csr -signkey private_key.pem -sha512 -out certificate.pem: Signs the CSR with the private key to generate a self-signed certificate valid for 365 days.
- openssl pkcs12 -export -out certificate.p12 -inkey private_key.pem -in certificate.pem: Bundles the private key and certificate into a PKCS#12 file (certificate.p12).
- keytool -importkeystore -destkeystore keystore.jks -srckeystore certificate.p12 -srcstoretype pkcs12 -alias 1: Imports the PKCS#12 file into a Java KeyStore (JKS) file named keystore.jks.
Create a
jwt-issuer-config.jsonfile as shown below. For information about the format, see Creating a JWT issuer secret by using a public key.{ "jwtConfiguration":[ { "iss":"oms", "keys":[ { "jwtAlgo":"RS512", "publicKey":"-----BEGIN PUBLIC KEY-----\nEnter Public Key\n-----END PUBLIC KEY-----", kid":"sip" } ] } ] }- Run
kubectl create secret generic jwt-secret --from-file=jwt-issuer-config.json=<path>/jwt-issuer-config.json -n <namespace>
For example:
kubectl create secret generic jwt-secret --from-file=jwt-issuer-config.json=/home/supportuser/jwt-issuer-config.jsonNote: In the preceding example, the JWT algorithm
RS512is used. However, additional algorithms are also supported. For more information, see Creating a JWT issuer secret by using a public key.- Run
Create SIP secret file. This file contains sensitive information such as the truststore password and credentials for middleware services unless you are deploying the SIP in development mode. In development mode, the only mandatory parameter is
truststore_password. This password is used to create the final truststore. You can choose to add trusted certificates or import the truststore that the SIP creates to ensure trusted connections between itself and external services.Create a SIP secret YAML named sip-secret.yaml
Run
kubectl create -f sip-secret.yamlapiVersion: v1 kind: Secret metadata: name: 'sip-secret' type: Opaque stringData: truststore_password: 'changeit' trustStorePassword: 'changeit'
Deploy SIP using Operators
Create a SIPEnvironment YAML named sip-env.yaml
Note: Ensure that you have internet access before starting the k8s operator deployment for the SIP application. This deployment requires downloading a list of images. If the images are not downloaded, the deployment will fail. Alternatively, you can download these images in advance, push them to your local registry, and then perform the deployment by referring to your local registry. Required images follow:
- registry.access.redhat.com/ubi8/ubi-minimal:latest
- registry.access.redhat.com/ubi8/openjdk-11:latest
- registry.access.redhat.com/ubi8/openssl:latest
- docker.io/cassandra:4.0.10
- docker.elastic.co/elasticsearch/elasticsearch:7.17.9
- docker.io/bitnami/kafka:3.5.0
- docker.io/mongo:5.0.24
Run
kubectl create -f sip-env.yamlapiVersion: apps.sip.ibm.com/v1beta1 kind: SIPEnvironment metadata: name: sip namespace: sip spec: license: accept: true ivService: serviceGroup: dev promisingService: serviceGroup: dev utilityService: serviceGroup: dev optimizerService: serviceGroup: dev apiDocsService: replicaCount: 1 resources: limits: cpu: '1' memory: 1.5Gi requests: cpu: '0.1' memory: 1Gi networkPolicy: podSelector: matchLabels: none: none policyTypes: - Ingress omsGateway: issuerSecret: jwt-secret workerPoolSize: 100 logLevel: INFO replicas: 1 webClient: connectTimeout: 2000 keepAlive: true keepAliveTimeout: 60 logActivity: false maxPoolSize: 15 requestTimeout: 5000 trustAll: false verifyHost: true cors: enabled: true allowedOrigins: '*' deltaHeaders: '' deltaMethods: '' exposedHeaders: '' allowCredentials: true externalServices: cassandra: createDevInstance: resources: limits: cpu: '3' memory: 12000Mi requests: cpu: '1' memory: 3000Mi storage: accessMode: ReadWriteMany capacity: 10Gi name: sip-pvc storageClassName: standard iv_keyspace: test elasticSearch: createDevInstance: storage: accessMode: ReadWriteMany capacity: 10Gi name: sip-pvc storageClassName: standard kafka: createDevInstance: storage: accessMode: ReadWriteMany capacity: 10Gi name: sip-pvc storageClassName: standard topicPrefix: sip mongodb: createDevInstance: storage: accessMode: ReadWriteMany capacity: 40Gi name: prat-persist-pvc storageClassName: prat-persist-pv optimizerdb: optimizer-db optimizerMetadatadb: mutlitomz-db common: ingress: host: replace_with_hostname_of_the_linux_vm ssl: enabled: true identitySecretName: ingress-cert upgradeStrategy: RollingUpdate secret: sip-secret serviceAccount: default image: pullPolicy: Always imagePullSecrets: - name: ibm-entitlement-key repository: cp.icr.io/cp/ibm-oms-enterprise tag: 10.0.2403.1-amd64 storage: accessMode: ReadWriteMany capacity: 10Gi name: sip-pvc storageClassName: standardNotes:
If you encounter rate limit issues while the SIP deployment attempts to pull images for external services such as Cassandra, Elasticsearch, Kafka, etc., see technical note for strategies to address and bypass these issues.
Users can also point to an external instance of cassandra and use that instance to install SIP Application, rather than relying on SIP opearator to create the dev instance of cassandra. To create an instance of cassandra and to use it for SIP application, complete the following steps:
Run the command
docker pull cassandra:4.0.10to pull the Cassandra Docker ImageRun command
docker volume create cassandra_datato create a Docker volume to persist Cassandra dataRun the Cassandra Docker Container using the following command:
docker run --name cassandra -d -e CASSANDRA_BROADCAST_ADDRESS=<RHEL IP> -p 7000:7000 -p 9042:9042 -v cassandra_data:/var/lib/cassandra --restart always cassandra:4.0.10Run the following commands to enable Port 9042 on RHEL:
sudo systemctl start firewalld sudo systemctl enable firewalld sudo firewall-cmd --zone=public --add-port=9042/tcp --permanent sudo firewall-cmd --reload sudo firewall-cmd --zone=public --list-portsRun the command
docker psto verify the Docker Container is running.Run the command
docker logs -f cassandrato check the Cassandra logs.To configure Cassandra keyspaces:
Run the command
docker exec -it cassandra cqlshto entercqlshmode.Run the below cqlsh commands to configure keyspaces:
CREATE KEYSPACE test WITH replication={'class':'SimpleStrategy', 'replication_factor':'1'};CREATE KEYSPACE ks_promising WITH replication = {'class':'SimpleStrategy', 'replication_factor':'1'};CREATE KEYSPACE ks_cas WITH replication = {'class': 'SimpleStrategy', 'replication_factor': '1'};CREATE KEYSPACE orderservice WITH replication = {'class':'SimpleStrategy', 'replication_factor': '1'};
By following the above steps, you will have the Cassandra container running, port 9042 open on your RHEL system, and the necessary keyspaces configured.
You can now point to this cassandra instance in sip.yaml as shown below and then run
kubectl create -f sip-env.yaml:apiVersion: apps.sip.ibm.com/v1beta1 kind: SIPEnvironment metadata: name: sip namespace: sip spec: license: accept: true ivService: serviceGroup: dev promisingService: serviceGroup: dev utilityService: serviceGroup: dev optimizerService: serviceGroup: dev apiDocsService: replicaCount: 1 resources: limits: cpu: '1' memory: 1.5Gi requests: cpu: '0.1' memory: 1Gi networkPolicy: podSelector: matchLabels: none: none policyTypes: - Ingress omsGateway: issuerSecret: jwt-secret workerPoolSize: 100 logLevel: INFO replicas: 1 webClient: connectTimeout: 2000 keepAlive: true keepAliveTimeout: 60 logActivity: false maxPoolSize: 15 requestTimeout: 5000 trustAll: false verifyHost: true cors: enabled: true allowedOrigins: '*' deltaHeaders: '' deltaMethods: '' exposedHeaders: '' allowCredentials: true externalServices: configuration: ssl_cassandra_disable: "true" cassandra: contactPoints: <RHEL_IP>:9042 iv_keyspace: test elasticSearch: createDevInstance: storage: accessMode: ReadWriteMany capacity: 10Gi name: sip-pvc storageClassName: standard kafka: createDevInstance: storage: accessMode: ReadWriteMany capacity: 10Gi name: sip-pvc storageClassName: standard topicPrefix: sip mongodb: createDevInstance: storage: accessMode: ReadWriteMany capacity: 40Gi name: prat-persist-pvc storageClassName: prat-persist-pv optimizerdb: optimizer-db optimizerMetadatadb: mutlitomz-db common: ingress: host: replace_with_hostname_of_the_linux_vm ssl: enabled: true identitySecretName: ingress-cert upgradeStrategy: RollingUpdate secret: sip-secret serviceAccount: default image: pullPolicy: Always imagePullSecrets: - name: ibm-entitlement-key repository: cp.icr.io/cp/ibm-oms-enterprise tag: 10.0.2403.1-amd64 storage: accessMode: ReadWriteMany capacity: 10Gi name: sip-pvc storageClassName: standard
Step 6. Validating the instance post deployment
Deployment Validation
Run command
kubectl describe sipenvironments.apps.sip.ibm.comto validate the deployment status.Status of the above command should show:
SIPEnvironmentAvailable,PromisingServiceAvailable,IVServiceAvailable, orUtilityServiceAvailable.Notes:
- If the status remains
InProgressfor an extended period after deployment, there may be issues with the deployment process. It is advisable to review the SIP/Gateway controller manager pods for any errors. - All pods should be up and running when you execute the command
kubectl get pods. If you encounter any errors or notice pods in an error state, usekubectl logs -f <podname>orkubectl describe pod <podname>to view the error details.
- If the status remains
Access API Documentation through port forwarding
Start the firewall (if not running)
sudo systemctl start firewalldAdd a couple of ports to the public zone. Run these commands:
sudo firewall-cmd --add-port=9443/tcp --zone=public --permanent sudo firewall-cmd --add-port=8080/tcp --zone=public --permanent sudo firewall-cmd --reloadUse Kubernetes to forward the required ports. The command format follows:
kubectl port-forward --address 0.0.0.0 svc/ingress-nginx-controller -n ingress-nginx 9443:443You can now access the API documentation via the RHEL server URL:
https://sipservice-<namespace>.<replace_with_hostname_of_the_linux_vm>:9443/api-docs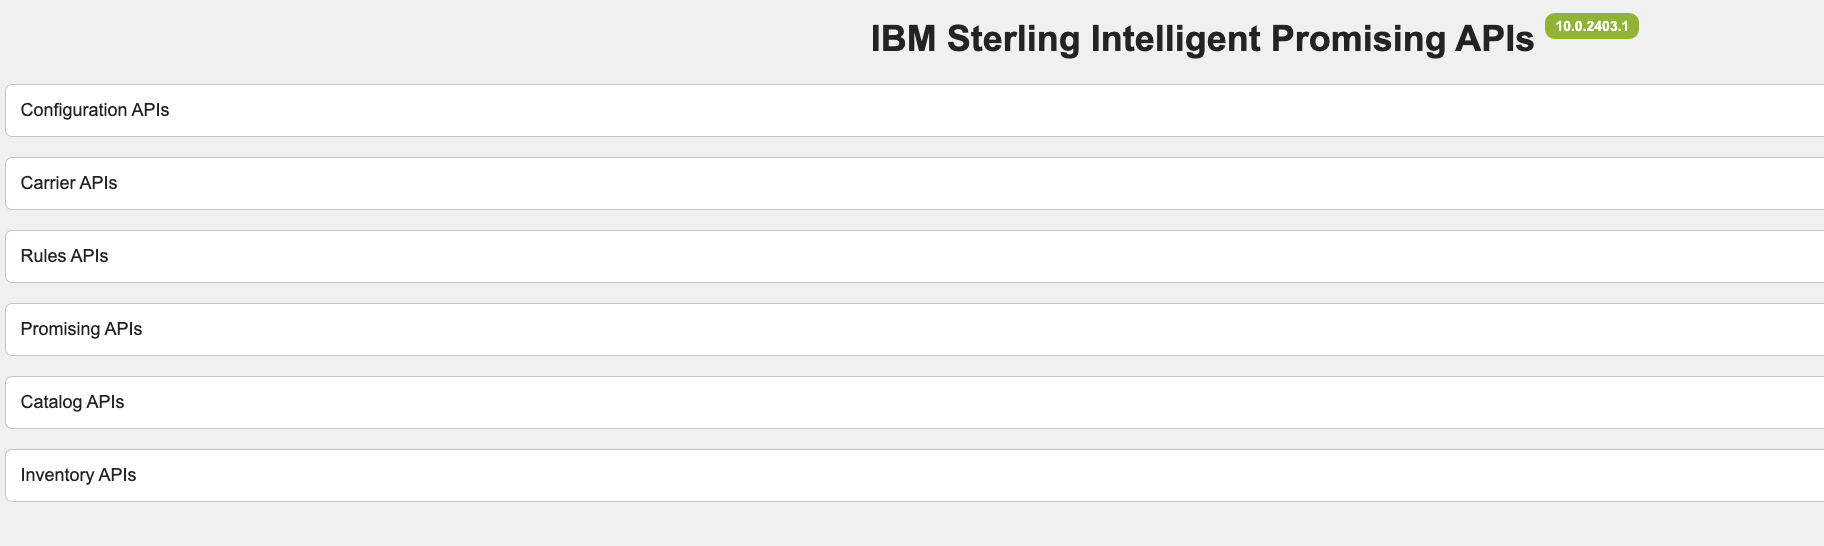
For Example:
https://sipservice-sip.myserver.ibm.com:9443/api-docs/
Invoke APIs via a REST client
Additionally, you can invoke APIs via a REST client by port-forwarding the oms-gateway app pod:
kubectl port-forward --address 0.0.0.0 svc/ingress-nginx-controller -n ingress-nginx 9443:443Access the API using a REST client with the following format. For obtaining the jwt token, you can use the following script using the
private_key.pemcreated inStep 5: Installing and deploying SIP > Installing SIP applicationsection of this document.#!/bin/bash # Replace this with the path to your private key file PRIVATE_KEY_PATH="/path/to/private_key.pem" # For example: # PRIVATE_KEY_PATH="/home/supportuser/cert1/private_key.pem" # JWT Header header=$(echo -n '{"alg":"RS512","typ":"JWT"}' | openssl enc -base64 -A | tr '+/' '-_' | tr -d '=') # JWT Payload (Linux date command syntax) payload=$(echo -n '{"iss":"oms","aud":"service","exp":'$(date -d "+1 day" +%s)'}' | openssl enc -base64 -A | tr '+/' '-_' | tr -d '=') # JWT Signature unsigned_token="$header.$payload" signature=$(echo -n "$unsigned_token" | openssl dgst -sha512 -sign $PRIVATE_KEY_PATH | openssl enc -base64 -A | tr '+/' '-_' | tr -d '=') # Complete JWT jwt="$unsigned_token.$signature" echo $jwtFor additional details, see product documentation.
With the token obtained, invoke SIP API via any REST client using the following URL:
https://sipservice-<namespace>.<replace_with_hostname_of_the_linux_vm>:9443/<module>/<tenant_id>/<version>/<api_context>For example:
https://sipservice-<namespace>.<replace_with_hostname_of_the_linux_vm>:9443/inventory/default/v1/configuration/settings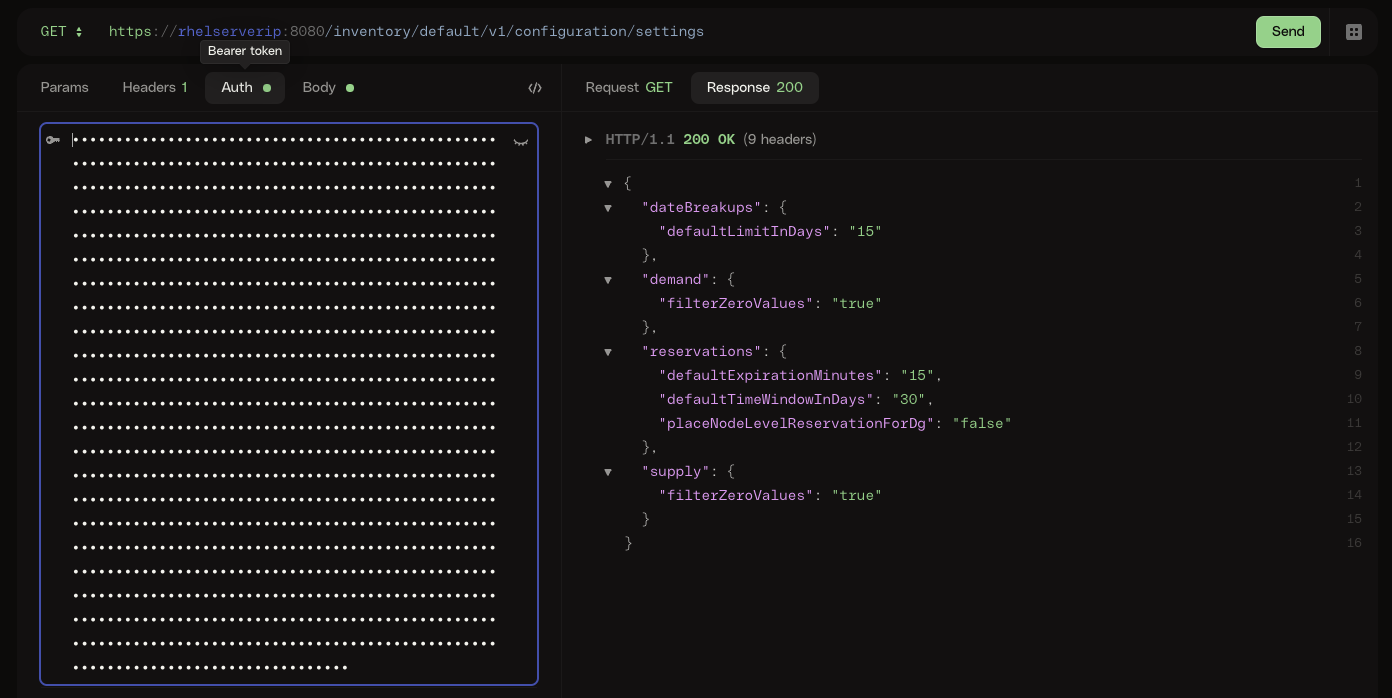
You can refer the API documentation for detailed URLs and additional information.
Summary
This tutorial provided step-by-step instructions on deploying IBM Sterling Intelligent Promising using Operators and accessing the application.