About cookies on this site Our websites require some cookies to function properly (required). In addition, other cookies may be used with your consent to analyze site usage, improve the user experience and for advertising. For more information, please review your options. By visiting our website, you agree to our processing of information as described in IBM’sprivacy statement. To provide a smooth navigation, your cookie preferences will be shared across the IBM web domains listed here.
Tutorial
Deploy QRadar Suite on OpenShift with VMware vSphere
Learn the process of deploying IBM Security QRadar Suite on Red Hat OpenShift using VMware vSphere volumes
On this page
Archived content
Archive date: 2028-07-31
This content is no longer being updated or maintained. The content is provided “as is.” Given the rapid evolution of technology, some content, steps, or illustrations may have changed.Red Hat OpenShift Container Platform (OCP) offers a robust Kubernetes environment for deploying various workloads, including IBM Security QRadar Suite. This tutorial guides you through integrating a Red Hat OpenShift cluster with persistent storage using VMware vSphere volumes, specifically tailored for deploying the QRadar Suite.
Required machines
- One temporary bootstrap machine
- One provisioner node with Red Hat Enterprise Linux (RHEL) 8.x installed
- Three control plane (master) machines
- At least two compute (worker) machines
- One DHCP and DNS server
Deployment steps
- Create DNS records.
- Deploy Bastion Host and generate an SSH key.
- Download the following OpenShift deployment installation packages:
- OpenShift installer
- Client
- OpenShift Pull Secret
- Copy the downloaded files on to the Bastion Host and extract OpenShift installation and command-line tar files.
- Deploy/install OpenShift Container Platform (OCP) cluster.
- Scale workload nodes.
For detailed deployment instructions, refer to Installing a cluster on vSphere with user-provisioned infrastructure.
Image registry configuration during installation
On platforms that do not provide shareable object storage, the OpenShift Image Registry Operator bootstraps itself as Removed. This allows the OpenShift installer to complete installations on these platform types. After installation, you must edit the Image Registry Operator configuration to switch the managementState from Removed to Managed.
Example:
oc edit config.imageregistry.operator.openshift.io -o yaml
    > apiVersion: v1
        items:
        - apiVersion: imageregistry.operator.openshift.io/v1
          kind: Config
          metadata:
            creationTimestamp: "2024-05-24T14:51:27Z"
            finalizers:
            - imageregistry.operator.openshift.io/finalizer
            generation: 4
            name: cluster
            resourceVersion: "35492"
            uid: 3b22dffa-4eb3-4159-8550-545769a882ac
          spec:
            httpSecret:
            logLevel: Normal
            managementState: Managed
            observedConfig: null
            operatorLogLevel: Normal
            proxy: {}
              type: NodeCADaemonControllerDegraded
            - lastTransitionTime: "2024-05-24T14:52:25Z"
              reason: AsExpected
              status: "False"
              type: ImageRegistryCertificatesControllerDegraded
            - lastTransitionTime: "2024-05-24T15:14:06Z"
              reason: PVC Exists
              status: "True"
              type: StorageExists
            generations:
            - group: apps
Configuring block registry storage for VMware vSphere
To allow the image registry to use block storage types such as vSphere Virtual Machine Disk (VMDK) during upgrades, you can use the Recreate rollout strategy as a cluster administrator.
Steps
Enter the following command to set the image registry storage as a block storage type, patch the registry so that it uses the Recreate rollout strategy, and runs with only one replica:
oc patch config.imageregistry.operator.openshift.io/cluster --type=merge -p '{"spec":{"rolloutStrategy":"Recreate","replicas":1}}'Provision the PV for the block storage device and create a PVC for that volume. The requested block volume uses the ReadWriteOnce (RWO) access mode.
Create a
pvc.yamlfile with the following contents to define a VMware vSphere PersistentVolumeClaim object:kind: PersistentVolumeClaim apiVersion: v1 metadata: name: image-registry-storage namespace: openshift-image-registry spec: accessModes: - ReadWriteOnce resources: requests: storage: 100GiNotes:
- A unique name represents the
PersistentVolumeClaimobject. - The namespace for the PersistentVolumeClaim object is
openshift-image-registry. - The access mode of the persistent volume claim is ReadWriteOnce (RWO), allowing the volume to be mounted with read and write permissions by a single node.
- Specify the size of the persistent volume claim.
- A unique name represents the
Enter the following command to create the
PersistentVolumeClaimobject from the file:oc create -f pvc.yaml -n openshift-image-registryEnter the following command to edit the registry configuration so that it references the correct PVC:
oc edit config.imageregistry.operator.openshift.io -o yamlExample output:
storage: pvc: claim:Notes:
By creating a custom PVC, you can leave the claim field blank for the default automatic creation of an image-registry-storage PVC. Refer to the following
image-registry-storagePVC.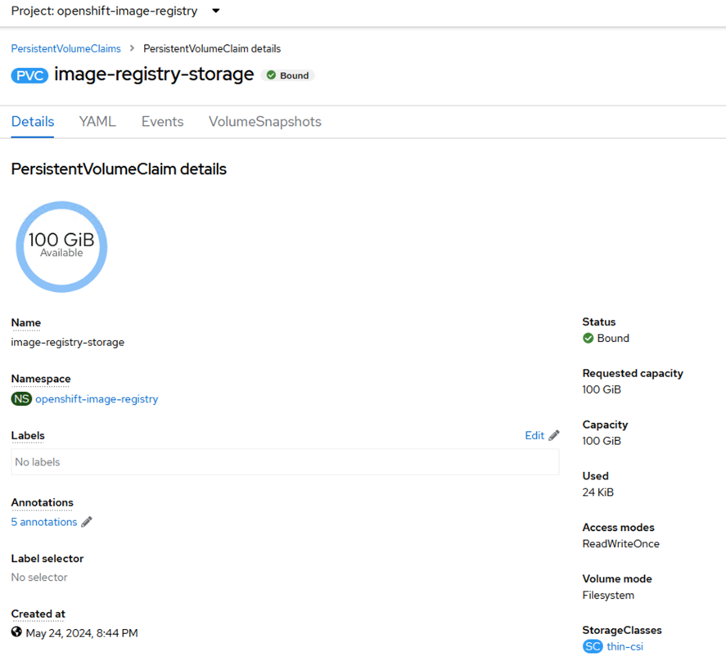
Refer to the OpenShift documentation for instructions on configuring registry storage to reference the correct PVC.
Set up your system for QRadar Suite deployment
You are now ready to set up your Linux VM or other system with CLI tools required to deploy QRadar Suite.
Note: Before starting the QRadar Suite deployment, increase the worker VM CPU and RAM according to the recommendations.
There are multiple installation methods to deploy QRadar Suite. This tutorial uses Container Application Software for Enterprises (CASE). For details, see Installing QRadar Suite Software by using CASE.
Important: Installation takes approximately 1.5 hours. When the installation is complete, the latest version of IBM Cloud Pak foundational services and QRadar Suite Software 1.10.20 will be installed. The storage class in your values.conf file must be thin-csi.
Verify the QRadar Suite software installation by running the following command:
oc ibm-pak launch -t 1 \ $CASE_NAME \ --version $CASE_VERSION \ --inventory ibmSecurityOperatorSetup \ --namespace $CP4S_NAMESPACE \ --action validate
The following message is displayed when the installation completes:
[INFO] IBM Cloud Pak for Security deployment is complete.
Demo video
This video demonstrates the steps to deploy IBM Security QRadar Suite on Red Hat OpenShift Container Platform (OCP) cluster using VMware vSphere volumes, similar to those you completed in the tutorial.

Video will open in new tab or window
Summary and next steps
This tutorial guided you through deploying IBM Security QRadar Suite on Red Hat OpenShift Container Platform (OCP) cluster using VMware vSphere volumes. It covered setting up necessary machines, configuring DNS, deploying OpenShift, and scaling workload nodes. Additionally, it explained how to configure block registry storage and verify the QRadar Suite installation. The process ensures a robust and integrated deployment environment tailored for QRadar Suite.
Now that you know how to deploy IBM Security QRadar Suite on Red Hat OpenShift Container Platform (OCP) cluster using VMware vSphere volumes, you can continue to explore IBM Security and Red Hat resources, products, and capabilities:
- Installing QRadar Suite
- Red Hat OpenShift: Detailed NFS on OCP setup guide
- IBM Developer – Security hub (for tutorials, articles, and other resources)
- IBM Security QRadar Suite product page
- Red Hat OpenShift Container Platform product page