About cookies on this site Our websites require some cookies to function properly (required). In addition, other cookies may be used with your consent to analyze site usage, improve the user experience and for advertising. For more information, please review your options. By visiting our website, you agree to our processing of information as described in IBM’sprivacy statement. To provide a smooth navigation, your cookie preferences will be shared across the IBM web domains listed here.
Tutorial
test data ingestion to watsonx.data using local Spark
Quickly set up a local Spark engine to test and refine your data ingestion
Apache Spark excels in handling large-scale data processing and seamlessly integrates with various frameworks. IBM watsonx.data offers an open, hybrid, and governed data store with its data lakehouse architecture, enabling storage and retrieval of enterprise data efficiently. By combining Apache Spark's processing capabilities with watsonx.data's architecture, organizations can scale and process massive data sets, empowering them to derive actionable insights with enhanced effectiveness and efficiency.
Primarily, there are three ways that you can configure a Spark engine for parallel processing. The first two ways are managed services plans provided by IBM where you pay for the service while using it, and you receive full support for any issues the services might have.
Use the included Spark runtime environment notebooks from IBM Watson Studio.
Use a serverless IBM Analytics Engine, which offers a consumption-based usage. You can use this link to provision the Analytics Engine. The Analytics Engine handles setting up and taking down Spark clusters so that they're ready when you need them. This helps save time and money by only using resources when necessary
Use your own local Spark setup that you manage. You can use the local setup to test whether it meets your needs. This example is what's covered in this tutorial.
The tutorial explains how to quickly set up a Spark engine locally so that you can try it out on your own system and dive into the lakehouse world. You can download a sample Python file to use with the tutorial.
Note: In this tutorial, the local Spark installation is done on macOS. In your installation, the certs path should be based on your local machine's OpenJDK path.
Prerequisites
To follow this tutorial, you need:
- An IBM watsonx.data instance
- A catalog with an IBM Cloud Object Storage bucket
- IBM Cloud Object Storage bucket credentials
- A Hive Metastore (HMS) URL from watsonx.data
- HMS Credentials from watsonx.data
Estimated time
It should take you approximately 30 minutes to complete this tutorial.
Steps
Step 1. Install Spark on your local machine
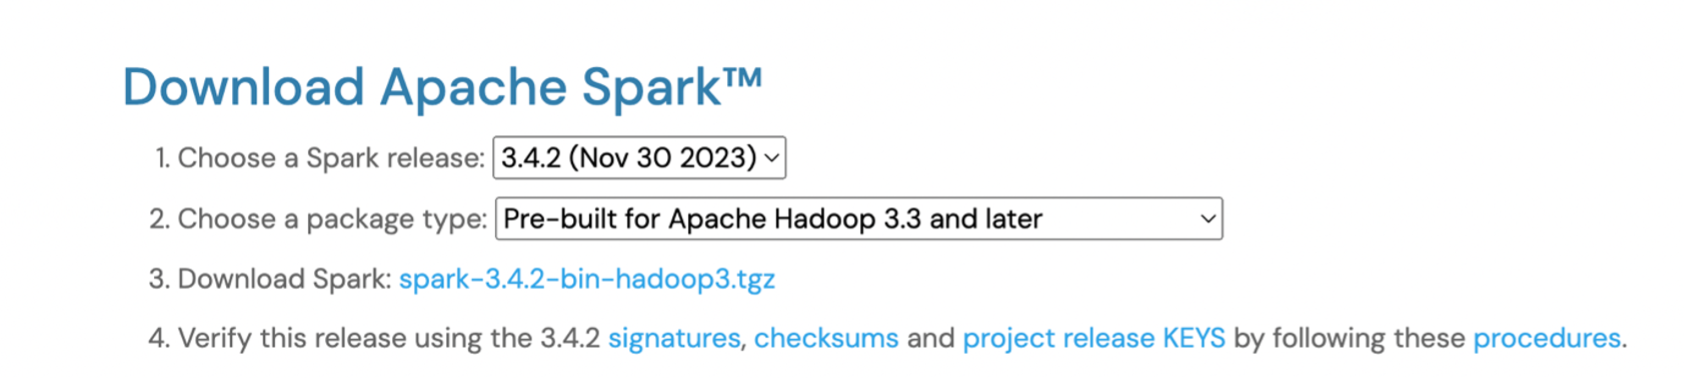
Download Spark on your local machine, and select the version that you want to download.
You see the JAR folders in the Spark installed path after you've downloaded Spark.
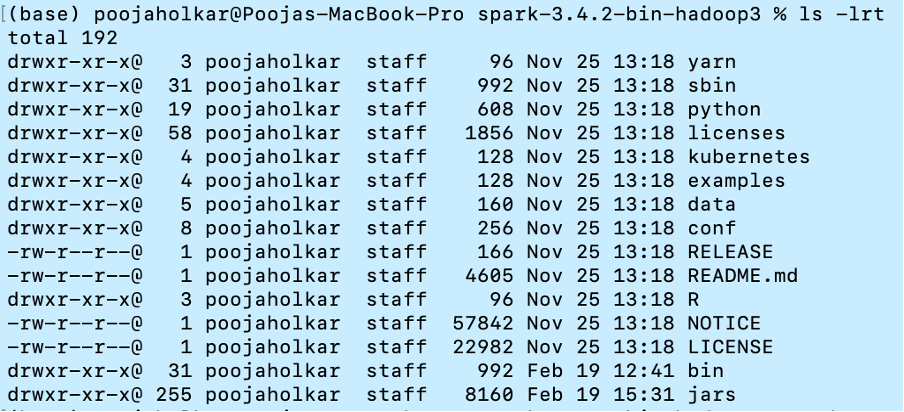
Because Spark applications are used for parallel processing, you can use the data from Spark to perform all of the compute-intensive tasks in watsonx.data. To connect your Spark engine with watsonx.data, it's important to download all of the required JAR files and place it in the JARS folder shown previously to make the connection to the watsonx.data Hive metastore. The Hive
exec,common, andmetastoreJAR files are modified JAR files to work with watsonx.data.Run the following commands to download the Hive Metastore, aws-sdk-bundle, and Hadoop-aws JAR files to your system.
wget https://github.com/IBM-Cloud/IBM-Analytics-Engine/raw/master/wxd-connectors/hms-connector/hive-exec-2.3.9-core.jar
 wget https://github.com/IBM-Cloud/IBM-Analytics-Engine/raw/master/wxd-connectors/hms-connector/hive-common-2.3.9.jar
 wget https://github.com/IBM-Cloud/IBM-Analytics-Engine/raw/master/wxd-connectors/hms-connector/hive-metastore-2.3.9.jar
 wget https://repo1.maven.org/maven2/com/amazonaws/aws-java-sdk-bundle/1.12.648/aws-java-sdk-bundle-1.12.648.jar
 wget https://repo1.maven.org/maven2/org/apache/hadoop/hadoop-aws/3.3.4/hadoop-aws-3.3.4.jar
After you have all of the JAR files in the JARS folder, you can look at the parameters that are needed in the Python file to submit your data in the lakehouse.
Step 2. Configure IBM Cloud Object Storage bucket
Watsonx.data stores its data and metadata in an object storage bucket. This tutorial uses IBM Cloud Object Storage, so if your data resides in an Amazon S3 bucket, you must give the credentials for that bucket.
def init_spark():
spark = SparkSession.builder     .appName("lh-hms-cloud")     .config("spark.hadoop.fs.s3a.bucket.lakehouse-bucket.endpoint" ,"s3.direct.us-south.cloud-object-storage.appdomain.cloud")     .config("spark.hadoop.fs.s3a.bucket.lakehouse-bucket.access.key" ,"<lakehouse-bucket-access-key>")     .config("spark.hadoop.fs.s3a.bucket.lakehouse-bucket.secret.key" ,"<lakehouse-bucket-secret-key>")     .config("spark.hadoop.fs.s3a.bucket.source-bucket.endpoint" ,"s3.direct.us-south.cloud-object-storage.appdomain.cloud")     .config("spark.hadoop.fs.s3a.bucket.source-bucket.access.key" ,"<source-bucket-access-key>")     .config("spark.hadoop.fs.s3a.bucket.source-bucket.secret.key" ,"<source-bucket-secret-key>")     .enableHiveSupport()     .getOrCreate()
  return spark
In your Python code:
Initialize Spark using bucket endpoints and access key and secret key. See Getting endpoints for your IBM Cloud Object Storage bucket.
Create the HMAC credentials for your source and target IBM Cloud Object Storage buckets by following these steps.
Check whether the connection is established by creating a database after you have initialized Spark.
def create_database(spark):
     # Create a database in the lakehouse catalog
     spark.sql("create database if not exists lakehouse.localsparkdb LOCATION 's3a:// localsparkbucket/'")
Step 3. Use Spark SUBMIT to run final application file
Run the
spark-submitscript. The following code shows an example.spark-submit \ --conf spark.sql.catalogImplementation=hive \ --conf spark.driver.extraClassPath=/Users/poojaholkar/GSI/SPARKINSTALL/hive-common-2.3.9.jar:/Users/poojaholkar /SPARKINSTALL/hive-metastore-2.3.9.jar:/Users/poojaholkar /SPARKINSTALL/hive-exec-2.3.9-core.jar \ --conf spark.executor.extraClassPath=/Users/poojaholkar/GSI/SPARKINSTALL/hive-common-2.3.9.jar:/Users/poojaholkar /SPARKINSTALL/hive-metastore-2.3.9.jar:/Users/poojaholkar /SPARKINSTALLhive-exec-2.3.9-core.jar \ --conf spark.sql.extensions=org.apache.iceberg.spark.extensions.IcebergSparkSessionExtensions \ --conf spark.sql.iceberg.vectorization.enabled=false \ --conf spark.sql.catalog.lakehouse=org.apache.iceberg.spark.SparkCatalog \ --conf spark.sql.catalog.lakehouse.type=hive \ --conf spark.hive.metastore.uris=<thriftmetastoreurl> \ --conf spark.hive.metastore.client.auth.mode=PLAIN \ --conf spark.hive.metastore.client.plain.username=ibmlhapikey \ --conf spark.hive.metastore.client.plain.password=<password>\ --conf spark.hive.metastore.use.SSL=true \ --conf spark.hive.metastore.truststore.type=JKS \ --conf spark.hive.metastore.truststore.path=file:/Library/Java/JavaVirtualMachines/openlogic-openjdk-11.jre/Contents/Home/lib/security/cacerts \ --conf spark.hive.metastore.truststore.password=changeit \ localspark-lakehouse.pyYou get the
metastore.urisandmetastore.client.plain.passwordparameters from the prerequistes steps. Themetastore.truststore.pathis the location of your cacerts of your local Java installation. This varies between systems.You should see the database in your watsonx.data Data manager after you've run the script.
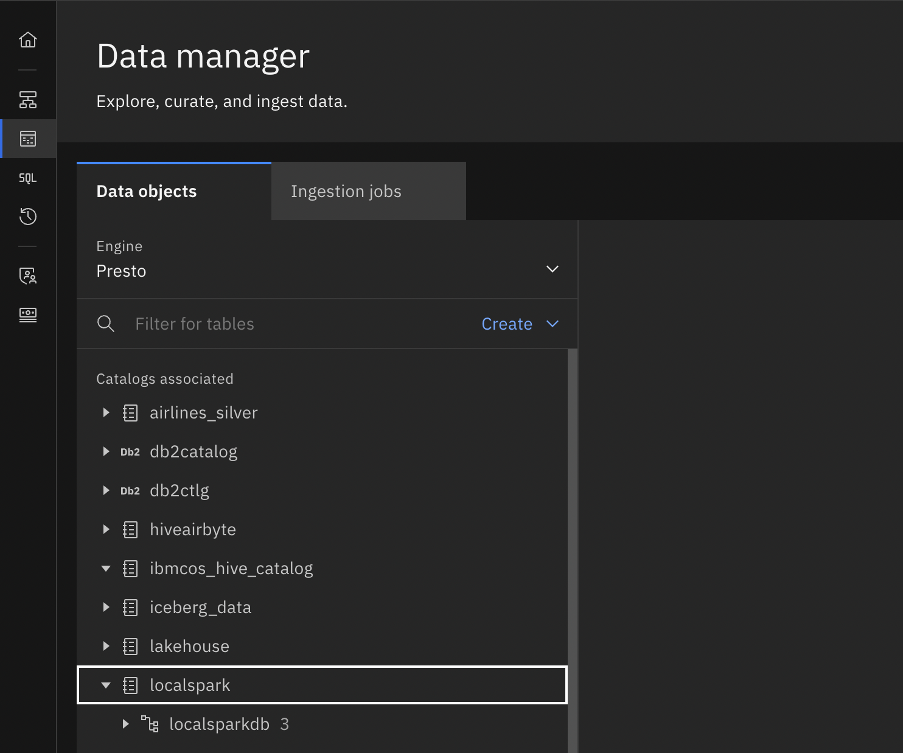
To see what your Python code is pushing into the watsonx.data from the console, you must associate the bucket in watsonx.data. Add a bucket-catalog pair to add your bucket and see the data and metadata files that are created. Then, you are able to view the database that was created in your data manager associated catalog.
Summary
In this tutorial, you've gained insight into the process of setting up a Spark engine locally from the ground up, a crucial step that lets you test it out on your own. The hands-on experience helps you grasp the details of lakehouse technology more effectively and explore its potential applications within your specific context.
Explore more articles and tutorials about watsonx on IBM Developer. You can also start your free watsonx.data trial.