About cookies on this site Our websites require some cookies to function properly (required). In addition, other cookies may be used with your consent to analyze site usage, improve the user experience and for advertising. For more information, please review your options. By visiting our website, you agree to our processing of information as described in IBM’sprivacy statement. To provide a smooth navigation, your cookie preferences will be shared across the IBM web domains listed here.
Tutorial
Streamlining data and Machine Learning workflows with Watsonx Studio Pipelines
Learn how to set up and automate efficient data processing pipelines in Watson Studio, focusing on parallel execution and integration with IBM Cloud Object Storage
On this page
Archived content
Archive date: 2025-11-14
This content is no longer being updated or maintained. The content is provided “as is.” given the rapid evolution of technology, some content, steps, or illustrations may have changed.In today’s data-driven world, efficiently managing and automating AI workflows is crucial. IBM Watson Studio, a key component of IBM's advanced AI and data platform, offers a robust suite of tools designed to streamline these processes. This tutorial provides a hands-on approach to creating and managing pipelines in Watson Studio, with a focus on parallel processing, seamless integration with IBM Cloud Object Storage (COS), and prompt automation.
In this tutorial, explore a real-world example of processing Java files for code explanation and summarization, demonstrating how Watson Studio can significantly enhance your machine learning workflows.
Watson Studio Pipelines
Watson Studio's Orchestration Pipelines provide a flexible and intuitive platform for designing, automating, and managing end-to-end workflows, whether for machine learning models, Python scripts, or custom data processing tasks. With a graphical interface and drag-and-drop functionality, pipelines can be configured to streamline various operations like training, deploying, updating models, and parallel task execution. Built-in features for monitoring and logging, along with support for parallel processing and scalability, make Watson Studio an ideal tool for complex workflows.
A pipeline can be tailored to fit a wide range of workflows, whether simple or highly complex. It may involve one step or multiple parallel and dependent tasks, ensuring each job flows logically from the previous one, with the ability to branch out or synchronize as needed. generally, pipelines follow this structure:
- Input/Initial Stage: Data ingestion or job triggering.
- Processing: Core tasks, which can include parallel jobs or sequential steps, with or without synchronization.
- Output/Final Stage: Merging and validating results before storage or further processing.
Use cases for Watson Studio Pipelines
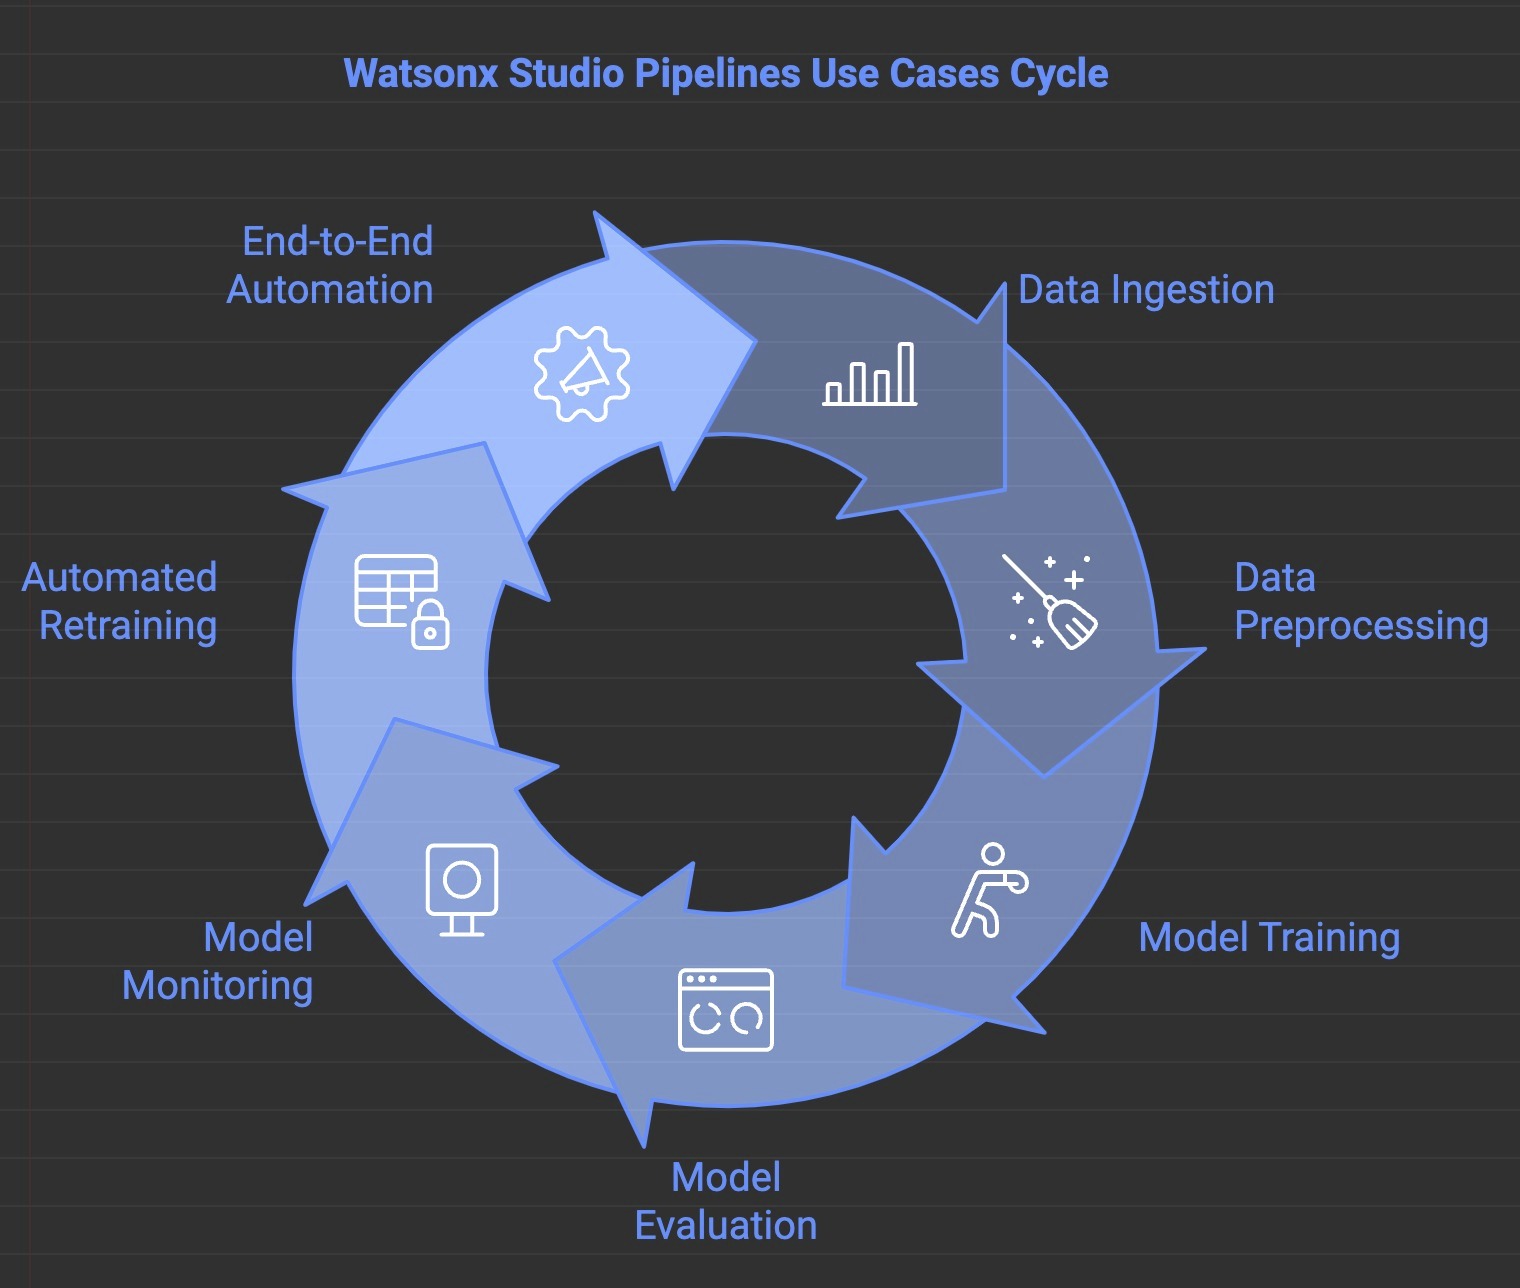
- Data Preprocessing and Model Training: Automate data cleaning, feature engineering, and model training to ensure consistent and high-quality inputs for machine learning.
- Large Language Model (LLM) Execution Across Multiple Sources: Run LLMs across extensive datasets or documents in parallel to generate insights, summaries, or predictions efficiently.
- Data Ingestion and Transformation: Automate data ingestion from diverse sources (APIs, databases, cloud storage) and perform transformations like normalization or aggregation.
- Model Evaluation and Monitoring: Continuously assess model performance to detect bias or drift, with automated retraining triggered by the pipeline.
- Parallel Preprocessing and LLM Execution: Use parallel notebook jobs for faster data processing and execution of large-scale models or custom tasks across multiple data streams.
- Model Training and Evaluation Automation: Set up pipelines to automate model training, tuning, and evaluation across different data sources, selecting the best-performing models.
- End-to-End Data Pipeline Automation: Integrate Watson Studio pipelines with other data sources and tools to automate the entire data lifecycle, from ingestion to transformation, training, and deployment, minimizing manual intervention and speeding up time-to-insight.
By using Watson Studio’s pipeline features, you can effectively orchestrate workflows that scale with their data needs, ensuring optimal performance, flexibility, and automation.
Example workflow: Processing Java files with Watson Studio
In this tutorial, we will create a pipeline that processes Java files stored in IBM Cloud Object Storage (COS). The pipeline will read Java files, generate both Javadoc comments and code summaries in parallel, and merge the results into a unified output.

Pipeline breakdown
Preprocessing:
- Job 1 - read_java: Reads Java files from COS, extracting and preparing them for further tasks.
Processing (parallel execution):
Job 2 - javadoc: generates Javadoc comments by analyzing the Java files.
Job 3 - summary: Creates code summaries, focusing on key elements like methods and class structures.
Note: These two jobs run in parallel, ensuring efficient execution without waiting for each other.
Wait for All Results: Ensures both jobs complete before moving to the next stage.
Postprocessing
- Job 4 - merge: Combines the outputs from the javadoc and summary jobs, producing a unified result that integrates both documentation and code summaries. The final output is validated and stored.
Prerequisites
Before getting started, make sure you have:
- An IBM Cloud account with access to Watson Studio (version 1.5.0 or later).
- Basic knowledge of Python programming and Jupyter Notebooks.
- Familiarity with IBM Cloud Object Storage (COS).
- API keys and instance credentials for IBM Cloud Object Storage.
- The
ibm_boto3Python library (version 1.19.0 or later) installed in your notebook environment.
Steps
Step 1. getting started with Watson Studio
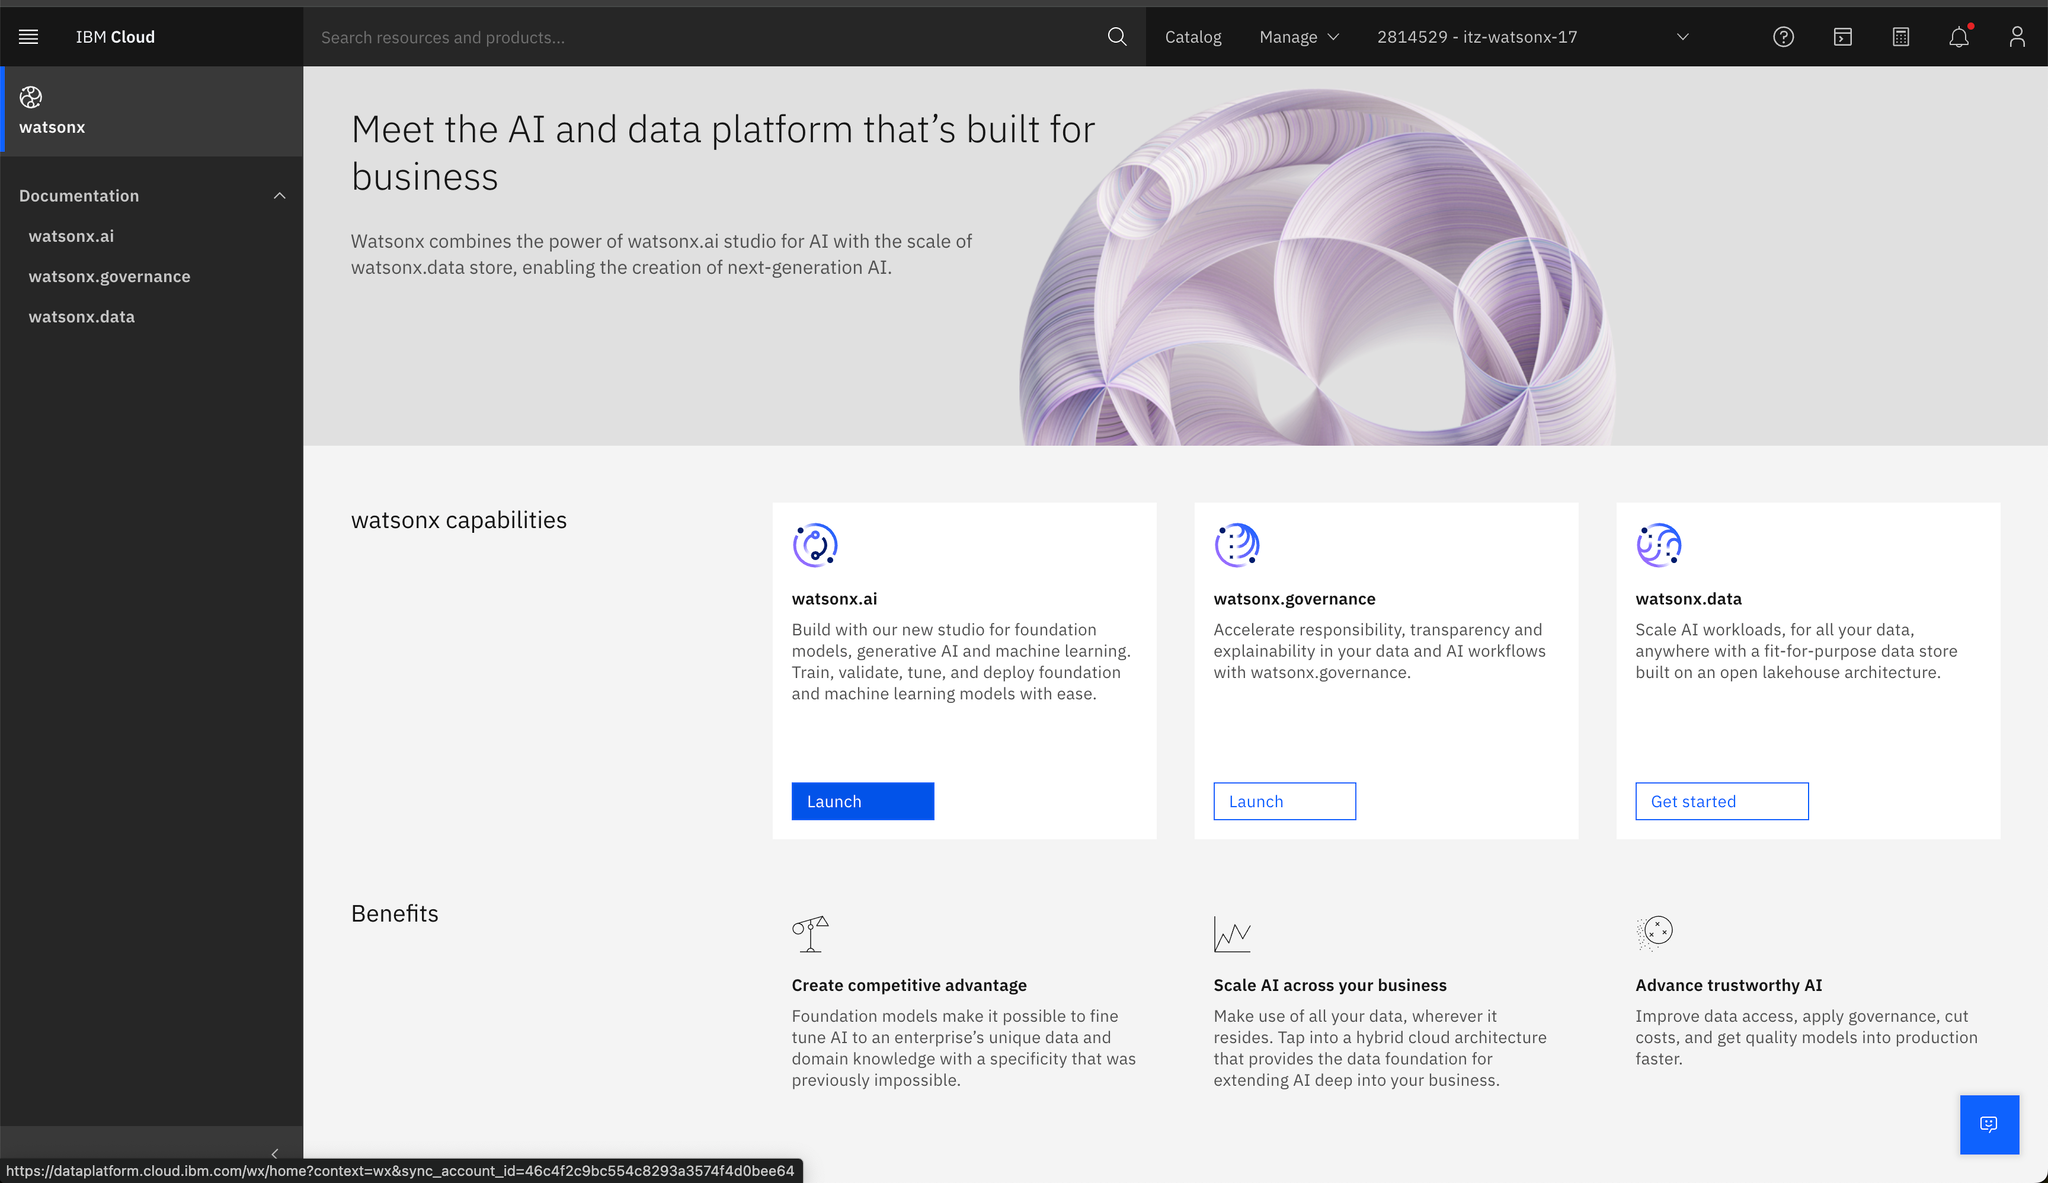
Log in to your IBM Cloud account and navigate to watsonx.
Launch watson studio to start setting up your environment.
In the watson studio dashboard, click on
Create Project.Select the project type and provide required details such as the project name and storage configuration.

Ensure you have the appropriate permissions to access IBM Cloud Object Storage (COS) and watson studio services.
Step 2. Configuring IBM Cloud Object Storage (COS) for Data Management
IBM Cloud Object Storage (COS) is used for storing and accessing the data that your pipeline will process.
Navigate to the IBM Cloud dashboard, click on
Create Resource, and search forCloud Object Storage.Provision a COS instance and take note of the API key and Resource Instance ID.
Within your COS instance, create a bucket to store your data files.
Upload the necessary Java files or other datasets to this bucket for use in your pipeline.
Step 3. Building and deploying prompt templates in Watson Studio
Prompt templates guide data processing and model training. To create one for summarizing Java files:
Open Watson Studio and navigate to the
Prompt Labsection.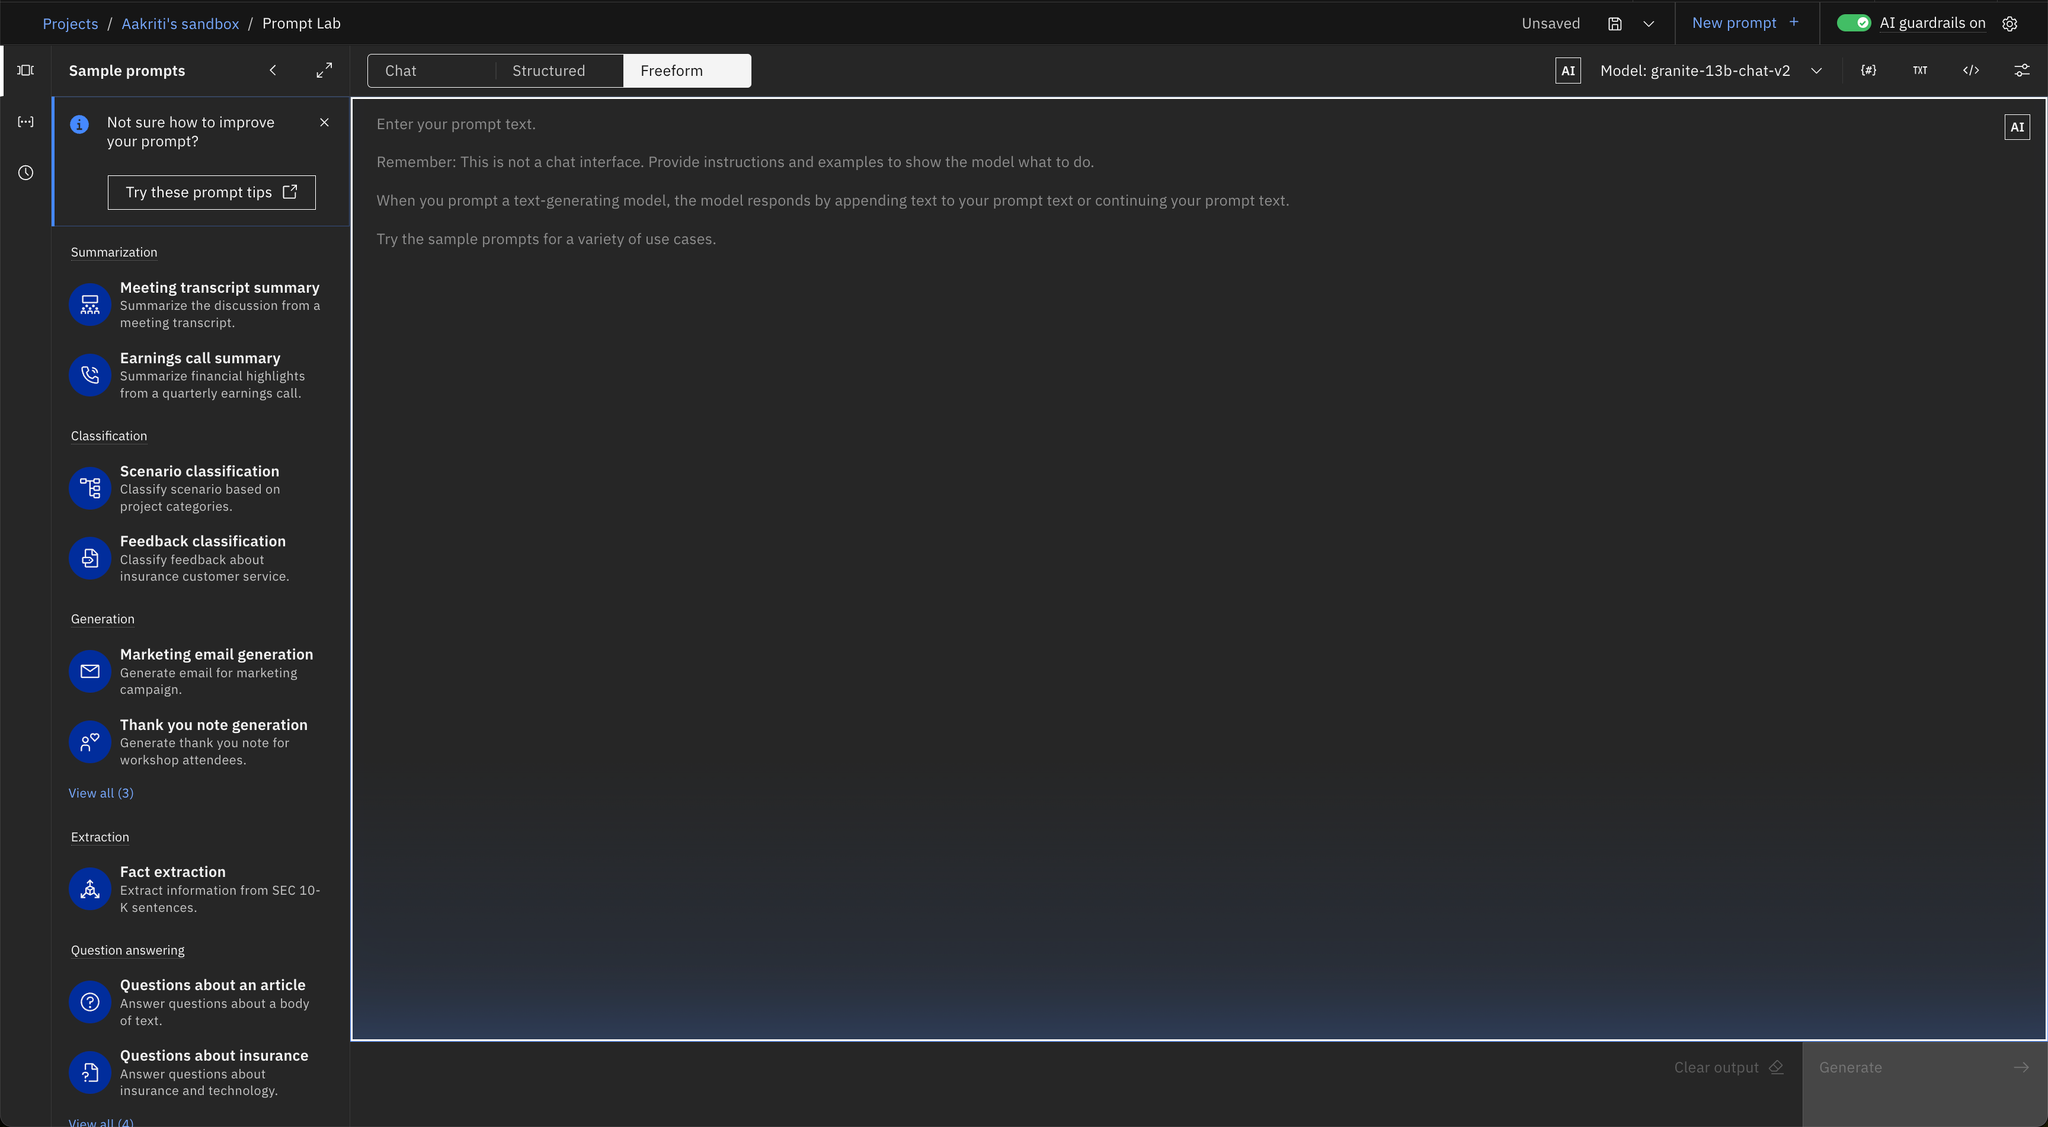
Develop a prompt structure that includes placeholders for inputs such as code snippets or configuration parameters. For example, create a template for summarizing Java code.

After refining your prompt, click the
Save Asbutton.Assign a descriptive name to your template.
Select the
Save as prompt templateoption.
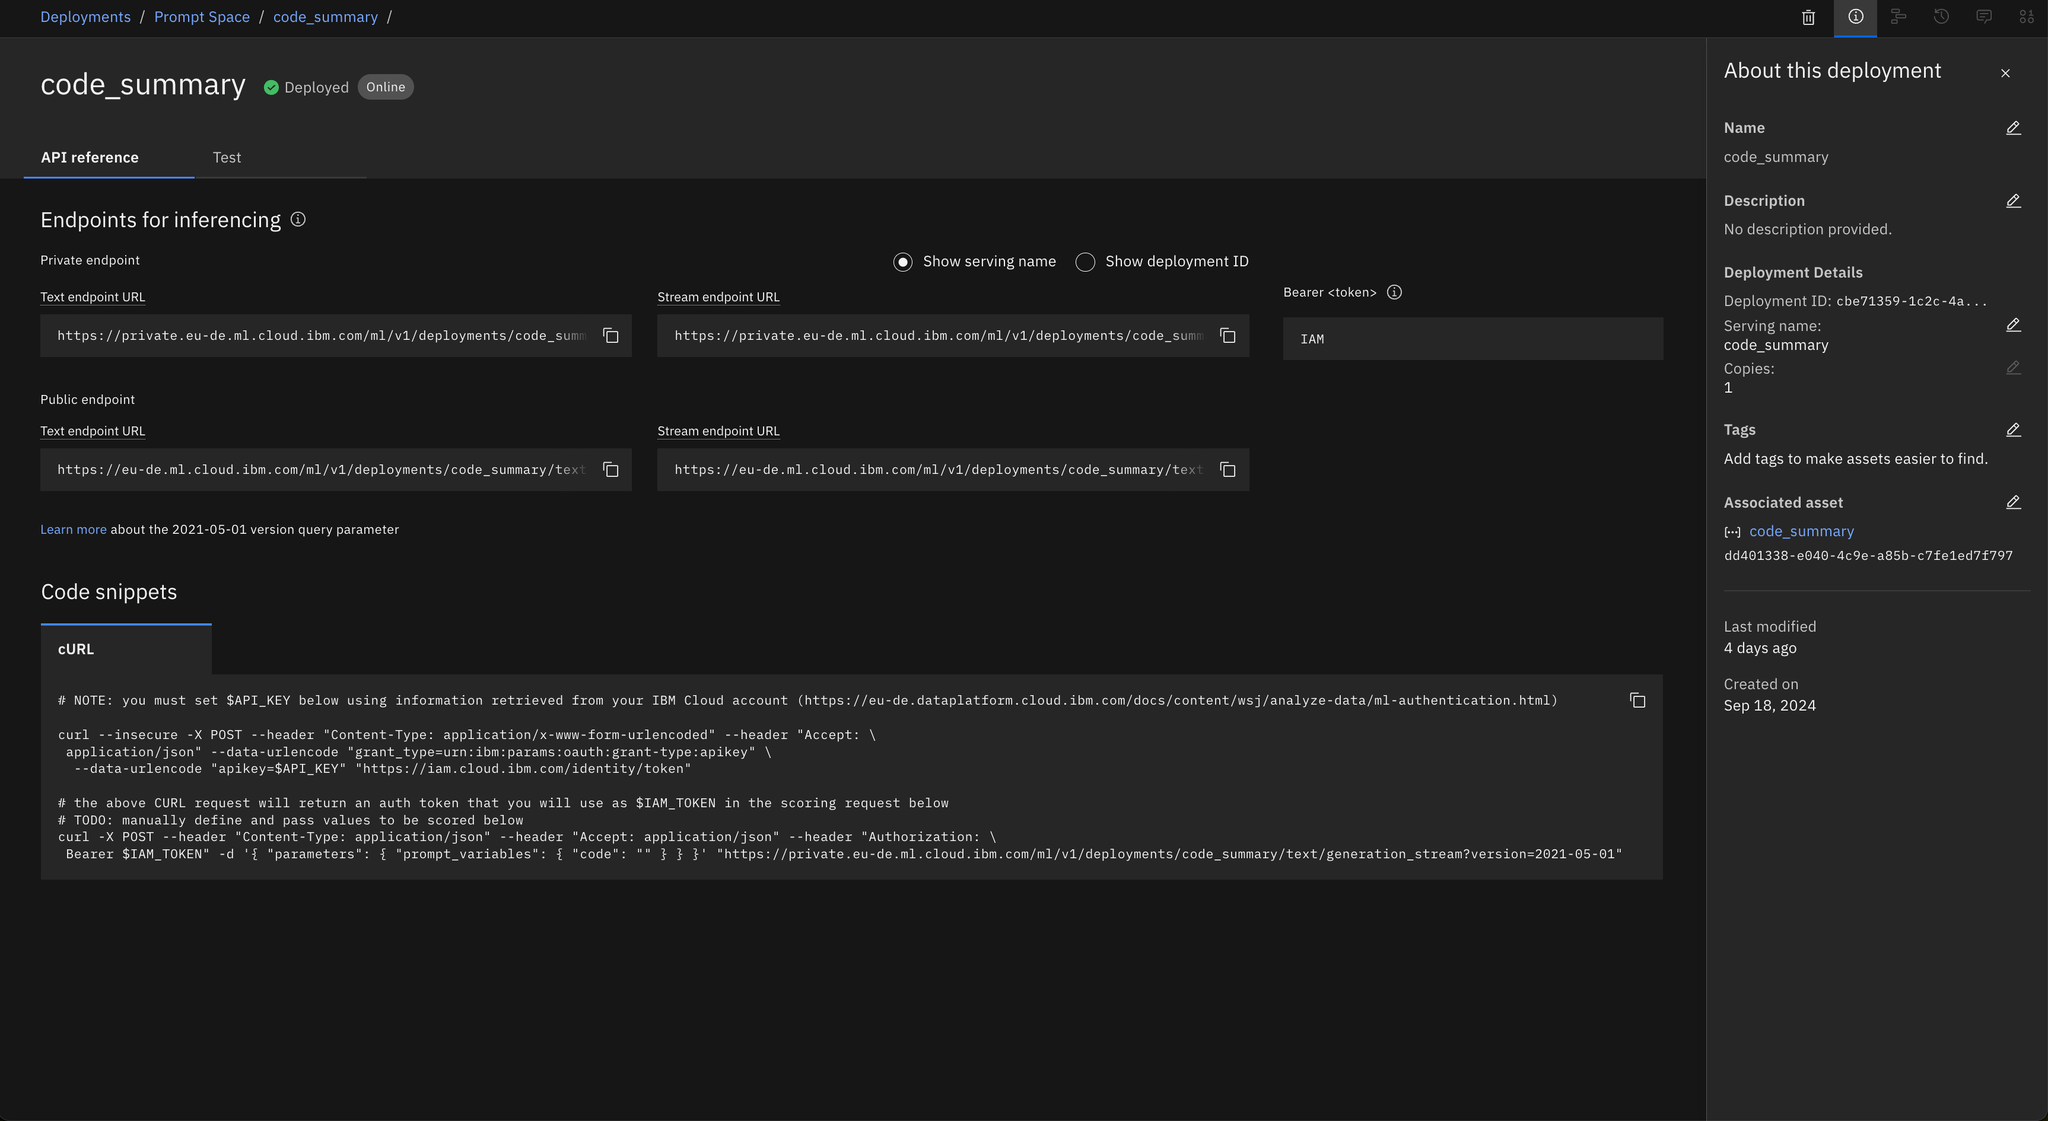
Step 4. Deploying the prompt template
You can deploy the prompt template to obtain an endpoint URL for use in your notebooks or access it directly through the Prompt Template Manager.
Click
Deployon the created prompt template. This action generates an endpoint URL for interacting with the template within your notebooks.Select the prompt template and click
Promote to Space. This step makes the prompt template available for deployment.
After promotion, go to the
Deploymentsection and select the space where you promoted the template.Select the promoted prompt template and click
Deployto finalize the deployment.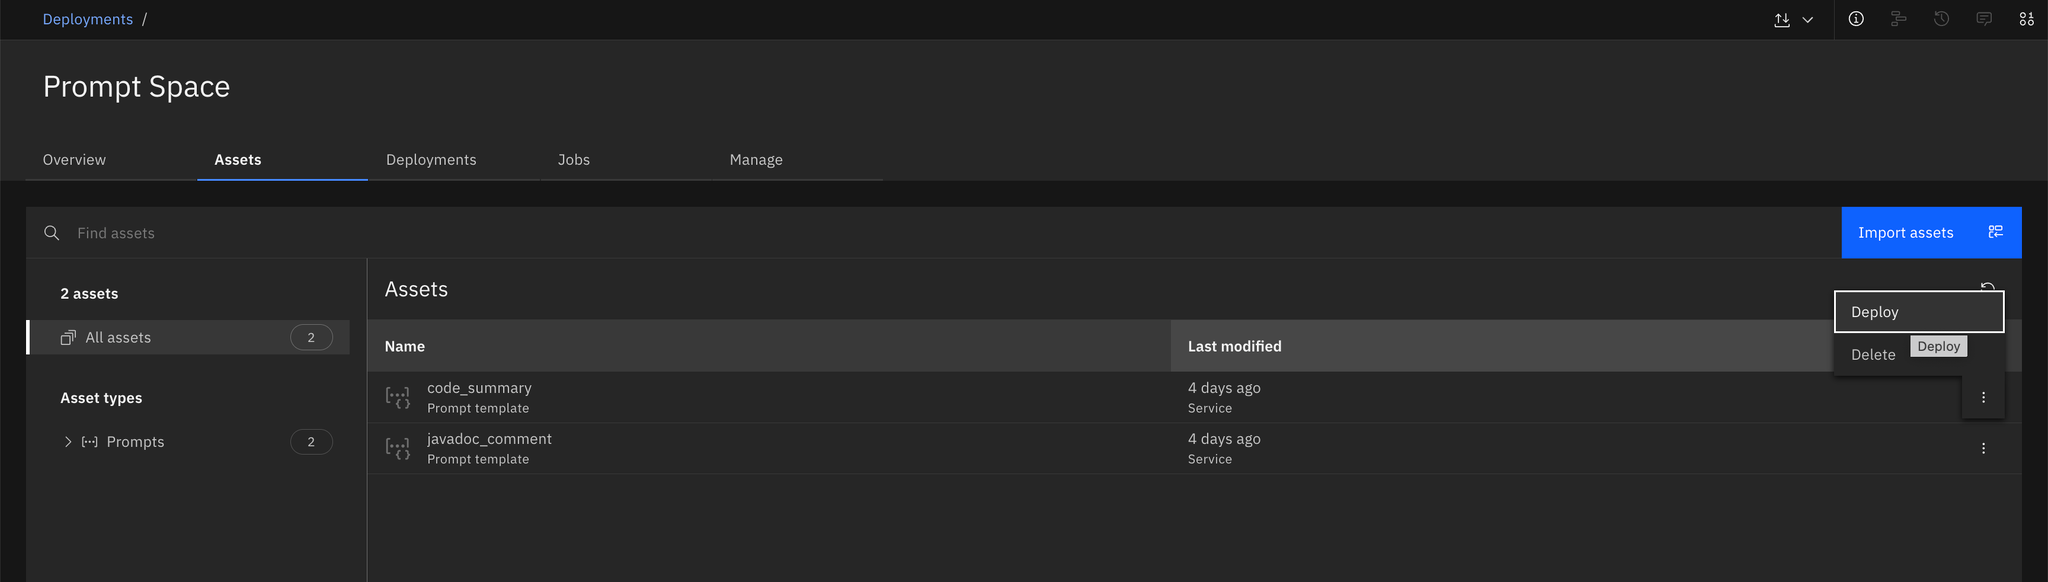
Once the deployment is successful, the system will provide an endpoint URL. You can use this URL in your notebooks to interact with the prompt template.
Alternatively, you can access the prompt directly from the Prompt Template Manager using the following Python code in your notebook:
from ibm_watsonx_ai.foundation_models.prompts import PromptTemplateManager, PromptTemplate from ibm_watsonx_ai.foundation_models.utils.enums import ModelTypes, DecodingMethods, PromptTemplateFormats from ibm_watsonx_ai.metanames import genTextParamsMetaNames as genParams prompt_mgr = PromptTemplateManager(credentials=get_credentials(), project_id=project_id) prompt_mgr.list() prompt_id = "<your_prompt_id>" prompt = prompt_mgr.load_prompt(prompt_id=prompt_id, astype=PromptTemplateFormats.STRINg)
Step 5. Creating a Notebook to access COS data
Navigate to
Notebooksin Watson Studio and create a new notebook. Select an appropriate environment, such asPython 3.x, which supports theibm\_boto3library.Write a function to interact with COS and fetch the Java code for processing.
Import the necessary libraries: import ibm_boto3 from ibm_botocore.client import Config, ClientError from ibm_cloud_sdk_core.authenticators import IAMAuthenticator from io import StringIODevelop the processing logic to handle the Java code retrieved from COS.
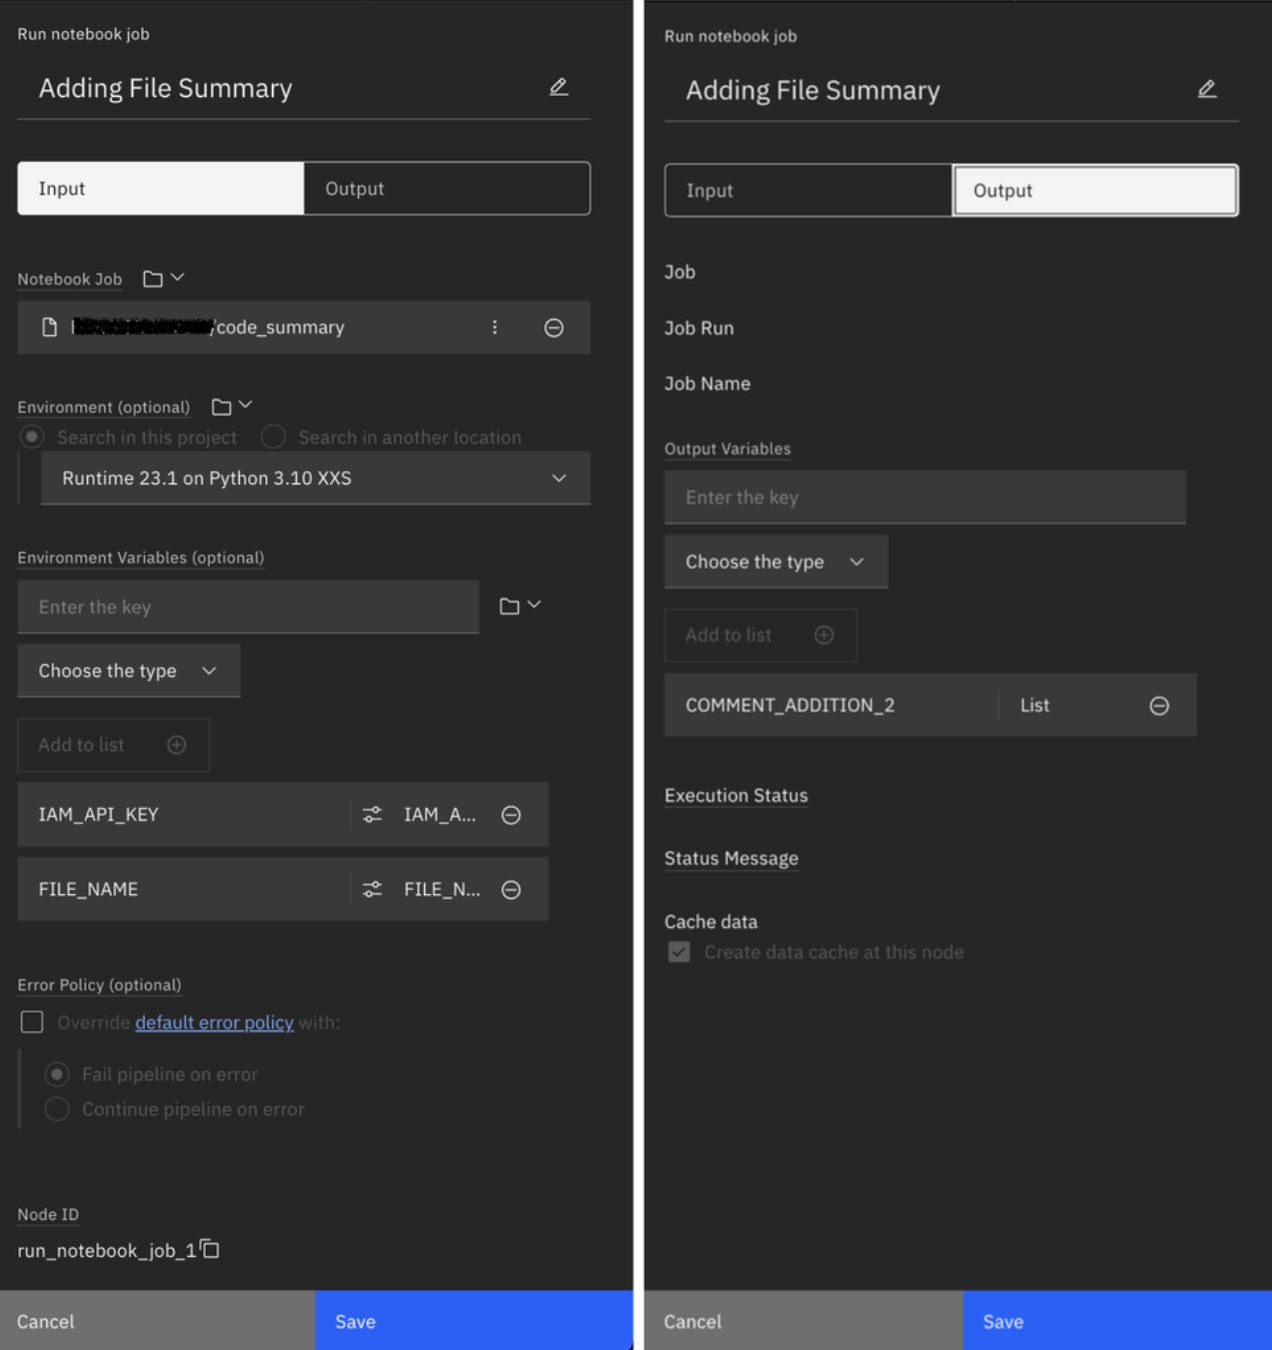
import requests import json import math def get_code_summary(java_code): global bearer_token # Ensure endpoint is defined at the top of your script headers = { "Content-Type": "application/json", "Accept": "application/json", "Authorization": "Bearer " + bearer_token } # Modify the prompt to ask for a summary data = { "parameters": { "prompt_variables": { "code": java_code, }, "return_options": { "generated_tokens": True, "input_tokens": True, "token_logprobs": True, "token_ranks": True, "top_n_tokens": 3 } } } response = requests.post(endpoint, data=json.dumps(data), headers=headers) if response.status_code == 200: result = response.json()['results'][0] summary = result['generated_text'].strip() # Calculate confidence generated_tokens = result['generated_tokens'] log_probs = [token['top_tokens'][0].get('logprob', 0) for token in generated_tokens] return summary elif response.status_code == 401: if response.json()['errors'][0]['code'] == 'authentication_token_expired': bearer_token = generate_bearer_token() print("Rerun code summary generation with new token") return get_code_summary(java_code) else: return "", 0.0 else: return "", 0.0 summary = get_code_summary(java_code) print(summary)Once the summarization is complete, store the result back into COS or in Watson Studio’s shared storage. You can choose to save files directly to COS or utilize Watson Studio’s shared storage as needed.
Saving files to COS
Import the necessary libraries: import ibm_boto3 from ibm_botocore.client import Config import io cos_client = ibm_boto3.client(service_name='s3', ibm_api_key_id=os.getenv('IAM_API_KEY'), ibm_auth_endpoint="https://iam.cloud.ibm.com/oidc/token", config=Config(signature_version='oauth'), endpoint_url='https://s3.private.eu-de.cloud-object-storage.appdomain.cloud' def write_to_cos(updated_java_code, bucket_name, object_key): java_code_bytes = updated_java_code.encode('utf-8') file_obj = io.BytesIO(java_code_bytes) try: cos_client.upload_fileobj( Fileobj=file_obj, Bucket=bucket_name, Key=object_key ) print(f"Successfully uploaded updated Java file to {bucket_name}/{object_key}") except Exception as e: print(f"An error occurred while uploading the file: {str(e)}") bucket_name = '<bucket_name>' write_to_cos(java_code, bucket_name, object_key)Saving to Watson Studio’s shared storage
import json
  from ibm_watson_studio_pipelines import WSPipelines
  apikey = os.getenv("IAM_API_KEY")
  client = WSPipelines.from_apikey(apikey)

  client.store_results({"CODE_SUMMARY": summary})

  print("Finished")
Step 6. Creating a Notebook job
In Watson Studio, navigate to
All Assets, select your notebook, and chooseCreate a Job. Provide necessary details such as the job name and description, and configure any required environment variables (e.g., COS API keys).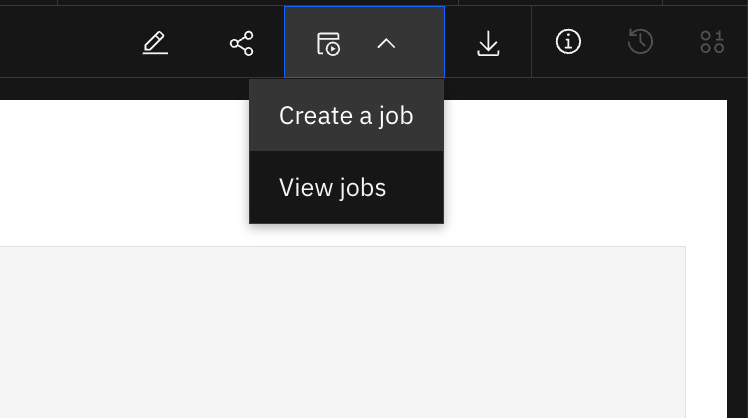
You can schedule the job to run immediately after creation, set it to follow a specific schedule, or start it manually when needed.
Once all configurations are completed, click on
Createto finalize the job setup.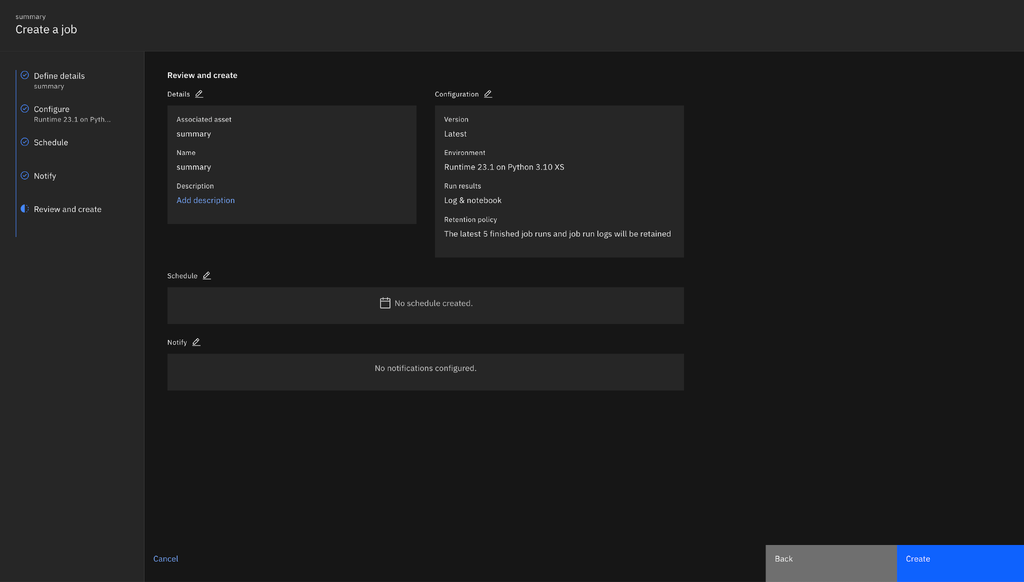
Step 7. Automating the Pipeline in Watson Studio
From the Watson Studio dashboard, select
New Assetand search forPipelines. Choose theAutomate Model Lifecyclesoption and provide a name for your pipeline, such asJava File Processing Pipeline.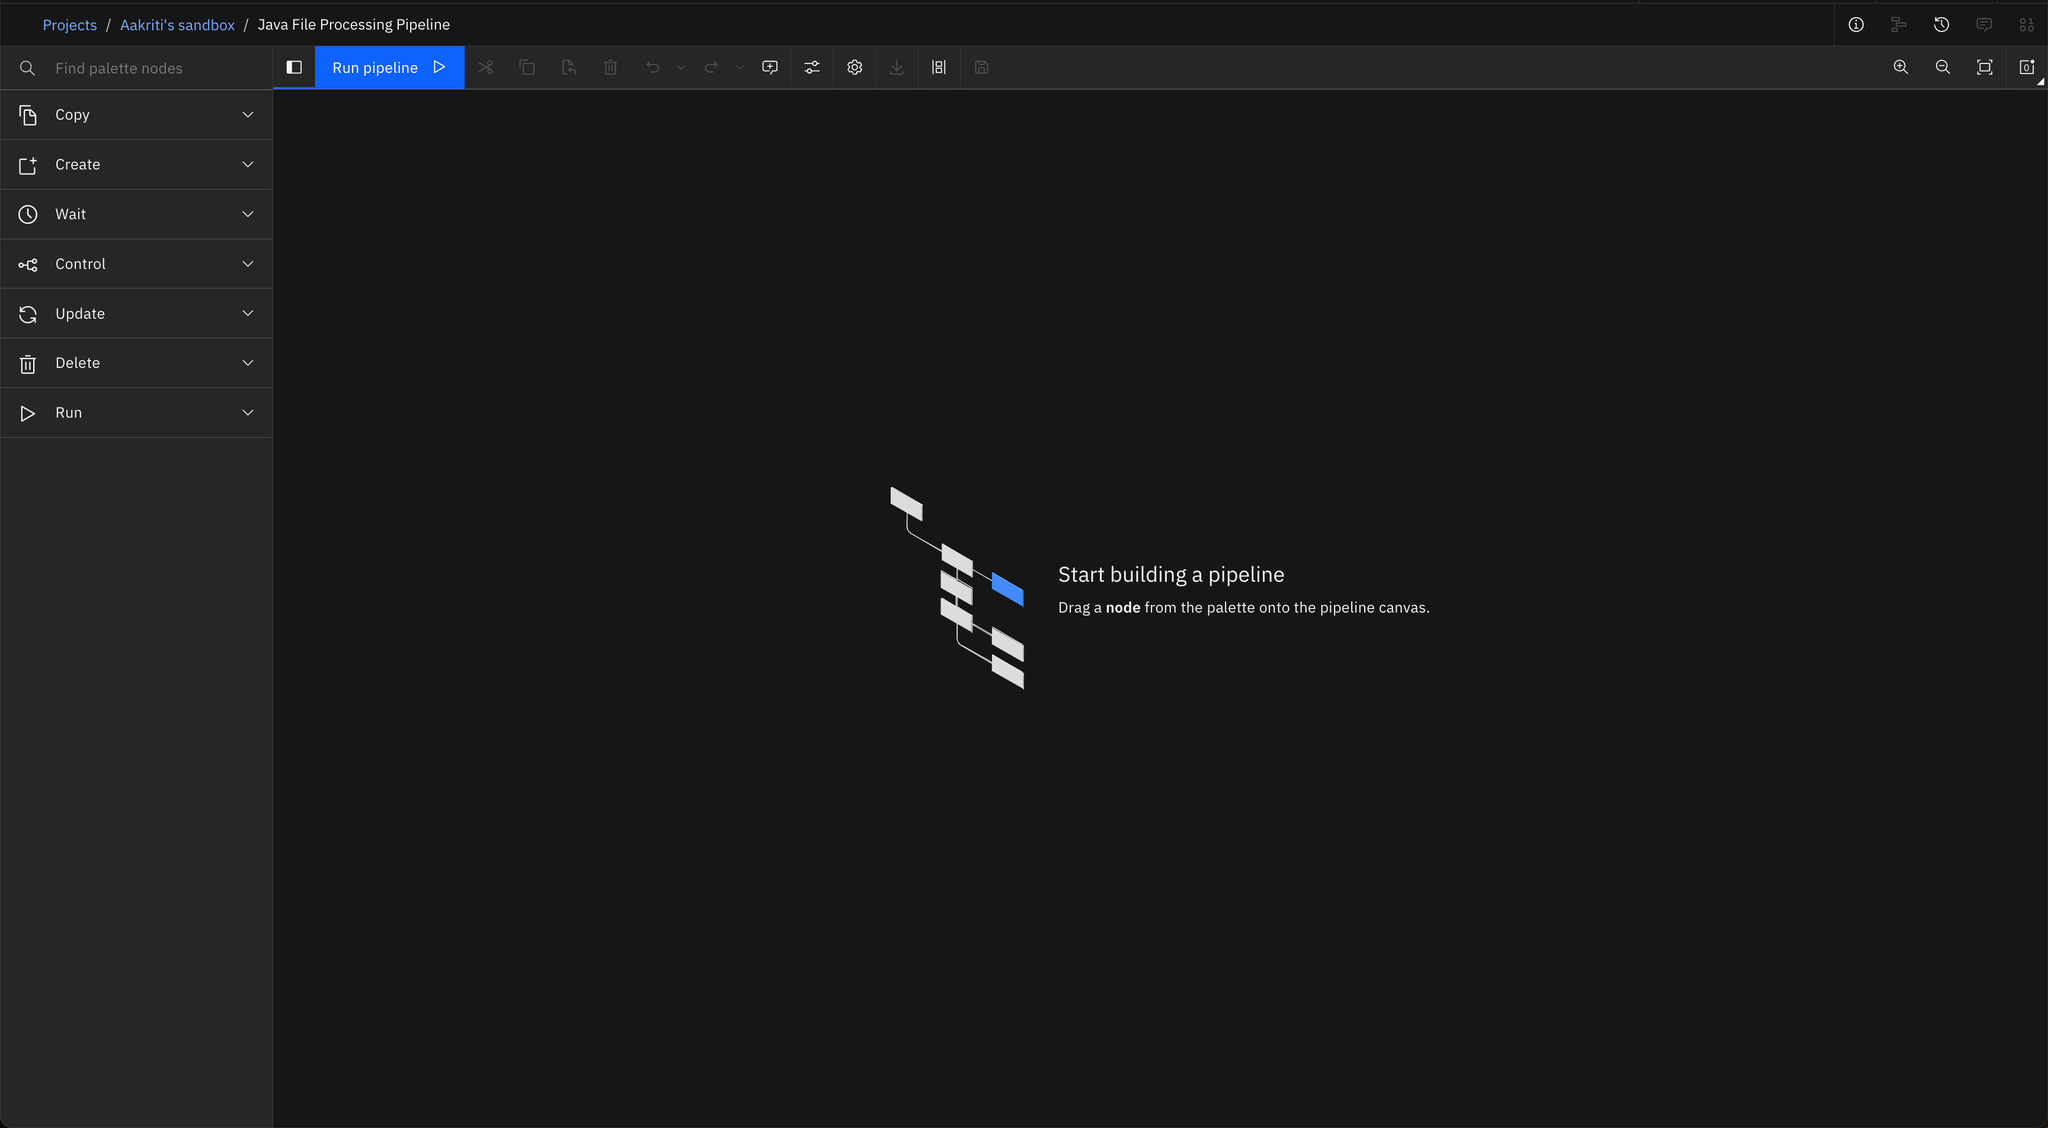
Use the drag-and-drop interface to connect the notebook jobs either sequentially or in parallel, depending on your workflow.
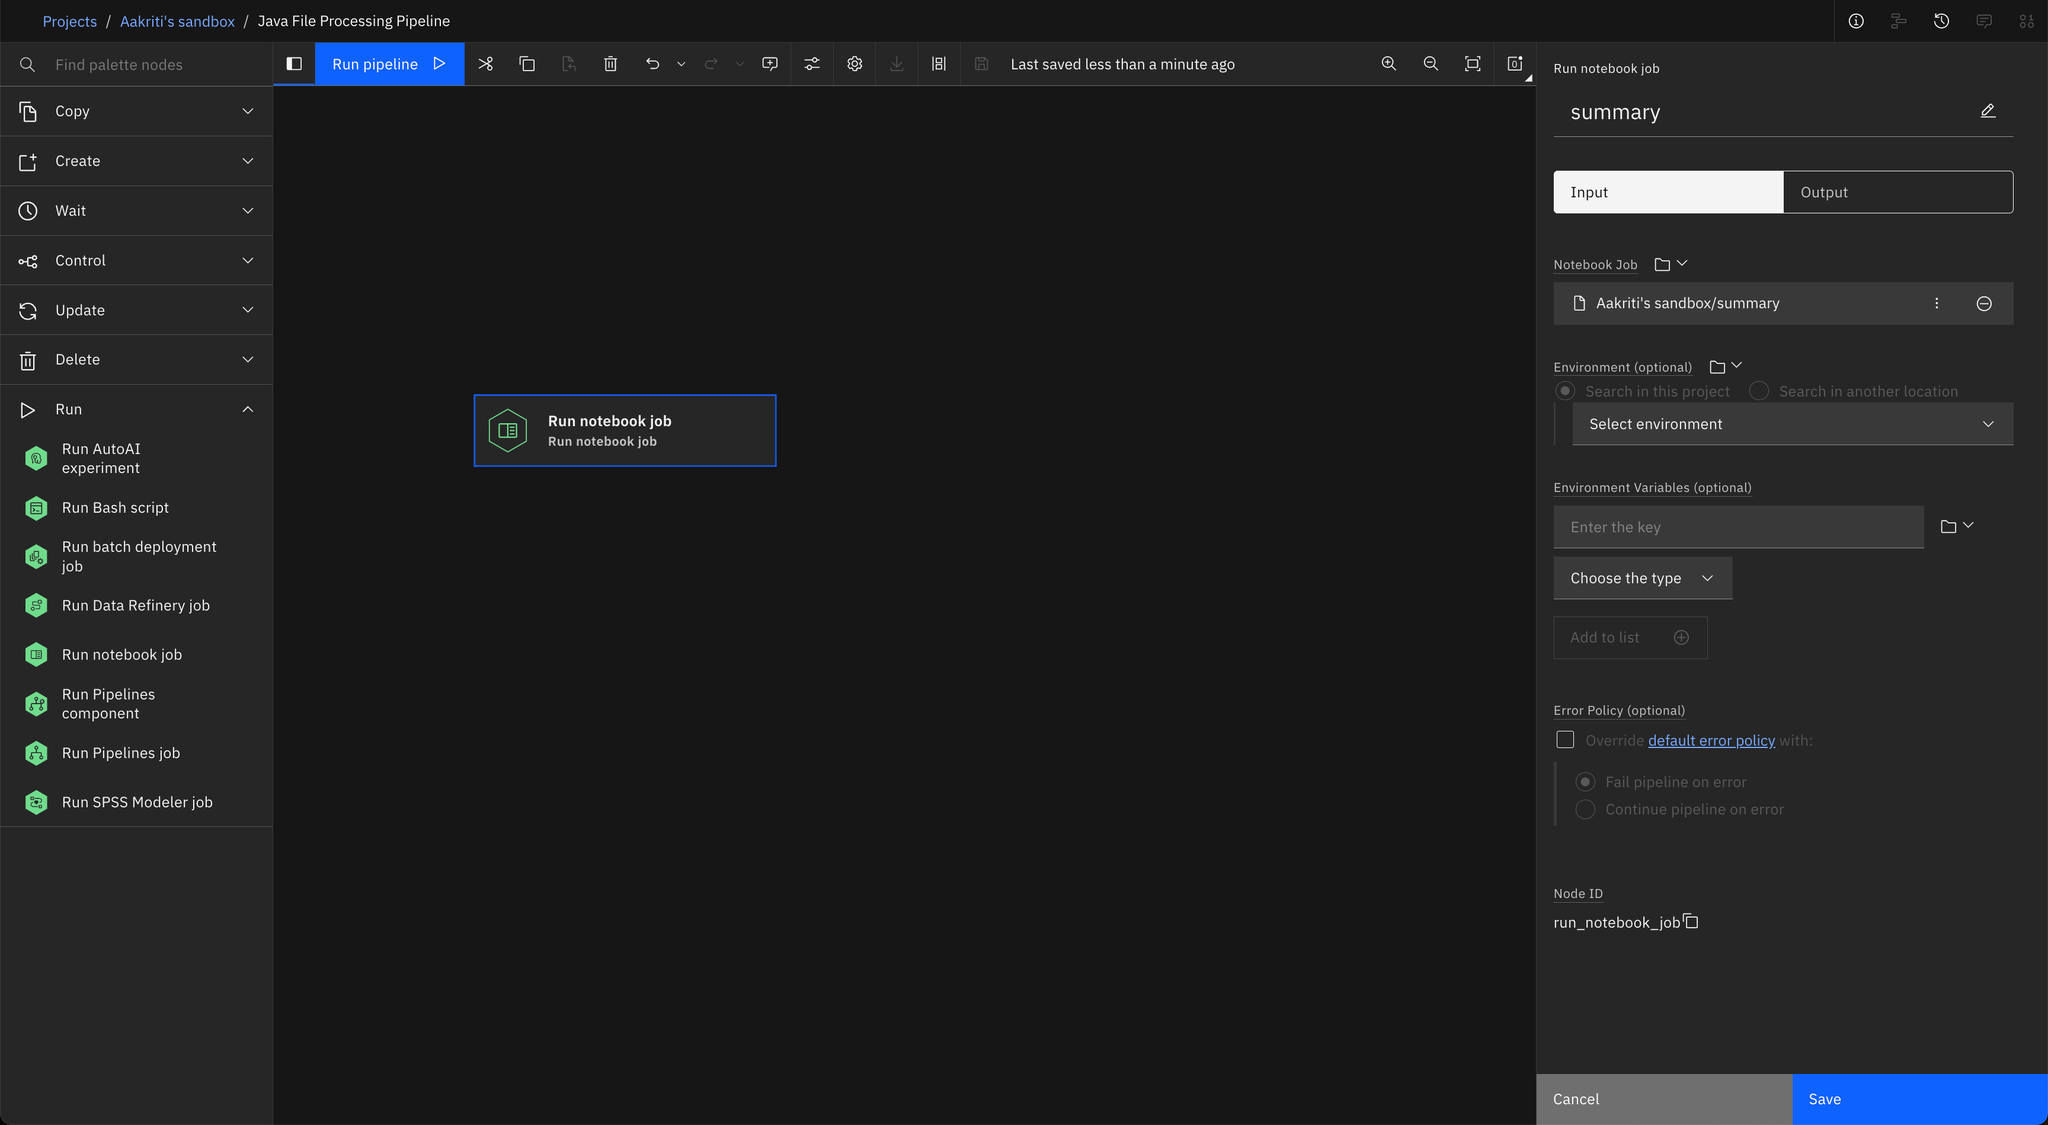
In the pipeline editor, add the following notebook jobs as nodes:
- read_java (fetches Java files from COS)
- javadoc (generates documentation)
- summary (summarizes content)
merge (merges all results)
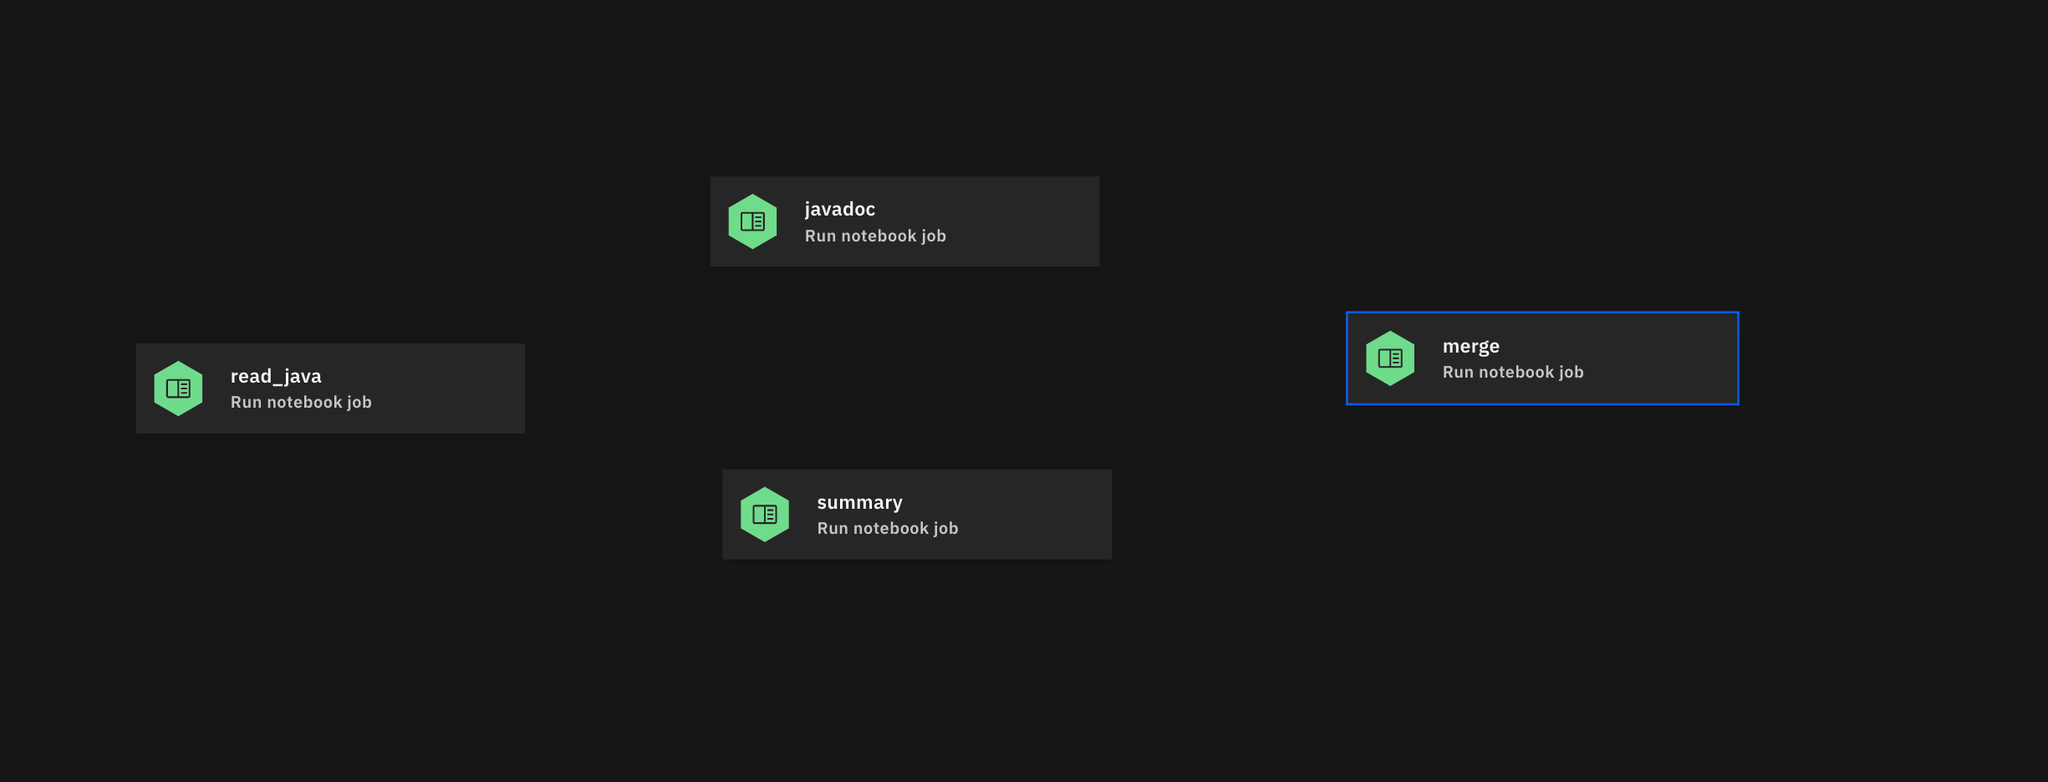
To ensure that the output of read_java is connected to the inputs of both javadoc and summary, modify the workflow accordingly. Additionally, specify configuration details such as the API key and file name.
Step 8. Adding synchronization points
To synchronize parallel jobs, add a Wait for All Results node. This ensures the pipeline does not proceed until both parallel tasks (e.g., javadoc and summary) are completed.

Only after these jobs finish can the next task, such as merging the results, begin.
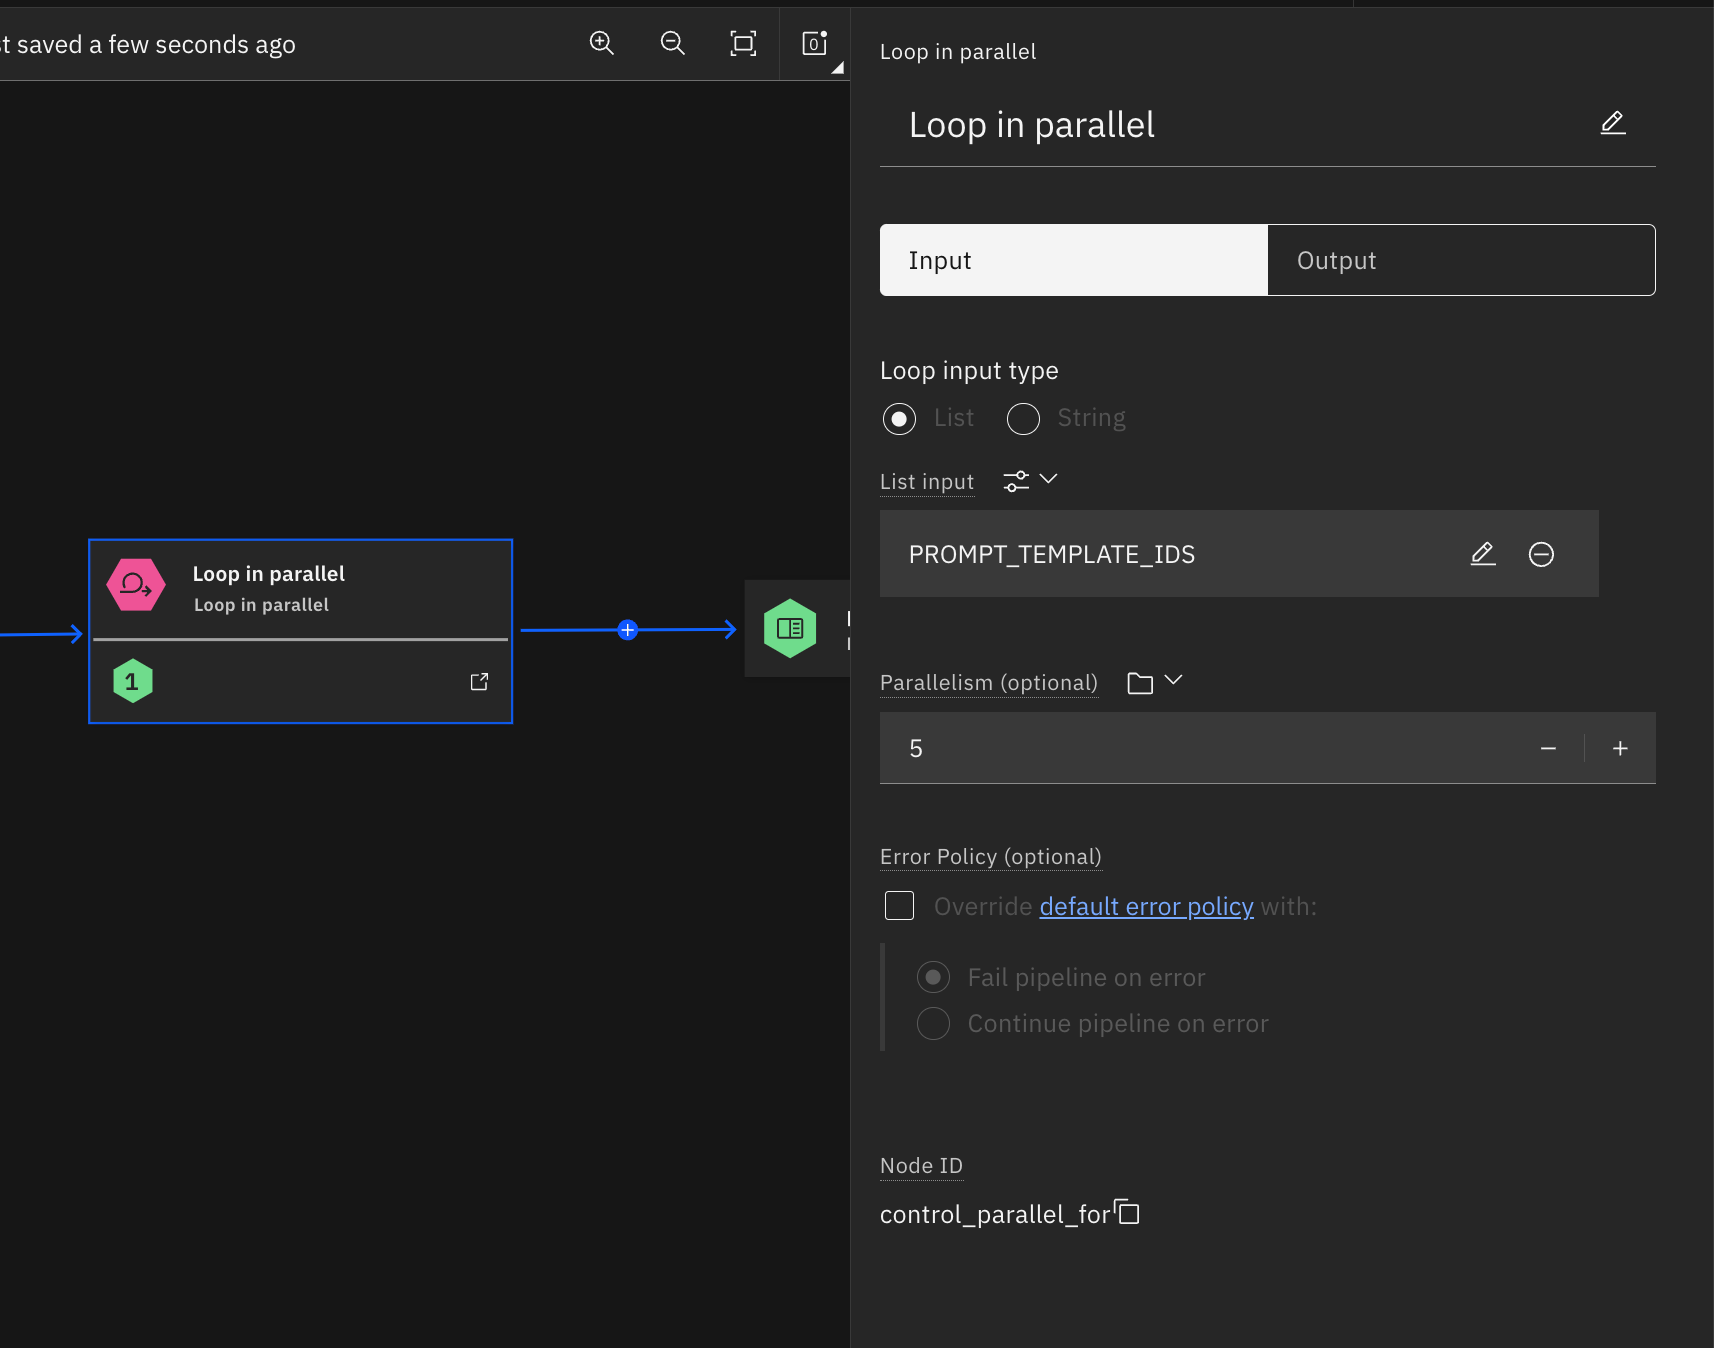
Step 9. Configuring parallelism
In the pipeline editor, select
Loop in Parallelfrom the control options.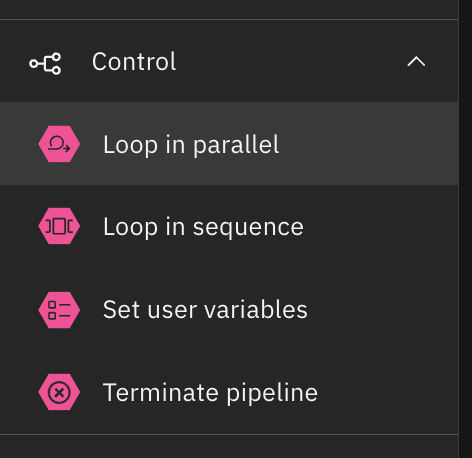
Configure the parallelism setting to process multiple files simultaneously, such as handling 5 files at once, for more efficient execution.
Step 10. Scheduling and running the Pipeline
Configure the pipeline to run automatically based on triggers, such as new files in Cloud Object Storage (COS), or at defined intervals.
Click
Run Pipelineand use Watson Studio’s built-in monitoring tools to track execution.Review logs and status updates for each node to ensure everything runs smoothly.
Benefits of using the approach for implementing the pipeline
Implementing the pipeline outlined in this tutorial offers several advantages that align with the goals of efficient, scalable, and automated processing of large data sets, such as Java files:
Parallel processing: The pipeline significantly reduces execution time by enabling simultaneous processing of large volumes of data. In the example, Java files are analyzed in parallel for code summarization and Javadoc generation, ensuring faster completion.
Scalability: Easily scale to handle larger datasets or more complex workflows. As your project grows, the pipeline can manage increased volumes of data without requiring major adjustments.
Flexibility: Customize the pipeline’s organization based on your specific project requirements. You can add, remove, or modify tasks to suit the type of data or process being managed.
Reproducibility: With well-documented and versioned steps, this approach ensures that workflows can be easily repeated or shared. This helps maintain consistency in processing and enables collaboration across teams.
Seamless Cloud integration: The pipeline integrates smoothly with IBM Cloud Object Storage (COS), providing efficient data storage, retrieval, and management, making it ideal for cloud-based workflows.
Automation and efficiency: Automating tasks like file fetching, summarization, and merging allows teams to focus on higher-level insights and innovation rather than manual processes. This maximizes productivity and reduces human error.
Performance optimization and best practices
To enhance the performance of your Watson Studio pipelines, follow these best practices:
Efficient data handling: Use optimized data formats (e.g., Parquet or CSV) to minimize I/O overhead. Implement data partitioning strategies for large datasets to enable faster processing and parallelism.
Resource allocation: Adjust compute resources (CPU, memory) based on the specific needs of each job. Use auto-scaling features to dynamically allocate resources and improve cost-efficiency.
Caching and intermediate results: Cache frequently used data or intermediate results to avoid redundant computation. Use Watson Studio's built-in caching options where applicable to improve execution speed.
Optimizing parallel execution: Balance the number of parallel jobs with the available system resources to prevent overload and ensure efficient execution. group similar tasks together to minimize the overhead from repeated job initialization and scheduling.
Monitoring and logging: Implement detailed logging for better troubleshooting, performance tracking, and optimization. Use Watson Studio's monitoring tools to track the performance of each pipeline, identify bottlenecks, and make adjustments to optimize execution.
Summary and next steps
In this tutorial, you explored how to leverage Watson Studio’s Orchestration Pipelines to streamline and automate your data and machine learning workflows. By utilizing the power of parallel processing and integration with IBM Cloud Object Storage, you can create scalable, efficient, and flexible workflows tailored to your specific project needs.
You learned how to set up and configure both Watson Studio and IBM Cloud Object Storage for optimal machine learning operations. You also developed and deployed customizable prompt templates to guide data processing and model training. By designing automated pipelines to run parallel notebook jobs, you ensured faster and more scalable AI processing. Additionally, you gained the skills to schedule and monitor your machine learning workflows for continuous execution and learned best practices for optimizing performance in large-scale deployments.
By mastering these tools, you are well-equipped to tackle complex data challenges and automate repetitive tasks, allowing you to focus on critical areas such as model optimization, feature engineering, and generating insights. As data complexity and volume grow, your proficiency in Watson Studio pipelines will be invaluable for maintaining a competitive edge in the AI-driven landscape.
For more detailed information and additional tutorials, refer to the following documentation: