About cookies on this site Our websites require some cookies to function properly (required). In addition, other cookies may be used with your consent to analyze site usage, improve the user experience and for advertising. For more information, please review your options. By visiting our website, you agree to our processing of information as described in IBM’sprivacy statement. To provide a smooth navigation, your cookie preferences will be shared across the IBM web domains listed here.
Tutorial
Integrate watsonx Orchestrate AI agents into a custom UI
A hands-on guide to integrating headless AI agents built in watsonx Orchestrate into a custom user interface
On this page
IBM watsonx Orchestrate is an AI platform that helps you create, deploy, and manage autonomous agents to automate business processes. It offers a single platform for both developers and business users to quickly build agents. You can create no-code agents in an easy-to-use interface and view the results instantly. To learn more about watsonx Orchestrate and why developers use it, see Get to know watsonx Orchestrate on IBM Developer.
Many organizations have already built chatbots, AI assistants, or conversational UIs with frameworks such as React or Vue. As the market evolves, agentic capabilities need to be added without replacing the existing front-end.
In this tutorial, learn how to integrate no-code or low-code AI agents that are built on IBM watsonx Orchestrate into any custom user interface.
Architecture of integrating AI agents into a custom UI
This following figure explains how a user request in a custom chat interface is processed end-to-end, from the front-end UI to watsonx Orchestrate agents.
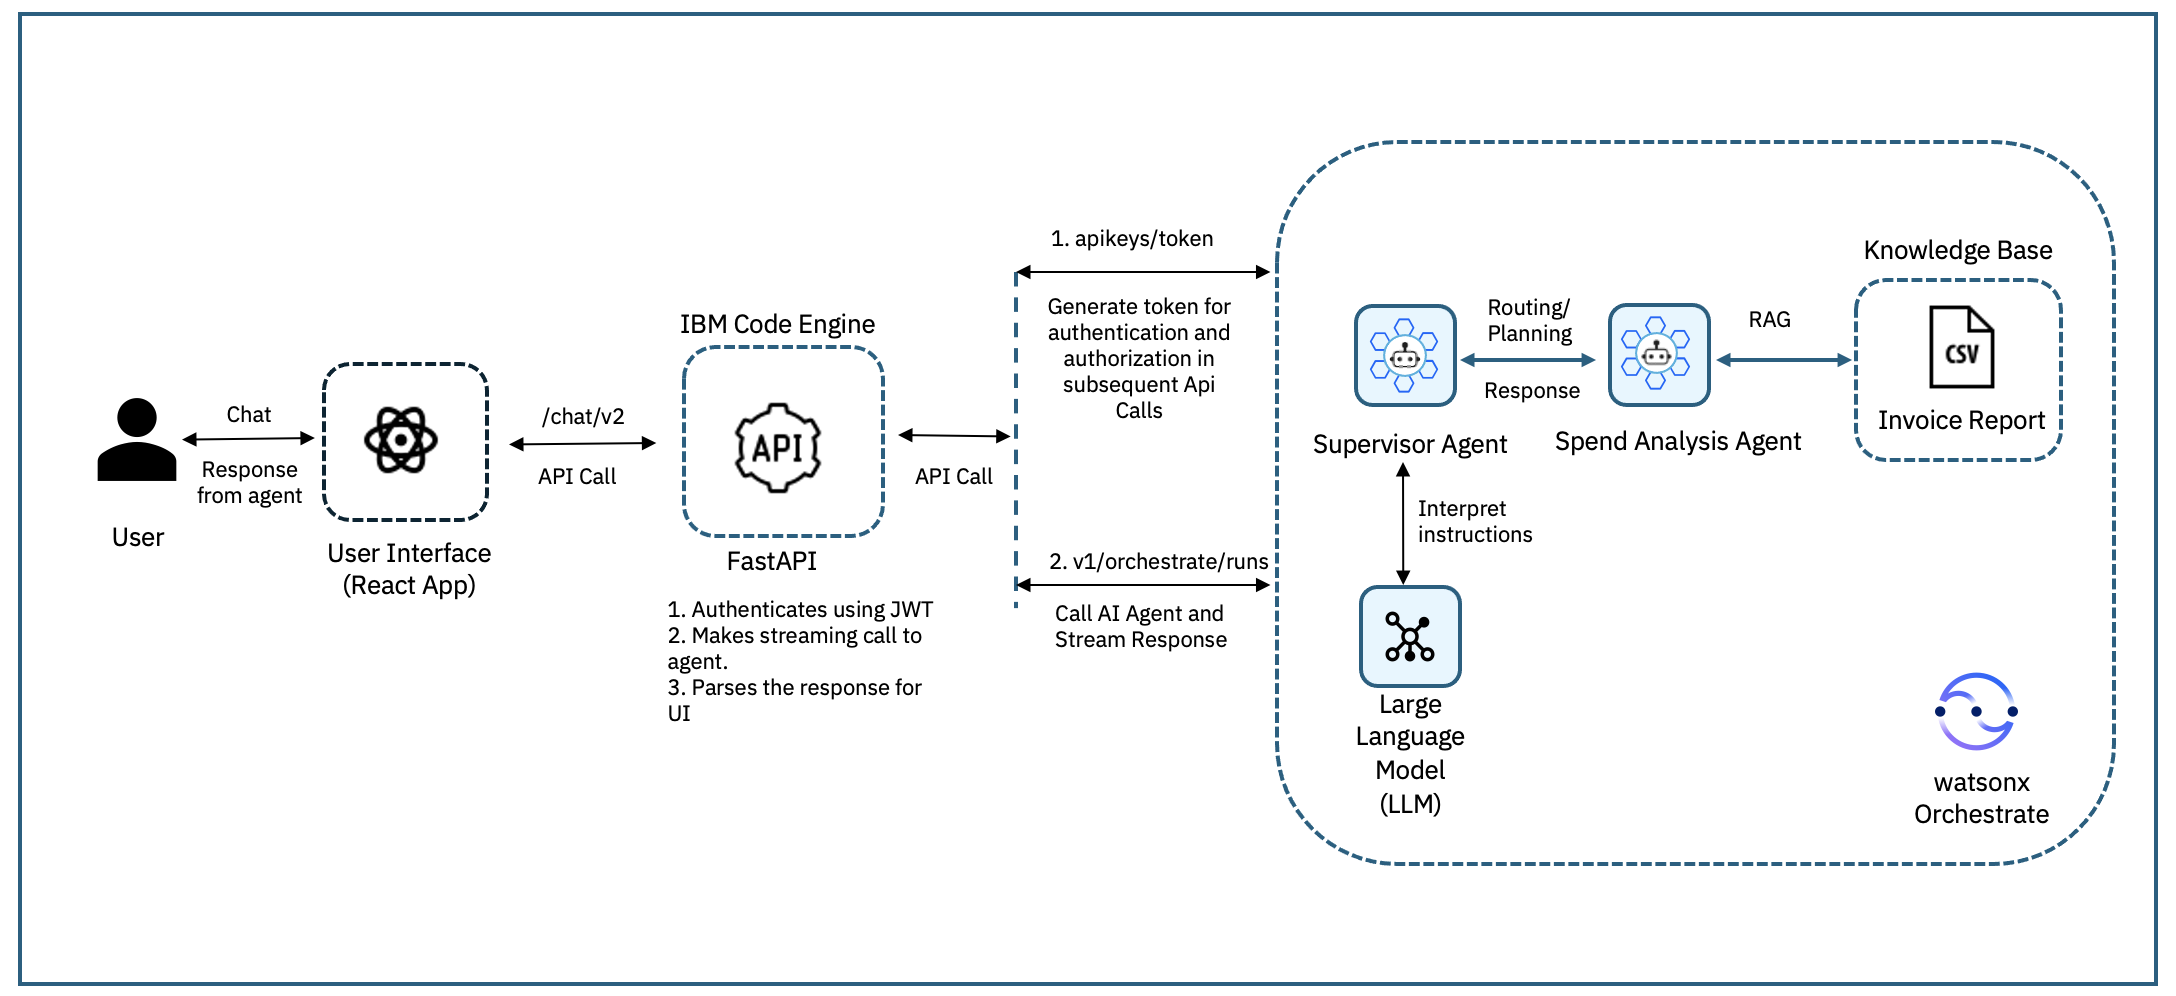
The flow is as follows:
- A user sends a chat message through a React-based interface to request invoice analysis.
- FastAPI, which acts as a wrapper, forwards the request to the watsonx Orchestrate Supervisor Agent.
- The Supervisor Agent interprets the request by using an LLM (llama-3.2-90B-Vision-Instruct from Meta) and routes it to the Spend Analysis Agent or the agent that you want to integrate.
- The Spend Analysis Agent or the agent that you want to integrate, retrieves data, processes it, and sends the response back through the Supervisor Agent.
- FastAPI formats the findings into a structured response, which is displayed in the custom chat interface.
Prerequisites
- An AI agent that is built and deployed in IBM watsonx Orchestrate. For detailed instructions, see Develop agents with no-code by using watsonx Orchestrate.
- A custom user interface built with React. Download the sample application from the GitHub repository. It includes back-end and front-end code that is used in the tutorial.
- A REST client such as Postman or curl to test the APIs.
- An IBM Cloud account. You can also sign up for a trial account.
Steps
- Understand and validate AI Agent APIs
- Build a FastAPI wrapper
- Deploy the FastAPI in IBM Code Engine
- Integrate the APIs into a custom user interface
Step 1. Understand and validate AI Agent APIs
The React front-end code works as a conversational interface. User instructions are sent to the AI agent in watsonx Orchestrate for processing. The agent identifies the intent, acts, and sends the response back to the front-end through APIs. In this step, explore the APIs needed to connect the AI agent with the interface.
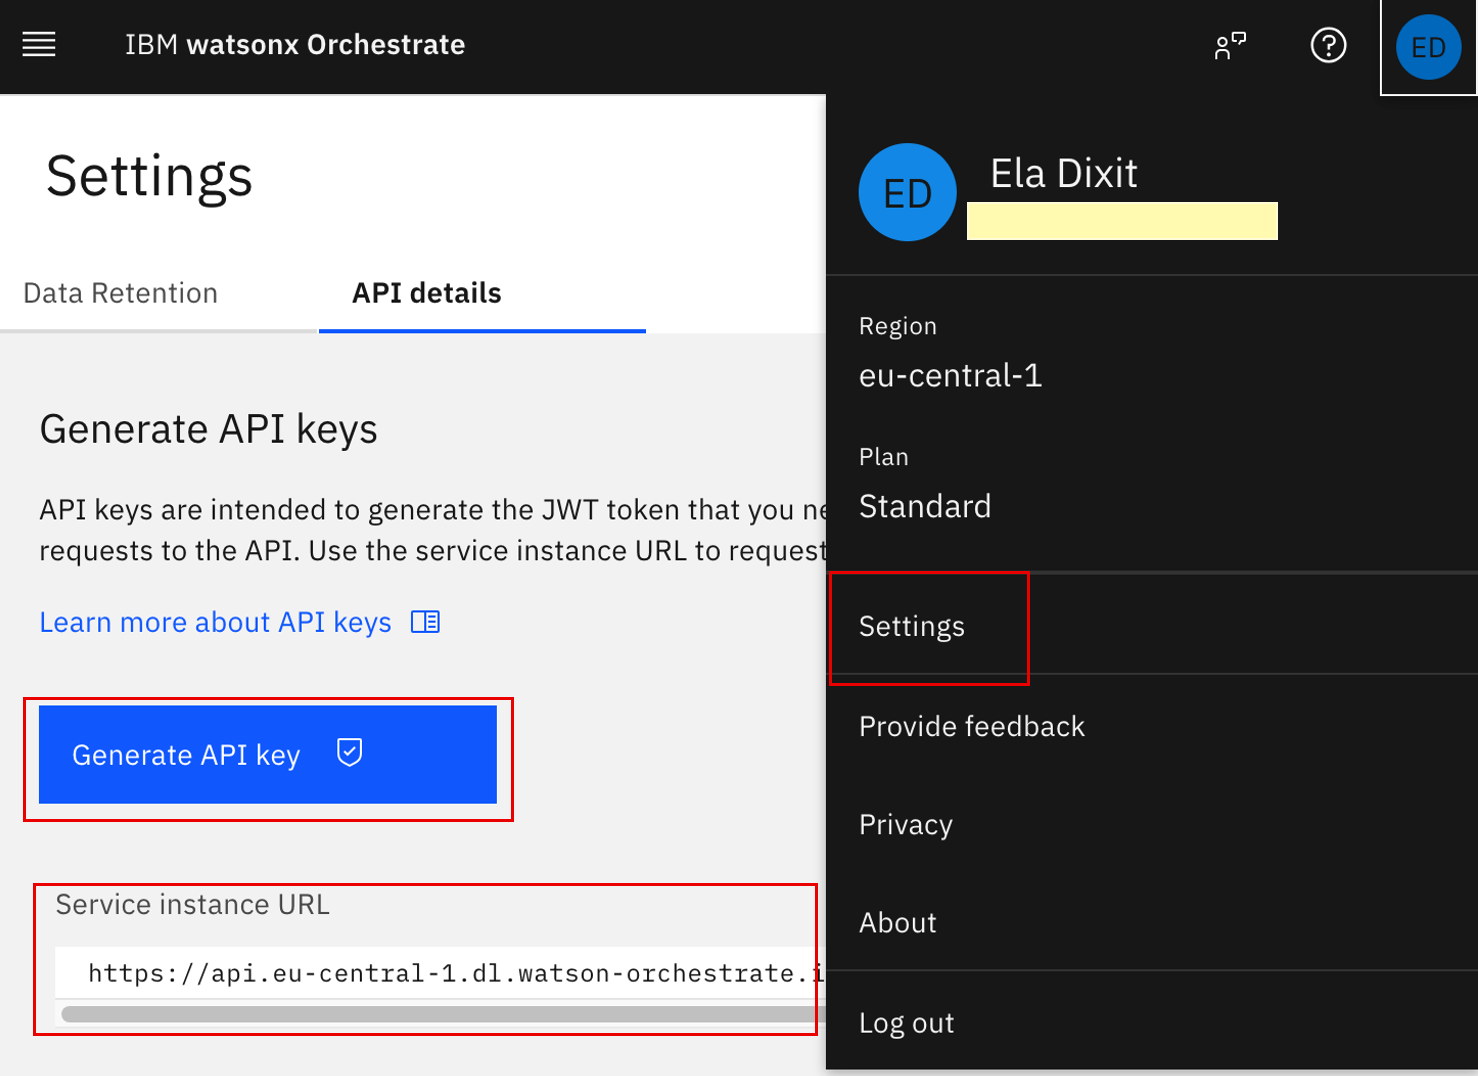
Generate token: Start by authenticating with an API key. This returns a bearer token that you must include in all API calls.
- Log in to your watsonx Orchestrate instance.
- Go to Profile → Settings → API Details.
- Click Generate API Key.
Copy the Service Instance URL and the API key. You will use them in the next steps.
Sample instance URL (referred to as YOUR_INSTANCE_URL):
https://api.eu-central-1.dl.watson-orchestrate.ibm.com/instances/20250508-1435-1457-50e0-b8f069e11f66Use the following command to generate a token:
curl --location 'https://iam.platform.saas.ibm.com/siusermgr/api/1.0/apikeys/token' \
 --header 'accept: application/json' \
 --header 'content-type: application/json' \
 --data '{"apikey": "YOUR_API_KEY"}'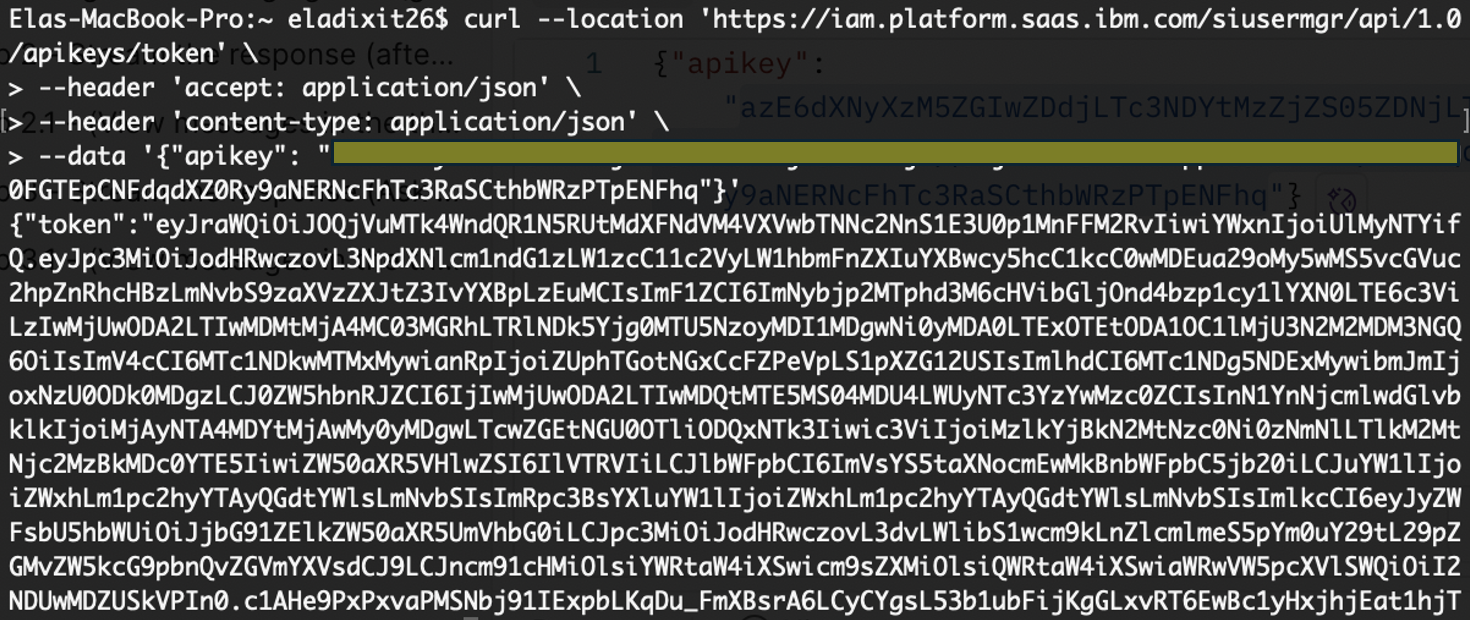
Note: If you are using a watsonx Orchestrate instance on IBM Cloud, run the following command to generate the token:
curl -X POST \
 "https://iam.cloud.ibm.com/identity/token" \
 --header "Content-Type: application/x-www-form-urlencoded" \
 --header "Accept: application/json" \
 --data 'grant_type=urn:ibm:params:oauth:grant-type:apikey&apikey=<YOUR_API_KEY>'
Get the AI Agent ID: Multiple agents are deployed in the IBM watsonx Orchestrate platform. Each agent in watsonx Orchestrate has a unique
agent_id. To find it, list all agents in your instance.For this tutorial, look for the ID that matches the Spend Analysis Agent or the agent that you want to integrate.
curl --location 'YOUR_INSTANCE_URL/v1/orchestrate/agents' \
 --header 'Authorization: Bearer <REDACTED_TOKEN>' \
 --header 'Accept: application/json'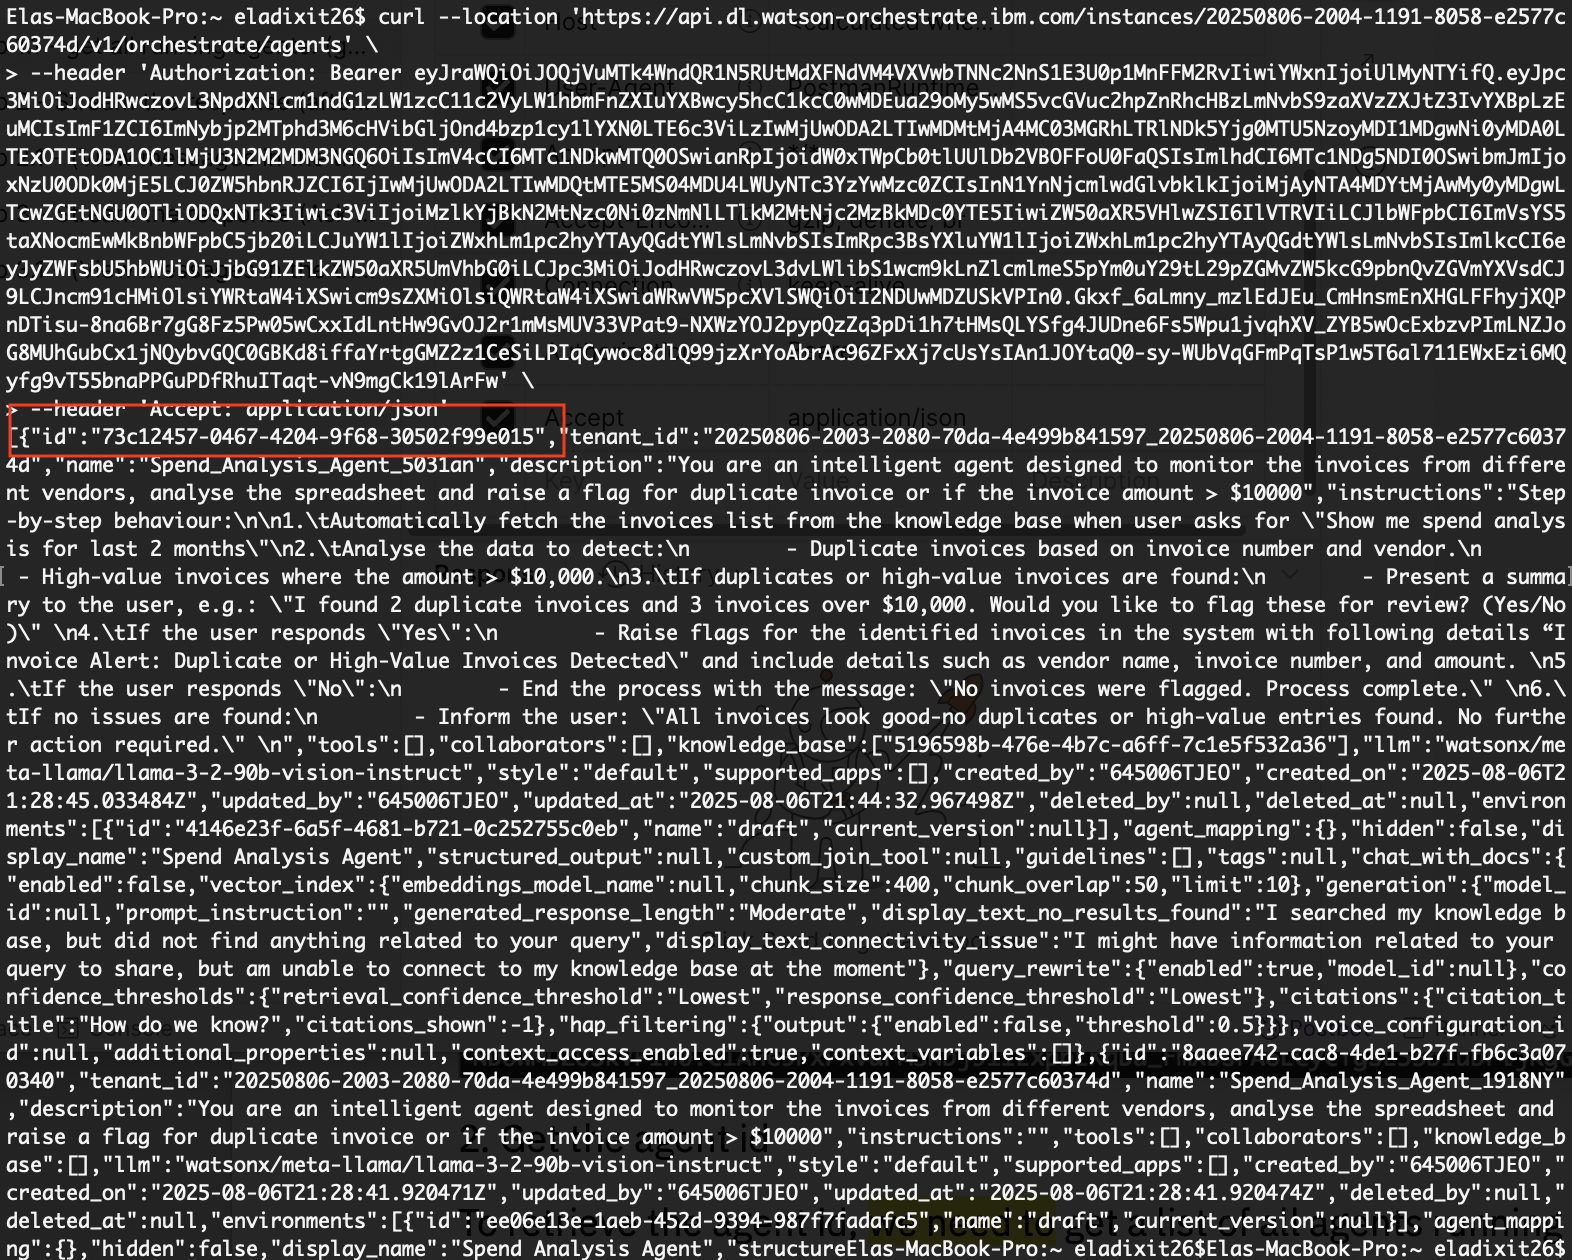
Send a message to the agent: Use this API to start or continue a conversation with the AI agent. Call it each time the user enters a message.
- On the first
/runscall, keep thethread_idblank. On follow-up calls, include the
thread_idfrom the response to keep the conversation in the same session.curl --location 'YOUR_INSTANCE_URL/v1/orchestrate/runs?stream=true&stream_timeout=120000&multiple_content=true' \ --header 'Authorization: Bearer <REDACTED_TOKEN>' \ --header 'IAM-API_KEY: <REDACTED_API_KEY>' \ --header 'accept: application/json' \ --header 'Content-Type: application/json' \ --data '{ "message": { "role": "user", "content": "show duplicate invoices" }, "agent_id": "73c12457-0467-4204-9f68-30502f99e015", "thread_id": "f56c36f5-480a-4ff7-ad91-860787acc786" }'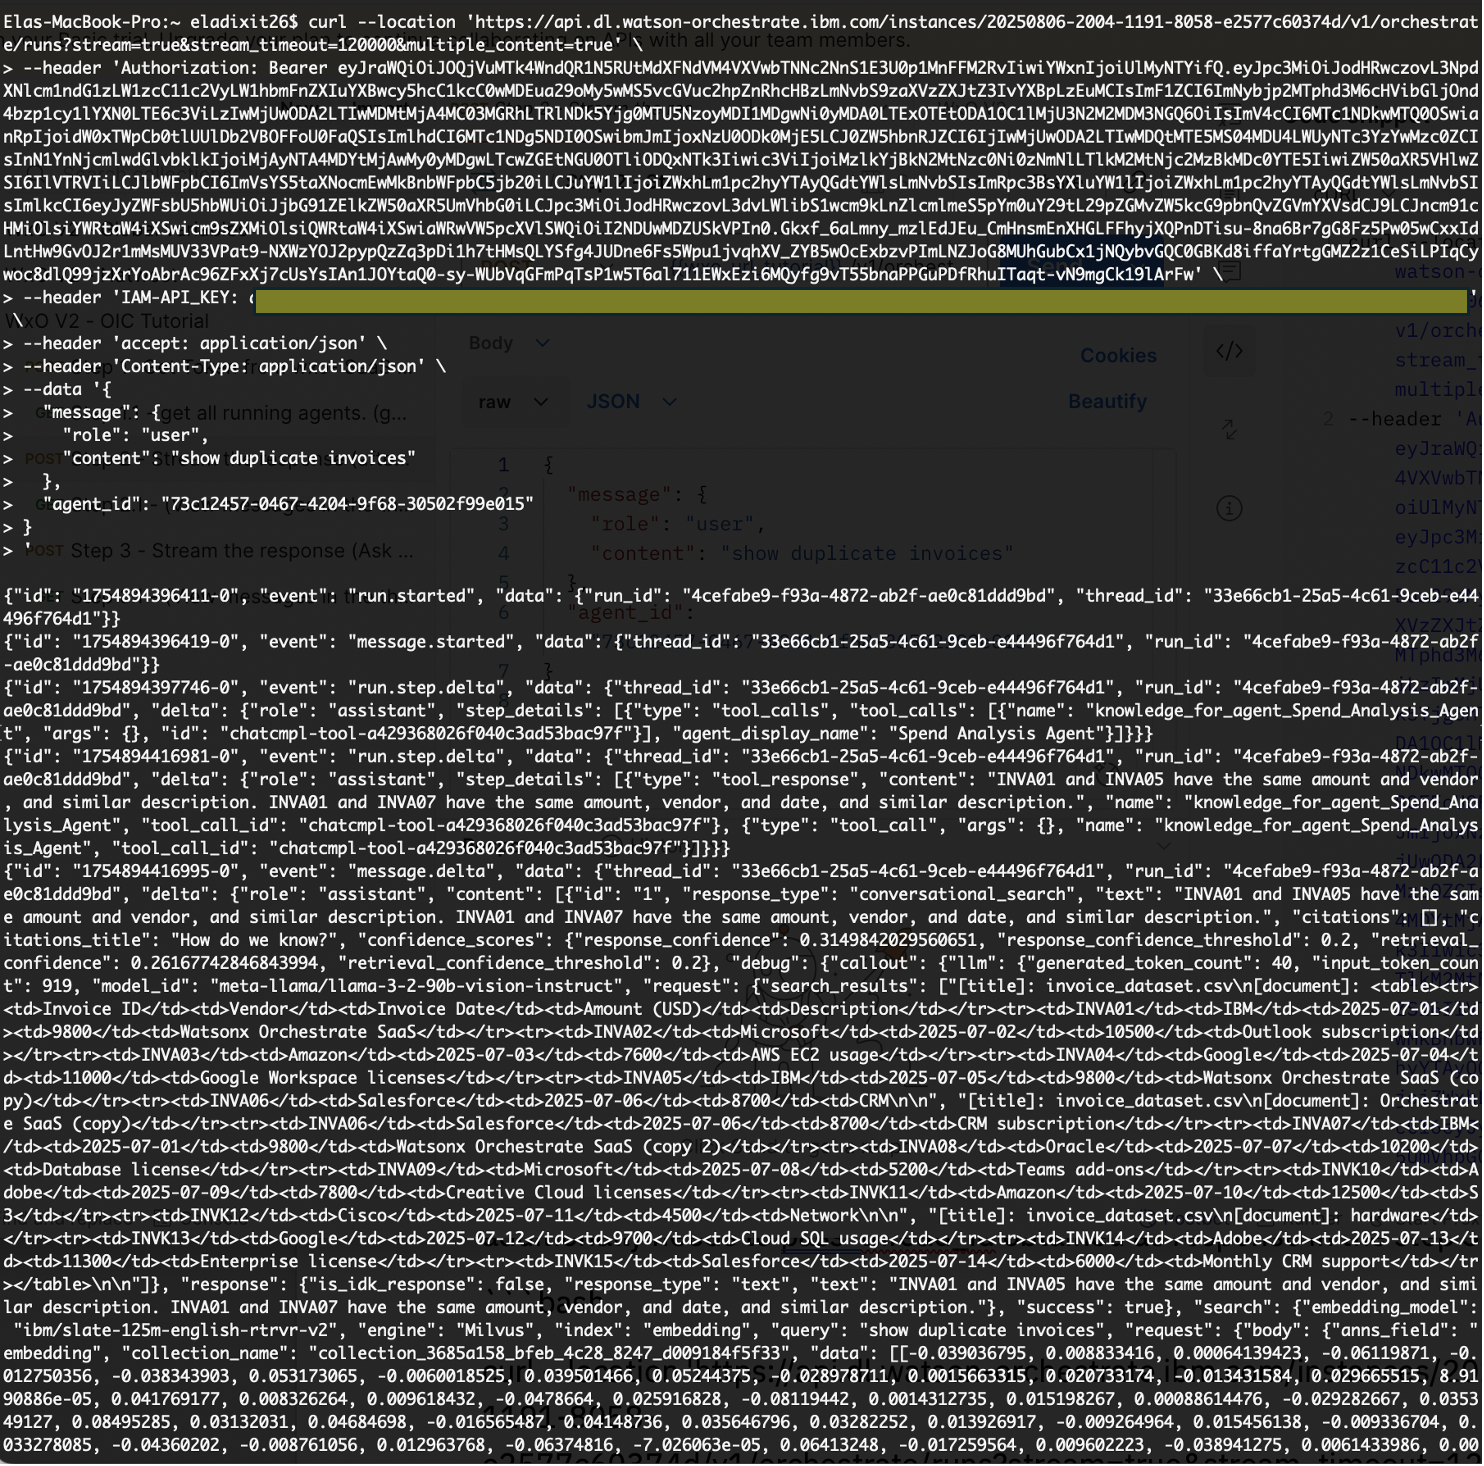
You now know how to generate a token, call the APIs, send a message to the agent, and display the response on the chat interface.
- On the first
Step 2. Build a FastAPI wrapper
In this step, create a FastAPI service that wraps the watsonx Orchestrate APIs. The service provides a single REST endpoint /chat/v2 to post questions and keeps the user interface separate from server-side processing.
Next, deploy the FastAPI service on IBM Code Engine, which standardizes the API contracts and runs in a fully managed, serverless environment with built-in scalability and efficiency.
Clone the FastAPI service to your local system:
git clone https://github.com/IBM/oic-i-agentic-ai-tutorials/tree/main/i-oic-integrate-headless-ai-agent/backend_codeOpen the code in VS Code. The service (api/main.py) is built with Python, but you can use Node.js or any framework of your choice.
Change the current directory to where the Dockerfile is located:
cd oic-i-agentic-ai-tutorials/i-oic-integrate-headless-ai-agent/backend_codeRename env.sample to .env in the backend_code folder and update the values:
YOUR_INSTANCE_URL=your_instance_url API_KEY=your_api_key CLOUD_API_KEY=your_ibm_cloud_api_keyInstall the required dependencies:
pip install -r requirements.txtRun the app with Uvicorn. The entry file is main.py in the api folder:
uvicorn api.main:app --reload --port 8080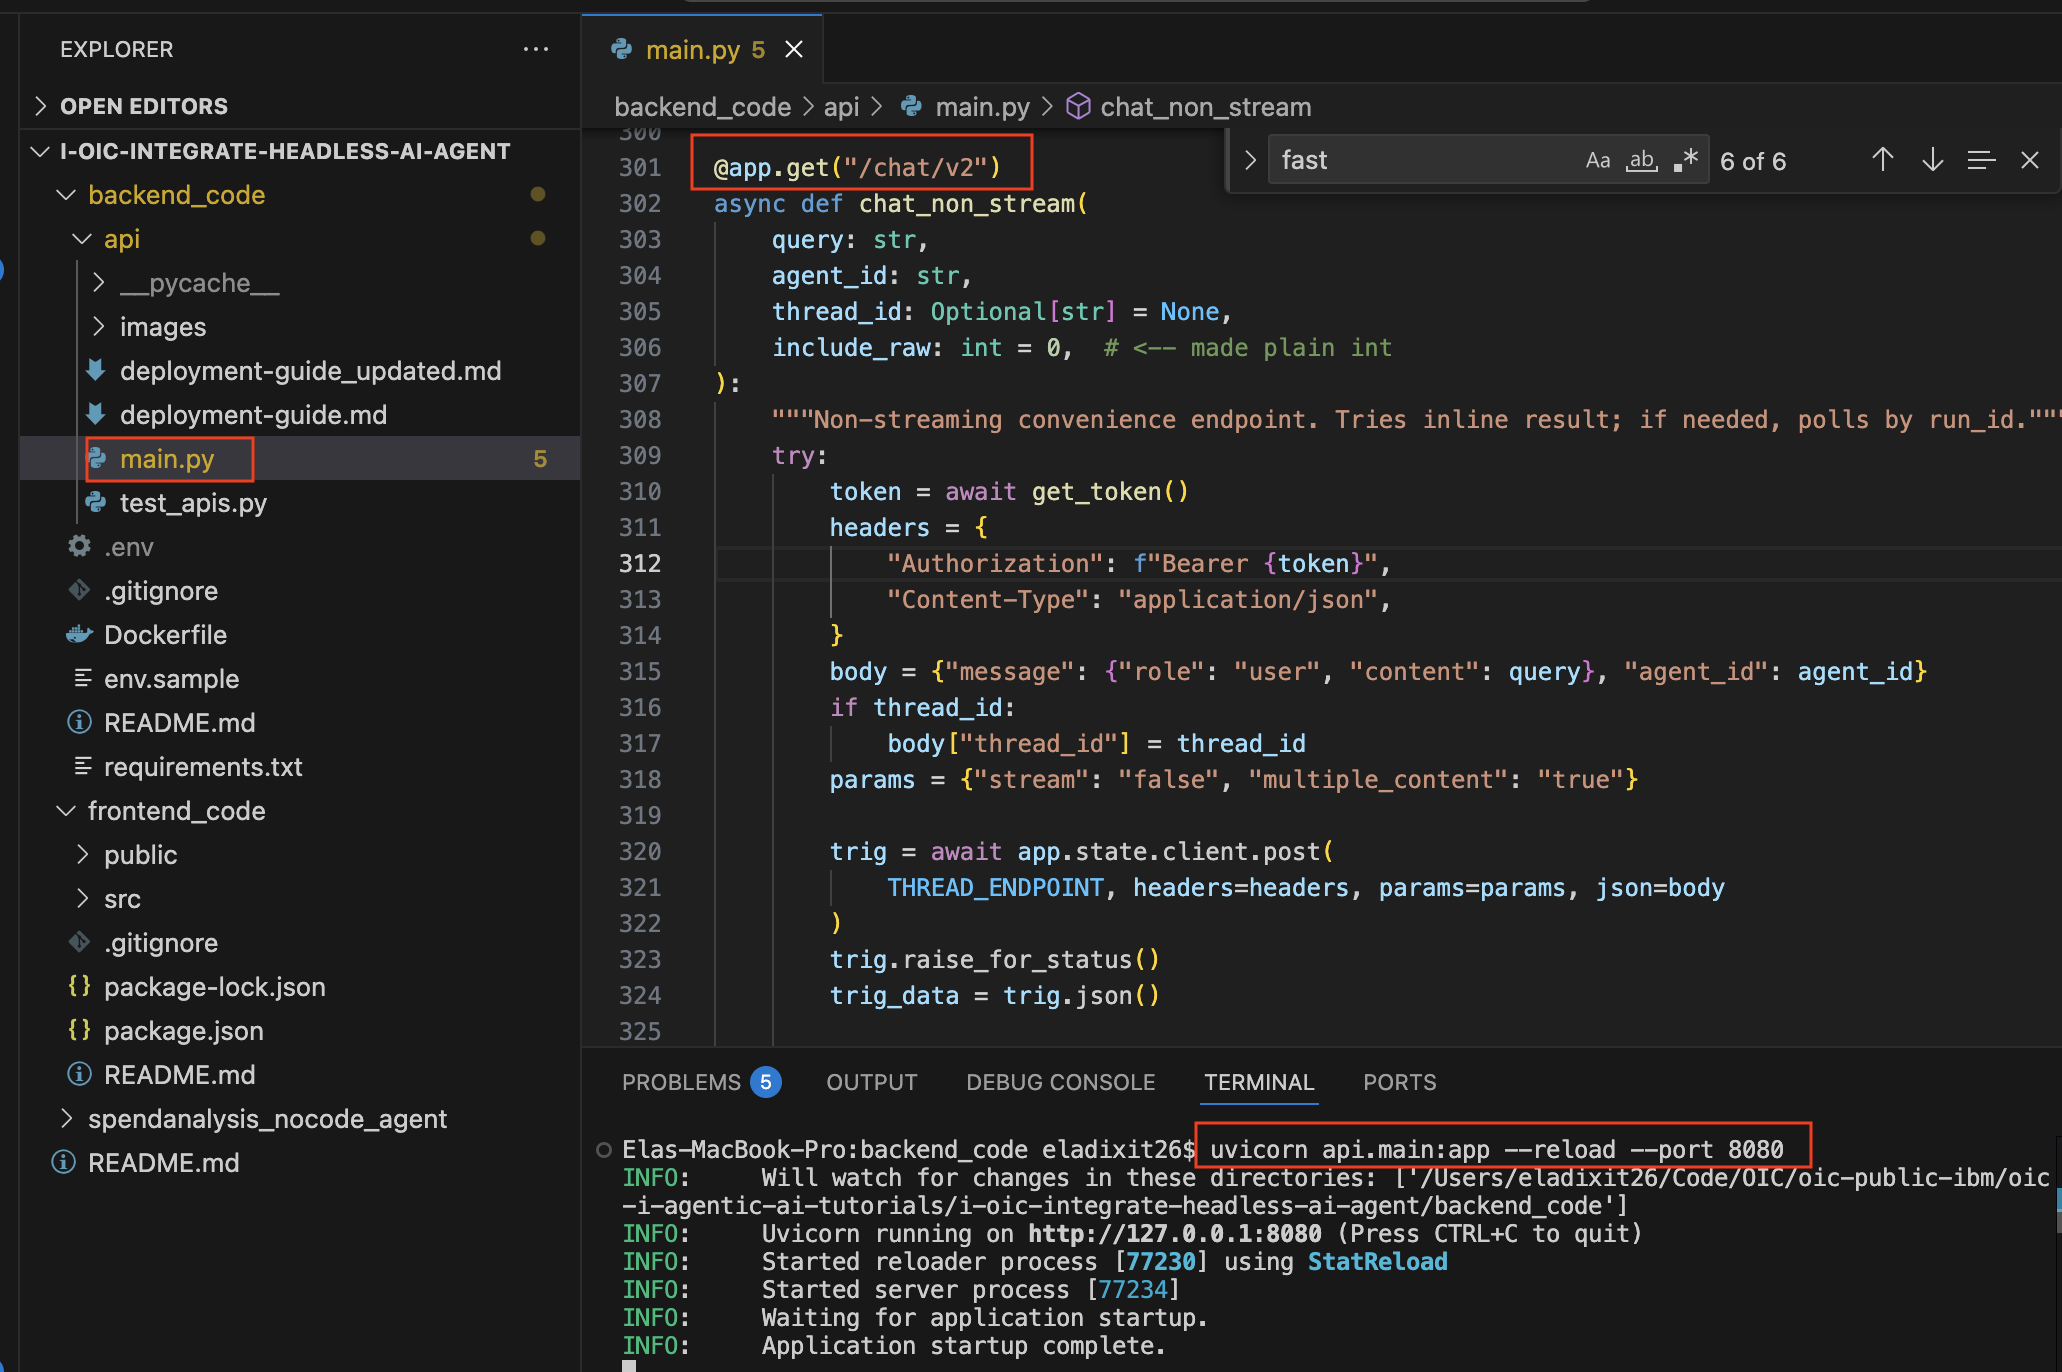
FastAPI is now running locally at
http://localhost:8080/docs.
Step 3. Deploy the FastAPI in IBM Code Engine
In this step, deploy the FastAPI wrapper to IBM Code Engine. Refer to the IBM Code Engine documentation for more details.
- Follow the deployment guide to deploy the containerized app in IBM Code Engine.
Once deployed, the application looks like the following screen. Click Open URL to access it:
https://application-d4.1ucys990xy44.us-south.codeengine.appdomain.cloud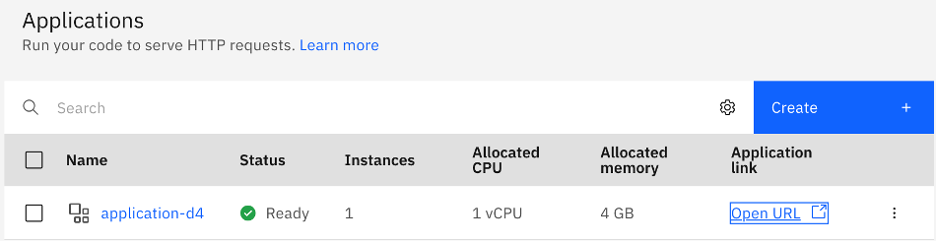
The deployed API provides a link that shows the following screen:
https://application-d4.1ucys990xy44.us-south.codeengine.appdomain.cloud/docs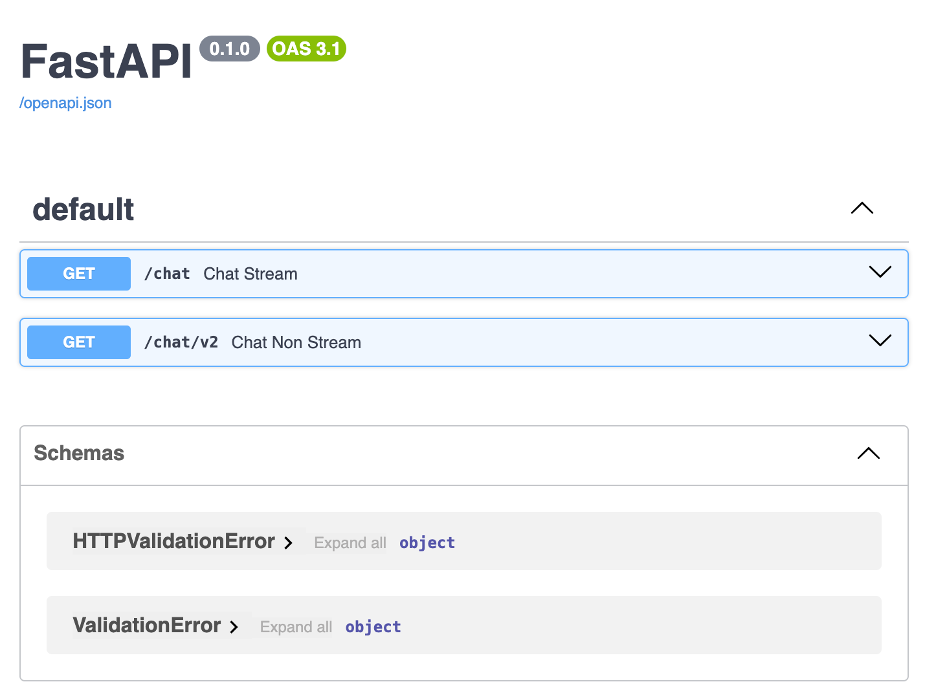
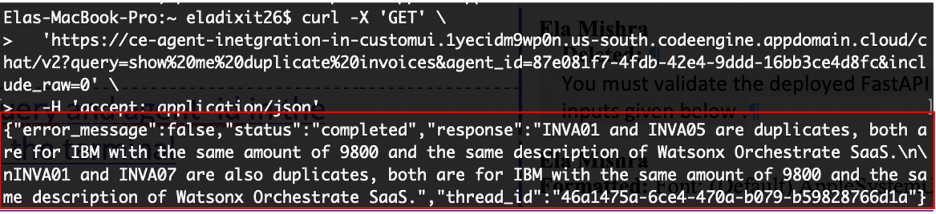
You can test the API from the FastAPI docs screen by entering a
queryandagent_idin the Try it out section. Alternatively, run the following curl command in your terminal:curl -X GET \ 'https://ce-agent-inetgration-in-customui.1yecidm9wp0n.us-south.codeengine.appdomain.cloud/chat/v2?query=show%20me%20duplicate%20invoices&agent_id=87e081f7-4fdb-42e4-9ddd-16bb3ce4d8fc&include_raw=0' \ -H 'accept: application/json'The API response displays the results of your query.
Step 4. Integrate the APIs into a custom user interface
In this final step, connect the FastAPI wrapper that you built in the previous section and integrate it with a React application. The following example demonstrates how the /chat/v2 endpoint is called from the UI to stream responses from the AI agent deployed in watsonx Orchestrate in real time.
- Download the frontend_code. It contains code for user interface to integrate AI agents. Open it in your preferred code editor such as VSCode.
Open src/App.js and update API_URL and DEFAULT_AGENT_ID, replace it with the updated Code Engine URL and
agent_idthat you retrieved in previous steps.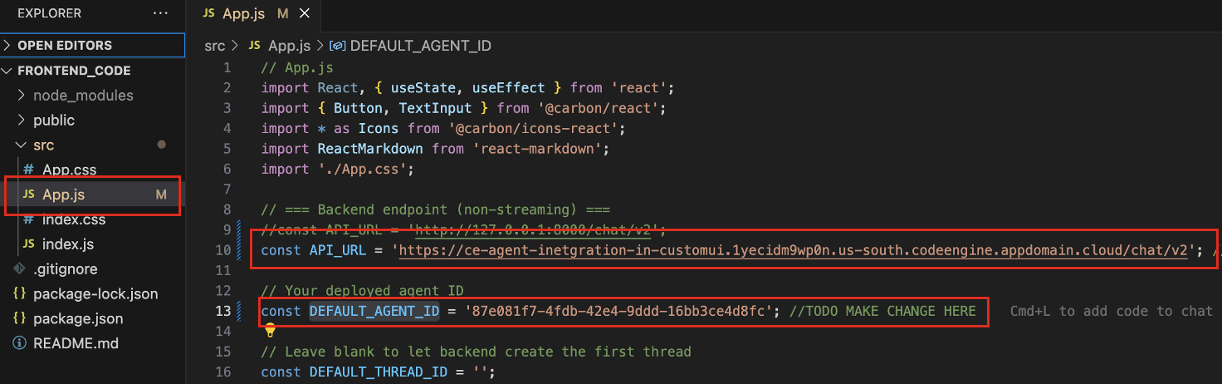
In the terminal, run the following commands to start the frontend_code application:
npm install npm startThe front_end code is now connected to AI agents deployed in watsonx Orchestrate, keeping the front-end (UI) responsive and independent of the back-end logic.
Access the application runs at
http://localhost:3000/. Enter a few queries in the chat screen such as Analyze the earliest invoice and view the responses in the UI.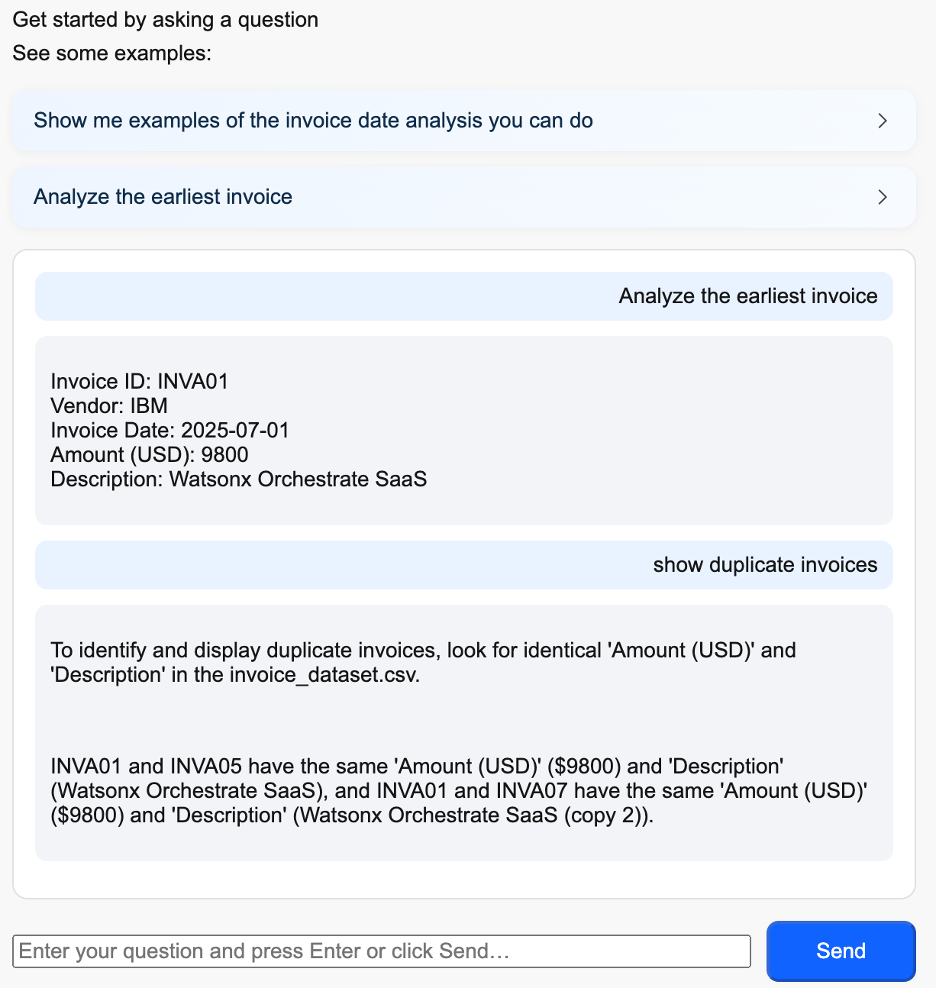
Note: The agent responses stream progressively instead of waiting for the full output.
Summary and next steps
In this tutorial, you learned how to integrate a no-code AI agent built with the watsonx Orchestrate platform into a custom user interface. This shows how you can quickly add agentic capabilities to your applications by using simple API integrations.
IBM watsonx Orchestrate provides a flexible way to build and manage agents with no-code, low-code, or pro-code approaches. It also supports integration with external agents that are built on frameworks such as CrewAI, AutoGen, or LangGraph, making it a powerful platform for modernizing both new and existing applications.
As a next step, think about how agentic AI can help streamline workflows, improve productivity, and bring automation into your organization while still working within your current architecture and tools.
Acknowledgments
This tutorial was produced as part of the IBM Open Innovation Community initiative: Agentic AI (AI for Developers and Ecosystem).
The authors deeply appreciate the support of Moises Dominguez Garcia, Ahmed Azraq, and Bindu Umesh for the guidance and expertise on reviewing and contributing to this tutorial.