About cookies on this site Our websites require some cookies to function properly (required). In addition, other cookies may be used with your consent to analyze site usage, improve the user experience and for advertising. For more information, please review your options. By visiting our website, you agree to our processing of information as described in IBM’sprivacy statement. To provide a smooth navigation, your cookie preferences will be shared across the IBM web domains listed here.
Tutorial
Deploy Red Hat OpenShift Container Platform on IBM Power Virtual Server using user-provisioned infrastructure installation
Kickstart your hybrid cloud journey with Red Hat OpenShift on IBM Power
On this page
Introduction
This tutorial shows you how to deploy a Red Hat® OpenShift® cluster on IBM® Power® Virtual Servers using the user-provisioned infrastructure (UPI) method.
Tutorial prerequisites
- IBM Power Virtual Server setup for Red Hat OpenShift Container Platform
- RHEL and RHCOS OVA images made available on IBM Power Virtual Server
- A system to execute the tutorial steps. This could be your laptop or a remote virtual machine (VM) with public internet connectivity and bash shell installed. The system must be running one of the following (64-bit) operating systems:
- Mac OS X (Darwin) - 10.15 (Catalina and later)
- Linux® (x86_64) - RHEL8 or CentOS8 and later, Ubuntu 16.04 and later
- Microsoft® windows® 10 (64-bit) with Cygwin, Git Bash, or windows Subsystem for Linux (WSL)
OpenShift deployment topology
The basic deployment of Red Hat OpenShift Container Platform consists of a minimum of seven Power Virtual Server instances:
- One bastion (helper)
- One bootstrap
- Three controllers (masters)
- Two workers
Bastion can also be configured for high availability (HA). For HA, two bastion nodes will get used.
The minimum configuration for bastion is as follows:
- One vCPU
- 16 GB RAM
- 120 GB (tier 3) storage
The minimum configuration for bootstrap, controller, and worker instances are as follows:
- One vCPU
- 32 GB RAM
- 120 GB (tier 3) storage
Bastion (helper) The bastion instance hosts the following required services for OpenShift Container Platform:
- Dynamic Host Configuration Protocol (DHCP) service for OpenShift Container Platform nodes
- Domain Name System (DNS) service for the OpenShift Container Platform domain
- HTTP file server to host ignition config files
- HAProxy to load-balance traffic to OpenShift Container Platform controllers and ingress router
- Source Network Address Translation (SNAT) or Squid proxy for OpenShift Container Platform nodes to access internet
Figure 1 shows a logical view of the OpenShift topology.
Figure 1. OpenShift deployment topology on Power Virtual Servers
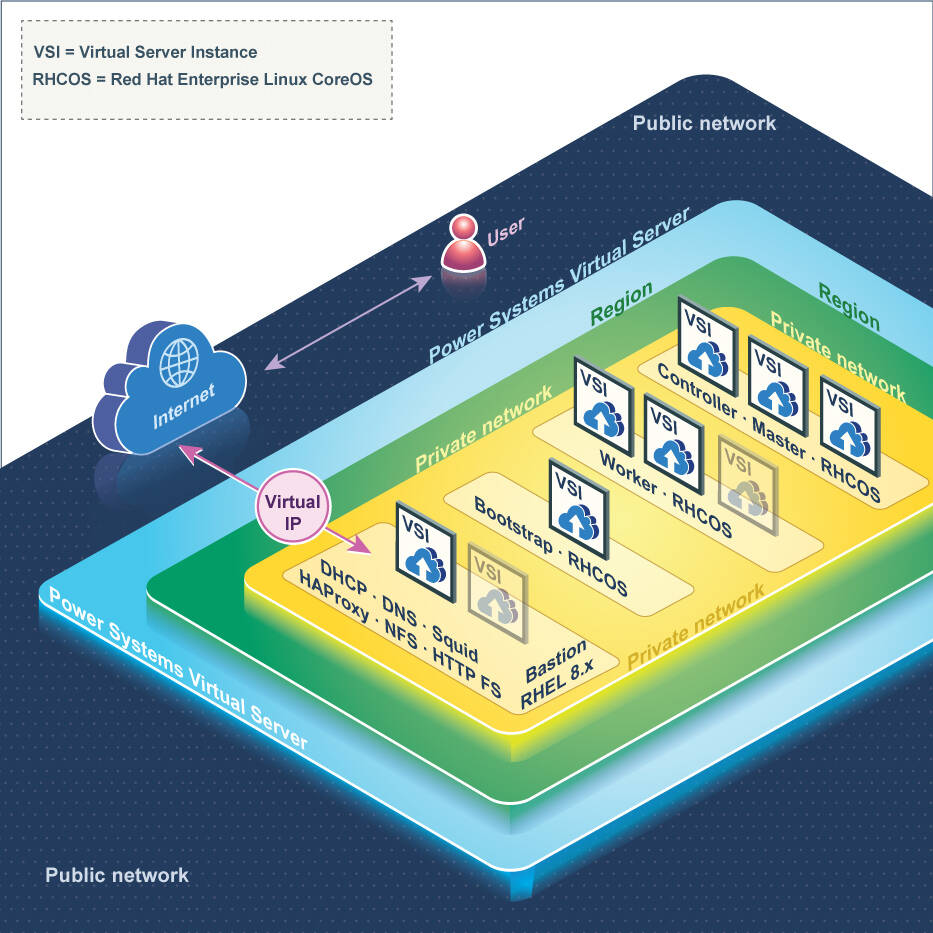
Following are the key aspects of the deployment topology:
- All OpenShift (RHCOS) nodes are in the private network.
- Bastion uses both public and private network. It communicates with the OpenShift nodes on the private network.
- SNAT configured on the bastion (helper) node is the default mechanism to provide internet connectivity for the OpenShift nodes.
- It is also possible to use Squid proxy setup on the bastion (helper) node as a cluster-wide proxy. Refer to the following OpenShift documentation for more details on cluster-wide proxy usage: https://docs.openshift.com/container-platform/4.6/networking/enable-cluster-wide-proxy.html. When using a cluster-wide proxy, if any application requires internet access, you must set the
HTTP_PROXYandHTTPS_PROXYenvironment variables to the value of the cluster-wide proxy. - Applications must use HTTPS routes if exposing traffic to the outside world. This is because Power Virtual Servers enables limited ports for external access. Refer to the documentation at: https://cloud.ibm.com/docs/power-iaas?topic=power-iaas-network-security for more details.
- Port 6443, which is used for OpenShift Container Platform CLI access, is blocked in WDC04 and DAL13 data centers. You need to log in to the bastion node for using CLI (
oc) in these data centers.
Installing OpenShift Container Platform on Power Virtual Server
Perform the following steps to install OpenShift Container Platform on Power Virtual Server:
Get the installation artifacts.
- IBM Cloud API key (refer to the instructions)
- OpenShift pull secret (download the secret)
- RHEL subscription ID and password
Download the installation helper script.
Open a terminal window and type the following commands:
mkdir ocp-install-dir && cd ocp-install-dir curl -sL https://raw.githubusercontent.com/ocp-power-automation/openshift-install-power/devel/openshift-install-powervs -o openshift-install-powervs && chmod +x openshift-install-powervs export PATH=$PATH:$(pwd)ocp-install-diris the install directory where all the install artifacts will be kept.You can also copy the openshift-install-powervs helper script to a directory in your system $PATH (for example, /usr/local/bin).
Start the installation.
Run the following commands to export the API key and RHEL subscription password as environment variables:
set +o history export IBMCLOUD_API_KEY="<YOUR_IBM_CLOUD_API_KEY>" export RHEL_SUBS_PASSWORD="<YOUR_RHEL_SUBSCRIPTION_PASSWORD>" set -o historyPlace the OpenShift pull secret file in the install directory and name it as pull-secret.txt, or you can paste the content when prompted by the helper script.
Run the following command to start the OpenShift cluster deployment.
openshift-install-powervs createFollow the prompts to select the appropriate options.
For highly available bastion nodes, select yes for the following prompt:
"Do you want to configure High Availability for bastion nodes?"Now wait for the installation to complete. It may take around 60 min to complete the provisioning.
After successful installation, the cluster details will be displayed as shown in the following sample output.
Login to bastion: 'ssh -i automation/data/id_rsa root@192.48.19.53' and start using the 'oc' command.
To access the cluster on local system when using 'oc' run: 'export KUBECONFIG=/root/ocp-install-dir/automation/kubeconfig'
Access the OpenShift web-console here: https://console-openshift-console.apps.test-ocp-6f2c.ibm.com
Login to the console with user: "kubeadmin", and password: "ABvmC-z5nY8-CBFKF-abCDE"
Add the line on local system 'hosts' file:
192.48.19.53 api.test-ocp-6f2c.ibm.com console-openshift-console.apps.test-ocp-6f2c.ibm.com integrated-oauth-server-openshift-   authentication.apps.test-ocp-6f2c.ibm.com oauth-openshift.apps.test-ocp-6f2c.ibm.com prometheus-k8s-openshift-monitoring.apps.test-ocp-6f2c.ibm.com grafana-openshift-monitoring.apps.test-ocp-6f2c.ibm.com example.apps.test-ocp-6f2c.ibm.com
These details can be retrieved anytime by running the following command from the install directory:
openshift-install-powervs access-info
In case of any errors, run the openshift-install-powervs create command again. Refer to known issues to get more details about the potential issues and workarounds.
You can also get the Terraform console logs from the logs directory for each run.
For advanced options or customization, refer to: https://github.com/ocp-power-automation/openshift-install-power
For addition support, refer to the existing the ocp4-upi-powervs Terraform OCP-UPI quick start Documentation
You may refer to Import Pre-Built Red Hat CoreOS OVAs into PowerVS to launch your OpenShift Cluster on PowerVS.
Post installation
This section describes how to create the API and ingress DNS records as part of the post-installation task.
Skip this section if your cluster_domain is one of the online wildcard DNS domains: nip.io, and sslip.io.
For all other domains, you can use one of the following options.
Add entries to your DNS server.
The general format is as follows:
api.<cluster_id>.<cluster-domain>. IN A <bastion_address> *.apps.<cluster_id>.<cluster-domain>. IN A <bastion_address>You’ll need
dns_entries. This is printed at the end of a successful installation. Alternatively, you can retrieve it anytime by running theopenshift-install-powervs output dns_entriescommand from the install directory. An exampledns_entriesoutput:api.test-ocp-6f2c.ibm.com. IN A 192.48.19.53 *.apps.test-ocp-6f2c.ibm.com. IN A 192.48.19.53Add entries to your client system hosts file.
For Linux and Mac hosts, the file is located at /etc/hosts, and for windows hosts, it is located at c:\windows\System32\Drivers\etc\hosts. The general format is:
<bastion_address> api.<cluster_id>.<cluster-domain> console-openshift-console.apps.<cluster_id>.<cluster-domain> integrated-oauth-server-openshift-authentication.apps.<cluster_id>.<cluster-domain> oauth-openshift.apps.<cluster_id>.<cluster-domain> prometheus-k8s-openshift-monitoring.apps.<cluster_id>.<cluster-domain> grafana-openshift-monitoring.apps.<cluster_id>.<cluster-domain> <app name>.apps.<cluster_id>.<cluster-domain>You’ll need
etc_host_entries. This is printed at the end of a successful installation. Alternatively, you can retrieve it anytime by running theopenshift-install-powervs output etc_hosts_entriescommand from the install directory. As an example, for the followingetc_hosts_entries:192.48.19.53 api.test-ocp-6f2c.ibm.com console-openshift-console.apps.test-ocp-6f2c.ibm.com integrated-oauth-server-openshift-authentication.apps.test-ocp-6f2c.ibm.com oauth-openshift.apps.test-ocp-6f2c.ibm.com prometheus-k8s-openshift-monitoring.apps.test-ocp-6f2c.ibm.com grafana-openshift-monitoring.apps.test-ocp-6f2c.ibm.com example.apps.test-ocp-6f2c.ibm.comAdd the following entry to the hosts file:
<existing entries in hosts file>

 192.48.19.53 api.test-ocp-6f2c.ibm.com console-openshift-console.apps.test-ocp-6f2c.ibm.com integrated-oauth-server-openshift-authentication.apps.test-ocp-6f2c.ibm.com oauth-openshift.apps.test-ocp-6f2c.ibm.com prometheus-k8s-openshift-monitoring.apps.test-ocp-6f2c.ibm.com grafana-openshift-monitoring.apps.test-ocp-6f2c.ibm.com example.apps.test-ocp-6f2c.ibm.com
Accessing the cluster
After successful installation, the OpenShift kubeconfig file will be copied to your system. It is also available in the bastion host and the location is displayed after a successful installation. Alternatively, you can retrieve it anytime by running the openshift-install-powervs access-info command from the install directory.
openshift-install-powervs access-info

Login to bastion: 'ssh -i automation/data/id_rsa root@192.48.19.53' and start using the 'oc' command.
To access the cluster on local system when using 'oc' run: 'export KUBECONFIG=/root/ocp-install-dir/automation/kubeconfig'
Access the OpenShift web-console here: https://console-openshift-console.apps.test-ocp-6f2c.ibm.com
Login to the console with user: "kubeadmin", and password: "ABvmC-z5nY8-CBFKF-abCDE"
You can start using the CLI oc or the web console. The oc client is already downloaded in the install directory.
Refer to the Getting started with CLI documentation for more details on using the OpenShift CLI.
Verifying the HA functionality (optional)
Perform the following steps to verify the HA functionality of bastion:
In the event of a failure of one bastion node, the public VIP will automatically switch to the next bastion node seamlessly without any interruption in the cluster access. You can simulate a failure by shutting down a bastion server whilte continuing to access the OpenShift web console.
The Keepalived service should be running on both the bastion servers.
$ systemctl status keepalived keepalived.service - LVS and VRRP High Availability Monitor Loaded: loaded (/usr/lib/systemd/system/keepalived.service; enabled; vendor preset: disabled) Active: active (running) since Sun 2020-11-22 23:47:46 EST; 24h ago Process: 294293 ExecStart=/usr/sbin/keepalived $KEEPALIVED_OPTIONS (code=exited, status=0/SUCCESS) Main PID: 294294 (keepalived) Tasks: 2 (limit: 97376) Memory: 34.5M CGroup: /system.slice/keepalived.service ├─294294 /usr/sbin/keepalived -D └─294295 /usr/sbin/keepalived -DFollowing is the Keepalived configuration on both the bastion servers.
Bastion-0:
global_defs { router_id ovp_vrrp } vrrp_script haproxy_check { script "killall -0 haproxy" interval 2 weight 20 } vrrp_instance OCP_LB { state MASTER interface env3 virtual_router_id 57 priority 100 virtual_ipaddress { 192.168.25.57 } track_script { haproxy_check } authentication { auth_type PASS auth_pass 46ed1602-bd25-4fae-8a60-694488dbcf55 } } vrrp_instance OCP_PLB { state MASTER interface env2 virtual_router_id 172 priority 100 virtual_ipaddress { 192.168.134.172 } track_script { haproxy_check } authentication { auth_type PASS auth_pass 04abb49e-f336-2786-4adc-9f4a601a9a65 } }Bastion-1:
global_defs {
 router_id ovp_vrrp
 }

 vrrp_script haproxy_check {
 script "killall -0 haproxy"
 interval 2
 weight 20
 }

 vrrp_instance OCP_LB {
   state BACKUP
   interface env3
   virtual_router_id 57
   priority 90
   virtual_ipaddress {
     192.168.25.57
   }
   track_script {
     haproxy_check
   }
 authentication {
       auth_type PASS
       auth_pass 46ed1602-bd25-4fae-8a60-694488dbcf55
   }
 }

 vrrp_instance OCP_PLB {
   state BACKUP
   interface env2
   virtual_router_id 172
   priority 90
   virtual_ipaddress {
     192.168.134.172
   }
   track_script {
     haproxy_check
   }
   authentication {
     auth_type PASS
     auth_pass 04abb49e-f336-2786-4adc-9f4a601a9a65
   }
 }
Clean up
To destroy the cluster after using it, run the openshift-install-powervs destroy command to make sure that all the resources are properly cleaned up.
openshift-install-powervs destroy
Do not manually clean up your environment unless both of the following conditions are true:
- You know what you are doing.
- Something went wrong with an automated deletion.
Summary
After you have an OpenShift cluster running, you can start building and deploying your applications. Refer to the other tutorials in this learning path for more details.