Tutorial
Manage e-commerce encryption keys using Guardium Key Lifecycle Manager
Simplify your key generation, retrieval, and deletion with GKLM
On this page
IBM Guardium Key Lifecycle Manager is an encryption key management tool that centralizes, simplifies and automates the key management process. It offers robust and security-rich key storage, key serving, and key lifecycle management for self-encrypting applications and solutions by using interoperability protocols, including KMIP, IPP, and REST APIs.
An e-commerce platform handles a substantial amount of sensitive data, including customer payment information and personal details, transaction records and other sensitive operations. To secure this data, the platform needs to use native encryption, which will result in a large number of encryption keys. This can be a burden from both operational and security perspectives, and the encryption keys have a separate lifecycle from the data being protected.
An e-commerce enterprise can leverage the features of Guardium Key Lifecycle Manager (GKLM) to manage its encryption keys externally, separate from the production data. Guardium Key Lifecycle Manager provides a centralized way to handle the lifecycle of cryptographic keys, including generation, storage, rotation, and retirement.
By using Guardium Key Lifecycle Manager, an e-commerce enterprise can meet regulations such as PCI DSS, Sarbanes-Oxley, and HIPAA by providing access control to protect against unauthorized access and breaches. It streamlines key management processes to minimize operational overhead and risk.
This tutorial demonstrates how a REST-based e-commerce client application can use Guardium Key Lifecycle Manager for key management operations such as key generation, key retrieval, rekey, key deletion, and master key rotation to help ensure data security and compliance with regulations.
Prerequisites
To complete this tutorial, you require: • Administrative access to Guardium Key Life Cycle Manager GUI V4.2.1 • Guardium Key Lifecycle Manager Client Application (e-commerce) • Node.js to run the web application locally: • Java
Estimated time
This tutorial should take approximately 30 minutes to complete.
Use case
In this tutorial’s scenario, a cybersecurity lead for a prominent e-commerce platform is responsible for ensuring the secure processing of millions of financial transactions daily. The platform is experiencing rapid growth, and there are increasing concerns about safeguarding sensitive customer data and financial records. This growth requires a robust security infrastructure to protect against data breaches and unauthorized access to sensitive information.
The e-commerce platform needs to manage and secure the encryption keys used for financial transactions, user data, and other sensitive operations. The keys must be generated, stored, retrieved, and rotated securely to maintain the integrity of the platform and comply with industry regulations.
Using Guardium Key Life Cycle Manager (GKLM), the e-commerce platform can efficiently manage its encryption keys throughout their lifecycle, ensuring data security and compliance with regulations.
Steps
To complete this tutorial, you need to perform the following steps:
- Web application download and set up
- Create server and e-commerce client certificate
- Configure the application client from the GKLM Server
- Perform key operation functionalities for the e-commerce platform
- Secure e-commerce transactions using the rekey function
Step 1. Download and set up the web application
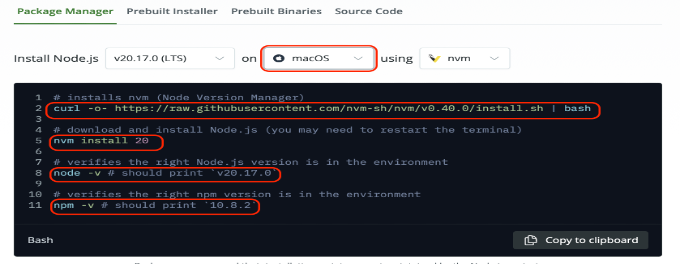
- Install Node.js to run the web application locally. You can choose Mac, windows, Linux, or AIX from the menu, depending on your local environment.
- Download the application code as a .zip file.
- Extract the “Encryption-Keys-Management-using-GKLM-main".zip file. Update your GKLM server URL under the
vite.config.jsfile.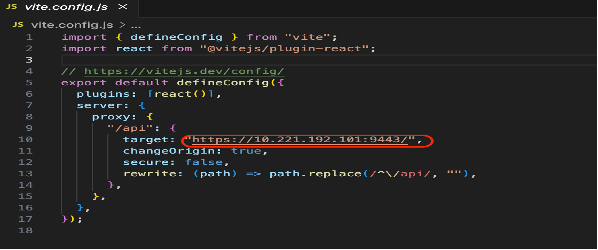
- Open a new terminal at the
Encryption-Keys-Management-using-GKLM-mainfolder and run thenpm installcommand:
- To start the application, run the
npm startcommand:
- When the application starts, go to the URL that displays in the terminal and sign in using the GKLM server admin credentials.
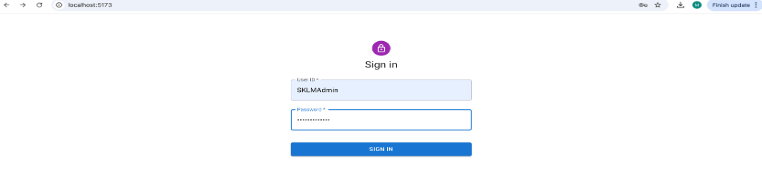
You have now downloaded and set up the application.
Step 2. Create an e-commerce client and GKLM server certificate
Open a terminal from the project folder and run the following command to generate the key pair:
keytool -genkeypair -storetype jceks -keystore defaultKeyStore -alias clientsslcert -keyalg RSA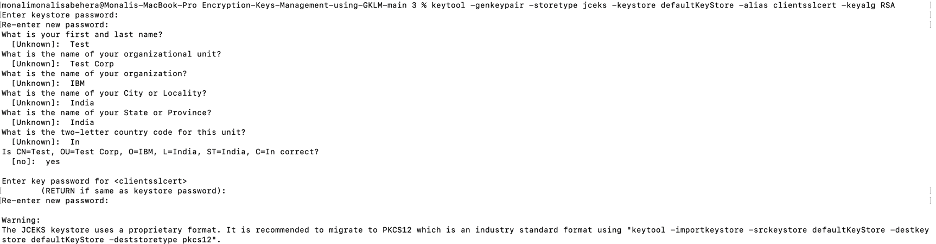
This command wraps the public key into a self-signed certificate, which is stored as a single element certificate chain. This certificate chain and the private key are stored in a new keystore entry identified by the alias. You also specify the algorithm (RSA) to use to generate the key pair
Verify whether the defaultKeyStore file is created in this folder. Run the following command:
ls -l
Export a client certificate and verify the certificate:
keytool -exportcert -storetype jceks -keystore defaultKeyStore -alias clientsslcert -file clientsslcert.cer
Verify that the clientsslcert.cer file is created in the folder:

Log in to your GKLM GUI, go to the configuration page, and click to launch Server Configuration Wizard:
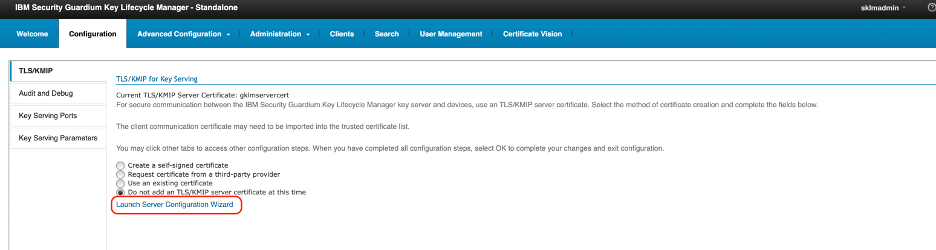
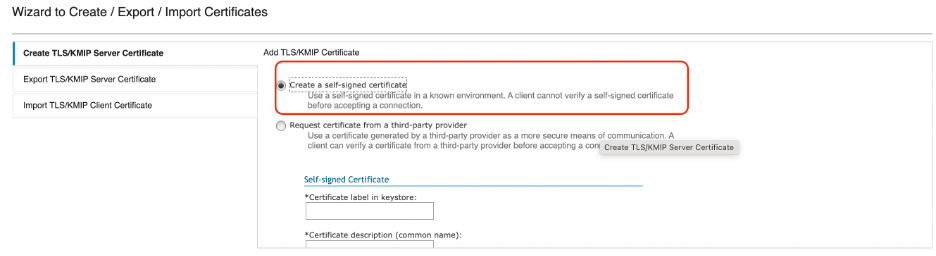
Select Create a self-signed certificate.
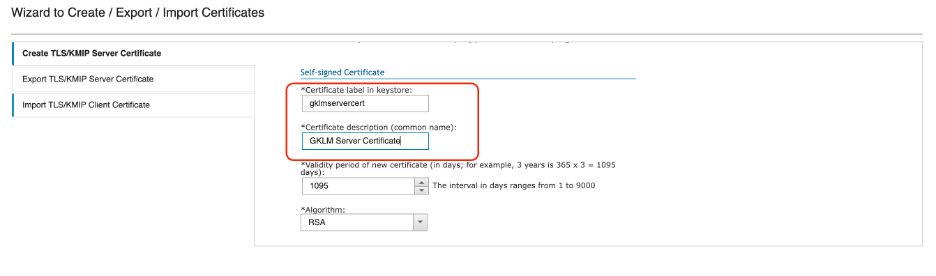
Specify the certificate details as shown:
- Certificate label in keystore: gklmservercert
- Certificate description: GKLM Server Certificate
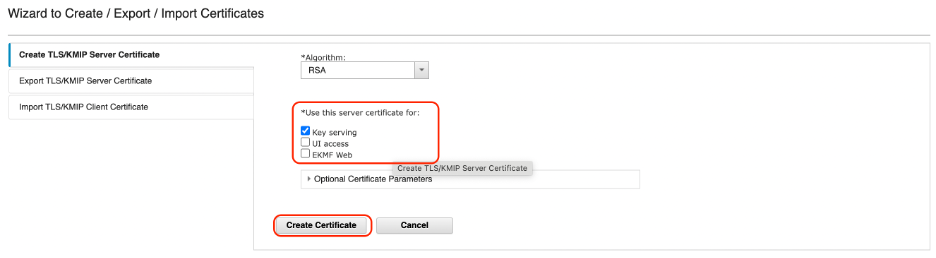
- Keep the defaults for the remaining fields.
Scroll to the bottom of the page and click Create Certificate.
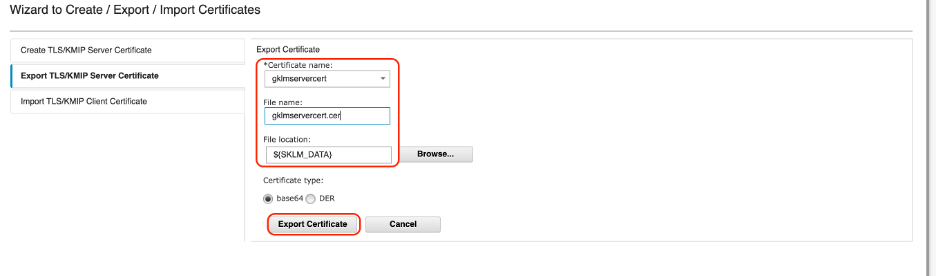
Specify the certificate details as shown:
- Certificate name: gklmservercert
- File name: gklmservercert.cer
- Keep the defaults for the remaining fields.
Click Export Certificate.
To import this server certificate into the e-commerce client end, copy the gklmservercert.cer file from the SKLM_DATA folder to your e-commerce project folder, open a terminal from the project folder, and run the following command:
keytool -import -storetype jceks -keystore defaultKeyStore -alias gklmservercert -file gklmservercert.cer -storepass passw0rd -trustcacerts -noprompt
You have now set up the GKLM server and client configuration and configured the certificates
Step 3. Configure the application client in GKLM
To configure the application client in GKLM, go to the GKLM GUI, click the Client tab and then click Create.

Specify the client name and in the Usage menu, select Generic. Click Save.

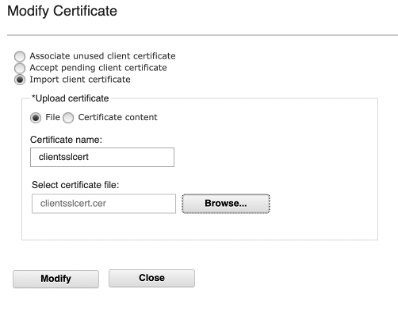
In the client certificate section, click Modify to add a client certificate

Select Import client certificate and add the certificate name. Select the certificate file (must have a .cer extension) and click Modify.
On the client page, click Add Users, and select the user from the box and save.
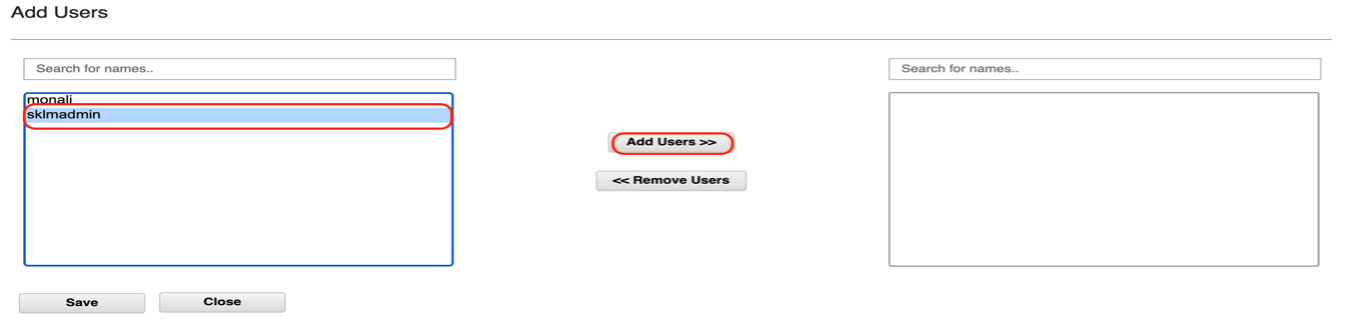
You have now configured the application client on the GKLM server.
Step 4. Perform key operation functionalities for an e-commerce platform using GKLM
Using Guardium Key Lifecycle Manager for an e-commerce platform requires several key operations to ensure data protection, compliance, and operational efficiency.
Key Generation
Generating keys for an e-commerce platform, particularly during a high-traffic period like the holiday season, involves several critical considerations to ensure security, efficiency, and scalability. You can use Guardium Key Lifecycle Manager to generate keys in batches to manage load efficiently.
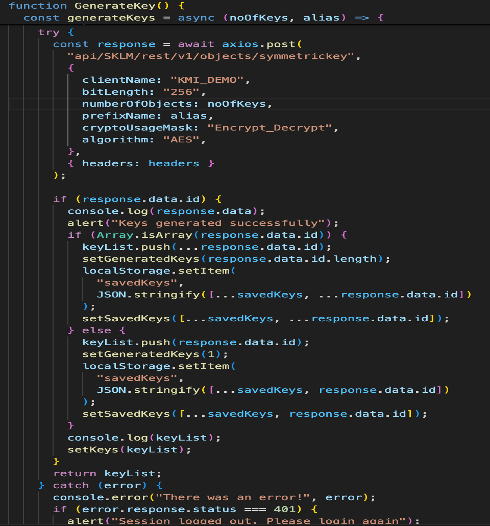
In the following example, we’ve used the Create/Register Symmetric Key REST Service to create or register one or more symmetric keys and associate them with the e-commerce client application.
For more details, see the this API reference.
Code reference:
Now you’ll review the key generation operation from the e-commerce application client using GKLM.
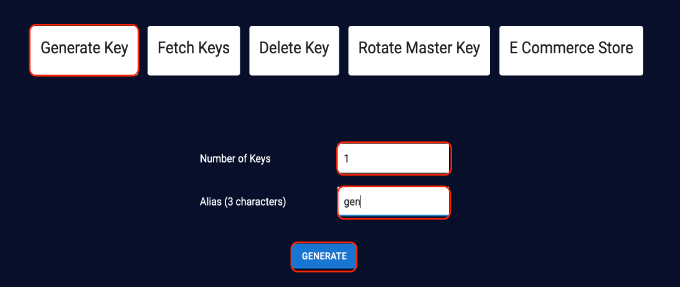
Login to the application client as described in step 1, above. On the home page, click the Key Generation tab to create new encryption keys.
Specify the number of keys to be generated and the alias name of the keys:
- Number of keys: 1
- Alias: gen
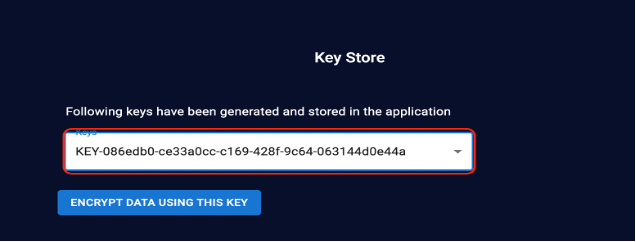
Click Generate. The application sends a Get request with the key ID/key alias and the GKLM server generates new encryption keys according to the specification provided. These keys can be used to further encrypt sensitive transaction data.
Choose any one of the keys from the menu and click Encrypt Data Using This Key.
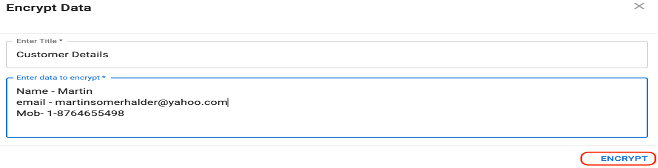
Enter the customer data to be encrypted and specify a title, and then click Encrypt.
You need to verify the same key on the GKLM server end. Go to the client page and select the KMI_DEMO client. Click Modify to display a list of keys.
Find the key with the gen alias name. (You created the key with the gen in step 3, above).
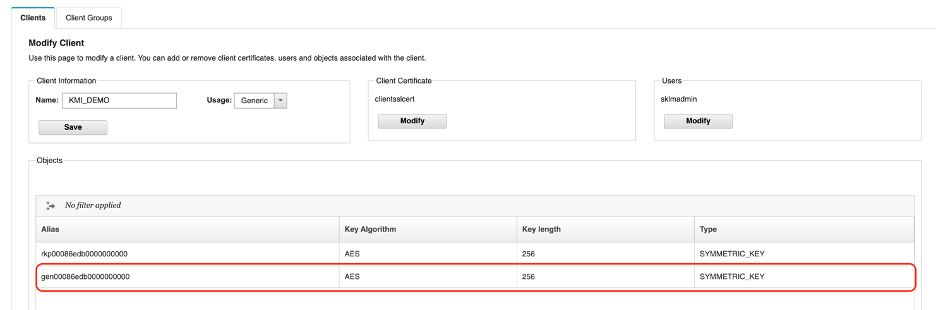
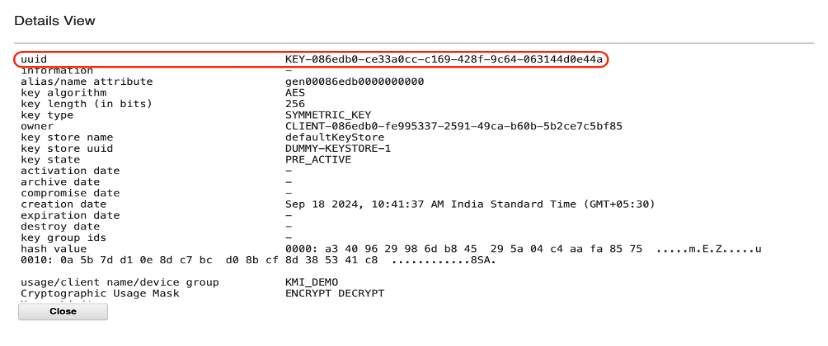
Double-click gen key to display the attributes related to the keys, such as uuid, alias, key algorithm, and so on.
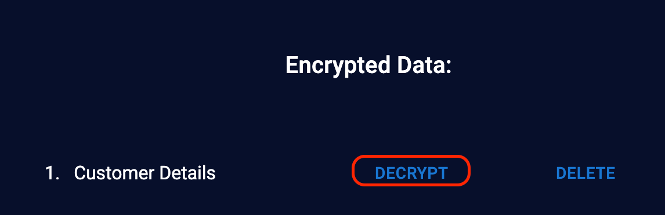
Go to the client application page. You now need to decrypt the customer details. Click Decrypt
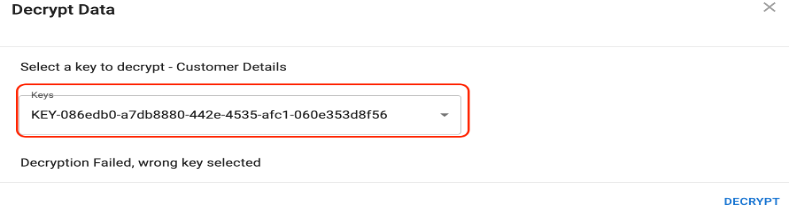
Note that if you select the wrong key with the same data file, you will not be able to read the data. You cannot encrypt with one key and decrypt with another.
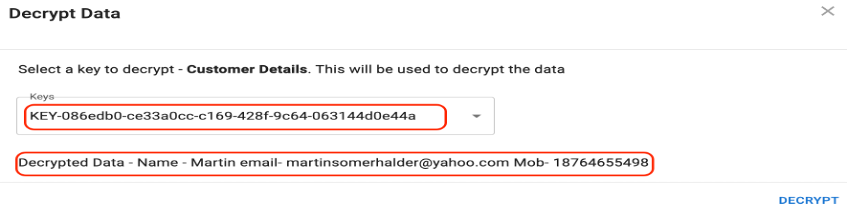
Select the original key and the data is decrypted.
You have now successfully encrypted the customer data using the encryption key served from the GKLM key server.
Key retrieval
A secure transaction processing system requires access to the encryption key for decrypting financial records during an audit. Depending on audit requirements, a security professional may need to export key metadata.
The key metadata can be retrieved from both GKLM and the application client end. You can access the GKLM interface using credentials with appropriate permissions. Ensure you are logged in as a user with sufficient privileges and you can view the keys meta data on the client page.
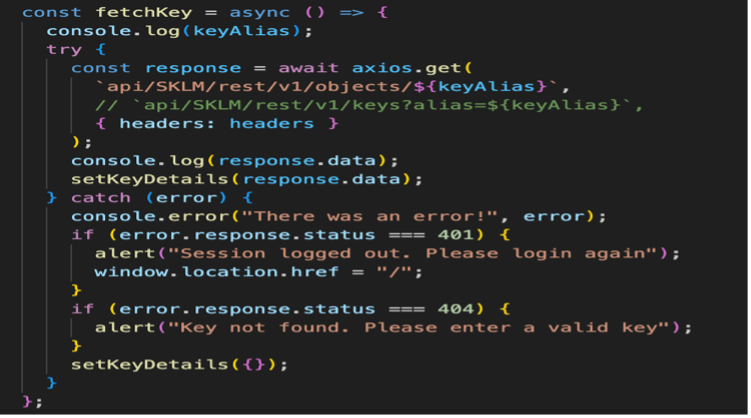
To access the key metadata from the application end, go to the e-commerce application home page and click Retrieve Key. You can then specify the key UID. The application will then send a Get request with the key ID. The GKLM server sends properties related to keys, such as creation date, algorithm, and key length.
The following example shows that the Get Object REST Service has been used to retrieve details about a specific managed object.
For more details, see this API reference
Code reference:
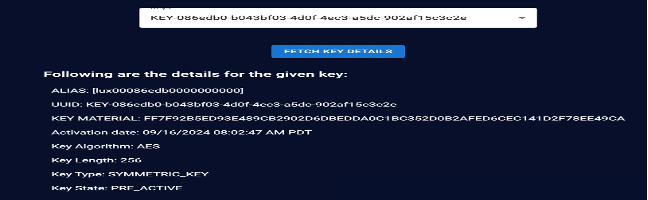
To retrieve the key attributes from the application end, go to the home page and click the Fetch Keys tab from the home page. You can now specify the key UUID or select the key from the menu. When you have selected the UUID or key, click Fetch Key Details.
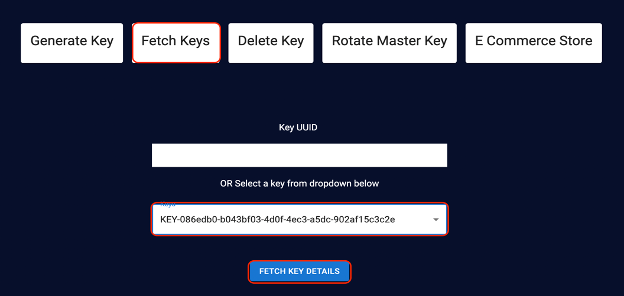
Review the key attributes related to the selected key, such as alias, UUID, activation date,key algorithm, key length, and key type.
 **
**
Key deletion
After a key is no longer needed, such as after the holiday season or when the key is compromised, it must be securely deleted to prevent unauthorized use. You can delete the keys from both the GKLM server and the client application end.
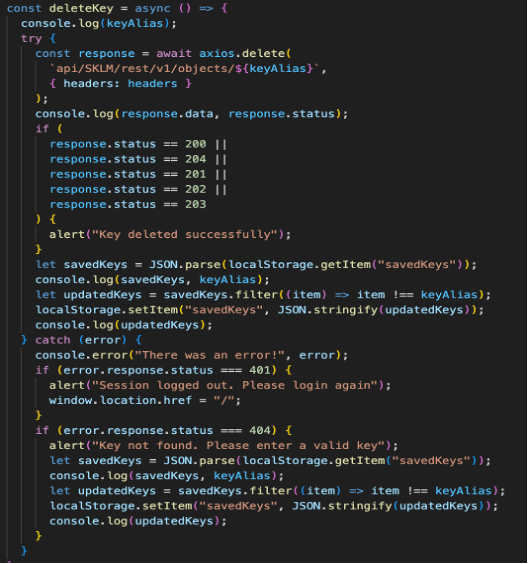
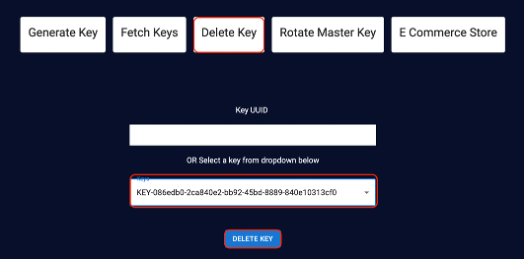
To delete the key from the e-commerce client platform, click Delete Key on the home page and then enter the key ID for the key that needs to be removed. The key is removed from both the client application and key server storage.
In the following example, we’ve used the Delete Object REST Service to delete a specific managed object.
For more details, see this API reference
Code reference:
- To delete the key from the application end, click Delete Key on the home page and specify the key UUID or the required key in the menu.
- Click the Delete Key button. The key is deleted.
- Check the same key on the GKLM end and you will see that it has been deleted.
Master key rotation
As computing power increases, the ability to perform cryptanalysis on encrypted data improves. Regularly rotating master keys helps counteract potential vulnerabilities and maintains encryption strength.
Even with secure key management practices, keys can be inadvertently exposed through misconfiguration. If a master key is compromised, encryption keys and associated sensitive data that can be exposed.
By regularly rotating master keys, you can counteract potential vulnerabilities and maintain the strength of your encryption. You can also help your e-commerce client meet industry best practices and avoid penalties.
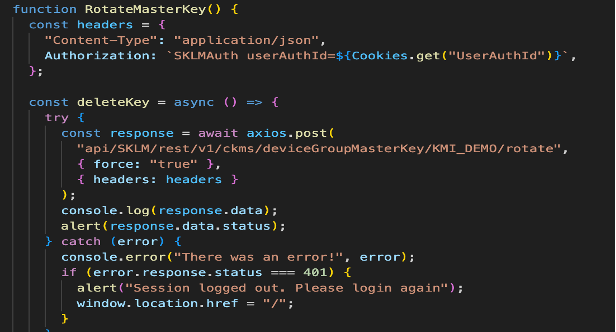
In the following example, we’ve used the Refresh Master Key for Device Group REST Service to refresh the master key for a specific device group or for all device groups. For more details, see this API reference.
Example:
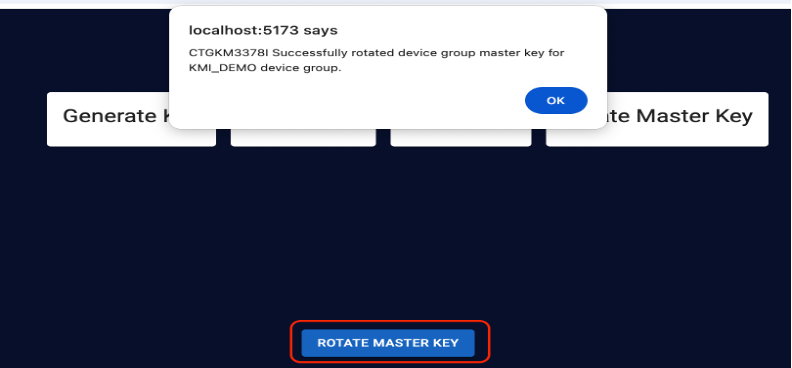
- To rotate the master key at the client application end, go to the home page and click Rotate Master Key. When the master key is updated, a message displays indicating success.
- Click OK to close the message.
Step 5. Secure e-commerce transactions using the rekey function
“Rekey” generally refers to the process of changing the current encryption key used for the encryption mechanism so that it can work with a new key.
Securing transaction or other sensitive information during the holiday period can be challenging, since security threats and attack vectors evolve over time. To prevent attack during the holiday period, an e-commerce organization needs to rotate its encryption keys periodically to ensure continuous security without disrupting ongoing operations. Regularly rotating encryption keys helps you adapt to new threats and ensures that cryptographic defenses remain effective.
To use the rekey function from your e-commerce client application, complete the following steps:
From the home page, click the E-commerce Store tab. The customer page opens, where you will see the various items available to purchase.
Click Add to cart for any item. In this example, we have added a laptop bagpack to the cart. When you have added your items, click Proceed to Checkout.

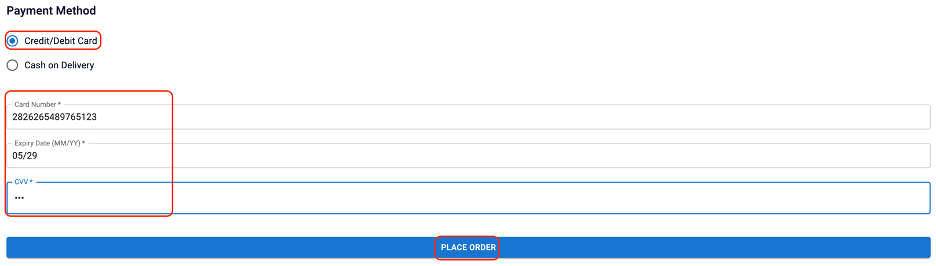
On the payment, specify your name, contact details and address.

Select your payment method as Credit/Debit Card, provide the card details, and click Place Order.
A “transaction successful” message is displayed, along with a transaction ID and the transaction time.

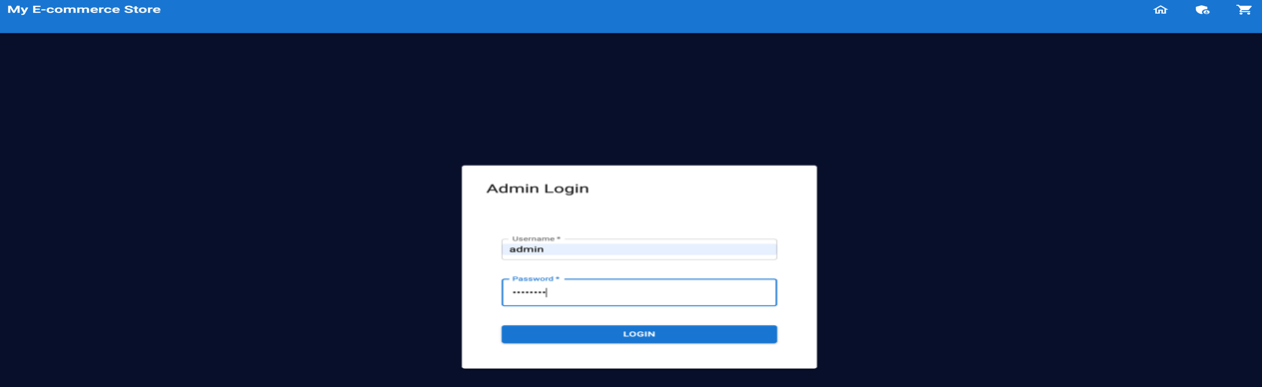
Go to the security admin page and enter the credentials as admin with a password of admin123.
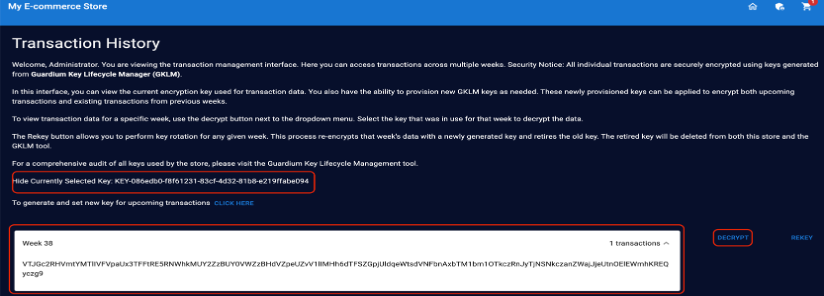
On the security admin page, review the transaction history. The transaction you just made will be displayed in the most recent week; for example, Week 38. Click to display the selected key.
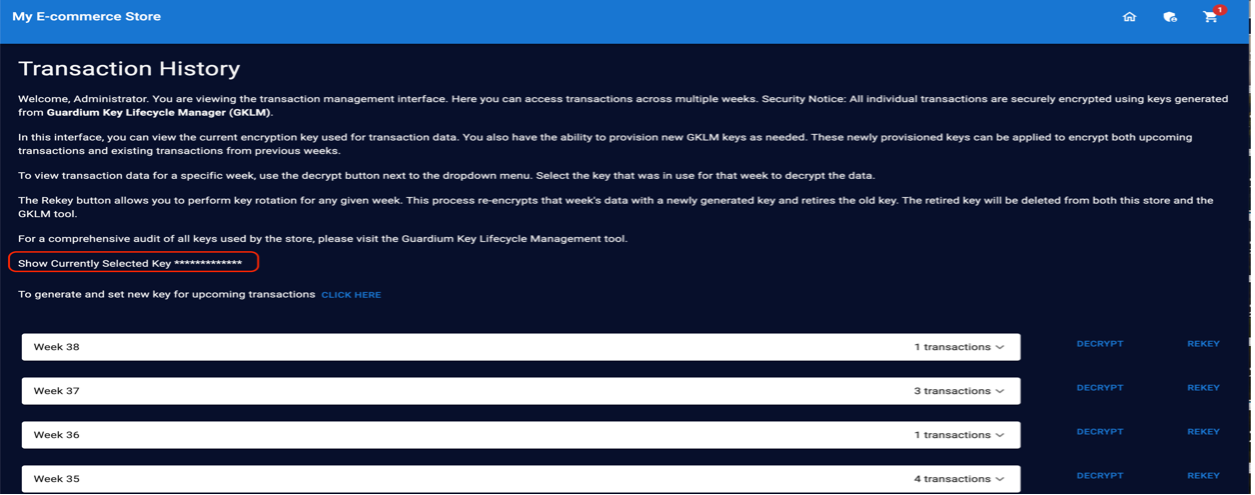
The current key used to encrypt the latest transaction is displayed. This same key will be used for any upcoming transactions until you change it.
To decrypt the transaction details, click Decrypt.
You can choose the key from drop-down menu. Select the correct encryption key that you displayed in a previous step to decrypt it.
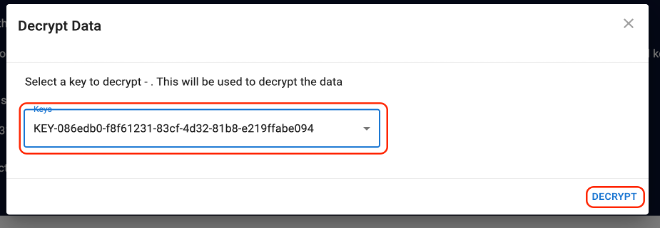
The transaction details are now decrypted and you can read the information in plain-text format.

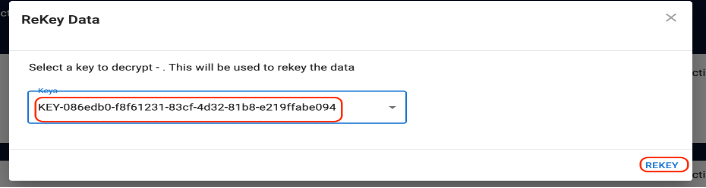
Click Rekey to change the current key.

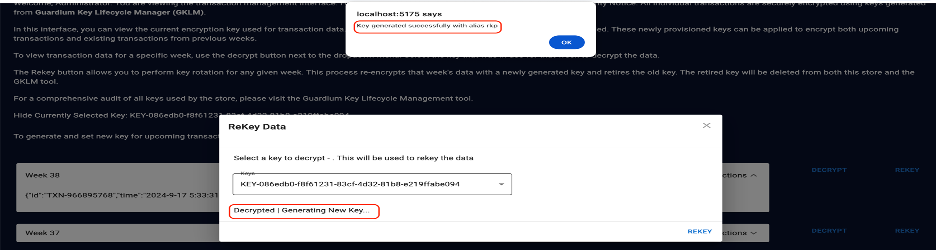
Select the current key from the drop-down menu and click Rekey. A new key is generated.
The newly generated key will be used to encrypt the current week’s transactions and the old key will remain unusable. The following screen shows a new generated key with the alias rkp.
 Note that the old key is unable to decrypt the data when selected.
Select the new key from drop-down menu and click Decrypt.
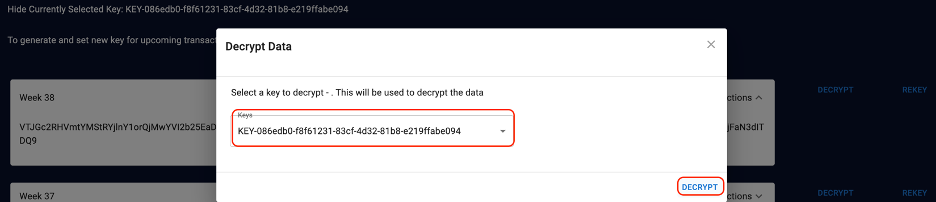
- The transaction details display in readable format.

- The transaction details display in readable format.
Verify that the new key on the GKLM server end. In the GKLM interface, click the Clients tab and select KMI_DEMO. Click Modify and find the key with the rkp alias name. Double-click on the key to see the details.
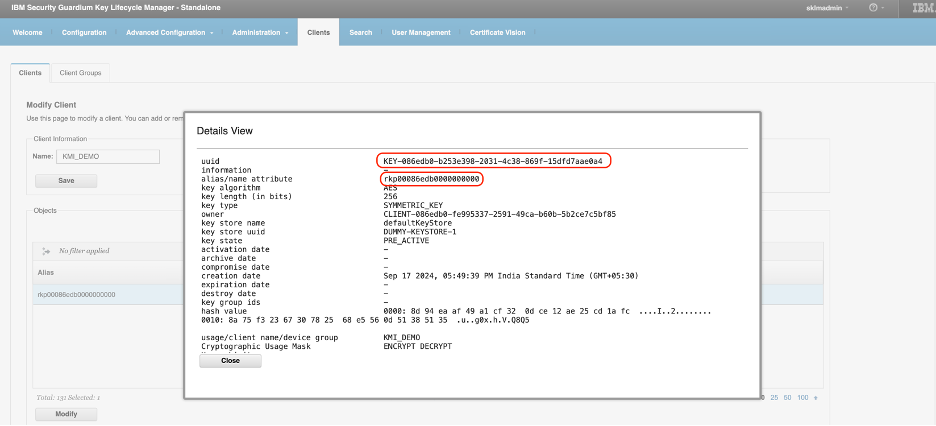
You have now successfully used rekey to change your e-commerce application’s key.
Summary
You have now used Guardium Key Lifecycle Manager to manager your keys. By implementing these functionalities, your e-commerce platform will have a significantly enhanced security posture, ensuring that sensitive financial data is protected, even in the event of a data breach. The platform can confidently scale its operations, knowing that its encryption keys are managed securely throughout their lifecycle.
Next steps
Now that you've completed this tutorial, continue to learn about Guardium Key Life Cycle from the following resources: