About cookies on this site Our websites require some cookies to function properly (required). In addition, other cookies may be used with your consent to analyze site usage, improve the user experience and for advertising. For more information, please review your options. By visiting our website, you agree to our processing of information as described in IBM’sprivacy statement. To provide a smooth navigation, your cookie preferences will be shared across the IBM web domains listed here.
Tutorial
Fine-tuning IBM Granite language models for enterprise applications using Red Hat Enterprise Linux AI
Multi-phased training of Granite models with a single custom knowledge topic on RHEL AI on IBM Cloud with NVIDIA 8xH100
On this page
Red Hat Enterprise Linux AI (RHEL AI) is designed to help AI practitioners tune and extend large language models (LLMs) and small language models (SLMs) with domain-specific knowledge by imparting the custom knowledge into the LLM/SLM at a foundation level by allowing the LLM/SLM to learn in a supervised manner. This process enables the model to capture and retain the knowledge in the model parameters so that this knowledge becomes foundational for every use case that uses this model as its foundation to make use of the model or further build on with additional skills and knowledge imparting.
In this tutorial, you will explore how to leverage RHEL AI to train an IBM Granite model, an enterprise-grade model optimized for AI workloads. By using RHEL AI, you can tune the model on specialized data sets, allowing it to better understand and respond to domain-specific queries. Throughout this tutorial, we will cover the setup, data preparation, synthetic data generation, and training steps that are required to fine-tune a model using RHEL AI. Whether you are looking to improve automation in your company or develop a more intelligent AI assistant for any task, this tutorial will provide the foundational knowledge needed to get started.
This tutorial guides through adding enterprise data into RHEL AI. In the steps, you will learn how to tune IBM Granite with new knowledge presented in a recently released publication "Great Tech Reset." The Great Tech Reset publication by IBM leverages “hybrid by design,” which is a strategic approach that goes beyond simply combining technologies. It’s about aligning IT with business goals, breaking down silos, and unlocking the power of cloud and AI synergy. This translates to real results: hybrid-by-design companies can generate 3x higher ROI over five years. The book serves as your roadmap to navigate the Great Tech Reset and unlock the transformative power of hybrid by design.
Prerequisites
The following are the perquisites for following this tutorial:
You will need an IBM Cloud account.
You will also need a Red Hat account.
You need to install the stand-alone IBM Cloud CLI.
You need to configure your IBM Virtual Private Cloud (VPC).
Finally, you need to create a subnet that will be used for your virtual server instance that will host RHEL AI.
Steps
The tutorial will take you through the steps required to have a model customized to your enterprise use case in 10 steps mentioned below:
- Download RHEL AI on IBM Cloud.
- Configure the network and SSH access.
- Initialize the H100 VSI Instance.
- Verify the created resources.
- Configure RHEL AI.
- Chat with the default model.
- Customize the taxonomy.
- Generate synthetic data.
- Train the model.
- Verify and evaluate the new custom model.
Step 1. Download and install RHEL AI on IBM Cloud
In this step, you will download RHEL AI on IBM Cloud Object Storage.
Step 1.1: Configure IBM Cloud Object Storage
IBM Cloud Object Storage is a web-scale platform that stores unstructured data. It provides reliability, security, availability, and disaster recovery without replication. Information that is stored with IBM Cloud Object Storage is encrypted and dispersed across multiple geographic locations. It is accessible through an implementation of the S3 API.
Install the necessary IBM Cloud plugins by running the following command:
ibmcloud plugin install cloud-object-storage infrastructure-serviceSet your preferred resource group and region. The following example command sets the resource group to "Default" and the region to "us-east."
ibmcloud target -g Default ibmcloud target -r us-eastCreate a Cloud Object Storage (COS) service instance and create your storage named "cloud-object-storage."
cos_deploy_plan=premium-global-deployment cos_si_name=THE_NAME_OF_YOUR_SERVICE_INSTANCE ibmcloud resource service-instance-create ${cos_si_name} cloud-object-storage standard global -d ${cos_deploy_plan}Configure your Cloud Object Storage (COS).
cos_crn=$(ibmcloud resource service-instance ${cos_si_name} --output json| jq -r '.[] | select(.crn | contains("cloud-object-storage")) | .crn') ibmcloud cos config crn --crn ${cos_crn} -forceCreate your Cloud Object Storage (COS) bucket. Buckets are a way to organize your data in an IBM Cloud Object Storage instance.
bucket_name=NAME_OF_MY_BUCKET ibmcloud cos bucket-create --bucket ${bucket_name}Set Permissions to read the buckets in the infrastructure. To manage buckets, your user must be granted permissions to work with buckets on the IBM Cloud Object Storage instance.
cos_si_guid=$(ibmcloud resource service-instance ${cos_si_name} --output json| jq -r '.[] | select(.crn | contains("cloud-object-storage")) | .guid')
 ibmcloud iam authorization-policy-create is cloud-object-storage Reader --source-resource-type image --target-service-instance-id ${cos_si_guid}
Alternatively, you can create the Cloud Object Storage using the IBM Cloud console UI through these steps in the IBM Cloud docs.
Step 1.2: Download the RHEL AI software
In this step, you are going to download the RHEL AI software in preparation for uploading it to IBM Cloud Object Storage (COS).
You will use a pre-built, bootable RHEL AI image that is optimized for machine learning workloads, and then set up the runtime environment on IBM Cloud.
This tutorial has been tested on RHEL AI 1.3. However, feel free to try it out with the latest release.
Navigate to the RHEL AI download page on Red Hat Developer.
Click the RHEL AI for NVIDIA on IBM Cloud button from the first column named RHEL AI on Cloud. A new browser tab opens, where you must enter your Red Hat account login credentials. Upon successful authentication to your Red Hat account, your download of the file begins. This download will take some time.
Step 1.3: Upload the RHEL AI Image into Cloud Object Storage
Now, you need to upload the recently downloaded RHEL AI into the Cloud Object Storage bucket and convert it into an IBM Cloud image.
Upload the
qcow2Imageto your Cloud Object Storage (COS) bucket:ibmcloud cos upload --bucket ${bucket_name} --key ${image_name}.qcow2 --file ${image_name}.qcow2 --region <region>While the upload is occurring check the status of the upload:
while ibmcloud is image --output json ${image_id} | jq -r .status | grep -xq pending; do sleep 1; doneConvert the RHEL AI image into an IBM Cloud image.
ibmcloud is image-create ${image_name} --file cos://<region>/${bucket_name}/${image_name}.qcow2 --os-name red-ai-9-amd64-nvidia-byol
 image_id=$(ibmcloud is images --visibility private --output json | jq -r '.[] | select(.name=="'$image_name'") | .id')
 ibmcloud is image ${image_id}
Step 2. Configure the network and SSH access
SSH keys are used by servers to identify a user or device through public-key cryptography. By adding an SSH key to a server, you can access the server with the corresponding private SSH key instead of a password. You can add SSH keys to a server only when you initially create the server. After a Linux server is created, you can edit keys directly in the ~/.ssh/ directory of the server. Creating a server with a password option for connecting isn't supported. You must specify an SSH key when you provision the server and use the private key to connect to the server.
Step 2.1: Configure SSH access
In this step, you create SSH keys (keypair of public and private keys) for accessing the virtual server instance (VSI) in the virtual private cloud (VPC). Using ed25519 key type helps with performance while providing the same level of security.
Make sure that the key is created using the IBM Cloud UI. To learn more about creating SSH keys, review the IBM Cloud docs.
ssh-keygen -f ibmcloud -t ed25519
You can now upload the public key to your IBM Cloud account by using the .pub file generated from the previous command:
ibmcloud is key-create my-ssh-key @ibmcloud.pub --key-type ed25519
Step 2.2: Set up your network
Floating IP addresses are IP addresses that are provided by the system and are reachable from the public internet. They are allocated an IPv4 address which can be used for external connectivity.
Create a floating IP for your IBM Cloud instance by using the following command. Be sure that you change the region to your preferred zone.
ibmcloud is floating-ip-reserve my-public-ip --zone <region>
This kind of connectivity is needed since the instance needs to download container images from Red Hat container registry and other components needed from HuggingFace repositories.
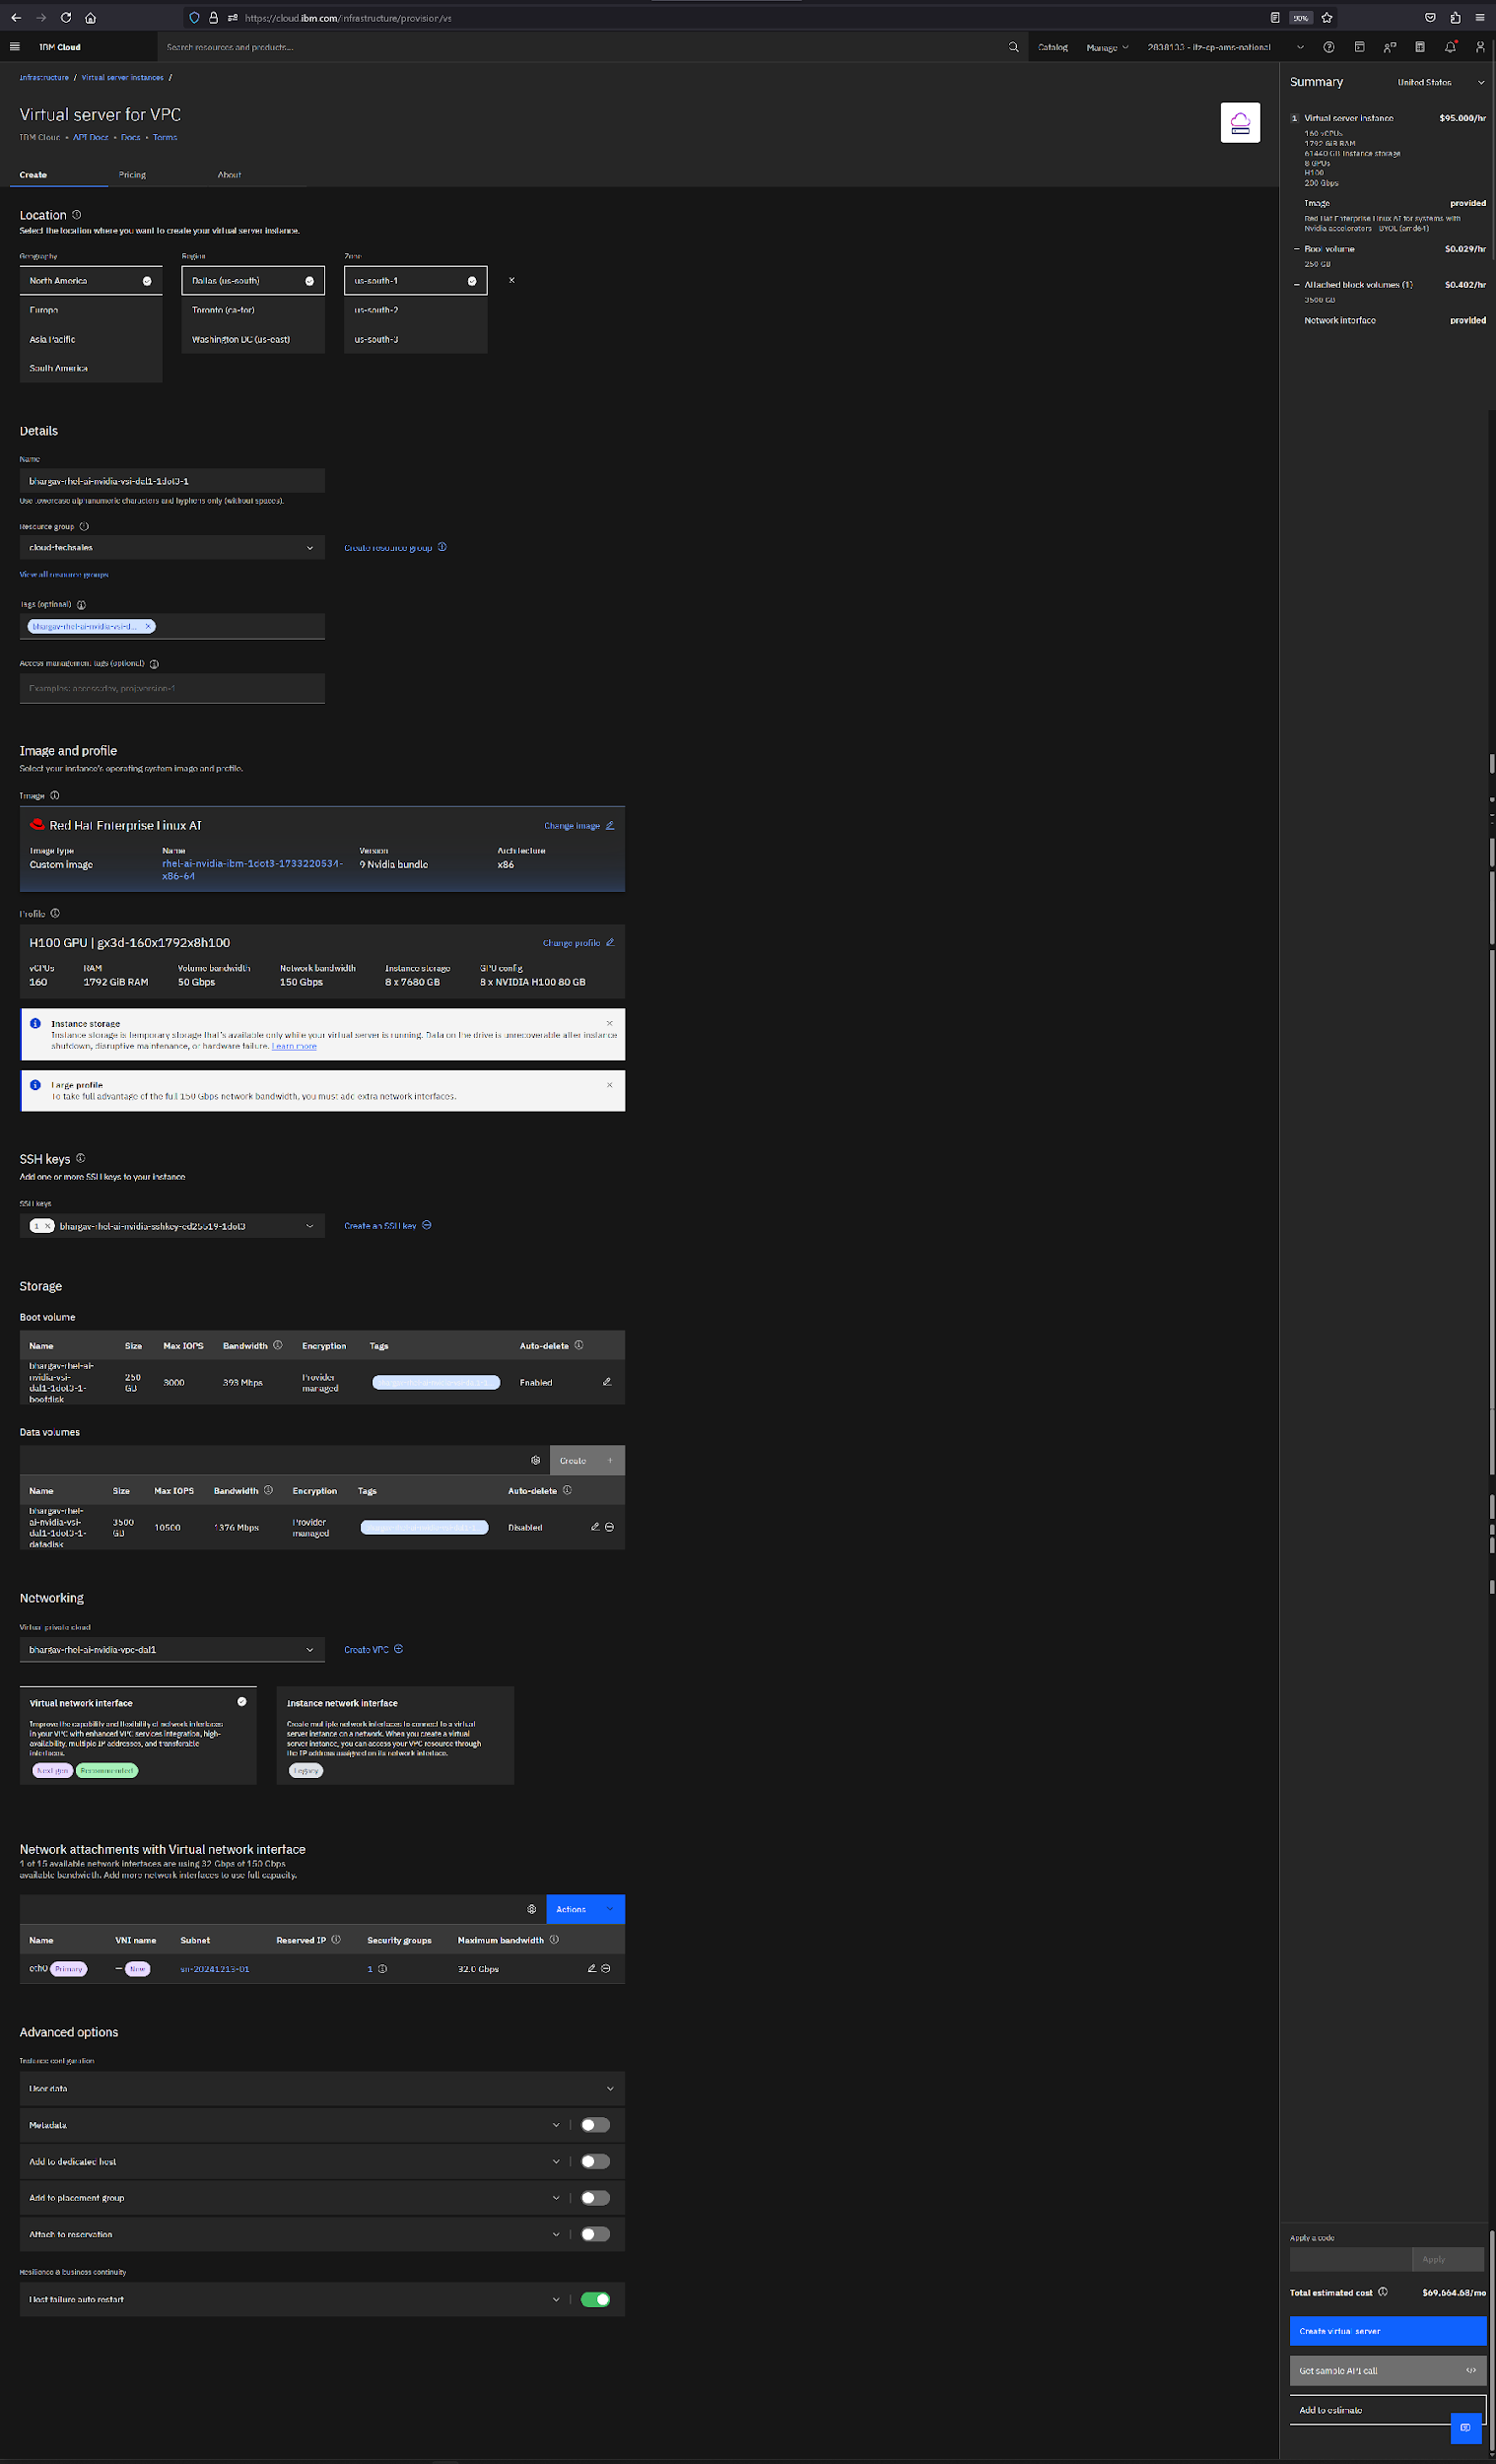
Step 3. Deploy and configure the Virtual Server Instance
On IBM Cloud Virtual Private Cloud (VPC), when you create a virtual server, you specify information such as the location and name for your virtual server. You specify an operating system image, a profile that defines the combination of vCPU and RAM, and SSH keys to securely connect to your virtual server. You can add data volumes in addition to the boot volume. You can also specify the type of network interface that is created for your virtual server. Finally, you can select from advanced options for your virtual server configuration.
Create a custom IBM Cloud Virtual Server Instance (VSI) using the formatted image with the correct compute profile, SSH key, and operating system, in your selected region and zone. A running and ready to use virtual server instance can be created from a custom boot image of IBM Cloud VPC image compliant format resource.
To create a virtual server instance from an image, you need to provide specific details such as: geography, region, zone, a name for VSI, resource group into which this VSI belongs, a tag for this VSI instance, and the image from which to create the running VSI instance.
You also need to create a block storage boot disk of size 250GB, and a block storage data disk of size 3.5TB. For creating a boot disk, you need to specify a name, optionally a tag, and a storage size. The life cycle of this boot volume is to be managed by IBM Cloud (auto delete when instance is de-provisioned).
Populate the environment variables for when you create the instance.
name=my-rhelai-instancevpc=my-vpc-in-us-eastzone=us-east-1subnet=my-subnet-in-us-east-1instance_profile=gx3-64x320x4l4image=my-custom-rhelai-imagesshkey=my-ssh-keyfloating_ip=my-public-ipdisk_size=250The following screen capture shows the GPU compute profile being specified with the shown details. You will need to use a supported NVIDIA GPU processor profile that has 160 vCPUs, 1792 GB RAM memory, 200 Gbps network bandwidth, 8 cores, 80 GB GPU memory and 8 times 7680 GB instance storage.

Create your instance, by running the following command:
ibmcloud is instance-create \ $name \ $vpc \ $zone \ $instance_profile \ $subnet \ --image $image \ --keys $sshkey \ --boot-volume '{"name": "'${name}'-boot", "volume": {"name": "'${name}'-boot", "capacity": '${disk_size}', "profile": {"name": "general-purpose"}}}' \ --allow-ip-spoofing falseLink the floating IP to the instance by running the following command:
ibmcloud is floating-ip-update $floating_ip --nic primary --in $name
The following screen capture shows all the details you provided for creating our VSI instance, including the connectivity into our server instance from zone 1’s subnet ethernet connection as shown.
Step 4. Verify your IBM Cloud resources
You can connect to the remote virtual server instance that you created in virtual private cloud in IBM Cloud – using your SSH ed25519 private key.
You can log in to the instance using "cloud-user" as the user name and the ed25519 private key with the ssh -i option.
ssh -i <private-key> cloud-user@<IP> -p 22
The following screen capture lists all the resources you created for a RHEL AI workload deployment on IBM Cloud under various categories.

Step 5. Configuring RHEL AI
In the previous steps, you have provisioned the required resources at IBM Cloud. In this step, you will configure the RHEL AI software. RHEL AI brings together:
- The InstructLab model alignment tools, which open the world of community-developed LLMs to a wide range of users
- A bootable image of RHEL, including popular AI libraries such as PyTorch and hardware optimized inference for NVIDIA, Intel, and AMD
- Enterprise-grade technical support and open source assurance legal protections
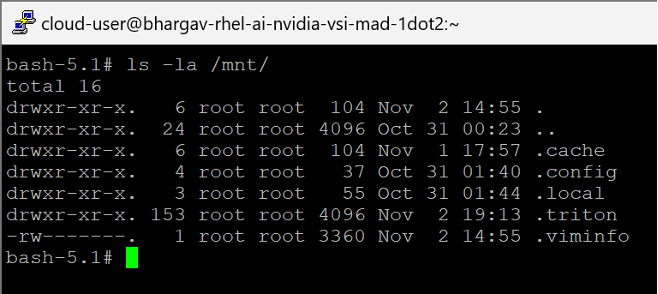
Step 5.1: Adding more storage to your IBM Cloud instance
You need additional storage to store the models. You provisioned additional block storage disk in previous step. In the following steps, you will configure the data disk of size 3.5 TB to be usable for all your work.
- To identify the block devices on RHEL, use the lsblk command:
lsblk. - Identify your data disk block storage device and assign an environment variable for it:
disk=/dev/vdb. - Create a new partition (partition number 1) starting at sector 0, extending to the end of the disk:
sgdisk -n 1:0:0 $disk. - Create an XFS file system, label the disk with the
-Loption, and mount it:mkfs.xfs -L ilab-data ${disk}1. - Add the mount point to /etc/fstab for automatic mounting at boot:
echo LABEL=ilab-data /mnt xfs defaults 0 0 >> /etc/fstab. - Reload the configurations to take effect. This command ensures that the new changes to /etc/fstab are applied immediately:
systemctl daemon-reload. Mount the file system to a mount point and set the proper permissions.
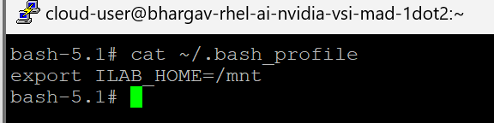
mount -a chmod 1777 /mnt/Add a data storage directory to your instance using these commands:
echo 'export ILAB_HOME=/mnt' >> $HOME/.bash_profile
 source $HOME/.bash_profile
The following screen capture shows the configured .bash_profile file for a script-based environment variable definition to access our mounted file system.
Step 5.2: Initializing RHEL AI
Initialize InstructLab in RHEL AI using the following command and follow the prompts with the system details.
ilab config init
You can view the system info using ilab system info, edit the configuration using ilab config edit, and view the configuration using ilab config show.
The following screen capture shows the successful initialization of ilab config init command and the resulting configuration files creation.
Step 5.3: Downloading the models from a Red Hat repository
Use the following commands to download the required models after successfully logging into Red Hat registry.
podman login registry.redhat.io
ilab model download --repository docker://registry.redhat.io/rhelai1/granite-8b-starter-v1 --release latest
ilab model download --repository docker://registry.redhat.io/rhelai1/granite-8b-lab-v1 --release latest
ilab model download --repository docker://registry.redhat.io/rhelai1/skills-adapter-v3 --release latest
ilab model download --repository docker://registry.redhat.io/rhelai1/knowledge-adapter-v3 --release latest
ilab model download --repository docker://registry.redhat.io/rhelai1/mixtral-8x7b-instruct-v0-1 --release latest
ilab model download --repository docker://registry.redhat.io/rhelai1/prometheus-8x7b-v2-0 --release latest
ilab model download --repository docker://registry.redhat.io/rhelai1/fluxcapacitor --release latest
Check the model list using ilab model list. Optionally, verify the models were downloaded and on the data disk file system.
ls /mnt/.cache/instructlab/models
The following screen capture shows the downloaded models.

Step 6. Check the model capability by chatting with the model
Chat with the existing IBM Granite model to see if it understands the knowledge presented in the Great Tech Reset book.
ilab model chat
Ask the model these questions:
How many applications have been migrated to cloud at Delta?

What's IBM expected productivity improvement through using hybrid by design?

What is the enterprise dollar value generated based on Enterprise Platform Management?

At this time of aligning and fine tuning our Granite model, it is clear that our current model doesn’t know the contents of the Great Tech Reset book.
Step 7. Tune your model using RHEL AI
In this step, you are going to customize IBM Granite by tuning it with additional knowledge through RHEL AI.
Step 7.1: Adding knowledge to your taxonomy tree
In this section, you will create the questions and answers file (qna.yaml) with at least 5 context seeds and 3 question and answer pairs for each context. This will be used by RHEL AI to generate additional synthetic training data.
Navigate to the directory of InstructLab.
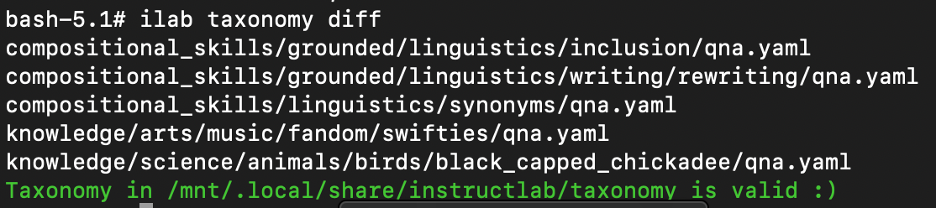
Perform the following command to understand the current changes to the taxonomy.
ilab taxonomy diffThe following output indicates that the taxonomy is valid and have some pending changes.
Change all the pending
qna.yamlintoqna.old, so that you start with an empty taxonomy. The following commands rename the pendingqna.yamlintoqna.oldso that they are not taking into consideration for the synthetic data generation, and start with an empty taxonomy.cd taxonomy mv compositional_skills/grounded/linguistics/inclusion/qna.yaml compositional_skills/grounded/linguistics/inclusion/qna.old mv compositional_skills/grounded/linguistics/writing/rewriting/qna.yaml compositional_skills/grounded/linguistics/writing/rewriting/qna.old mv compositional_skills/linguistics/synonyms/qna.yaml compositional_skills/linguistics/synonyms/qna.old mv knowledge/science/animals/birds/black_capped_chickadee/qna.yaml knowledge/science/animals/birds/black_capped_chickadee/qna.old mv knowledge/arts/music/fandom/swifties/qna.yaml knowledge/arts/music/fandom/swifties/qna.old cd ..Run the
ilab taxonomy diffcommand again to check that your taxonomy is valid.
Create your
qna.yamlfile incorporating the additional knowledge or skill that you want to add to the taxonomy. As a recommendation, use the InstructLab UI to create yourqna.yamlfile. Here is a sampleqna.yamland a sampleattribution.txtfor the Great Tech Reset book.mkdir -p taxonomy/knowledge/technology/hybrid_cloud/the_great_tech_reset vi taxonomy/knowledge/technology/hybrid_cloud/the_great_tech_reset/qna.yaml vi taxonomy/knowledge/technology/hybrid_cloud/the_great_tech_reset/atribution.txtMake sure that the syntax is valid for the qna.yaml file, you can use yamllint for that.
Validate the taxonomy again using the
ilab taxonomy diffcommand again. Important: Do not proceed further if the file includes any syntax errors, or if the additionalqna.yamlfile is not listed.
Step 7.2: Generate synthetic data
RHEL AI uses its Agentic Pipeline to generate the synthetic data. After validating the taxonomy, you need to start the Synthetic Data Generation (SDG).
Tmux (short for "Terminal Multiplexer") is a powerful tool that allows you to manage multiple terminal sessions within a single window or session. It’s commonly used by developers, system administrators, and power users to enhance productivity in a command-line environment. It's advisable to use a tmux session, since SDG is a time consuming process. For example, use these commands:
tmux new -s ilab-sdg-session \; pipe-pane -o "cat > /var/home/cloud-user/tmux-ilab-sdg.log"
date;ilab data generate --enable-serving-output;date
Next, press Ctrl+B, and then press D to detach the current session, while continuing running the session in the background, allowing you to disconnect from it while keeping your processes active.
vLLM is a high-performance, memory-efficient library designed to serve large language models (LLMs) for production environments. Eventually, the vLLM server will start and the synthetic data generation will begin.
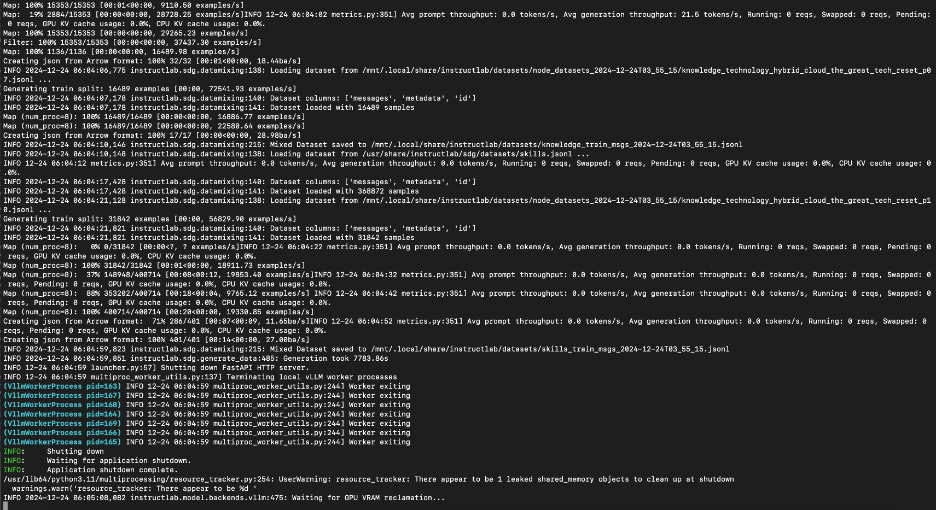
Watch the log file to see the progress.
tail -1f /mnt/.local/share/instructlab/datasets/test_mixtral-8x7b-instruct-v0-1_2024-12-25T18_03_36.jsonl
As you can see it started generating the synthetic data with the /usr/share/instructlab/sdg/pipelines/agentic pipeline using mixtral-8x7b-instruct-v0-1\ as the teacher model.

You can watch the GPU utilization status using the nvidia-smi command.
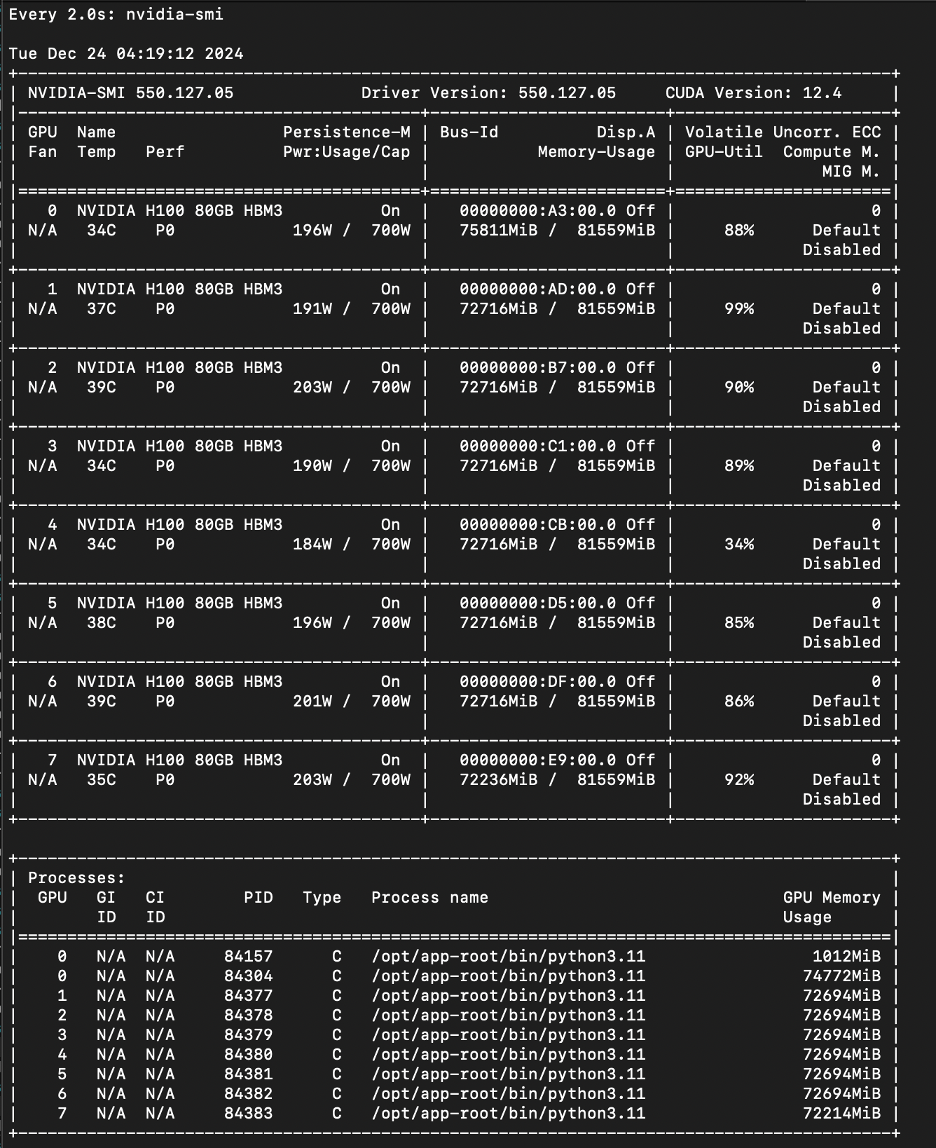
The following command just keeps track of the GPU utilization and GPU memory usage in the gpu_utilization.log file:
nohup bash -c 'while true; do echo "$(date "+%Y-%m-%d %H:%M:%S") $(nvidia-smi --query-gpu=index,memory.used,memory.total,utilization.gpu --format=csv,noheader,nounits)" >> gpu_utilization.log; sleep 5; done' &
On 8 H100 GPUs, it took 3 minutes to serve the teacher model, and processing a PDF with 148 pages converted using Docling took 5 minutes. For details about the Docling project, see the Docling docs.
In the different runs, it has typically taken from 1 hour to 2 hours for SDG on 8 H100 GPUs.
Verify the new synthetic data
You can view output of synthetic data generation by navigating to the ~/.local/share/datasets/<generation-date> directory and opening the JSONL file.
cat ~/.local/share/datasets/<generation-date>/<jsonl-dataset>
Keep track of the path as you will use it in the next step for the training.
Step 7.3: Run the multi-phase training
Now, you can use RHEL AI to train a model with your synthetically generated data.
Create a new tmux session for the training.
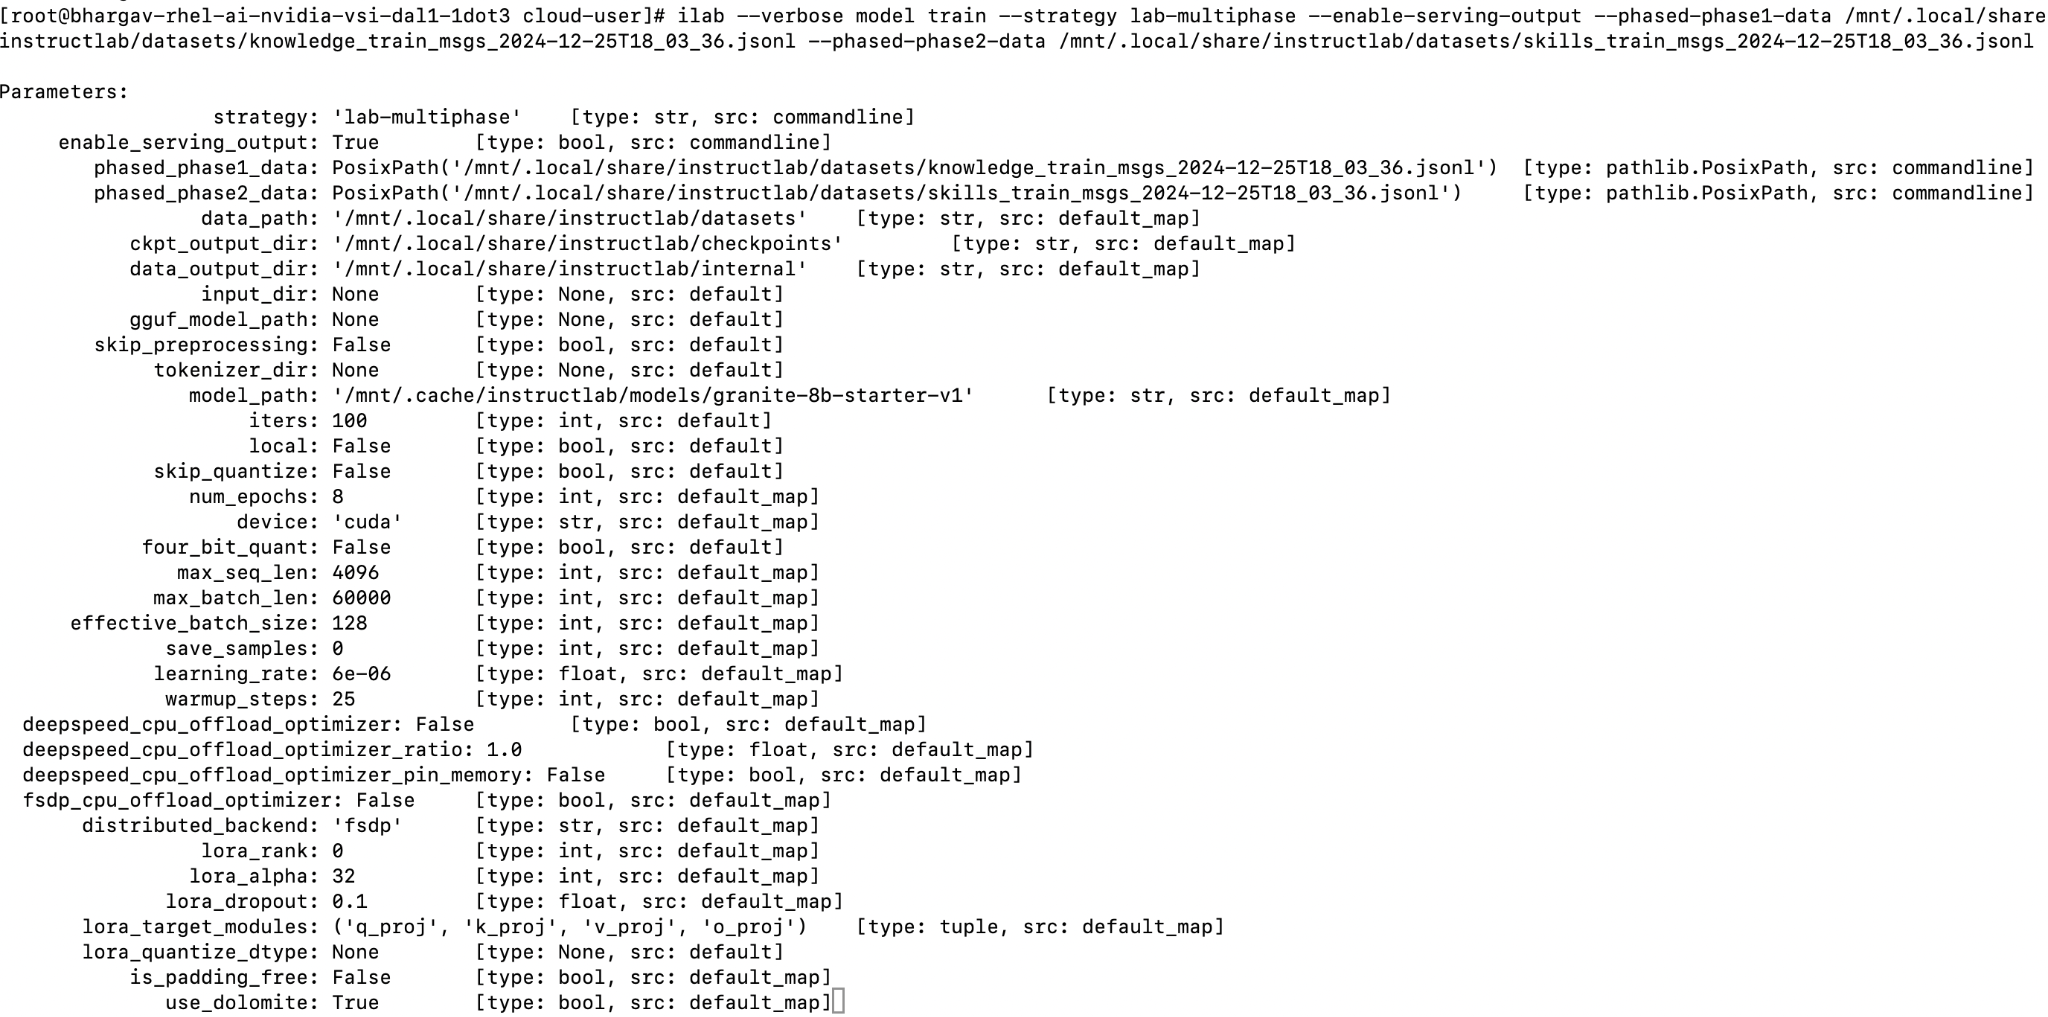
tmux new -s ilab-train \; pipe-pane -o "cat > /var/home/cloud-user/ tmux-ilab-train.log"Run multi-phase training and evaluation by running the following command with the data files generated from synthetic data generation.
ilab --verbose model train --strategy lab-multiphase --enable-serving-output --phased-phase1-data /mnt/.local/share/instructlab/datasets/knowledge_train_msgs_2024-12-25T18_03_36.jsonl --phased-phase2-data /mnt/.local/share/instructlab/datasets/skills_train_msgs_2024-12-25T18_03_36.jsonl<knowledge-train-messages-file>is the location of theknowledge_messages.jsonlfile generated during synthetic data generation in the previous step. RHEL AI trains the student model granite using the data from this.jsonlfile. This should be passed as the argument for phased-phase1-data argument.<skills-train-messages-file>is the location of theskills_messages.jsonlfile generated during synthetic data generation. RHEL AI trains the student modelgranite-7b-starterusing the data from the.jsonlfile. This should be passed as the argument forphased-phase2-dataargument.Next, press Ctrl+B, and then press D.
Output from the multi-phase training:
When training a model with ilab model train, multiple checkpoints are saved with the samples_ prefix based on how many data points they have been trained on. These are saved to the ~/.local/share/instructlab/phase/ directory. Check the checkpoints.
ls ~/.local/share/instructlab/phase/<phase1-or-phase2>/checkpoints/
You can check the status of the phased training in these log files:
tail -f /var/home/cloud-user/tmux-ilab-train.log
After training is complete, a confirmation appears and displays your best performed checkpoint. It has taken roughly around 8 hours for the training on 8 H100 GPUs.
*Training finished:*
*Training finished! Best final checkpoint: /mnt/.local/share/instructlab/phased/phase2/checkpoints/hf\_format/samples_395641 with score: 7.326923076923077*
*Journal: /mnt/.local/share/instructlab/phased/journalfile.yaml*
Note as shown in the above screenshot, samples_39564 is the best final checkpoint which you will use as the new custom model with the enterprise knowledge.
Step 7.4: Verify the new custom model
Verify the new custom model by serving and chatting with the model.
List the model.
ls -l ~/.local/share/instructlab/checkpoints/hf_format/Serve the model.
ilab model serve --model-path /mnt/.local/share/instructlab/phased/phase2/checkpoints/hf_format/samples_39564
Step 8. Chat with the fine-tuned model
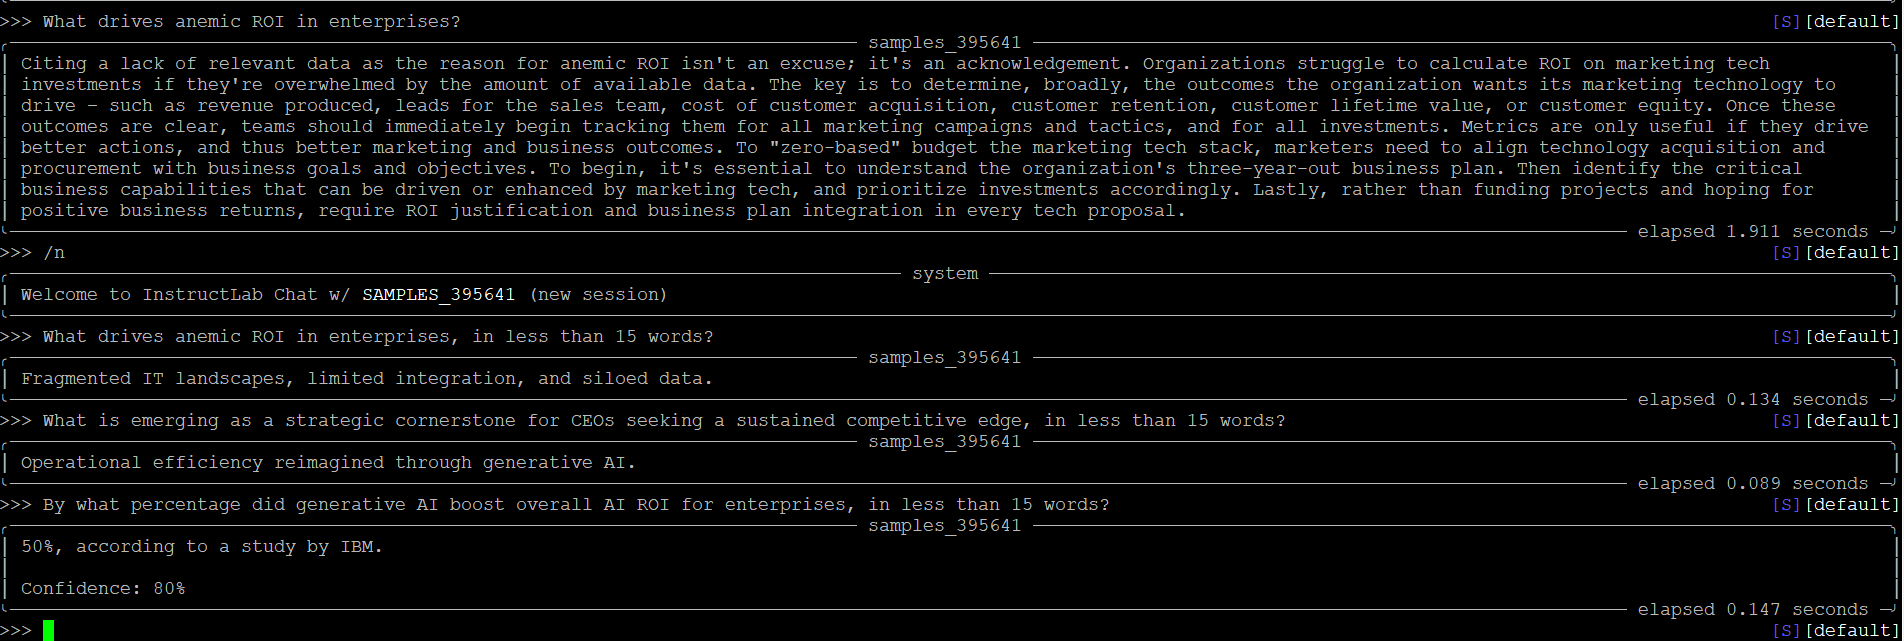
Once vLLM has started and is accepting requests, in the other terminal, enter the following to chat with the newly-trained model:
ilab model chat -gm --model /root/.local/share/instructlab/checkpoints/hf_format/samples_395641
Chat with the model directly to qualitatively identify whether the new model has learned the knowledge we created. Use the same questions as in Step 6.
Step 9. Evaluate the new custom model
Because this model has some preloaded skills, we need to evaluate the model to understand how these skills are impacted by the new additional knowledge.
ilab model evaluate \
    --benchmark mt_bench_branch \
    --model  /mnt/.local/share/instructlab/phased/phase2/checkpoints/hf_format/samples_395641 \
    --judge-model /mnt/.cache/instructlab/models/prometheus-8x7b-v2-0 \
    --branch /mnt/.local/share/instructlab/taxonomy \
    --base-branch main \
    --gpus 8 \
For measuring the improvements of the new model, compare its performance to the base model with the evaluation process and also chat with the model directly to qualitatively identify whether the new model has learned the knowledge that is created. Additionally, for more quantitative results of the model improvements, run the evaluation process in the RHEL AI CLI.
## BASE MODEL (SCORE)
/mnt/.cache/instructlab/models/granite-8b-starter-v1 (5.72/10.0)

## MODEL (SCORE)
/mnt/.local/share/instructlab/phased/phase2/checkpoints/hf_format/samples_395641 (5.7/10.0)

### IMPROVEMENTS (0.0 to 10.0):
1. foundational_skills/reasoning/logical_reasoning/causal/qna.yaml: 4.0 -> 6.67 (+2.67)
2. foundational_skills/reasoning/mathematical_reasoning/qna.yaml: 6.0 -> 8.33 (+2.33)
3. foundational_skills/reasoning/linguistics_reasoning/odd_one_out/qna.yaml: 7.67 -> 9.0 (+1.33)
4. compositional_skills/linguistics/synonyms/qna.yaml: 6.17 -> 7.33 (+1.17)
5. foundational_skills/reasoning/linguistics_reasoning/object_identification/qna.yaml: 2.0 -> 3.0 (+1.0)
6. compositional_skills/grounded/linguistics/inclusion/qna.yaml: 5.17 -> 6.17 (+1.0)
7. foundational_skills/reasoning/linguistics_reasoning/logical_sequence_of_words/qna.yaml: 8.0 -> 8.67 (+0.67)
8. compositional_skills/grounded/linguistics/writing/rewriting/qna.yaml: 7.2 -> 7.6 (+0.4)

### REGRESSIONS (0.0 to 10.0):
1. foundational_skills/reasoning/temporal_reasoning/qna.yaml: 6.67 -> 2.33 (-4.33)
2. foundational_skills/reasoning/common_sense_reasoning/qna.yaml: 4.67 -> 2.0 (-2.67)
3. foundational_skills/reasoning/logical_reasoning/general/qna.yaml: 6.13 -> 5.27 (-0.87)
4. foundational_skills/reasoning/theory_of_mind/qna.yaml: 3.88 -> 3.25 (-0.62)
5. foundational_skills/reasoning/logical_reasoning/tabular/qna.yaml: 4.67 -> 4.33 (-0.33)

### NO CHANGE (0.0 to 10.0):
1. foundational_skills/reasoning/unconventional_reasoning/lower_score_wins/qna.yaml (8.33)
If you want to measure how your knowledge contributions have impacted your model, run the mmlu_branch benchmark by executing the following command:
ilab model evaluate \
    --benchmark mmlu_branch \
    --model  /mnt/.local/share/instructlab/phased/phase2/checkpoints/hf_format/samples_396838 \
    --judge-model /mnt/.cache/instructlab/models/prometheus-8x7b-v2-0 \
    --branch /mnt/.local/share/instructlab/taxonomy \
    --base-branch main \
    --gpus 8 \
    --enable-serving-output
Summary and next steps
In this tutorial, you learned how to customize a model for your enterprise use case using Red Hat Enterprise Linux AI (RHEL AI) on IBM Cloud. You were guided through the process of downloading, configuring, initializing, and verifying resources, as well as customizing the taxonomy, generating synthetic data, training the model, and evaluating the new custom model. This approach simplifies the generative AI process, making it more accessible and less risky for developers and domain experts, eliminating the need for extensive data science expertise to tune models.
Having mastered the customization of language models with RHEL AI, you are now ready to explore the next steps in scaling your AI workload. Red Hat OpenShift AI provides a robust, integrated MLOps platform that supports the entire lifecycle of models, including distributed compute, collaborative workflows, monitoring, and hybrid-cloud applications. This platform enables you to build AI-enabled applications at scale, ensuring efficient management and deployment of your models.
Furthermore, InstructLab in watsonx.ai offers an advanced fine-tuning experience, complete with data lineage and evaluation features. It provides the necessary computational infrastructure to handle large-scale AI development projects. By seamlessly bridging the gap between low-cost, accessible testing and full-scale enterprise deployment, InstructLab allows businesses to start small and scale up effortlessly as their AI needs evolve. This progression from RHEL AI to OpenShift AI and InstructLab in watsonx.ai ensures a smooth transition from model customization to full-scale AI application deployment.
Acknowledgements
This tutorial was produced as part of an IBM Open Innovation Community Initiative: Better Together: Joint IBM and Red Hat assets supporting Data and AI lifecycle in the Hybrid Cloud.
We want to thank our fellow professionals and leadership team members for helping us succeed. Their help directly led to getting us mentored, learning, debugging and finally proving the technology and concepts.
- IBM Professionals: Andrea Crawford, David Stacy, Suraksha Vidyarthi, Zack Grossbart, Adam Ngo, Harold Smith, Roger Snook, Martin Obianwu, Randall Tan, Frederic Lavigne, Gary Skinner, Alluri Ruchitha
- Red Hat Professionals: Thalia Hooker, William Henry, Pepa Zimek, Hu Gary