Tutorial
Install Red Hat OpenShift APIs for Data Protection and Velero to back up and restore Kubernetes workloads
Learn the end-to-end process to install, back up, and restore your application data
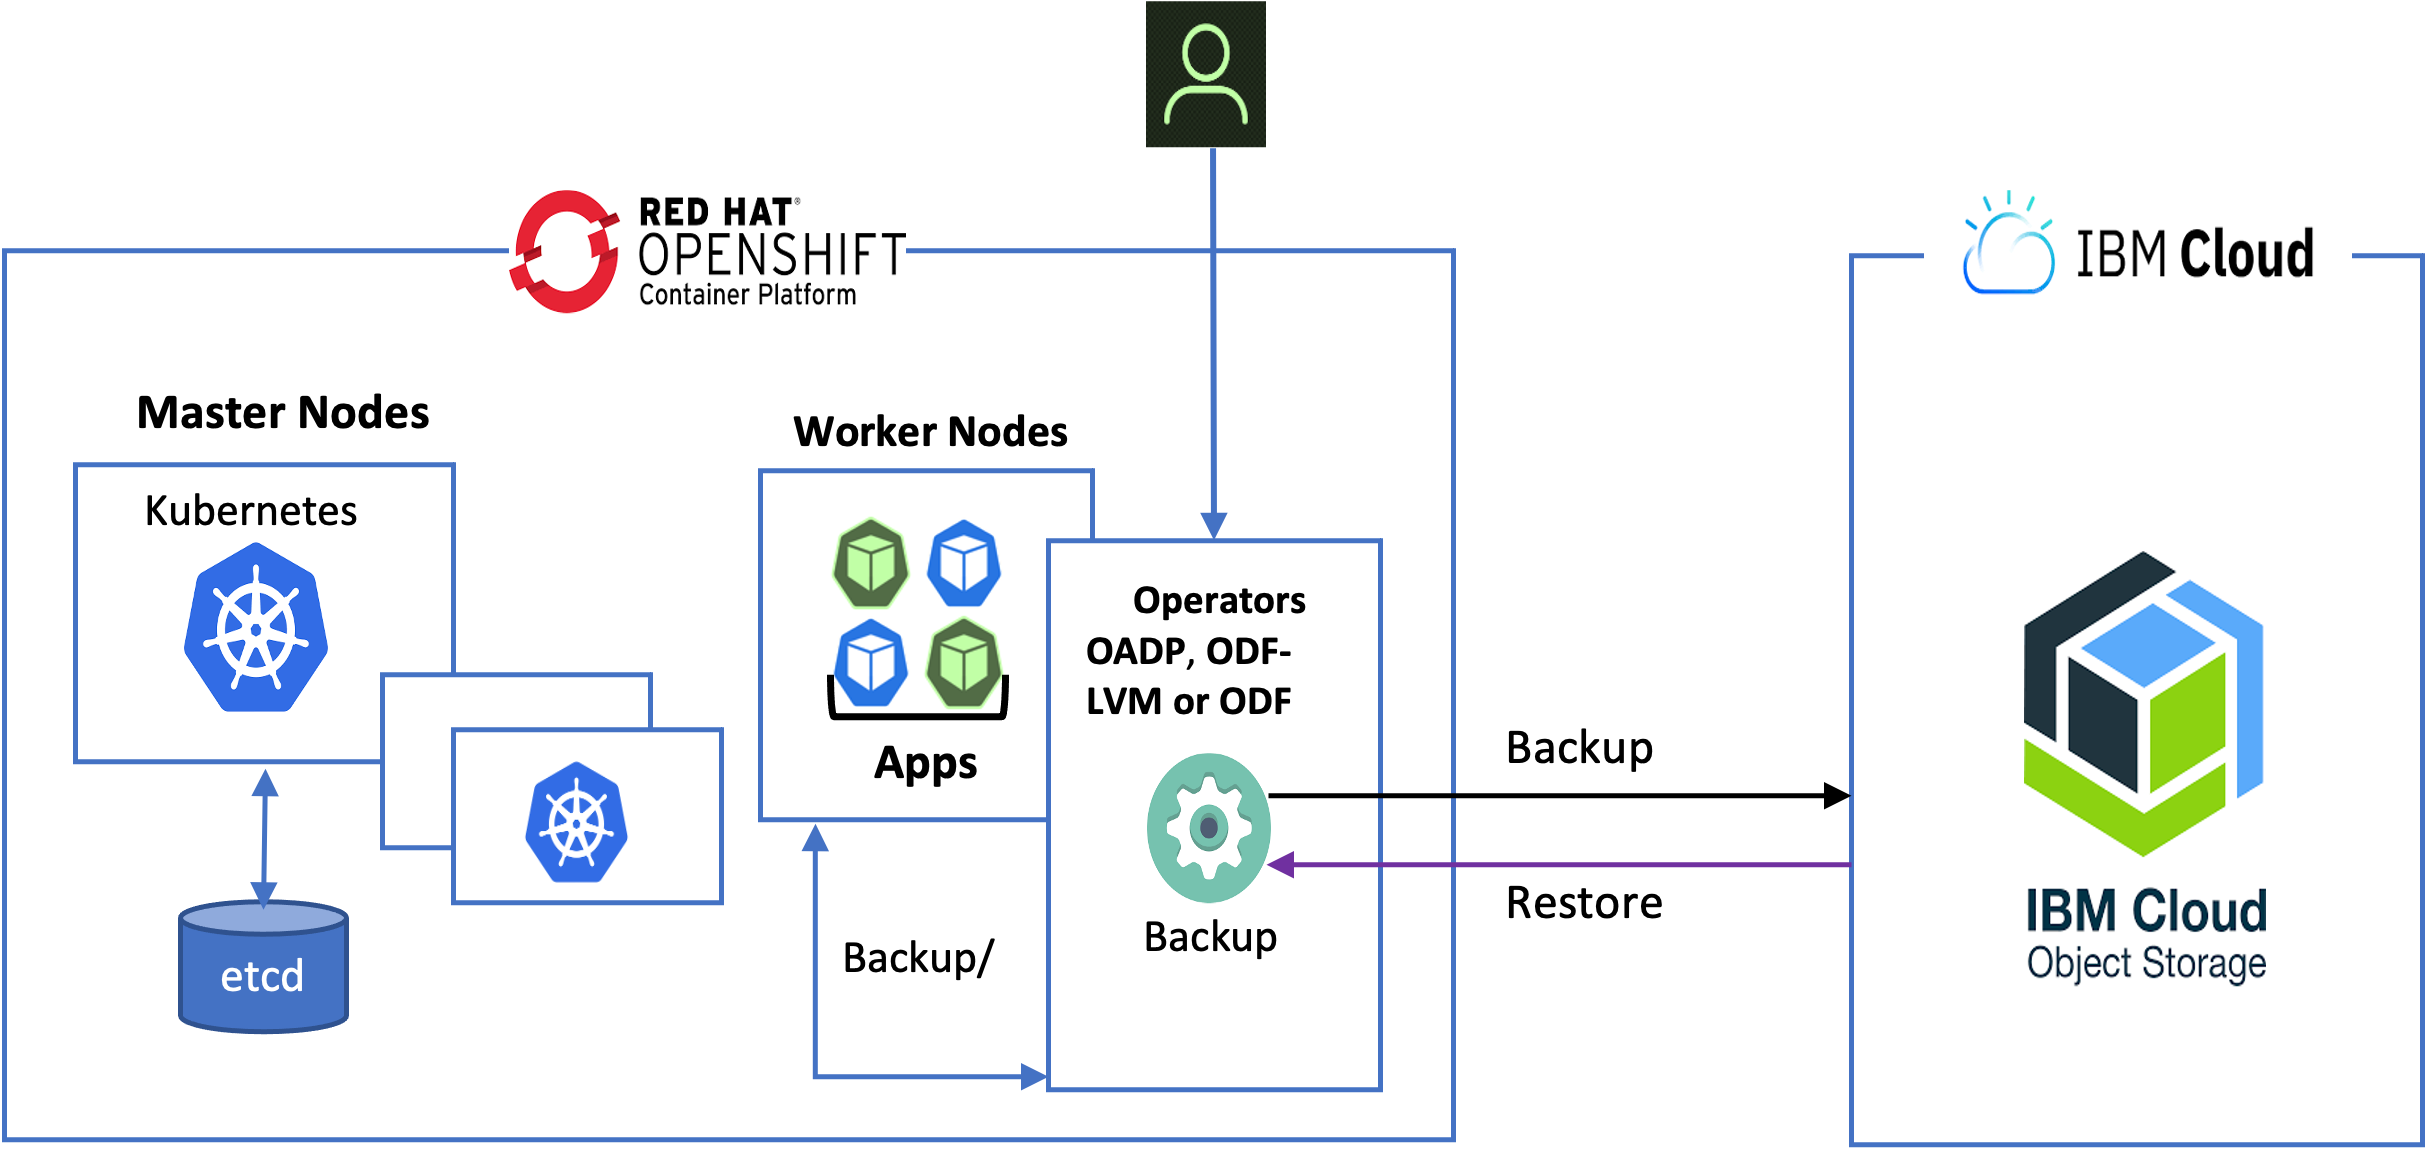
Red Hat OpenShift APIs for Data Protection (OADP) is an operator to create backup and restore APIs in the OpenShift cluster. OADP provides the following APIs:
- Backup
- Restore
- Schedule
- BackupStorageLocation
- VolumeSnapshotLocation
The OADP Operator will install Velero, an open source tool to safely backup and restore Kubernetes resources. It also installs OpenShift plugins for Velero to use in backup and restore operations.
OADP uses the Velero backup controller for Kubernetes resources discovery and backup using the Kubernetes API and Velero Container Storage Interface (CSI) plugin in the persistent volume backup.
The backup and restore configuration using OADP is complex compared to IBM Storage Fusion and will require OpenShift development skills.
Note: Your OADP operator selection will differ depending on whether you have a single- or multi-node OpenShift cluster. The steps provided in this tutorial are for an ODF operator for a multi-node node OpenShift cluster. If you are using a single-node OpenShift cluster, you must install the OADP LVM operator.
Prerequisites
In addition to OpenShift development skills, ensure that you have the following requirements before starting this tutorial:
- Red Hat OpenShift Cluster (multi-node cluster) installed with 8 logical CPU, 32GB, and a minimum 2 storage disks (OS and data)
- Cluster-admin privileges
- IBM Cloud Object Storage: Create an instance
- OpenShift CLI
High-level architecture diagram
Steps
To learn how to install Red Hat OpenShift APIs for Data Protection and Velero to back up and restore your Kubernetes workloads, complete the following steps:
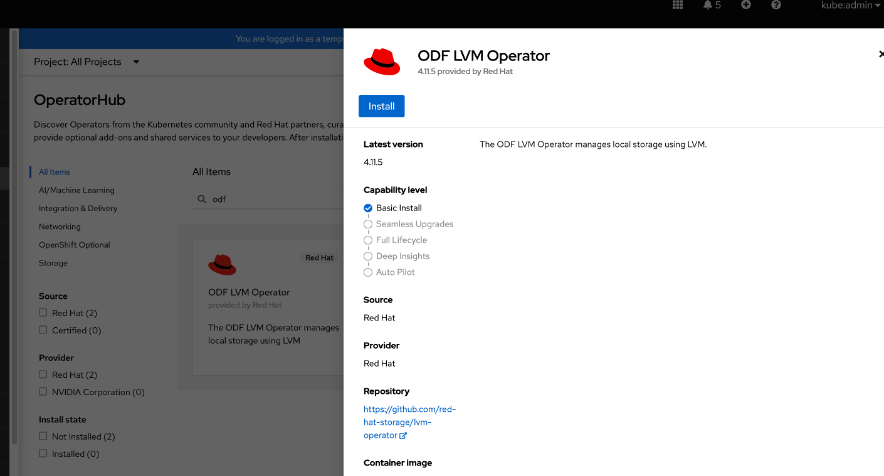
Step 1. Install the ODF LVM Operator on a single-node Red Hat OpenShift cluster
For this step, we will assume that you have already installed the single-node OpenShift cluster. The ODF LVM Operator is recommend only for a single-node OpenShift cluster.
- Go to the OperatorHub page and search for and install ODF LVM Operator.
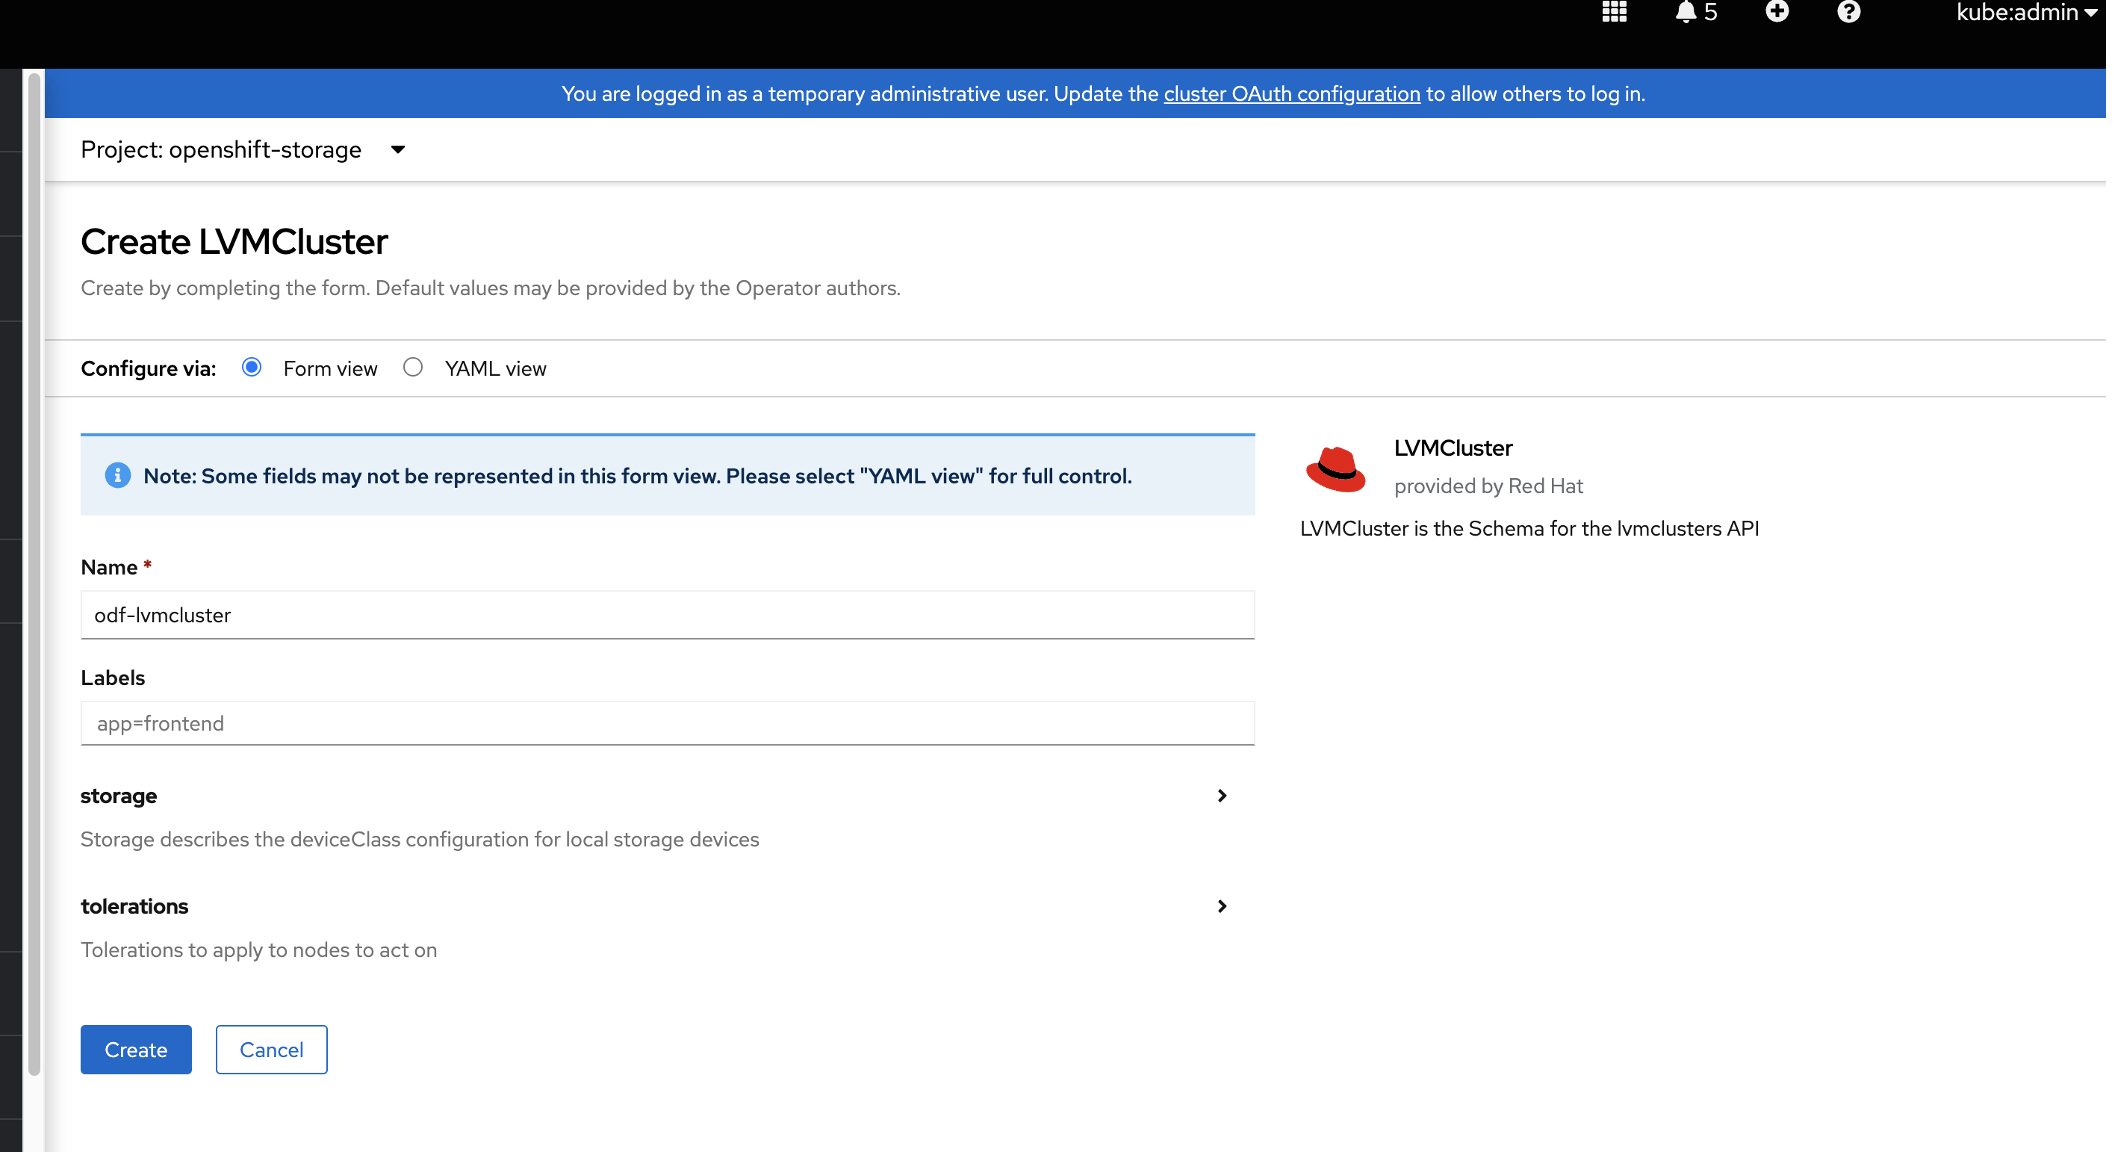
- When installation is complete, go to the Create LVMCluster tab and click Create.
- To verify that the
odf-lvm-vg1storage class has been created, in the OpenShift console's left menu, click Storage > StorageClasses.
- To set the
odf-lvm-vg1storage class as the default, in the console's left menu, click Storage > StorageClasses. Click theodf-lvm-vg1storage class and then click Annotation. - Add the
storageclass.kubernetes.io/is-default-classkey with the value of true. Click Save.
Note: The ODF LVM StorageClass must be set as the default to deploy the container application with dynamic persistent volume on ODF LVM storage.
Step 2. Install OpenShift Data Foundation on a multi-node Red Hat OpenShift cluster
For this step, we assume that you have already installed a multi-node OpenShift cluster.
- Go to the OperatorHub page and search for and install OpenShift Data Foundation.

- To create the storage system, click the name of the operator that you installed and then click Create StorageSystem. Note: For more information, see the Red Hat OpenShift Data Foundation 4.11 documentation. In the Category menu, select Deploying, go to the deployment documentation for your cloud provider, and follow the instructions to create an OpenShift Data Foundation cluster.
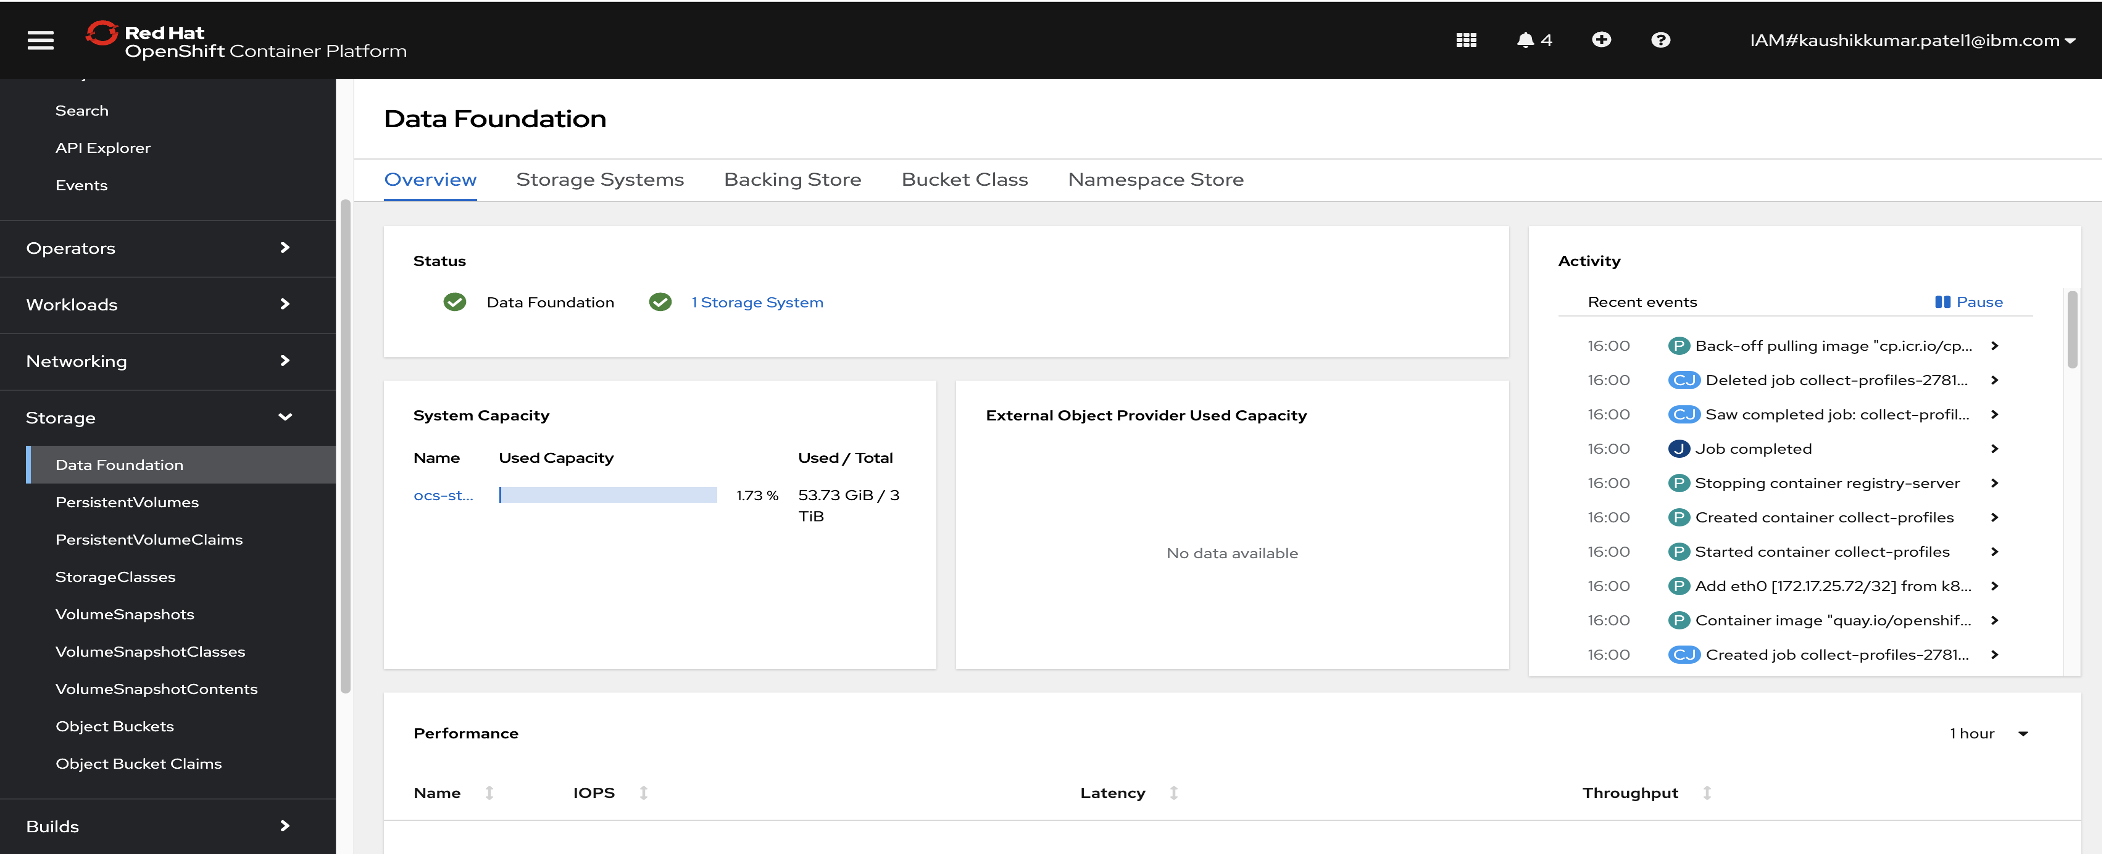
- To verify that OpenShift Data Foundation has been installed successfully, log in to the OpenShift Console. In the left menu, click Storage > Data Foundation. The status should be green.
To verify the storage classes, in the left menu, click Storage > StorageClasses and confirm the following classes have been created:
ocs-storagecluster-cephfs
ocs-storagecluster-ceph-rbd
ocs-storagecluster-ceph-rgw
openshift-storage.noobaa.io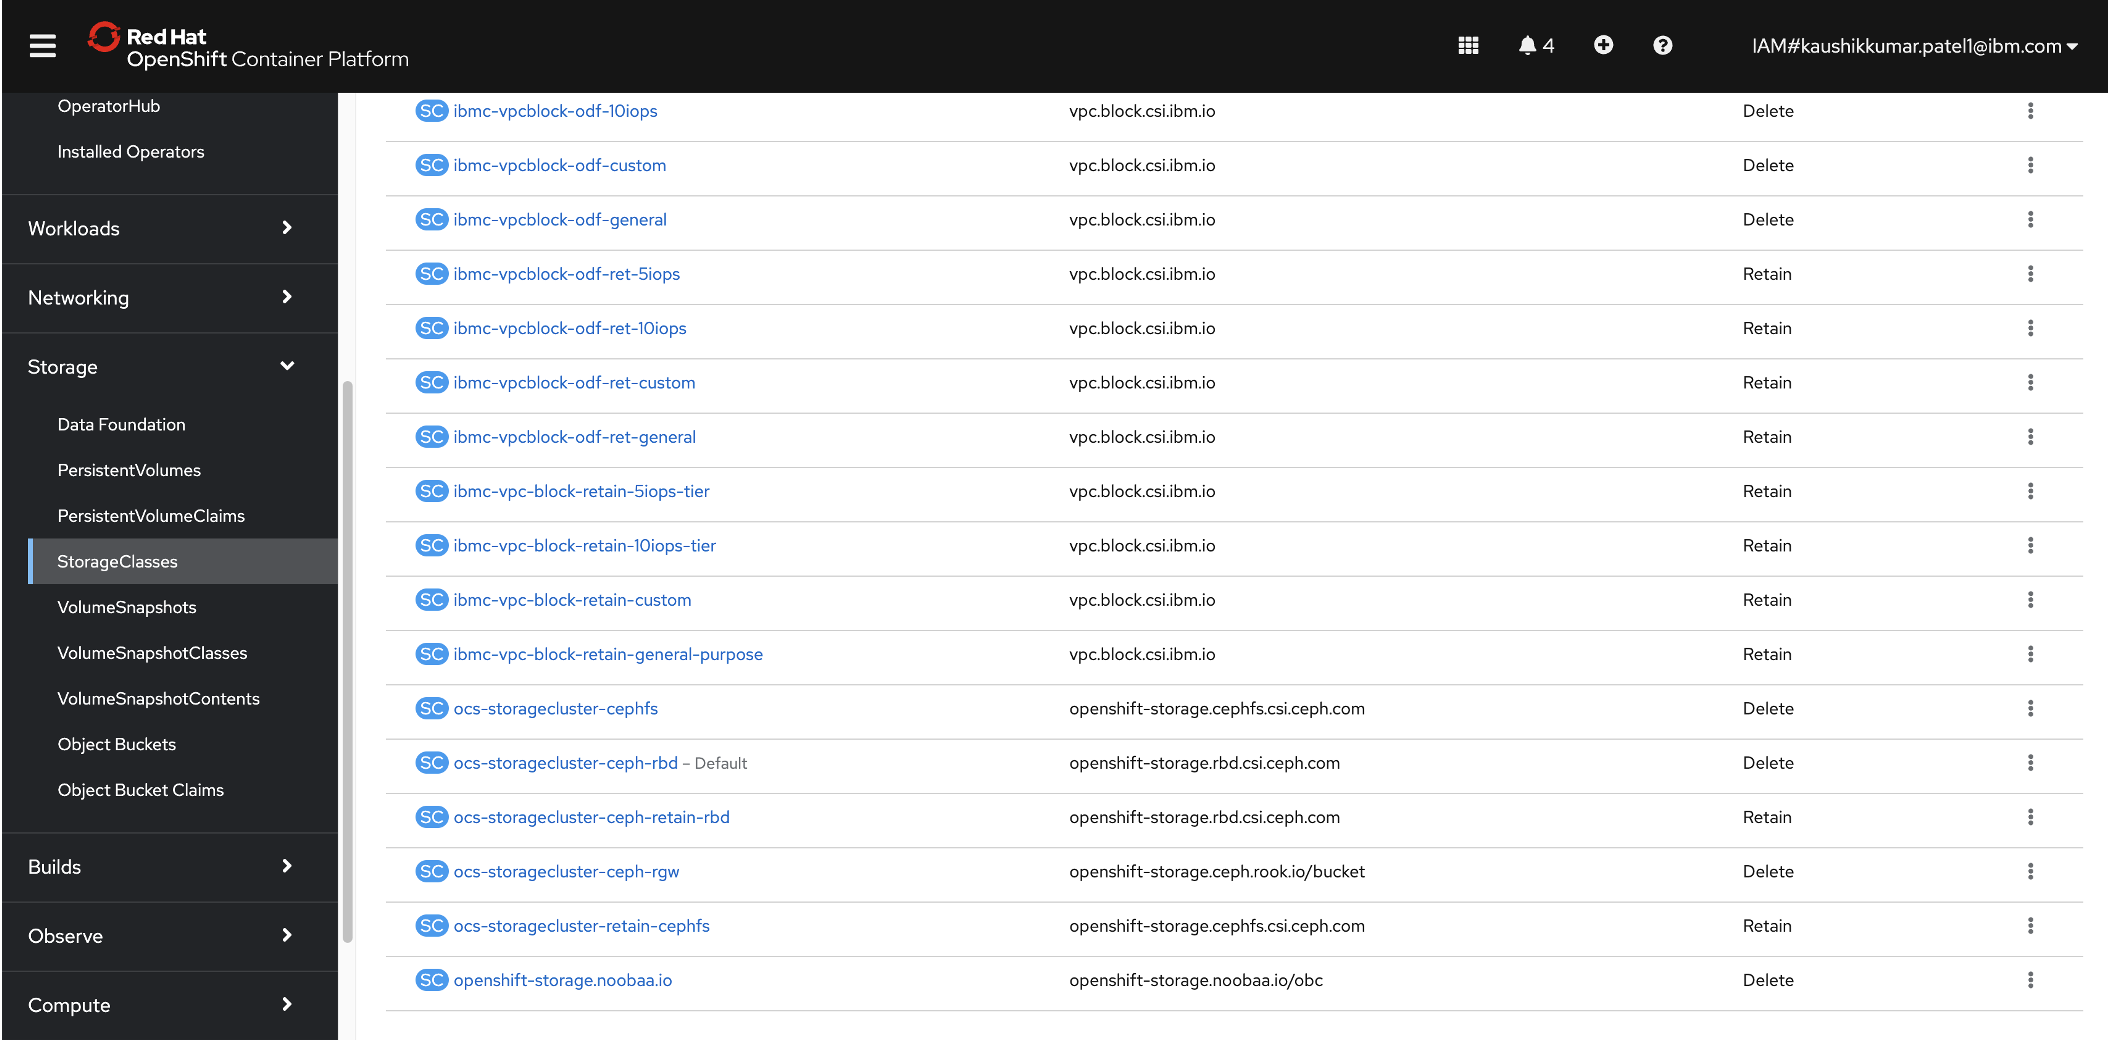
To set the ODF StorageClass as the default, in the OpenShift console's left menu, click StorageClasses and then click the
ocs-storagecluster-ceph-rbdclass. (Note: The ODF StorageClass must be set as the default to deploy a container application with dynamic persistent volume on ODF storage.)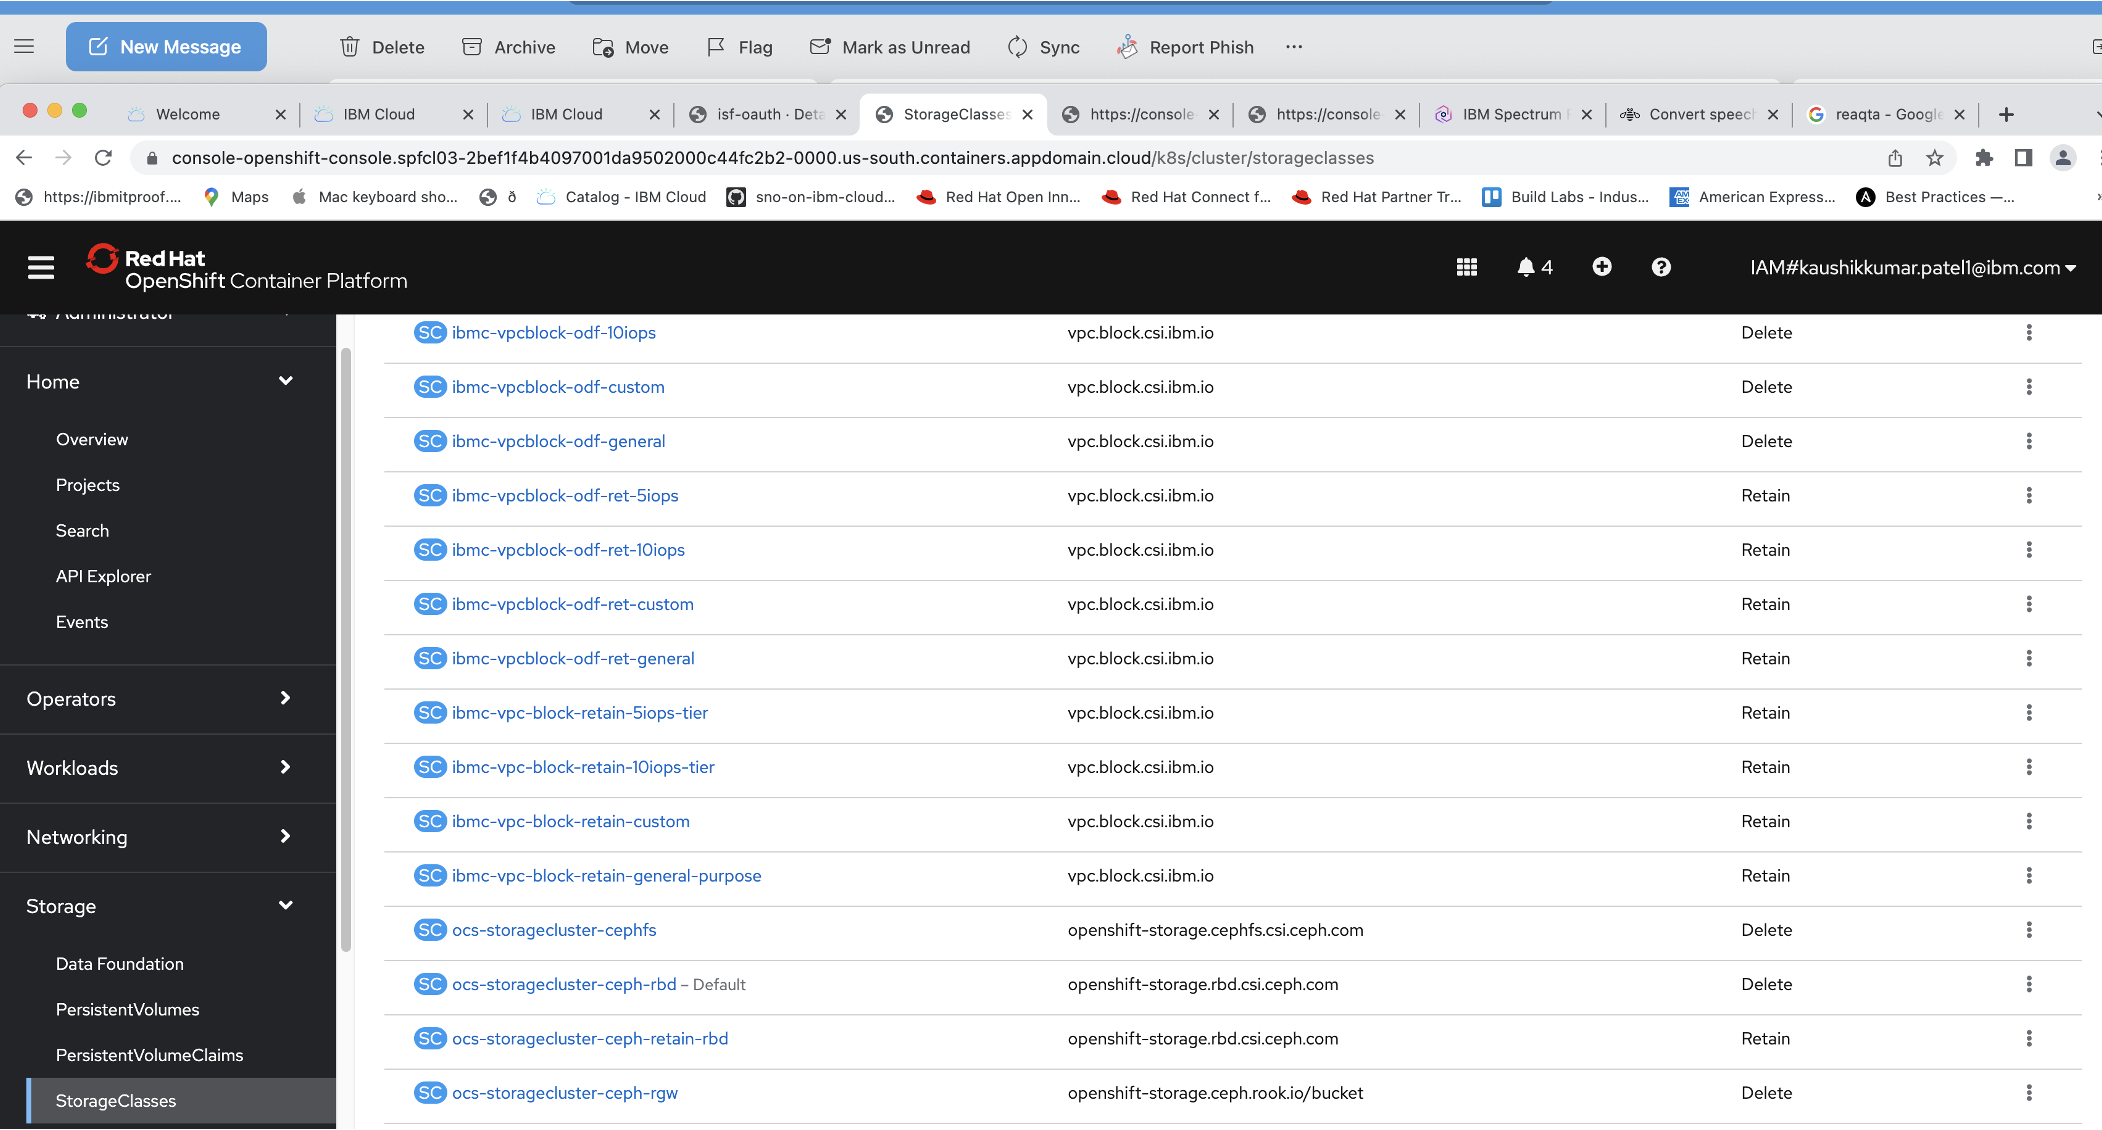
- Click Add More and enter the key name
storageclass.kubernetes.io/is-default-classwith the value of true. Click Save.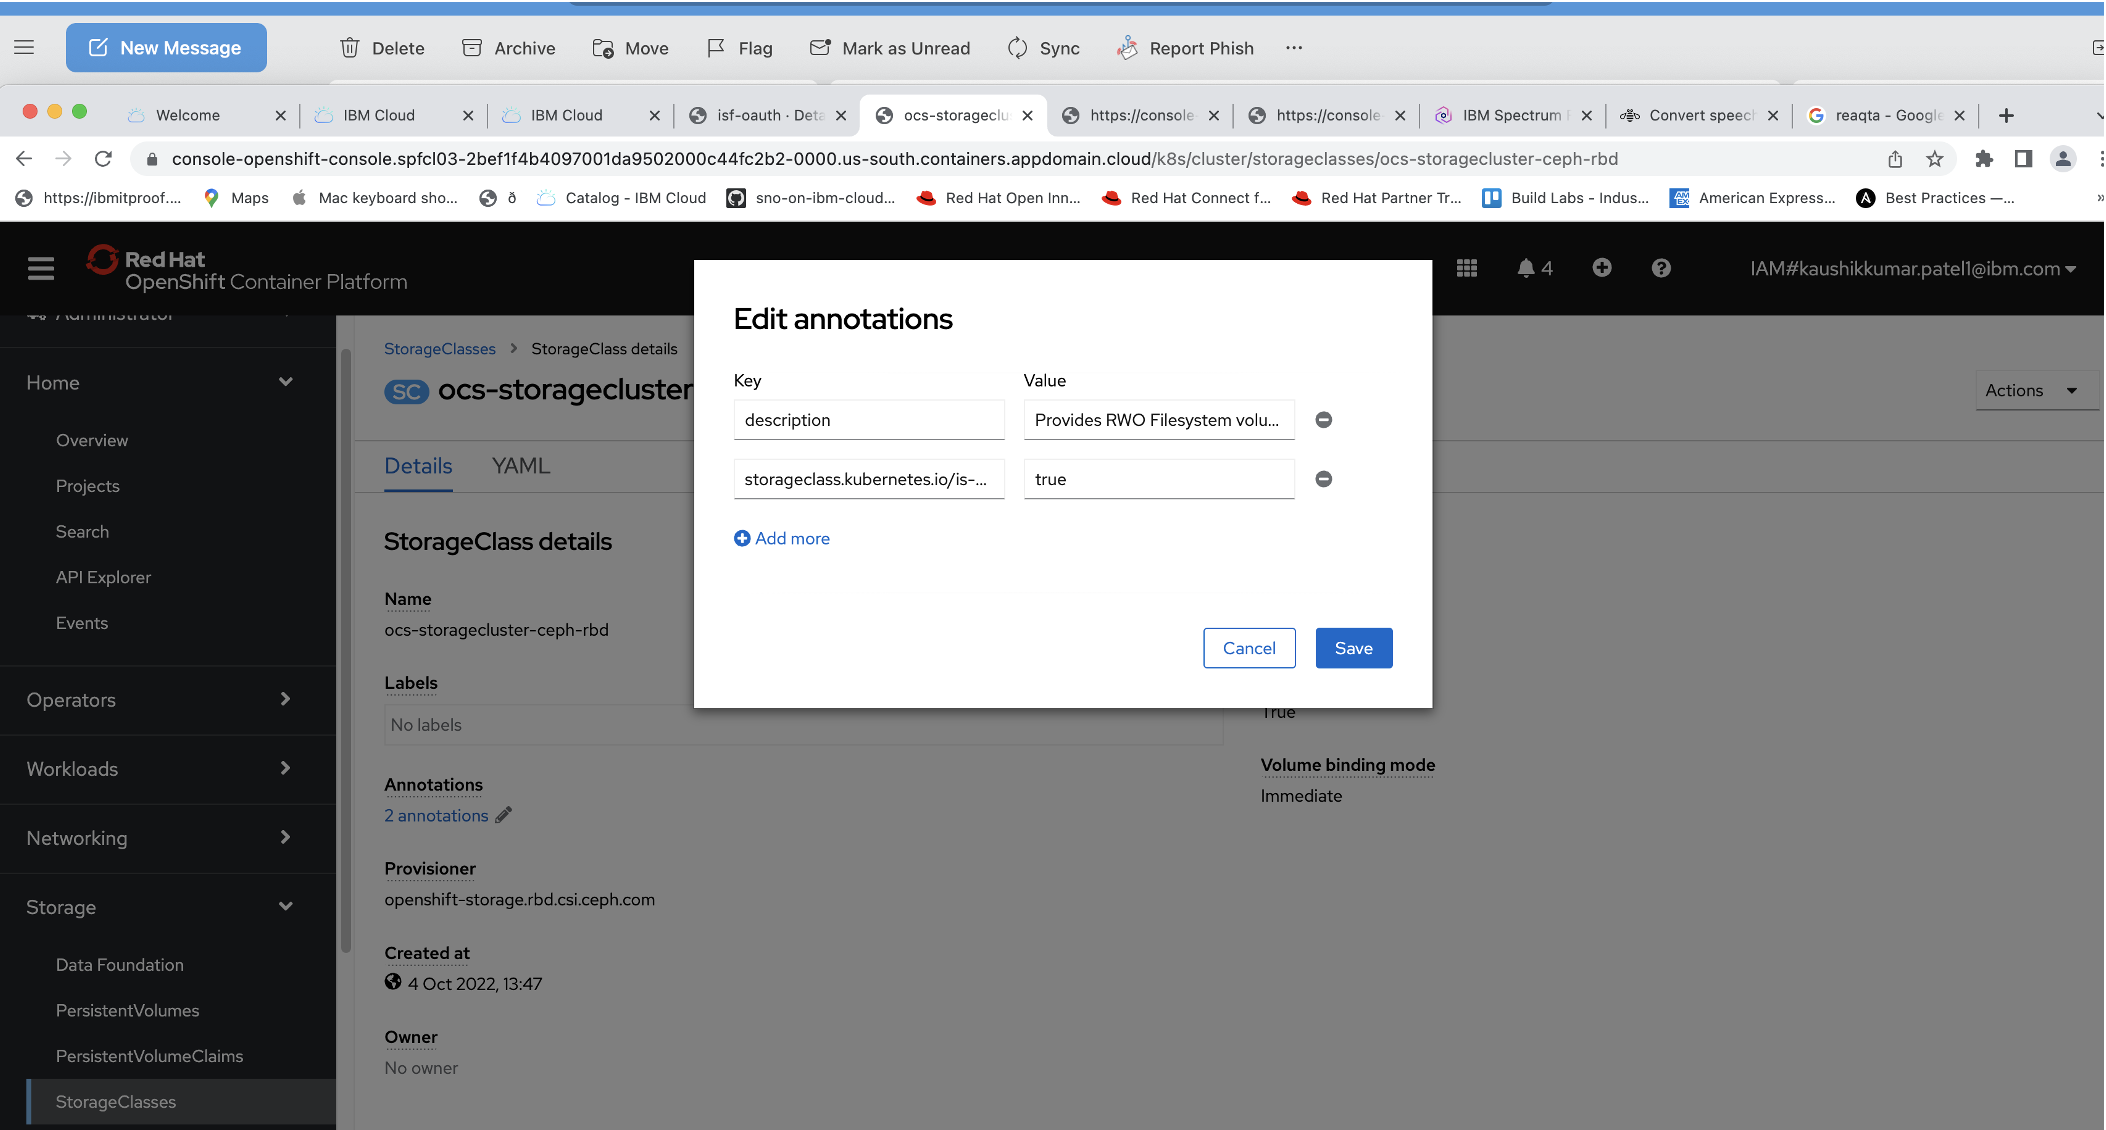
Step 3. Create a backup storage location
To save your backup to IBM Cloud Object Storage, you must have an IBM Cloud account and have created an IBM Cloud Object Storage instance.
These steps assume that you have already created the IBM Cloud Object Storage instance.
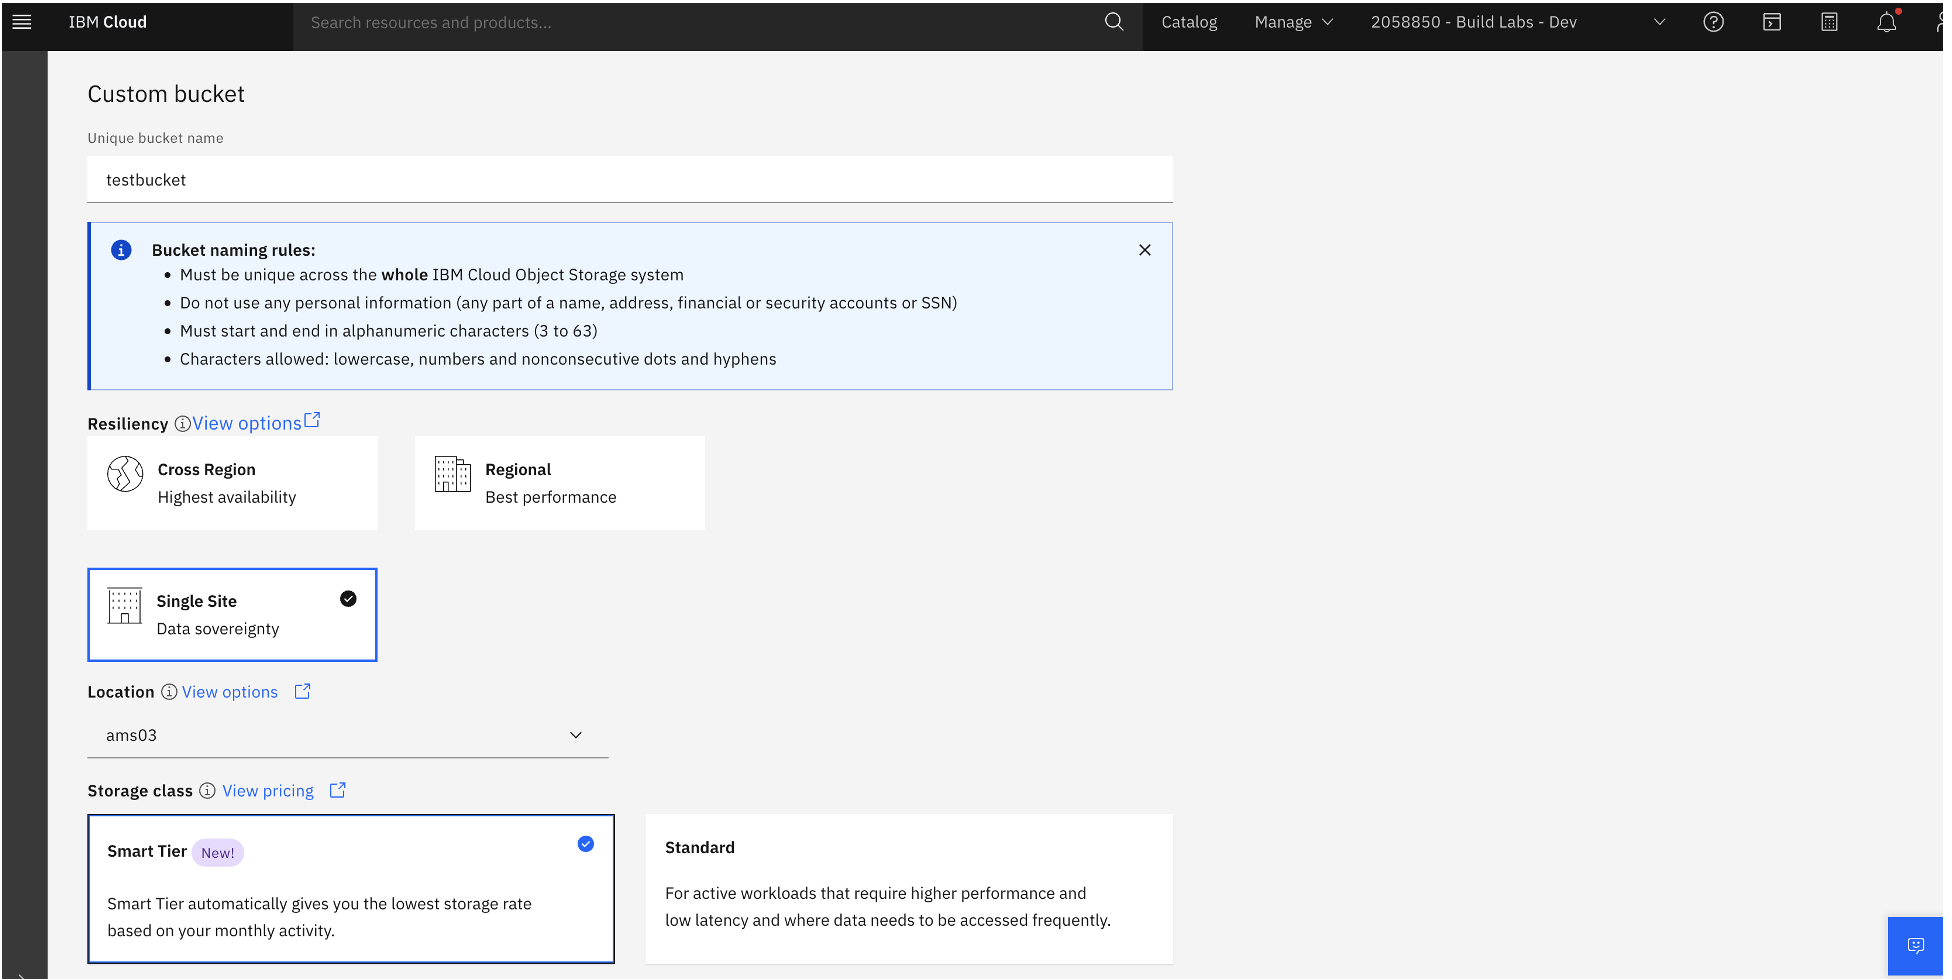
- To create a bucket in IBM Cloud Object Storage, log in to IBM Cloud and in the left menu, click Resource list.
- Locate the Cloud Object Storage instance that you created previously. In the left menu, click Storage instances > Buckets.
In the Buckets window, click Create bucket.

Click Customize your bucket. Enter a unique bucket name and select the type of resiliency, location, and type of storage class. When you have completed your selections, click Create bucket.
Click the bucket that you created and then click the Permissions tab.
- In the "Access policies" panel, select Service ID and for role, select Writer. Click Create access policy.

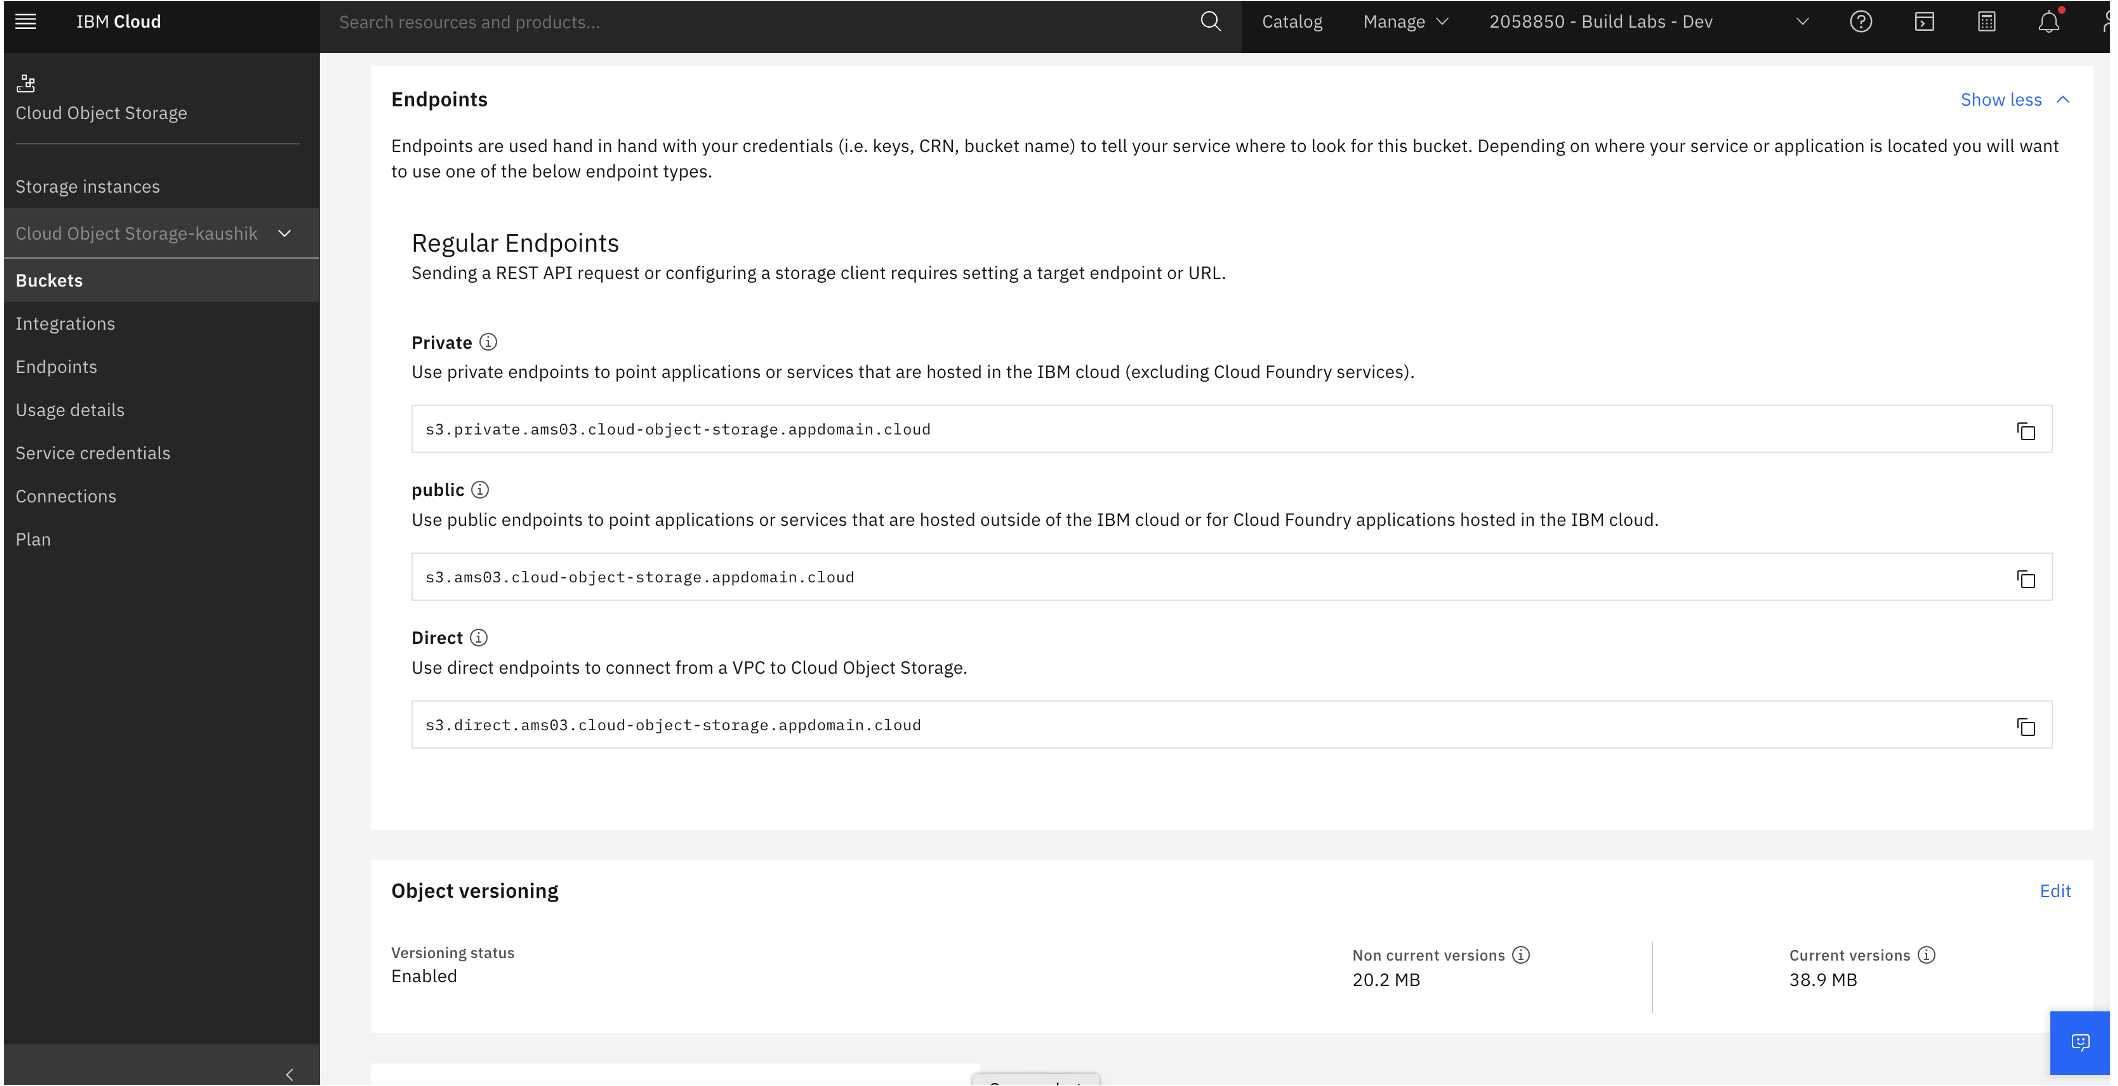
- To connect to Object Storage, you need the bucket endpoint name. Click the Configuration tab and then click Endpoints.
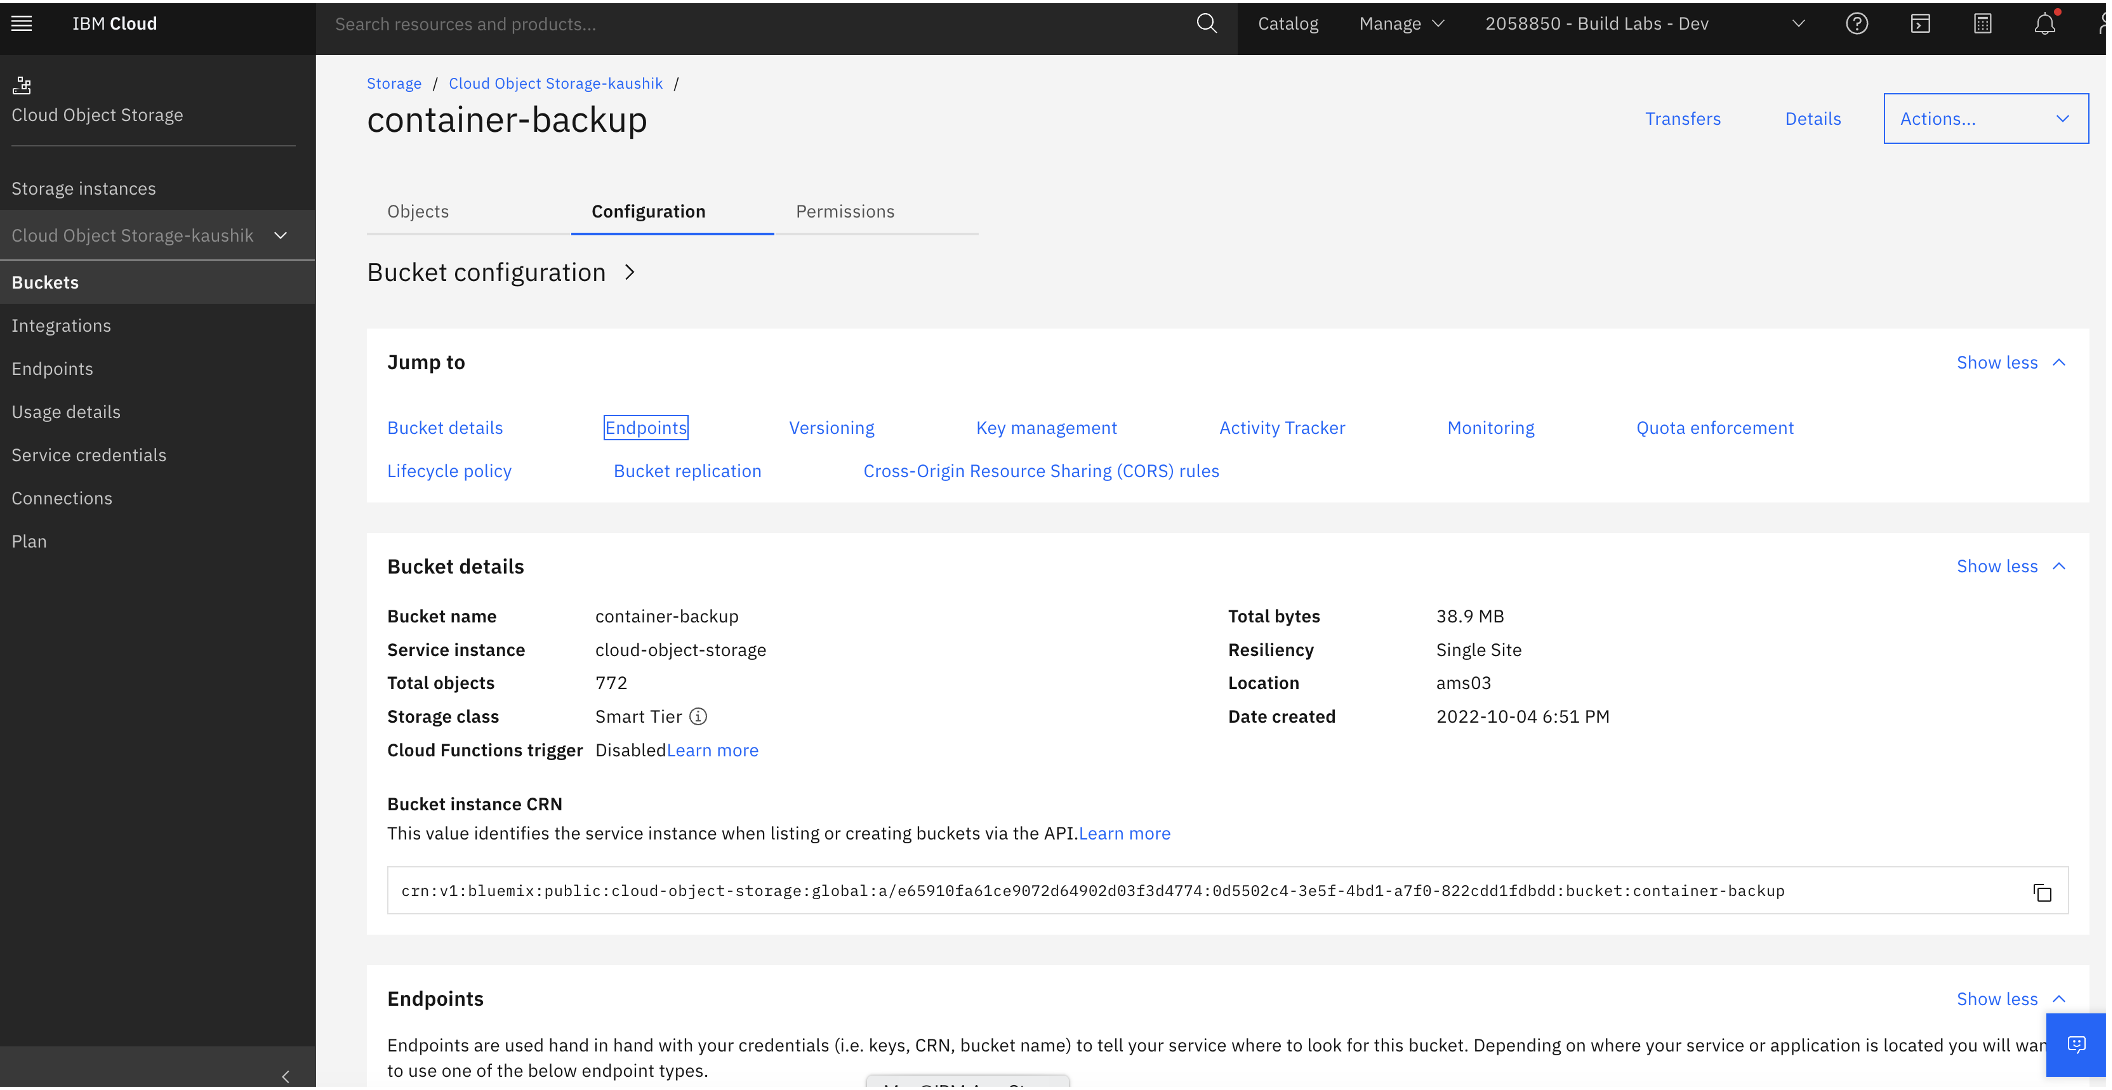
- Scroll to the Direct panel and copy the direct endpoint name to a location where you can retrieve it easily later.
- You need an access key and secret key to authenticate with IBM Cloud Object storage. Go to IBM Cloud Object Storage and in the left menu of the IBM Cloud console, click IBM Cloud Object > Service Credentials.
- In the Service Credentials window, paste in the access key and secret key that you copied earlier.
Step 4. Install the OpenShift API for Data Protection Operator
You can install the OADP Operator from OpenShift's OperatorHub.
In the OperatorHub window, search for
oadp. Click the OADP Operator tile and in the installation page, click Install.
Confirm all required values, including update channel, installation mode, operator namespace, and update approval. Click Install. The
openshift-adpproject is created and the operator is installed.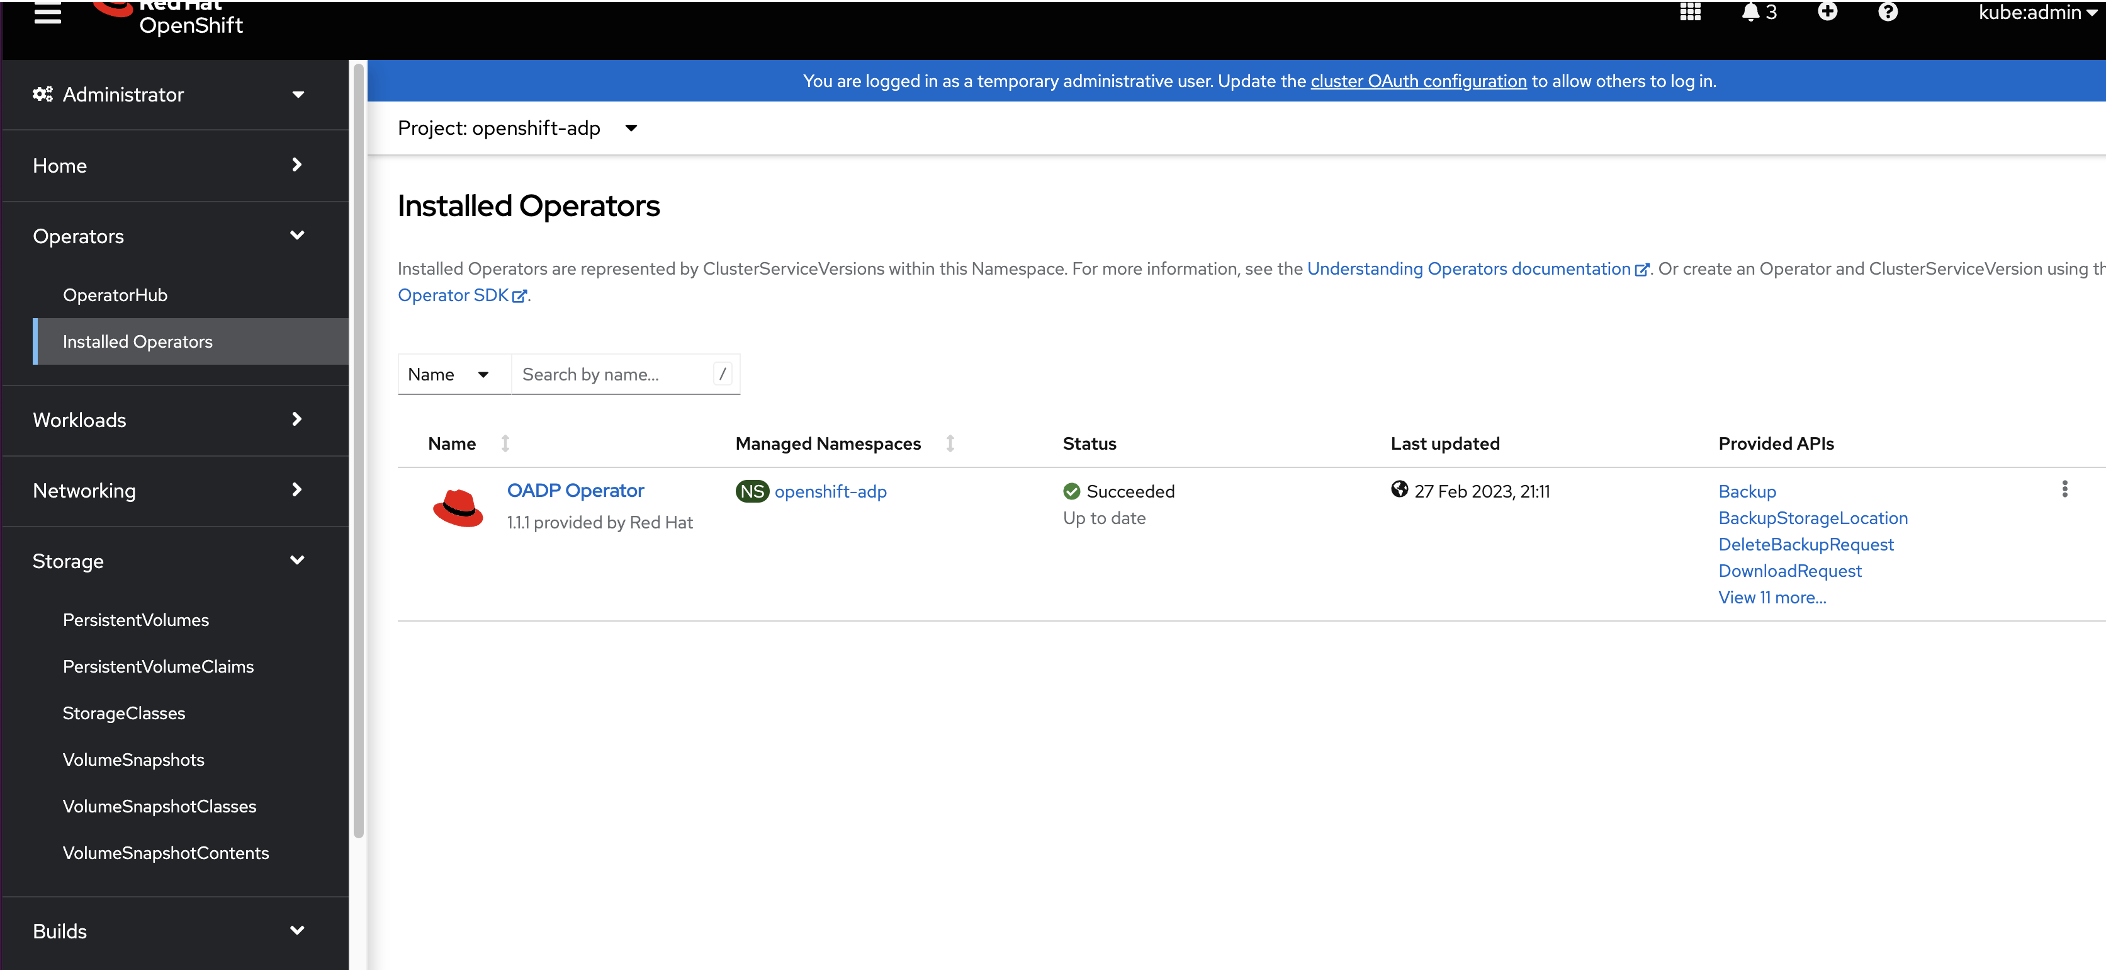
Step 5. Create a credentials secret for the OADP Operator
You now need to create a cloud-credentials secret using values from the IBM Cloud Object Storage bucket in the openshift-adp project.
- In the OpenShift web console left menu, Workloads > Secrets.
In the Secrets window, click Create and from the drop-down menu, select Key/value secret.
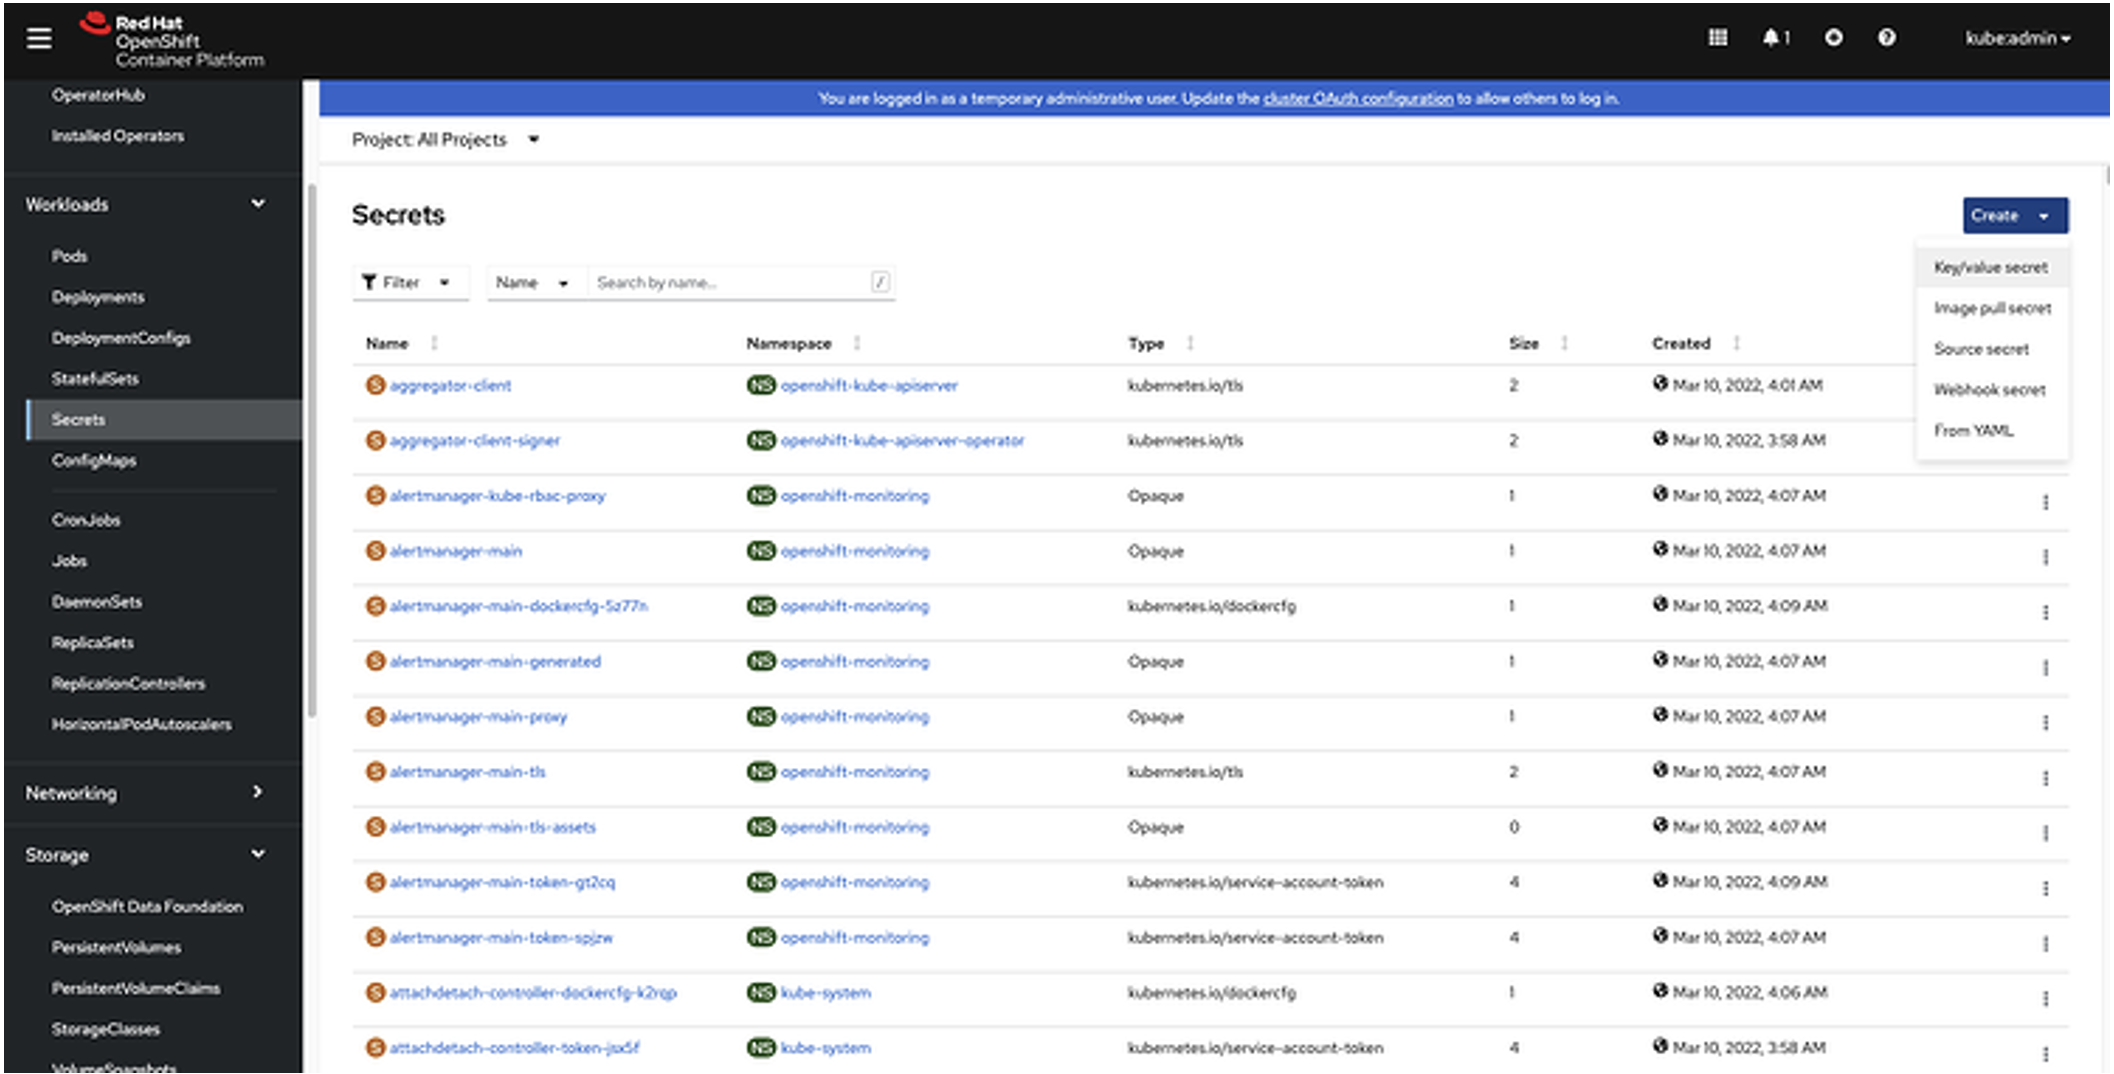
Enter the following values:
- Secret name:
cloud-credentials - Key:
cloud - Value: [Enter the access key and secret key that you copied previously.]Note: Do not use quotes or brackets in the key values.
[default]
 aws_access_key_id=<INSERT_VALUE>
 aws_secret_access_key=<INSERT_VALUE>
- Secret name:
Step 6. Create the DataProtectionApplication custom resource
- In the OpenShift web console left menu, click Operators > Installed Operators.
- Click Create instance above (DPA) DataProtectionApplication.

- Select to configure using the YAML view.
Update the fields with the following values.
- Update
.spec.backupLocations[0].objectStorage.bucketwith the bucket name you added in a previous step. Update
.spec.backupLocations[0].config.s3Urlwith the bucket host you added in a previous step.kind: DataProtectionApplication apiVersion: oadp.openshift.io/v1alpha1 metadata: name: velero-dpa namespace: openshift-adp spec: backupLocations: - velero: config: profile: default region: ams03 s3Url: https://s3.private.ams03.cloud-object-storage.appdomain.cloud insecureSkipTLSVerify: "true" s3ForcePathStyle: "true" credential: key: cloud name: cloud-credentials default: true objectStorage: bucket: snocontainer-backup prefix: velero provider: aws configuration: restic: enable: false velero: defaultPlugins: - openshift - csi - aws featureFlags: - EnableCSINote: The object storage we are using is s3-compatible storage provided by the IBM Cloud Object Storage instance. We are using custom s3Url capability from the
aws veleroplugin to access the IBM Cloud Object Storage endpoint in Velero.
- Update
- Click Create.
- In the horizontal menu, click All instances. Verify the status of
DataProtectionApplicationis Condition: Reconciled. and the status ofBackupStorageLocationis Phase: Available.
Step 7. Update the VolumeSnapshotClass deletion policy
By updating the VolumeSnapshotClass deletion policy, you can preserve the volume snapshot in the storage system for the lifetime of the Velero backup. You can also prevent the deletion of the volume snapshot in the storage system in the event of a disaster, where the namespace with the VolumeSnapshot object is lost.
The Velero CSI plugin will choose the VolumeSnapshotClass in the cluster that has the same driver name and the velero.io/csi-volumesnapshot-class value set to "true."
- In the OpenShift web console's left menu, click Storage > VolumeSnapshotClasses.
- Click odf-lvm-vg1 storgeclass. The class details page opens.
Click the YAML tab and update the
deletionPolicyvalues as shown below:apiVersion: snapshot.storage.k8s.io/v1 deletionPolicy: Retain driver: topolvm.cybozu.com kind: VolumeSnapshotClass metadata: name: odf-lvm-vg1 labels: velero.io/csi-volumesnapshot-class: "true"
Step 8. Create a container application backup
In this step, you will deploy a sample application in OpenShift and then verify that it creates the persistent volume in ODF LVM storage.
- In the OpenShift web console's left menu, click Administrator and then click Home > Projects. The Projects window opens.
In the Projects window, click Create Project.

In the Create Project pop-up window's Name field, enter
demoappsand then click Create.
In the OpenShift console's left menu, switch to the Developer role. Switch to the demoapps project. In the left menu, click +Add.

In the Developer Catalog, click All services. Search for the Node.js + PostgreSQL templates.

Click the Node.js + PostgreSQL templates tile. Click Instantiate Template, verify that the namespace is
demoapps, and then click Create.
In the left menu, switch back to the Administrator view. Confirm that the
nodejs-postgresql-persistent-XXXandpostgesqlXXpods have a status of Running. When a pod is in the running state, it means it's been created successfully with a perstistent volume using theodf-lvm-vg1default StorageClass.
To confirm that a persistent volume has been created, in the left menu click Storage > PersistentVolumeClaims. Confirm that postgresql has the status of Bound and that its StorgeClass is
odf-lvm-vg1, which is the default StorageClass that you set up in previous steps.
Step 9. Back up the application
- In the left menu, click Operators > Installed Operators.
- In the Installed Operators window, from the Projects drop-down menu, openshift-adp.
- To access the operator configuration values, click OADP Operator.
Click the Details tab. In the Provided APIs section, locate the Backup panel and click Create instance.

In the Name field, enter
demoapps-backup.- In the IncludedNamespace section's Value field, enter
demoapps. Select the snapshotVolumes checkbox.

Click Create. The status of
backupwill display as Phase: Complete. Note: It might take a few moments for the status to be updated.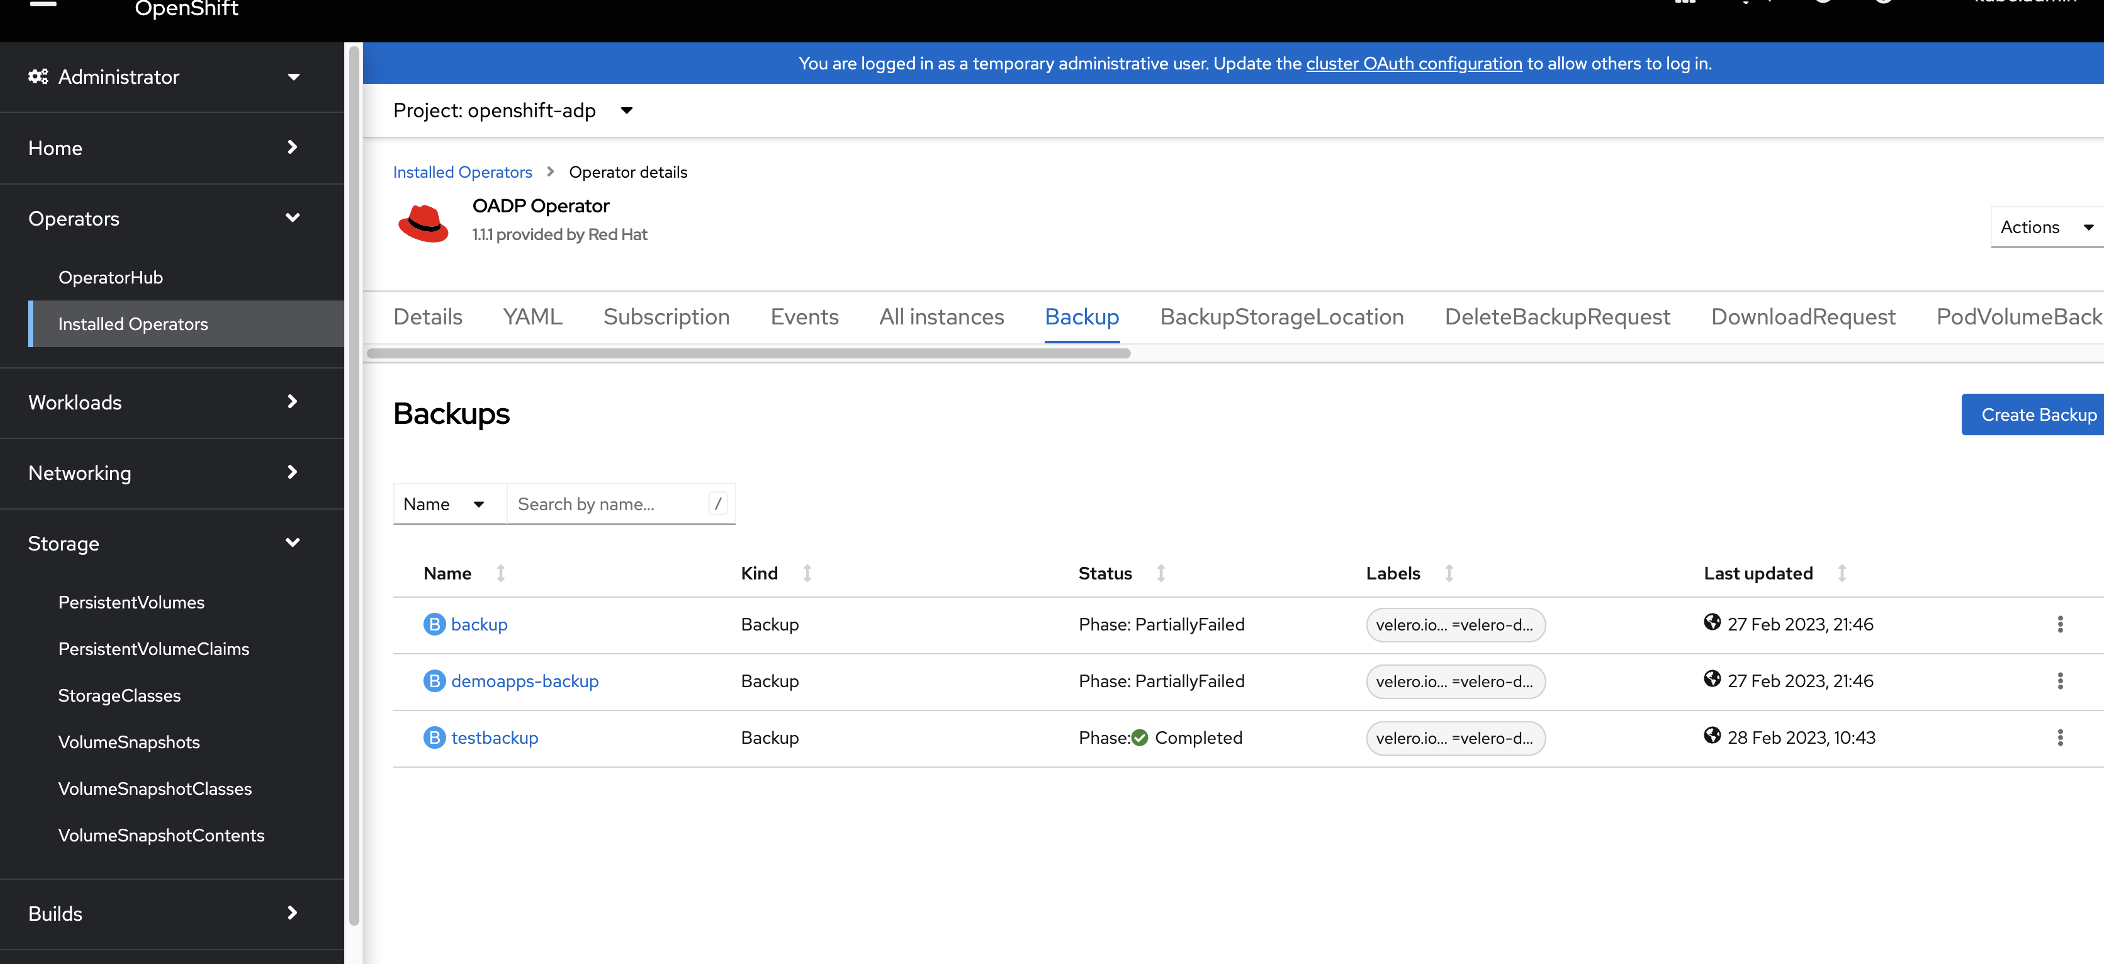
Step 10. Create an application-consistent backup
OADP with Velero backs up application data consistently across all the persistent volumes (PV). It ensures that the recovered data is error-free, reliable, and usable.
In an application-consistency approach, application input and output must be paused before a snapshot by using hooks. Although it achieves the highest level of consistency, this approach comes at the cost of application down-time that can be disruptive and lengthy, depending on the application. For instructions about specifying these application hooks, see the Velero documentation on backup hooks.
Backup hooks
Note: This content in this section is contained in the backup hooks section of the Velero documentation. It is included here for your convenience.
When performing a backup, you can specify one or more commands to execute in a container in a pod when that pod is being backed up. The commands can be configured to run before any custom action processing (“pre” hooks), or after all custom actions have been completed and any additional items specified by custom action have been backed up (“post” hooks). Note that hooks are not executed within a shell on the containers.
Backup hooks can be specified through annotations on the pod itself.
Annotations
You can use the following annotations on a pod to make Velero execute a hook when backing up the pod:
Pre hooks
pre.hook.backup.velero.io/container: The container where the command should be executed. Defaults to the first container in the pod. Optional.pre.hook.backup.velero.io/command: The command to execute. If you need multiple arguments, specify the command as a JSON array, such as ["/usr/bin/uname", "-a"]pre.hook.backup.velero.io/on-error: What to do if the command returns a non-zero exit code. Defaults to Fail. Valid values are Fail and Continue. Optional.pre.hook.backup.velero.io/timeout: How long to wait for the command to execute. The hook is considered in error if the command exceeds the timeout. Defaults to 30s. Optional.
Post hooks
post.hook.backup.velero.io/container: The container where the command should be executed. Defaults to the first container in the pod. Optional.post.hook.backup.velero.io/command: The command to execute. If you need multiple arguments, specify the command as a JSON array, such as ["/usr/bin/uname", "-a"]post.hook.backup.velero.io/on-error: What to do if the command returns a non-zero exit code. Defaults to Fail. Valid values are Fail and Continue. Optional.post.hook.backup.velero.io/timeout: How long to wait for the command to execute. The hook is considered in error if the command exceeds the timeout. Defaults to 30s. Optional.
Apply the pre and post backup hook annotations directly to the declarative deployment. Following is an example of what updating an object in place might look like.
oc annotate pod -n demoapps -l name=postgresql \
        pre.hook.backup.velero.io/command='["/bin/bash", "-c", 'psql  -c "\"select pg_start_backup('app_cons');\""']' \ pre.hook.backup.velero.io/container=postgresql \
        post.hook.backup.velero.io/command='["/bin/bash", "-c", 'psql -c "\"select pg_stop_backup( );\"""]'\
        post.hook.backup.velero.io/container=postgresql
Step 11. Restore an application
Backups that are taken on an Object Storage can be restored to the same project or a new or different project.
- In the OpenShift web console left menu, click Operators > Installed Operators.
- In the openshift-adp project, click OADP Operator.
- In the Provided APIs section, locate the Restore tile and click Create instance.

- In the Backup Name field, type
backup. - In the Name field, type
restore-demoapps. - In backupName field, type the backup job name that was successful and which you want to restore from, for example
testbackup. - In IncludedNamespaces section, type
demoapps. - Select the restorePVs checkbox.

- Click Create. The status of
restore-demoappswill display as Phase: Completed.
Note: It might take a few moments for the status to be updated.
After a few minutes, you should see that the chat application is up and running. You can check by clicking Workloads > Pods in the left menu and then checking the demoapps project.

You can then access the application using the URL.
Summary
In this tutorial, you worked through the steps for installing an ODF operator for a multi-node node OpenShift cluster and installing the OADP Velero Operator in the OpenShift cluster. This tutorial also showed you how to back up the container application to IBM Cloud Object Storage and restore an application using OADP Velero.
Now that you are familiar with the installation steps, be sure to check out additional reading, product information, and demos for data backup, restoration, and disaster recovery: