About cookies on this site Our websites require some cookies to function properly (required). In addition, other cookies may be used with your consent to analyze site usage, improve the user experience and for advertising. For more information, please review your options. By visiting our website, you agree to our processing of information as described in IBM’sprivacy statement. To provide a smooth navigation, your cookie preferences will be shared across the IBM web domains listed here.
Tutorial
Deploy and configure Red Hat OpenShift Lightspeed with IBM watsonx Runtime
Set up OpenShift Lightspeed and integrate it with watsonx Runtime to enable an AI-powered virtual assistant for cluster operations
On this page
Red Hat OpenShift Lightspeed is a generative AI-based virtual assistant built into the OpenShift web console. Developers and administrators can use it to:
Ask questions about OpenShift and its deployed components.
Get real-time, context-aware answers from the cluster.
Backed by Red Hat’s expertise in OpenShift and mission-critical applications, Lightspeed helps users build skills faster, navigate the console more easily, and improve productivity in tasks such as troubleshooting and investigating cluster resources.
Lightspeed supports queries on:
OpenShift Container Platform
Kubernetes
OpenShift Virtualization
OpenShift Pipelines
OpenShift Service Mesh
It does not respond to topics beyond this scope. For a full list of supported topics, refer to the latest documentation.
Lightspeed can connect to large language models (LLMs) from:
IBM watsonx.ai
Microsoft Azure OpenAI
OpenAI
This flexibility helps organizations adopt Lightspeed across platforms while making use of their existing tech investments.
As of June 2025, Lightspeed is generally available. For more details, see the Red Hat announcement in the References and resources section.
Because it is context-aware, Lightspeed maintains conversation threads. You can reset the context by:
Clearing chat history
Reloading the console
Restarting the Lightspeed operator
OpenShift Lightspeed supports several key use cases:
Querying: Ask stand-alone questions about cluster resources and related follow-up questions within the same context.
Knowledge finding: Get answers based on existing knowledge sources, including YAML definitions and other attachable resources.
Troubleshooting: Investigate alerts with context pulled from the cluster.
Logging: Keep or clear conversation history as needed.
Lightspeed also captures user feedback using thumbs up/down buttons to help improve its performance over time.
OpenShift Lightspeed supports the following OpenShift resource types:
| OpenShift Console Section | Resource Definitions |
|---|---|
| Workloads | CronJob, DaemonSet, Deployment, Job, Pod, ReplicaSet, StatefulSet |
| Observe | Alert |
| Networking | Services, Routes, Ingresses, NetworkPolicies |
Prerequisites
To complete this tutorial, you need:
An IBM Cloud account.
A Red Hat OpenShift cluster set up on IBM Cloud (bare metal or virtual server).
Procedure: Summary of steps
Follow these steps to complete the tutorial. Each step is explained in detail in the Detailed walkthrough section.
Set up object storage.
Create an IBM Cloud Object Storage instance
Create a bucket in the instance
Set up the IBM Cloud watsonx.ai Runtime.
Deploy the OpenShift Lightspeed Operator.
Configure the watsonx.ai Runtime.
- Note the watsonx.ai URL for use when configuring the Lightspeed operator
Create OpenShift Lightspeed resources.
Create an API key
Create a project
Deploy the virtual assistant
Connect to the backend LLM
Create a secret
Create the
OLSConfigcustom resourceVerify that OpenShift Lightspeed is running
Access the Lightspeed Assistant.
Run natural language queries.
Ask a general stand-alone question
Follow up with related questions
Ask a question with attached cluster resources
Troubleshoot alerts
Start a new conversation after clearing previous history
Check infrastructure consumption from:
OpenShift (Developer and Administrator views)
IBM watsonx.ai Project Overview
Procedure: Detailed walkthrough
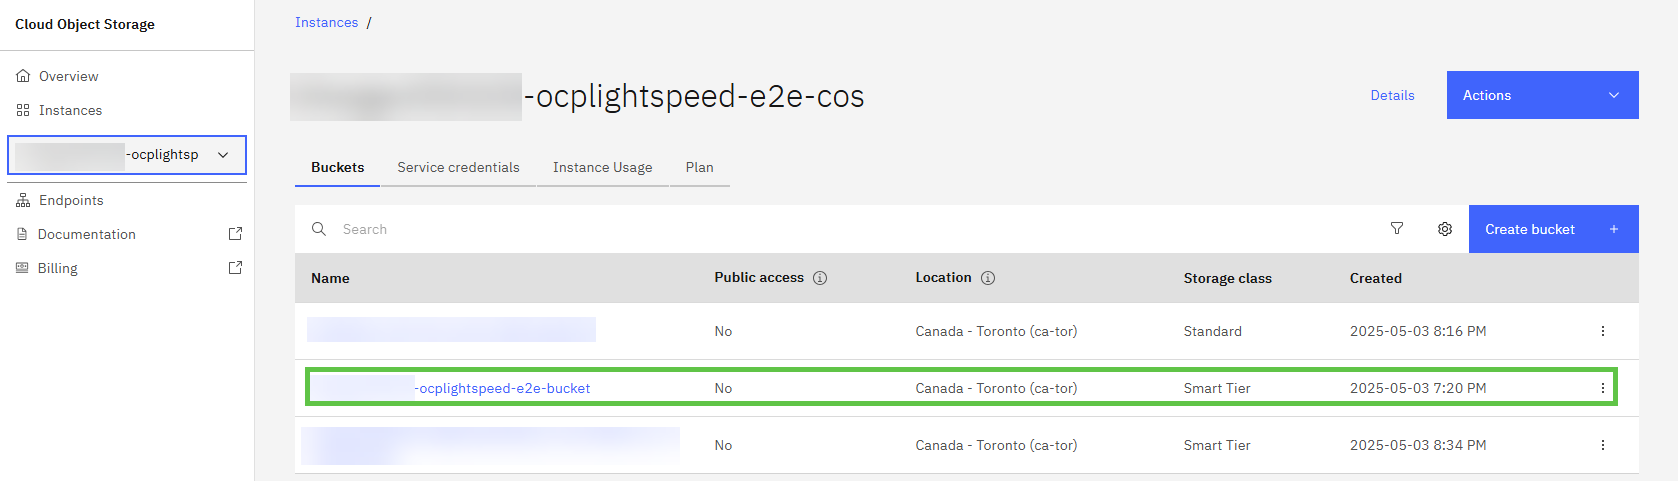
Step 1. Create IBM Cloud object storage and bucket
In this step, you will create an IBM Cloud object storage (COS) instance and a bucket.
Region: Canada – Toronto
Plan: Standard
Resource Group:
cloud-techsalesStorage Class: Smart Tier (Regional)
Create COS Instance
From the IBM Cloud console, go to Navigation Menu → Infrastructure → Storage → Object Storage.
Click Create instance.
Fill in the following:
Pricing plan: Standard
Service name:
<YOUR-SERVICE-INSTANCE-NAME>Tags:
<YOUR-SERVICE-INSTANCE-TAG>Resource group:
<YOUR-RESOURCE-GROUP>
Click Create.
Create Bucket
Go to Navigation Menu → Infrastructure → Storage → Object Storage → Instances.
Select your instance:
<YOUR-SERVICE-INSTANCE-NAME>Click Create bucket → Create a custom bucket.
Fill in the following:
Bucket name:
<YOUR-CUSTOM-BUCKET-NAME>(must be unique)Resiliency: Regional
Location: Canada – Toronto (ca-tor)
Storage class: Smart Tier
Click Create bucket.
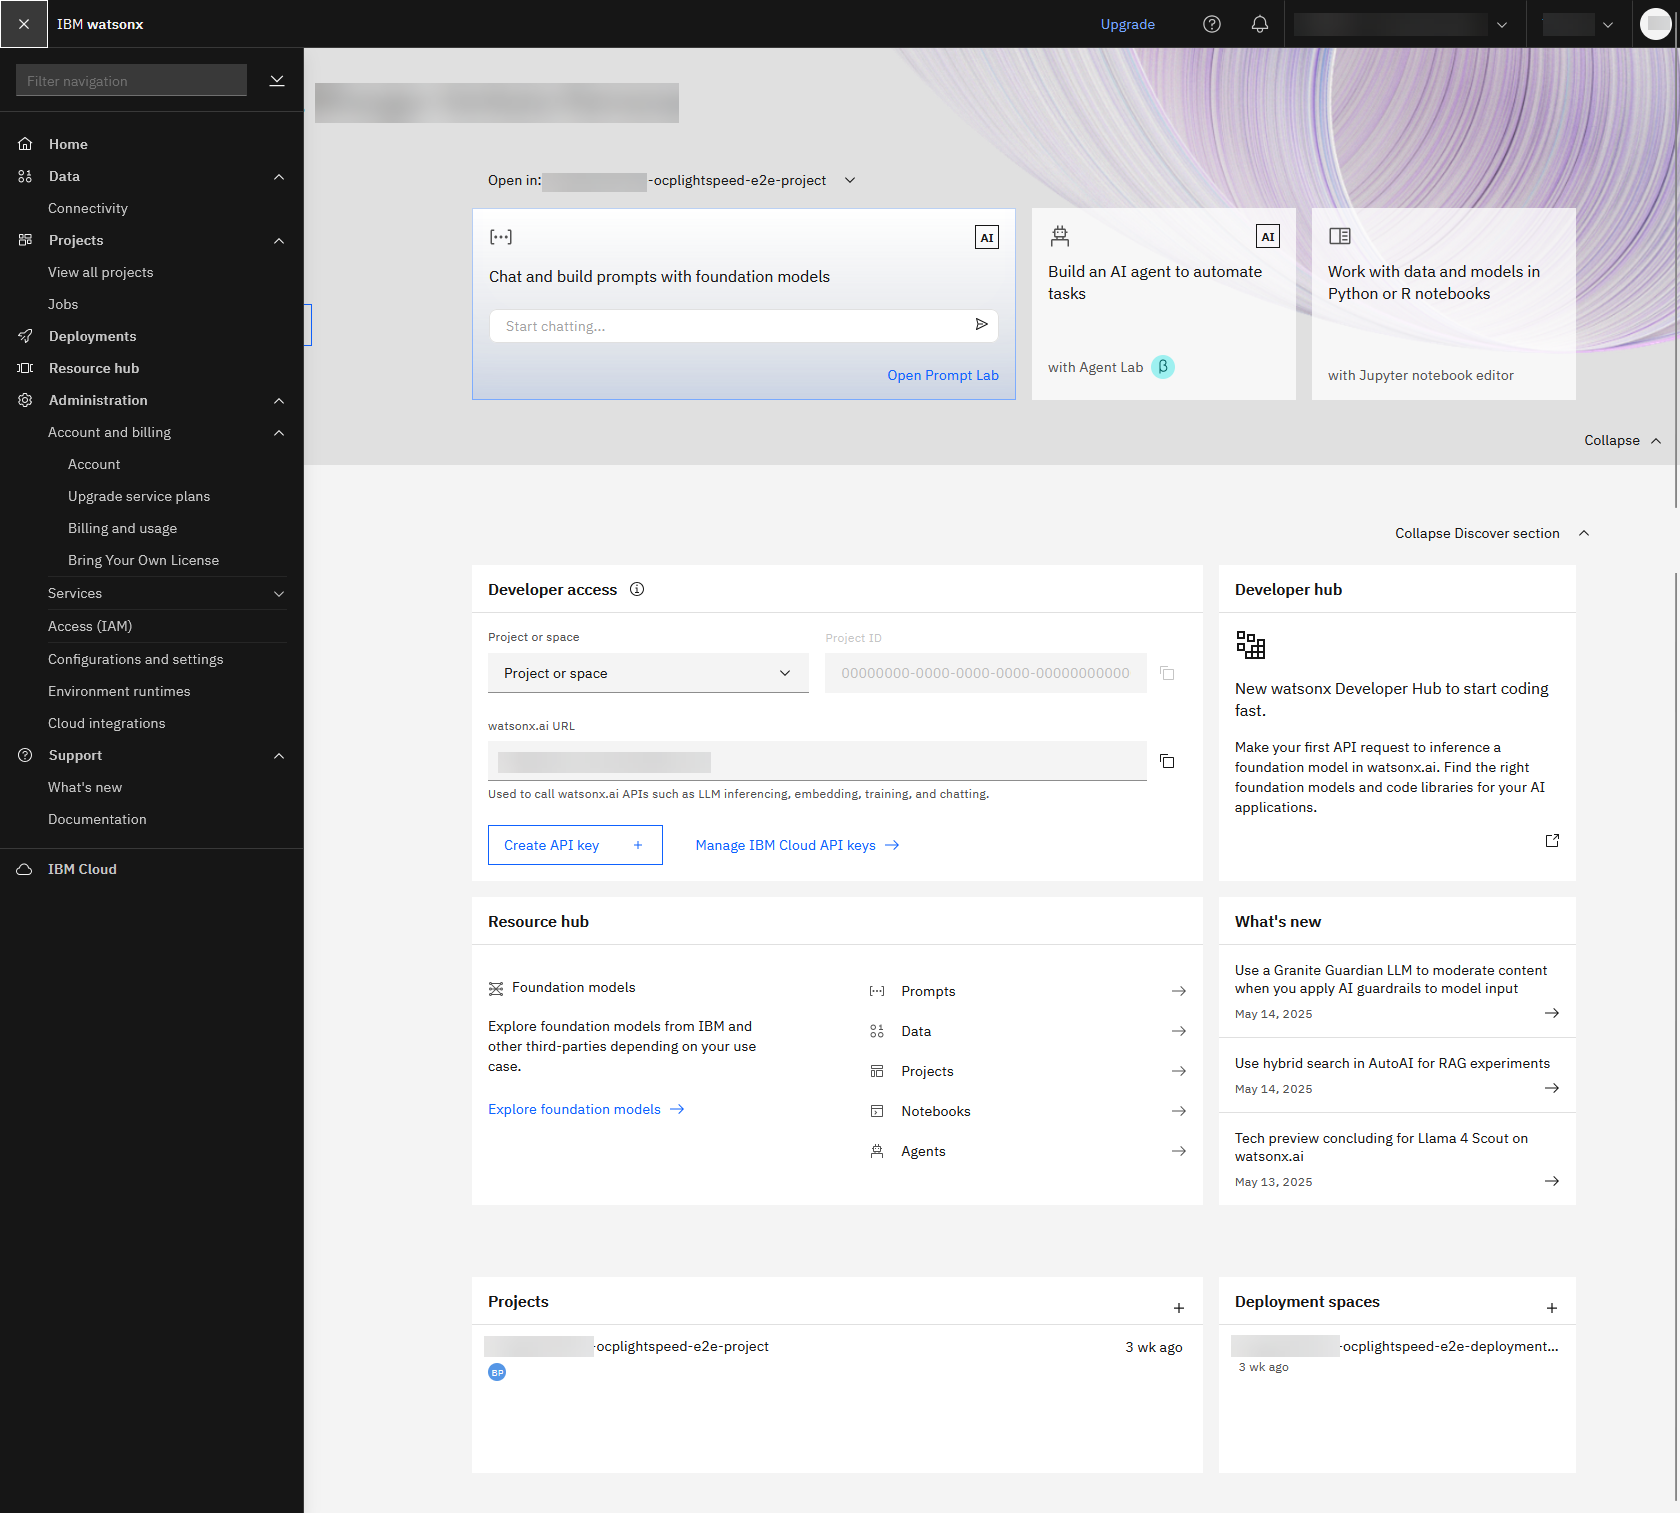
Step 2. Create an IBM Cloud watsonx.ai Runtime instance
In this step, you will create a watsonx.ai Runtime instance in IBM Cloud.
Region: Canada – Toronto
Plan: Lite
Resource Group:
cloud-techsales
Follow these steps:
Go to Catalog → watsonx.ai Runtime.
Set the following options:
Location: Toronto (ca-tor)
Pricing plan: Lite
Service name:
<YOUR-SERVICE-INSTANCE-NAME>Tags:
<YOUR-SERVICE-INSTANCE-TAG>Resource group:
<YOUR-RESOURCE-GROUP>
Accept the license agreement.
Click Create.
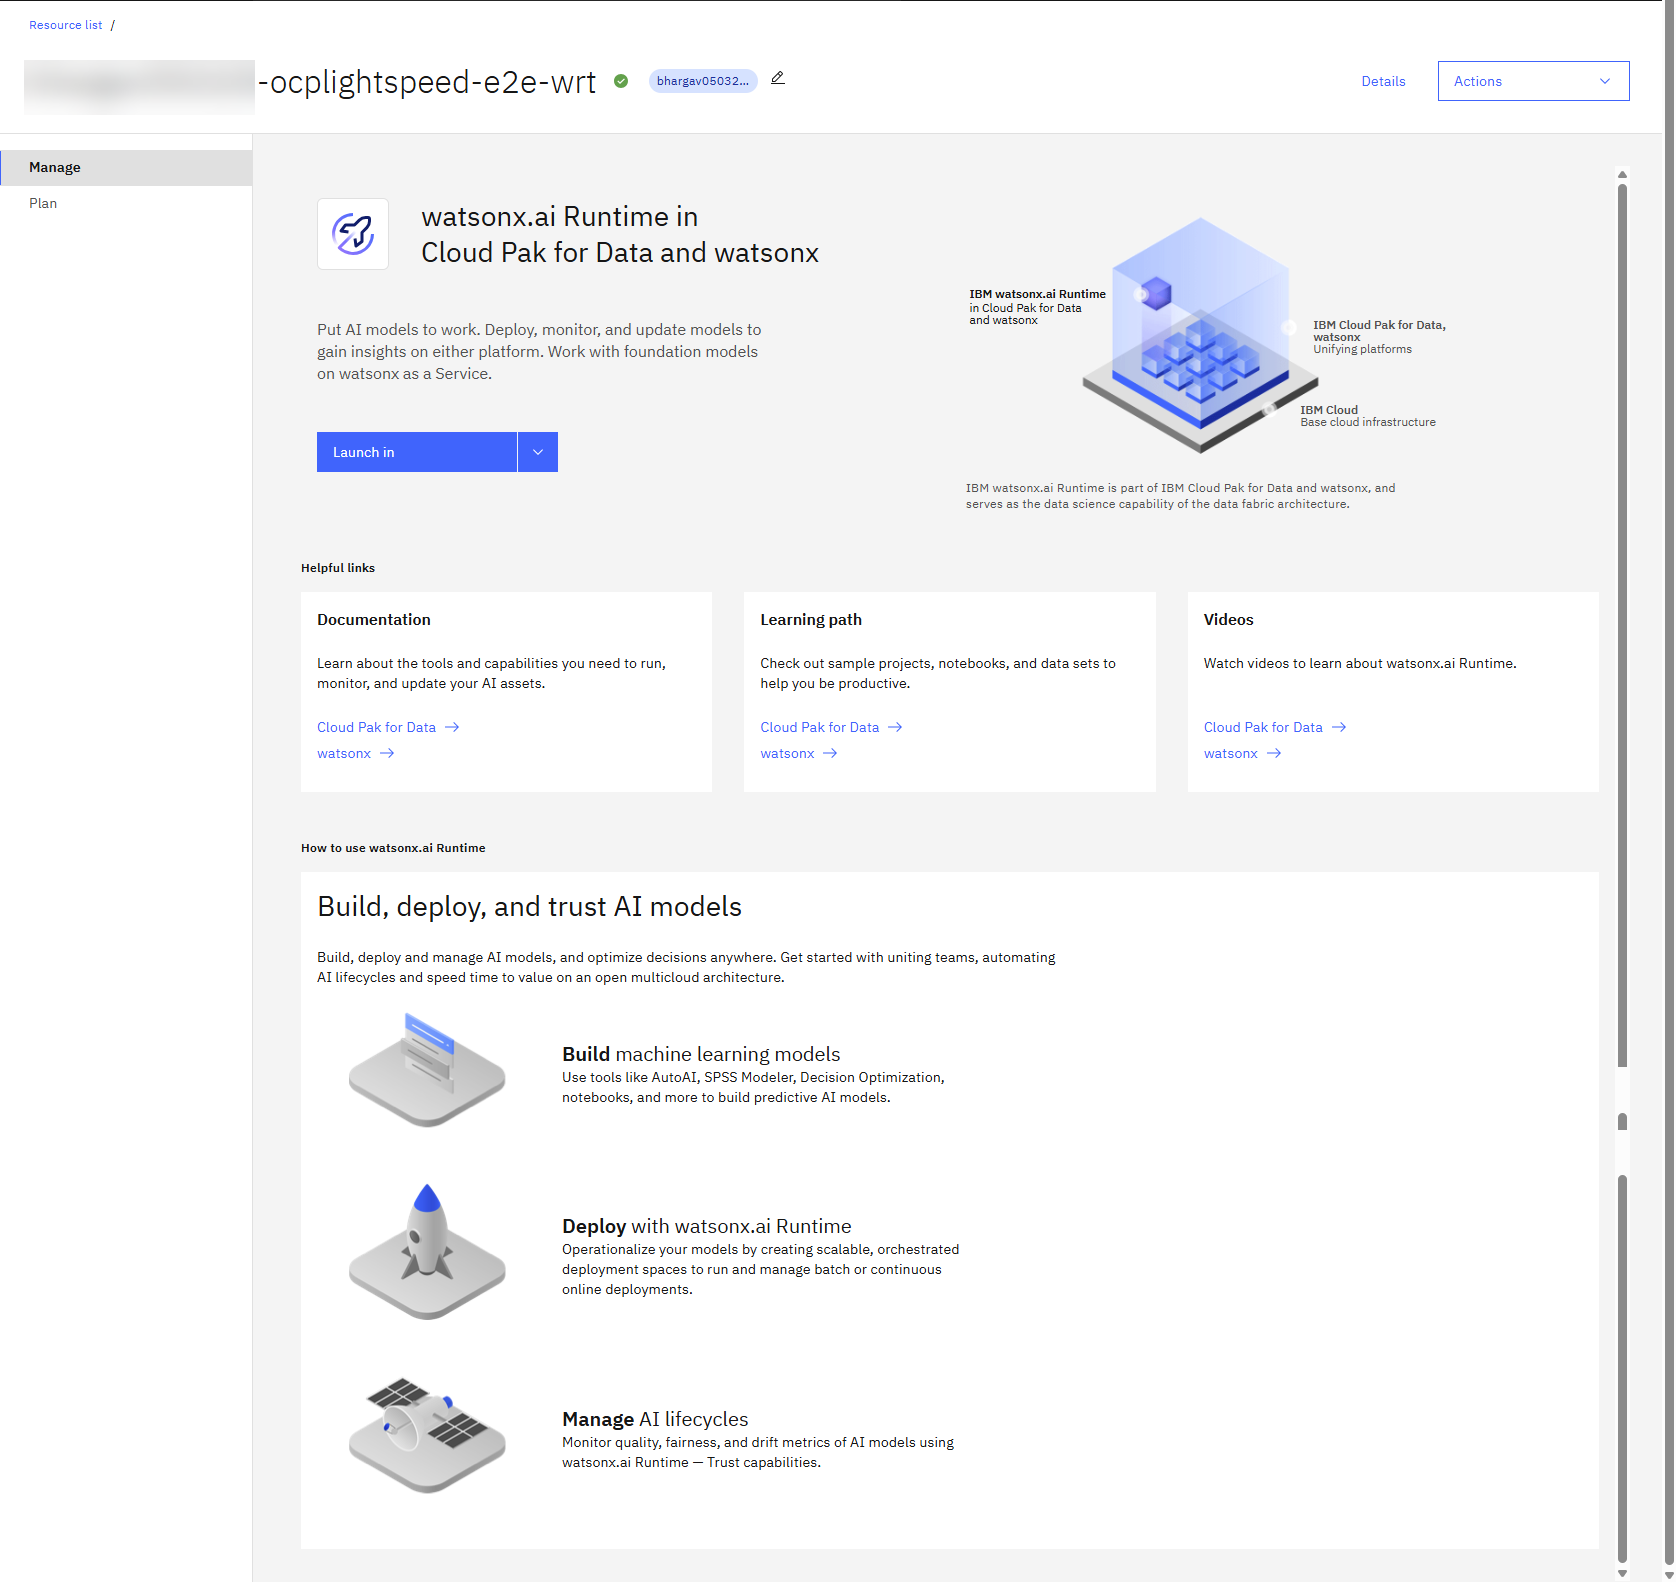
After the Runtime instance is created, the IBM watsonx welcome screen appears.
You can now see the following two resources listed in your IBM Cloud account under Resource list.
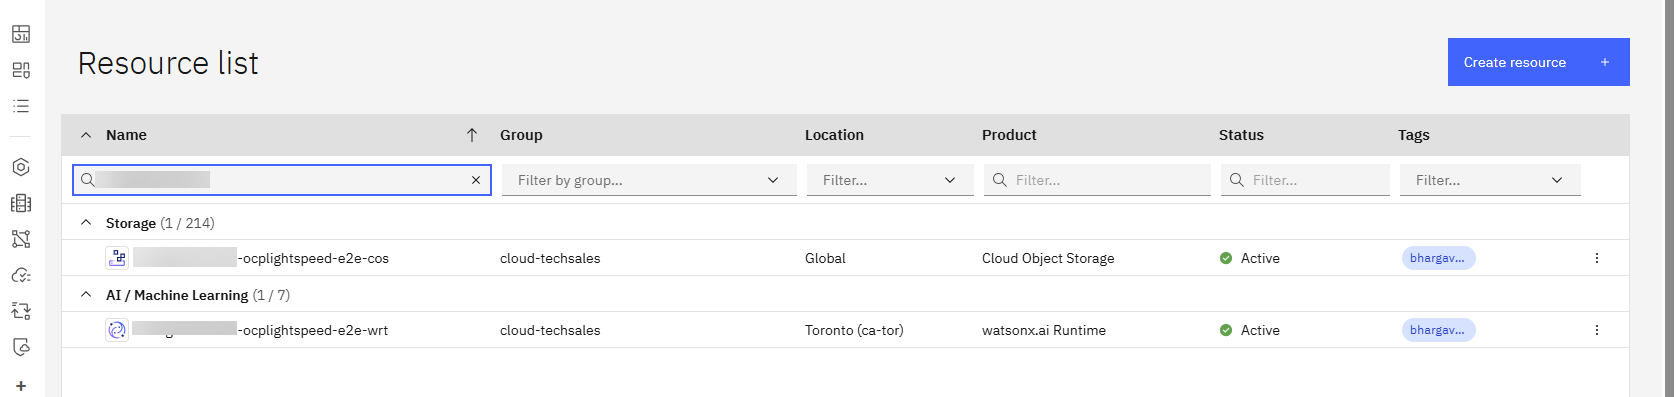
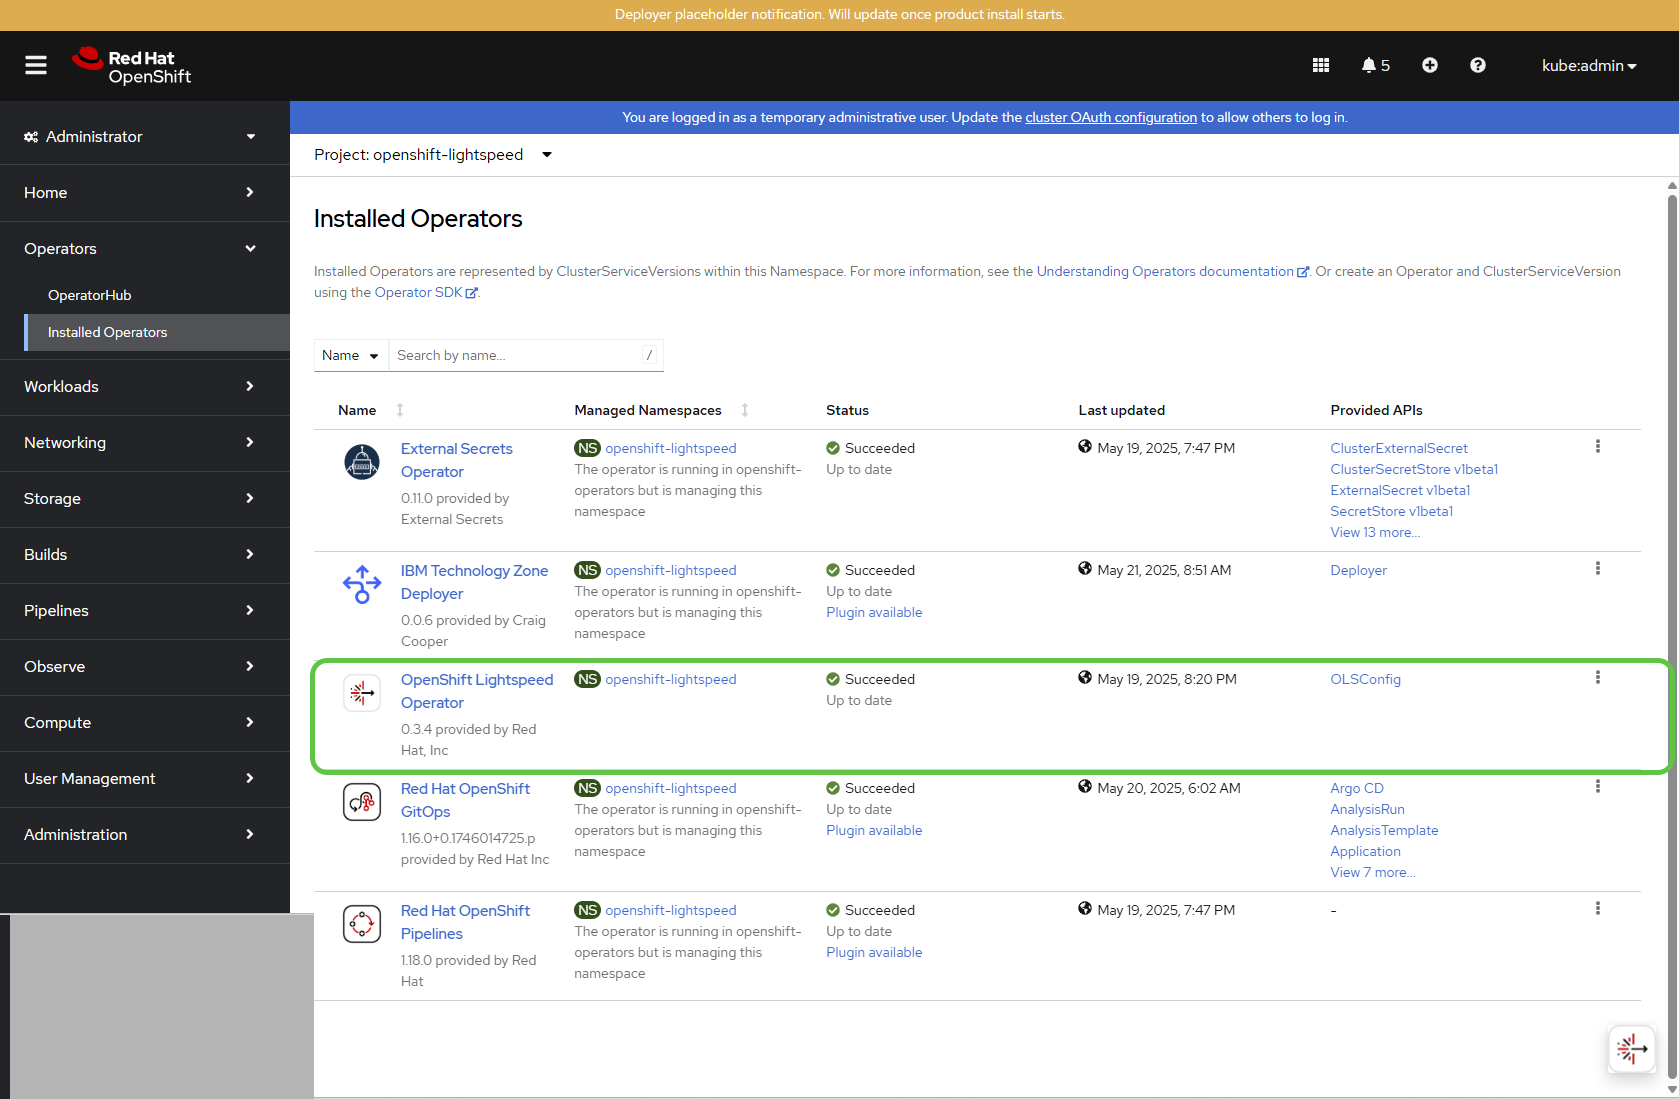
Step 3. Deploy the OpenShift Lightspeed operator from OperatorHub
Log in to the Red Hat OpenShift web console as an Administrator (with cluster admin permissions). From the Administrator view:
Go to Operators → OperatorHub.
Search for OpenShift Lightspeed Operator.
Install it using the default options.
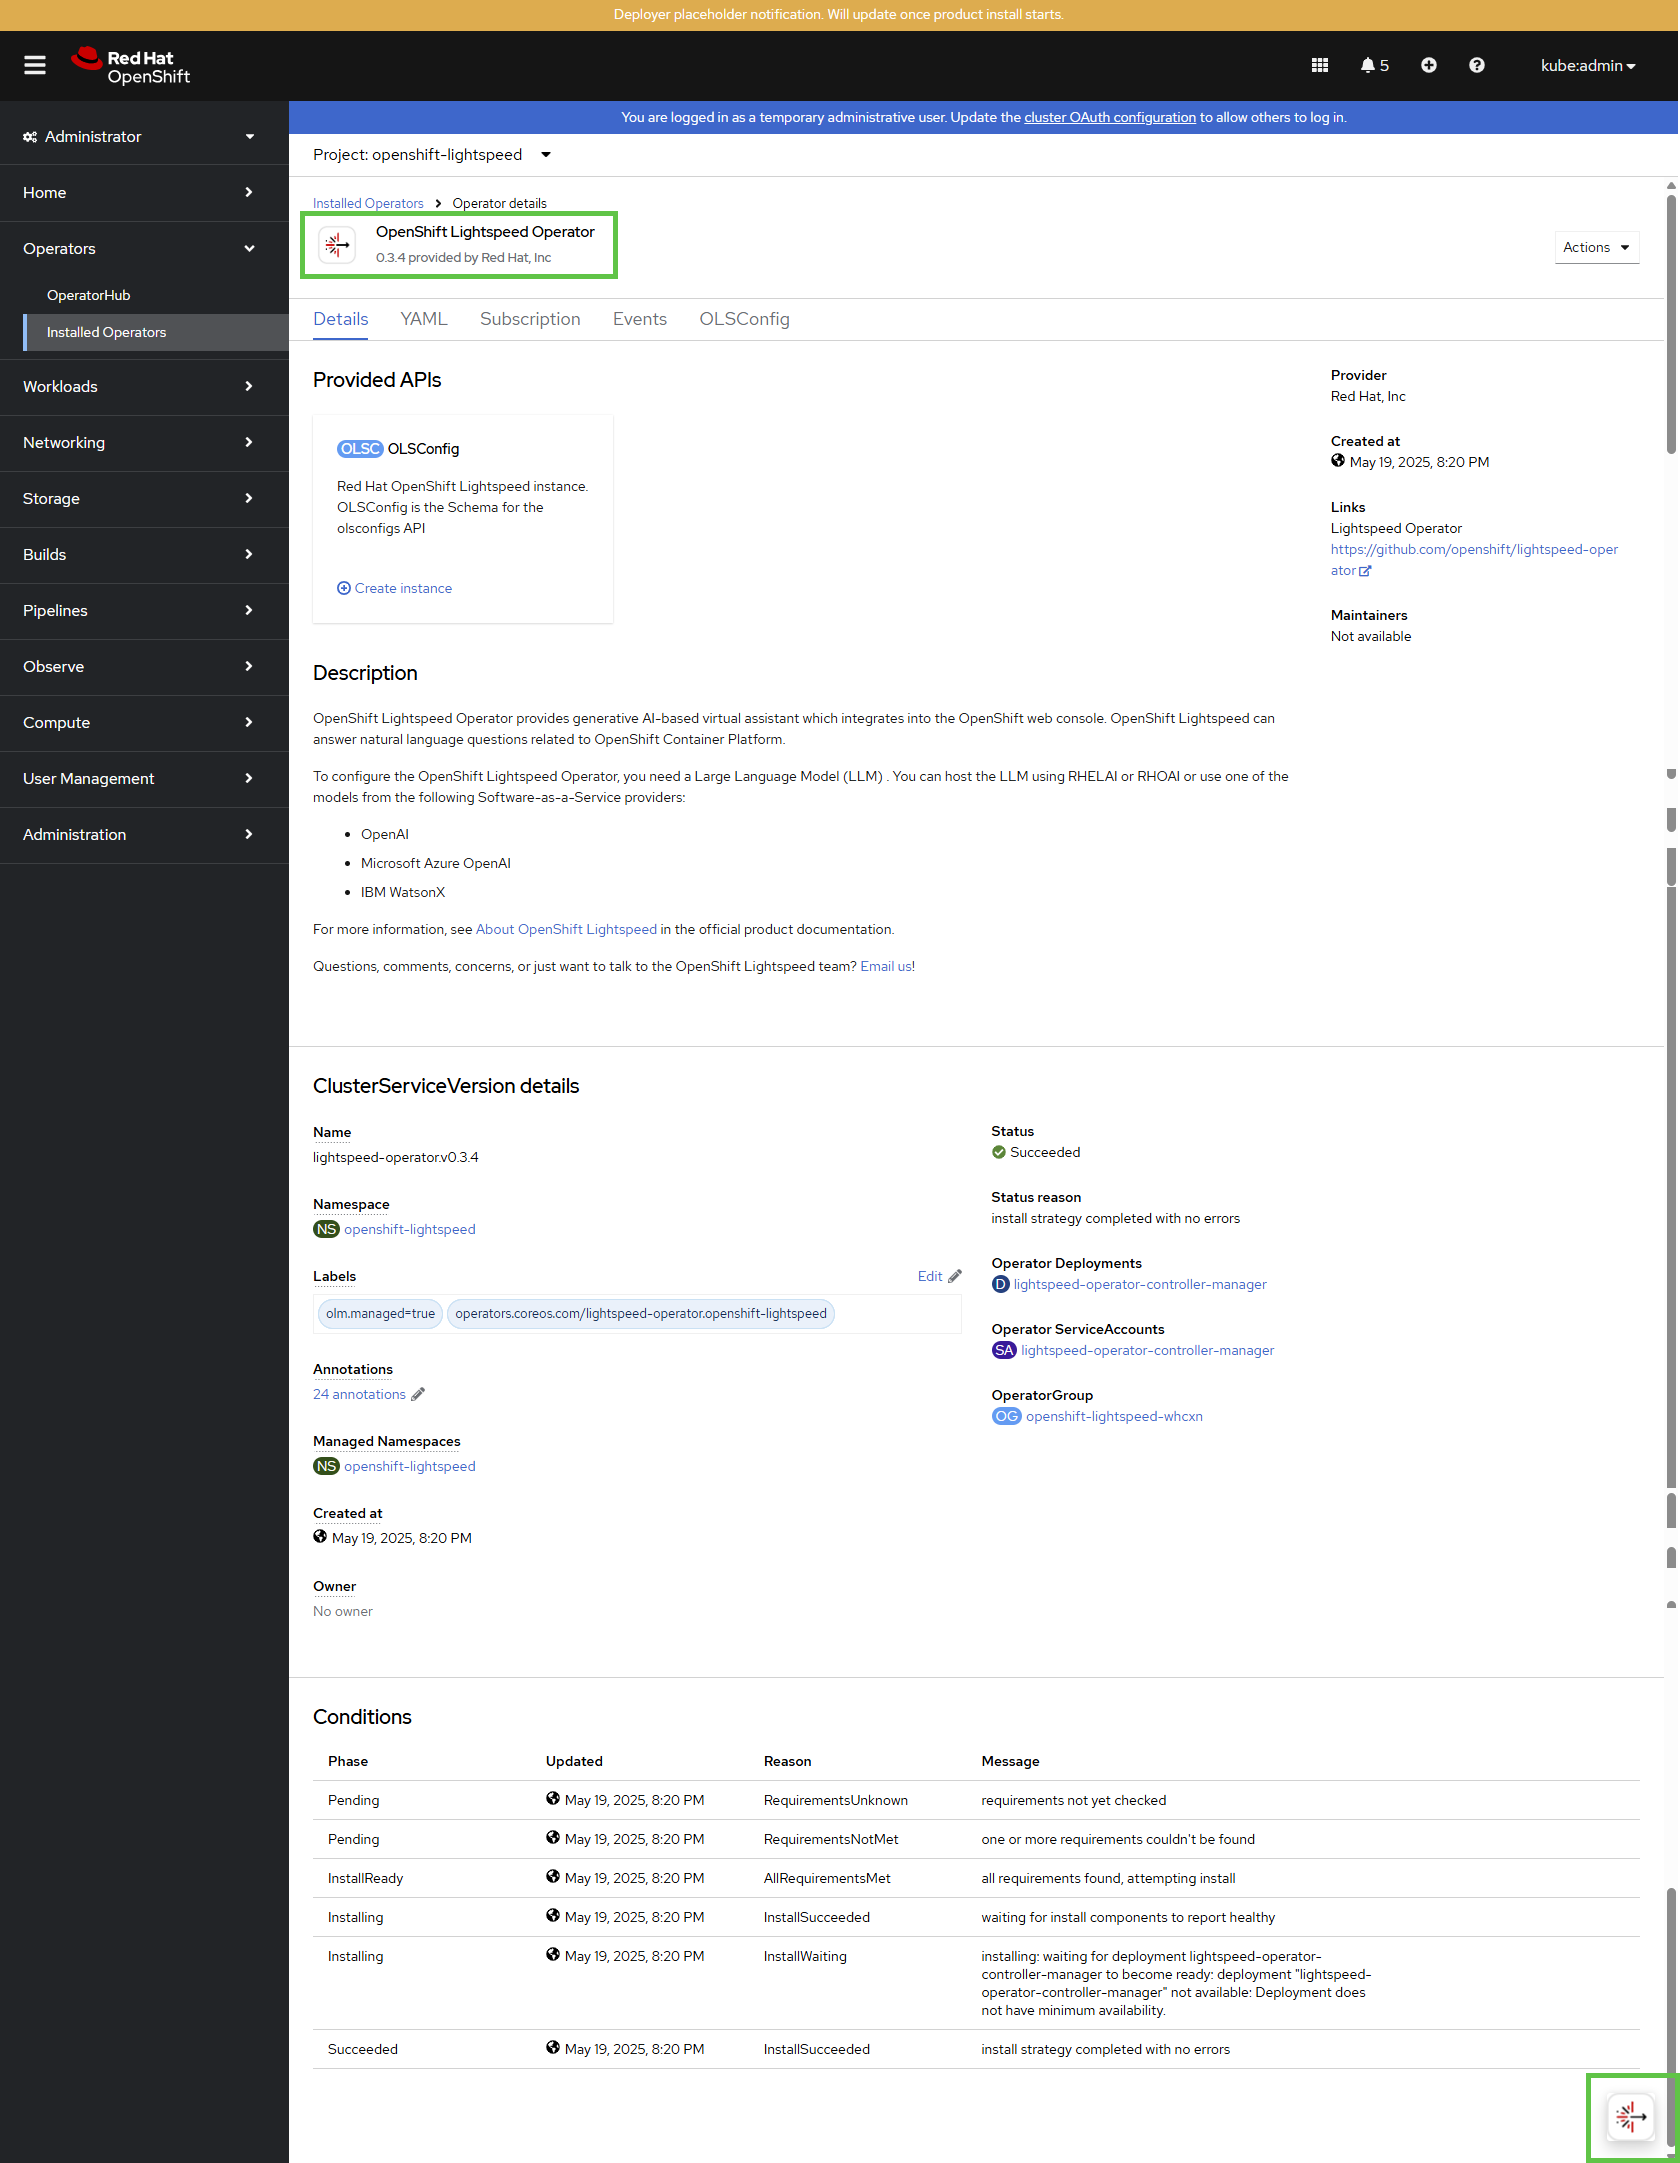
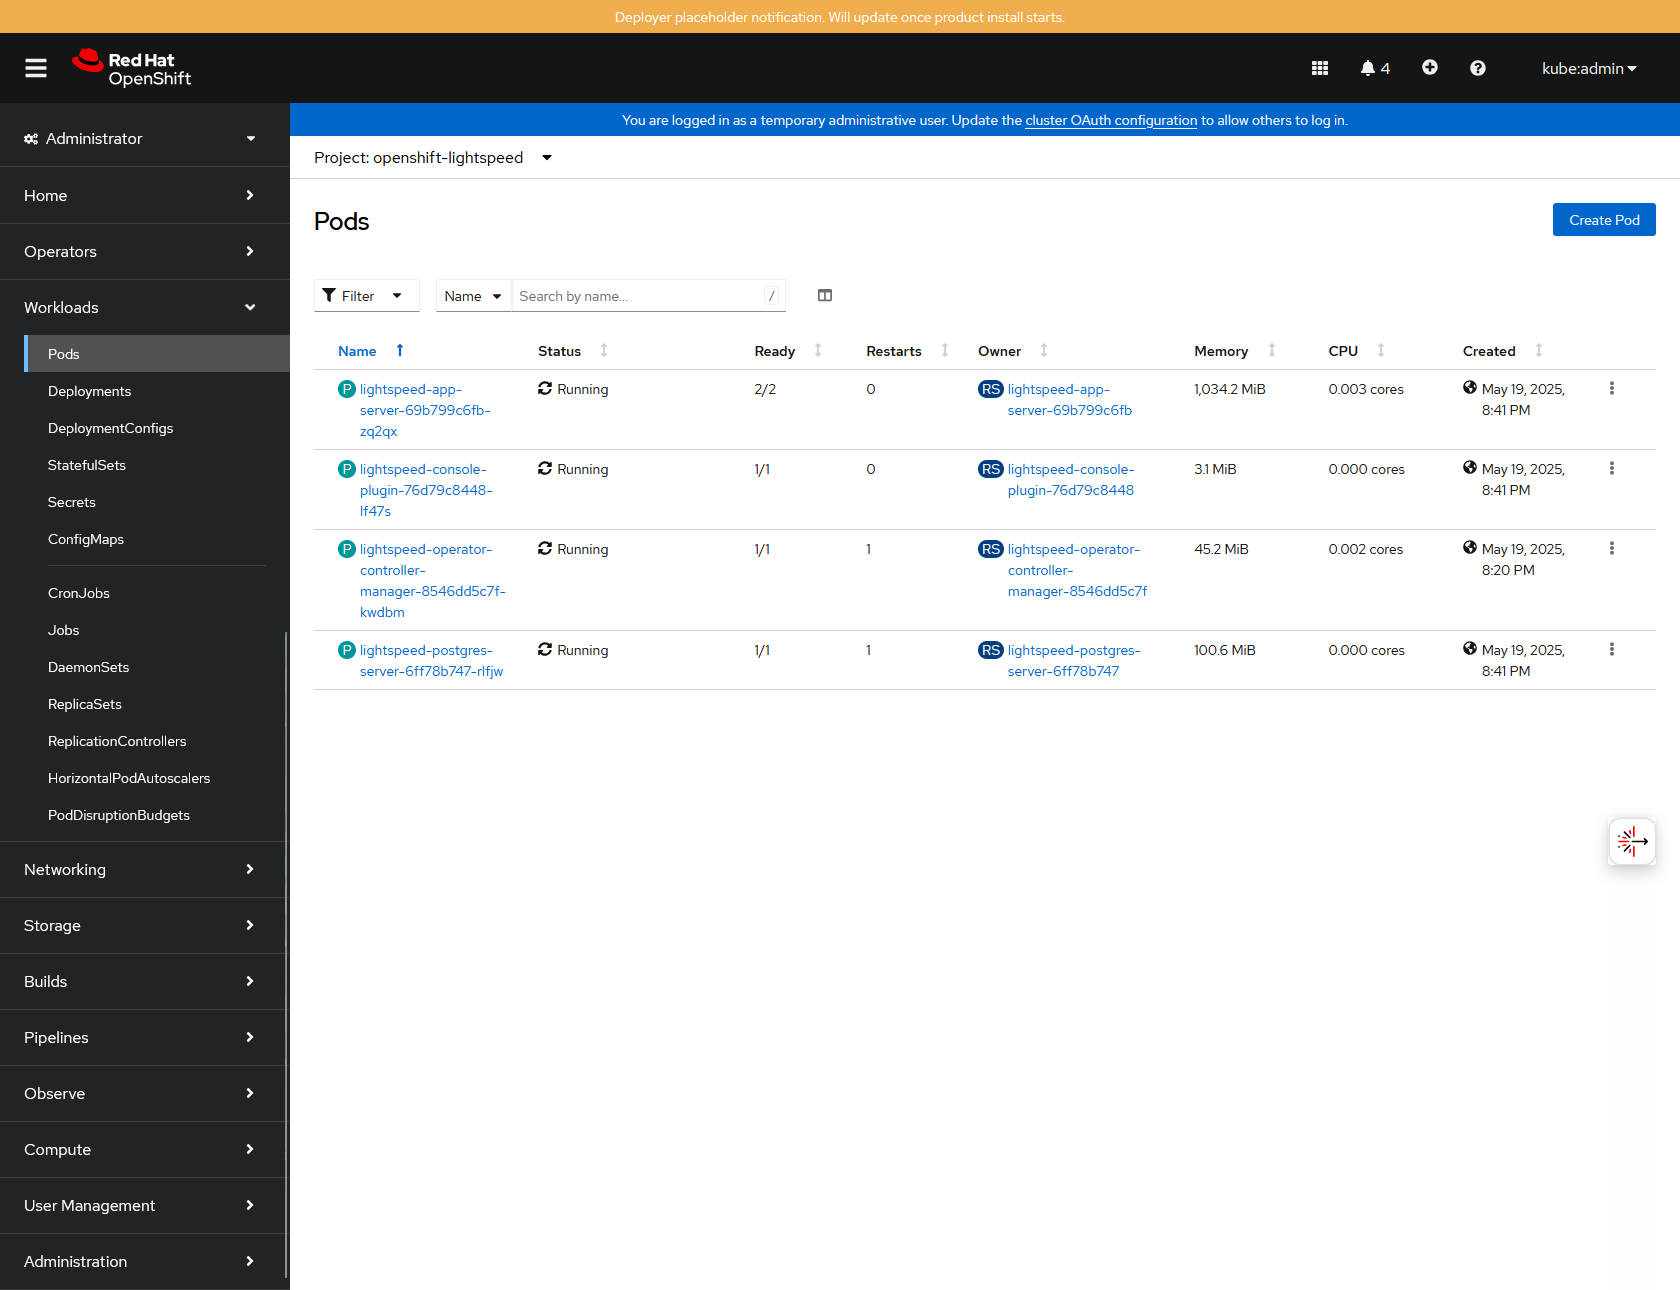
After installation, switch to the OpenShift-Lightspeed project. You will see the operator dashboard. At the time of writing, the operator version is 0.3.4.
This screen shows the current configuration details of the OpenShift Lightspeed operator before setting up the OLSConfig custom resource.
Step 4. Configure watsonx.ai Runtime service
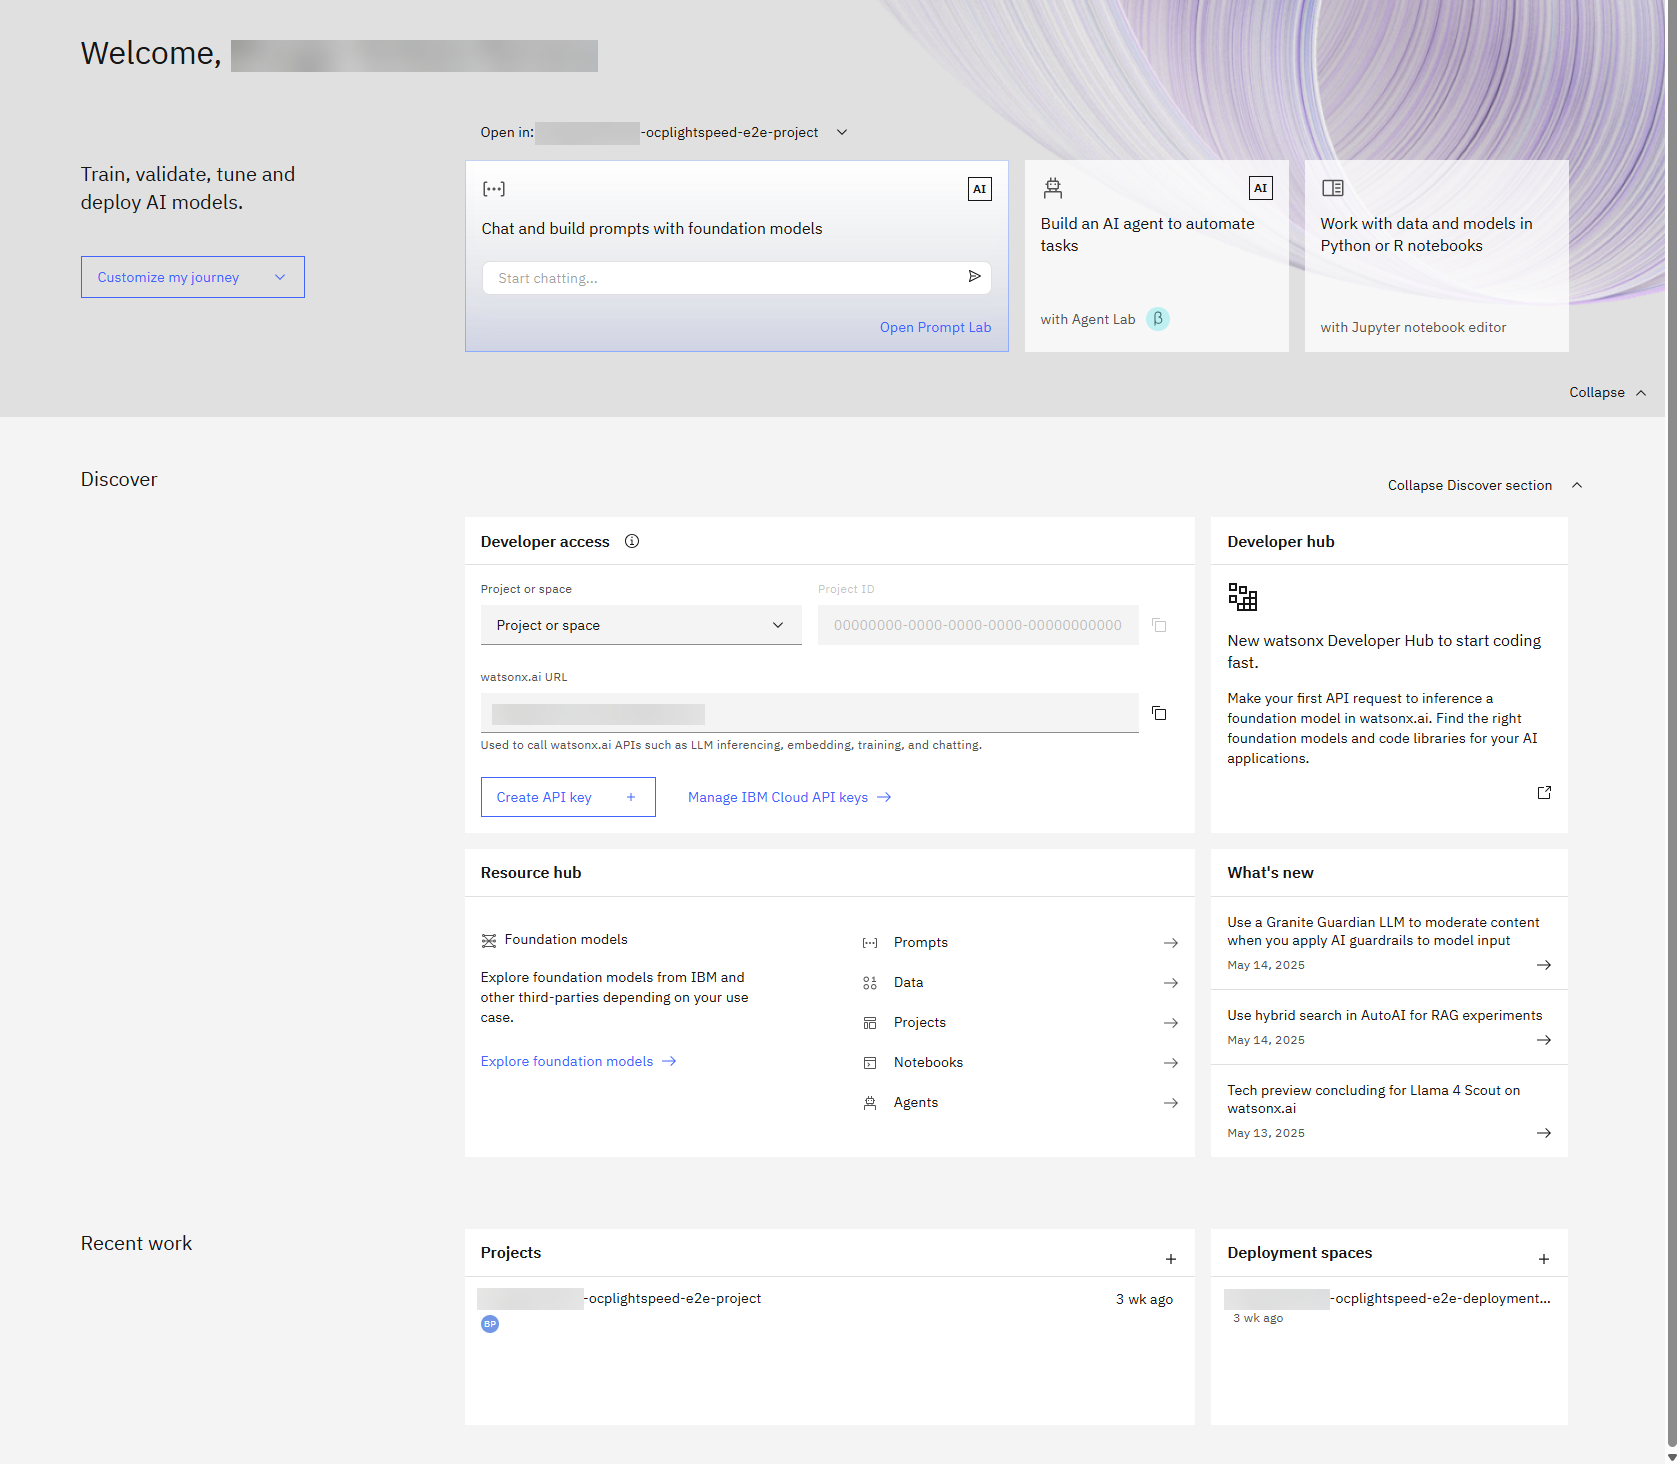
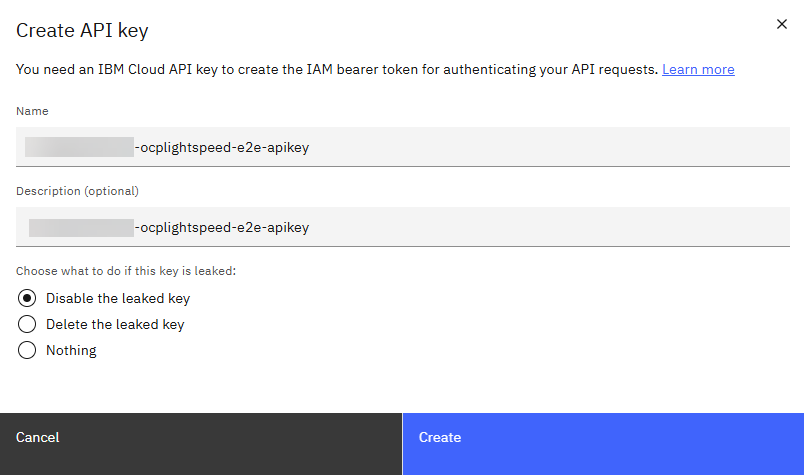
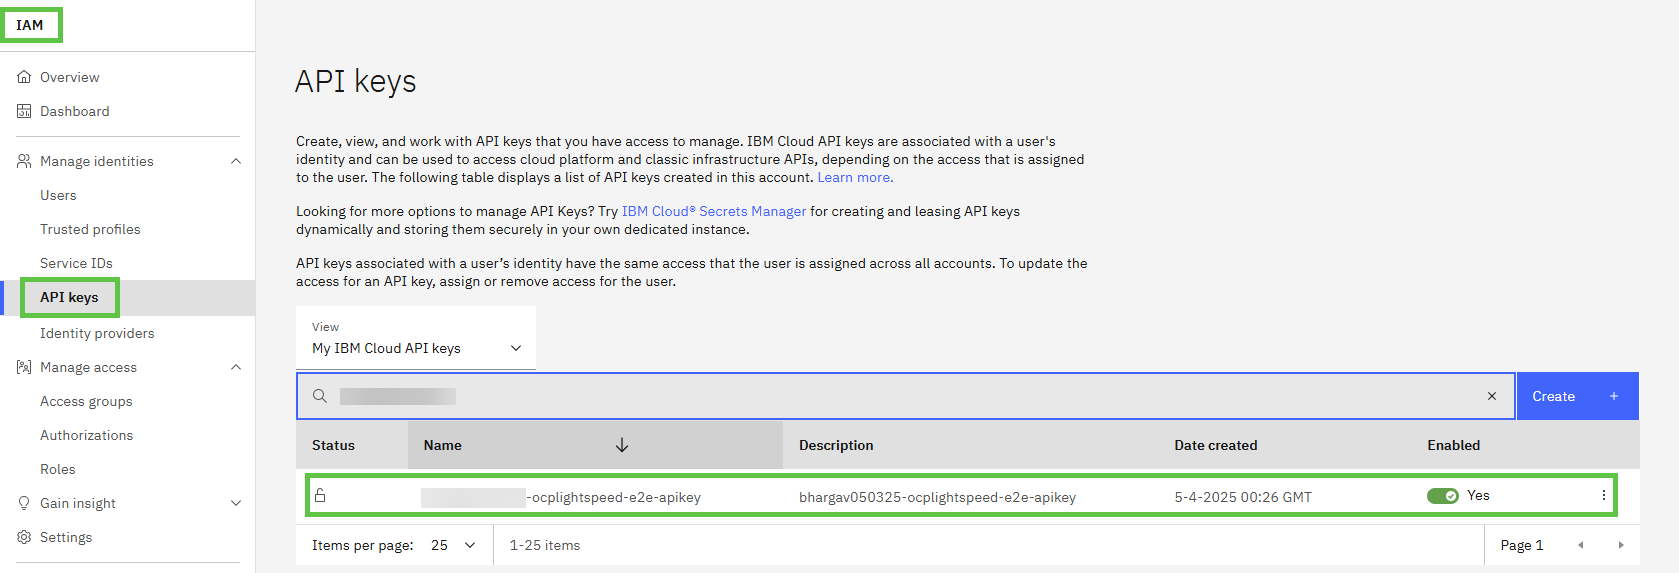
To configure the watsonx.ai Runtime service, start by creating an API key for the backend large language model.
Make sure to save the generated API key, you will need it later.
Steps:
Go to Create API key.
Name:
<YOUR-API-KEY>Description (optional):
<YOUR-API-KEY-DESC>
Click Create.

Create a project where the backend large language model will be hosted. Make sure to save the Project ID for later use.
Steps:
a. Go to Create Project.
b. Define details:
Name:
<YOUR-PROJECT>Description (optional):
<YOUR-PROJECT-DESC>Tags (optional):
<YOUR-PROJ-TAG>
c. Define storage
- Select storage service:
<YOUR-SERVICE-INSTANCE-NAME>
d. Click Create
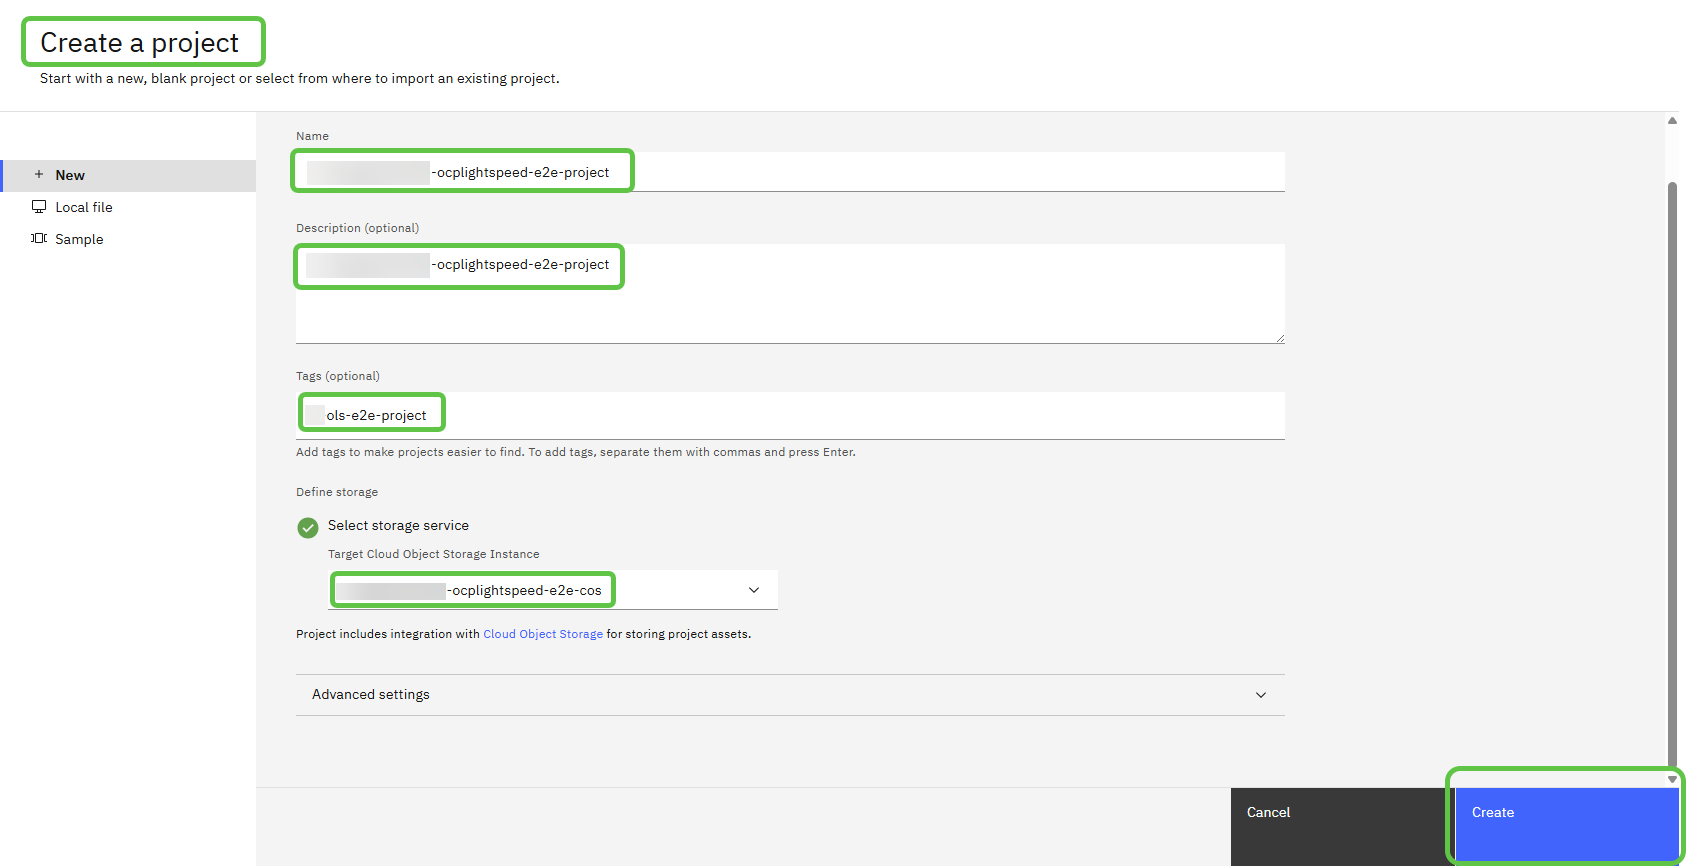
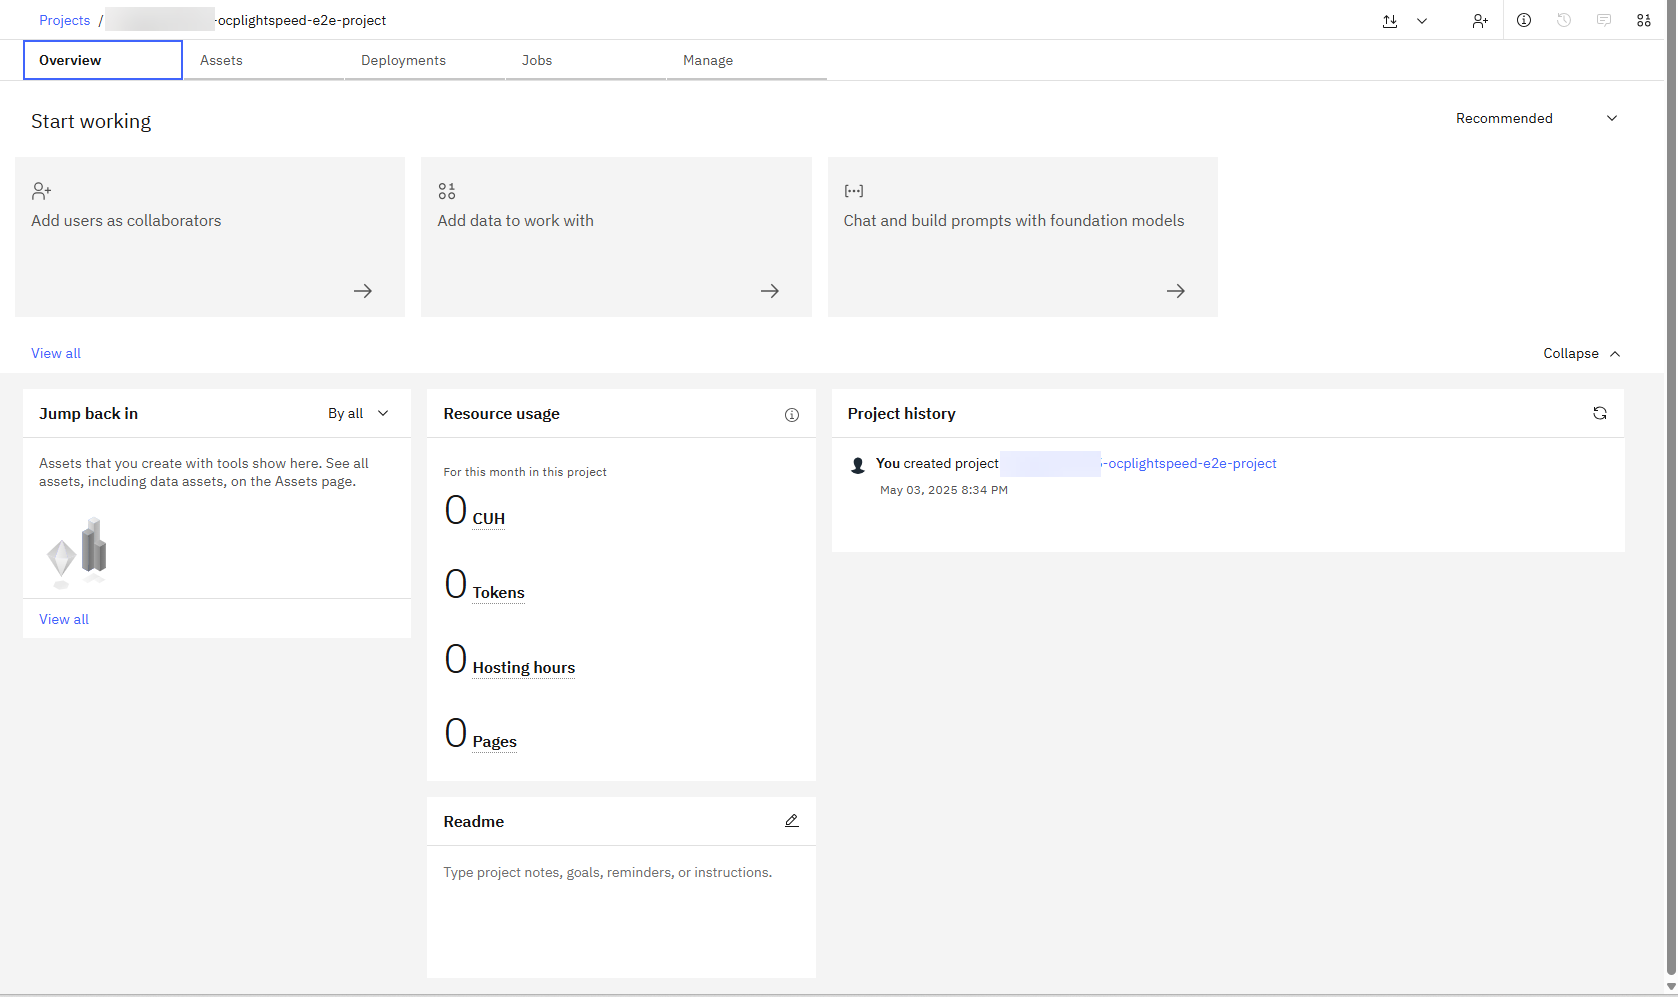
After creating the project, you will be directed to the project overview screen.
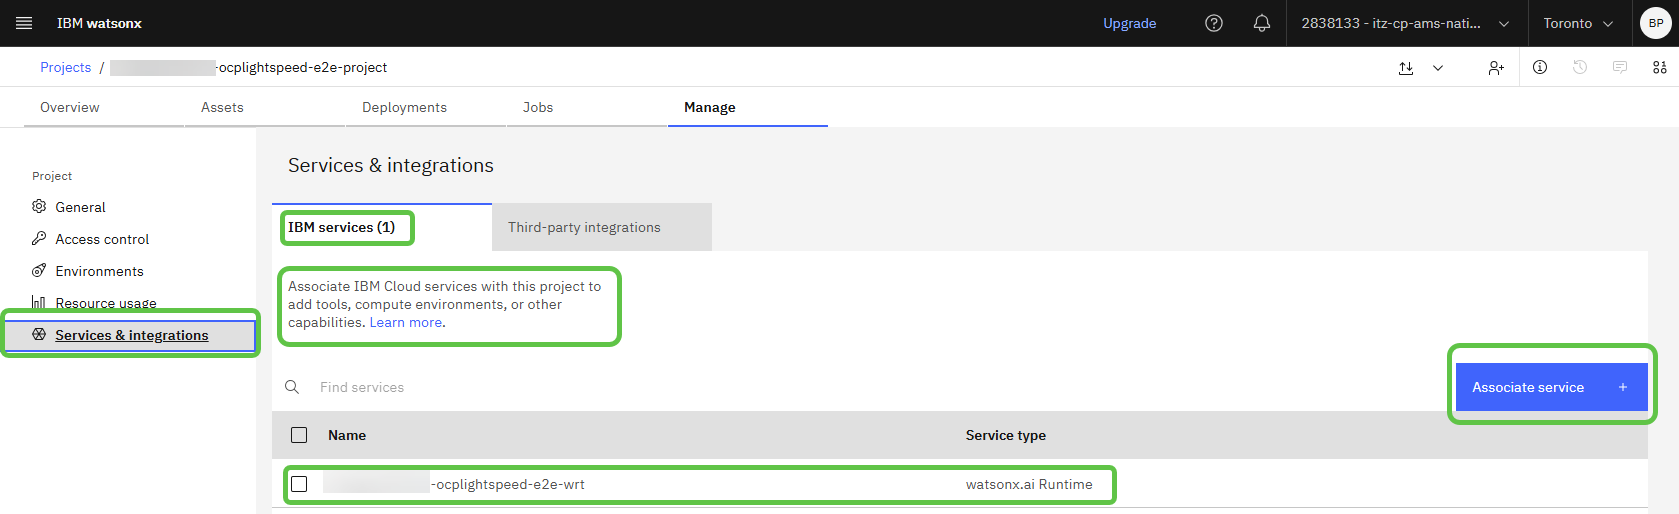
Associate your project with a watsonx.ai Runtime instance. You will see a screen guiding you through this step. The large language model used here is
granite-3-8b-instruct.
Connect your project to the Runtime instance to host the large language model (LLM).
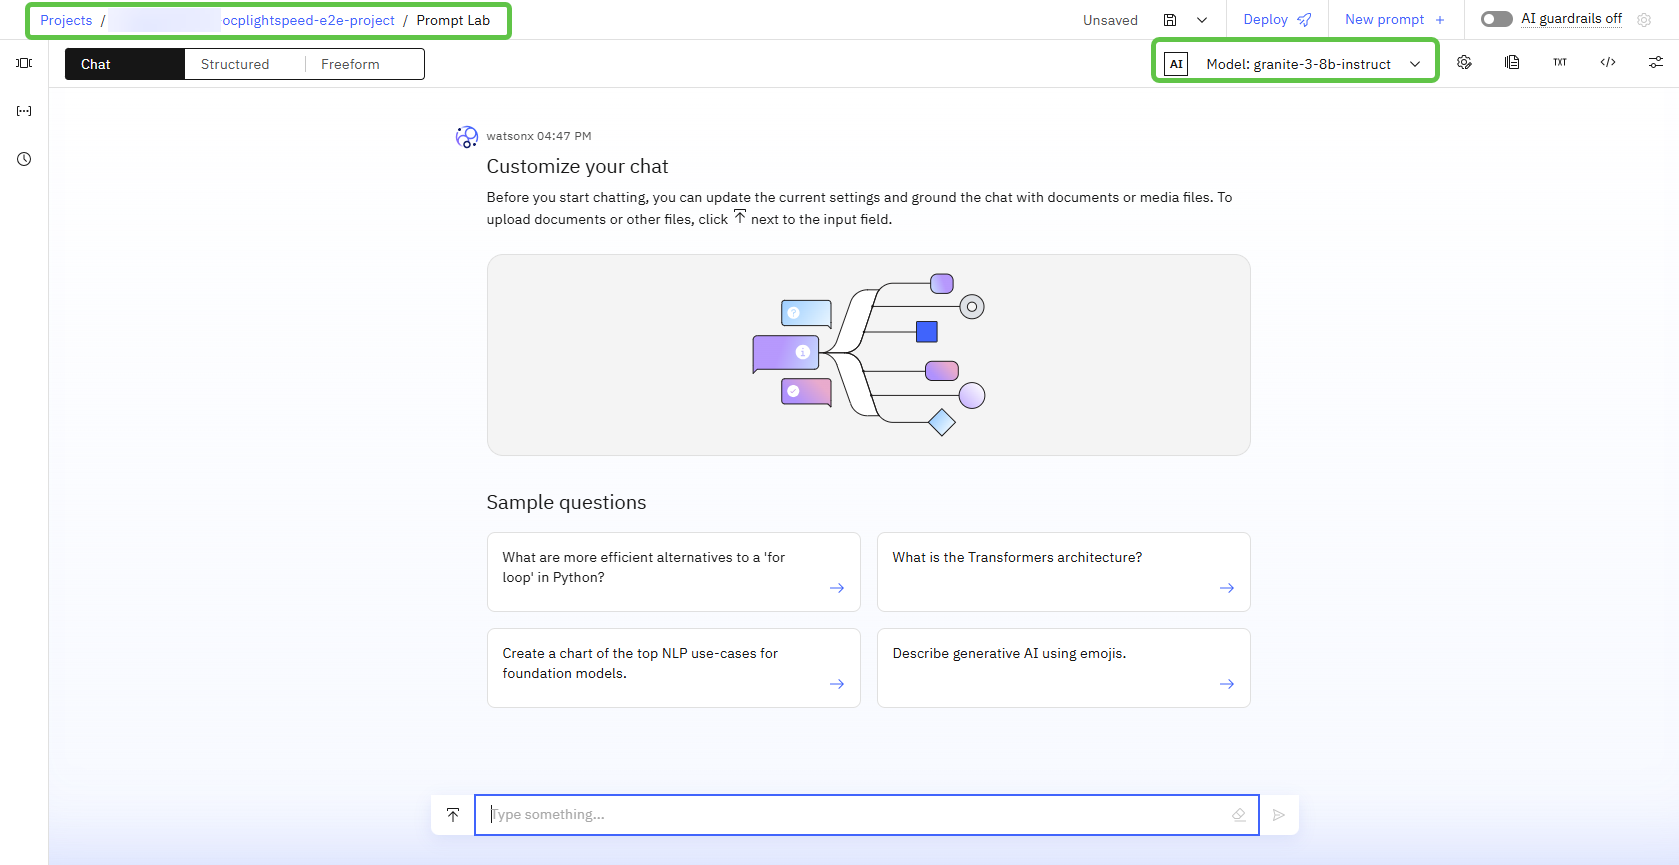
Confirm that your Runtime instance is successfully associated with your project, as shown.
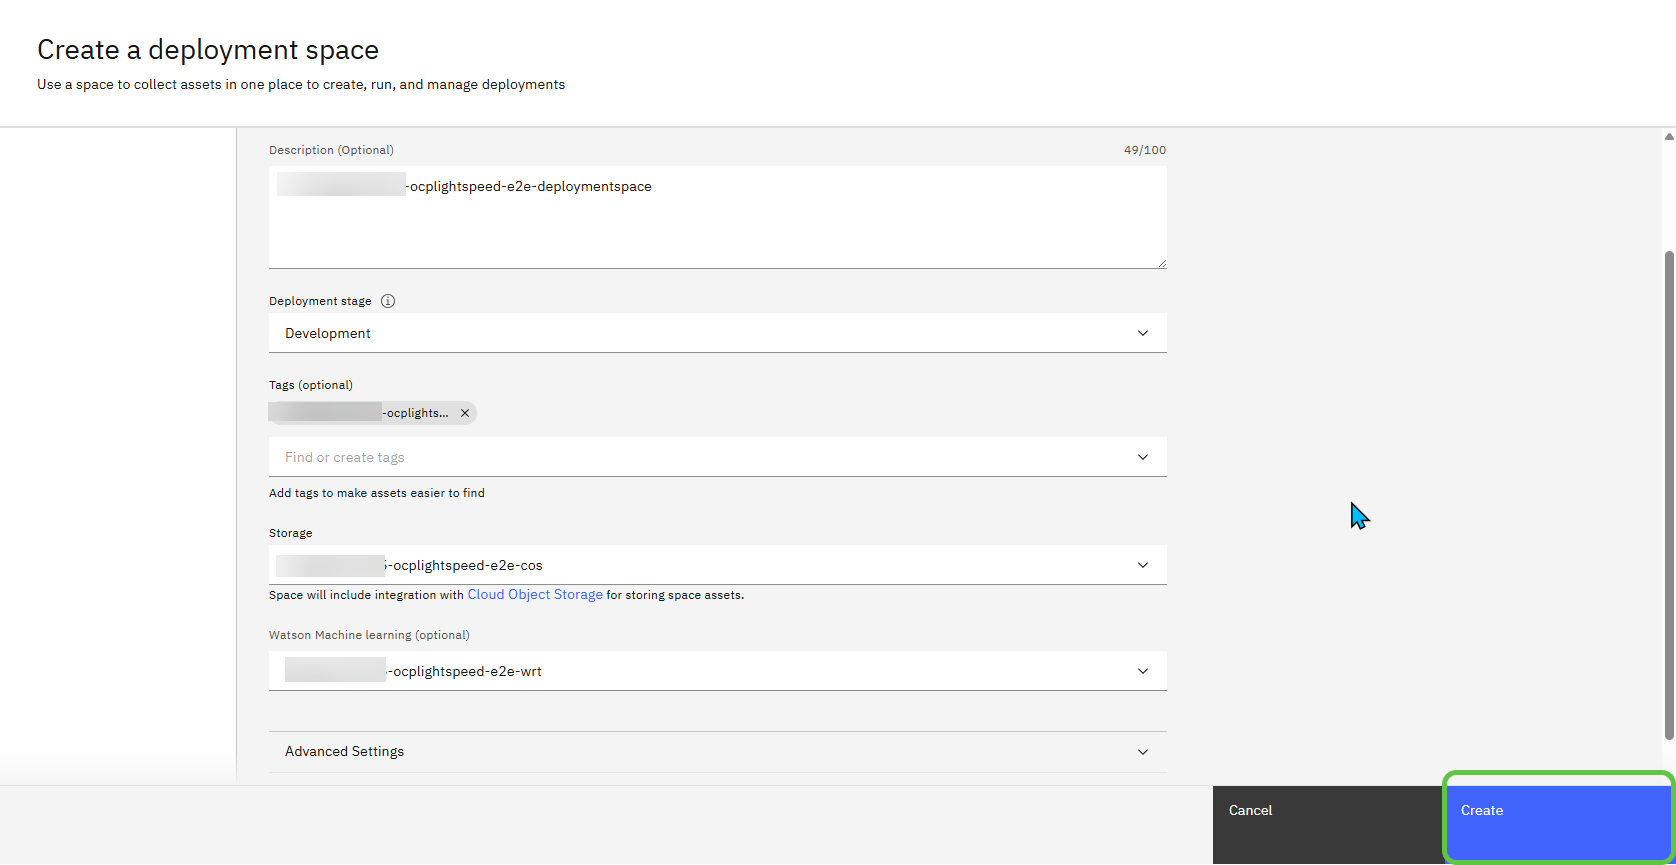
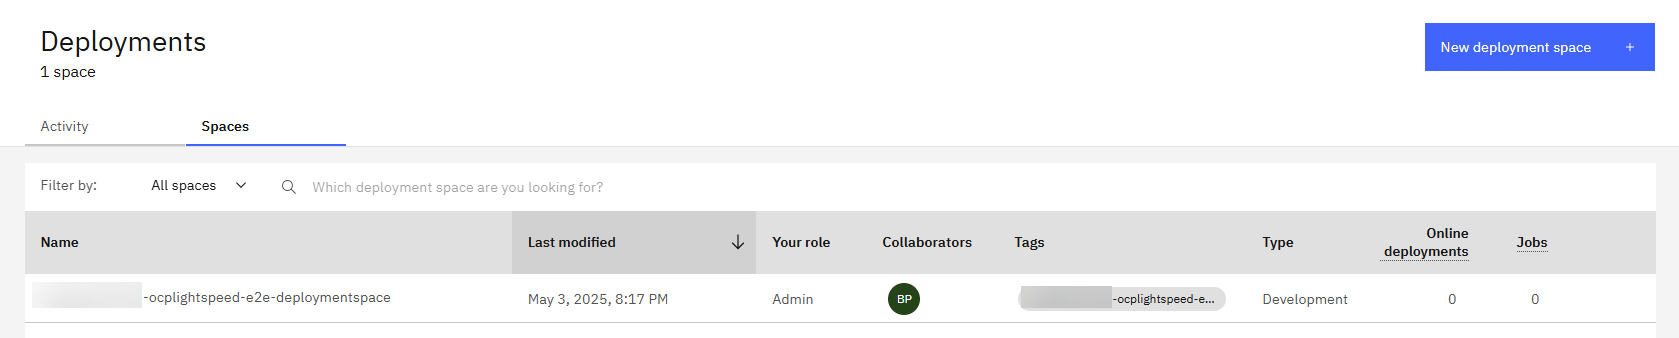
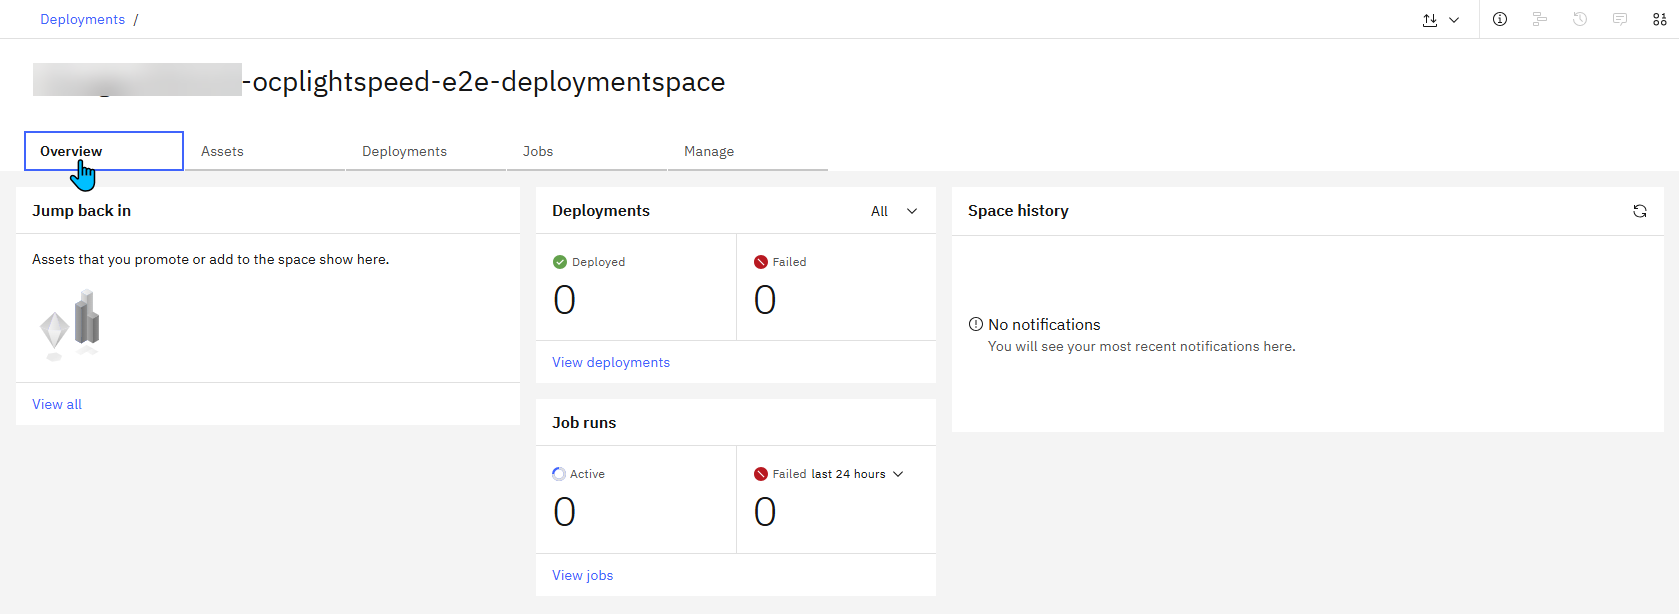
Create a deployment space to host the backend large language model. Make sure to save the Deployment Space GUID for later configuration.
a. Create a deployment space.
Name:
<YOUR-DEPLOYMENT-SPACE-NAME>Description (Optional):
<YOUR-DEPLOYMENT-SPACE-DESC>Deployment Stage: Development
Tags (Optional):
<YOUR-DEPLOYMENT-SPACE-TAG>
Select Services:
Storage Service:
<YOUR-SERVICE-INSTANCE-NAME>watsonx.ai Runtime Service (Optional): `
b. Click Create.
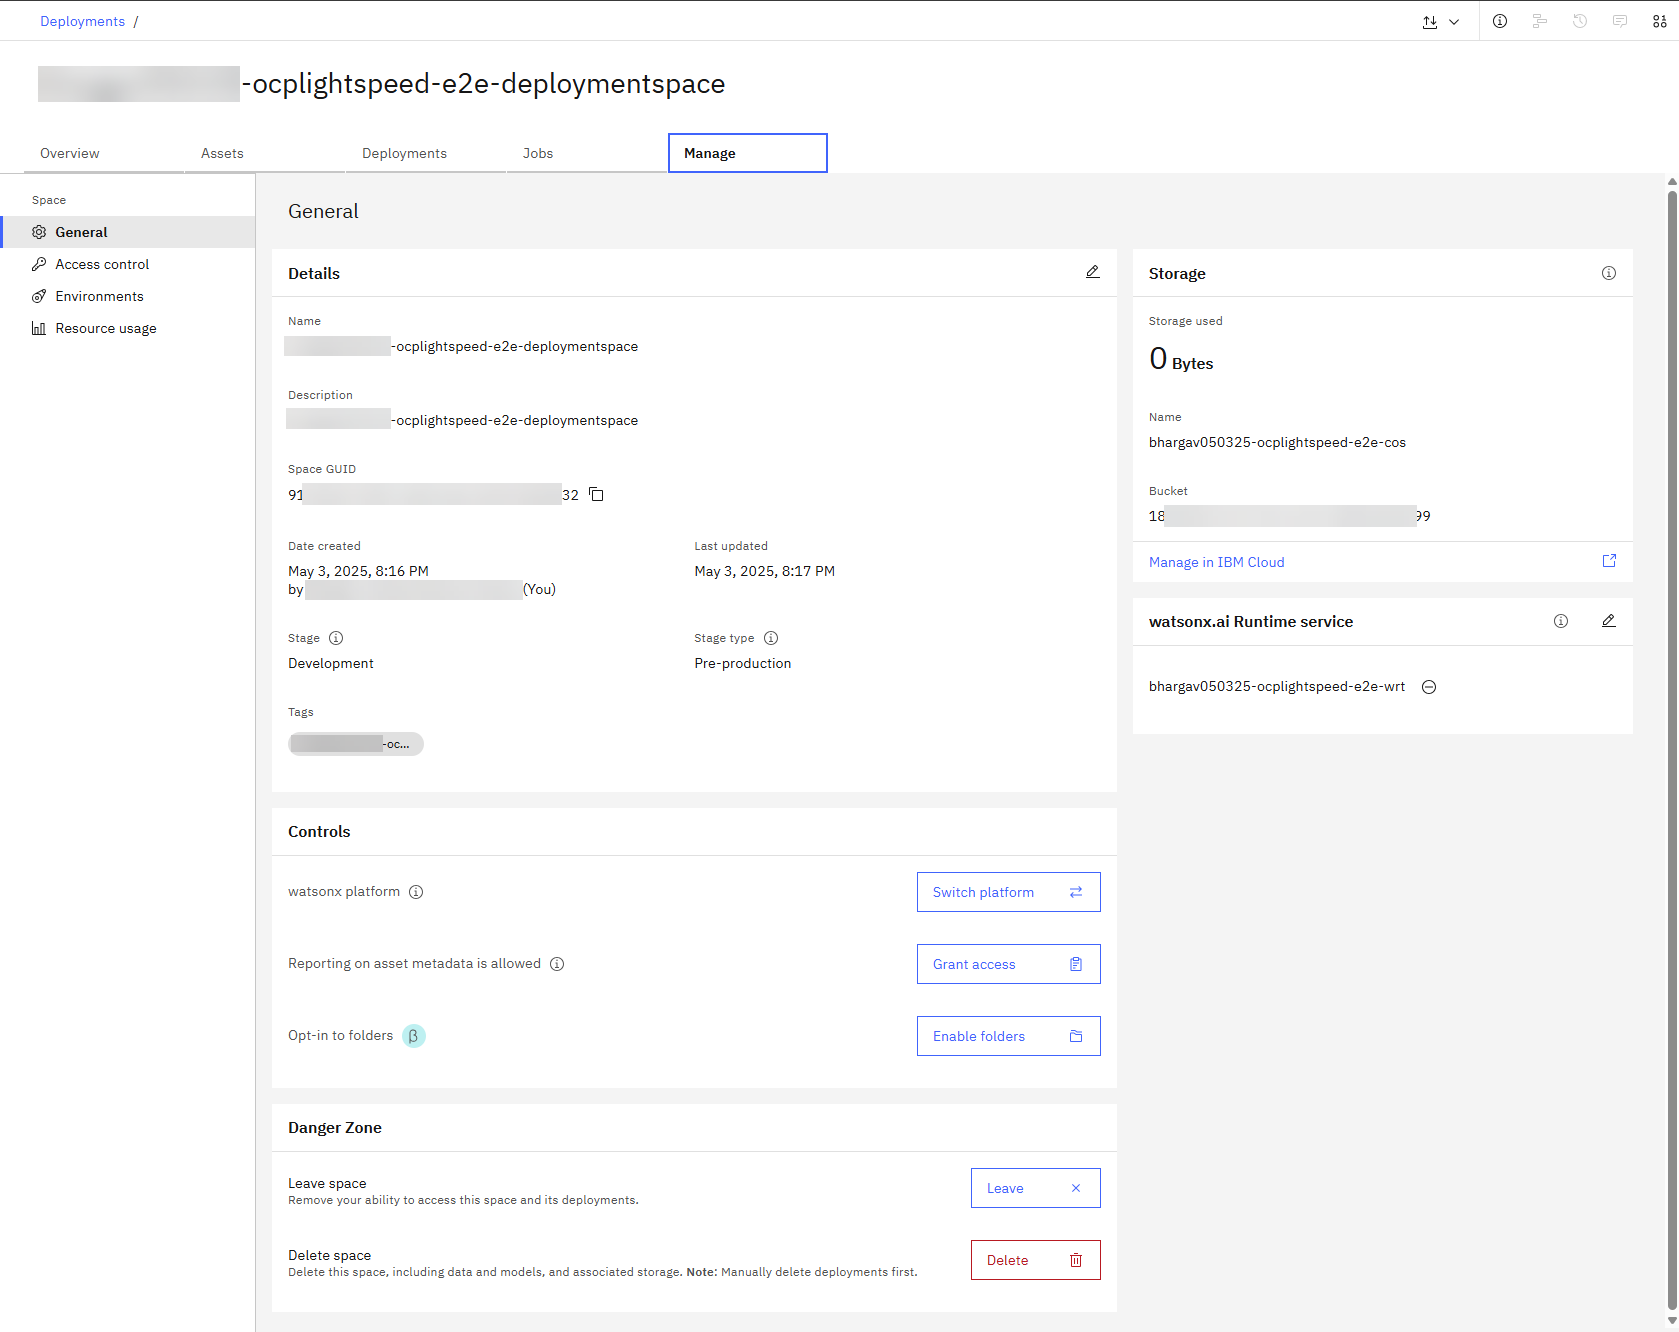
The following screen shows a fully configured watsonx.ai setup with the granite-3-8b-instruct large language model.
Step 5. Create OpenShift Lightspeed resources in OpenShift
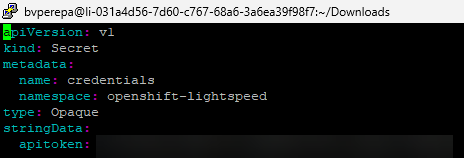
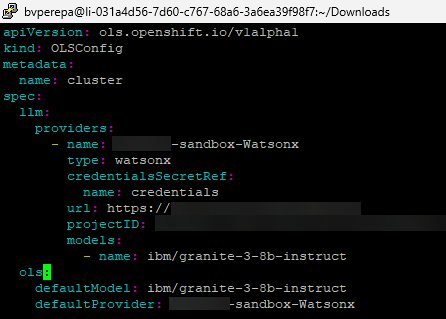
In this step, you will create two YAML files:
A Secret resource that stores the API key to connect OpenShift Lightspeed to the backend LLM.
An OLSConfig custom resource that configures OpenShift Lightspeed using the watsonx.ai URL, project ID, and model name for the Toronto region.
After creating the YAML files, apply them using the OpenShift CLI (oc).
bvperepa:~$ cat ./<YOUR-LLM-PROVIDER-NAME>-llm-secret.yaml
apiVersion: v1
kind: Secret
metadata:
  name: credentials
  namespace: openshift-lightspeed
type: Opaque
stringData:
  apitoken: <watsonx.ai API key>

bvperepa:~$ cat ./<YOUR-LLM-PROVIDER-NAME>-llm-config-cr.yaml
apiVersion: ols.openshift.io/v1alpha1
kind: OLSConfig
metadata:
  name: cluster
spec:
  llm:
    providers:
      - name: <YOUR-LLM-PROVIDER-NAME>
        type: watsonx
        credentialsSecretRef:
          name: credentials
        url: https://ca-tor.ml.cloud.ibm.com
        projectID: <YOUR-PROJECT-ID>
        models:
          - name: ibm/granite-3-3-8b-instruct
  ols:
    defaultModel: ibm/granite-3-3-8b-instruct
    defaultProvider: <YOUR-LLM-PROVIDER-NAME>
First, log in to your OpenShift cluster before using the oc CLI.
Use the following commands to complete this step.
oc login --token=<YOUR-LOGIN-TOKEN> --server=https://<YOUR-SERVER-URL>:6443

vi ./ <YOUR-LLM-PROVIDER-NAME>-llm-secret.yaml
vi ./ <YOUR-LLM-PROVIDER-NAME>-llm-config-cr.yaml
cat ./ <YOUR-LLM-PROVIDER-NAME>-llm-secret.yaml
cat ./ <YOUR-LLM-PROVIDER-NAME>-llm-config-cr.yaml
oc create/apply -f ./ <YOUR-LLM-PROVIDER-NAME>-llm-secret.yaml
oc create/apply -f ./ <YOUR-LLM-PROVIDER-NAME>-llm-config-cr.yaml
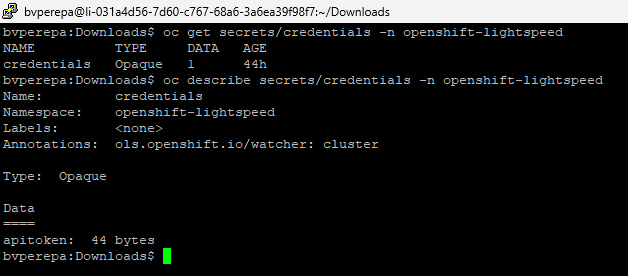
oc get secrets/credentials -n openshift-lightspeed
oc describe secrets/credentials -n openshift-lightspeed
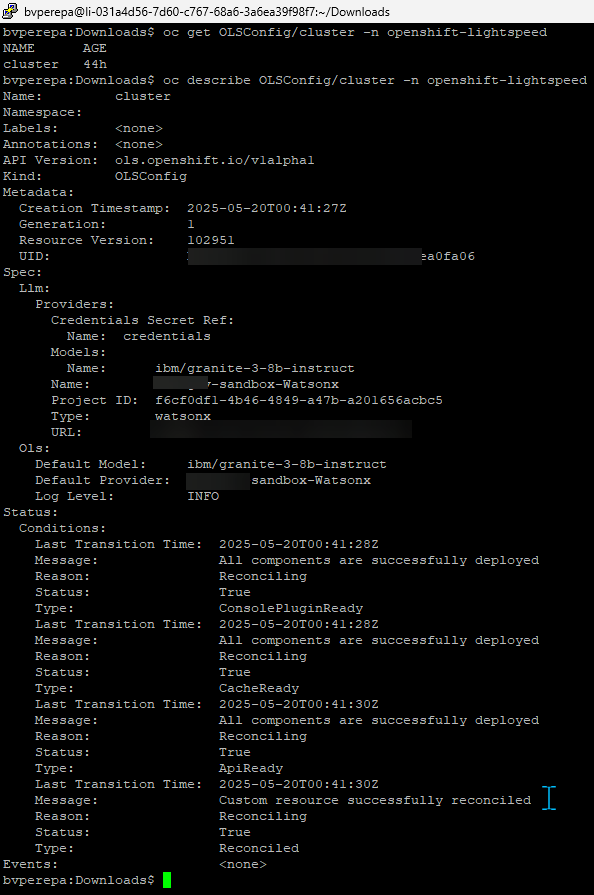
oc get OLSConfig/cluster -n openshift-lightspeed
oc describe OLSConfig/cluster -n openshift-lightspeed
Run the following command to check that OpenShift Lightspeed is running correctly in the cluster.
oc logs deployment/lightspeed-app-server -c lightspeed-service-api -n openshift-lightspeed | grep Uvicorn

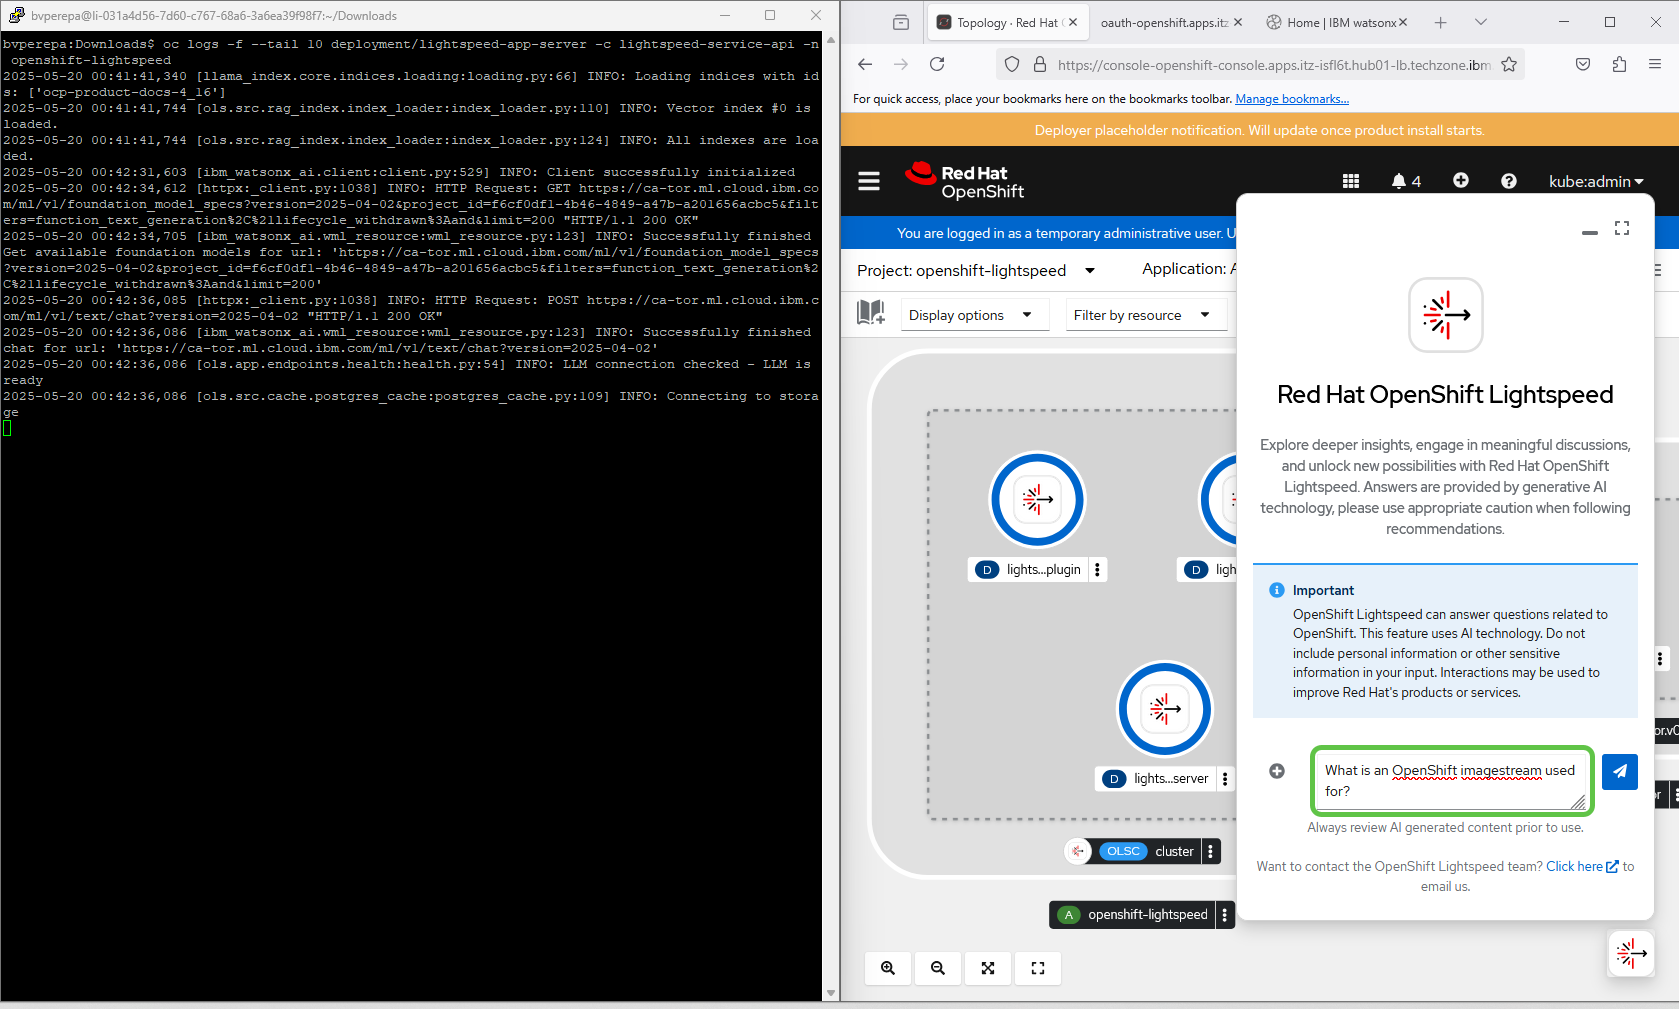
Step 6. Access the OpenShift Lightspeed gen AI virtual assistant
In this step, you will access the gen AI virtual assistant from the OpenShift web console.
You can open the assistant in several ways:
By clicking the floating icon in the lower-right corner of the screen.
From the Actions dropdown after selecting a specific resource.
From the Node Options menu in a resource list view.
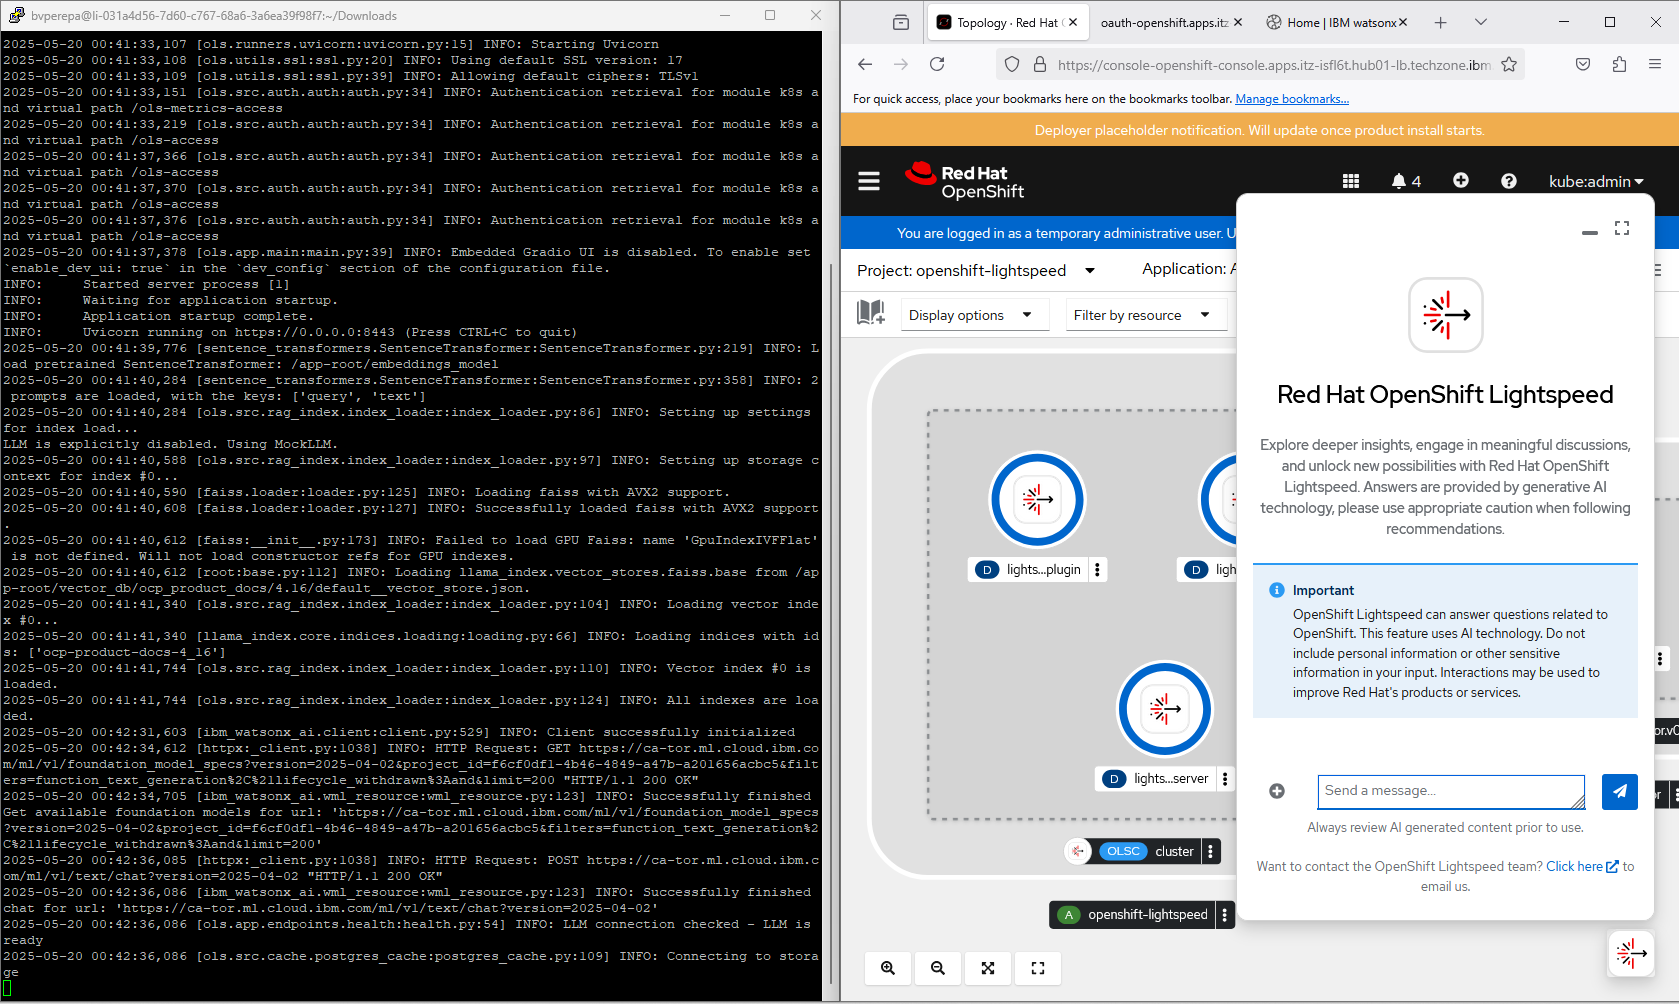
The following screen shows the fully expanded virtual assistant chat window.
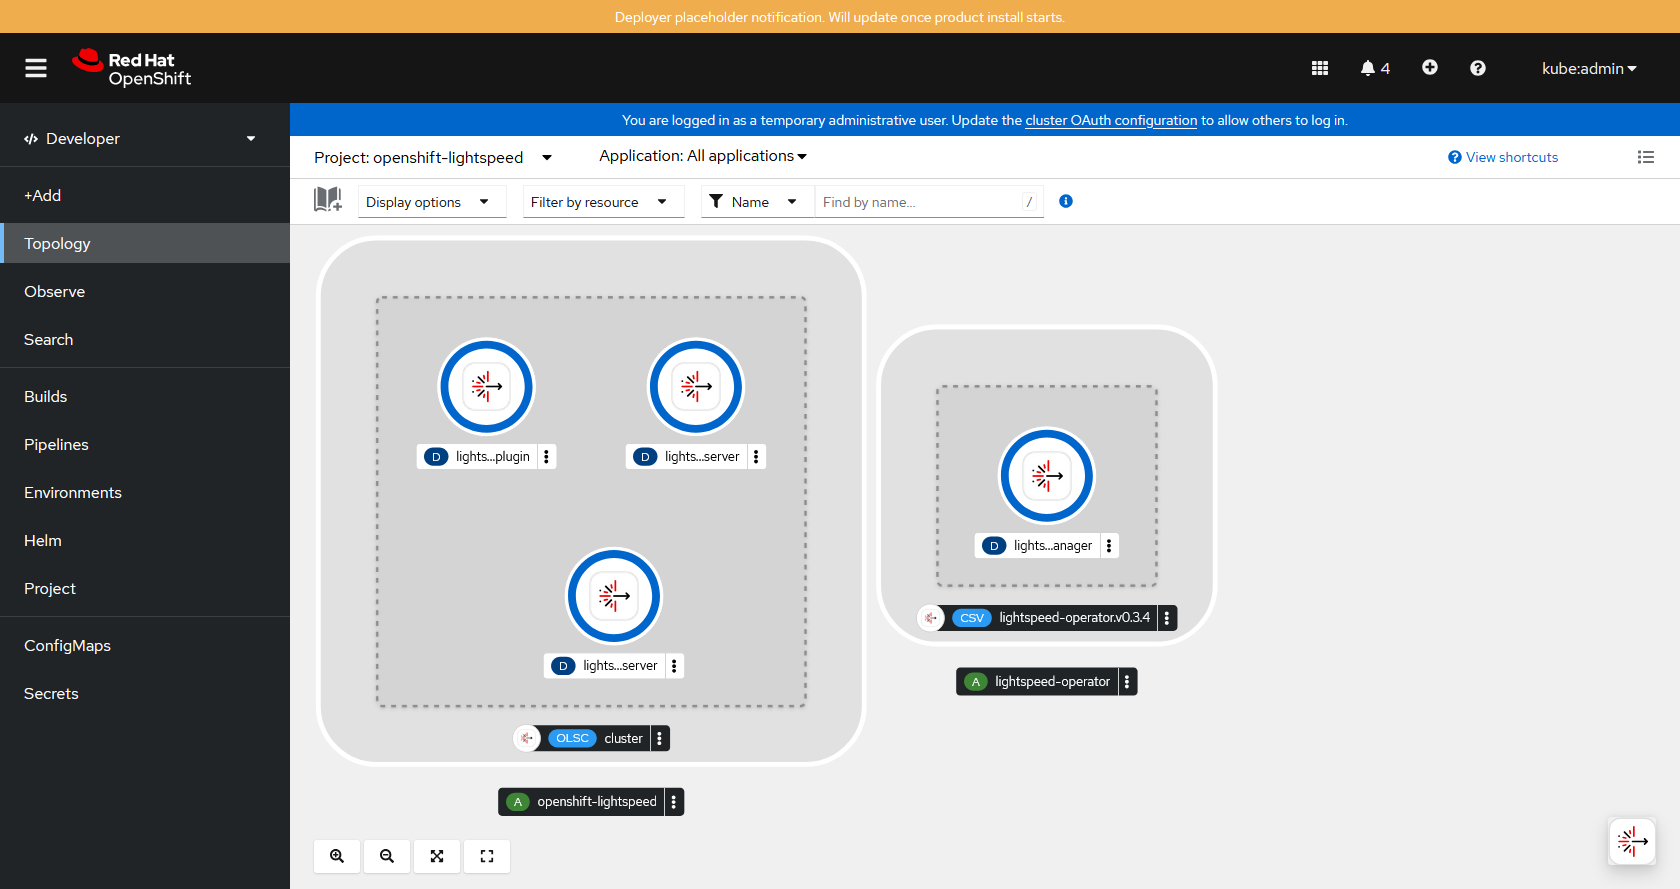
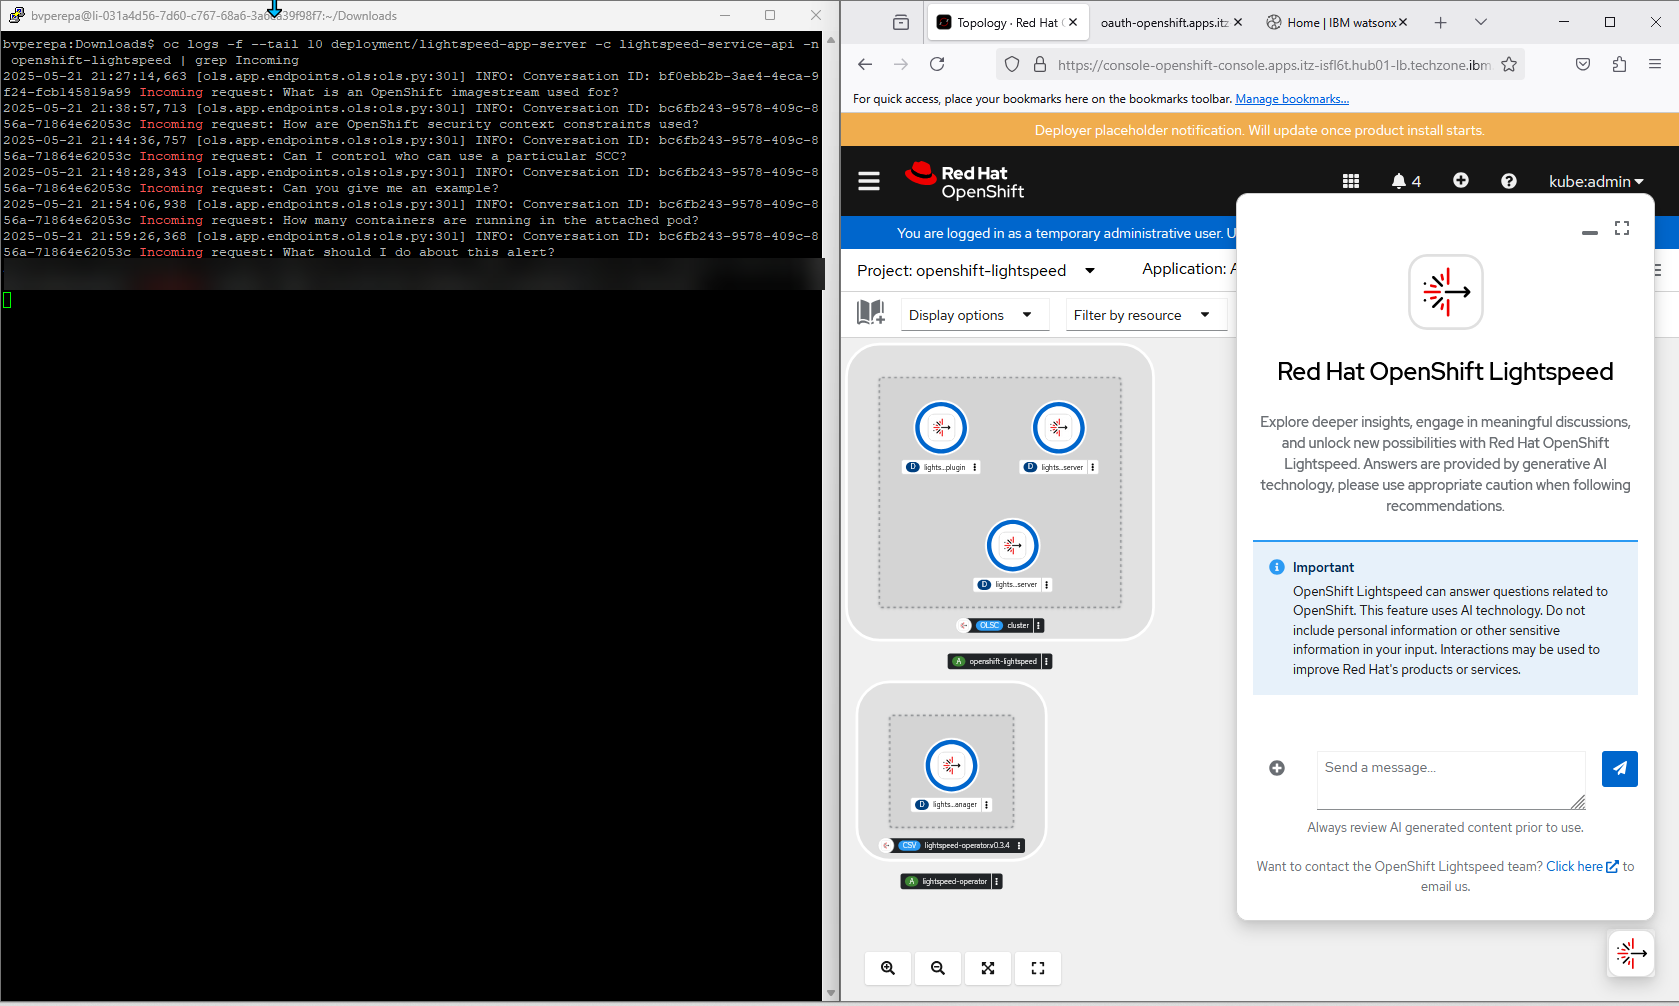
The following screen shows the topology view of the successfully deployed OpenShift Lightspeed virtual assistant, who is viewed from the Developer perspective.
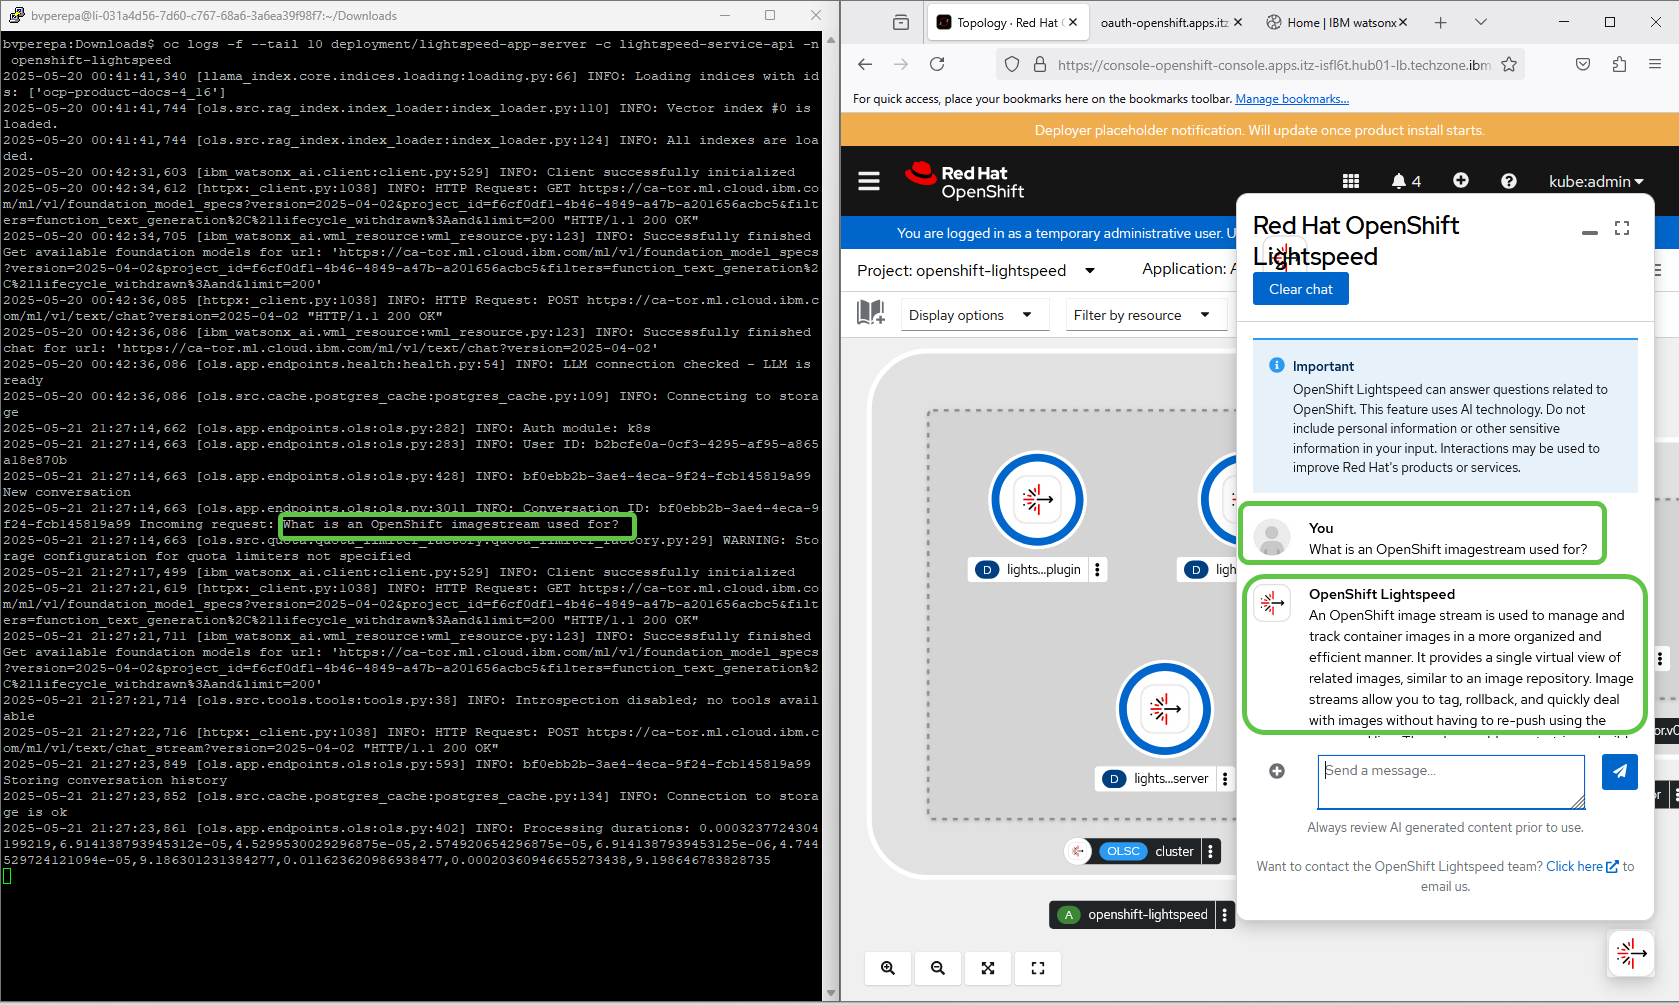
Step 7. Ask natural language questions using the gen AI virtual assistant
In this step, you will interact with the OpenShift Lightspeed virtual assistant by asking questions in plain English. The screens show the assistant panel on the right and a terminal window on the left, which uses the oc CLI to track the complete flow from the OpenShift web console, through the Lightspeed operator, to the backend watsonx.ai model (granite-3-8b-instruct).
The following example shows a stand-alone question submitted to the assistant:
“What is an OpenShift image stream used for?”
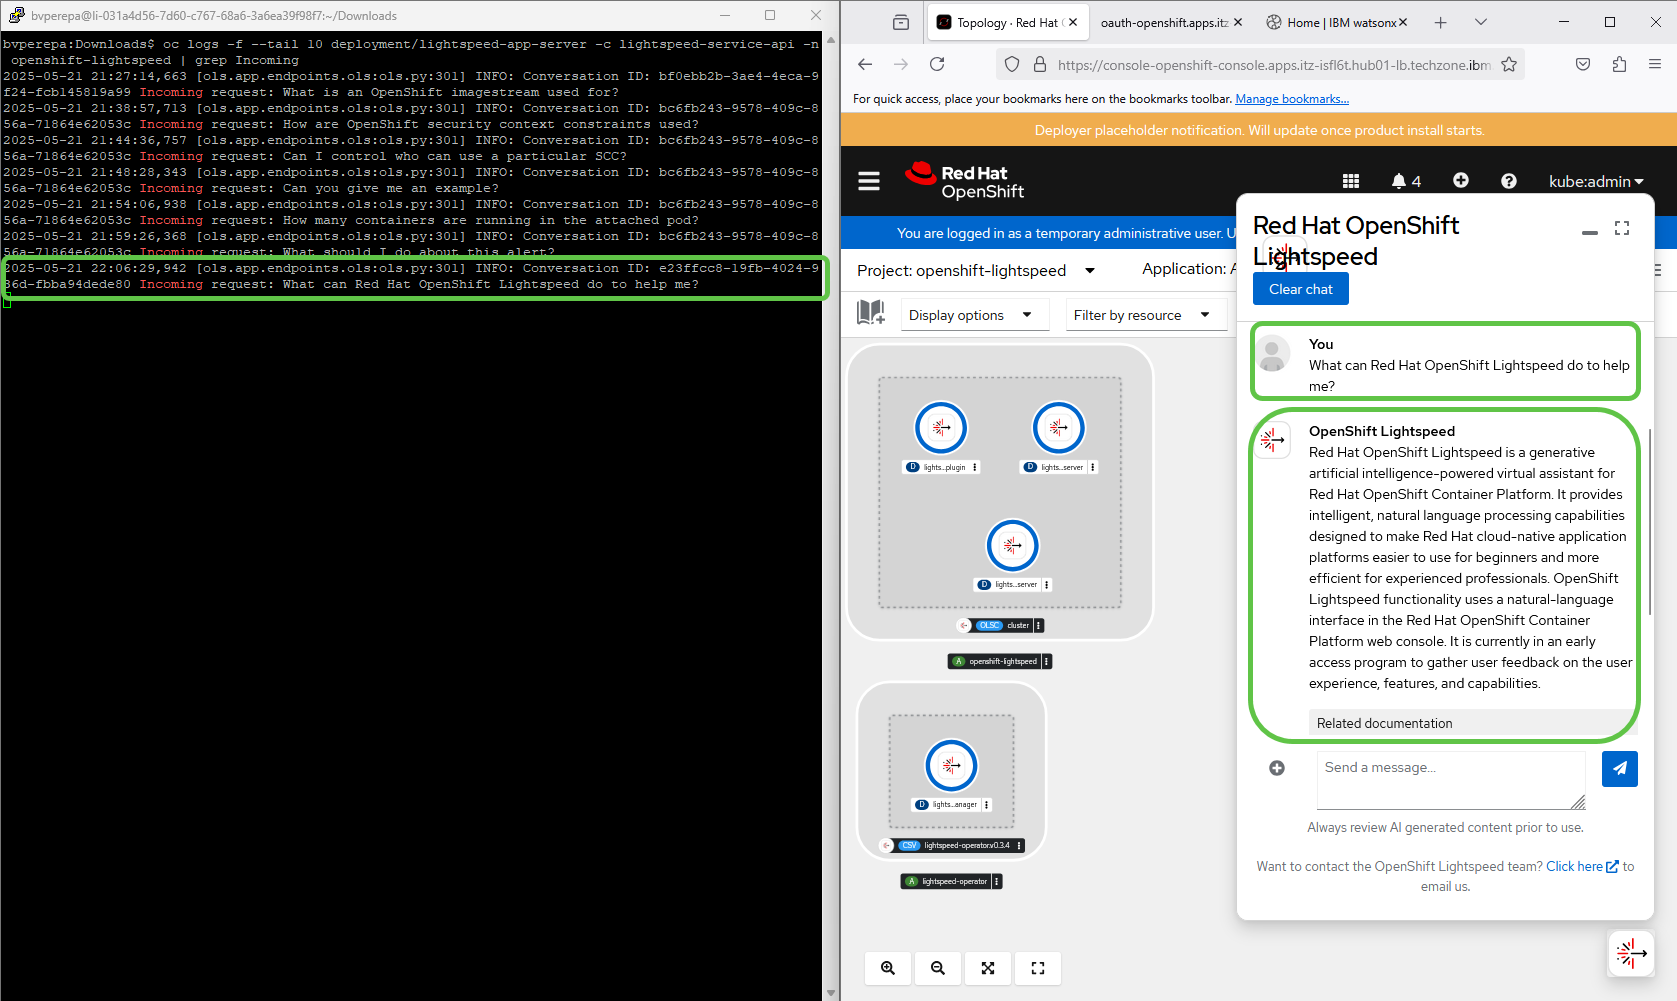
The following screen shows the virtual assistant’s response in both the OpenShift web console and the oc CLI terminal.
Note the highlighted sections showing the assistant's reply in each window.
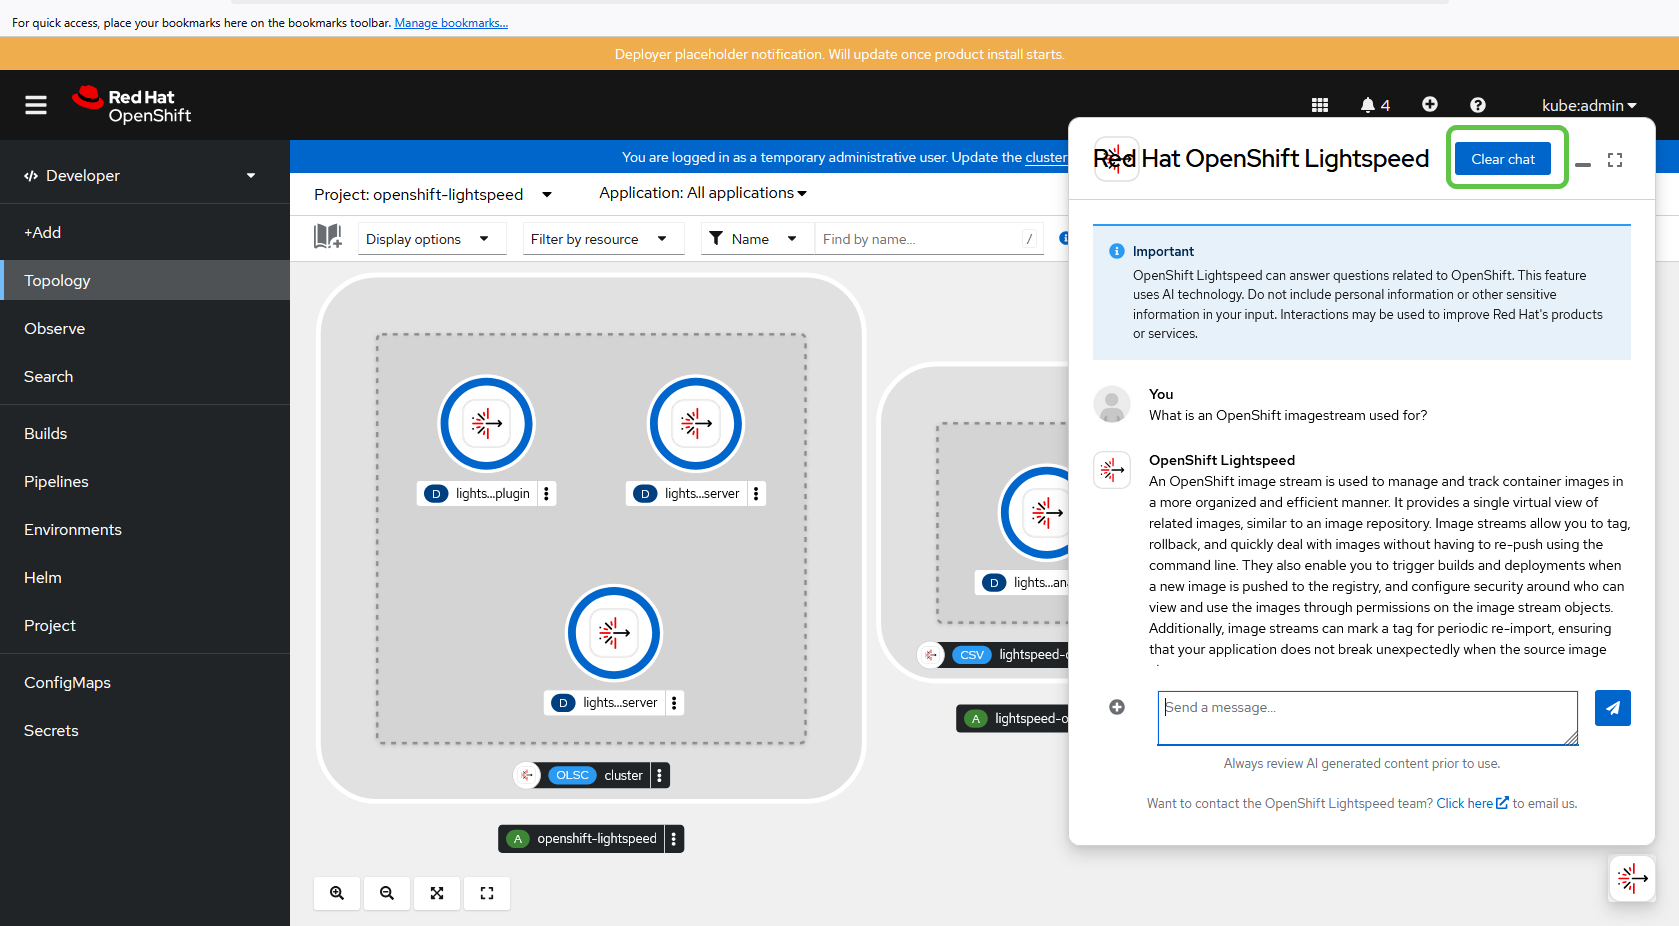
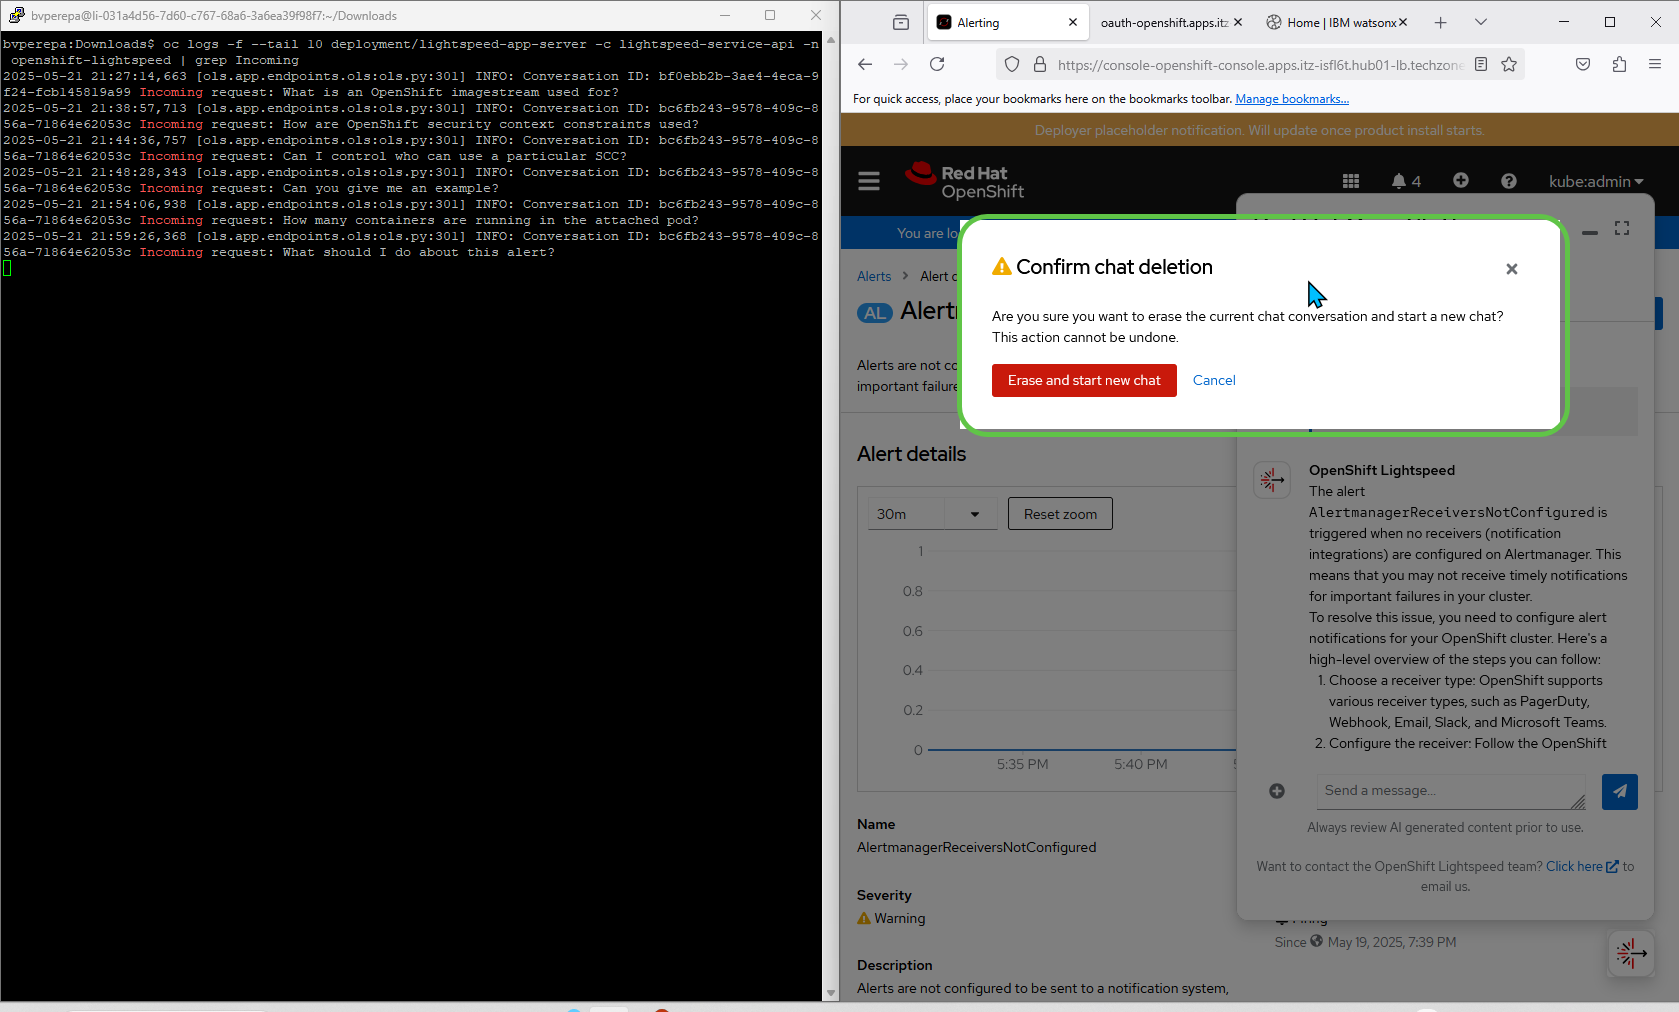
The following screen shows how to clear the chat history.
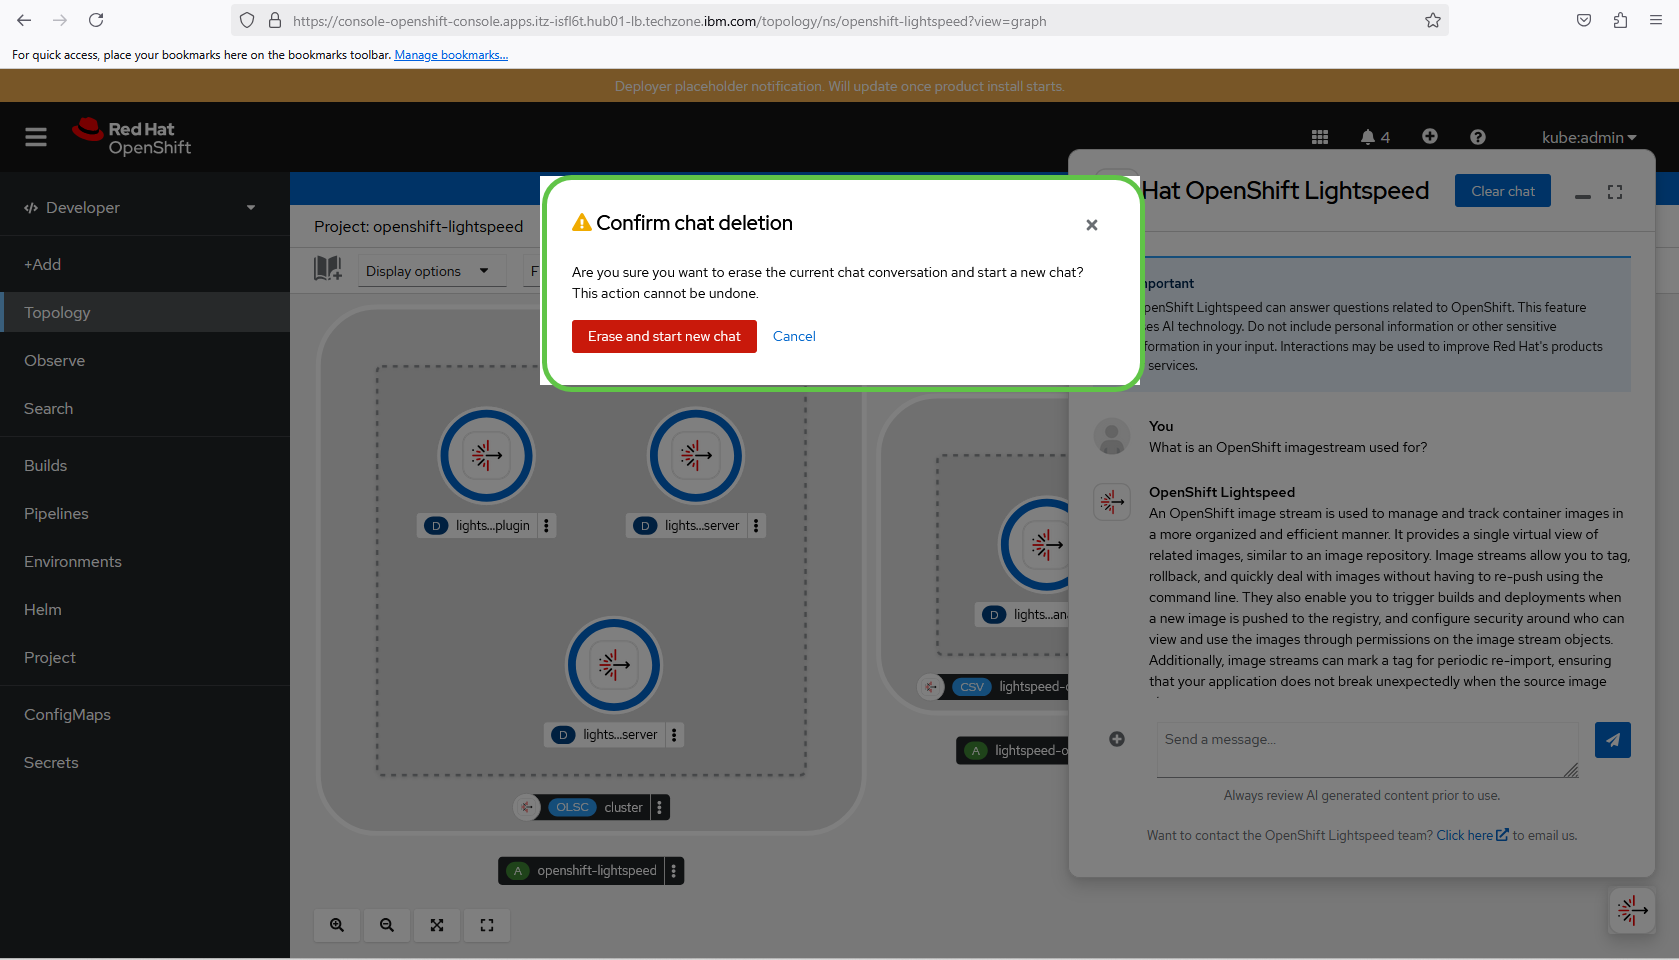
The following screen shows the chat being cleared, with a confirmation dialog to confirm the deletion.
The following screens show the virtual assistant's responses to a series of related questions.
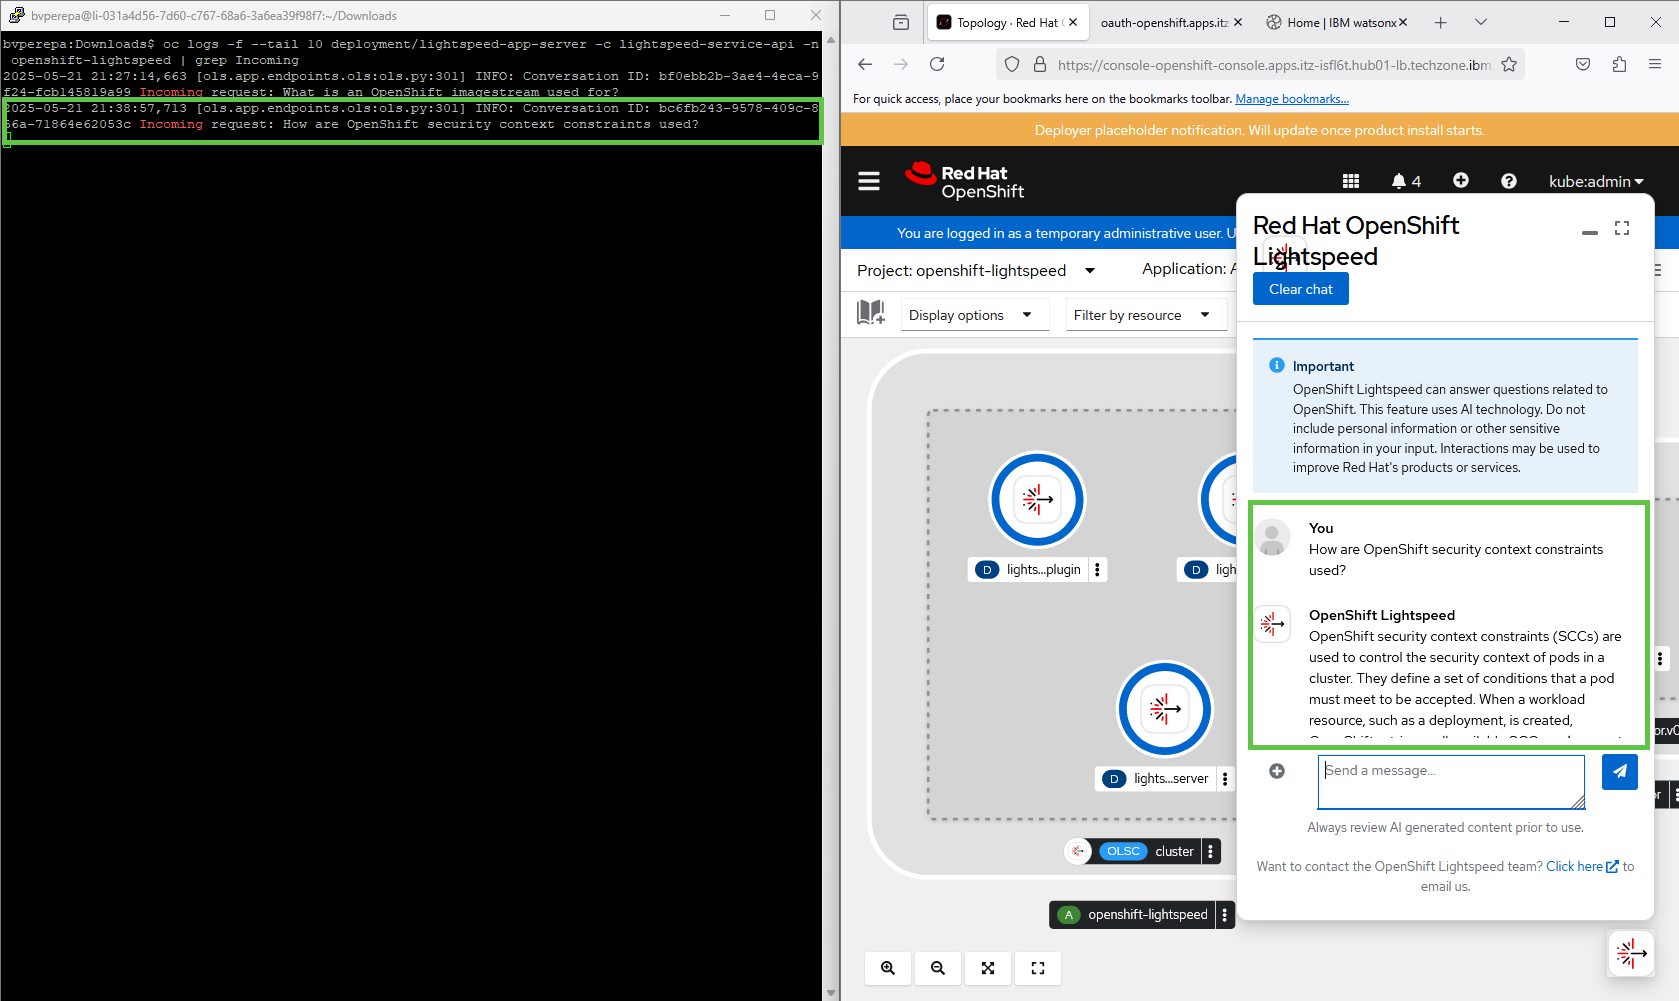
Example question: How are OpenShift security context constraints used?
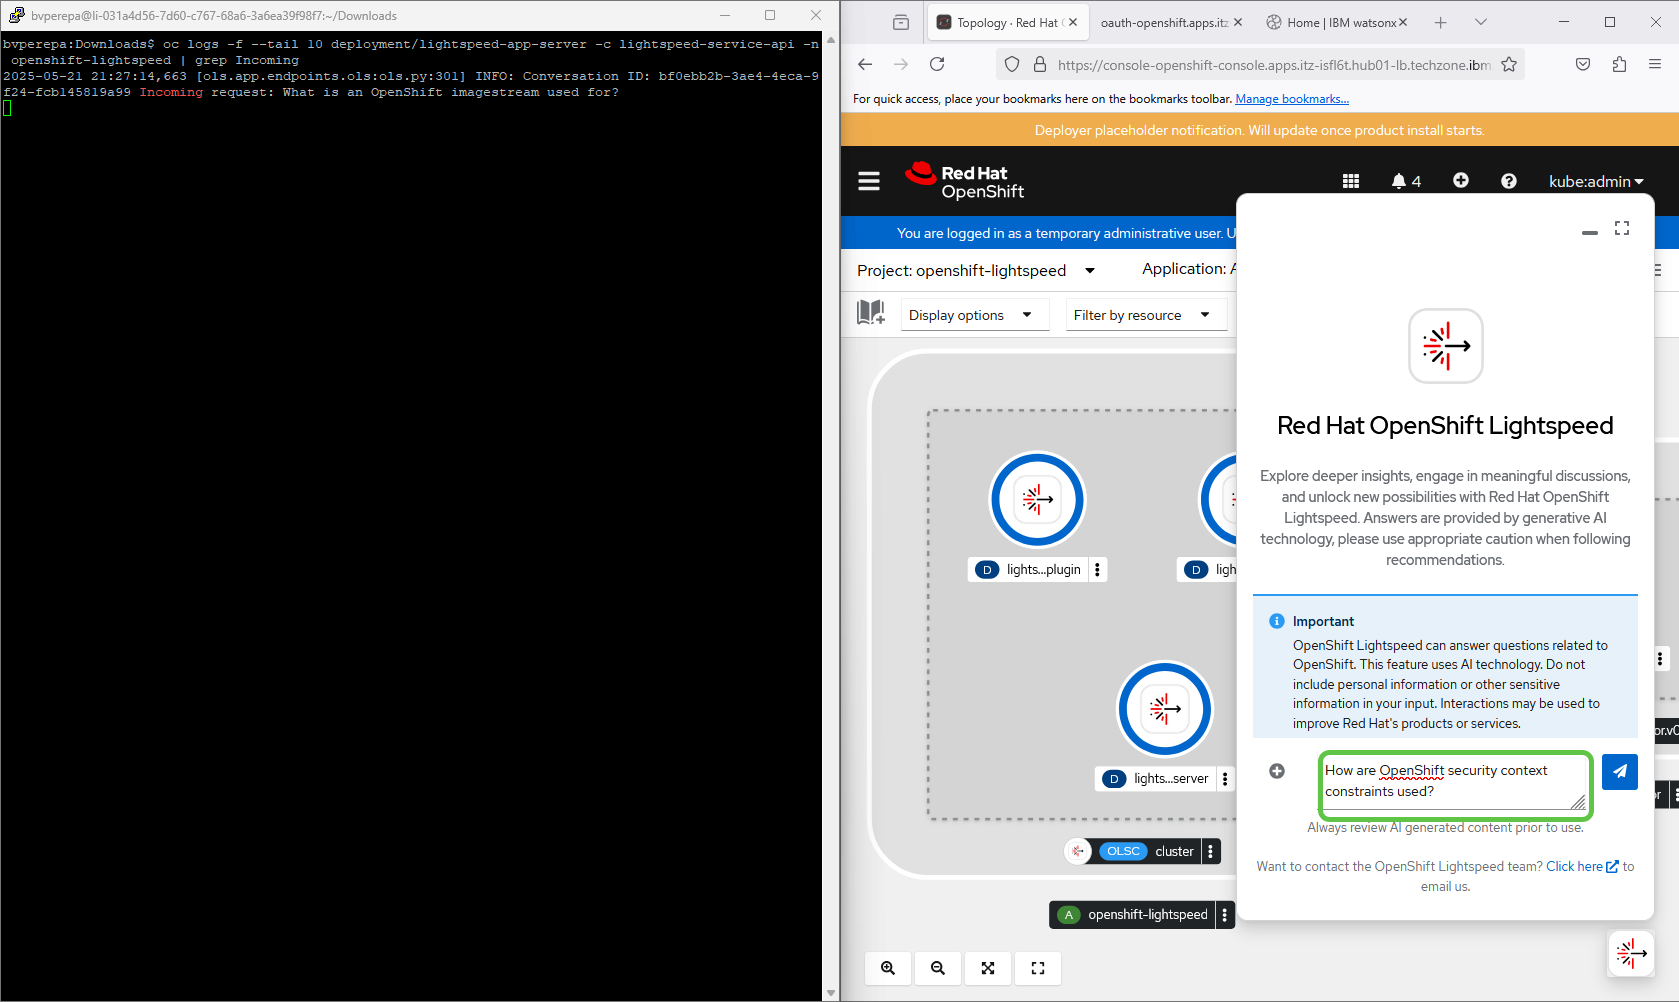
The following screen shows the virtual assistant’s response in both the web console and the terminal window.
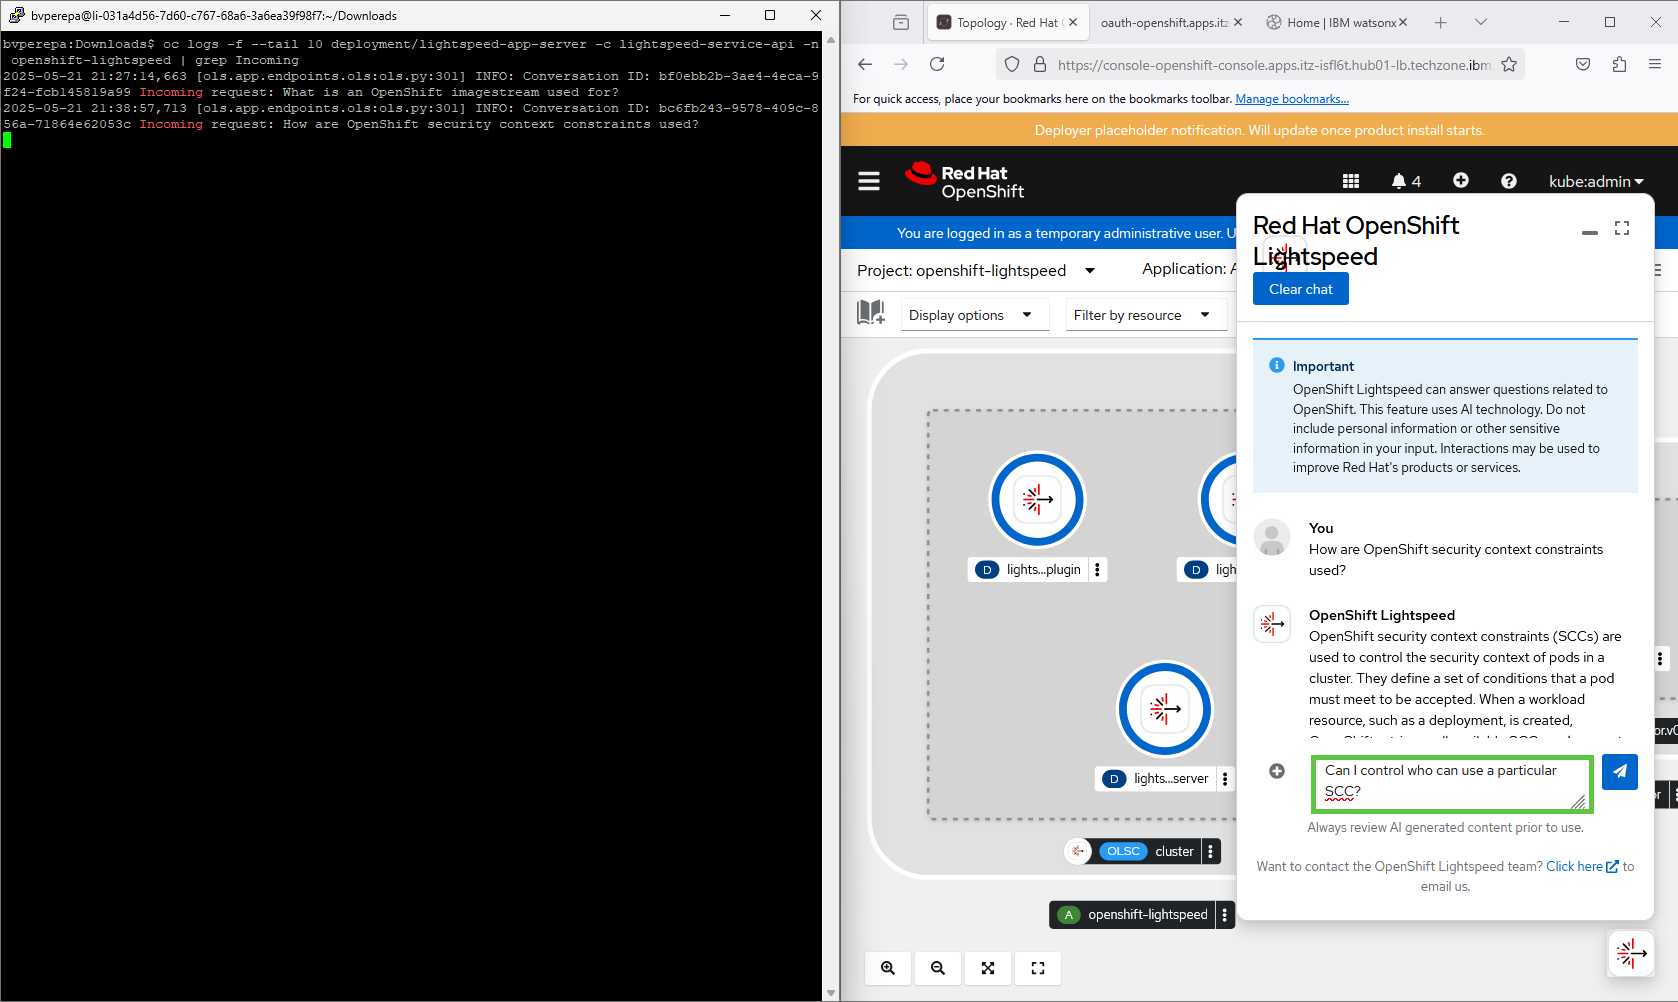
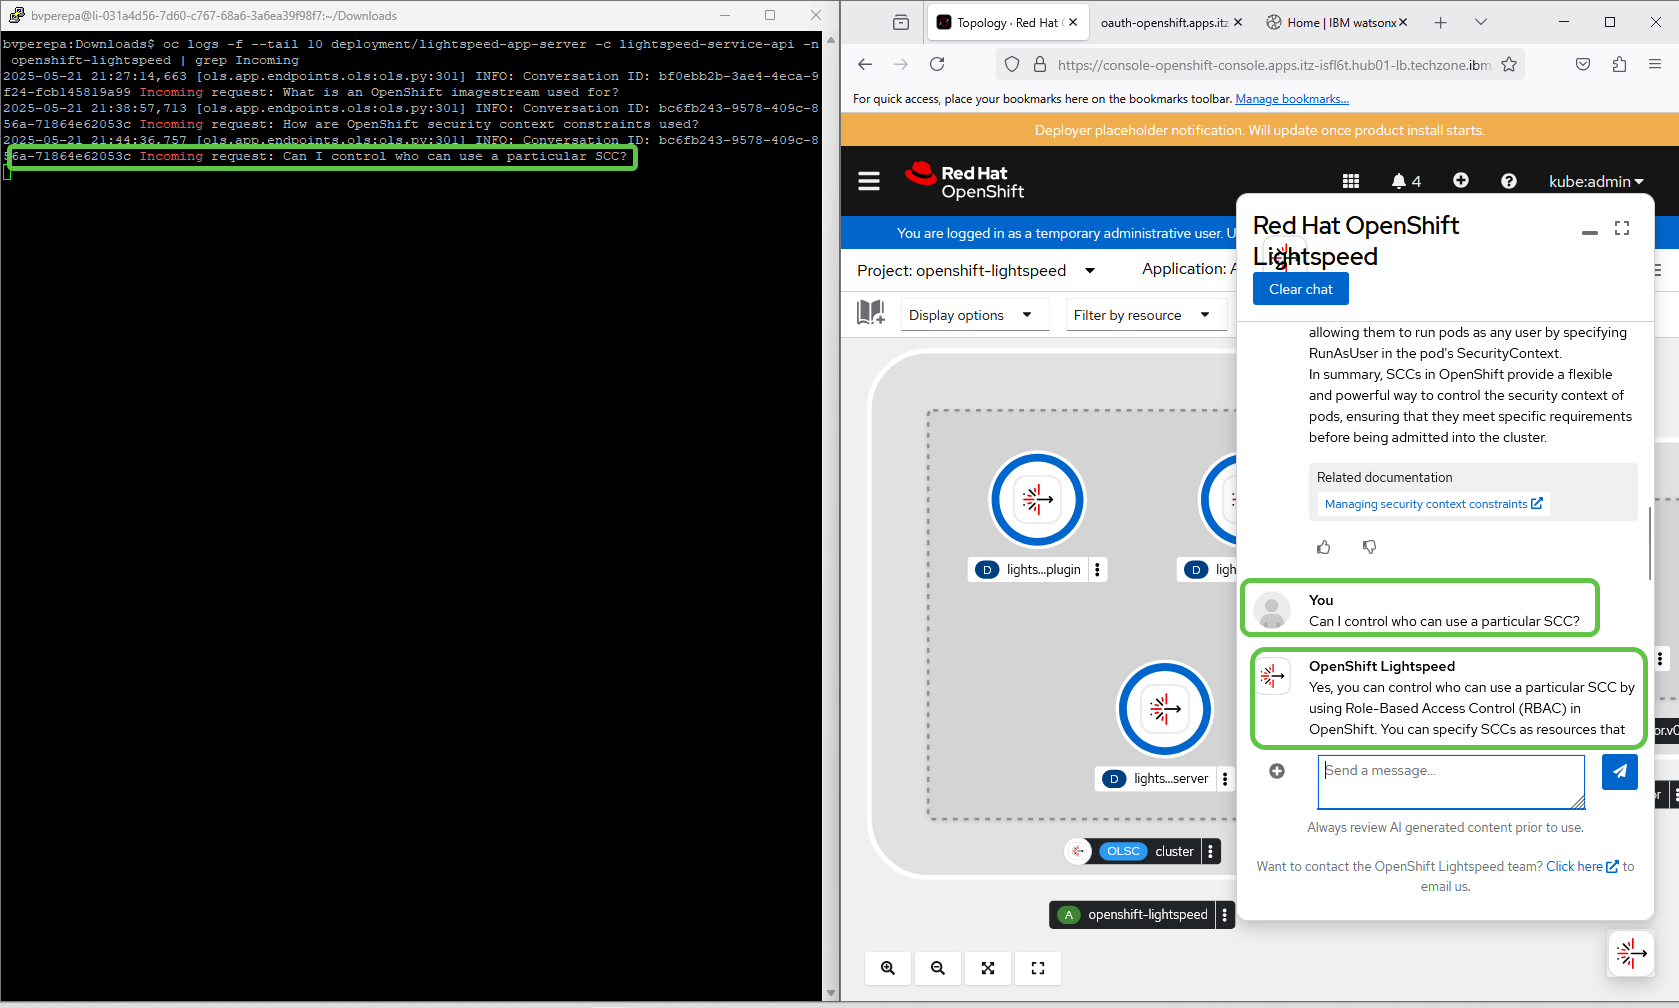
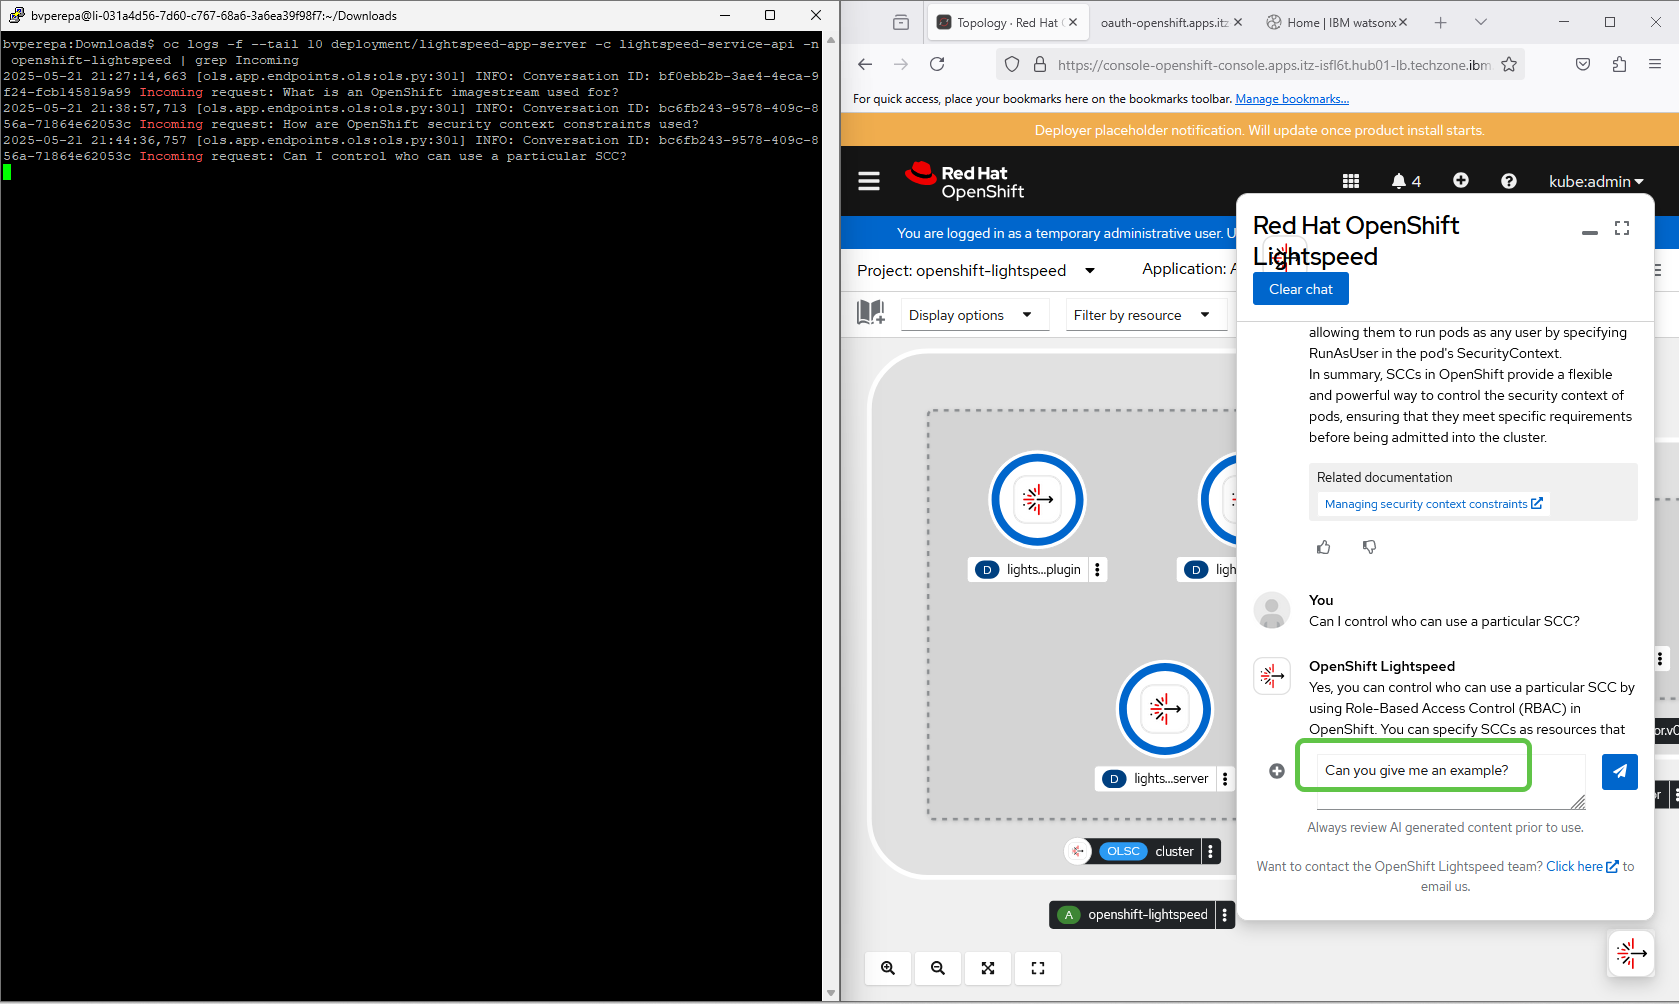
The following screen shows the virtual assistant’s response to a follow-up, context-aware question:
Can I control who can use a particular SCC?
The following screen shows the virtual assistant's response to a follow-up, context-aware question.
Highlighted sections in both windows show the response details.
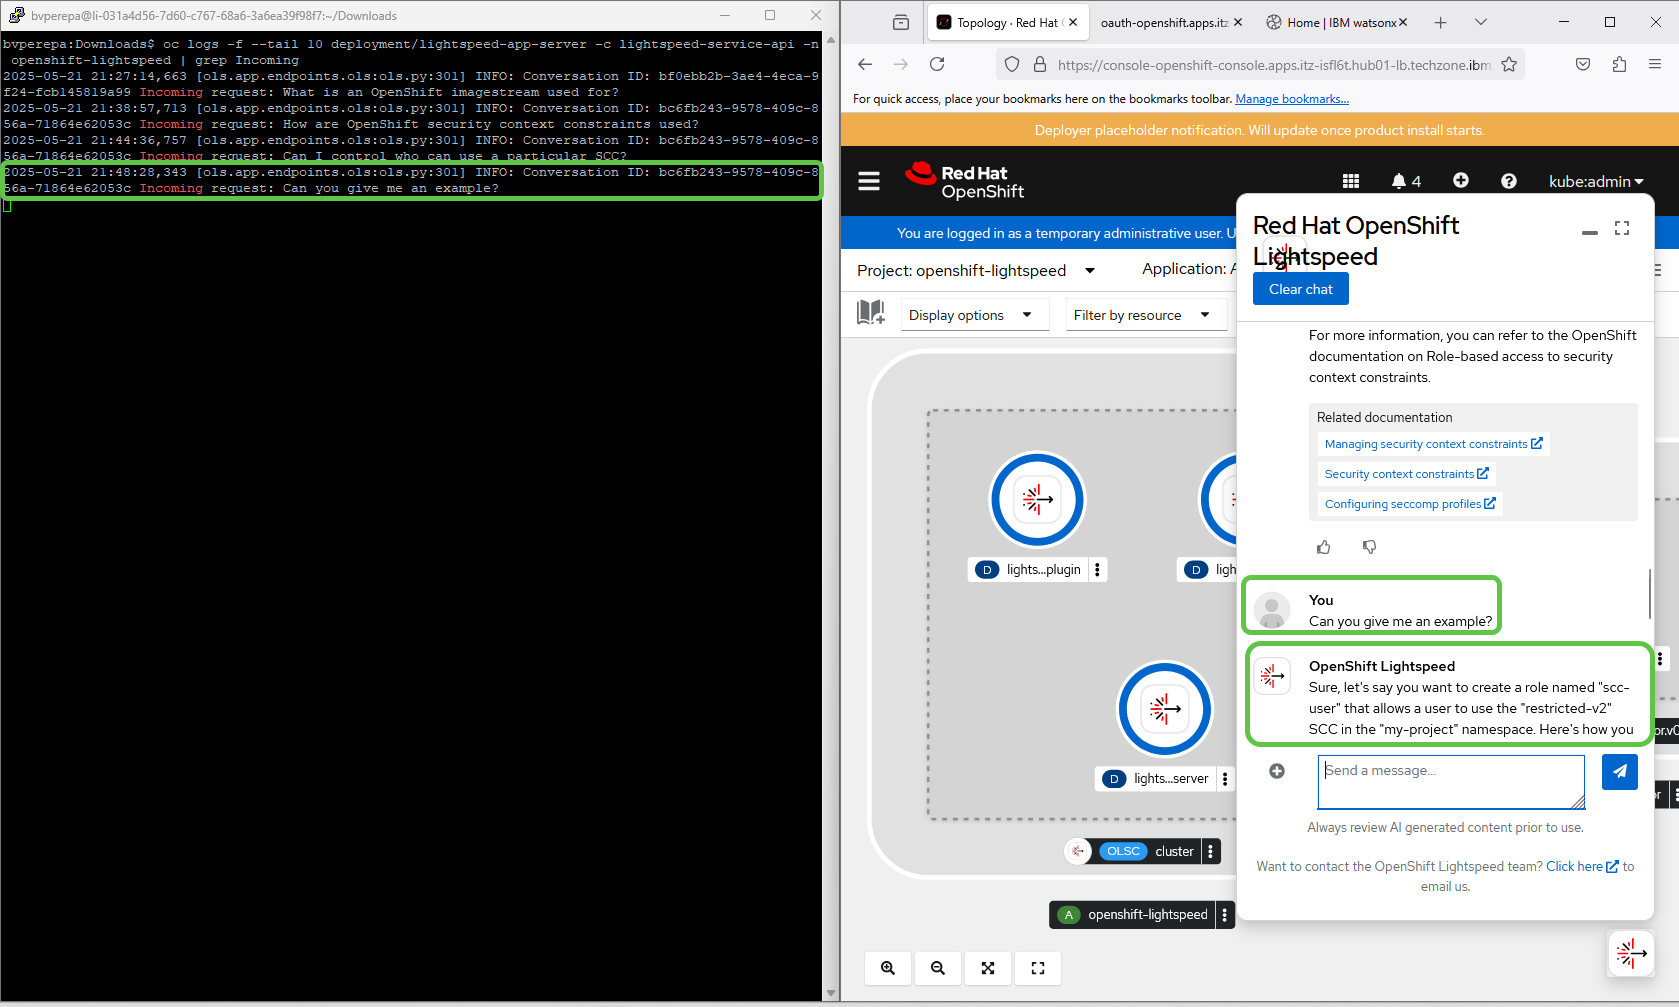
The following screen shows the query and response from the virtual assistant for a follow-up, context-aware question:
“Can you give me an example?”
The following screen shows a follow-up, context-aware question and the virtual assistant’s response:
“Can you give me an example?”
Review the highlighted responses in both the web console and terminal windows.
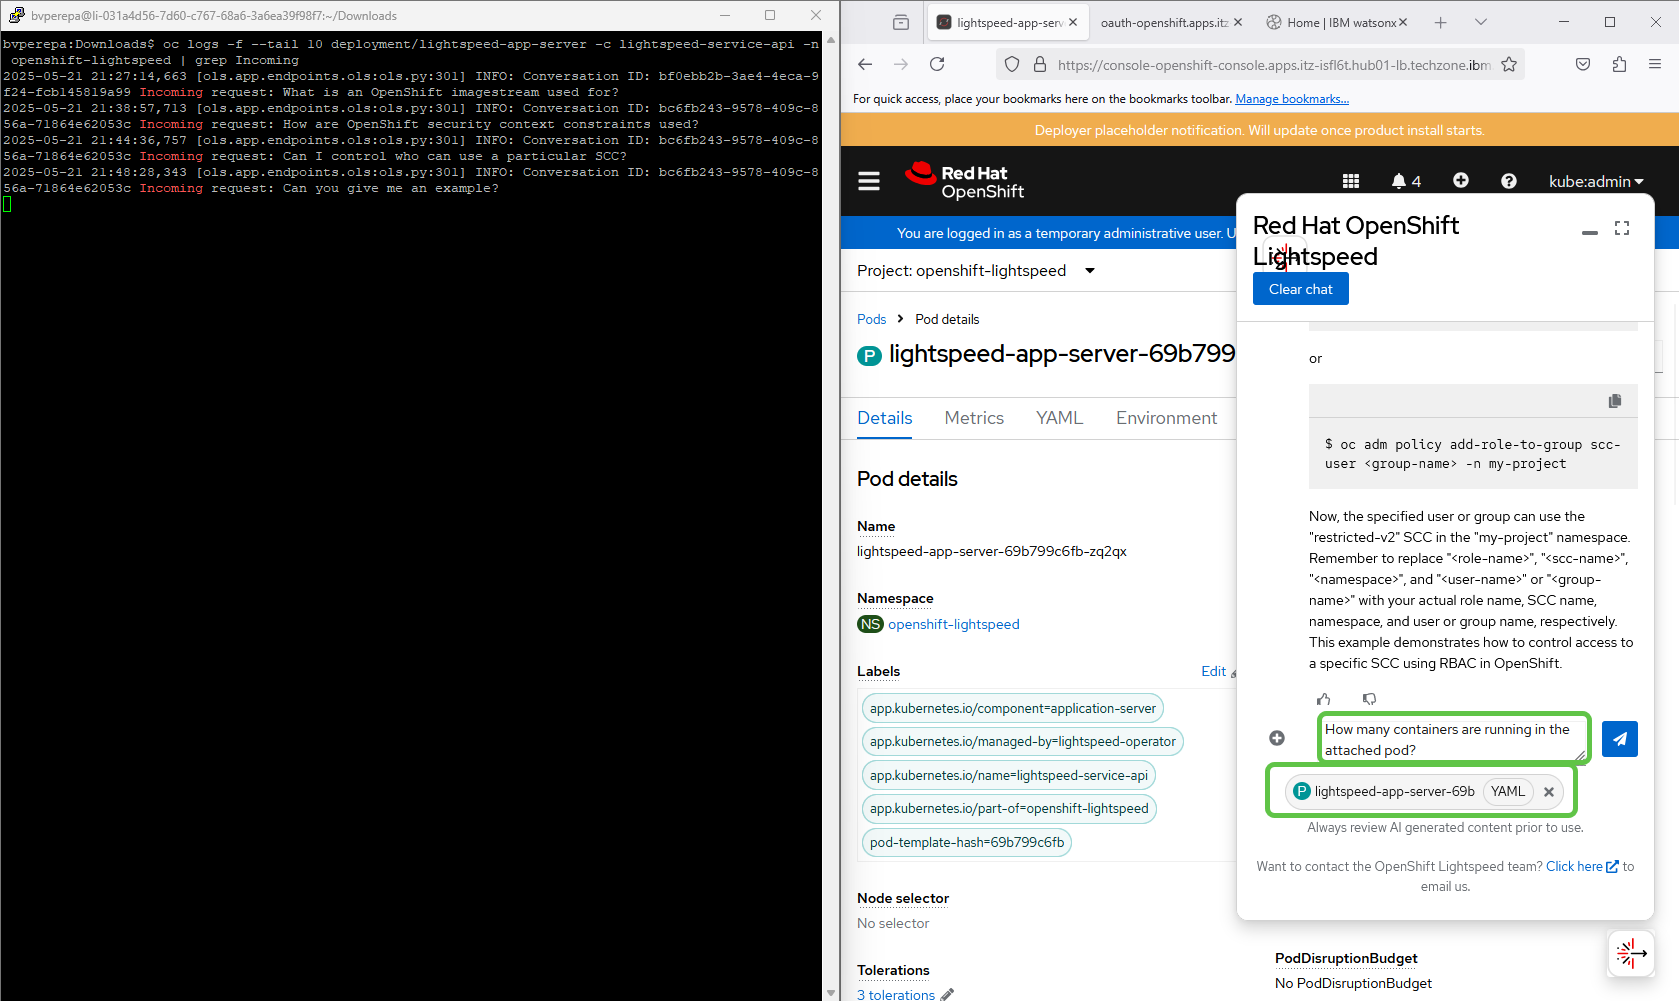
The following screen shows a question about a cluster resource, a pod, and the response from the virtual assistant.
The assistant accepts and processes the attached declarative YAML definition as an in-the-moment, in-context reference.
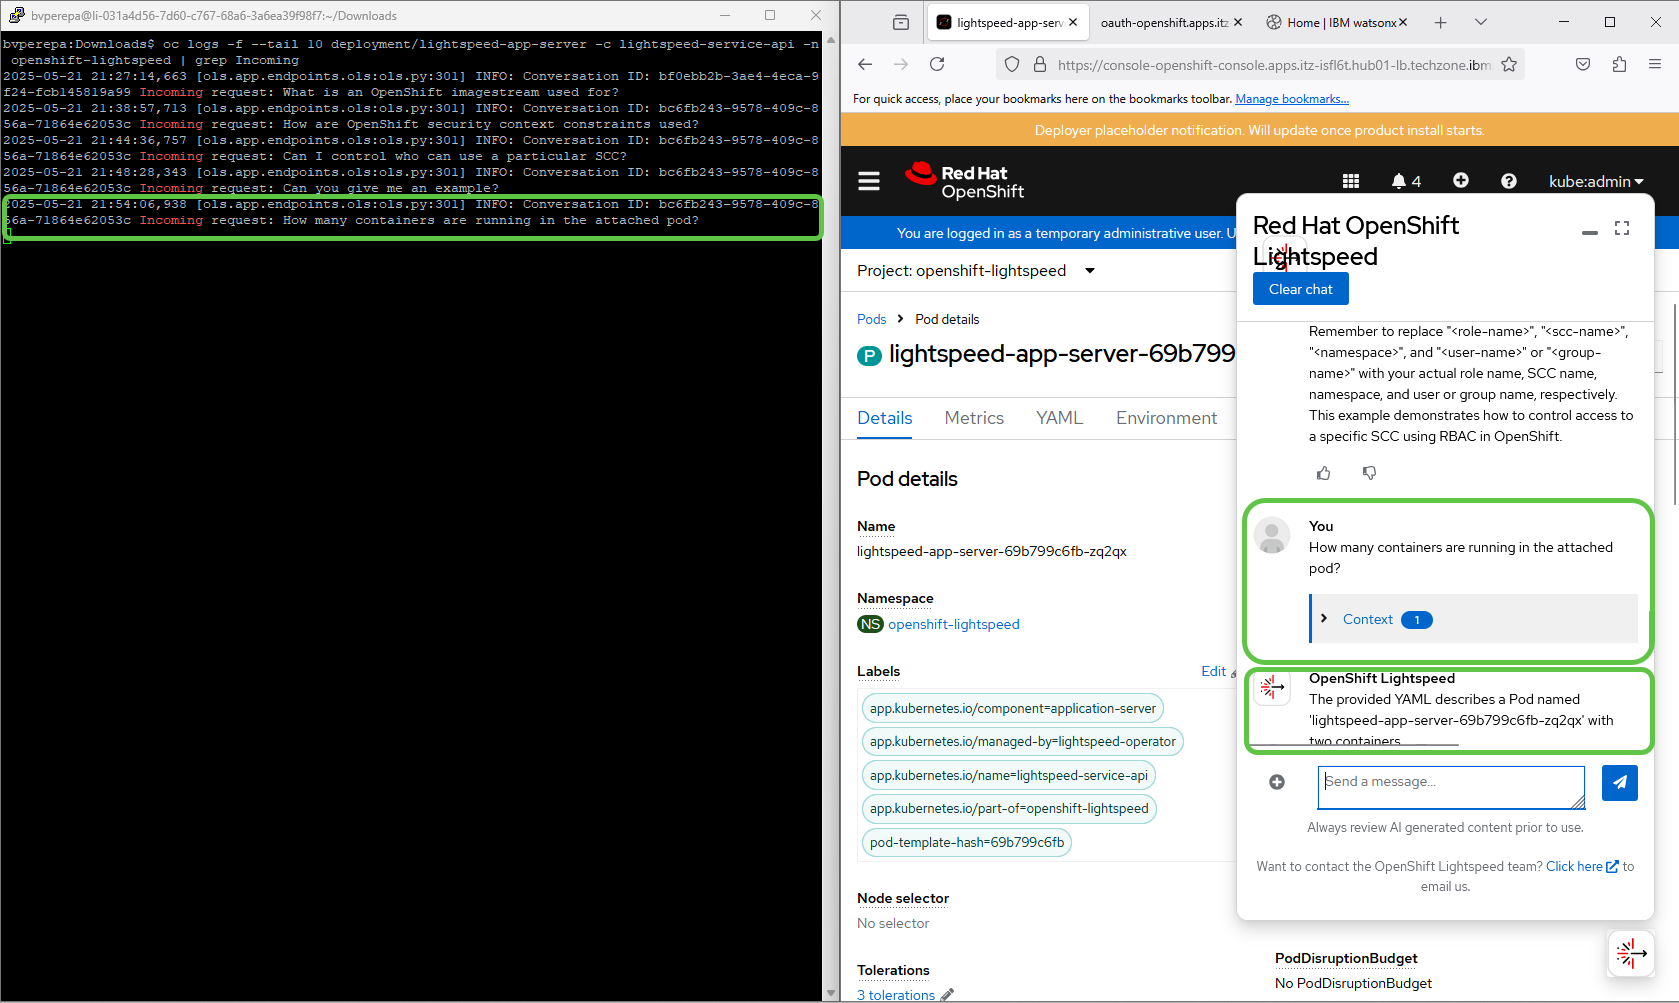
Pod name: lightspeed-app-server-69b799c6fb-zq2qx
Question: How many containers are running in the attached pod?
The following screen shows the virtual assistant’s response to a question about a pod resource.
The assistant uses the attached declarative YAML definition as in-the-moment, in-context input to generate its response.
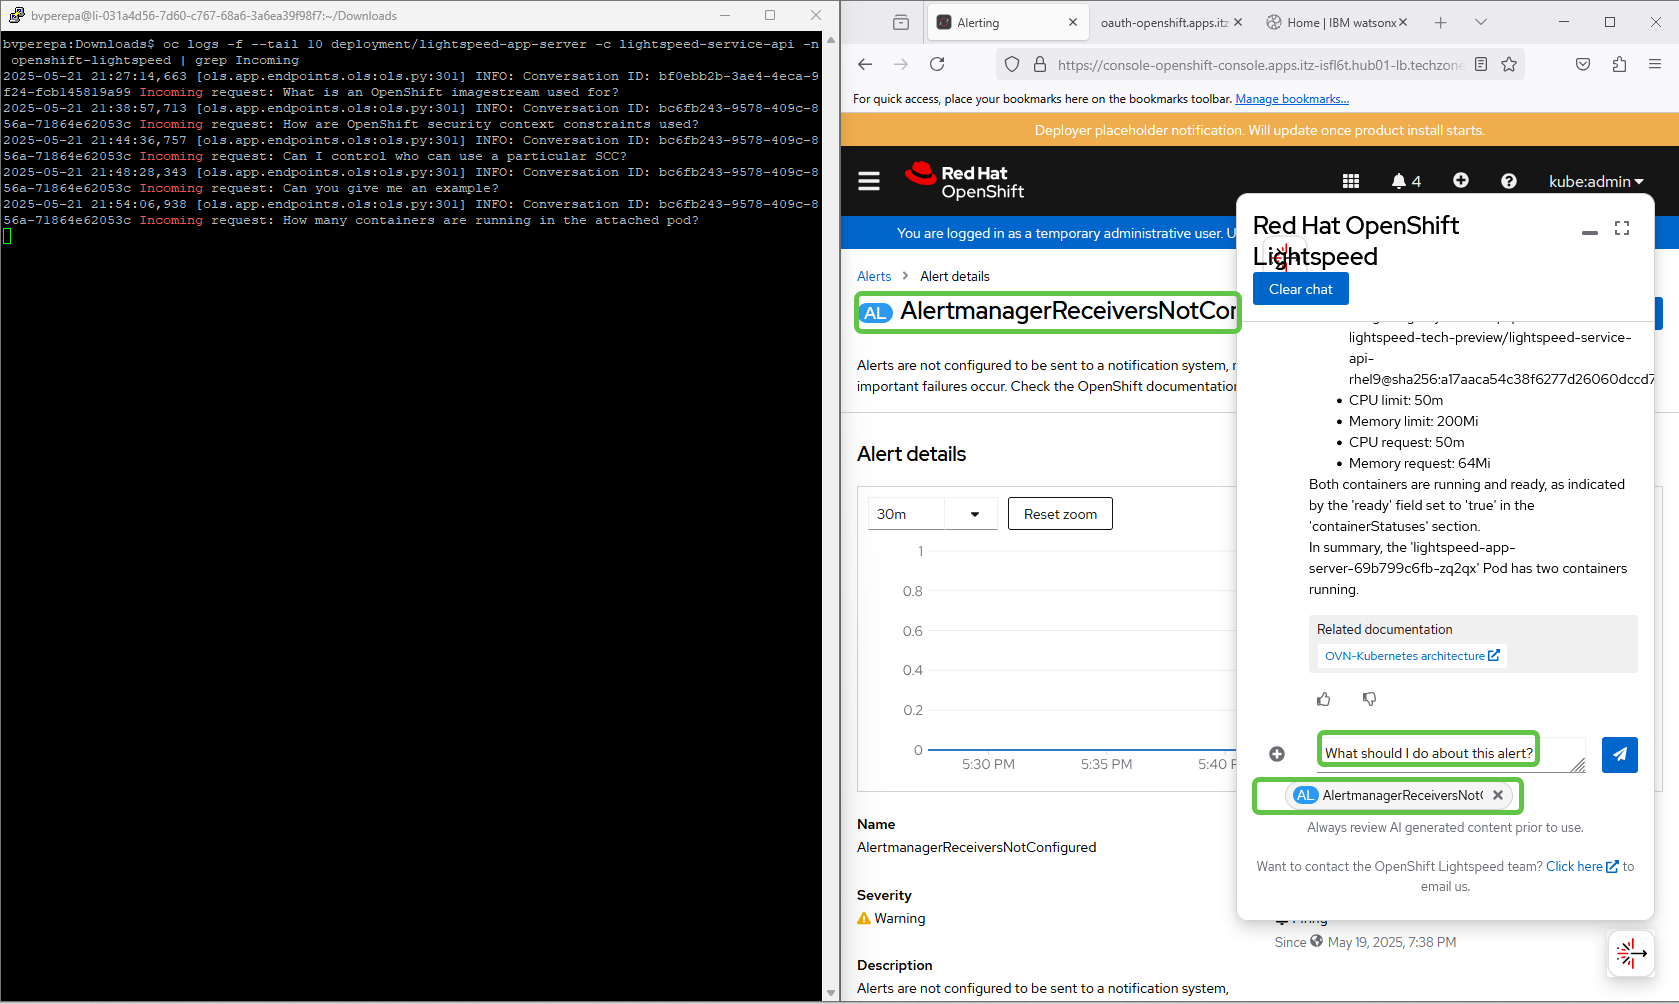
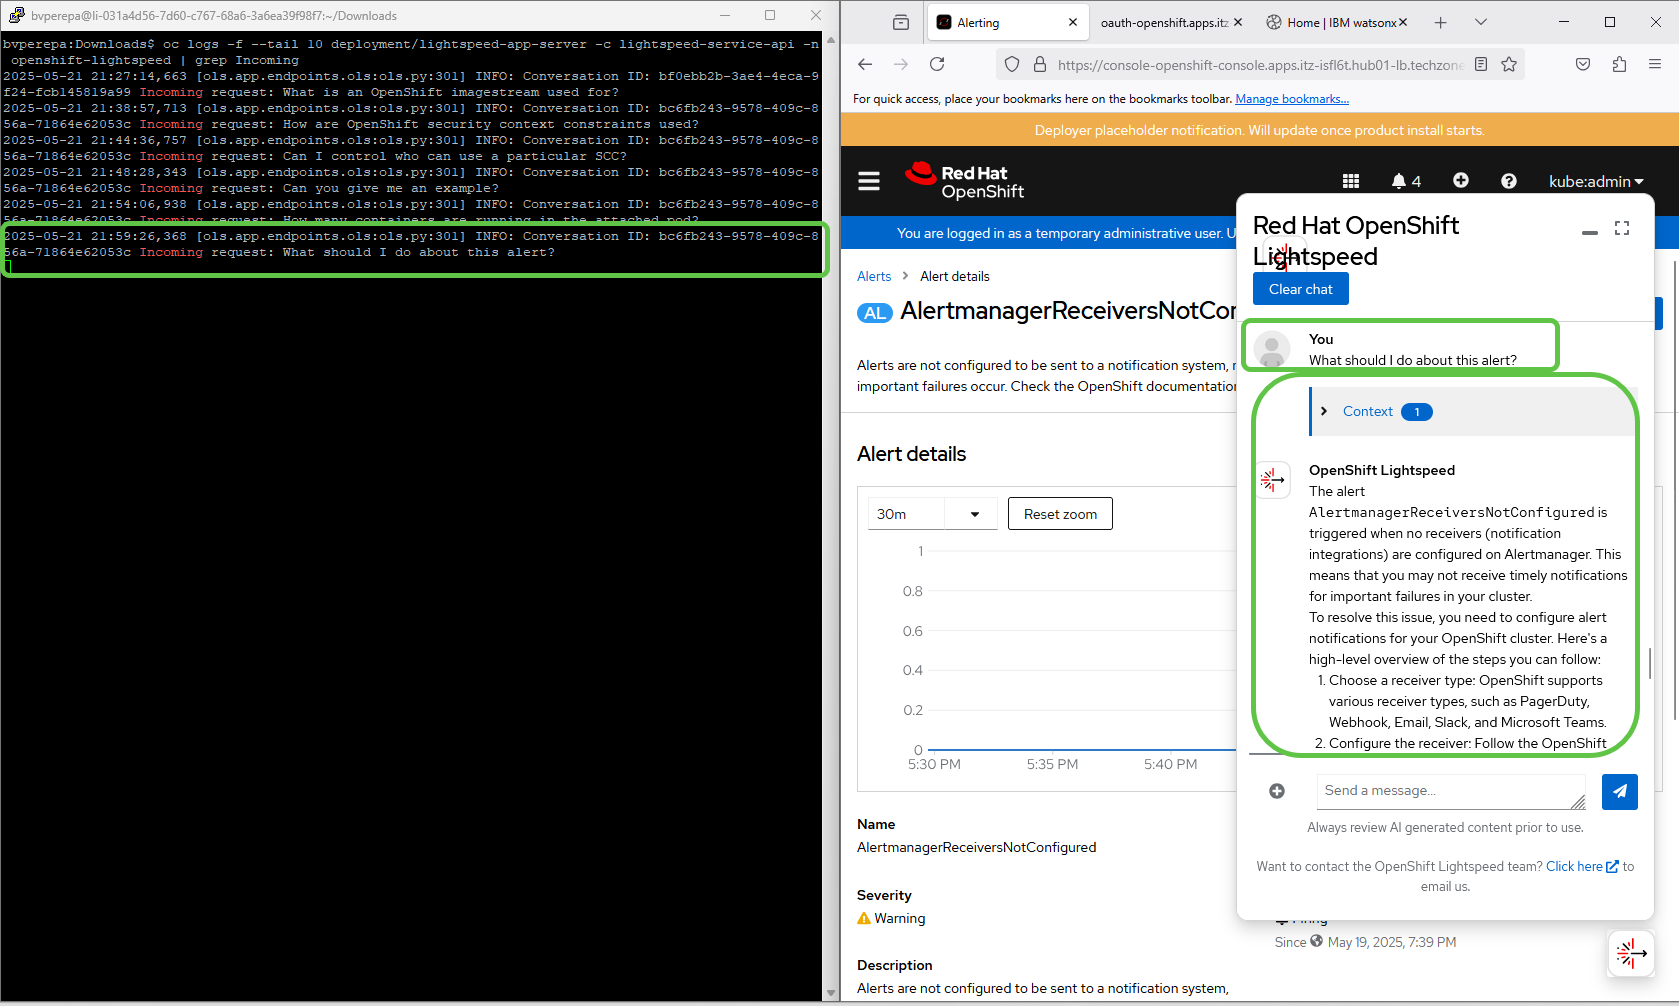
The following screen shows the question related to an alert resource and the response from virtual assistant. The virtual assistant accepts in the context and in the moment resource definition as an attachment.
AlertmanagerReceiversNotConfigured What should I do about this alert?
The following screen shows the virtual assistant’s response to a question about an alert resource.
The assistant uses the attached in-the-moment, in-context resource definition to answer the question:
AlertmanagerReceiversNotConfigured – What should I do about this alert?
The following screen shows the virtual assistant’s response to a cluster alert resource. It uses the attached in-context, in-the-moment resource definition to generate the response.
The following screen shows how to start a new question after completing a chain of connected queries. This includes clearing the previous chat history and resetting the context.
Clear Chat
Start New Chat
The following screen shows the setup for a new question and the virtual assistant’s response.
The following screen shows a new question asked to the virtual assistant:
"What can Red Hat OpenShift Lightspeed do to help me?"
The assistant's response is displayed alongside.
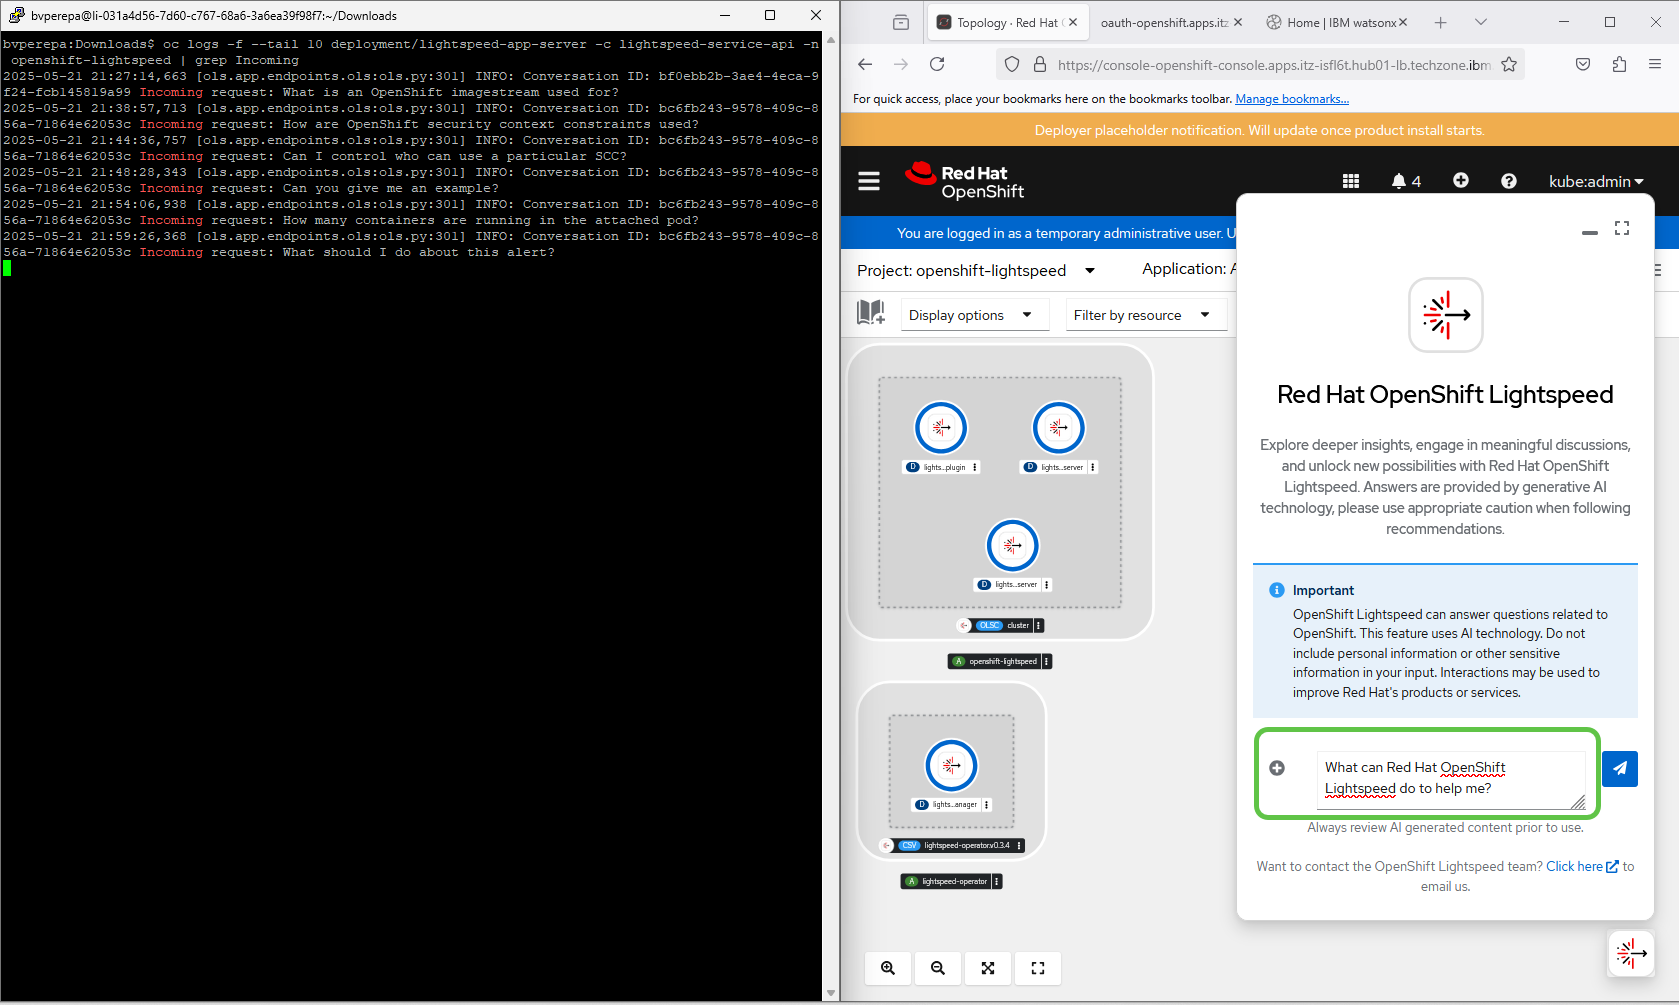
The following screen capture shows a new question posed to the virtual assistant and the corresponding response that is displayed in the chat window.
Step 8. Review resources used in OpenShift and watsonx.ai
In this step, you will review resource usage and observability data from both the OpenShift web console and the IBM watsonx.ai Project Overview.
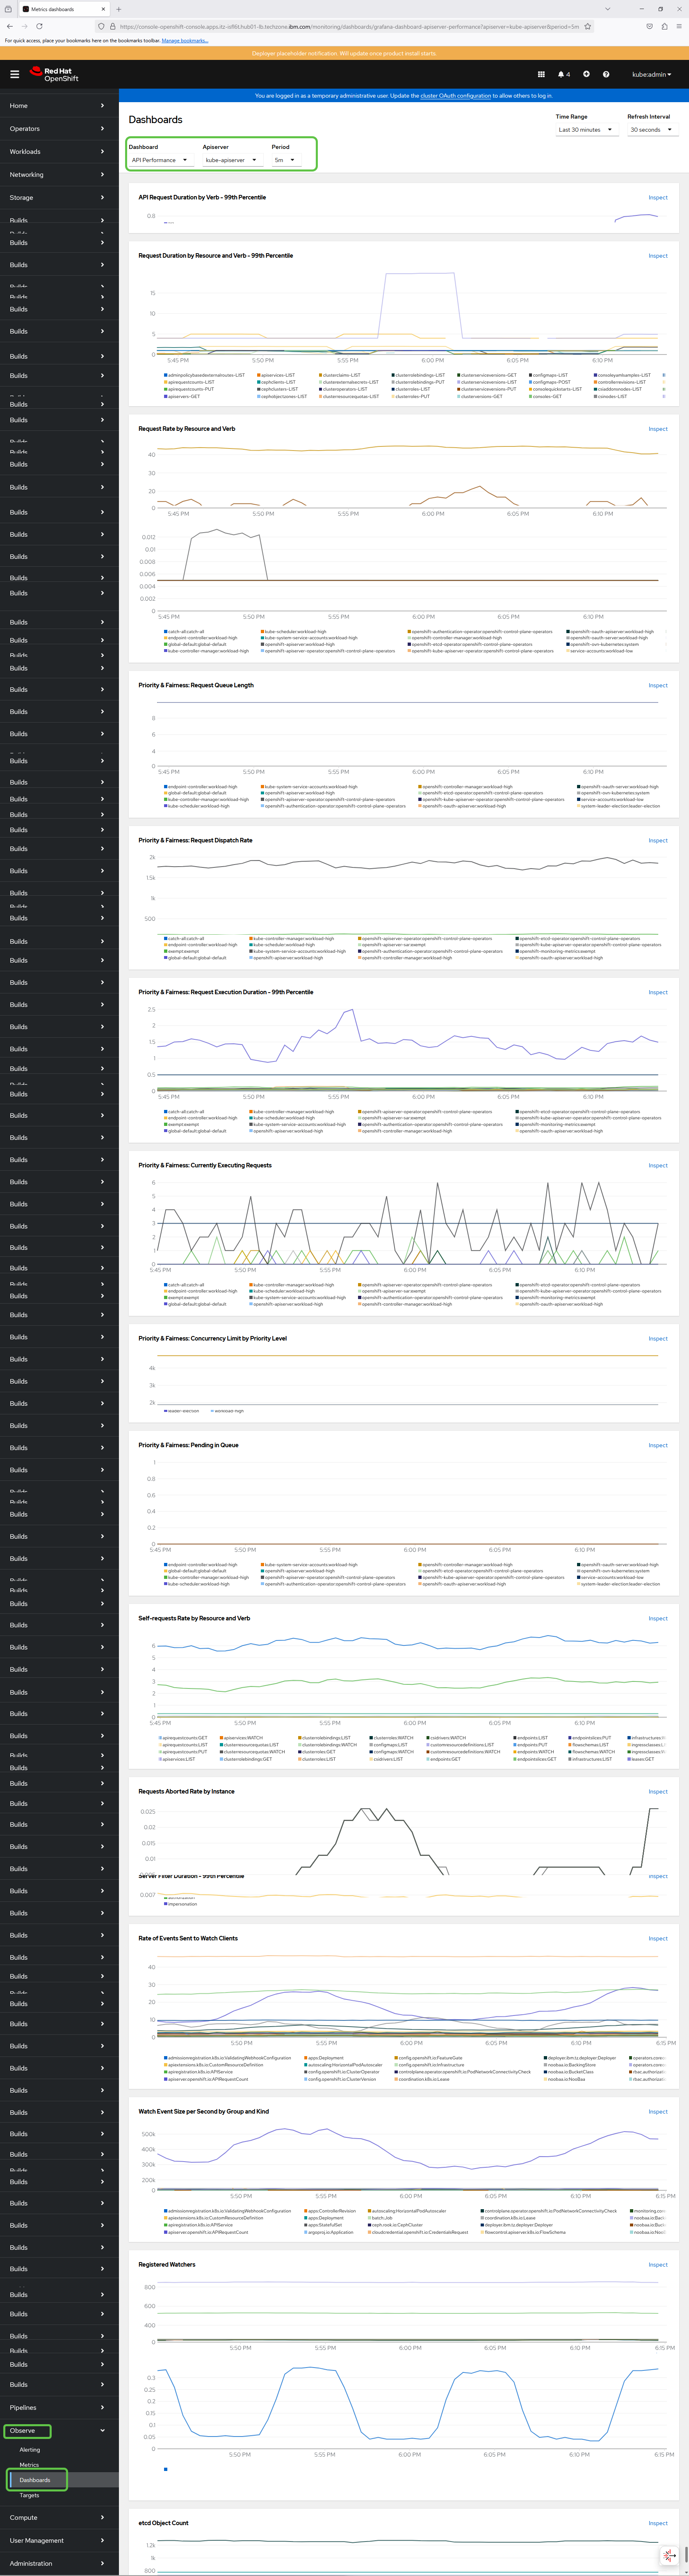
As an Administrator, check API performance and
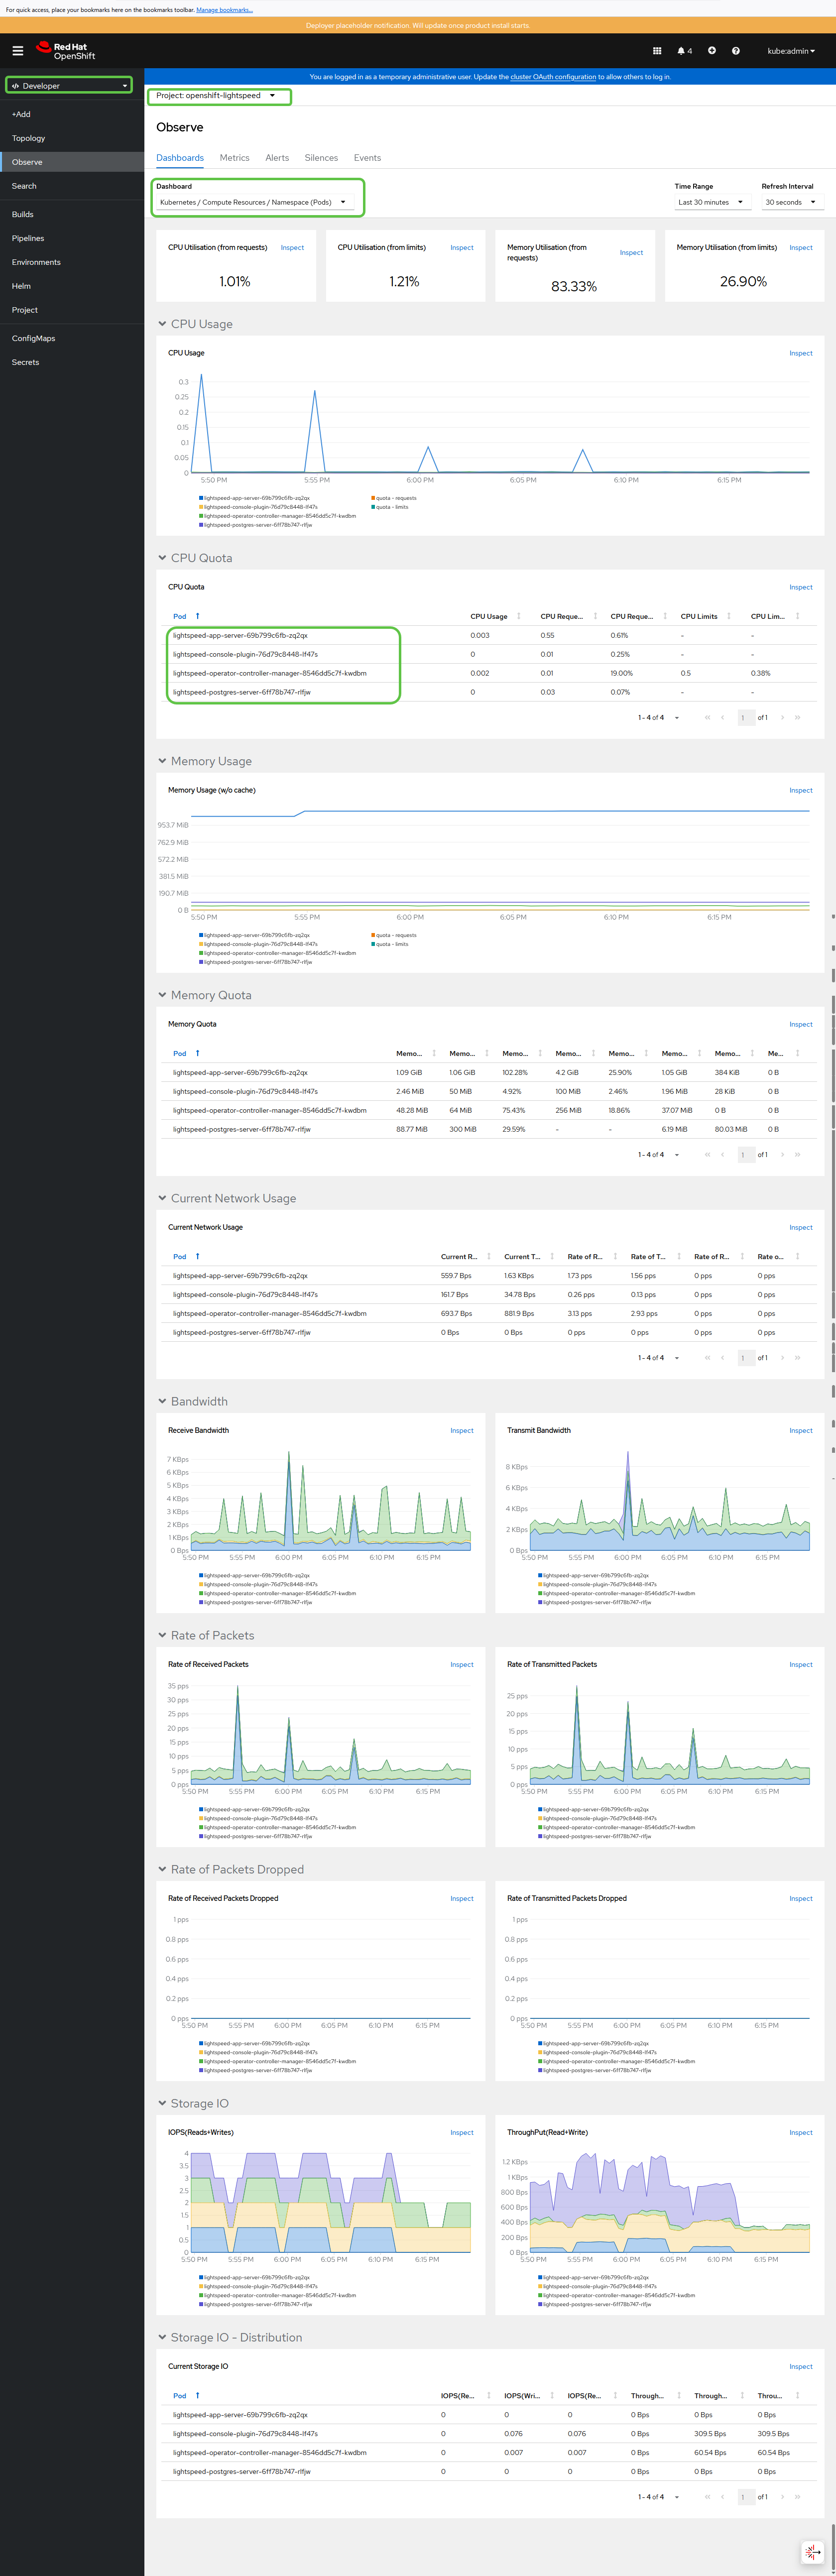
kube-apiservermetrics.As a Developer, explore the Dashboards, Metrics, Alerts, Silences, and Events views.
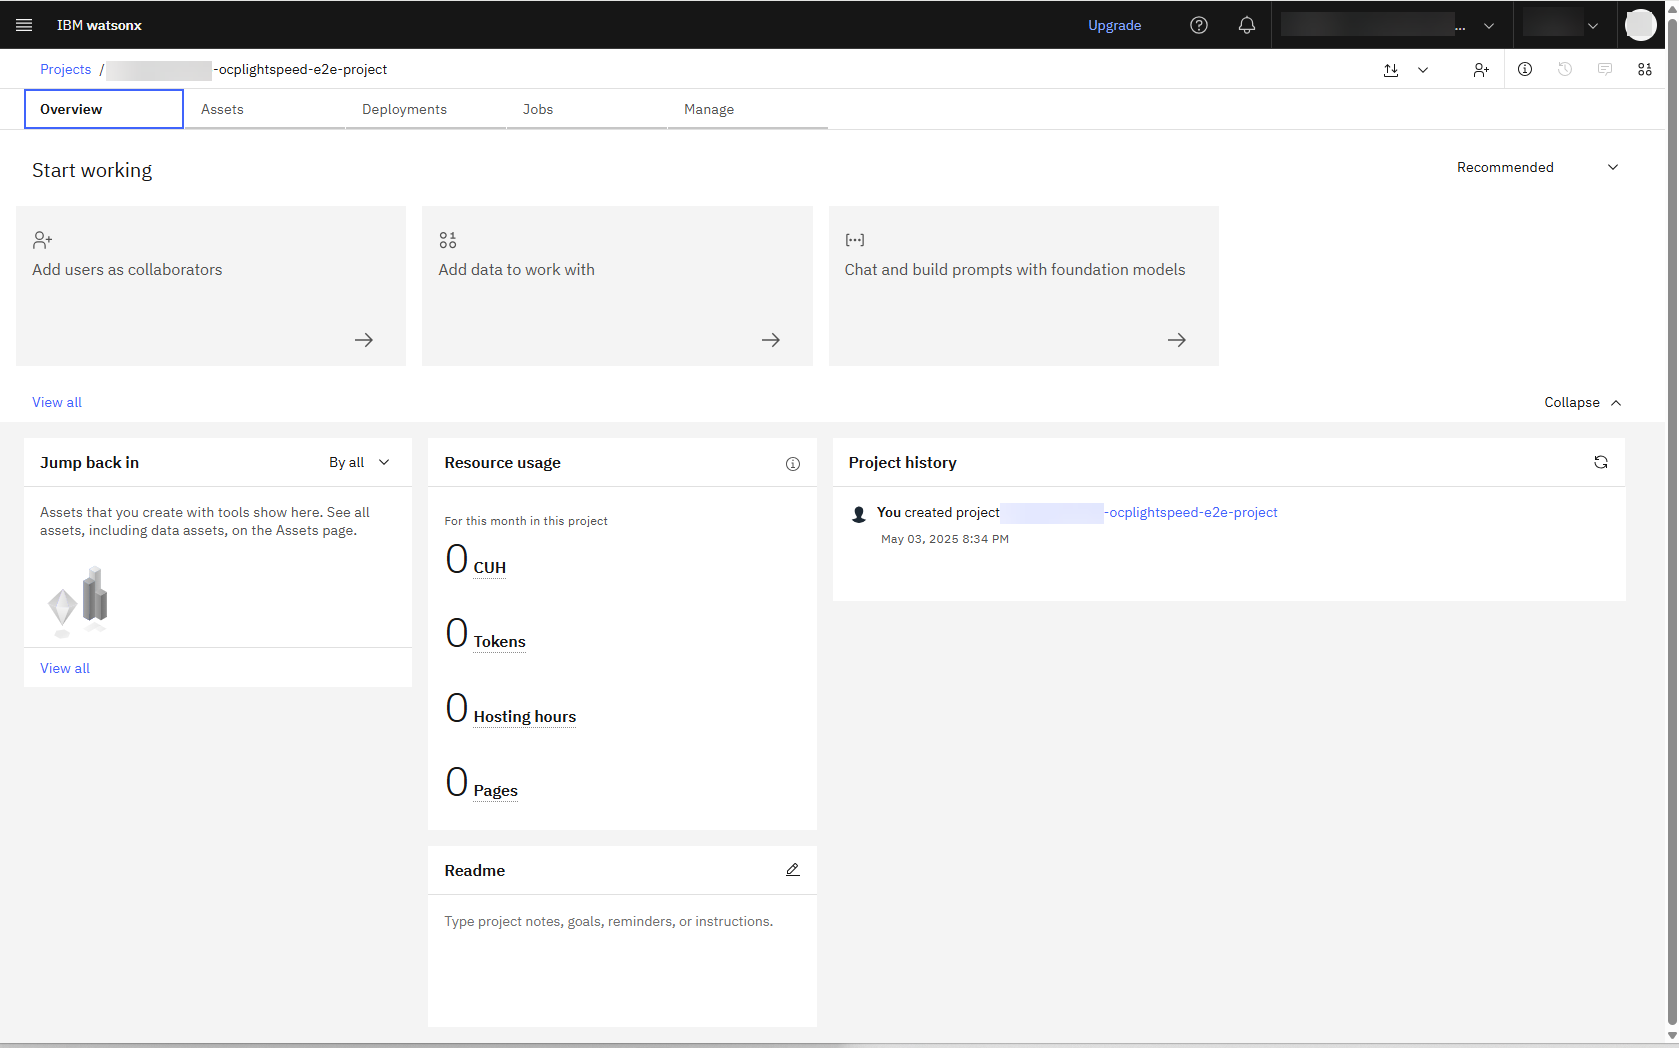
In IBM watsonx.ai, view the Project dashboard to monitor resource consumption by the backend LLM.
Acknowledgments
This tutorial was created as part of the IBM Open Innovation Community Initiative:
Better Together: Joint IBM and Red Hat assets supporting the Data and AI lifecycle in the Hybrid Cloud.
We extend our sincere thanks to our colleagues and leadership teams for their guidance, mentorship, and support throughout this journey—from early experimentation to successful validation of the concepts and technologies.
IBM Professionals:
Ahmad Azraq, Rishi Balaji, Suj Chetan Hireholi, Martin Obianwu, Nisarg Patel, Suj Perepa, Santha Kumari Ramala, Rajalaksmi S., Jay Talekar, Randall Tan, Ajay Varshney
Red Hat Professionals:
Thalia Hooker, Erik Jacobs