About cookies on this site Our websites require some cookies to function properly (required). In addition, other cookies may be used with your consent to analyze site usage, improve the user experience and for advertising. For more information, please review your options. By visiting our website, you agree to our processing of information as described in IBM’sprivacy statement. To provide a smooth navigation, your cookie preferences will be shared across the IBM web domains listed here.
Tutorial
Build a GraphRAG agent using watsonx Orchestrate and DataStax Astra DB
A hands-on guide for building a link aware retrieval flow that combines semantic search with knowledge graph context using watsonx tools and Astra DB
Traditional RAG uses a collection of data that is divided into text chunks and stored as documents in a vector database. When a user asks a question, the vector database is searched, and the matching documents are sent to the large language model (LLM) to help it create an answer. This method is useful for giving the language model current information or internal information that is not part of its training. However, it does not capture relationships or structured links between documents. Even if the knowledge base contains all the information that is needed to answer the question, the RAG system may not find everything, especially when the information is spread across several documents or chunks.
GraphRAG builds on traditional RAG by using the same documents and adding entities that are stored as metadata that describe relationships between documents. For example, if you search the vector database with the question “Tell me about the theory of relativity and its history?”, you may find a document that explains the theory but mentions Albert Einstein only briefly. With extra metadata, the document can include a “created by” entity that links it to a biography document with a “name” entity that identifies Albert Einstein. When documents have direct and clear relationships, the RAG system should use these links to provide better context during search.
You can use LLMs to identify the entities that must be stored as metadata for unstructured documents, but this method is time consuming, prone to errors, and difficult to maintain. A simpler option is to use the document links that already exist in the content. Each document chunk can include the URL of the original page and the links that appear within the page. This captures clear connections between pieces of content, including links to definitions that may appear in other chunks of the same document. This method is easy for a parser to process and works well for large and frequently changing datasets.
In this tutorial, you will create a watsonx Orchestrate AI agent that crawls the following websites:
- watsonx Orchestrate tutorials on IBM Developer
- watsonx Orchestrate Agent Development Kit (ADK) documentation
The watsonx Orchestrate ADK is the developer tool that creates AI agents and tools. The watsonx Orchestrate tutorials on IBM Developer often refer to the ADK documentation, and these repeated links create relationships that GraphRAG can use.
The documents will be parsed to determine their URL and links, split into chunks and stored in DataStax Astra DB with a vector of embeddings calculated by watsonx.ai.
You will also create two tools in watsonx Orchestrate. One tool will behave like traditional RAG. The other tool will build a knowledge graph of the search results and combine semantic search results with results from graph traversal, which finds documents that are related through links. You will then compare the results by using an example query.
Prerequisites
Before you begin, ensure that you have the following:
- Basic familiarity with terminal commands and bash commands.
- Basic Python skills and general coding skills, including experience with Jupyter Notebooks.
- A Jupyter Notebook installation.
- A watsonx Orchestrate Agent Development Kit (ADK) installation. Check out the getting started with ADK tutorial if you don’t have an active instance.
- Access to watsonx Orchestrate. You can sign up for a free 30-day trial.
- Access to watsonx.ai. You can sign up for a free 30-day trial.
Step 1. Set up Astra DB
Create a new database. Sign up for a free DataStax Astra DB account on the DataStax Astra DB portal.
In the Astra DB dashboard, click Create database.

Enter the details for the new database:
- Database type: Serverless (vector)
- Database name: wxo_docs
- Provider: Amazon Web Services
Region: us‑east‑2
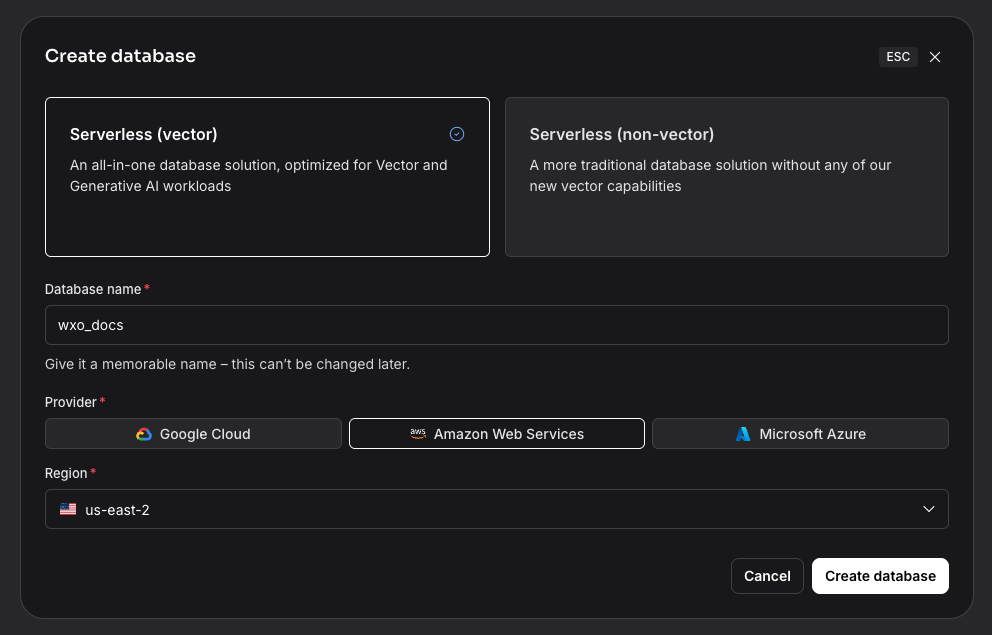
After a few minutes, the database will be created. Make a note of the API_ENDPOINT because you will need it later.

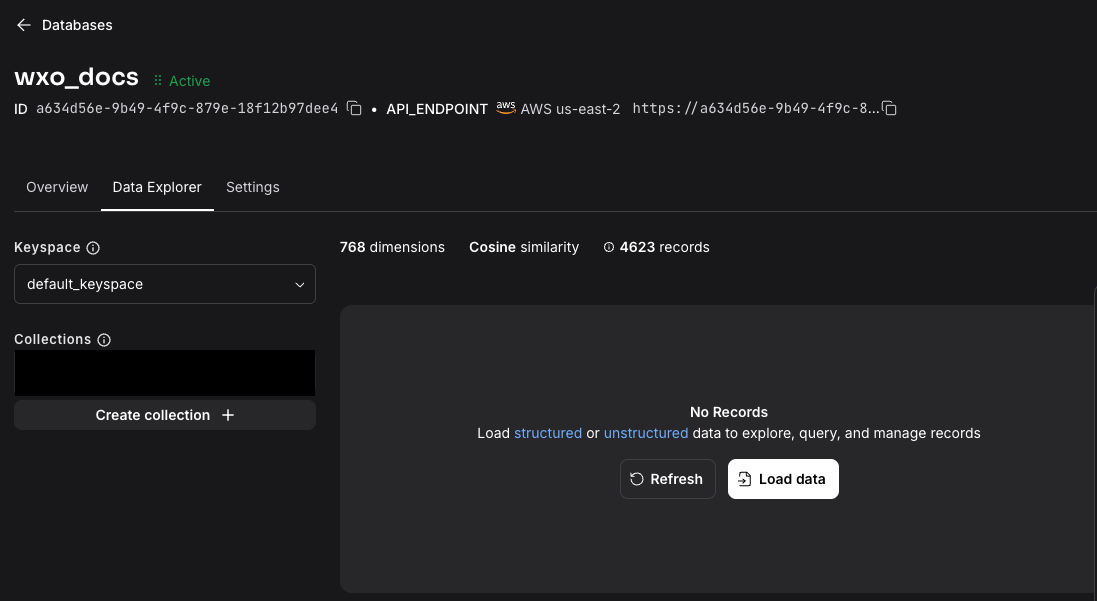
Step 2. Create an Astra DB document collection
Create the collection that will store the documents and their embedding vectors.
Click the Data Explorer tab and click Create collection.
Enter the information and then click Create collection.
- Collection name: wxo_docs
- Vector enabled collection: Yes
- Embedding generation method: Bring my own
- Dimensions: 768
Similarity metric: Cosine
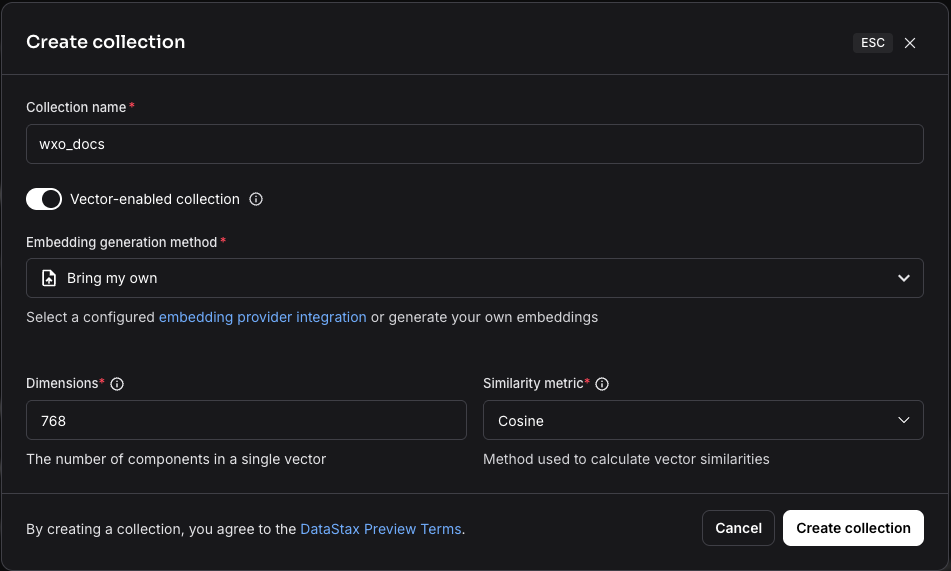
Note: Astra DB can generate embeddings automatically when documents are loaded, but in this tutorial the embeddings are created with Python code by using a watsonx.ai embedding service.
Click Connection details.

Click Generate token.
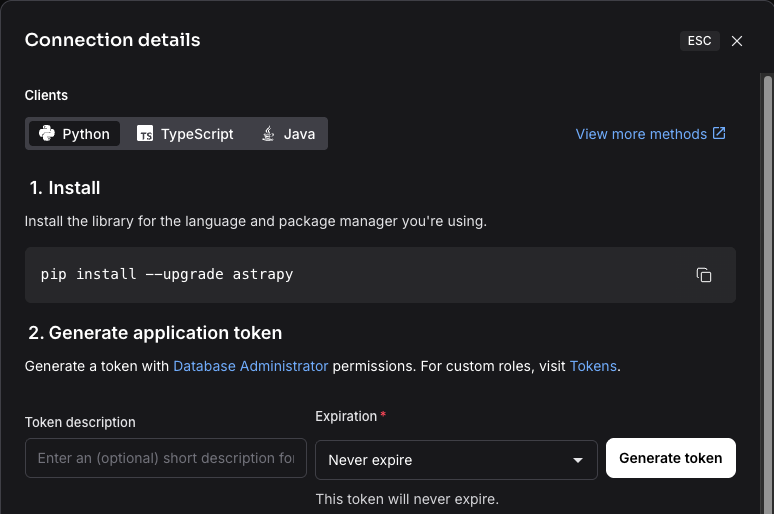
Make a note of the application token because you will need it later.
Step 3. Clone the sample repository and choose a data loading method
Clone the sample code repository.
git clone https://github.com/IBM/oic-i-agentic-ai-tutorials cd oic-i-agentic-ai-tutorials/astra-db-graphrag/Rename the file
.env-templateto.envand set the following properties with the values that you noted earlier:ASTRA_DB_APPLICATION_TOKEN= ASTRA_DB_API_ENDPOINT= ASTRA_DB_COLLECTION= wxo_docs
Step 4. Set up the IBM Cloud API key and the watsonx.ai project
watsonx.ai provides access to embedding models that the sample code uses.
Log in to IBM Cloud and go to Manage → Access (IAM) → API Keys → Create to create an IBM Cloud API key.
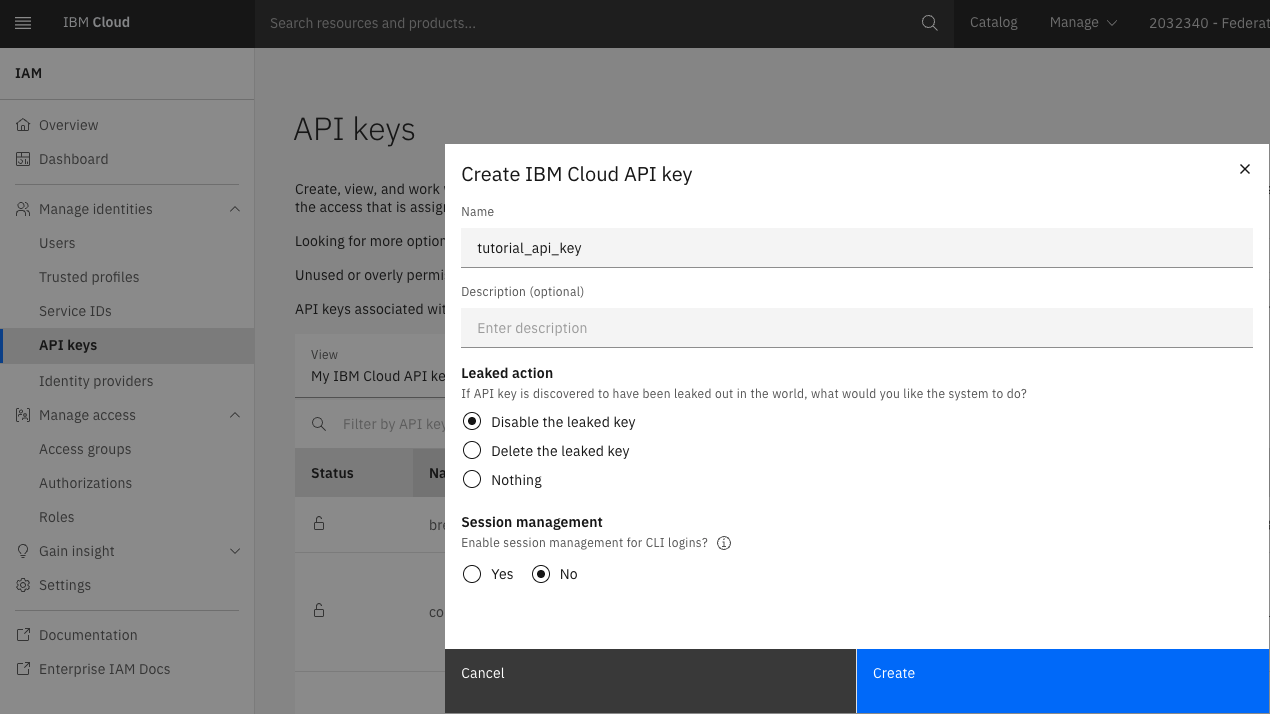
Make a note of the IBM Cloud API key because you will need it later.
Open watsonx.ai Studio from the IBM Cloud Resource list and choose Launch in IBM watsonx.

After launch, you may need to accept the terms and conditions.
Select Projects → View all projects from the hamburger menu, click New project, enter a name, select Cloud Object Storage from your account, and click Create.
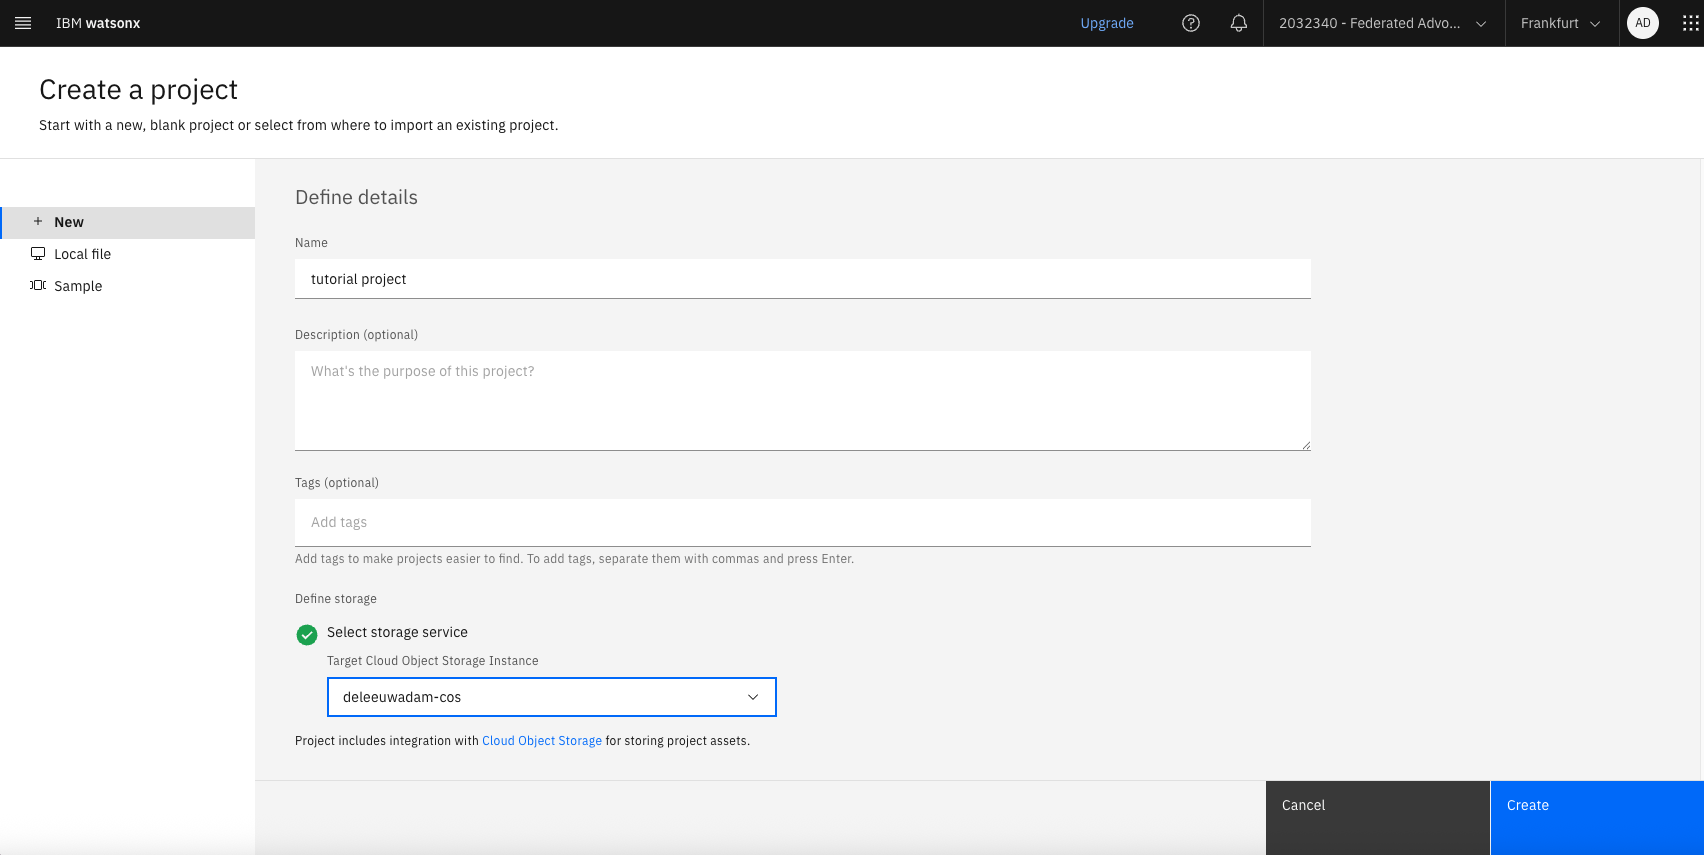
After the project is created, open the Manage tab. Make a note of the Project ID and add both the Project ID and the IBM Cloud API key to the
.envfile:WATSONX_APIKEY= WATSONX_PROJECT_ID=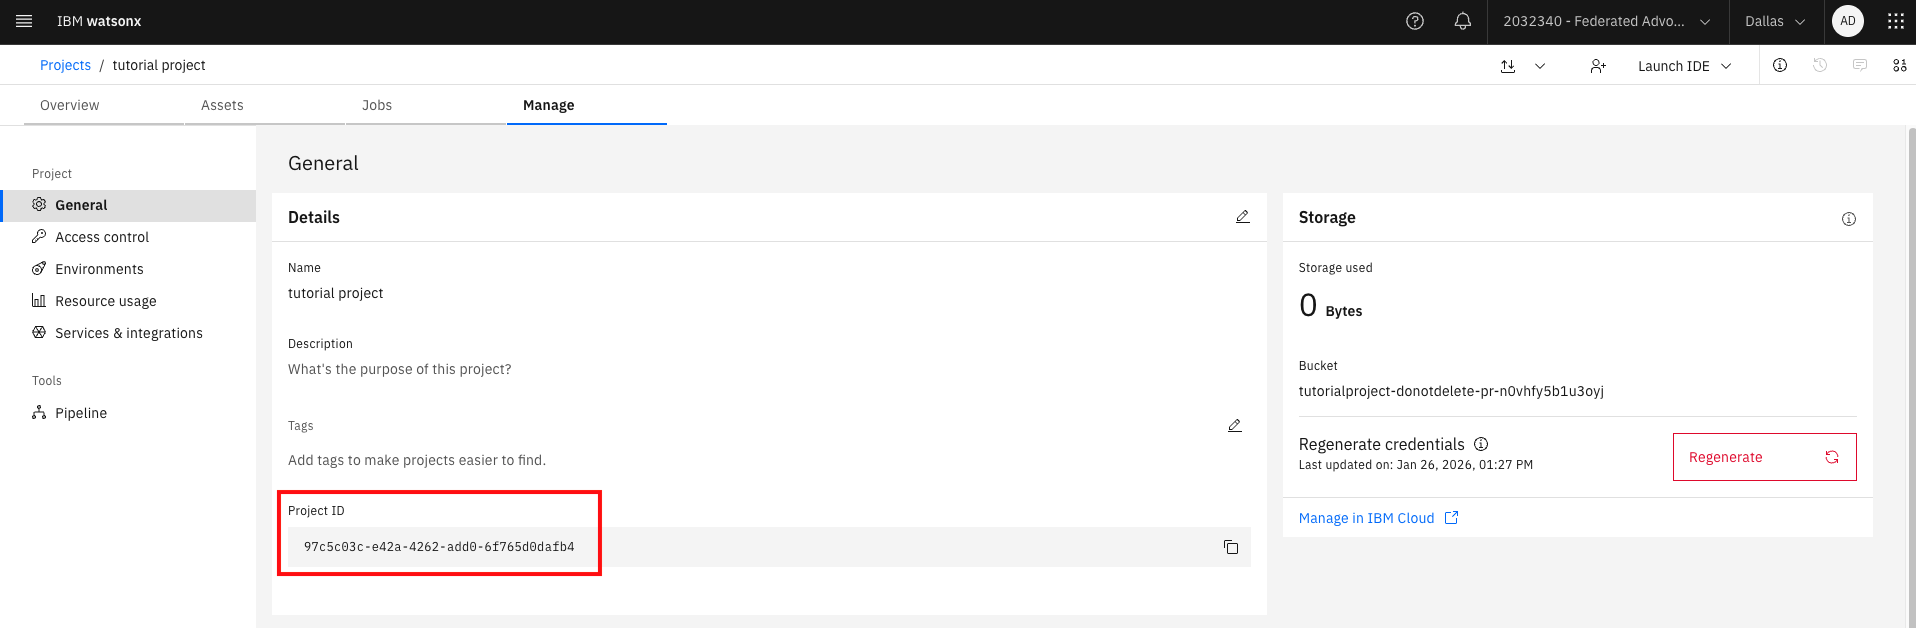
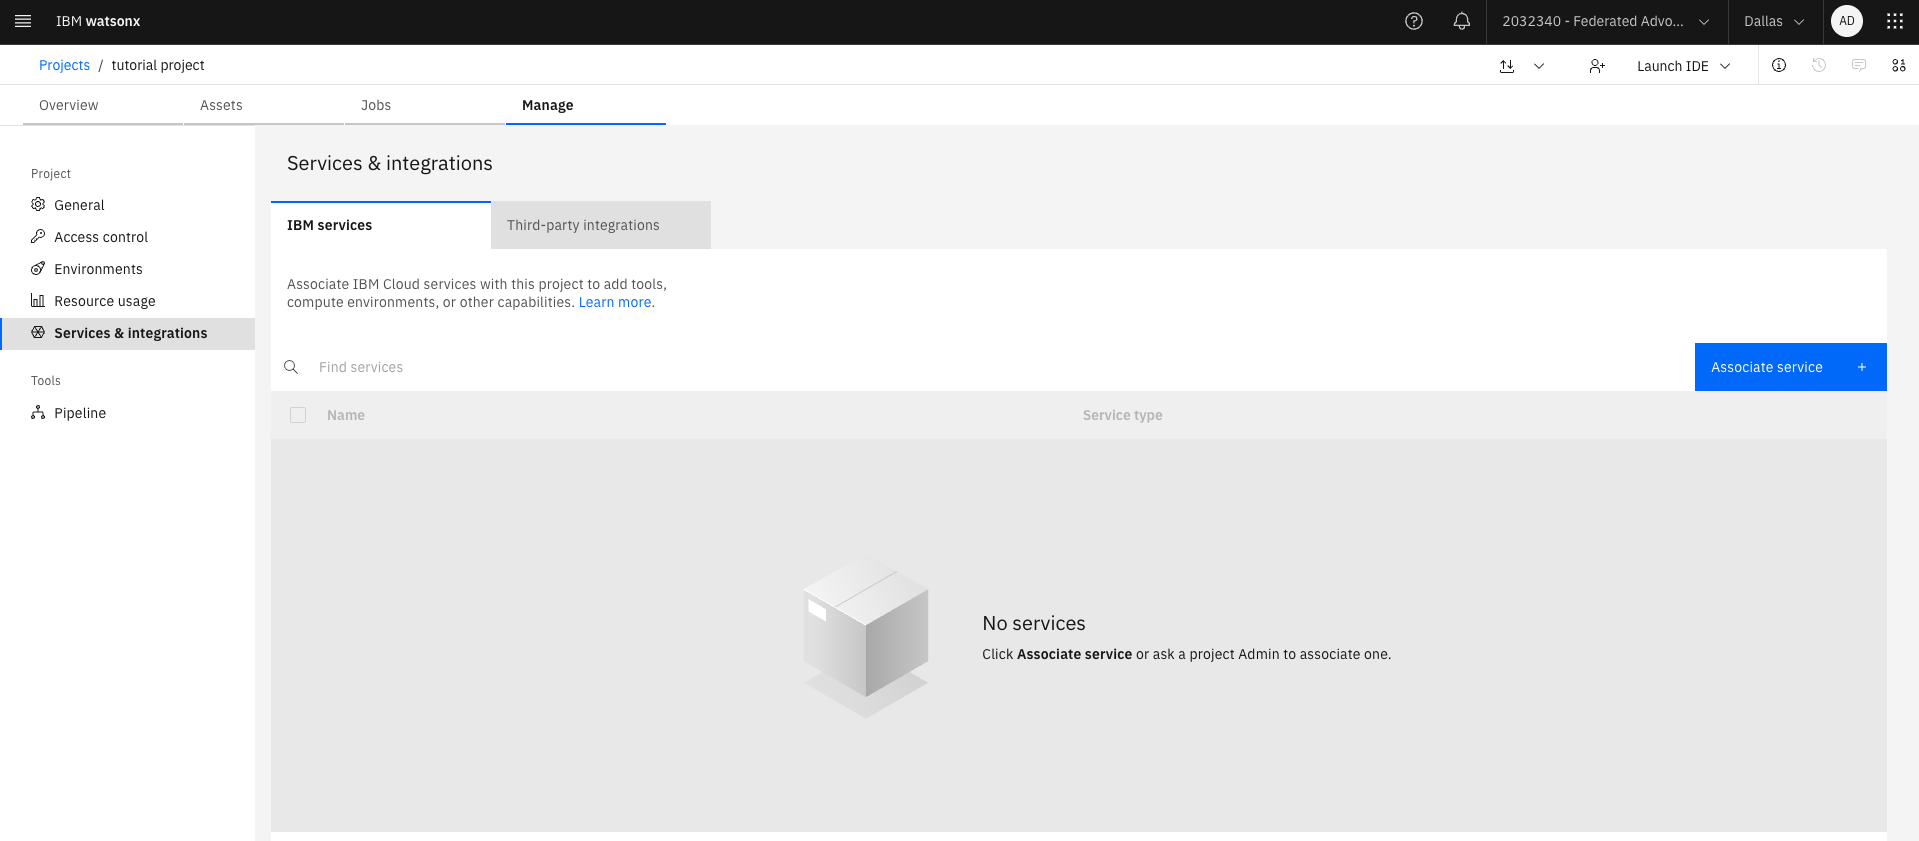
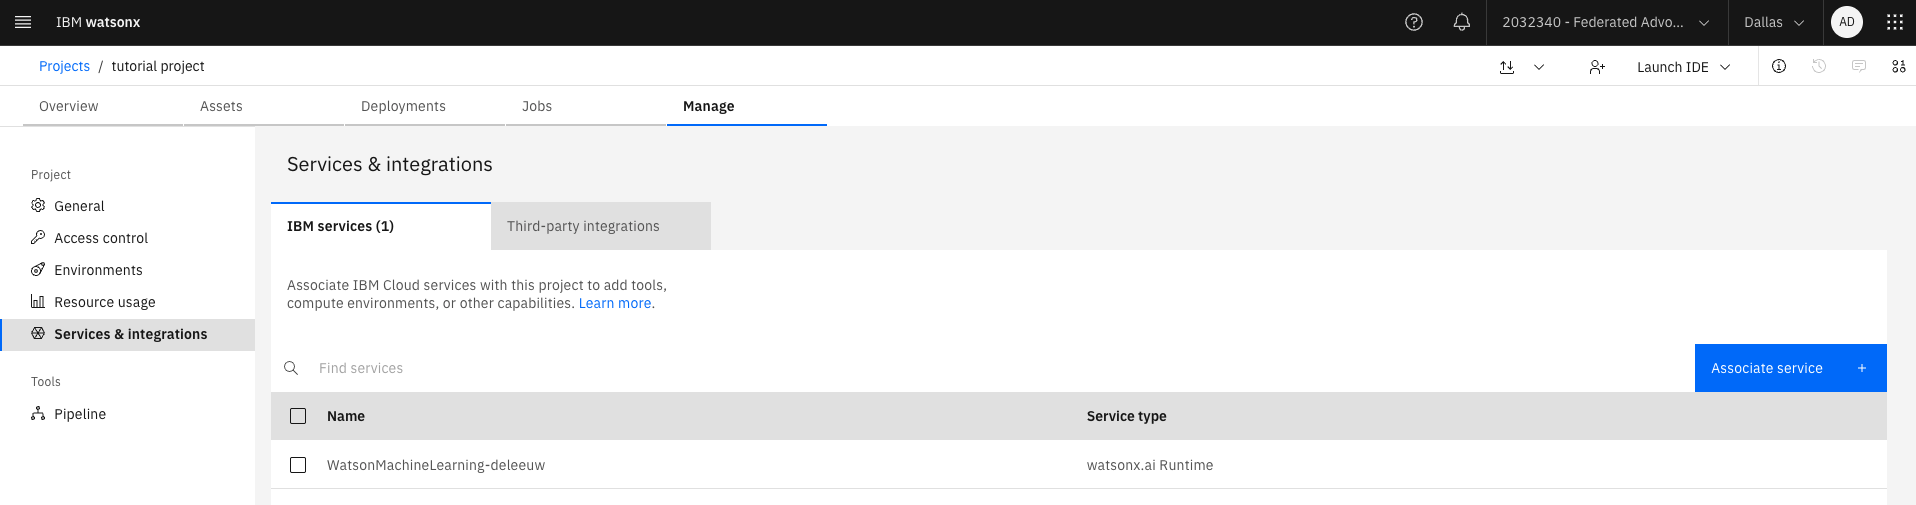
Select the Services and Integrations tab from the navigation and click Associate Service. Choose an instance of watsonx.ai Runtime to associate with the project.
Step 5. Load data into Astra DB
Before you create a watsonx Orchestrate agent, you need to load data into Astra DB. Choose from the following options:
- Use the sample code to crawl the webpages, create embeddings with watsonx.ai, and load the documents into Astra DB. This option takes more time but prepares you to crawl your own websites. If you want to use this option, continue with the next step.
- Import the provided dataset that contains the crawled webpages and the embeddings. This option is faster and lets you focus on building the watsonx Orchestrate agent. If you want to use this option, continue from the Importing a dataset into Astra DB step.
Step 6. Crawl webpages with ChromeDriver
Many websites, including IBM Developer, load their content with Ajax requests after the initial html page loads. When you use Python to crawl a website, a simple HTTP request may return only the initial html page. Any Ajax requests that depend on JavaScript will not run. A solution is to install ChromeDriver. ChromeDriver is a stand‑alone server that runs JavaScript and can be controlled by a Python library. You must also have the Google Chrome browser installed in a known location.
Open the Chrome browser and go to Settings → About Chrome. Make sure that you have version 115 or later.
Go to the Chrome for Testing Availability dashboard.
Scroll to the Stable section and copy the download link for ChromeDriver for your platform. For example, if you use a Mac with Apple Silicon, choose mac‑arm64.
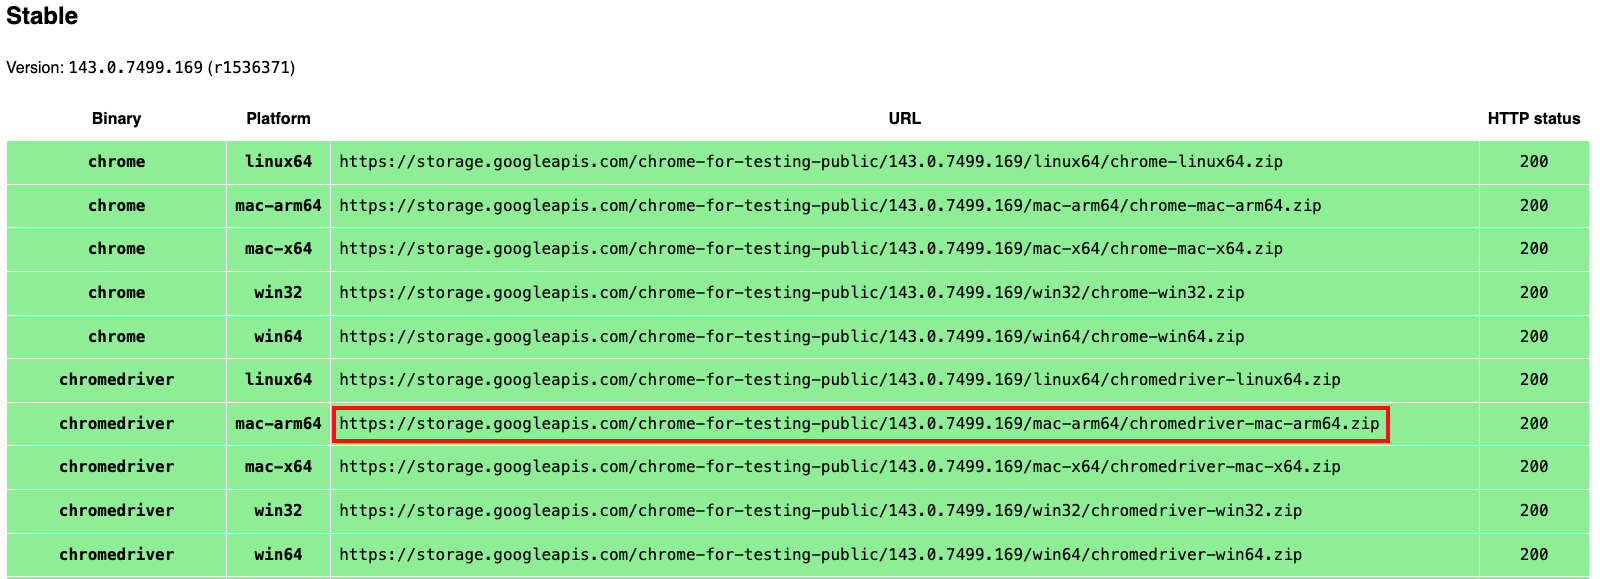
Paste the URL into your browser and download the compressed file.
In a terminal, enter the following command to uncompress the compressed file.
unzip chromedriver-mac-arm64.zipTry to launch the binary.
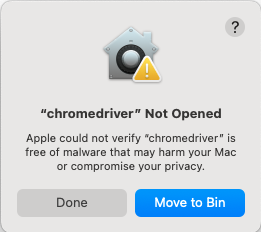
cd chromedriver-mac-arm64 ./chromedriver --versionYou will not have permission. Click Done on the Mac warning dialog.
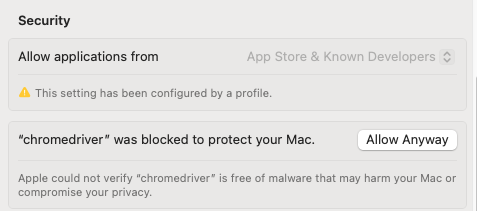
Open Mac Settings → Privacy and Security. Click Allow Anyway for “chromedriver”.
Return to your terminal window and launch the ChromeDriver binary again.
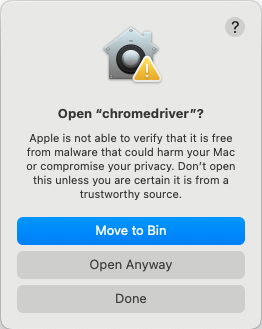
./chromedriver --versionThis time, you can view an option to Open Anyway. After you enter your password, the binary will run.

Add the full path to the ChromeDriver binary in the
.envfile:CHROME_DRIVER_PATH=
Step 7. Load data with the Jupyter Notebook
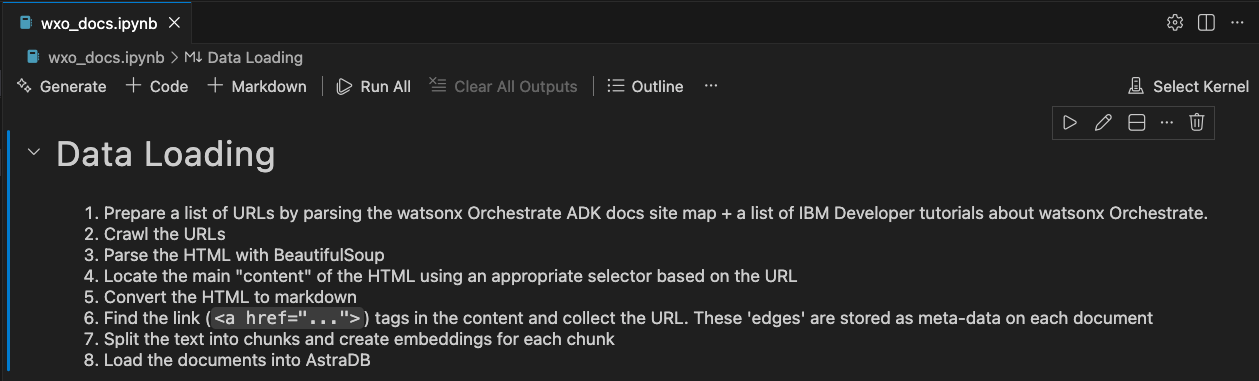
In Visual Studio Code(VS Code), open data-load-web-crawl/wxo_docs.ipynb and click Run All.
VS Code will prompt you for the kernel source. Select Python Environments.

When prompted, create a virtual environment and select your Python interpreter. This tutorial uses Python 3.12.11, or later.

Install the dependencies from data-load-web-crawl/requirements.txt.

After the virtual environment is created, the notebook will run the data loading steps. See the notebook description for more information.
Wait until the notebook finishes running. You will see a number in the square brackets next to each cell when execution is complete. This will take a few minutes.
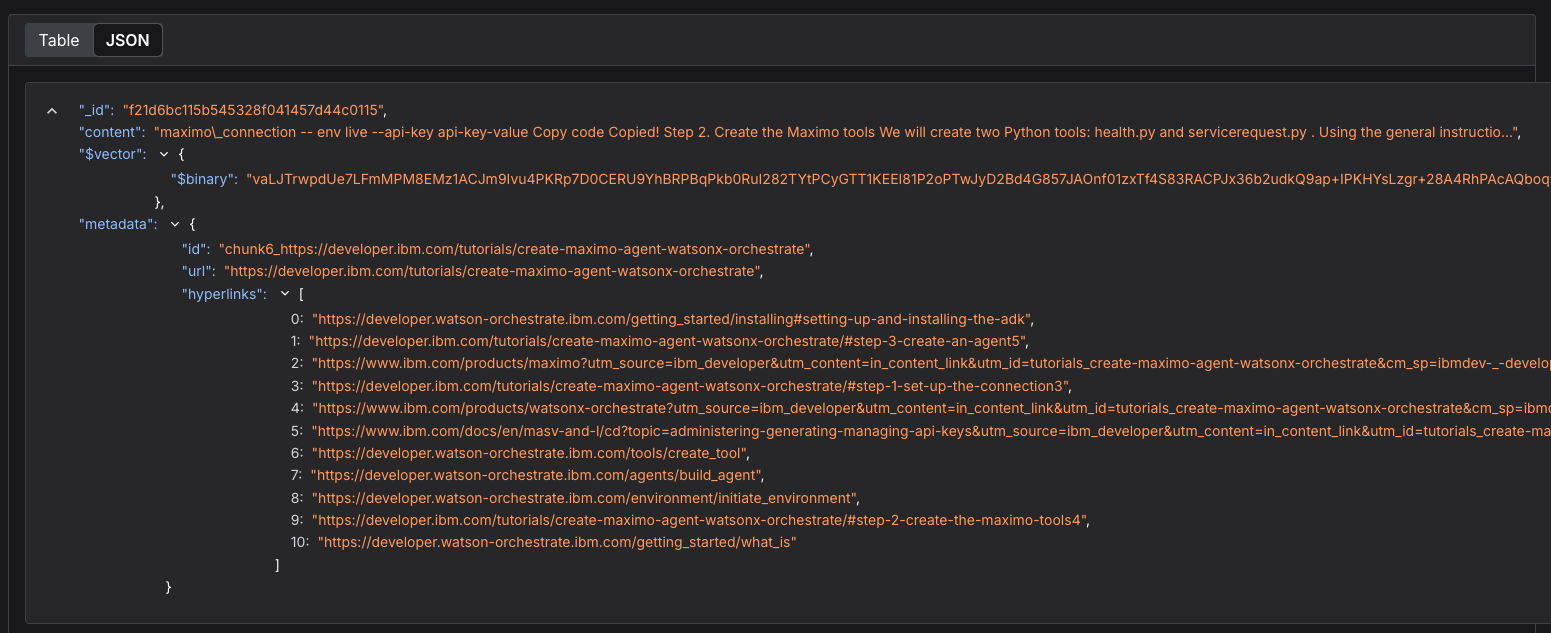
The notebook prints the URL of each crawled webpage and the list of links found in it. For example, the webpage Automate Maximo workflows with watsonx Orchestrate ADK includes links to the watsonx Orchestrate ADK documentation and to the Maximo tutorial on IBM Developer.
Loading page: https://developer.ibm.com/tutorials/create-maximo-agent-watsonx-orchestrate Adding link: https://developer.watson-orchestrate.ibm.com/getting_started/what_is Adding link: https://www.ibm.com/products/watsonx-orchestrate Adding link: https://www.ibm.com/products/maximoAfter the notebook completes, Astra DB will contain more than 4500 chunks. You can view the loaded data in the Astra DB Data Explorer tab if you want.
One of the chunks for the IBM Developer tutorial about Maximo and watsonx Orchestrate includes part of the tutorial text, its vector embedding, and the metadata.
Go to Step 9.
Step 8. Import a dataset into Astra DB
If you did not run the web crawler, you can import the provided dataset directly into Astra DB.
Create a virtual environment and run the import script.
python -m venv .astradb-venv source .astradb -venv/bin/activate cd data-load-astradb-script pip install -r requirements.txtDecompress the dataset.
unzip export.json.zipRun the Python script to import the dataset. Use your Astra DB application token, your Astra DB endpoint URL, and the wxo_docs collection you created in Step 2.
python astra_graph_data.py import --collection wxo_docs --file export.json –token <ASTRA_DB_APPLICATION_TOKEN> --endpoint <ASTRA_DB_API_ENDPOINT>The script completes with the following message:
Import completed! 4623/4623 documents imported into wxo_docs
Step 9. Explore the agent and the tools
watsonx Orchestrate can create agents that connect directly to knowledge bases, but this uses a standard RAG pattern. To run a query with GraphRAG, you need a custom tool. The watsonx Orchestrate ADK allows you to create Python tools that you can test on your workstation with the local watsonx Orchestrate Developer Edition or publish to a watsonx Orchestrate SaaS instance. In this tutorial, you will use the SaaS instance.
The sample repository includes the definition of an agent and two tools. The tools are nearly identical. One tool performs a simple semantic search, and the other tool uses a knowledge graph. You will test both tools.
Start by reviewing the two tools in the wxo/tools folder. Each tool contains a method with a @tool annotation.
@tool(name="orchestrate_rag_tool",
      permission=ToolPermission.READ_ONLY,
      expected_credentials=[
          ExpectedCredentials(
            app_id = "astradb",
            type = ConnectionType.KEY_VALUE),
          ExpectedCredentials(
            app_id = "watsonx",
            type = ConnectionType.KEY_VALUE)
        ]
)
def doc_search_rag(question:str) -> RAGSearchResults:
The annotation defines the name of the tool and confirms that the tool can access the credentials for watsonx.ai and Astra DB.
The function expects a question string and returns a Pydantic class named RAGSearchResults. This data structure contains the search result generated by the language model and a list of documents used as context, which in this case are the document IDs.
class RAGSearchResults(BaseModel):
    """
    This class represents the search results.
    """
    context_data: str | None = Field(description="Context data for the question")
    document_titles: List[str] | None = Field(description="A list of document titles")
The function creates an embedding vector for the query string and searches the Astra DB vector store. Each tool performs the search in a different way.
The orchestrate_rag_tool performs the search as follows:
simple_retriever = GraphRetriever(
    store = vectorstore,
    edges = [("hyperlinks", "url")],
    strategy = Eager(k=5, start_k=5, max_depth=0)
    )
query_results = simple_retriever.invoke(question)
The simple_retriever is set to return five search results, defined by k = 5. The value max_depth = 0 prevents any graph traversal. This means that the tool performs a semantic search that works like a standard RAG system.
Now compare this with the search performed by the orchestrate_graph_rag_tool:
# Request up to 11 results, 10 from semantic search and 1 from graph traversal
 graph_retriever = GraphRetriever(
        store = vectorstore,
        edges = [("hyperlinks", "url")],
      strategy = Eager(k=6, start_k=5, max_depth=1)
    )
The graph_retriever is set to return six search results, defined by k = 6. Each result may include a list of hyperlinks that point to URLs of other documents in Astra DB. The relationships are not stored in Astra DB. Instead, at query time, the GraphRetriever component uses the metadata (the hyperlinks and the URLs) to build an in‑memory knowledge graph. It begins with the five semantic search results that are defined by start_k = 5 and follows their relationships one level deep, as defined by max_depth = 1. As a result, the final set includes the five semantic search results and one more document from the graph traversal, which may provide extra insight.
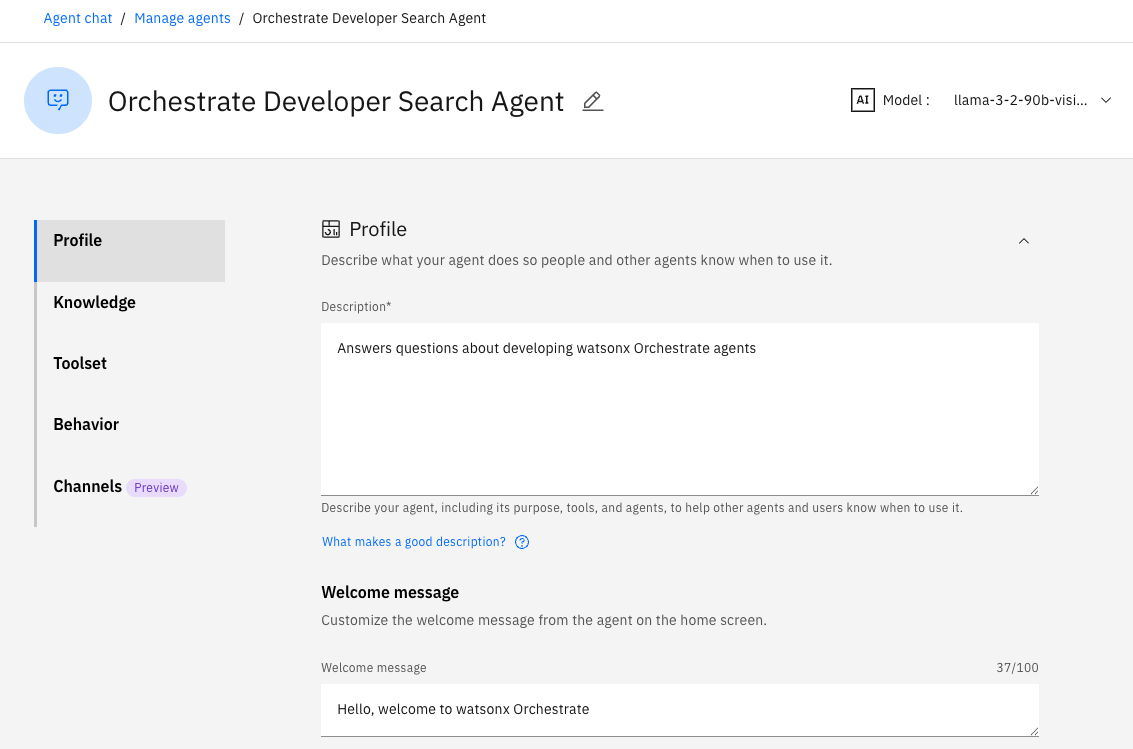
Next, review the agent definition in wxo/agents/orchestrate_docs_agent YAML.
spec_version: v1
kind: native
name: orchestrate_docs_search
display_name: Orchestrate Developer Search Agent
description: Answers questions about developing watsonx Orchestrate agents
llm: watsonx/meta-llama/llama-3-2-90b-vision-instruct
style: default
instructions: |-
  You are a helpful assistant that answers questions about watsonx Orchestrate using the provided context.

  Use only the information from the context to answer. If the answer is not in the context, say "The answer is not in the provided context."

  The context must be retrieved from the 'orchestrate_rag_tool' tool.

  Answer the question from the user.
collaborators: []
tools:
  - orchestrate_rag_tool
knowledge_base: []
It instructs the agent to answer the user question by using context data. The tool orchestrate_rag_tool searches Astra DB and retrieves the context. You will test the agent with this tool first, and later you will switch to orchestrate_graph_rag_tool.
Step 10. Import the agent and the tools
Before you import the tools, install the required Python packages locally.
pip install -r wxo/tools/requirements.txtFrom the directory where you cloned the repository, run:
./scripts/load_agents_tools.shThis script creates the following components:
- The orchestrate_docs_agent agent.
- The orchestrate_rag_tool and orchestrate_graph_rag_tool tools.
- Application connections for Astra DB and watsonx.ai.
- Credentials for Astra DB and watsonx.ai, using the key and value pairs from the
.envfile. For example, the Astra DB credentials include the endpoint and the token. The tools use these credentials.
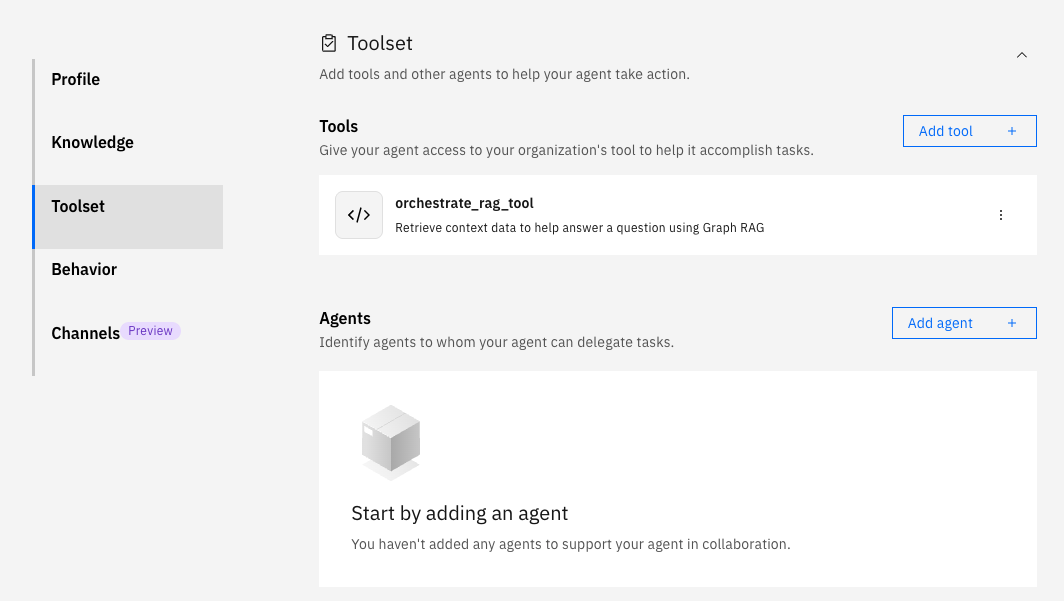
When the script completes, you can find the agent definition in the watsonx Orchestrate user interface. The agent is loaded as a draft, so it does not appear on the main watsonx Orchestrate home page. Click Manage Agents at the bottom of the page and select the draft agent that is named Orchestrate Developer Search Agent to view it.
Click the Toolset tab and notice the agent is currently configured to use the standard RAG tool (orchestrate_rag_tool).
Step 11. Test the agent with the RAG tool
In the agent preview on the right side of the screen, ask the agent this question:
In the Maximo tutorial, the healthapi Python tool will not connect to Maximo using localhost. Why not?
This question is complex because it refers to an IBM Developer tutorial and asks for specific technical details that go beyond the basic content of the tutorial.
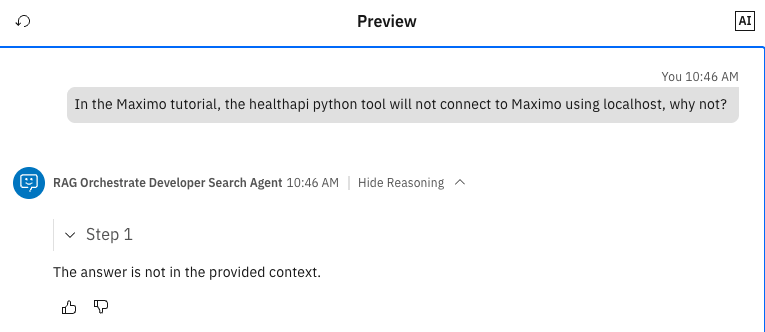
The result shows that the agent could not answer the question. Expand the Show reasoning section and check the context provided by the tool.
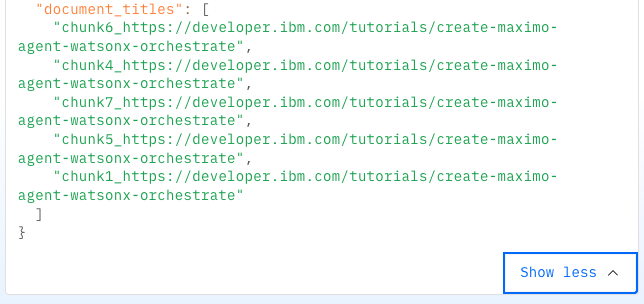
All five context documents show the tutorial about creating a Maximo tool. This is expected because the question refers to Maximo, but the tutorial does not contain the answer.
Step 12. Test the agent with the GraphRAG Tool
To test the agent with the GraphRAG tool, you need to update the agent definition. You can make the changes in the user interface, but since the agent and the tools were created through the ADK with YAML files, it is better to continue with that method.
Update the tool definition in both the instructions section and the tools section of the wxo/agents/orchestrate_docs_agent.yaml YAML file.
spec_version: v1 kind: native name: orchestrate_docs_search display_name: Orchestrate Developer Search Agent description: Answers questions about developing watsonx Orchestrate agents llm: watsonx/meta-llama/llama-3-2-90b-vision-instruct style: default instructions: |- You are a helpful assistant that answers questions about watsonx Orchestrate using the provided context. Use only the information from the context to answer. If the answer is not in the context, say "The answer is not in the provided context." The context must be retrieved from the 'orchestrate_graph_rag_tool' tool. Answer the question from the user. collaborators: [] tools: - orchestrate_graph_rag_tool knowledge_base: []Save the file and run the command.
./scripts/load_agents_tools.shClick the Reset chat icon in the preview pane and test the updated agent again with the same question:
In the Maximo tutorial, the healthapi Python tool will not connect to Maximo using localhost. Why not?
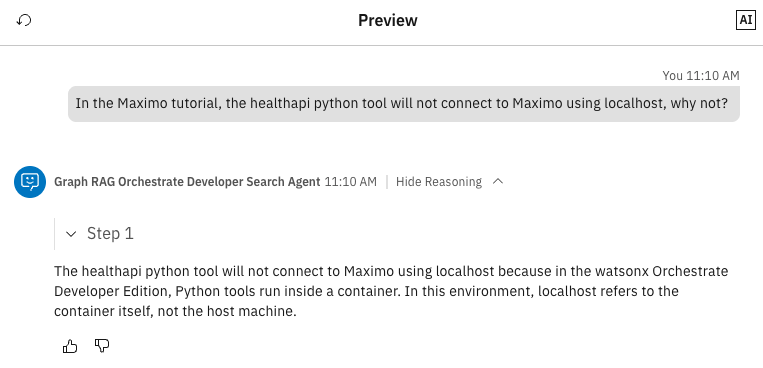
With GraphRAG, the answer is much better. The agent understands that the user is following the tutorial with watsonx Orchestrate Developer Edition and a local Maximo instance. Because watsonx Orchestrate Developer Edition runs in a container, the agent correctly explains that localhost refers to the container, not the host machine. The user must use docker.host.internal or the IP address of the host machine.
Now, check the context data that the agent used to generate the response.
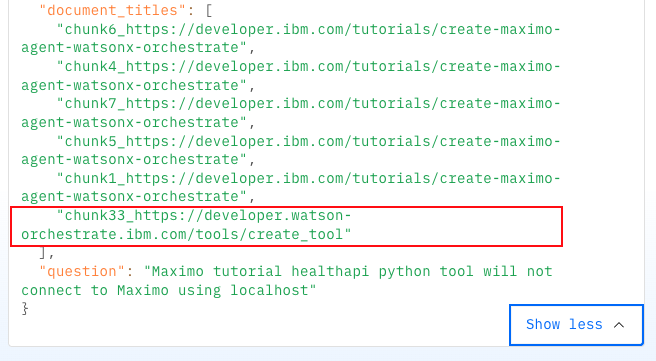
This time the context includes documents from the Maximo tutorial and a document from the watsonx Orchestrate product documentation. That product documentation page contains the information that helped the agent answer the question.
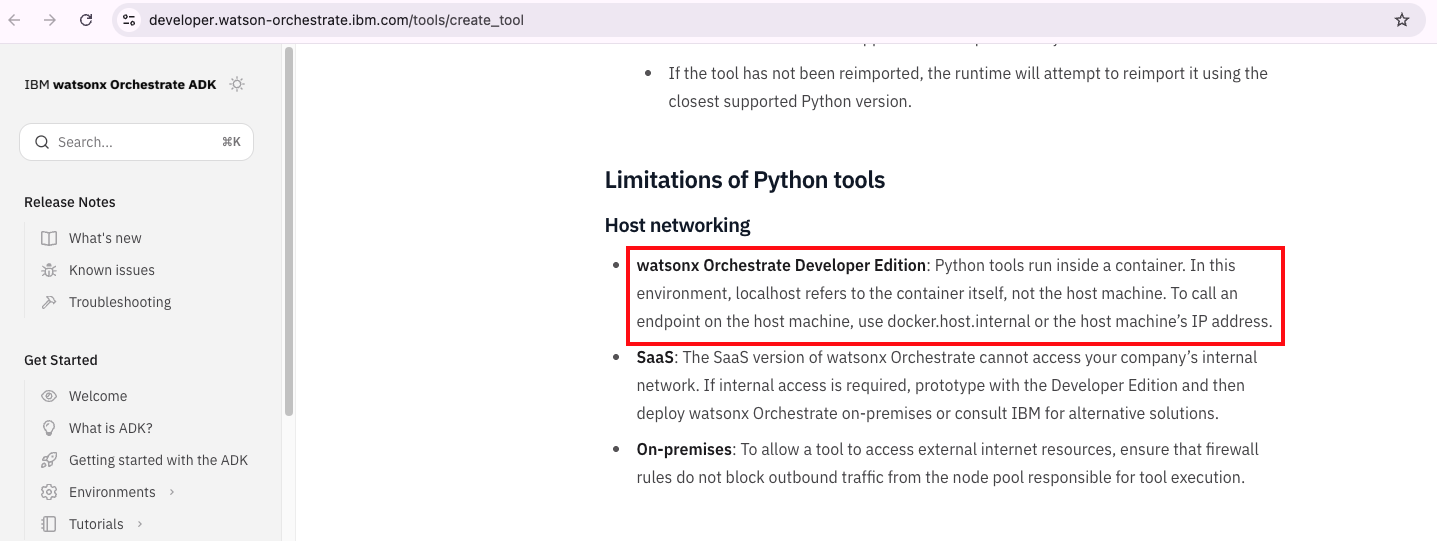
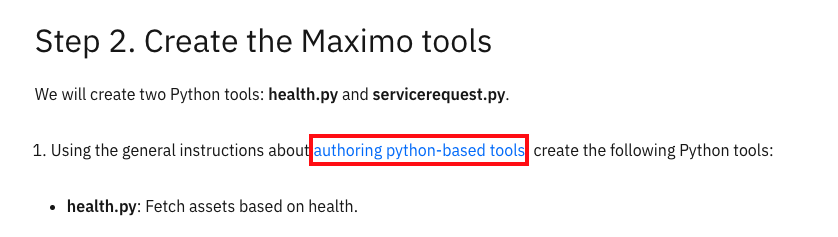
The Maximo tutorial on IBM Developer includes a link to the Authoring Python-Based Tools page from the watsonx Orchestrate ADK documentation. That page is now part of the context because of the GraphRAG approach.
Summary and next steps
You learned how to:
- Create a vector store with Astra DB
- Set up the watsonx Orchestrate ADK
- Crawl websites with different methods
- Use the watsonx Orchestrate ADK to create an agent and a tool that queries Astra DB and build results with a knowledge graph
You can now explore crawling your own websites and creating more agents and tools that use GraphRAG.
Acknowledgments
This tutorial was produced as part of the IBM Open Innovation Community initiative: Agentic AI (AI for Developers and Ecosystem).
The authors deeply appreciate the support of Ahmed Azraq and Bindu Umesh for reviewing and contributing to this tutorial.