Tutorial
Getting started with request-response messaging applications
See the request-response messaging pattern in action
On this page
With request-response messaging, your applications can exchange messages asynchronously, meaning they can function independently making them more robust. By enhancing your applications further with features such as message expiry and application timeout, you can also minimise the effect of downstream application failures.
In this tutorial, we’ll configure and run sample JMS request and response applications, highlighting the expected behaviour and looking at how they implement the best practices outlined in the other articles in this series.
Prerequisites
You must have the following software installed on your machine:
- Git
- Java
- Maven
- The latest version of the IBM MQ allclient
In this tutorial, we will be using samples from the mq-dev-patterns repository.
Steps
Step 1. Get the JMS applications
In this tutorial, we’ll be using the JmsRequest.java and JmsResponse.java applications, in the mq-dev-patterns repository.
First, clone the repo using this command:
git clone https://github.com/ibm-messaging/mq-dev-patterns
Then, navigate to the JMS directory, and follow the steps in the README to build the sample applications. If you already have this repo cloned, ensure that your version is up-to-date usinggit pull.
Step 2. Set up your queue manager
The requester and responder applications will be putting and getting messages to and from queues, so we need to set up a queue manager for them to connect to.
Follow the instructions found in this tutorial to set up a queue manager in a container.
Step 3. Configure env.json
Having set up our queue manager, we need to provide its connection details to the applications, which they will get from the env.json file. Navigate to the env.json file in the mq-dev-patterns directory and replace what is in there with the following:
{
  "MQ_ENDPOINTS": [{
    "HOST": "localhost",
    "PORT": "1414",
    "CHANNEL": "DEV.APP.SVRCONN",
    "QMGR": "QM1",
    "APP_USER": "app",
    "APP_PASSWORD": "passw0rd",
    "QUEUE_NAME": "DEV.QUEUE.1",
    "BACKOUT_QUEUE": "DEV.QUEUE.2",
    "MODEL_QUEUE_NAME": "DEV.APP.MODEL.QUEUE",
    "RESPONDER_INACTIVITY_TIMEOUT": "600",
    "REQUEST_MESSAGE_EXPIRY": "600"
  }]
}
Other than the connection information for our queue manager, there are a few extra details to note:
APP_USERandAPP_PASSWORDhave been set to the values given when following the tutorial from the previous step to set up the queue manager, but if you changed the values you will need to use those same ones here.RESPONDER_INACTIVITY_TIMEOUTspecifies the amount of time the responding application should wait for a request before timing out and ending (in this case 10 minutes).REQUEST_MESSAGE_EXPIRYspecifies the time after which the message will be deleted if it has not been picked up from its destination queue (in this case 10 minutes).MODEL_QUEUE_NAMEspecifies the queue to be used as a template for the temporary reply-to queue, which is created dynamically by the application. Depending on your use case, you might want to useREPLY_QUEUE_NAMEto define a static queue to receive your replies at, though using temporary dynamic queues is best practice.- Since the request-response interaction will be happening in a transaction and using JMS,
BACKOUT_QUEUEspecifies the queue to which poison messages should be backed out to, which you can read more about in "An introduction to local transactions".
Step 4. Create the model queue
The easiest way to create the model queue is through the MQ Console. You can follow the instructions in this tutorial to set up and use the MQ Console.
Follow these steps to create the model queue:
From Manage > Queues, click the Create button.

Select Model.
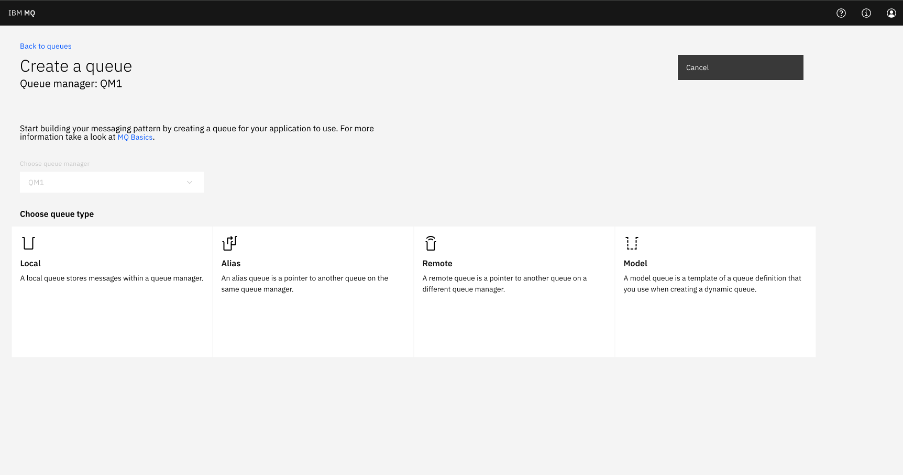
Set the queue name to DEV.APP.MODEL.QUEUE, and then click Create. Note that we have to prefix the queue with DEV. because the default developer security permissions allow the app user to only access queues with this prefix.
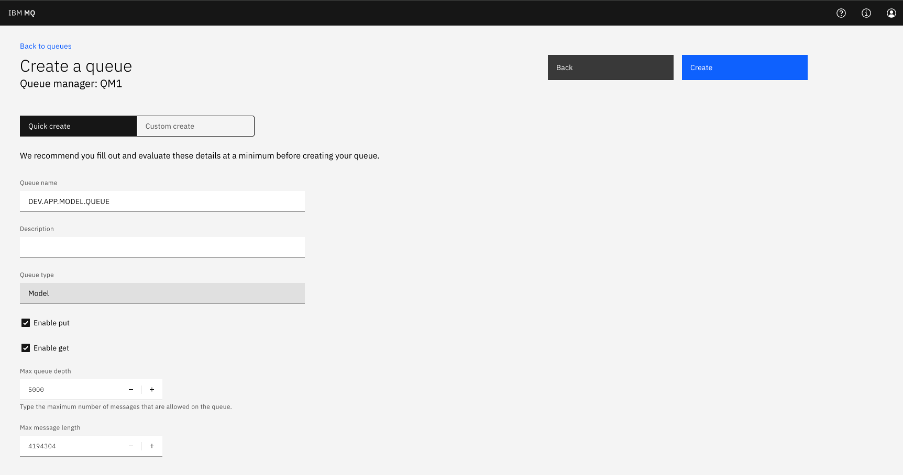
Your model queue is created and shows up in the table for the queue manager.

Step 5. Run the Request app
The requesting application that we will be using is JmsRequest.java. In a separate terminal, navigate to the JMS directory and run the application by using one of the following commands.
If you used maven to build the samples, you can run:
java -cp target/mq-dev-patterns-0.1.0.jar com.ibm.mq.samples.jms.JmsRequest
Otherwise, compile the app:
javac -cp ./com.ibm.mq.allclient-9.2.5.0.jar:./javax.jms-api-2.0.1.jar:./json-20230227.jar:. com/ibm/mq/samples/jms/JmsRequest.java
Then, run the app:
java -cp ./com.ibm.mq.allclient-9.2.5.0.jar:./javax.jms-api-2.0.1.jar:./json-20230227.jar:. com.ibm.mq.samples.jms.JmsRequest
After running this application, it will display to the terminal:

This tells us that the request has been sent and a temporary queue has been created to receive the response. The response will be selected based on the given JMSCorrelationID.
Take a look in the MQ Console:
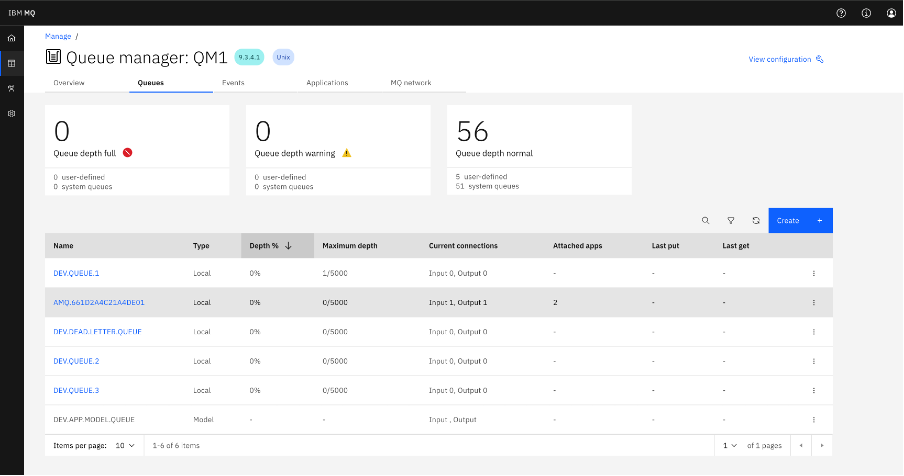
You will notice that the request message has been put to DEV.QUEUE.1, and a temporary reply-to queue has been created (AMQ.661D2A4C21A4DE01 in this case).
Step 6. Run the Response app
The responding application that we will be using is JmsResponse.java. Navigate to the JMS directory and run the application by using one of the following commands.
If you used maven to build the samples, you can run:
java -cp target/mq-dev-patterns-0.1.0.jar com.ibm.mq.samples.jms.JmsResponse
Otherwise, compile the app:
javac -cp ./com.ibm.mq.allclient-9.2.5.0.jar:./javax.jms-api-2.0.1.jar:./json-20230227.jar:. com/ibm/mq/samples/jms/JmsResponse.java
Then, run the app:
java -cp ./com.ibm.mq.allclient-9.2.5.0.jar:./javax.jms-api-2.0.1.jar:./json-20230227.jar:. com.ibm.mq.samples.jms.JmsResponse
After running this application, the request app will display the following, and exit:

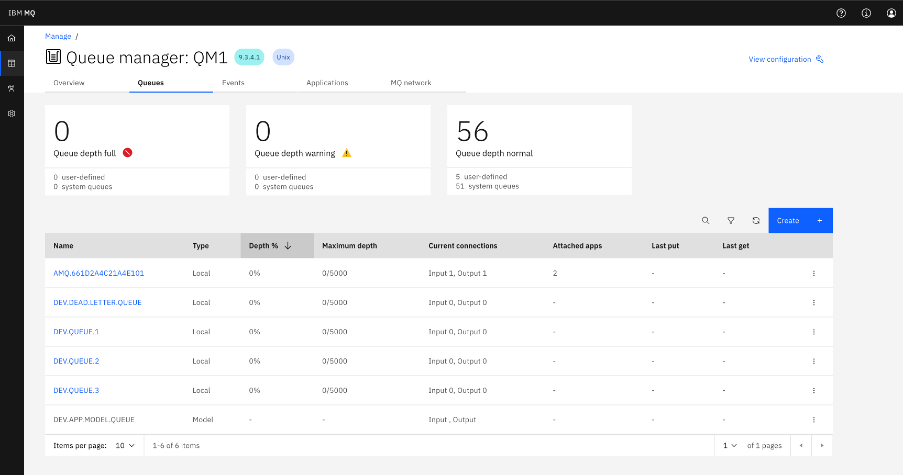
Take a look in the MQ Console again:

You can see that the request has been consumed from DEV.QUEUE.1. The response message would have been put to the temporary queue to be consumed by the requester, which disconnects afterwards. Because of this, the temporary queue has been deleted from the queue manager.
Expiry and Timeout
The scenario played out above was an ideal one, which meant we didn’t observe message expiry or application timeout. We can recreate these scenarios, but before we do that, let’s edit our env.json file so that we are only waiting for 1 minute instead of 10.
{
  "MQ_ENDPOINTS": [{
    "HOST": "localhost",
    "PORT": "1414",
    "CHANNEL": "DEV.APP.SVRCONN",
    "QMGR": "QM1",
    "APP_USER": "app",
    "APP_PASSWORD": "passw0rd",
    "QUEUE_NAME": "DEV.QUEUE.1",
    "BACKOUT_QUEUE": "DEV.QUEUE.2",
    "MODEL_QUEUE_NAME": "DEV.APP.MODEL.QUEUE",
    "RESPONDER_INACTIVITY_TIMEOUT": "60",
    "REQUEST_MESSAGE_EXPIRY": "60"
  }]
}
Let’s now recreate a scenario where the request message would expire.
First, stop both the requesting and responding applications.
Then, run just the requesting application.
As before, the request will be on DEV.QUEUE.1 and a temporary queue will be created.
If we don’t run JmsResponder.java, we will see the message being deleted from the queue after the time specified in REQUEST_MESSAGE_EXPIRY has elapsed (in this case 1 minute) and the application ending.
To recreate a timeout scenario, you have to first stop both the requesting and responding applications.
Then, run just the responding application.
If there is no request for the responder to process before the time specified in RESPONDER_INACTIVITY_TIMEOUT has elapsed (in this case 1 minute), you will see the responding application timing out and ending:

Summary and next steps
In this tutorial, we set up and ran sample requesting and responding applications. We also looked at the key features that are necessary for applications that engage in a request-response exchange and when those features are useful.
If you would like to explore more messaging patterns, and even earn a digital credential, head to the IBM MQ Developer Essentials learning path!