About cookies on this site Our websites require some cookies to function properly (required). In addition, other cookies may be used with your consent to analyze site usage, improve the user experience and for advertising. For more information, please review your options. By visiting our website, you agree to our processing of information as described in IBM’sprivacy statement. To provide a smooth navigation, your cookie preferences will be shared across the IBM web domains listed here.
Tutorial
Install IBM Storage Scale Container Native Storage Access 5.2.1.1 on Red Hat OpenShift Container Platform 4.14 on IBM Power Virtual Servers
Take advantage of a cloud-native storage solution for your OpenShift cluster using IBM Storage Scale container native
On this page
Introduction
IBM Storage Scale in containers (IBM Storage Scale Container Native Storage Access) allows the deployment of the cluster file system in a Red Hat OpenShift cluster. Using a remote mount-attached IBM Storage Scale file system, the IBM Storage Scale solution provides a persistent data store to be accessed by the applications via the IBM Storage Scale Container Storage Interface (CSI) driver using persistent volumes (PVs).
This tutorial shows how to create a two-node Storage Scale 5.2.1.1 storage cluster on Red Hat Enterprise Linux (RHEL) 9.4 virtual machines (VMs) and shared disks on IBM Power Virtual Servers and then connect the Storage Scale storage cluster to your Red Hat OpenShift Container Platform 4.14 cluster running on IBM Power Virtual Servers via Storage Scale Container Native Storage Access 5.2.1.1.
Prerequisites
This tutorial assumes that you are familiar with the Red Hat OpenShift Container Platform 4.14 environment on IBM Power Virtual Server. It is assumed that you have it already installed, you have access to it and have the credentials of an OpenShift cluster administrator (also known as kubeadmin).
Furthermore, you need to have access to the IBM Cloud console to provision the RHEL VMs and the storage on IBM Power Virtual Server for the Storage Scale cluster that is created in this tutorial.
You must be familiar with the Linux command line and have at least a basic understanding of Red Hat OpenShift.
Estimated time
It is expected to take around 2 to 3 hours to complete the installation of IBM Storage Scale 5.2.1.1 on IBM Power Virtual Server and to set up IBM Storage Scale Container Native Storage Access 5.2.1.1 on the Red Hat OpenShift 4.14 cluster. This lengthy duration is because we need to provision VMs on Power Virtual Server, install software from internet repositories, and reboot the worker nodes of the Red Hat OpenShift cluster.
Steps
This tutorial includes the following steps:
- Provision RHEL 9.4 VMs on IBM Power Systems Virtual Server.
- Change the MTU size of the private network interface of each RHEL 9.4 VM to 1450.
- Prepare the RHEL 9.4 nodes for Storage Scale 5.2.1.1.
- Download Storage Scale 5.2.1.1 installer from IBM Fix Central.
- Install the Storage Scale 5.2.1.1 binary files.
- Create a two-node Storage Scale cluster on the RHEL 9.4 VMs and the shared disks.
- Prepare the Storage Scale 5.2.1.1 cluster for Storage Scale Container Native Storage Access 5.2.1.1.
- Prepare the OpenShift 4.14 cluster for Storage Scale Container Native Storage Access 5.2.1.1.
- Install Storage Scale Container Native Storage Access 5.2.1.1 on the OpenShift 4.14 cluster.
Step 1 – Provision RHEL 9.4 VMs and shared disks on IBM Power Virtual Server
We need to create two basic RHEL 9.4 VMs on Power Virtual Servers with firewalld installed. These VMs need to be on the private network, the same one that we have the OpenShift nodes on. Make sure that the /etc/hosts files have an entry for each VMs long and short hostnames pointing to the IP of this interface. So, when the cluster is built, we get the Storage Scale daemon running on the IP for the private network interface. Add at least two shareable disks to these VMs so we can use them for the file system creation process.
Detailed steps:
- Provision two RHEL 9.4 VMs on IBM Power Virtual Servers, each with at least:
- 2 physical cores with SMT8 (resulting in 16 vCPUs at the operating system level)
- 16 gB RAM
- 50 gB disk (for the operating system)
- 1 public IP address for Secure Shell (SSH) access. The IP address must be in the same network as the workers from the OpenShift cluster.
- Provision at least two shared disks each with at least 100 gB size.
- Attach the shared disks to each of the VMs.
- Log in as root user into each of the VMs.
Using your Red Hat account, register the VM with Red Hat in order to receive updates and packages. Make sure the system stays on the RHEL 9.4 Extended Update Support (EUS) release for the kernel by specifying the release parameter.
subscription-manager register --release=9.4Run the following command and verify if the RHEL release is 9.4.
subscription-manager releaseRun a system update for each RHEL VM and reboot afterward.
yum update -y reboot nowVerify that the system had been updated to the latest kernel. After running the following command, check if the output displays a kernel version of 5.14.0-427.37.1.el9_4.ppc64le or later.
uname -r
Step 2 – Change the MTU size of the private network interfaces of each RHEL 9.4 VM to 1450
Change the MTU size of the private network interface to 1450 that is used to connect to the OpenShift worker nodes.
Caution: When changing the MTU size of a network interface the network adapter is going to be disabled. This will cause the SSH session to the VM to be closed. To enable the network interface again, make sure that you can login to the VM using the IBM Cloud web interface.
- Log in as a root user to the RHEL VM.
Run the
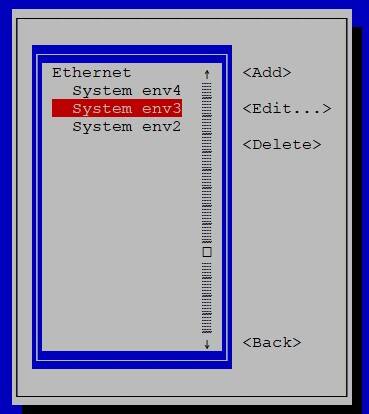
nmtuicommand.nmtuiSelect Edit a connection and press Enter.

Choose the private network interface for which we want to set the MTU size to 1450, for example System env3, and press Enter.
Select
<Show>using the Down Arrow key and press Enter.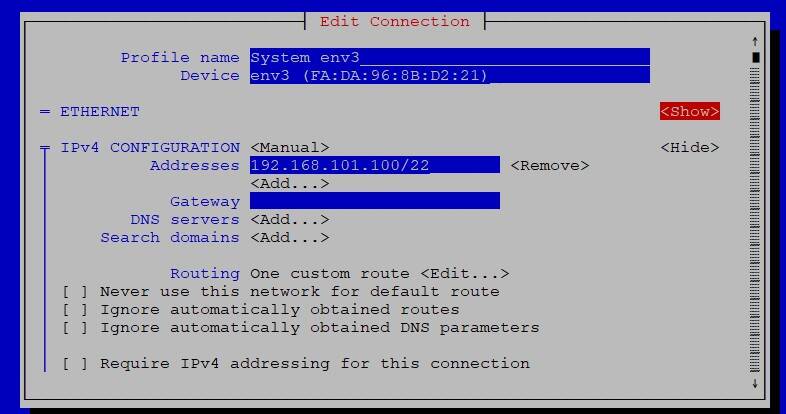
go to the MTU field using the arrow keys and enter the value as 1450.
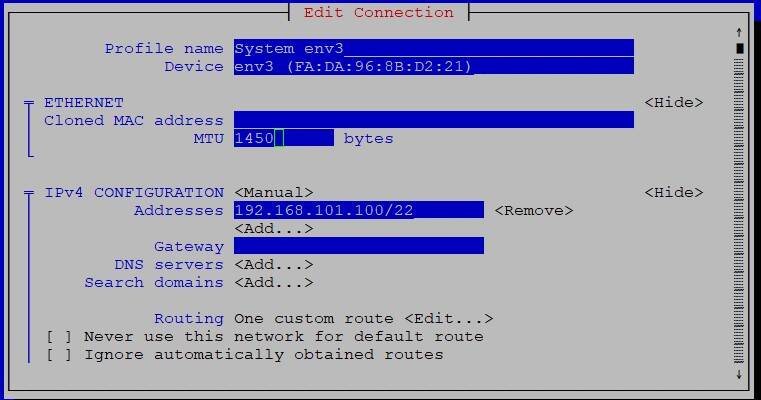
Scroll down using the Down Arrow key, select
<OK>at the bottom of the screen, and press Enter.
On the Ethernet screen using the arrow keys, select
<Back>and press Enter.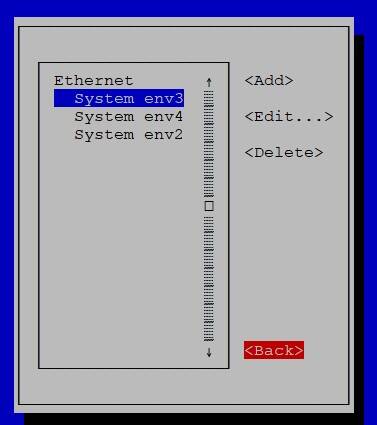
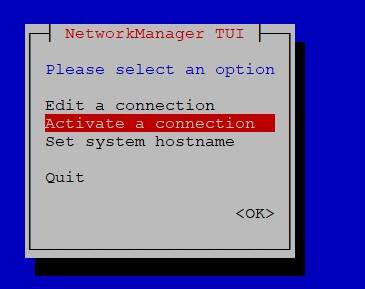
On the NetworkManager TUI screen, select Activate a connection and press Enter.
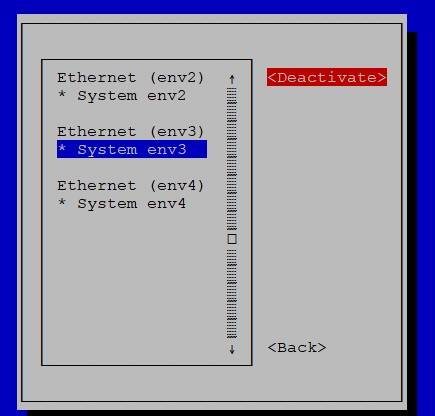
Using the arrow keys, select the * System env entry of the private network interface you want to deactivate (in this example, * System env3). Press the Right Arrow key and then press Enter. This will deactivate the network interface.
Caution: This will close your current SSH connection to the VM assuming you have connected to the VM via this network interface.
From the console to the VM in the IBM Cloud Administration gUI, log in to the VM as root user.
- Run the
nmtuicommand. - Activate the connection again.
- Repeat step 2 to step 14 to change the MTU size to 1450 for the other RHEL 9.4 VM.
Step 3 – Prepare the RHEL 9.4 nodes for Storage Scale 5.2.1.1
On each node, create a /etc/hosts file that has the IP addresses, the fully qualified hostnames, and the short hostnames for the two RHEL VMs that you just created. The following shows an example.
# cat /etc/hosts 127.0.0.1 localhost localhost.localdomain localhost4 localhost4.localdomain4 ::1 localhost localhost.localdomain localhost6 localhost6.localdomain6 192.168.167.234 218018-linux-1.power-iaas.cloud.ibm.com 218018-linux-1 192.168.167.238 218018-linux-2.power-iaas.cloud.ibm.com 218018-linux-2Login to the first node as root user. In this example, the first node is the host 218018-linux-1 and the second node is the host 218018-linux-2.
Configure password-less SSH by performing the following steps (that is, step 4 to step 8). The nodes in the cluster must be able to communicate with each other without the use of a password for the root user and without the remote shell displaying any extraneous output.
generate an SSH key for the system by issuing the following command:
ssh-keygen -b 2048 -t rsa -f ~/.ssh/id_rsa -q -N ""Copy the public key of the SSH key to the ~/.ssh/authorized_keys file by issuing the following command:
cat ~/.ssh/id_rsa.pub >> ~/.ssh/authorized_keysChange the permissions of the ~/.ssh/authorized_keys file by issuing the following command:
chmod 600 ~/.ssh/authorized_keysCopy the content of the ~/.ssh directory to the other node in the cluster.
scp ~/.ssh/* 218018-linux-2:/root/.sshTest the SSH setup to ensure that all nodes can communicate with all other nodes. Test by using short hostnames, fully qualified host names, and IP addresses. Assume that the environment has the two nodes:
a) 218018-linux-1.power-iaas.cloud.ibm.com:192.168.167.234 , and
b) 218018-linux-2.power-iaas.cloud.ibm.com:192.168.167.238.
Repeat the following test using the short names (218018-linux-1 and 218018-linux-2), the fully qualified names (218018-linux-1.power-iaas.cloud.ibm.com and 218018-linux-2.power-iaas.cloud.ibm.com ), and the IP addresses (192.168.167.234 and 192.168.167.238):
#!/bin/bash # Edit nodes list and re-run the script for IP addresses, # short hostnames and long hostnames. #nodes="192.168.167.234 192.168.167.238" #nodes="218018-linux-1.power-iaas.cloud.ibm.com 218018-linux-2.power-iaas.cloud.ibm.com" nodes="218018-linux-1 218018-linux-2" # Test ssh configuration for i in $nodes; do for j in $nodes; do echo -n "Testing ${i} to ${j}: " ssh ${i} "ssh ${j} date" done doneSample output:
Testing 218018-linux-1 to 218018-linux-1: Sat Sep 28 14:12:36 EDT 2024 Testing 218018-linux-1 to 218018-linux-2: Sat Sep 28 14:12:36 EDT 2024 Testing 218018-linux-2 to 218018-linux-1: Sat Sep 28 14:12:37 EDT 2024 Testing 218018-linux-2 to 218018-linux-2: Sat Sep 28 14:12:38 EDT 2024Install the Linux wget and screen utilities on the first node. The screen utility helps you maintain your session in case your internet connection drops and makes it recoverable when you reconnect.
yum -y install wget yum -y install https://dl.fedoraproject.org/pub/epel/9/Everything/ppc64le/Packages/s/screen-4.8.0-6.el9.ppc64le.rpmOpen a new screen session. You can resume a screen session via the
screen -rcommand.screenCreate a nodes file, that contains the short hostnames of the nodes of your cluster.
cat > /nodes << EOF 218018-linux-1 218018-linux-2 EOFSet up chrony (a time synchronization service) on all nodes. Chrony is an implementation of the Network Time Protocol (NTP).
for node in `cat /nodes` do echo "" echo "===== $node =====" ssh $node "yum install -y chrony; systemctl enable chronyd; systemctl start chronyd" doneVerify that the time is synchronized on all nodes.
for node in `cat /nodes` do echo "" echo "===== $node =====" ssh $node "date" doneInstall the prerequisites to build the Storage Scale portability layer on each node.
for node in `cat /nodes` do echo "" echo "===== $node =====" ssh $node "yum -y install 'kernel-devel-uname-r == $(uname -r)'" ssh $node "yum -y install cpp gcc gcc-c++ binutils" ssh $node "yum -y install 'kernel-headers-$(uname -r)' elfutils elfutils-devel make" doneInstall the python3, ksh, m4, boost-regex, postgresql, openssl-devel, cyrus-sasl-devel, and nftables packages on each node.
for node in `cat /nodes`
do echo ""
echo "===== $node ====="
ssh $node "yum -y install python3 ksh m4 boost-regex"
ssh $node "yum -y install postgresql-server postgresql-contrib"
ssh $node "yum -y install openssl-devel cyrus-sasl-devel"
ssh $node "yum -y install nftables"
done
Step 4 – Download Storage Scale 5.2.1.1. installer from IBM Fix Central
Download the Storage Scale Data Management Edition 5.2.1.1 for Power LE Linux binaries from the IBM Fix Central web site with the following steps.
Using your favourite web browser, open the following URL:
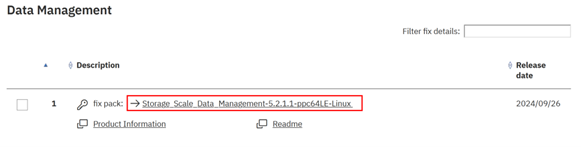
- Click the "Data Management" link.
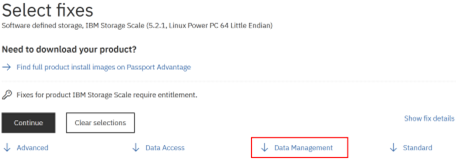
- Click the "Storage_Scale_Data_Management-5.2.1.1-ppc64LE-Linux " link.
- Log in to IBM using your IBM ID.
- Select the Download using your browser (HTTPS) option.
- Clear the Include prerequisites and co-requisite fixes checkbox.
- Click Continue.
- In the View and accept terms pop-op window, scroll to the end and click I agree.
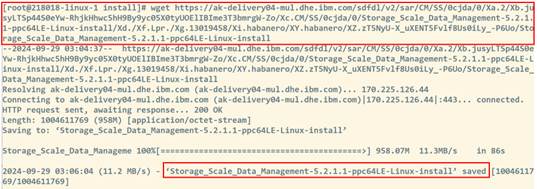
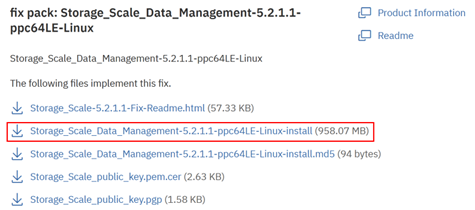
- In the main browser window, scroll down and right-click the Storage_Scale_Data_Management-5.2.1.1-ppc64LE-Linux-install Hyperlink and click Copy Link.
Verify if you get a link similar to:
https://ak-delivery04-mul.dhe.ibm.com/sdfdl/v2/sar/CM/SS/0cjda/0/Xa.2/Xb.jusyLTSp44S0eYw-RhjkHhwc5hH9By9yc05X0tyUOElIBIme3T3bmrgW-Zo/Xc.CM/SS/0cjda/0/Storage_Scale_Data_Management-5.2.1.1-ppc64LE-Linux-install/Xd./Xf.Lpr./Xg.13019458/Xi.habanero/XY.habanero/XZ.zT5NyU-X_uXENT5Fvlf8Us0iLy_-P6Uo/Storage_Scale_Data_Management-5.2.1.1-ppc64LE-Linux-installIn your command line window on the first RHEL node, use the
wgetcommand with the link to download the Storage Scale binary file.wget <put your download URL here>Note that the download could take up to 5 minutes as the file is approximately around 1 gB in size.
Step 5 – Install the Storage Scale 5.2.1.1 binary files
- Login as the root user into the first node, for example, 218018-linux-1.
Run the following command to install the Storage Scale binary files on the node. Enter “1” to accept the license agreement when being asked.
chmod u+x Storage_Scale_Data_Management-5.2.1.1-ppc64LE-Linux-install ./Storage_Scale_Data_Management-5.2.1.1-ppc64LE-Linux-installVerify that the Storage Scale binary files have been installed on the node.
rpm -qip /usr/lpp/mmfs/5.2.1.1/gpfs_rpms/gpfs.base*.rpmSample output from the command:
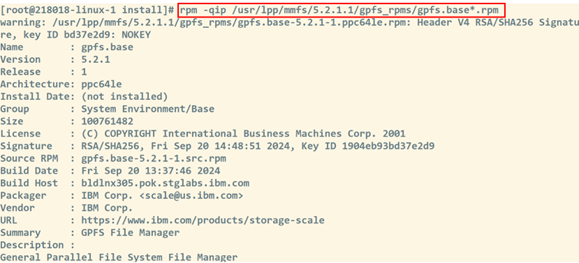
Step 6 – Create a two-node Storage Scale 5.2.1.1 cluster on the RHEL 9.4 VMs
In this step we will create a two-node Storage Scale cluster on the two RHEL VMs. We first setup the installer node on the first node, then create the Storage Scale cluster on both nodes and finally create a Storage Scale file system on that cluster.
- Log in as the root user into the first node, for example, 218018-linux-1.
Run the screen command.
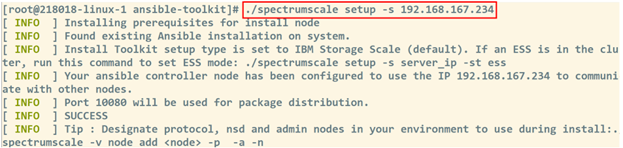
screenSet up the installer node.
cd /usr/lpp/mmfs/5.2.1.1/ansible-toolkit ./spectrumscale setup -s <IP of private network interface of first node>Sample output:
Use the
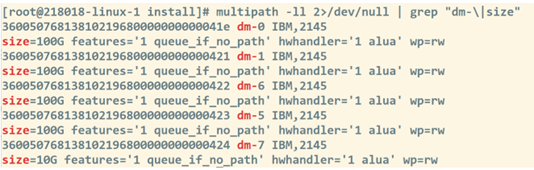
multipathcommand to find out the device IDs of your shared disks. In our test system, the VM has five disks:- disk1 is the rootvg disk for the RHEL operating system, with size of 100 gB and is bound to the device, dm-0
- disk2 is the first shared disk of 100 gB size and is bound to device dm-1.
- disk3 is the second shared disk of 100 gB size and is bound to device dm-6.
- disk4 is the third shared disk of 100 gB size and is bound to device dm-5. We are not going to use this device.
- disk 5 is the fourth shared disk of 10 gB size and is bound to device dm-7. We are not going to use this device.
Caution: Make sure that you choose the right dm-nnn IDs for the following step in order to not accidentally overwrite the rootvg disk and thus the partition for the RHEL operating system on that VM.
multipath -ll 2>/dev/null | grep "dm-\|size"Sample output:
List the /dev/mapper directory to find out the name of the device that is being used for the rootvg.
ls /dev/mapperSample output:

In our sample, the device 36005076813810219680000000000041e has three partitions on it e1, e2, and e2, while the other disks 360050768138102196800000000000421, 360050768138102196800000000000422, 360050768138102196800000000000423 and 360050768138102196800000000000424 have no partitions.
Run the df command to make sure by another means that for the rootvg the device 36005076813810219680000000000041e is being used
dfSample output:

Here we see, that the partition 36005076813810219680000000000041e3 is being used for the root filesystem of the RHEL VM.
Use the define_cluster.sh script to define the topology of the two-node Storage Scale cluster. Edit the script with your preferred editor and adapt the contents of the variables
NODE_1,NODE_2,DISK_1,DISK_2, andCLUSTER_NAMEto your environment.# short hostnames of the two nodes in the cluster NODE_1="218018-linux-1" NODE_2="218018-linux-2" # device names dm-x of the shared disks as printed by: "multipath -ll 2>/dev/null | grep 'dm-\|size'” DISK_1="dm-1" DISK_2="dm-6" # cluster name CLUSTER_NAME="gpfs-tz-p9-cluster"Run the modified define_cluster.sh script to define the topology of the Storage Scale cluster.
chmod u+x define_cluster.sh ./define_cluster.sh | tee define_cluster.outSample output:
View larger imageRun the following commands to disable callhome and to perform an installation precheck for Storage Scale. Before continuing to the next step, verify that the installation precheck command reports a Pre-check successful for install message.
cd /usr/lpp/mmfs/5.2.1.1/ansible-toolkit # disable call home ./spectrumscale callhome disable # list node configuration ./spectrumscale node list # run install precheck ./spectrumscale install -–precheckSample output:

View larger imageRun the
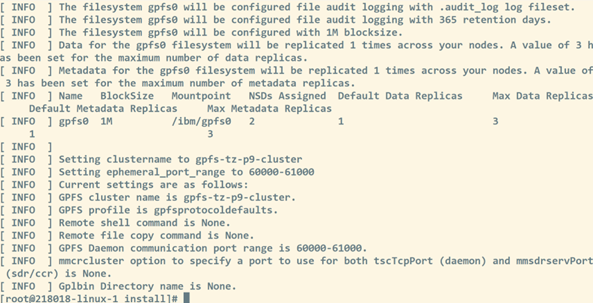
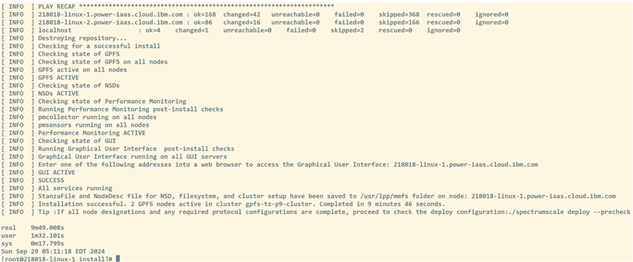
spectrumscale installcommand. This will create the Storage Scale cluster together with a Storage Scale gpfs0 file system on the two nodes and the two shared disks. Also, include the date and time commands to measure the duration of the installation of the cluster. The command will take up to 10 minutes to complete.date time ./spectrumscale install dateSample output:
View larger imageAdd the tiebreaker disk. This step is necessary to achieve quorum on a two-node Storage Scale cluster.
/usr/lpp/mmfs/bin/mmchconfig tiebreakerDisks=nsd1Edit the
~/.bash_profilefile and append the entry/usr/lpp/mmfs/binto thePATHvariable.PATH=$PATH:$HOME/bin:/usr/lpp/mmfs/binSource the
~/.bash_profilefile using the following command:source ~/.bash_profileRun the
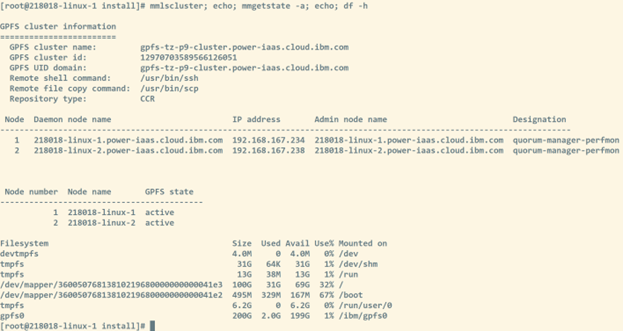
mmlscluster,mmgetstate -a, anddf -hcommands to list the Storage Scale cluster definition, to verify that all cluster nodes are active, and to validate that the gpfs0 file system has been successfully mounted under /ibm/gpfs0.mmlscluster; echo; mmgetstate -a; echo; df -hSample output:
Step 7 – Prepare the Storage Scale 5.2.1.1 cluster for Storage Scale Container Native 5.2.1.1
Create a new gUI user for Storage Scale container native with username as cnss_storage_gui_user and password as cnss_storage_gui_password.
/usr/lpp/mmfs/gui/cli/mkuser cnss_storage_gui_user -p cnss_storage_gui_password -g ContainerOperator --disablePasswordExpiry 1Sample output:

Create a new gUI group CSIadmin and a new gUI user for Storage Scale CSI with username as csi-storage-gui-user and password as csi-storage-gui-password.
/usr/lpp/mmfs/gui/cli/mkusergrp CsiAdmin --role csiadmin /usr/lpp/mmfs/gui/cli/mkuser csi-storage-gui-user -p csi-storage-gui-password -g CsiAdmin --disablePasswordExpiry 1Sample output:

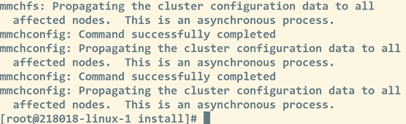
Run the following commands to enable quota on the gpfs0 file system, to change SELinux setting and to enable the
filesetdfoption.:# enable quota on filesystem used by csi mmchfs gpfs0 -Q yes # enable quota for root user mmchconfig enforceFilesetQuotaOnRoot=yes -i # ensure selinux parameter is set to yes mmchconfig controlSetxattrImmutableSELinux=yes -i # enable filesetdf mmchfs gpfs0 --filesetdfSample output:
Step 8 – Prepare the OpenShift 4.14 cluster for Storage Scale Container Native 5.2.1.1
- Log in as the root user to the bastion host of your OpenShift 4.14 cluster on IBM Power Virtual Server.
Install the wget and unzip utilities.
yum -y install wget unzipDownload the Storage Scale Container Native 5.2.1.1 deployment code from gitHub.
wget https://github.com/IBM/ibm-spectrum-scale-container-native/archive/refs/heads/v5.2.1.x.zipExtract the archive.
unzip v5.2.1.x.zipChange to the directory ibm-spectrum-scale-container-native-5.2.1.x.
cd ibm-spectrum-scale-container-native-5.2.1.xLog in to the OpenShift cluster as the kubeadmin user. Replace
ClusterNameandDomainwith the values from your OpenShift cluster.oc login https://api.ClusterName.Domain:6443 -u kubeadminApply the Machine Config Operator (MCO) settings for Storage Scale Container Native 5.2.1.1 for OpenShift 4.14 on IBM Power. Note that applying the MCO to update the configuration will trigger a reboot of all the worker nodes in your OpenShift cluster.
oc apply -f generated/mco/ocp4.14/mco_ppc64le.yamlCheck the status of the update. Verify if the
oc get mcpcommand showsUPDATED=True,UPDATINg=False, andDEgRADED=Falsefor the workers.oc get mcpValidate if the kernel-devel package has been successfully installed on all worker nodes. The number of lines in the command output should match the number of worker nodes in your cluster. Eventually, you need to rerun the command to get the correct output.
oc get nodes -lnode-role.kubernetes.io/worker= \ -ojsonpath="{range .items[*]}{.metadata.name}{'\n'}" |\ xargs -I{} oc debug node/{} -T -- chroot /host sh -c "rpm -q kernel-devel" 2>/dev/nullSample output:
kernel-devel-5.14.0-284.73.1.el9_2.ppc64le
kernel-devel-5.14.0-284.73.1.el9_2.ppc64le
kernel-devel-5.14.0-284.73.1.el9_2.ppc64le
Step 9 – Install Storage Scale Container Native 5.2.1.1 on the OpenShift 4.14 cluster
Make sure that you are logged in as the root user on the bastion host of the OpenShift cluster and that you are logged in as the kubeadmin user at the OpenShift cluster.
oc whoamiChange to the directory where you have extracted the Spectrum Scale Container Native 5.2.1.1 deployment files from Step 8.
cd /root/ibm-spectrum-scale-container-native-5.2.1.xCreate namespaces for Spectrum Scale container native, Spectrum Scale container native CSI, Spectrum Scale container native operator, and Spectrum Scale DNS.
oc create namespace ibm-spectrum-scale oc create namespace ibm-spectrum-scale-csi oc create namespace ibm-spectrum-scale-operator oc create namespace ibm-spectrum-scale-dns- Make a note of the fully qualified domain name (FQDN) of the gUI node of your Spectrum Scale cluster on the RHEL VMs that you created earlier. This is the FQDN of the first hostname we created, for example 218018-linux-1.power-iaas.cloud.ibm.com..
Make a backup copy and edit the /var/named/zonefile.db file on the bastion host and add an additional line at the end of the file just before the line that contains the
EOFstring. The line should contain the short hostname and the IP address of the private network interface of your Storage Scale gUI node using the following format:<short hostname of gUI node> IN A <IP address of private interface of gUI node> ;EOFSample:
; Create an entry for the gUI server of the external Storage Scale cluster 218018-linux-1 IN A 192.168.167.234 ; ;EOFMake a backup copy and edit the /var/named/reverse.db file on the bastion host and add an additional line at the end of the file just before the line that contains the EOF string. The new line should include the last part of the IP address of the gUI node’s private network and the FQDN hostname of the gUI node following this format. Note that there is an additional character (“.”) at the end of the new line.
<last octet of IP address of private interface of gUI node> IN PTR <FQDN hostname of gUI node>. ; ; EOFSample:
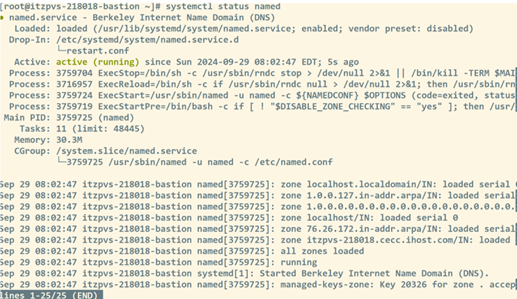
234 IN PTR 218018-linux-1.power-iaas.cloud.ibm.com. ; ;EOFRestart the named service and verify that it is running.
systemctl restart named systemctl status namedSample output:
View larger imageCreate the secrets for Storage Scale container native and CSI. Replace
REMOTE_SSCALE_gUI_NODEwith the FQDN hostname of the gUI node of your Spectrum Scale cluster on the RHEL VMs. Then run the following commandsREMOTE_SSCALE_gUI_NODE="<replace with FQDN of the gUI node of your remote Spectrum Scale storage cluster>"oc create secret generic cnsa-remote-mount-storage-cluster-1 --from-literal=username='cnss_storage_gui_user' \ --from-literal=password='cnss_storage_gui_password' -n ibm-spectrum-scale oc create configmap cacert-storage-cluster-1 \ --from-literal=storage-cluster-1.crt="$(openssl s_client -showcerts -connect ${REMOTE_SSCALE_gUI_NODE}:443 </dev/null 2>/dev/null|openssl x509 -outform PEM)" \ -n ibm-spectrum-scale oc create secret generic csi-remote-mount-storage-cluster-1 --from-literal=username=csi-storage-gui-user \ --from-literal=password=csi-storage-gui-password -n ibm-spectrum-scale-csi oc label secret csi-remote-mount-storage-cluster-1 product=ibm-spectrum-scale-csi -n ibm-spectrum-scale-csi- Add the pull secret for the Storage Scale container native software. The IBM Container Registry (ICR) entitlement key can be obtained from this URL: https://myibm.ibm.com/products-services/containerlibrary
#!/bin/bash ENTITLEMENT_KEY=<REPLACE WITH YOUR ICR ENTITLEMENT KEY> oc create secret docker-registry ibm-entitlement-key \ --docker-server=cp.icr.io \ --docker-username cp \ --docker-password ${ENTITLEMENT_KEY} -n ibm-spectrum-scale oc create secret docker-registry ibm-entitlement-key \ --docker-server=cp.icr.io \ --docker-username cp \ --docker-password ${ENTITLEMENT_KEY} -n ibm-spectrum-scale-dns oc create secret docker-registry ibm-entitlement-key \ --docker-server=cp.icr.io \ --docker-username cp \ --docker-password ${ENTITLEMENT_KEY} -n ibm-spectrum-scale-csi Deploy the Storage Scale container native operator.
oc project default oc apply -f generated/scale/install.yamlVerify that the operator pod is running. You should see one ibm-spectrum-scale-controller-manager-zzz pod with READY 1/1 and STATUS Running.
oc get pods -n ibm-spectrum-scale-operatorMonitor the log file output from the operator pod by running the following command:
oc logs $(oc get pods -n ibm-spectrum-scale-operator -o name) -n ibm-spectrum-scale-operator -fLabel the worker nodes by running the following command:
oc label nodes -lnode-role.kubernetes.io/worker= scale.spectrum.ibm.com/daemon-selector=Sample output:

We need to now edit the configuration file that creates the Storage Scale container native custom resource to adapt the configuration to our environment. Edit the generated/scale/cr/cluster/cluster.yaml file using your preferred editor.
Modify the
hostAliases: section. The hostAliases section contains the list of hostnames of the remote Storage Scale cluster nodes.Note: Make sure to indent the entries properly as this is a YAML file:
Find the following lines:
# hostAliases: # - hostname: example.com # ip: 10.0.0.1Replace with the following lines:
hostAliases: - hostname: <FQDN of first node of remote Spectrum Scale storage cluster> ip: <IP address of private network of first node> - hostname: <FQDN of second node of remote Spectrum Scale storage cluster> ip: <IP address of private network of second node>For example:
hostAliases: - hostname: 218018-linux-1.power-iaas.cloud.ibm.com ip: 192.168.167.234 - hostname: 218018-linux-2.power-iaas.cloud.ibm.com ip: 192.168.167.238Modify the
license: section to accept the licence for Storage Scale Container Native.Find the following lines:
license: accept: false license: data-accessReplace with the following lines:
license: accept: true license: data-management- Save all the changes to the file. Refer to a sample file.
- Create the Storage Scale container native custom resource. This will deploy Storage Scale container native on your OpenShift cluster.
oc apply -f generated/scale/cr/cluster/cluster.yaml - Verify that the Storage Scale container native pods are up and running. You should see an output as shown in the following example. Note, that for each of your OpenShift worker nodes, you will see one worker-nnn pod.Sample output:
oc get pods -n ibm-spectrum-scaleNAME READY STATUS RESTARTS AgE ibm-spectrum-scale-gui-0 4/4 Running 0 6m44s ibm-spectrum-scale-gui-1 4/4 Running 0 98s ibm-spectrum-scale-pmcollector-0 2/2 Running 0 6m14s ibm-spectrum-scale-pmcollector-1 2/2 Running 0 4m6s worker-0 2/2 Running 0 6m39s worker-1 2/2 Running 0 6m39s worker-2 2/2 Running 0 6m39s Verify that the cluster CR has been created successfully
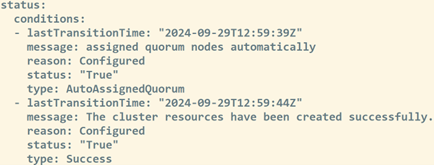
oc get cluster ibm-spectrum-scale -o yamlSample output:
We need to now edit the configuration file that creates the Storage Scale remote cluster custom resource to adapt the configuration to our environment. Edit the generated/scale/cr/remotecluster/remotecluster.yaml file using your preferred editor.
- Comment out the contactNodes: section.
Find the following lines:Replace with the following lines:
contactNodes: - storagecluster1node1 - storagecluster1node2# contactNodes: # - storagecluster1node1 # - storagecluster1node2 Modify the gui section. In the gui section the FQDN of the gUI node of the remote Storage Scale cluster is specified. The gUI node will be contacted by Storage Scale Container Native when provisioning for example new persistent volumes (PVs).
Find the following lines:
gui: cacert: cacert-storage-cluster-1 # This is the secret that contains the CSIAdmin user # credentials in the ibm-spectrum-scale-csi namespace. csiSecretName: csi-remote-mount-storage-cluster-1 # hosts are the the gUI endpoints from the storage cluster. Multiple # hosts (up to 3) can be specified to ensure high availability of gUI. hosts: - guihost1.example.com # - guihost2.example.com # - guihost3.example.com insecureSkipVerify: false # This is the secret that contains the ContainerOperator user # credentials in the ibm-spectrum-scale namespace. secretName: cnsa-remote-mount-storage-cluster-1Replace with the following lines:
gui: #cacert: cacert-storage-cluster-1 # This is the secret that contains the CSIAdmin user # credentials in the ibm-spectrum-scale-csi namespace. csiSecretName: csi-remote-mount-storage-cluster-1 # hosts are the the gUI endpoints from the storage cluster. Multiple # hosts (up to 3) can be specified to ensure high availability of gUI. hosts: - <FQDN of the gUI node of the remote Storage Scale storage cluster> # - guihost2.example.com # - guihost3.example.com insecureSkipVerify: true # This is the secret that contains the ContainerOperator user # credentials in the ibm-spectrum-scale namespace. secretName: cnsa-remote-mount-storage-cluster-1For example:
gui: #cacert: cacert-storage-cluster-1 csiSecretName: csi-remote-mount-storage-cluster-1 hosts: - 218018-linux-1.power-iaas.cloud.ibm.com insecureSkipVerify: true secretName: cnsa-remote-mount-storage-cluster-1- Create the remote cluster custom resource.
oc apply -f generated/scale/cr/remotecluster/remotecluster.yaml Verify that the remote cluster CR has been successfully created.
oc get remotecluster -n ibm-spectrum-scaleSample output:

We need to now edit the configuration file that creates the Storage Scale remote filesystem custom resource to adapt the configuration to our environment. Edit the generated/scale/cr/filesystem/filesystem.remote.yaml file using your preferred editor.
Find the following lines:
remote: cluster: remotecluster-sample fs: fs1Replace with the following lines:
remote: cluster: remotecluster-sample fs: gpfs0 `- Create the remote filesystem custom resource.
oc apply -f generated/scale/cr/filesystem/filesystem.remote.yaml Verify that the remote filesystem CR has been successfully created.
oc get filesystem -n ibm-spectrum-scaleSample output:

Label the worker nodes for CSI integration.
oc label nodes -l node-role.kubernetes.io/worker= scale=trueSample output:

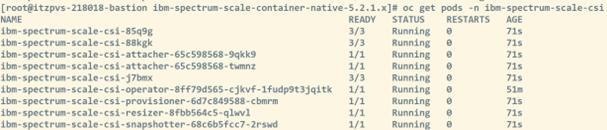
Verify that the Spectrum Scale CSI pods are up and running. You should see an output as shown in the following example. Note that for each worker node of your OpenShift cluster, you will see one ibm-spectrum-scale-csi-zzzzz pod.
oc get pods -n ibm-spectrum-scale-csiSample output:
On the first RHEL VM from your external Storage Scale storage cluster, run the
mmlsclustercommand to find out the gPFS cluster ID.mmlsclusterSample output:
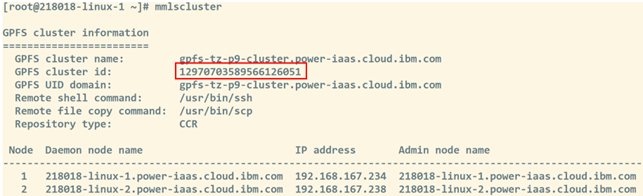 View larger image
Enter the following command to filter out the cluster ID:
mmlscluster | grep 'cluster id' | awk '{print $4}'Sample output:
12970703589566126051On the bastion node, create a file storage_class_fileset.yaml that defines a new storage class ibm-spectrum-scale-csi-fileset for Storage Scale container native. Replace with your cluster ID obtained from the previous step.
cat <<EOF > storage_class_fileset.yaml --- apiVersion: storage.k8s.io/v1 kind: StorageClass metadata: name: ibm-spectrum-scale-csi-fileset provisioner: spectrumscale.csi.ibm.com parameters: permissions: "777" volBackendFs: remote-sample clusterId: "<replace with your cluster ID>" reclaimPolicy: Delete EOFSample content of a storage_class_fileset.yaml file:
--- apiVersion: storage.k8s.io/v1 kind: StorageClass metadata: name: ibm-spectrum-scale-csi-fileset provisioner: spectrumscale.csi.ibm.com parameters: permissions: "777" volBackendFs: remote-sample clusterId: "12970703589566126051" reclaimPolicy: DeleteCreate the new storage class on your OpenShift cluster.
oc apply -f storage_class_fileset.yamlVerify that the new storage class has been created.
oc get scSample output:

View larger imageCreate a new physical volume claim (PVC) named ibm-spectrum-scale-pvc that uses the storage class ibm-spectrum-scale-fileset-csi by entering the following command.
oc project default cat << EOF | oc apply -f - --- apiVersion: v1 kind: PersistentVolumeClaim metadata: name: ibm-spectrum-scale-pvc-1 spec: storageClassName: ibm-spectrum-scale-csi-fileset accessModes: - ReadWriteMany resources: requests: storage: 1gi EOFVerify that the new PVC has been created and it has the status as Bound.
oc get pvcSample output:

View larger image
Summary
In this tutorial, you have learned how to set up Storage Scale Container Native 5.2.1.1 on OpenShift 4.14 on IBM Power Virtual Servers and how to provision new PVCs on a remote Storage Scale 5.2.1.1 cluster running on two RHEL 9.4 VMs on IBM Power Virtual Servers.
Acknowledgments
The authors would like to thank Paulina Acevedo, Tara Astigarraga, Isreal Andres Vizcarra gondinez, Todd Tosseth, Alexander Saupp and Harald Seipp for their guidance and insights on how to set up and verify Storage Scale Container Native Storage Access 5.2.1.1 on Red Hat OpenShift Container Platform 4.14.
Take the next step
Join the Power Developer eXchange Community (PDeX). PDeX is a place for anyone interested in developing open source apps on IBM Power. Whether you're new to Power or a seasoned expert, we invite you to join and begin exchanging ideas, sharing experiences, and collaborating with other members today!