About cookies on this site Our websites require some cookies to function properly (required). In addition, other cookies may be used with your consent to analyze site usage, improve the user experience and for advertising. For more information, please review your options. By visiting our website, you agree to our processing of information as described in IBM’sprivacy statement. To provide a smooth navigation, your cookie preferences will be shared across the IBM web domains listed here.
Tutorial
Get an IBM MQ queue for development running on AWS Cloud using Ansible
Configure your queue for app connections
To see how IBM MQ works, you will be guided through creating and configuring a queue manager (server). Then, you will connect an application (client) to it.
After completing the tutorial, you will be able to send messages to and retrieve messages from a queue.
AWS provides several cloud technologies into which it is possible to deploy an IBM MQ queue manager: AWS Elastic Compute Cloud (EC2), AWS Elastic Kubernetes Services (EKS) and AWS Elastic Container Services (ECS). Amazon Elastic Compute Cloud (Amazon EC2) is a web service that provides scalable computing capacity in the cloud. EC2 allows you to launch virtual machine instances with a variety of operating systems, including Ubuntu.
In this tutorial, we will walk through the steps to set up an EC2 instance running Ubuntu on Amazon Web Services (AWS), then rapidly install IBM MQ on the instance using Ansible.
(You can instead manually download, install, and run IBM MQ queue manager (server) on AWS.)
Prerequisites
This tutorial assumes you are using the AWS free tier for hosting, however the queue manager deployment onto Amazon ECS requires some AWS resources that are outside the free tier. At the time of this writing, we estimate a minimal configuration will cost approximately $2 per day. The exact cost is dependent on several factors including size of container requested, volume of messages stored and network traffic. To avoid unnecessary cost, users should monitor their utilization carefully and remove resources when they are no longer required. This tutorial provides steps on how to remove the resources that are created.
To protect your AWS account credentials, do not run this tutorial as an account root user, and ensure that you enable multi-factor authentication for all AWS accounts. Your root user has complete unrestricted access, so it should not be used for everyday access. Only grant the permissions needed to each user account for the services that that user needs.
Also, do not grant policy permissions directly to users, but instead grant permissions to groups and associate users with groups. In creating this tutorial, we used the IAM (Identity and Access Management) service to create two users, an admin user and a compose user.
To complete this tutorial, you will need:
- If you don’t already have it, you will need cURL installed on your computer.
- Ansible,
passlib, andansible-lintare required on your local machine to run playbooks implementing this collection. For guidance on how to install these libraries, follow the Ansible documentation. - An AWS Account.
Steps
You can downlowd the files from our mq-ansible repo.
Step 1. Create and Launch an Amazon EC2 instance
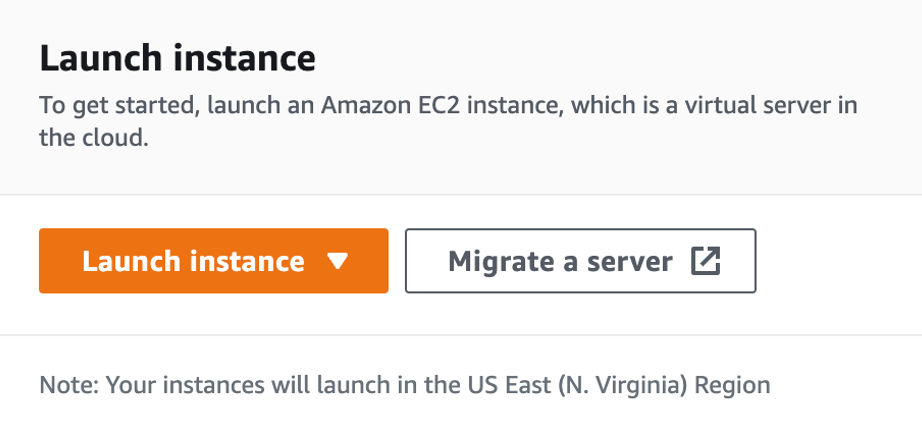
Go to the EC2 dashboard.
Click the Launch Instance button.
Add a name (and tags) for your new instance. Tags are optional metadata to your instance in the form of key-value pairs. Example: “testing-vm”.
Select
Ubuntufrom the list of available OS images.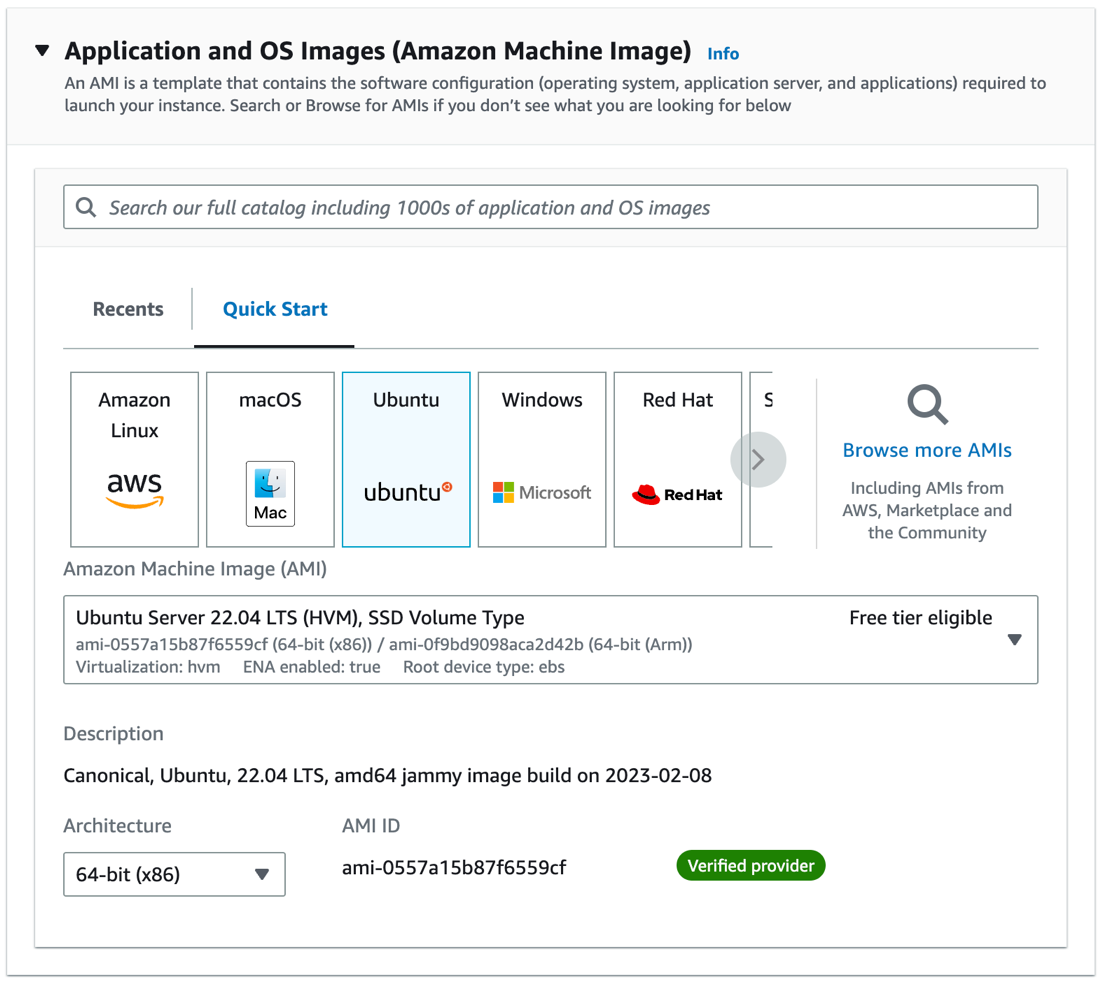
From the Amazon Machine Image drop-down list, choose the instance type you want to launch. The instance type determines the hardware of the host computer that your instance will be running on. You can choose a
t2.microinstance, which is eligible for the free tier, for testing purposes.
In the Key pair section, you can either create a new key pair or use an existing one. A key pair is used to securely log in to your instance using SSH.
If you don't already have a key pair, you can create one by clicking the Create new key pair link.

In the Create key pair window, specify a name for the key pair, and click the Create key pair button. Save the
.pemfile in a secure location, as you will not be able to download it again.
In the Network settings section, you can create a new security group or use an existing one. A security group acts as a firewall for your instance, controlling inbound and outbound traffic. By default, the security group allows all outbound traffic and no inbound traffic.
You will need to add an inbound rule to allow SSH traffic so that you can log in to your instance. Check the Allow SSH traffic from option. You can leave the source as
Anywherefor testing purposes.
In the Configure storage section, you can increase the size of the root volume if needed. Typically, IBM MQ does not require a high storage size, but this is also depending on your needs and storage requirements.

In the Advanced details section, leave the default settings as they are.
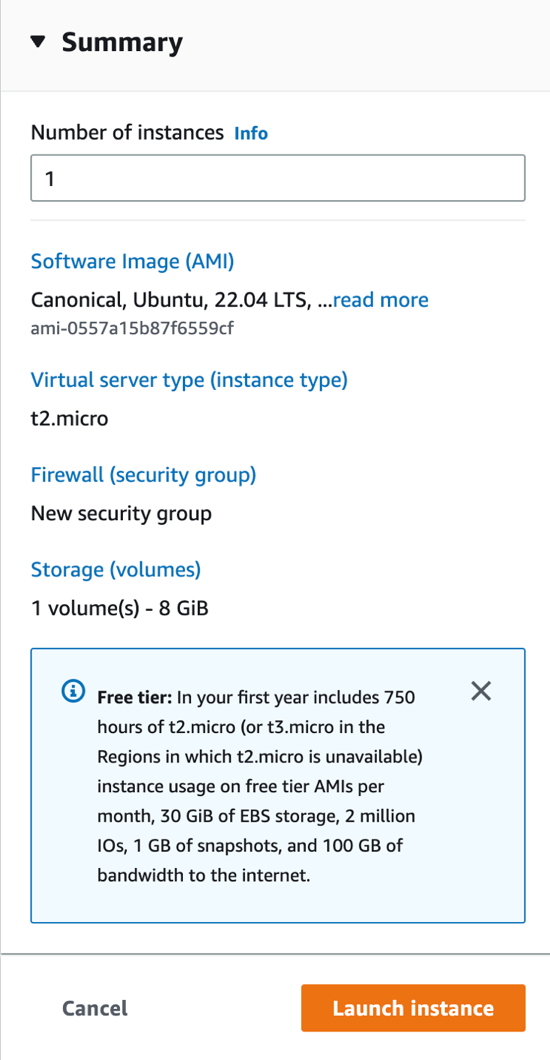
On the right side of the page, in the Summary section, review the details of your instance, then click the Launch instance button.
Creating your instance will take a few seconds and initializing it will take up to a few minutes.
Once your instance has been launched, you need to get the SSH access details, which will be used shortly to install IBM MQ. To do this, follow these steps:
In the EC2 dashboard, click the Instances link in the left-hand navigation menu.
Select the instance you just launched by clicking on its ID.

Click the Connect button from the top right-hand navigation menu.
Under SSH Client, copy your user name (usually “ubuntu”) and the host name (“*.amazonaws.com”) and keep them somewhere handy.
Step 2. Install IBM MQ using Ansible
Once you have created and launched your instance, you are ready to proceed with installing IBM MQ on your VM by following these steps:
Clone the
MQ-Ansiblerepository by running the following command on your local machine.git clone github.com/ibm-messaging/mq-ansibleOpen the cloned repository and navigate to the
/ansible_collections/ibm/ibmmq/directory.Move the
.pemfile that you downloaded from Amazon EC2 to this directory.Create a file called
inventory.iniinside the directory with the following content:``` [servers:vars] ansible_ssh_private_key_file=./PEM_FILE.pem [servers] HOST_NAME ansiblessh_user=SSH_USER
Change
PEM_FILEto the name of the.pemfile that you copied to the directory. ChangeHOST_NAMEto the EC2 instance host name, such asec2-9-99-999-999.eu-west-2.compute.amazonaws.com. ChangeSSH_USERto the EC2 instance's SSH user, for exampleubuntu.The sample playbook
ibmmq.ymlinstalls IBM MQ Advanced for Developers with the Ansible roles and configures a queue manager with thequeue_manager.pymodule. Before running the playbook, ensure that you have added the following directory path to theANSIBLE_LIBRARYenvironment variable. Make sure to change to your local directory path in the following commands.On Mac:
export ANSIBLE_LIBRARY=${ANSIBLE_LIBRARY}:<PATH-TO>/mq-ansible/ansible_collections/ibm/ibmmq/libraryOn Windows:
set ANSIBLE_LIBRARY=%ANSIBLE_LIBRARY%;<PATH-TO>/mq-ansible/ansible_collections/ibm/ibmmq/libraryRun the following command to execute the tasks within the playbook:
ansible-playbook ./ibmmq.yml -i inventory.ini -e 'ibmMqLicense=accept'
The playbook should return the result of
dspmqwith the queue manager created listed.
Step 3. Verify that IBM MQ is installed on your VM
Log in to your EC2 instance via SSH by running the following command in your Terminal or SSH Client.
ssh -i <PATH_TO>/PEM_FILE.pem YOUR_USER@HOST_NAMEChange
<PATH-TO>to your local directory path. ChangePEM_FILEto the name of the.pemfile that you copied to the directory. ChangeYOUR_USERto the EC2 instance's SSH user, such asubuntu. ChangeHOST_NAMEto the EC2 instance hostname, such asec2-9-99-999-999.eu-west-2.compute.amazonaws.com.Once logged in, verify that IBM MQ is installed by running the following command.
dspmqverThe output should be similar to the following:

You have successfully installed IBM MQ on your VM! If you encountered any challenges during the installation process, check out the Troubleshooting section on the MQ-Ansible GitHub repository.
Step 4. Use cURL to put and get messages
Once you have successfully installed IBM MQ on your EC2 instance using Ansible, you will have an active queue manager (QM1) that was already created automatically while running the Ansible playbook.
To post messages to a queue, you can use the load balancer address. As a quick way to test this, you can use the curl command to post a persistent message over HTTPS. To do this, open a terminal or command window and run the following command. But, make sure to replace the placeholders with your own values: your app password and host IP address.
(The default password that is set during the Ansible playbook execution is Passw0rd for the user app).
curl -i -k -X POST \
 -u app:<put your app password here>  \
--header 'Content-Type: text/plain; charset=utf-8' \
--header 'Accept: application/json' \
--header 'ibm-mq-rest-csrf-token: blank' \
--header 'ibm-mq-md-expiry: unlimited' \
--header 'ibm-mq-md-persistence: persistent' \
-d 'This is a persistent message' \
'<your_host>.amazonaws.com:9443/ibmmq/rest/v3/messaging/qmgr/QM1/queue/DEV.QUEUE.1/message’
You should see a 201 return code (HTTP/2 201), indicating that the message was successfully posted.
Also place a non-persistent message onto the queue by running the command.
curl -i -k -X POST \
 -u app:<put your app password here>  \
--header 'Content-Type: text/plain; charset=utf-8' \
--header 'Accept: application/json' \
--header 'ibm-mq-rest-csrf-token: blank' \
--header 'ibm-mq-md-expiry: unlimited' \
-d 'This is a non-persistent message' \
'<your_host>.amazonaws.com:9443/ibmmq/rest/v3/messaging/qmgr/QM1/queue/DEV.QUEUE.1/message'
Step 5. Access the IBM MQ web console
The Ansible playbook starts the web console automatically after setting up IBM MQ. To access the console, open your web browser on your local machine and navigate to the URL for the IBM MQ web console. The URL should be in the following format: https://<public-ip-address>:9443/ibmmq/console.
Replace <public-ip-address> with the public IP address or DNS hostname of your AWS EC2 instance.
If you are successfully redirected to the login screen of MQ console, congratulations! You should see an output similar to the one below.

Enter your IBM MQ Console login credentials to access the web console. The default username is mqadmin, and the default password is mqadmin. It is recommended that you change the password after logging in for the first time.
Once you have successfully logged in, you can use the web console to manage your IBM MQ queue managers, channels, and other objects. You can create new queues, view message flows, and monitor the health of your IBM MQ environment using the web console. A full MQ Console tour is available in this IBM Docs article, but we'll go over some basic actions here.
Accessing the IBM MQ web console on an AWS EC2 instance requires that the appropriate security groups and firewall rules are in place to allow incoming traffic on port 9443. You may need to adjust your security group settings or firewall rules to allow incoming traffic on this port if you are having trouble accessing the web console. Check out this guide for more details on how to do that.

From the Homepage, Select Manage to open a list of queue managers. You can create or manage them from here. Selecting a queue manager from the “Local queue managers” tab, such as QM1, will display the queues and other objects associated with this queue manager, like the image below.
From here, click Create to create your own queues. You can also see the messages on existing queues by selecting an individual queue, as shown below:

You can put a message onto this queue clicking Create on this page, which here means "create a new message". The Application data field contains the message contents. Clicking Create puts your message onto the queue.

Clicking on the message will show the Message details, which provide more insights about the message properties.
Summary
Great job! Through this tutorial, you used Ansible to deploy IBM MQ on Amazon EC2, enabling persistent and effective management across various operations. You accessed the IBM MQ console and interacted with the MQ REST API, confirming the functionality of your queue manager.
In IBM MQ, the queue manager acts as the server, and the applications that connect to it are the clients. Administrators manage the MQ server and routing, while developers create client applications using IBM MQ libraries.
With IBM MQ now available on AWS, you can develop MQ applications using the queue manager. Now you're ready to build and deploy an IBM MQ app to AWS cloud.