Tutorial
Getting Started with watsonx Orchestrate Agent Development Kit
Start building flexible, reusable AI agents right away
On this page
IBM watsonx Orchestrate includes the Agent Development Kit (ADK) which is a set of developer-focused tools for building, testing, and managing agents. With the ADK, developers get the freedom and control to design powerful agents using a lightweight framework and a simple CLI. You can define agents in clear YAML or JSON files, create custom Python tools, and manage the entire agent lifecycle with just a few commands.
In this tutorial, you’ll follow a step-by-step guide to install the ADK, set up your local development environment, and deploy your first agent to a watsonx Orchestrate SaaS instance, so you can start building flexible, reusable AI agents right away.
Prerequisites
To get the most out of this tutorial, you should have:
- Basic familiarity with terminal and bash commands
- Basic Python and general coding skills
Also, you will need access to watsonx Orchestrate, which you can sign up for a free 30-day trial.
Setting up the watsonx Orchestrate Agent Development Kit (ADK)
After installing a compatible Python version (3.11 through 3.13), you can install and configure the ADK.
Install Python
Before installing the ADK, make sure you have a compatible Python version (3.11 through 3.13) installed on your machine.
Check your current Python version by opening a terminal window and running this command:
python –version
If your version is outside the 3.11-3.13 range, you'll need to install a compatible version. You can download a specific release from the official Python website or if you are on macOS or Linux use a version manager like pyenv to manage multiple Python versions and install the one you need.
After installing Python, make sure you also have pip, Python’s package installer. Run the following command on the terminal:
pip –version
If pip isn’t installed, you can follow the instructions in the official pip documentation to add it.
Create a Python virtual environment
Before installing the ADK, it’s a good practice to create a Python virtual environment. This keeps your agent dependencies isolated and easy to manage.
Create a virtual environment in your project folder with the following command:
python -m venv venv
Next, activate the virtual environment.
On macOS/Linux:
source venv/bin/activateOn Windows:
venv\\Scripts\\activate
After creating and activating your virtual environment, you should see venv tagged on your CLI, like the following screenshot.

Install the ADK
With your virtual environment active, install the ADK:
pip install ibm-watsonx-orchestrate
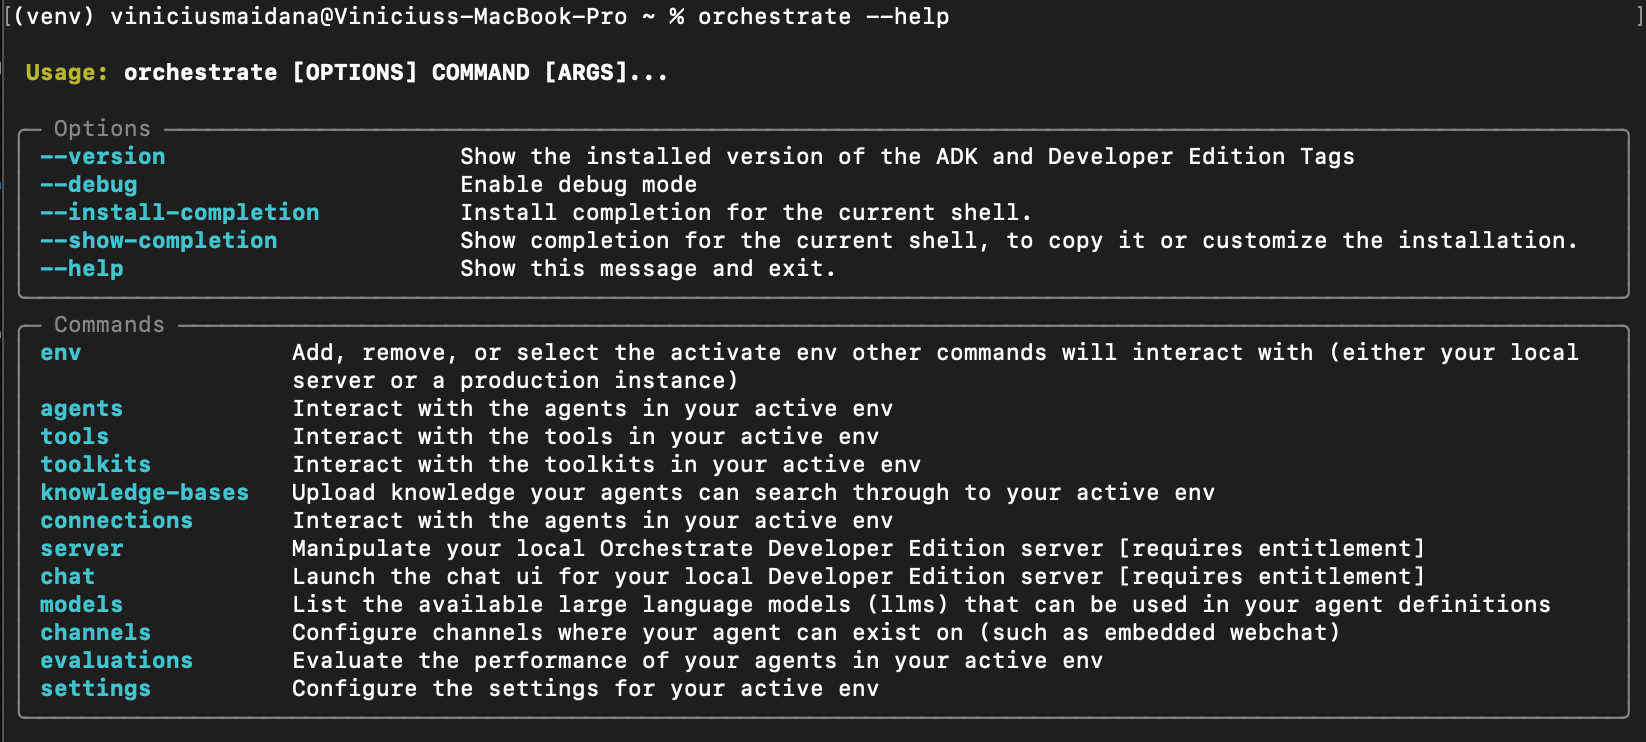
After the installation process completes, check if your instance is working properly with the command:
orchestrate –-help
If everything is set up correctly, you’ll see a list of available ADK CLI commands, like in the following screenshot.
Connect the ADK to your SaaS environment and activate your environment
Now that you’ve installed the ADK, it’s time to connect it to your watsonx Orchestrate SaaS instance, such that you can deploy your agents directly to your SaaS environment.
You’ll need your instance’s API Key and Instance URL. Follow these steps:
- Sign in to your watsonx Orchestrate instance.
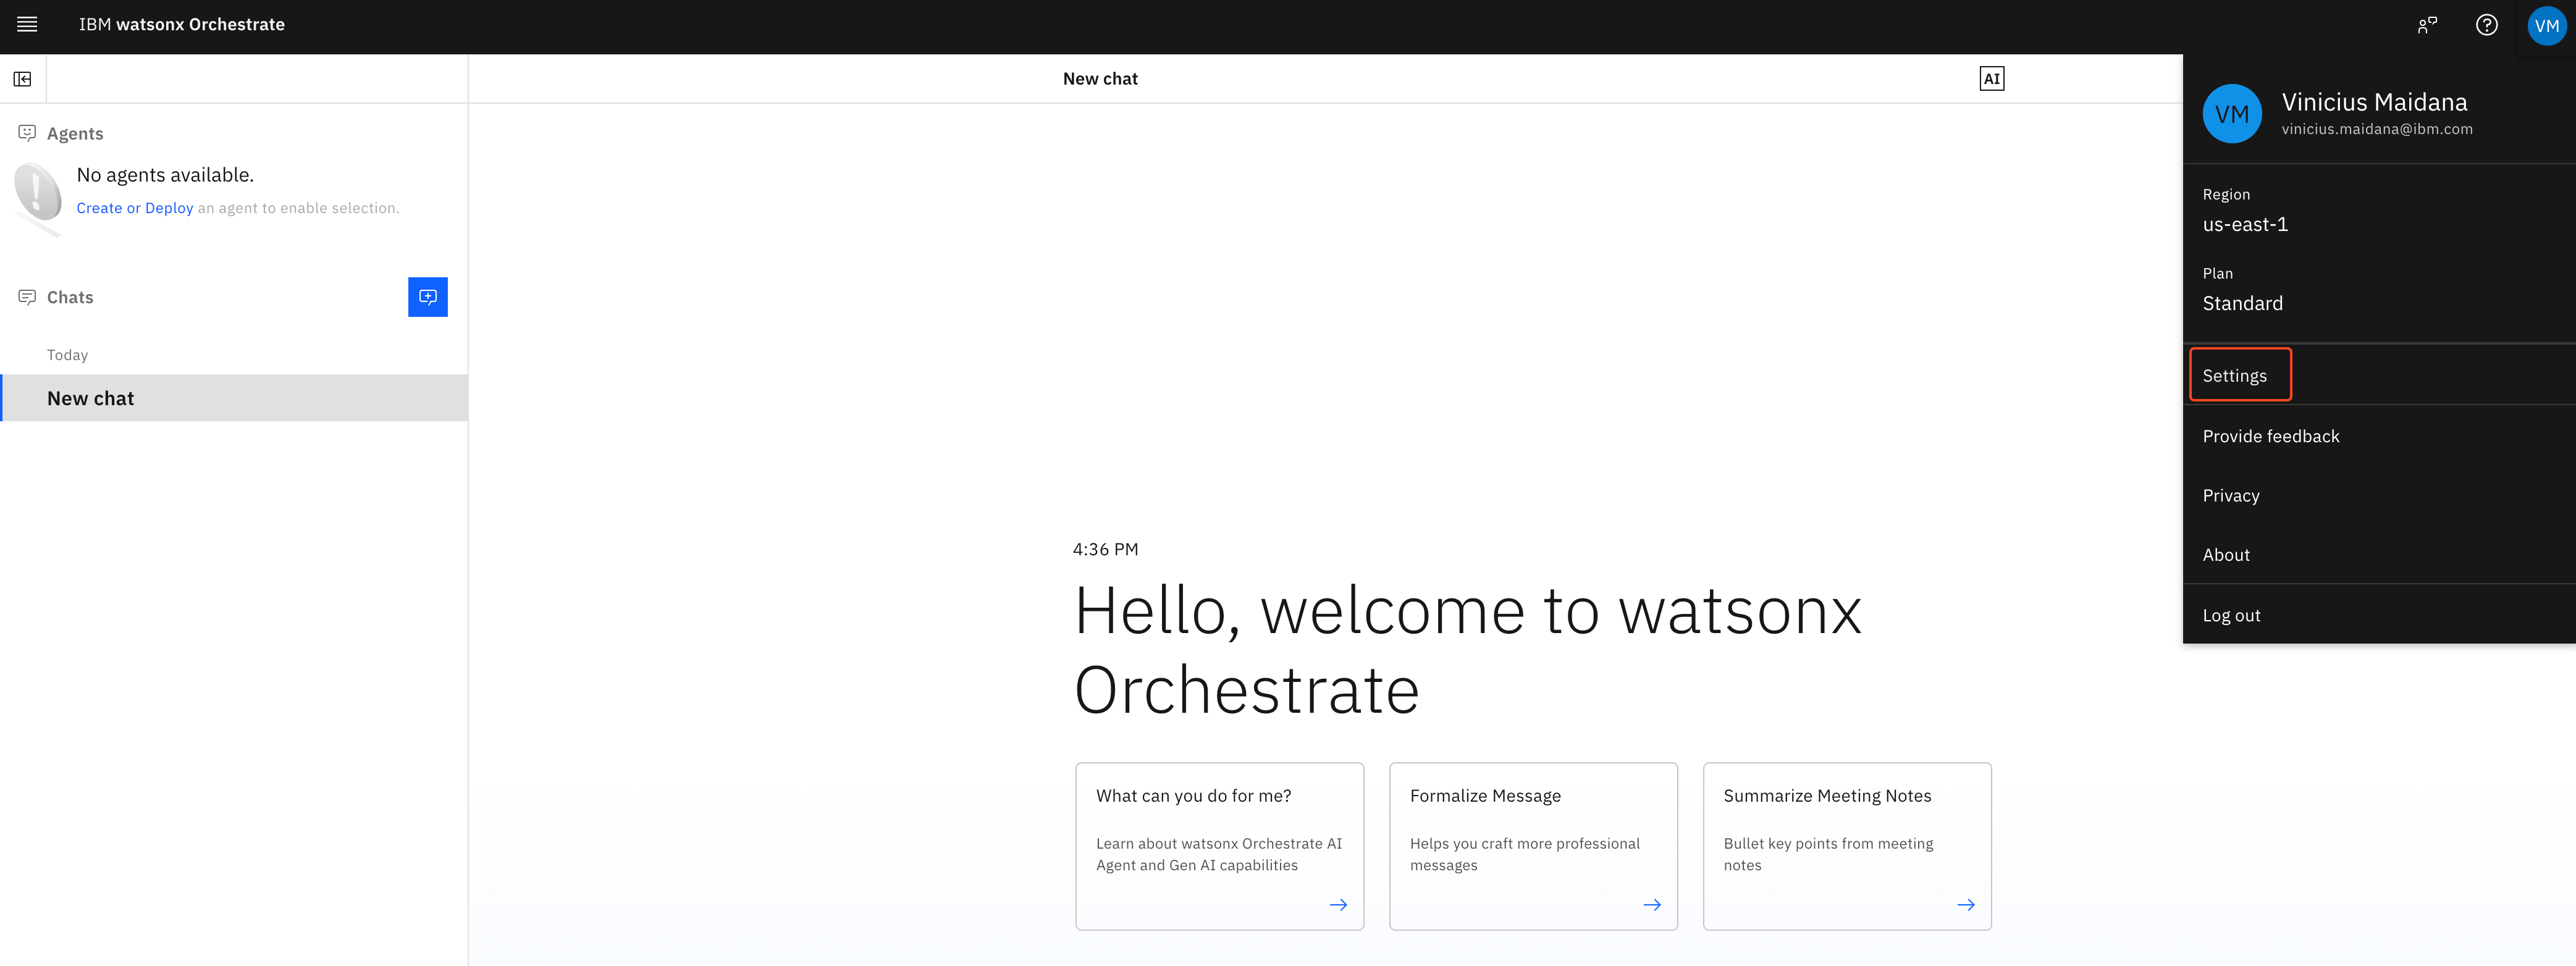
- Click the Profile icon in the top-right corner.
In the menu that opens, click Settings.
On the Settings page, go to the API details tab.
- Copy the Service instance URL.
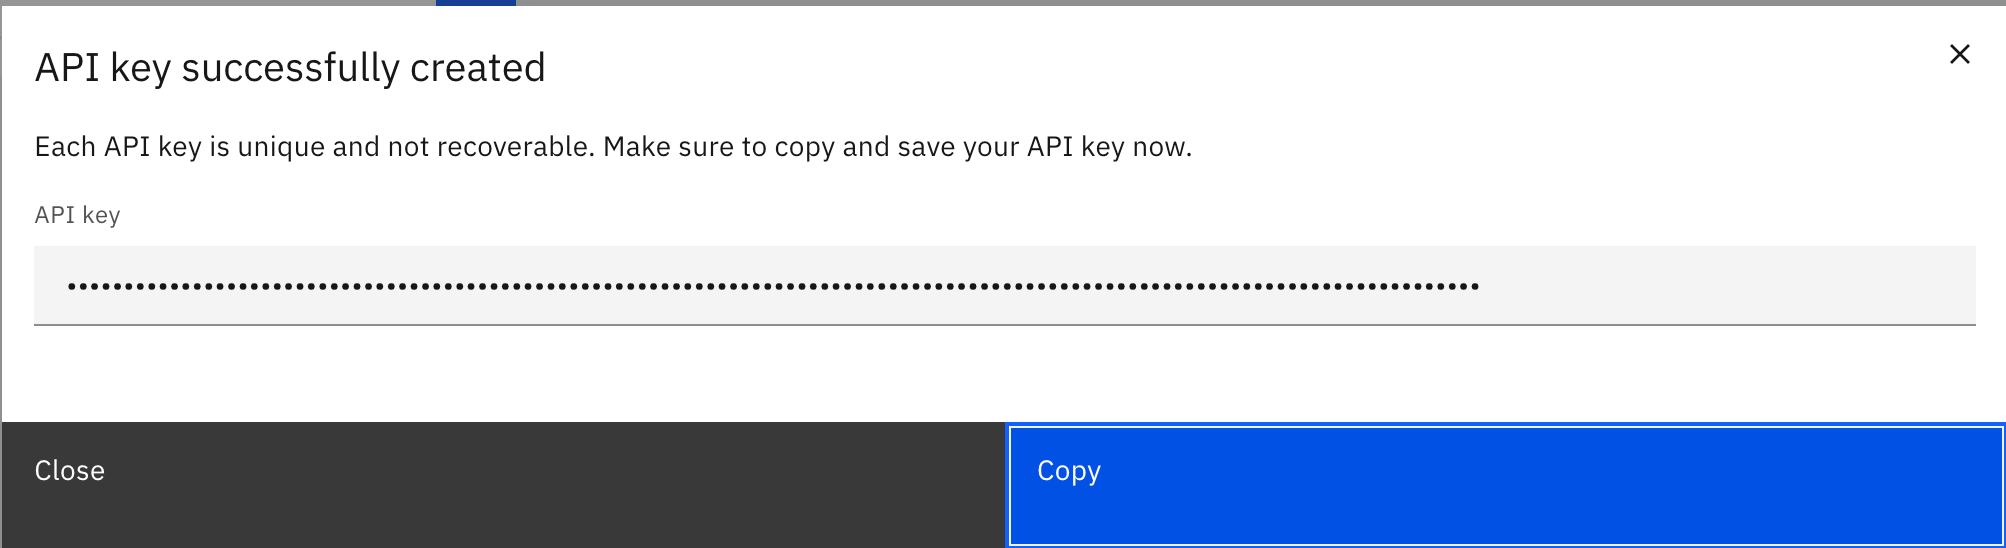
Click the Generate API key button.

A popup will appear with your new API Key. Copy it immediately and save it somewhere safe (for example, in a .txt file). You won’t be able to see it again later.
Go back to your terminal and run the following command:
orchestrate env add -n <environment-name> -u <Service-instance-url> --type mcsp –-activateReplace
<environment-name>with a name of your choice for your environment and<Service-instance-url>with the service instance URL you copied earlier. For example:orchestrate env add -n wxO-AWS -u https://api.dl.watson-orchestrate.ibm.com/instances/20250605-1433-1621-306a-df42bcdd849c --type mcsp –activate.The environment has already been created, but now you will be prompted for your API Key in the terminal to activate it.

Paste the API Key on the terminal and press the Enter key on your keyboard to confirm. If everything worked out, you’ll get a message confirming the environment has been successfully created and is already activated, similar to the following image.

Defining your first agent
With your ADK connected to your watsonx Orchestrate SaaS instance, you’re ready to test your setup by publishing a simple agent.
In watsonx Orchestrate, agents are defined with YAML or JSON files. The agent specification file describes the agent’s core details, such as its name, kind, instructions for the LLM, and the tools it can use.
When you build agents with the ADK, you write this specification yourself, giving you full control over what your agent can do and how it behaves. More advanced agents can include custom tools, collaborators, or integrations, but for now, you’ll start with a minimal Hello World agent.
Start by creating the YAML file for the agent and name the file as ‘hello-world-agent.yaml’. Open the created file with the text editor of your choice, then copy and paste the following code.
spec_version: v1
kind: native
name: Hello_World_Agent
description: A simple Hello World agent
instructions: >
  You are a test agent created for a tutorial on how to get started with watsonx Orchestrate ADK.
  When the user asks "who are you", respond with: I'm the Hello World Agent. Congratulations on completing the Getting Started with watsonx Orchestrate ADK tutorial!
llm: watsonx/meta-llama/llama-3-2-90b-vision-instruct
style: default
collaborators: []
tools: []
Save the file, and then go back to the terminal and navigate to the directory where you created the file. After that, run the following command to import your agent:
orchestrate agents import -f hello-world-agent.yaml
If the import is successful, you will get a confirmation message in the terminal. In the following image, you can see an example where the user navigates to the Desktop in the terminal, creates the hello-world-agent.yaml file, and then imports the agent:

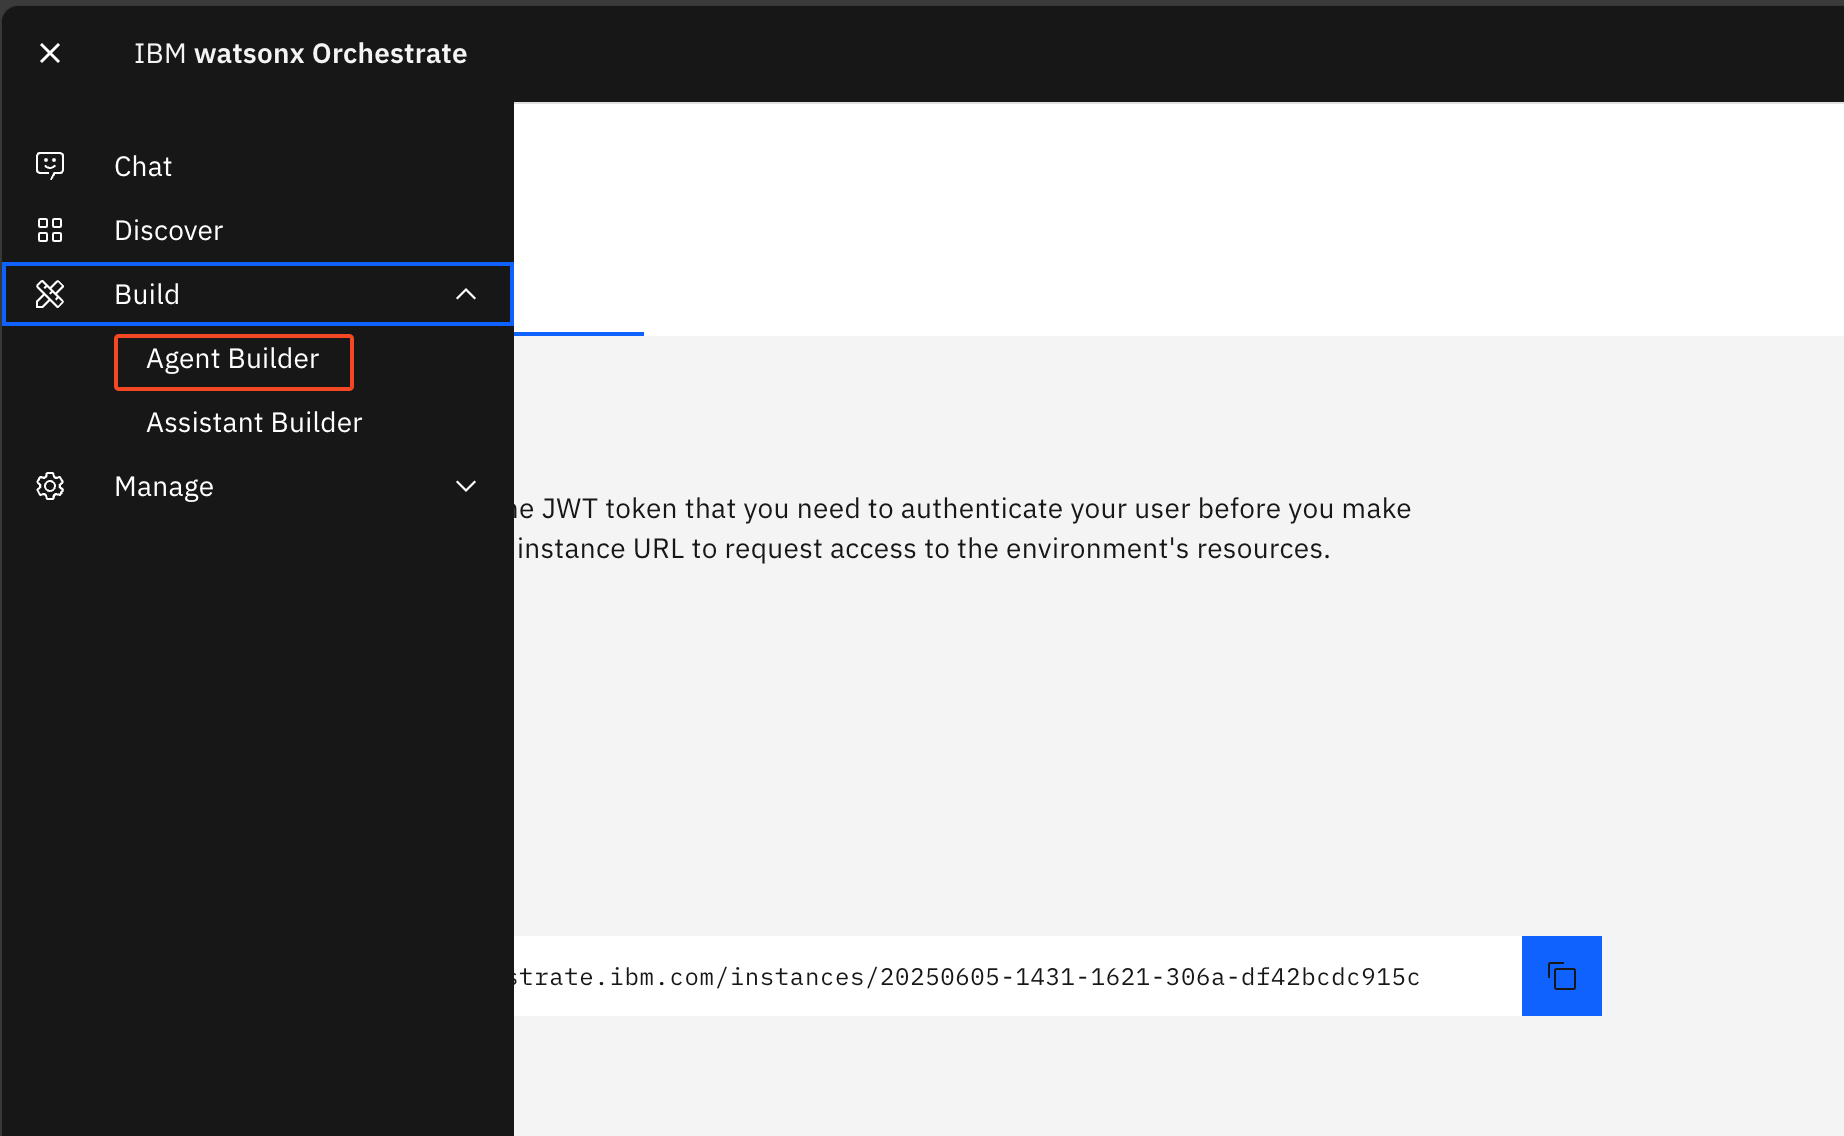
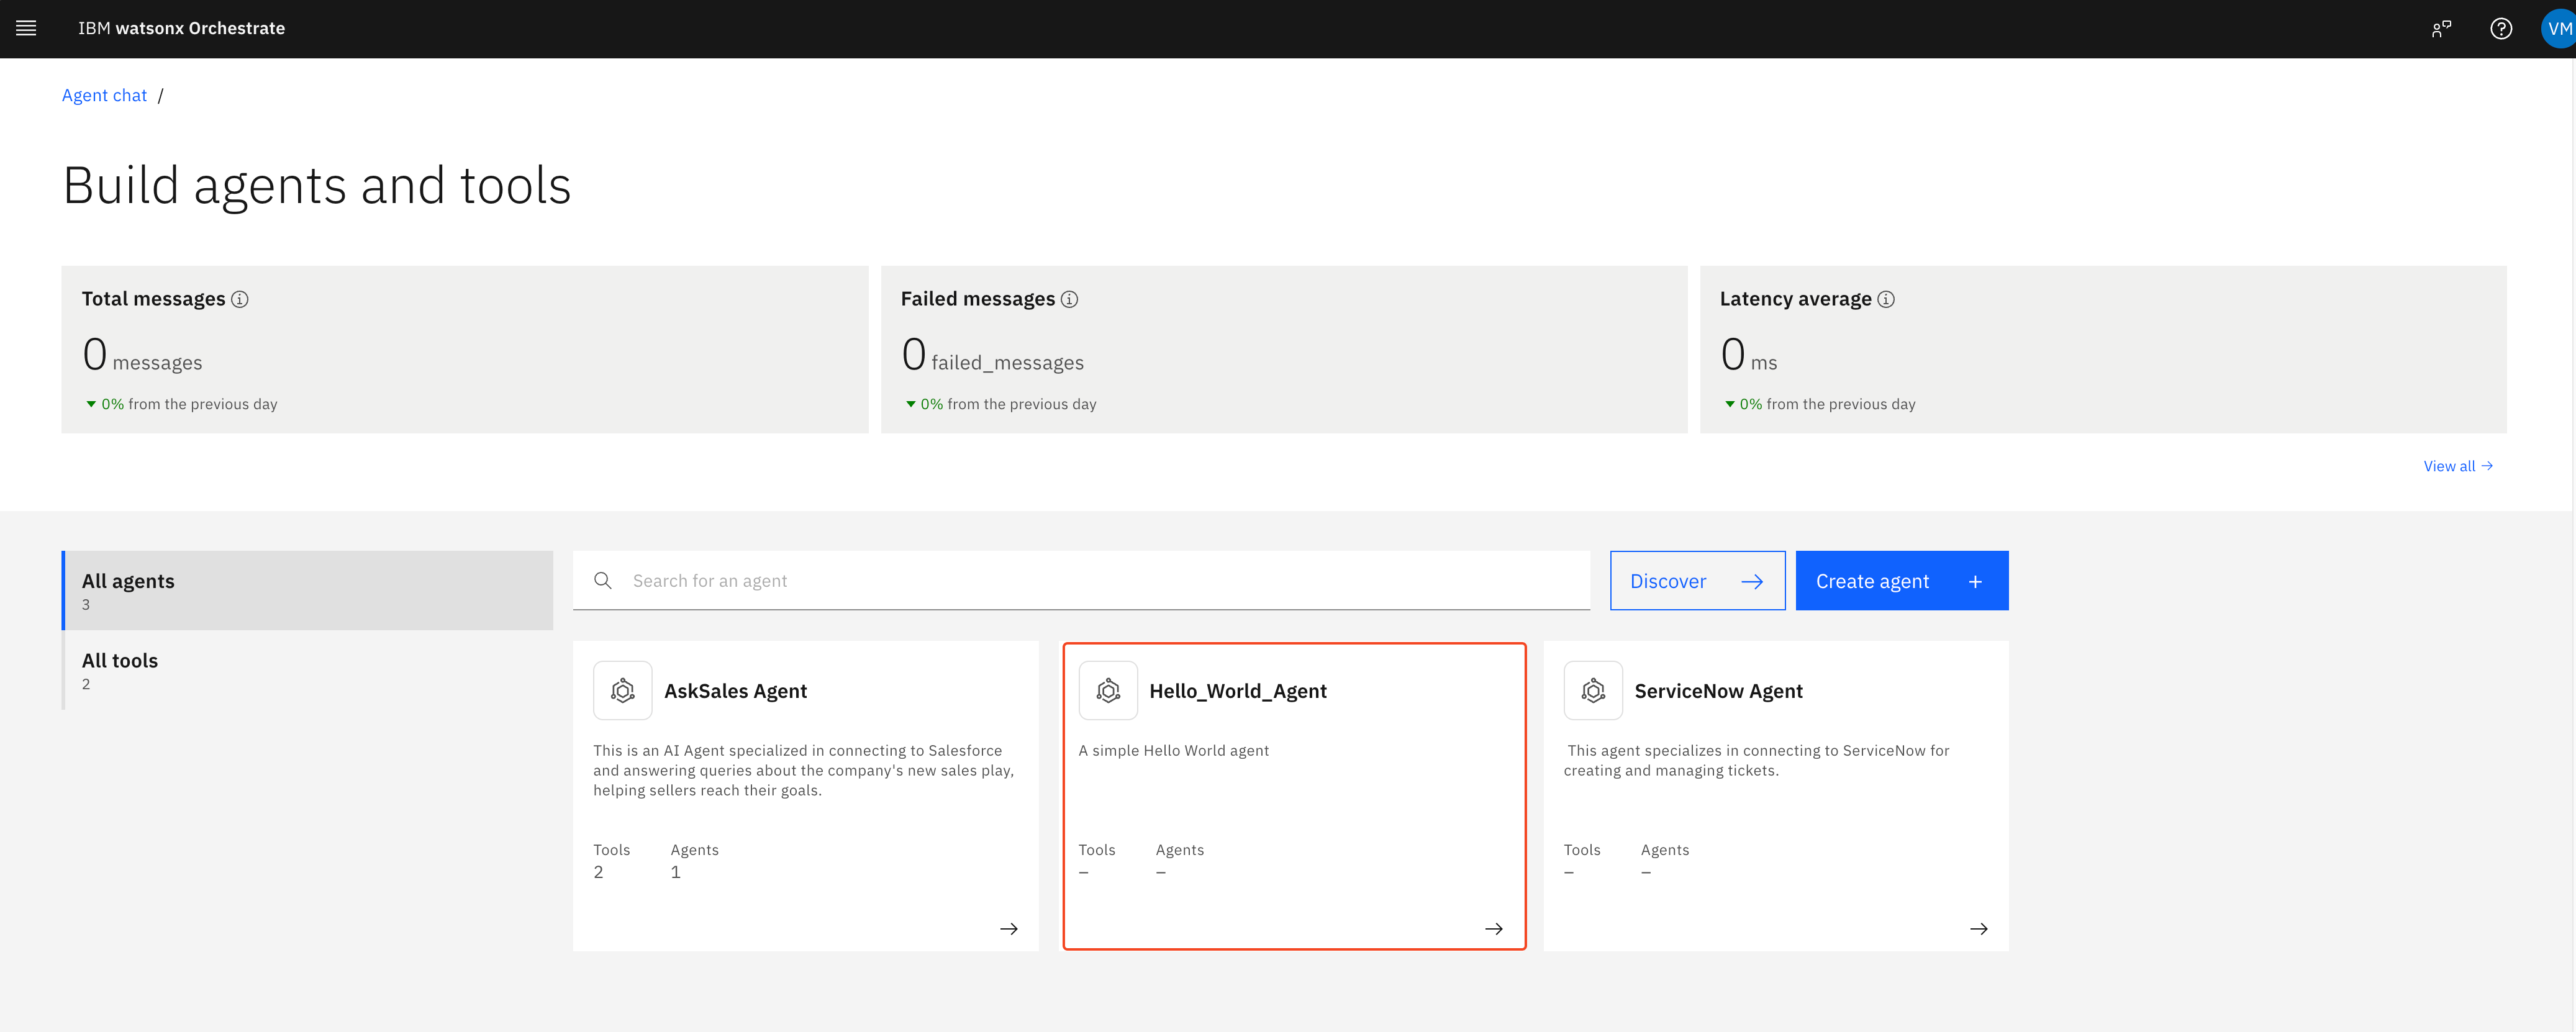
You can now go back to your SaaS instance of watsonx Orchestrate, then click the navigation menu button to the top left to expand the main menu. Then, click on Build, then Agent Builder.
You are now in the Agent Builder screen. You should see the hello_world_agent you imported just now, along with any other agents that have been imported to your watsonx Orchestrate tenant previously, if any. Click your hello_world_agent to open it.
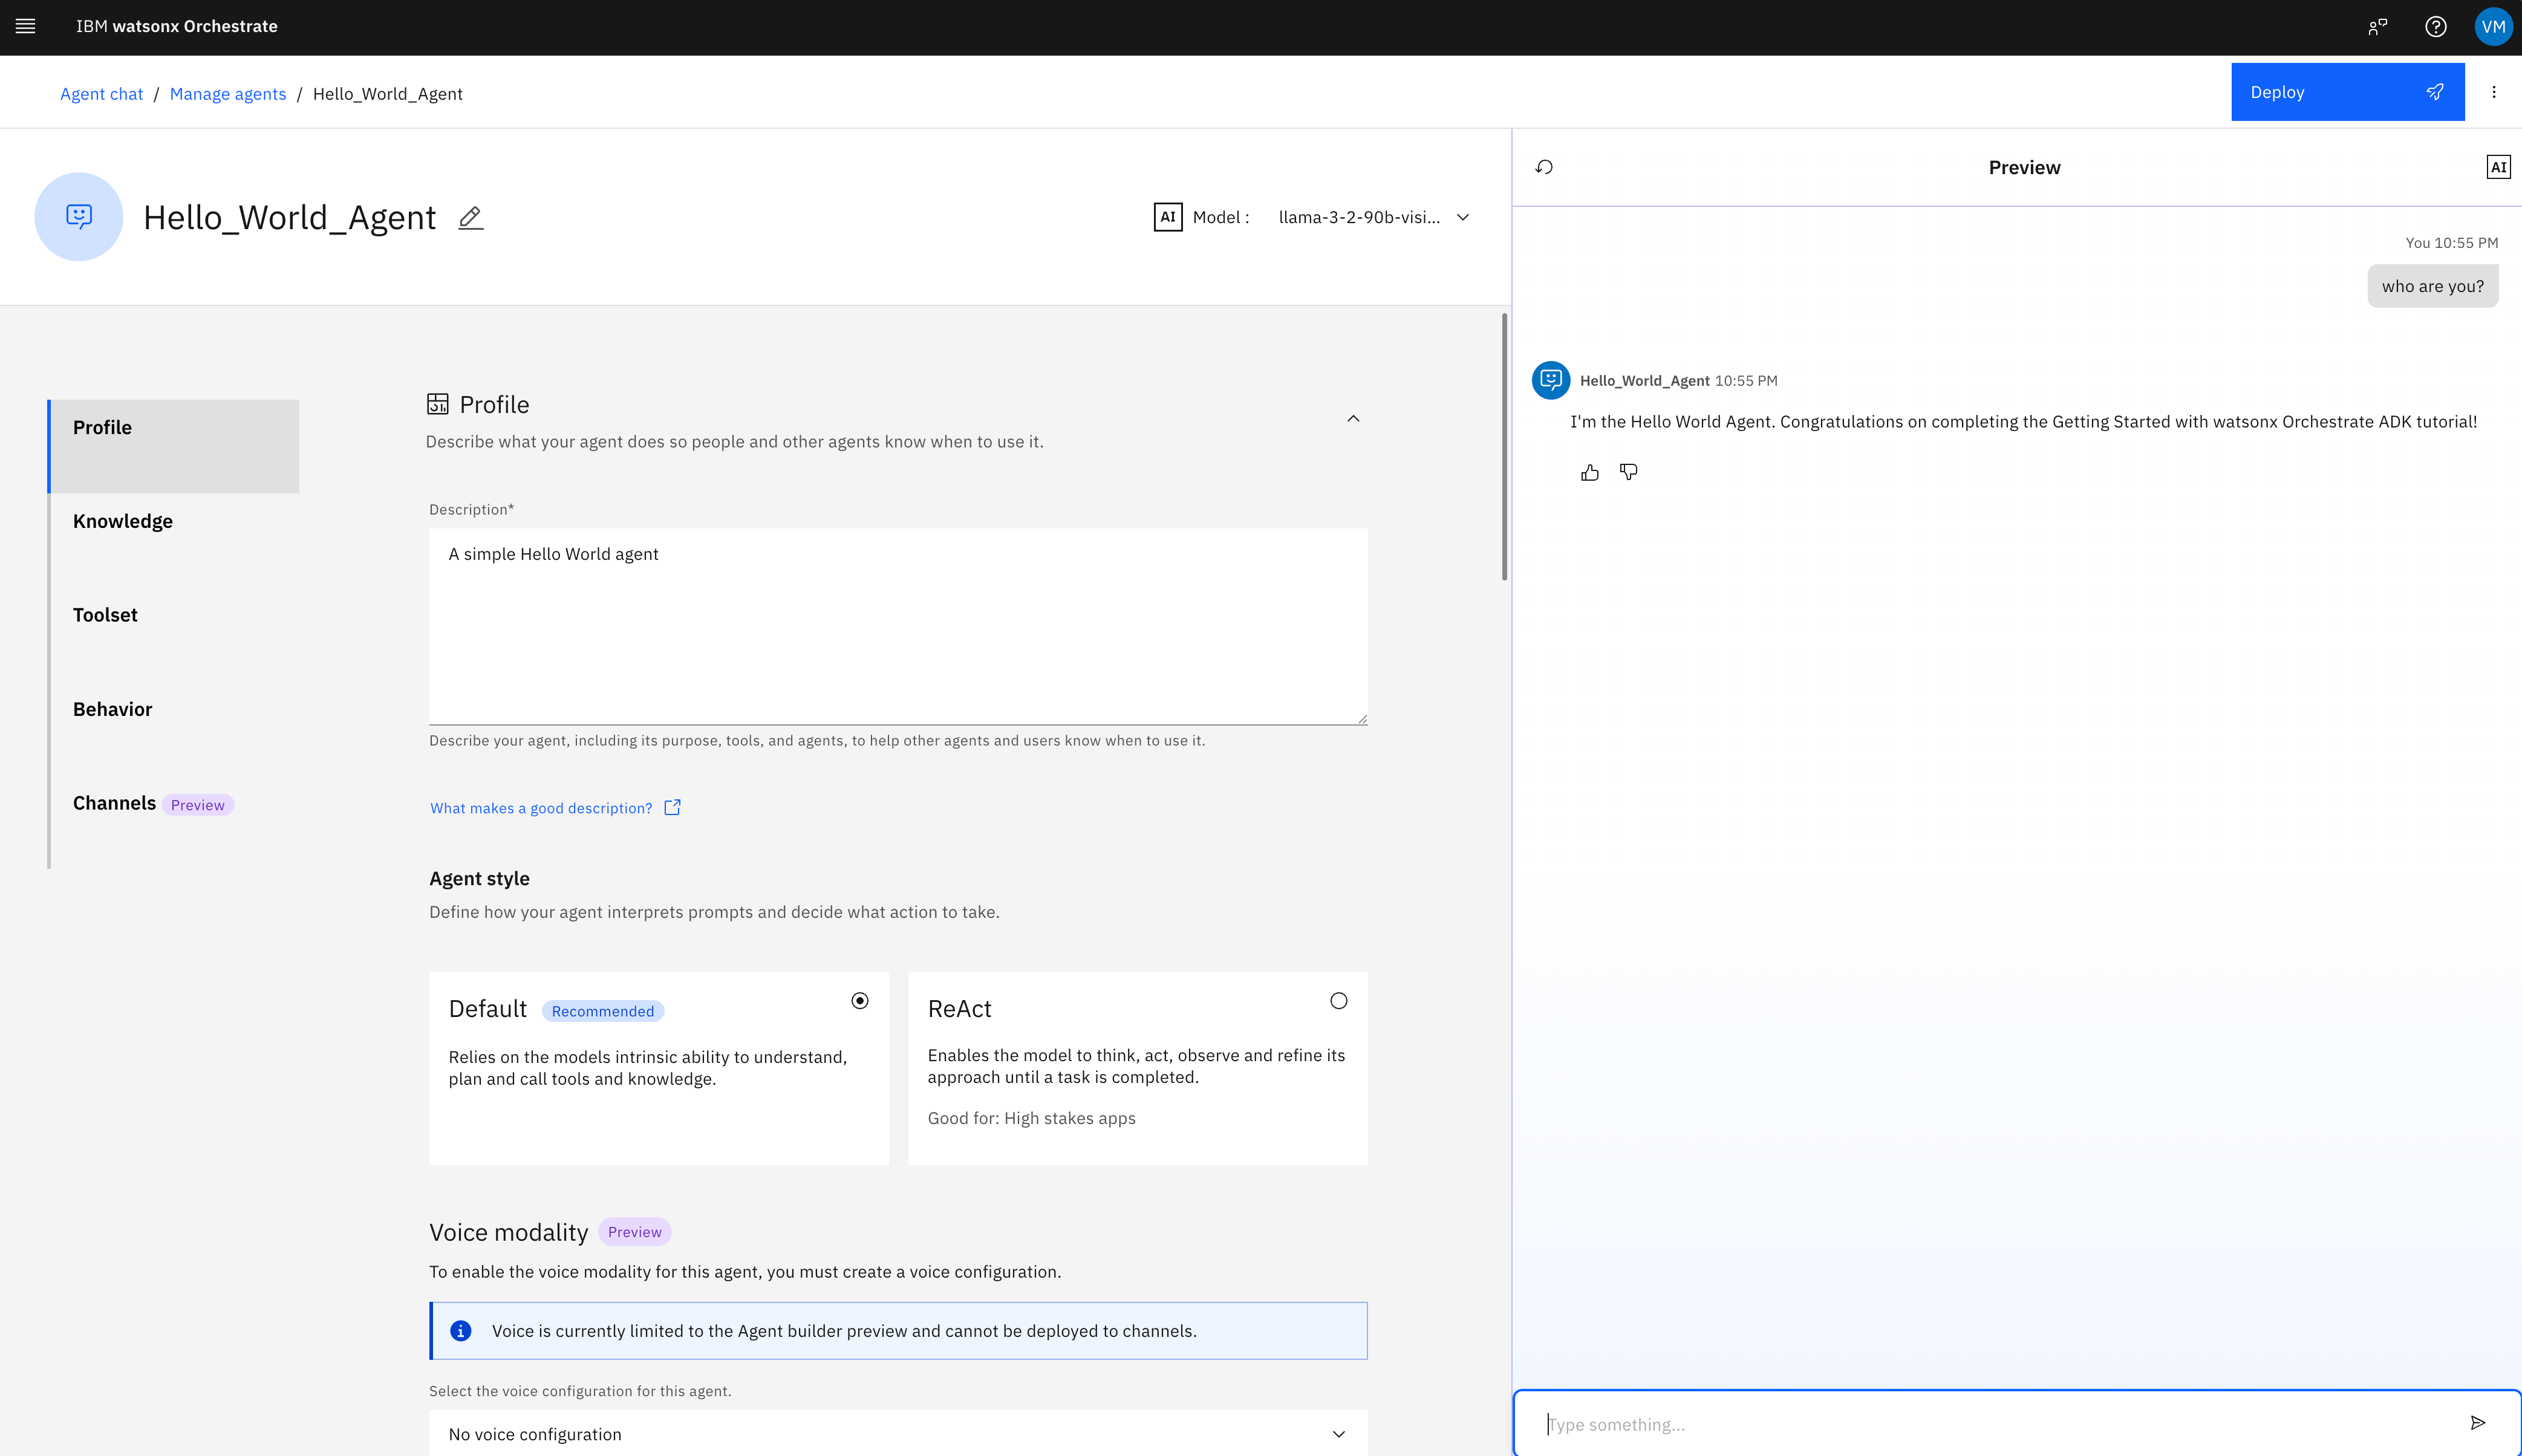
You are now in the Agent’s configuration screen. Here, you can see all the options you have for building your agent with watsonx Orchestrate’s Agent Builder, the no-code building experience for building agents. As you scroll down to see all the options, notice how the Description and Instructions fields match the content from your hello-world-agent.yaml file. You can customize your agent further from here if you’d like, but let’s perform the final test.
To the right of the screen, you can see the test chat, where you can interact with your agent. Type “Who are you?” on the chat, then press the Enter key to send and watch the agent’s response.
Summary
In this tutorial, you set up your environment, installed the ADK, and defined your first agent.
Next steps
Now that you’ve set up your ADK environment, connected to your SaaS instance of watsonx Orchestrate, and published an agent, you’re ready to keep going.
Here are a few ways to build on what you’ve learned:
- Explore the CLI. Run orchestrate --help to see all available commands for managing environments, agents, tools, and more. Try out different options to get comfortable with what the ADK can do.
- Add tools. Extend your agent by defining tools it can use, for example, calling an external API. Learn more about tools in the ADK docs.
- Knowledge bases for agents. In watsonx Orchestrate, agents can use knowledge bases to ground their responses to user requests. Learn more about knowledge bases in the ADK docs.
- Join the community. Connect with other developers building agents and share feedback, ideas, and use cases in the watsonx Orchestrate community.