


About cookies on this site Our websites require some cookies to function properly (required). In addition, other cookies may be used with your consent to analyze site usage, improve the user experience and for advertising. For more information, please review your options. By visiting our website, you agree to our processing of information as described in IBM’sprivacy statement. To provide a smooth navigation, your cookie preferences will be shared across the IBM web domains listed here.
Tutorial
Install IBM Cloud Pak for Data 5.2 on Red Hat OpenShift Container Platform 4.18 on IBM Power Virtual Server
Bringing innovations for data and AI to the cloud
On this page
Introduction
IBM Cloud Pak for Data unifies and simplifies the collection, organization, and analysis of data. Enterprises can turn data into insights through an integrated cloud-native architecture. IBM Cloud Pak for Data is extensible and can be customized to a client's unique data and AI landscapes through an integrated catalogue of IBM, open source, and third-party microservices add-ons.
This tutorial shows how to perform an online installation of IBM Cloud Pak for Data 5.2 on Red Hat OpenShift Container Platform 4.18 running on IBM Power Virtual Server and some of the services that are needed to use the IBM Industry Accelerators.
Prerequisites
This tutorial assumes that you are familiar with the Red Hat OpenShift Container Platform 4.18 environment on IBM Power Virtual Server. It is assumed that you have it already installed, you have access to it, and have the credentials of an OpenShift cluster administrator (kubeadmin). You must be familiar with Linux command line and have at least a basic understanding of Red Hat OpenShift.
For this tutorial, we assume that the OpenShift 4.14 environment on IBM Power Virtual Server consists of three worker nodes, each with two physical IBM Power cores (that is, 16 vCPU from a Kubernetes level) and 64 gB RAM.
Also, you must have created a local repository on a persistent storage and have a Network File System (NFS) storage class where the NFS export has the no_root_squash property set.
You need to have the wget and the oc clients already installed on your PATH variable.
Estimated time
It is expected to take around 2 to 3 hours to complete the installation of IBM Cloud Pak for Data 5.2 on IBM Power Virtual Server. This lengthy duration is because we need to install the software from internet repositories.
Steps
Installation of IBM Cloud Pak for Data 5.2 on IBM Power Virtual Server includes the following steps:
- Prepare the bastion host.
- Prepare for OpenShift cluster.
- Install Cloud Pak Foundational Services and Cloud Pak for Data control plane.
- Install IBM Watson Studio and IBM Watson Machine Learning services.
- Run an AutoAI experiment.
- Optional: Install additional RStudio, Analytics Engine, Decision Optimization, and IBM Db2 services.
Step 1 – Prepare the bastion host
Log in as the root user on the bastion host.
Install the Linux screen utility that will maintain your session in case your internet connection drops and will make it recoverable when you reconnect.
# on a RHEL 8 system run: yum -y install https://dl.fedoraproject.org/pub/epel/8/Everything/ppc64le/Packages/s/screen-4.6.2-12.el8.ppc64le.rpm # on a RHEL 9 system run: yum -y install https://dl.fedoraproject.org/pub/epel/9/Everything/ppc64le/Packages/s/screen-4.8.0-6.el9.ppc64le.rpmInstall the Linux podman package that will allow you to run containers on the bastion host. The Cloud Pak for Data CLI software, that we will be using to install the IBM Cloud Pak for Data software later in this tutorial, runs inside a container on the bastion host.
yum -y install podmanVerify that the
no_root_squashparameter is set for the NFS share. Change the parameter in the file /etc/exports tono_root_squashif needed.sed -i 's/,root_squash/,no_root_squash/g' /etc/exports exportfs -a exportfs -vCreate a new user cp4d on the bastion host, that we will be further using in the installation process, and change to that new user.
useradd cp4dChange to the cp4d user.
su – cp4dDownload the cpd-cli utility from gitHub:
wget https://github.com/IBM/cpd-cli/releases/download/v14.2.0/cpd-cli-ppc64le-EE-14.2.0.tgz tar -xzvf cpd-cli-ppc64le-EE-14.2.0.tgz mv cpd-cli-ppc64le-EE-14.2.0*/* . rm -rf cpd-cli-ppc64le-EE-14.2.0* rm -f cpd-cli-ppc64le-EE-14.2.0.tgz ./cpd-cli versionAfter running the commands, you should get an output similar to the following sample:
cpd-cli Version: 14.2.0 Build Date: 2025-06-09T12:27:40 Build Number: 2081 CPD Release Version: 5.2.0Retrieve the OpenShift Container Platform API URL. Log in to the OpenShift web console as kubeadmin user. Then click the Copy login command under the “kube:admin” widget at the upper-right corner. Click Display token. Under “Log in with this token”, you should see an entry similar to this:
oc login --token=sha256~kOnz77iElg4JrlFxEccBTmi_pDbw9Q8IegJc_S5urfc --server=https://api.itzpvs-218018.cecc.ihost.com:6443Make a note of the OpenShift Container Platform API URL value (the value after the
--server=parameter) and store it in thePVS_API_URLenvironment variable:export PVS_API_URL=<replace with the value of the OCP API URL> # for example export PVS_API_URL=https://api.itzpvs-218018.cecc.ihost.com:6443Retrieve the kubeadmin password and store it in the
PVS_CLUSTER_ADMIN_PWDenvironment variable.export PVS_CLUSTER_ADMIN_PWD=<replace with your cluster admin password> # for example export PVS_CLUSTER_ADMIN_PWD=qD8nz-aDQxj-rxeVB-D8S3fObtain your IBM entitlement API key for IBM Cloud Pak for Data and store the value in the
PVS_IBM_ENTITLEMENT_KEYenvironment variable. You can find the instructions for obtaining the key at: https://www.ibm.com/docs/en/software-hub/5.2.x?topic=information-obtaining-your-entitlement-api-key.export PVS_IBM_ENTITLEMENT_KEY=<replace with the value of your IBM entitlement API key> # for example: export PVS_IBM_ENTITLEMENT_KEY=eyJ0eXAiOiJKV1QiLCJxxxDefine the
PVS_API_HOSTenvironment variable:export PVS_API_HOST=<replace with the hostname of the API server> # for example export PVS_API_HOST=api.itzpvs-218018.cecc.ihost.comVerify all four environment variables.
set | grep PVS# you should see an output similar to the following: PVS_API_HOST=api.itzpvs-218018.cecc.ihost.com PVS_API_URL=https://api.itzpvs-218018.cecc.ihost.com:6443 PVS_CLUSTER_ADMIN_PWD=qD8nz-aDQxj-rxeVB-D8S3f PVS_IBM_ENTITLEMENT_KEY=eyJ0eXAiOiJKV1QiLCJxxxValidate that you can successfully log in to your OpenShift cluster using the oc command.
oc login -u kubeadmin -p $PVS_CLUSTER_ADMIN_PWD $PVS_API_URL --insecure-skip-tls-verify# you should see an output like the following: Login successful. You have access to 71 projects, the list has been suppressed. You can list all projects with 'oc projects' Using project "default". Welcome! See 'oc help' to get started.Verify that the default storage class is
nfs-storage-provisioner.oc get sc# you should see an output like the following: NAME PROVISIONER RECLAIMPOLICY VOLUMEBINDINgMODE ALLOWVOLUMEEXPANSION AgE nfs-storage-provisioner (default) nfs-storage Delete Immediate false 2d1hgenerate a cpd_vars.sh environment variables file by running the following command:
tee cpd_vars.sh <<EOF #=========================================================== # Cloud Pak for Data installation variables #=========================================================== # ---------------------------------------------------------- # Cluster # ---------------------------------------------------------- export OCP_URL="$PVS_API_HOST:6443" export OPENSHIFT_TYPE="self-managed" export OCP_USERNAME="kubeadmin" export OCP_PASSWORD="$PVS_CLUSTER_ADMIN_PWD" export OCP_TOKEN="$(oc whoami -t)" # ---------------------------------------------------------- # Projects # ---------------------------------------------------------- export PROJECT_CERT_MANAgER="ibm-cert-manager" export PROJECT_LICENSE_SERVICE="ibm-licensing" export PROJECT_SCHEDULINg_SERVICE="cpd-scheduler" export PROJECT_CPD_INST_OPERATORS="cpd-operators" export PROJECT_CPD_INST_OPERANDS="cpd-instance" # ---------------------------------------------------------- # Storage # ---------------------------------------------------------- export STg_CLASS_BLOCK=nfs-storage-provisioner export STg_CLASS_FILE=nfs-storage-provisioner # ---------------------------------------------------------- # IBM Entitled Registry # ---------------------------------------------------------- export IBM_ENTITLEMENT_KEY=$PVS_IBM_ENTITLEMENT_KEY # ---------------------------------------------------------- # Cloud Pak for Data version # ---------------------------------------------------------- export VERSION=5.2.0 # ---------------------------------------------------------- # Components # ---------------------------------------------------------- export COMPONENTS=ws,wml EOFVerify your cpd_vars.sh file. The file should look similar to the following example:
cat cpd_vars.sh# for example: #=========================================================== # Cloud Pak for Data installation variables #=========================================================== # ---------------------------------------------------------- # Cluster # ---------------------------------------------------------- export OCP_URL="api.itzpvs-218018.cecc.ihost.com:6443" export OPENSHIFT_TYPE="self-managed" export OCP_USERNAME="kubeadmin" export OCP_PASSWORD="qD8nz-aDQxj-rxeVB-D8S3f" export OCP_TOKEN="sha256~m7yyLOJtsgK9ogXRI4Fwxiaw5r4Z7VrHprRUotp8piQ" # ---------------------------------------------------------- # Projects # ---------------------------------------------------------- export PROJECT_CERT_MANAgER="ibm-cert-manager" export PROJECT_LICENSE_SERVICE="ibm-licensing" export PROJECT_SCHEDULINg_SERVICE="cpd-scheduler" export PROJECT_CPD_INST_OPERATORS="cpd-operators" export PROJECT_CPD_INST_OPERANDS="cpd-instance" # ---------------------------------------------------------- # Storage # ---------------------------------------------------------- export STg_CLASS_BLOCK=nfs-storage-provisioner export STg_CLASS_FILE=nfs-storage-provisioner # ---------------------------------------------------------- # IBM Entitled Registry # ---------------------------------------------------------- export IBM_ENTITLEMENT_KEY=eyJ0eXAiOiJKV1QiLCJxxx # ---------------------------------------------------------- # Cloud Pak for Data version # ---------------------------------------------------------- export VERSION=5.1.3 # ---------------------------------------------------------- # Components # ---------------------------------------------------------- export COMPONENTS=ws,wml
Step 2 – Prepare the OpenShift cluster
As cp4d user, source the cpd_vars.sh file.
source cpd_vars.shRun the
cpd-cli manage logincommand. Note that running the command for the first time takes some time to complete, as the container image that is used by thecpd-cli manage logincommand will be downloaded from the internet../cpd-cli manage login-to-ocp --token=${OCP_TOKEN} --server=${OCP_URL}Successful completion of the
cpd-cli manage logincommand would look like the following sample:[…] Using project "default" on server "https://api.itzpvs-218018.cecc.ihost.com:6443". [SUCCESS] 2025-05-22T13:08:01.093265Z You may find output and logs in the /home/cp4d/cpd-cli-workspace/olm-utils-workspace/work directory. [SUCCESS] 2025-05-22T13:08:01.093327Z The login-to-ocp command ran successfully.Add your IBM entitlement key to the global pull secret of your OpenShift cluster.
./cpd-cli manage add-icr-cred-to-global-pull-secret --entitled_registry_key=${IBM_ENTITLEMENT_KEY}Successful completion would look as follows:
[SUCCESS] 2025-05-22T13:09:22.301797Z The add-icr-cred-to-global-pull-secret command ran successfully.Create new OpenShift projects for the IBM Cloud Pak for Data installation.
oc new-project ${PROJECT_CERT_MANAgER} oc new-project ${PROJECT_LICENSE_SERVICE} oc new-project ${PROJECT_SCHEDULINg_SERVICE} oc new-project ${PROJECT_CPD_INST_OPERATORS} oc new-project ${PROJECT_CPD_INST_OPERANDS}Successful completion would look as follows:
[…]
Now using project "cpd-instance" on server "https://api.itzpvs-218018.cecc.ihost.com:6443".
[…]
Step 3 – Install IBM Software Hub and IBM Cloud Pak for Data control plane
As the cp4d user, open a screen session. This will allow you to reconnect to your terminal using the
screen -rcommand if you lose the SSH connection to the bastion host.screenInstall the shared cluster components. This will install the IBM certificate manager and the IBM licensing service on your cluster.
./cpd-cli manage apply-cluster-components \ --release=${VERSION} \ --license_acceptance=true \ --licensing_ns=${PROJECT_LICENSE_SERVICE}Successful completion will look as follows:
[SUCCESS] 2025-06-17T02:52:24.187042Z The apply-cluster-components command ran successfully.Authorize the instance topology.
./cpd-cli manage authorize-instance-topology \ --cpd_operator_ns=${PROJECT_CPD_INST_OPERATORS} \ --cpd_instance_ns=${PROJECT_CPD_INST_OPERANDS}Successful completion will look as follows:
[SUCCESS] 2025-06-17T02:57:48.847340Z The authorize-instance-topology command ran successfully.Set up the instance, and include running a storage validation test. Note that this step can take 30-60 minutes as container images will be downloaded from the IBM container registry and containerized software for the IBM Cloud Pak for Data instance will be deployed into the
PROJECT_CPD_INST_OPERANDSnamespace../cpd-cli manage setup-instance \ --release=${VERSION} \ --license_acceptance=true \ --cpd_operator_ns=${PROJECT_CPD_INST_OPERATORS} \ --cpd_instance_ns=${PROJECT_CPD_INST_OPERANDS} \ --block_storage_class=${STg_CLASS_BLOCK} \ --file_storage_class=${STg_CLASS_FILE} \ --run_storage_tests=trueSuccessful completion will look as follows:
[SUCCESS] 2025-06-17T03:40:37.037781Z The setup-instance command ran successfully.
Step 4 – Install Watson Studio and Watson Machine Learning services
Install the operators for the IBM Cloud Pak for Data services that you have specified in the
COMPONENTSenvironment variable. In our case the operators for the Watson Studio (ws) and Watson Machine Learning (wml) services will be installed../cpd-cli manage apply-olm \ --release=${VERSION} \ --cpd_operator_ns=${PROJECT_CPD_INST_OPERATORS} \ --components=${COMPONENTS}Successful completion will look as follows:
[SUCCESS] 2025-06-17T03:52:44.106196Z The apply-olm command ran successfully.Install Watson Studio and Watson Machine Learning services by running the
apply-crcommand. Note, that this command eventually takes 30 minutes to complete due to the number of services that will be installed during Watson Studio and Watson Machine Learning installation../cpd-cli manage apply-cr \ --release=${VERSION} \ --license_acceptance=true \ --cpd_instance_ns=${PROJECT_CPD_INST_OPERANDS} \ --components=${COMPONENTS} \ --block_storage_class=${STg_CLASS_BLOCK} \ --file_storage_class=${STg_CLASS_FILE} \ -vCommand output during processing:
[…] TASK [utils : check if CR status indicates completion for ws-cr in cpd-instance, max retry 150 times 60s delay] ************************************************************ Not ready yet - Retrying: check if CR status indicates completion for ws-cr in cpd-instance, max retry 150 times 60s delay (150 Retries left) Not ready yet - Retrying: check if CR status indicates completion for ws-cr in cpd-instance, max retry 150 times 60s delay (149 Retries left) […]Successful completion will look as follows:
[[SUCCESS] 2025-05-22T09:31:09.350954Z The apply-cr command ran successfully.Watch the installation progress. You may want to monitor the installation progress by running the following command in a second command line terminal in your bastion host. Make sure to run the
source cpd_vars.shcommand before, so that thePROJECT_CPD_INST_OPERANDSenvironment variable is defined. The command shows the list of pods in the IBM Cloud Pak for Data instance namespace with the most recently created pods being shown first:watch -n 10 "oc get pods -n ${PROJECT_CPD_INST_OPERANDS} \ --sort-by=.status.startTime | tac"Output:
Retrieve the default IBM Cloud Pak for Data admin password by running the following command:
oc -n ${PROJECT_CPD_INST_OPERANDS} \ get secret ibm-iam-bindinfo-platform-auth-idp-credentials \ -o 'jsonpath={.data.admin_password}'| base64 --decode ;\ echoOutput:
on2laS9ExxxRetrieve the IBM Cloud Pak for Data web console URL:
oc get routes -A | grep ibm-nginx-svc | awk '{print "https://" $3}'Output:
https://cpd-cpd-instance.apps.itzpvs-218018.cecc.ihost.comLog in to the IBM Cloud Pak for Data web console.
Open a browser and enter the IBM Cloud Pak for Data web console URL you retrieved from the previous step. Accept the warnings of a potential security risk. Then enter cpadmin as the username and the default IBM Cloud Pak for Data admin password retrieved from step 3. Click Log in to proceed.

Click the Switch Location icon at the upper-right corner.
Click IBM Cloud Pak for Data.

Notice that the IBM Cloud Pak for Data web console is displayed.
Step 5 – Run an AutoAI experiment
For a quick test, you can run an AutoAI experiment. Perform the following steps to conduct the test using the AutoAI experiment.
Click the main menu icon at the upper-left corner.
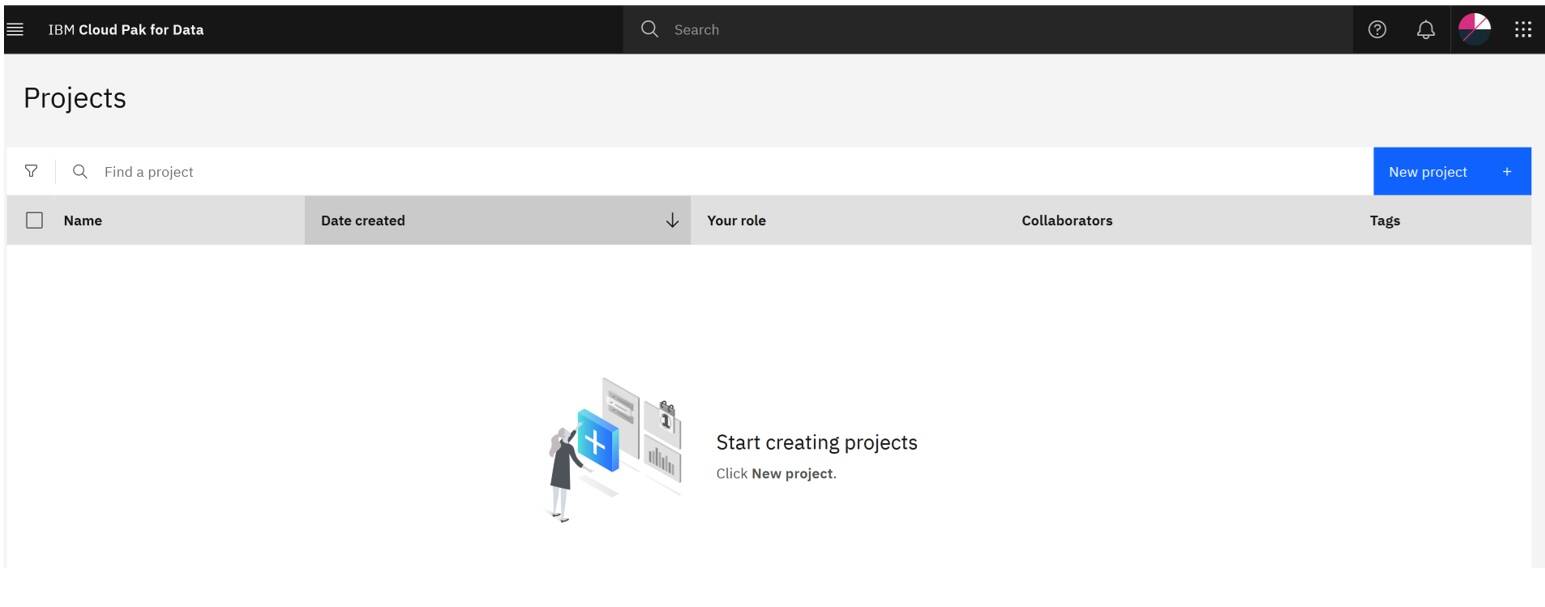
Click Projects --> All projects.
Click New project.
Enter autoai-test as the project name and enter a description. Click Create.
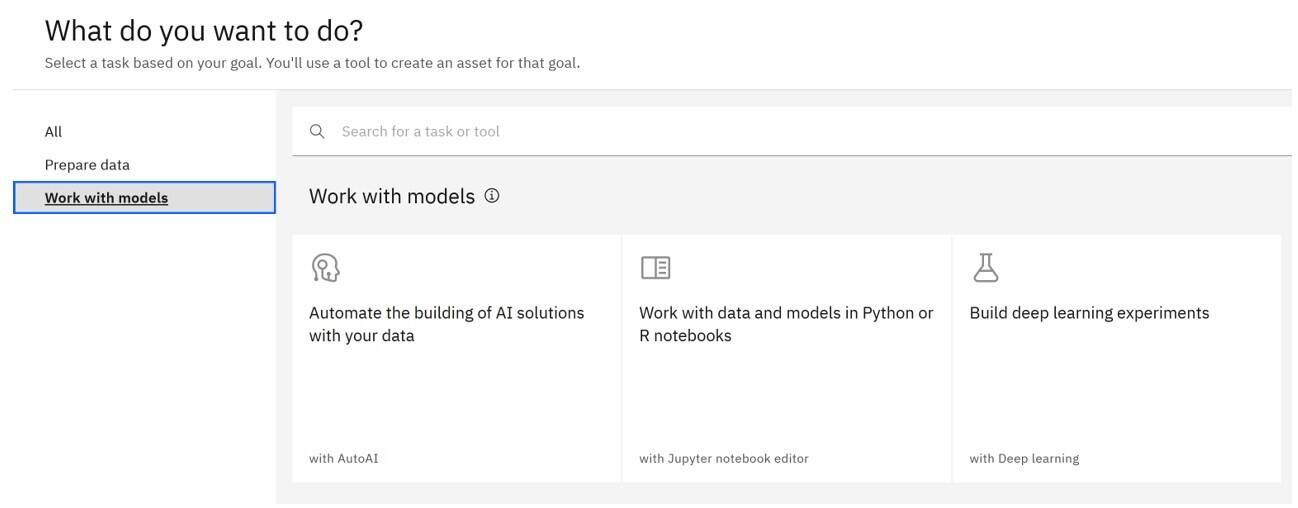
Click the Assets tab.
Click New asset.
Click Work with models and then click the Automate the building of AI solutions with your data tile.
Enter a name for your AutoAI experiment and click Create.
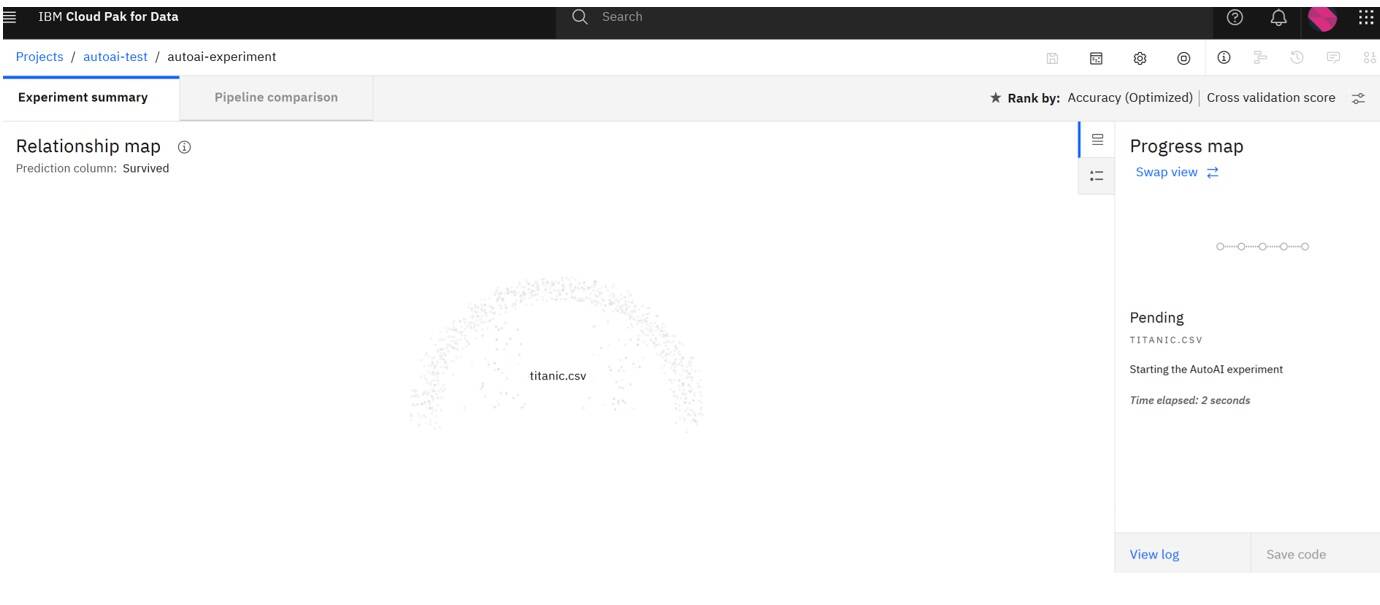
Open a new tab in your browser and download the Titanic example.
Save the downloaded the CSV file and drop it on the Add data sources page.
In the Configure details section, click No for “Create a time series analysis?”.
Select Survived as the prediction column for “What do you want to predict?”.
Click Run experiment.
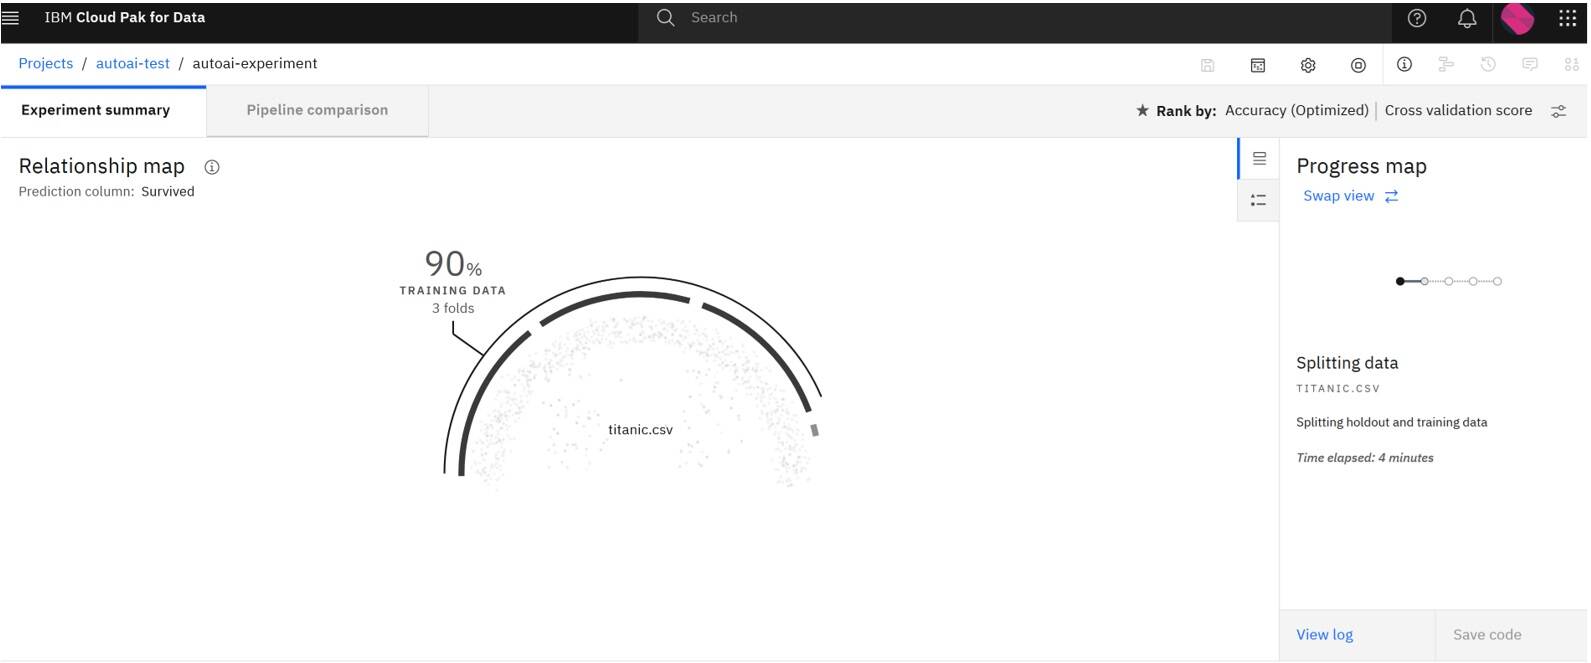
Watch the progress of the AutoAI experiment. You might need to wait at the first time a bit in Pending state as a new container image for the AutoAI experiment is going to be downloaded from the internet to your OpenShift Container Platform cluster.
After the experiment is complete, notice that the state now shows “Experiment completed” indicating that you have successfully run the AutoAI experiment on your IBM Cloud Pak for Data 5.2 cluster running on OpenShift 4.18 on Power Virtual Server.
Step 6 – Optional: Install Analytics Engine, RStudio, Decision Optimization, Db2 services, DataStage, and IBM Knowledge Catalog
Modify the cpd_vars.sh file in order to specify the additional IBM Cloud Pak for Data services you want to install on the cluster.
cp cpd_vars.sh cpd_vars.sh.ORg sed -i \ 's/COMPONENTS=ws,wml/COMPONENTS=analyticsengine,rstudio,dods,db2oltp,db2wh,dmc,datastage_ent_plus,wkc/g' \ cpd_vars.shIn our case, for IBM Cloud Pak for Data on Power Virtual Server, we are going to install these additional services: Analytics Engine, RStudio, Decision Optimization, Db2 Services (Db2 OLTP, Db2 Warehouse, Db2 Management Console), DataStage, and IBM Knowledge Catalog.
Source the modified cpd_vars.sh file.
source cpd_vars.shVerify that the COMPONENTS environment variable has been updated by running the following command:
set | grep COMPONENTSYou should see an output like this:
COMPONENTS=analyticsengine,rstudio,dods,db2oltp,db2wh,dmc,datastage_ent_plus,wkcRun the
apply-olmcommand to install the operators for the new IBM Cloud Pak for Data services../cpd-cli manage apply-olm --release=${VERSION} \ --cpd_operator_ns=${PROJECT_CPD_INST_OPERATORS} \ --components=${COMPONENTS}Successful completion will look as follows:
[SUCCESS] 2025-06-17T05:23:11.944486Z The apply-olm command ran successfully.Run the
apply-crcommand to install the additional IBM Cloud Pak for Data services on your cluster. Note, that this step can take up to 2-3 hours to complete, due to the large number of services that will be installed../cpd-cli manage apply-cr \ --release=${VERSION} \ --cpd_instance_ns=${PROJECT_CPD_INST_OPERANDS} \ --components=${COMPONENTS} \ --block_storage_class=${STg_CLASS_BLOCK} \ --file_storage_class=${STg_CLASS_FILE} \ --license_acceptance=true \ -vSuccessful completion will look as follows:
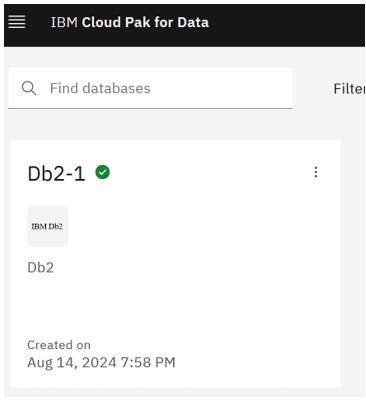
[SUCCESS] 2025-06-17T06:45:22.843084Z The apply-cr command ran successfully.Next, you need to create a new Db2 database instance on the IBM Cloud Pak for Data cluster to verify that the Db2 service on IBM Cloud Pak for Data is working fine.
Log in to the IBM Cloud Pak for Data web console.
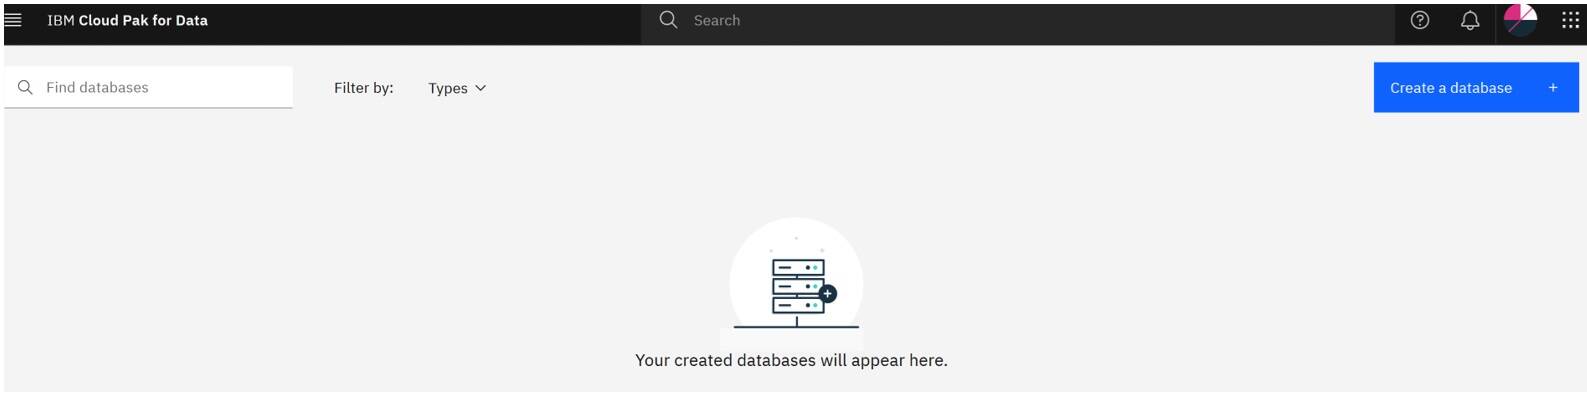
Click the main menu icon and then click Data --> Databases.
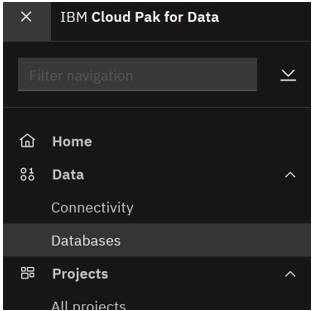
Click Create a database.
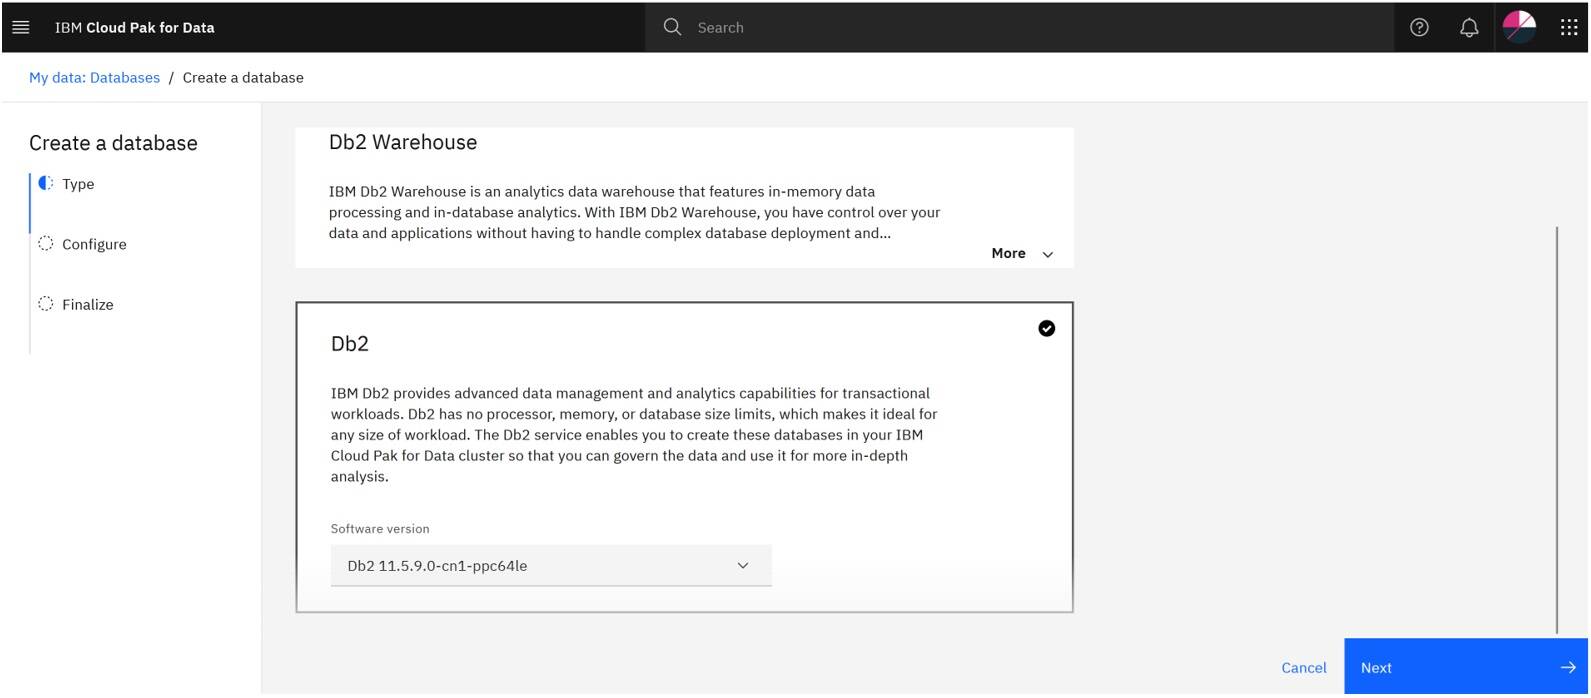
Click Db2 and then click Next.
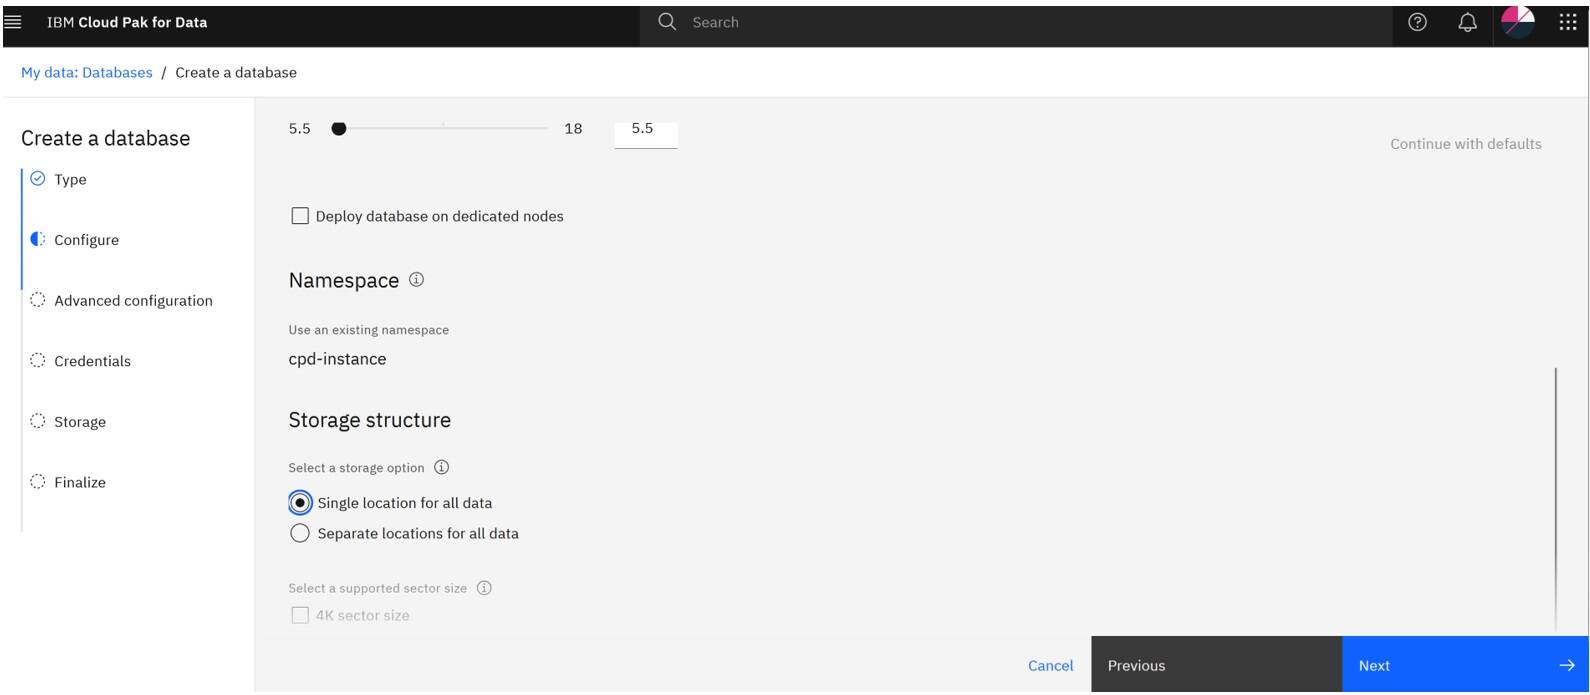
Scroll down and click Single location for all data. Then, click Next.
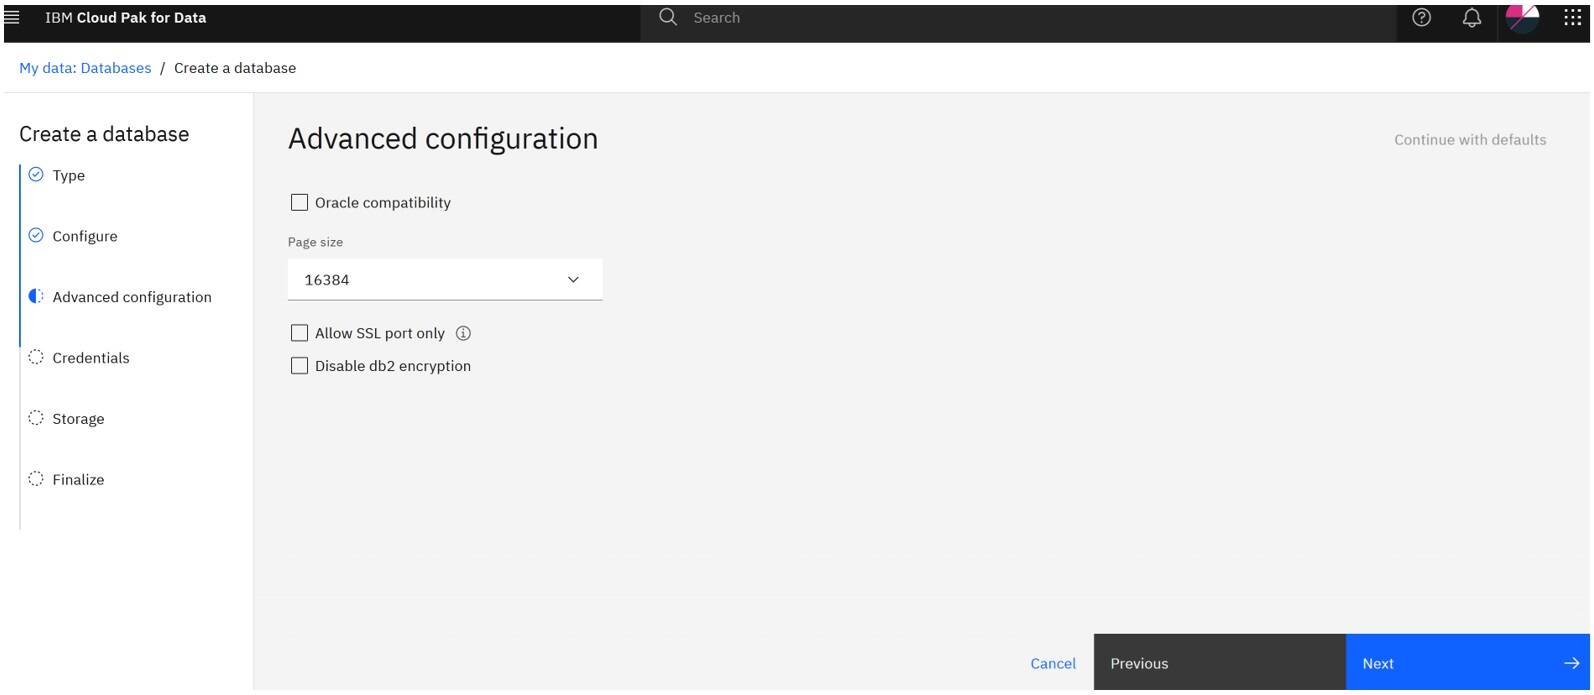
Click Next.
From the Input method list, select generate a Kubernetes secret. Click Next.
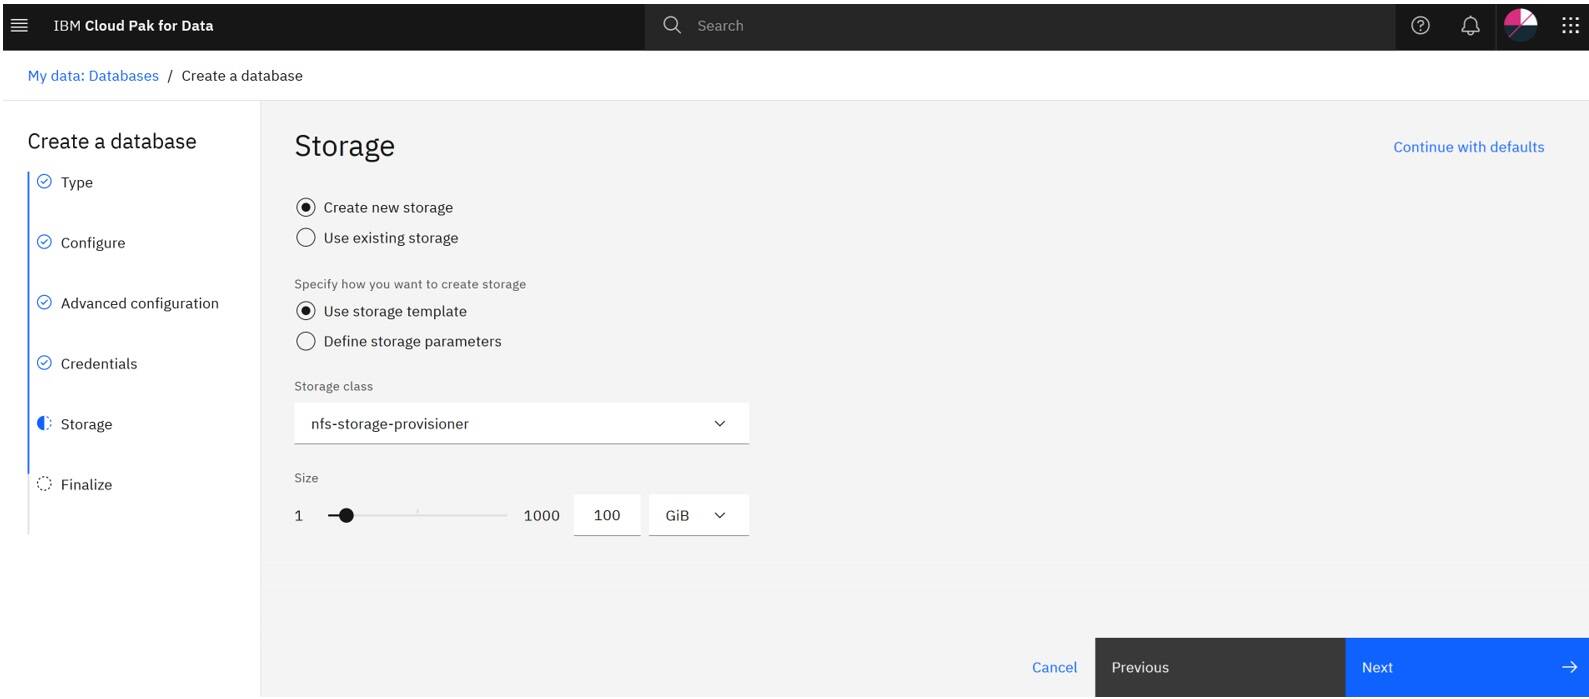
On the Storage page, make sure that the required settings are selected and click Next.
On the Finalize page, validate the options you have set for the database and click Create.
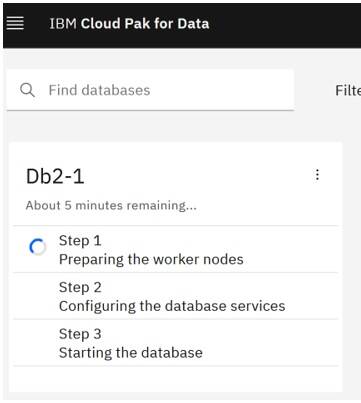
The new Db2 database is now being provisioned. Note that the provisioning process can take 10 -15 minutes to complete.
Summary
This tutorial helped you to install a comprehensive AI and machine learning environment using IBM Cloud Pak for Data 5.2 on your IBM Power Virtual Server environment and to run a simple AutoAI experiment.
Further readings
For more details on the installation process for the IBM Cloud Pak for Data product, refer to the Installing Cloud Pak for Data documentation at: https://www.ibm.com/docs/en/cloud-paks/cp-data/5.2.x?topic=installing-administering-cloud-pak-data
For details on latest changes in the IBM Cloud Pak for Data product, refer to the What’s New in Cloud Pak for Data page at: https://www.ibm.com/docs/en/cloud-paks/cp-data/5.2.x?topic=data-whats-new
For an innovative approach, on how to auto-install IBM Cloud Pak for Data using a Tekton pipelines, refer to the gitHub repository at: https://github.com/schabrolles/cpd-install-pipeline
Note that this Tekton pipeline is not part of the official IBM Cloud Pak for Data product, but is an asset that has been developed by IBM Client Engineering. So, use it at your own risk!