Tutorial
Continuously optimize your infrastructure using the IBM Turbonomic Provider for HashiCorp Terraform
Streamline your infrastructure optimization processes
On this page
As cloud usage scales, so does cost—often in ways that aren't efficient. Many organizations provision virtual machines based on guesswork or peak demand but then fail to scale down when demand decreases. This results in performance risks, wasted compute resources, bloated cloud bills, or underutilized infrastructure.
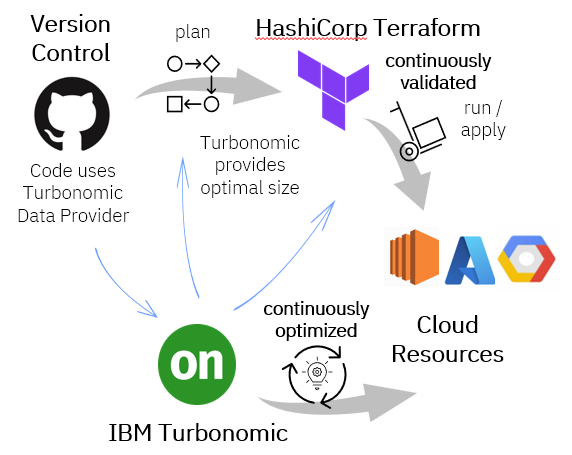
The Turbonomic Provider for Terraform is a plugin that enables HashiCorp Terraform to interact with Turbonomic, which in turn communicates with cloud services such as AWS, Azure, and GCP to optimize your cloud infrastructure. By integrating the Turbonomic Provider for Terraform into your Infrastructure as Code (IaC), you not only gain intelligent optimization recommendations, but you can also apply those changes automatically using Terraform runs or automate safely in Turbonomic or wherever you choose. The Turbonomic Provider for Terraform takes you beyond Continuous Integration and Continuous Deployment to Continuous Optimization (learn more in this Turbonomic community blog).
Prerequisites
To set up continuous optimization, you need:
- Hashicorp Terraform
- Turbonomic. Sign up for your free trial.
- Turbonomic Provider for Terraform
Steps
- Provision the Turbonomic Provider for Terraform
- Enable continuous optimization using the Turbonomic Provider for Terraform
Step 1. Provisioning the Turbonomic Provider for Terraform
The initial phase of this provider will establish Turbonomic as the source of truth within Terraform configurations for resource optimization, enabling dynamic lookup and application of optimal sizing recommendations for customer entities.
Add the Turbonomic Provider for Terraform to the private library at the organization level in HashiCorp.
Configure provider credentials.
Request or confirm that Turbonomic is optimizing the resources in your cloud account.
Step 1.1: Add the Turbonomic Provider for Terraform to the private registry
It is a best practice to add the Turbonomic Provider for Terraform to the HCP Terraform private registry. Follow the steps in the HCP Terraform docs.
The Turbonomic Provider for Terraform is available through the public Terraform Registry.
Commit your Terraform code containing Turbonomic Provider for Terraform to a version control system (VCS) supported by HashiCorp Terraform, and connect it to HashiCorp Terraform. Follow the steps in the HCP Terraform docs for your VCS.
When your Terraform workspace is connected to a VCS repository in HashiCorp Terraform, the platform automatically runs terraform init during the initial plan. This step downloads and installs the provider plugin, initializes the backend, and prepares the environment for subsequent runs like terraform plan and terraform apply.
Step 1.2: Configuring the provider credentials
After adding the provider, it needs to be configured with credentials. Good practice is to use OAuth 2.0.
Follow the steps in the Turbonomic docs to create, manage, and authenticate OAuth 2.0 clients.
Once the workspace is created, HashiCorp Terraform will automatically scan your repository. If a variables.tf file is present, a pop-up will appear prompting you to input the required variable values, which will then be securely stored in HashiCorp Terraform.
The following code is an example of authenticating with Turbonomic APIs using OAuth 2.0.
terraform {
  required_providers {
    turbonomic = {
      source  = "IBM/turbonomic"
      version = "1.2.0"
    }
  }
}
provider "turbonomic"{
  hostname      = var.hostname
  client_id     = var.client_id
  client_secret = var.client_secret
  role          = var.role
}
Step 1.3: Add your public cloud subscription to Turbonomic
Turbonomic must be optimizing your deployed resources using its native integrations with AWS, Azure, or GCP. Provide your Turbonomic administrator with the details of your public cloud subscription and resource types and names to confirm that Turbonomic has successfully discovered and is optimizing them.
Refer to the target configuration docs to see the requirements for AWS, GCP, and Azure. This is what your Turbonomic administrator will need to enable Turbonomic to optimize your resources.
Step 2. Enable continuous optimization using the Turbonomic Provider for Terraform
Configure your Terraform resources to use the Turbonomic Data source.
Run a speculative plan to validate that continuous optimization using Turbonomic is active.
Choose to automate optimization in real time:
- Enable Continuous validation using Turbonomic Provider for Terraform.
- Work with your Turbonomic Administrator to enable Turbonomic automation policies.
Step 2.1 Enable continuous optimization for the resources
Use the AWS provider to define and manage AWS resources—in this case, to launch and configure an EC2 instance in AWS. It allows Terraform to interact with AWS using the specified credentials and region. Credentials can be stored as environment variables or terraform workspace variables to avoid exposing secrets publicly.
provider "aws" {
  region = "us-east-1" // Specifies the AWS region where resources will be provisioned
}
The turbonomic_cloud_entity_recommendation is the specific type of data source provided by the Turbonomic Provider for Terraform. It is designed to get scaling recommendations for cloud entities from your Turbonomic instance, which will then be applied during a Terraform apply command. When the provider does not find an entity with the specified name, it returns a null value. In such cases, the default value t3.nano is used. This typically occurs during the first run of terraform apply.
data "turbonomic_cloud_entity_recommendation" "example" {
  entity_name  = "exampleVirtualMachine" // Name of the cloud entity (e.g., a virtual machine) to get recommendations for
  entity_type  = "VirtualMachine" // Type of the cloud entity (e.g., VirtualMachine, Database, etc.)
  default_size = "t3.nano" // Default instance size used if no recommendation is available.
}
The resource block is used to define and provision the actual AWS EC2 instance. It tells Terraform what to create and how to configure it in your AWS environment.
resource "aws_instance" "terraform-demo-ec2" {
  ami           = "ami-079db87dc4c10ac91" // AMI ID used to launch the instance.
  instance_type = data.turbonomic_cloud_entity_recommendation.example.new_instance_type // Uses the recommended instance type from the Turbonomic data source.

  tags = merge(
    {
      Name = "exampleVirtualMachine" // Sets the Name tag for easy identification
    },
    provider::turbonomic::get_tag() //tag the resource as optimized by Turbonomic Provider for Terraform
  )
}
The preceding modifications are enough to incorporate the Turbonomic Provider for Terraform into your Terraform configuration, making it easier to leverage Turbonomic suggested changes without directly interacting with its UI.
The diagram below illustrates two possible workflows: one in which the change to the EC2 instance is made directly within Turbonomic (shown on the left), and another where the change is implemented using Terraform.
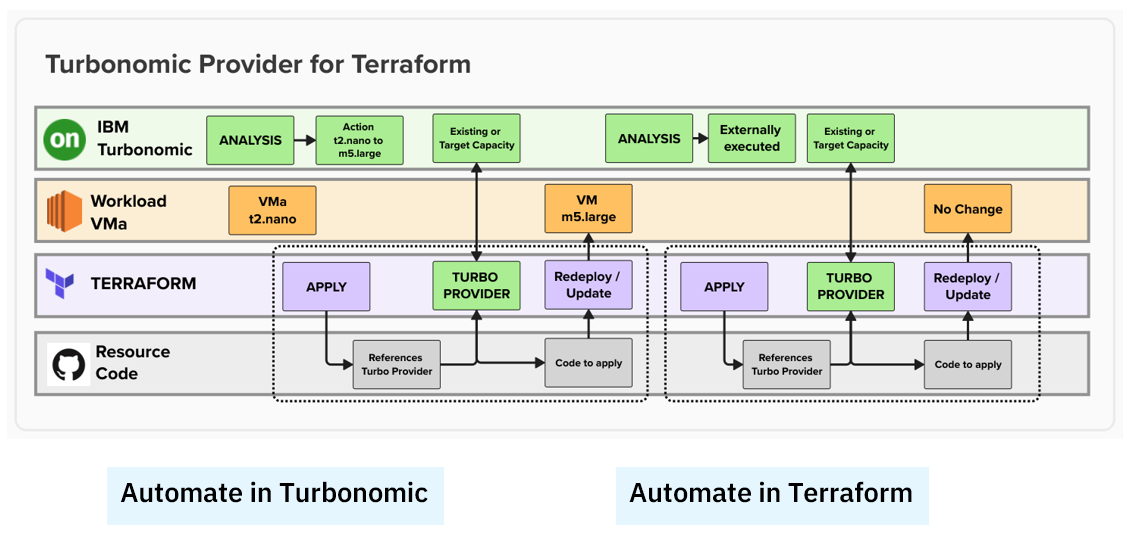
In either case, the Turbonomic Provider enables you to drift TOWARDs an optimized state automatically.
- IBM Turbonomic determines the optimal state for a given resource.
- The Turbonomic Provider for Terraform ensures that any drift between what is running and the code is toward the optimal state and not away from it.
- The Turbonomic Provider for Terraform enables automation in Turbonomic or Terraform to keep the resource in the optimal state continuously matching to the demand to assure performance at the best cost.
Step 2.2 Run a standard plan and apply
After connecting to the corresponding Terraform code repository and adding the required variables, initiate a run by following these steps:
- Click Start Plan.
- Select the run type.
- Click Start to run the plan and apply process.
This will trigger a Terraform Plan and Terraform Apply, which will validate your configuration and provision your infrastructure accordingly.
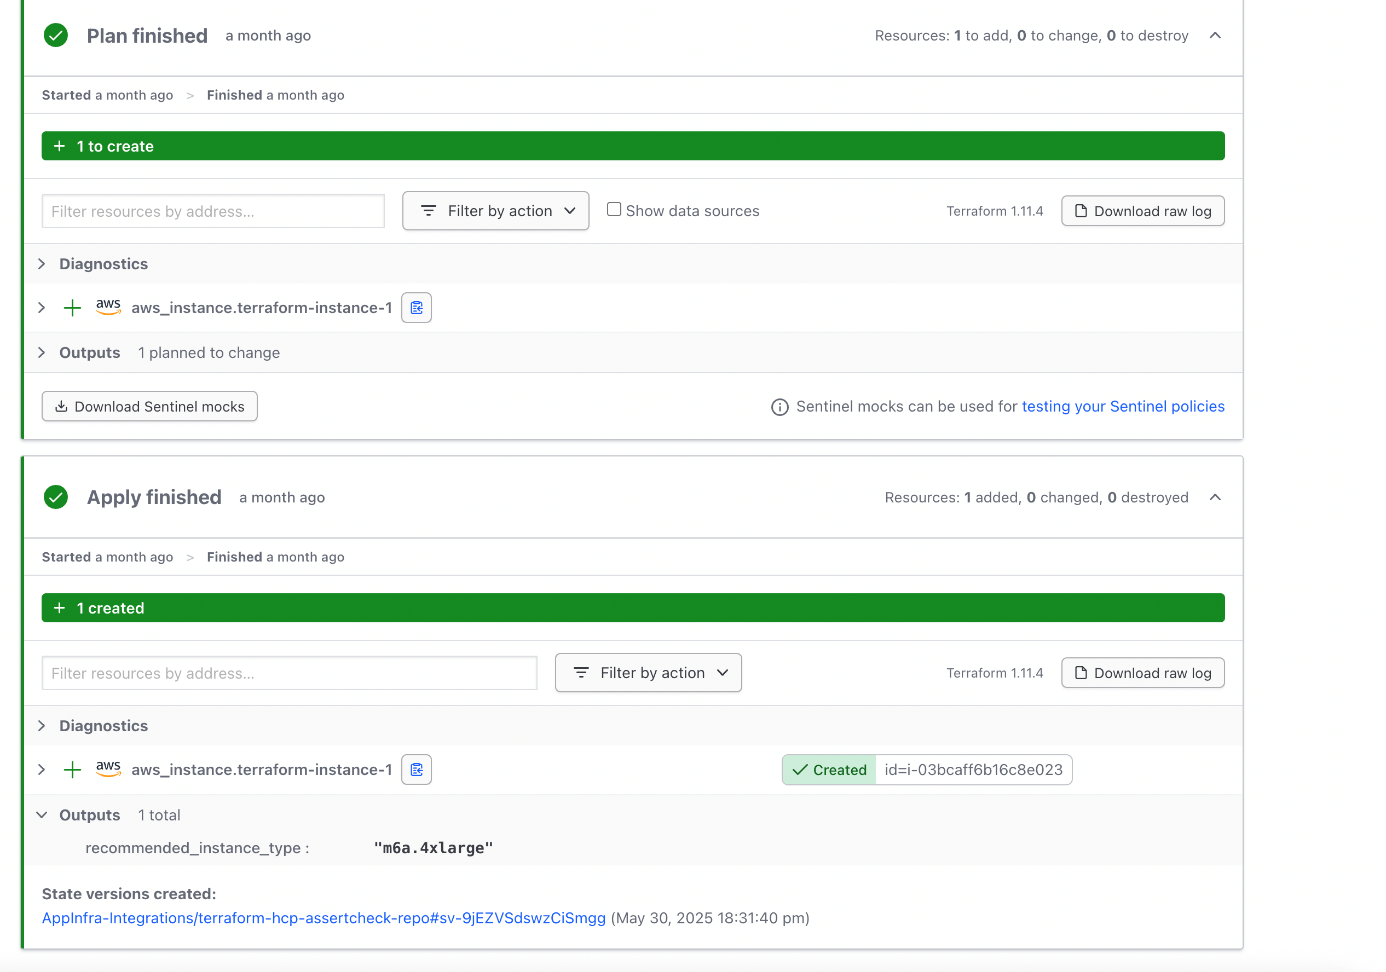
By integrating a Version Control System (VCS) with HashiCorp Terraform, any changes pushed to the Terraform code in the connected repository will automatically trigger a new Terraform Plan and, depending on the workspace settings, a Terraform Apply as well.
Step 2.3 Set up automation in IBM Turbonomic
First, you need to create a group for Terraform Provider resources. When you create a group in Turbonomic using an Optimized by filter, the platform will automatically include any entities that match your criteria. As Turbonomic Provider-driven resources are added or updated, the group adjusts itself in real time.
- Log in to Turbonomic.
- Open the Settings page.
- Click Groups.
- Click the New Group button.
- Choose the entity type and provide the name of the group.
- Click the filter icon, and click the Add criteria button.
- Select Optimized by, and then choose Turbonomic (Provider) from the drop-down list.
Click Save and apply, and then click Create.

Next you need to create an Automation policy: Open the Settings page.
- Click Policies.
- Click the Create button.
- Choose the entity type to create the policy for and click Next
- Give the policy and name and Scope it to the group created in the previous step
- Add an Automation workflow and choose one of the scale options: Cloud scale all, Cloud scale for performance, or Cloud scale for savings.
Set Action generation to Recommend only or Manual to allow Turbonomic to generate actions
Note: Always explicitly set both scaling options, performance and savings to avoid relying on global defaults.

Click Submit, and then click Create.

Step 2.4 Set up IaC Automation in HashiCorp Terraform
You can use the HashiCorp Terraform Continuous validation feature along with Terraform Provider, which ensures resource configurations are consistent with Turbonomic recommendations. The health check runs periodically every 24 hours, and it can be run from the Continuous validation page in HashiCorp Terraform.
To enable health check in your HashiCorp Terraform workspace:
- Sign in to HashiCorp Terraform.
- Go to your workspace.
- Verify the requirements (the Terraform version and execution mode).
- Navigate to Settings.
- Click Health.
- Under Health Assessments, select Enable.
Click Save Settings.

To perform an assertion check on an AWS EC2 instance using Turbonomic recommendations, configure the provider, fetch Turbonomic recommendations using a data source, and add a turbonomic_consistent_with_recommendation_check assertion:
check "turbonomic_consistent_with_recommendation_check"{
  assert {
    condition =  aws_instance.terraform-instance-1.instance_type == coalesce(data.turbonomic_cloud_entity_recommendation.example.new_instance_type,aws_instance.terraform-instance-1.instance_type)
    error_message = "Must use the latest recommended instance type,${coalesce(data.turbonomic_cloud_entity_recommendation.example.new_instance_type,aws_instance.terraform-instance-1.instance_type)}"
  }
}
Finally, to view and verify the assertions, follow these steps:
- Sign in to HashiCorp Terraform.
- Go to your workspace.
- Open the Health tab.
- View the Continuous validation results.
- Click the Start health assessment button for a manual immediate health check.
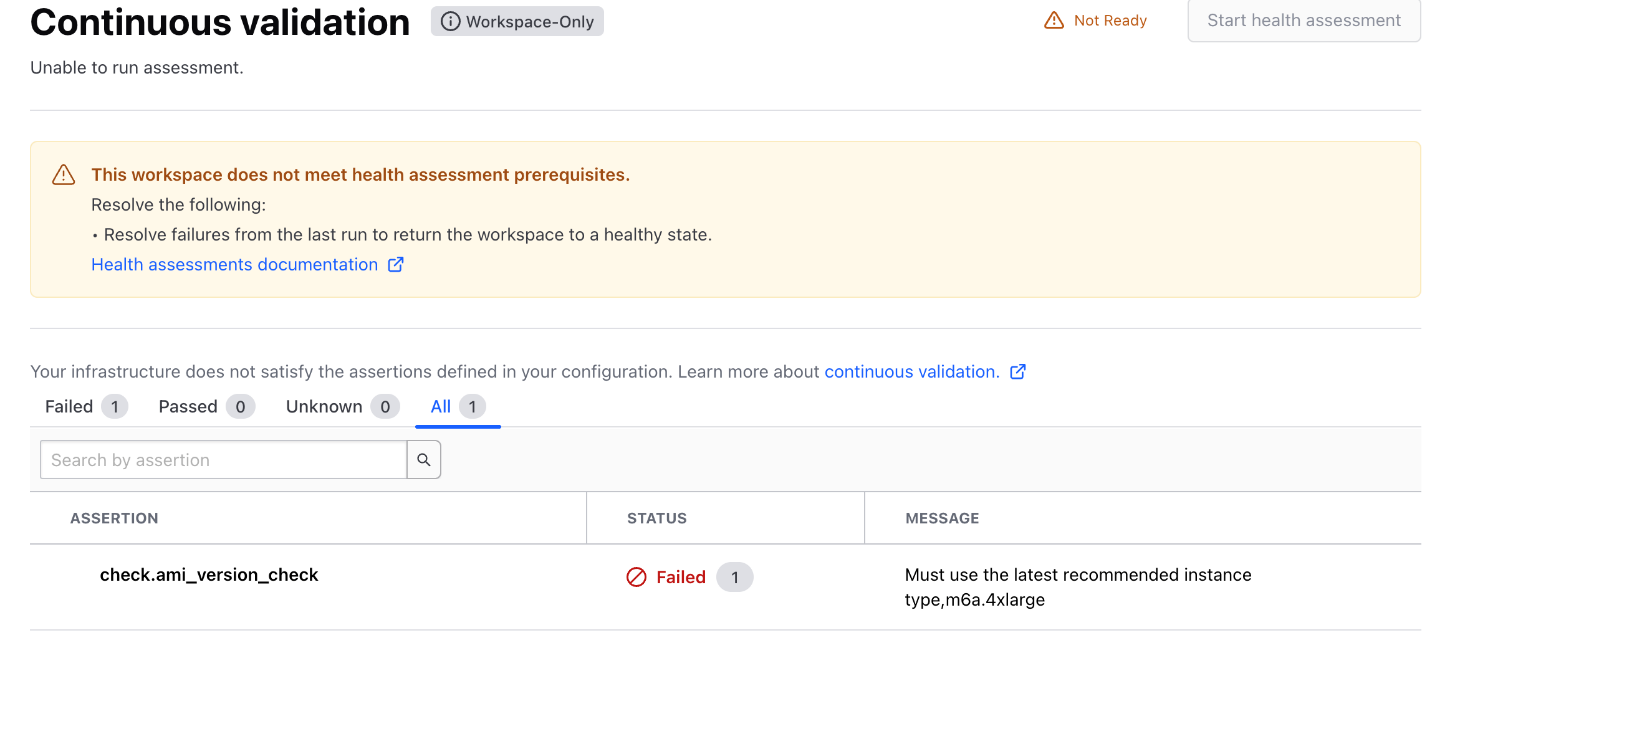
The following image shows a health check failure for a workspace.
Conclusion
This tutorial showed you how to set up continuous optimization from IBM Turbonomic in your HashiCorp Terraform environments. In future tutorials, we’ll explore more advanced configurations that include dynamic modules or lean, single-responsibility modules.