About cookies on this site Our websites require some cookies to function properly (required). In addition, other cookies may be used with your consent to analyze site usage, improve the user experience and for advertising. For more information, please review your options. By visiting our website, you agree to our processing of information as described in IBM’sprivacy statement. To provide a smooth navigation, your cookie preferences will be shared across the IBM web domains listed here.
Learning Path
Get started with Node.js
Software is maintained long after its initial release. Maintenance activities include:
- Bug fixes
- Adding new features
- Upgrades or other changes to the underlying system stack
- Upgrades to third-party software dependencies
While developers tend to have the first 3 activities down, the last one is more or less out of our control. This is especially serious in Node because of the sheer number of dependencies to be managed. That's why it's key that you understand package.json and its role in maintaining and evolving your applications.
What is package.json
A Node project is commonly known as a package. JSON (JavaScript Object Notation) is the notation used to describe Node packages.
package.json is a file that contains basic information like package name and version number, as well as more complex metadata.
npm requires the package.json file to manage projects, and every project submitted to the npm registry must have one. If you want to create a successful Node project, you need to know how to create a package.json file.
Let's look closer at the elements of this file.
The project manifest
A manifest is a document describing the contents of a given object, such as a container. package.json is the manifest required for every Node project. At minimum, a package.json file must contain two elements:
- name: The package's name
- version: The package's version number
package.json can contain many more fields than just these two, but let's start with what's required. I introduce the other fields soon.
Project metadata
In addition to elements like name and version, package.json contains more complex metadata. This metadata helps npm manage your dependencies, run scripts to start the application (as you saw in "Create your first Node.js application," run unit tests, and more.
Project metadata includes elements like:
- description: The human readable description, which comes up in
npm searchif you publish a package to the npm registry. - entry point: The package's main JavaScript module.
- license: The package's license identifier (in Software Package Data Exchange (SPDX) format); available licenses include
Apache2.0,MIT, orISC(the default), to name a few. - author: The developer (more specifically, the developer's name and email address).
- scripts: Scripts that run at various points in the package's lifecycle (for example,
startandtest). - dependencies: Any other Node.js packages the package depends on (lots more about this later).
These are just a few of the metadata elements used for Node. You can read about all of the metadata available in package.json in the Node documentation).
Sharing code
One of Node's greatest strengths is the npm ecosystem, and sharing code is key to the culture of Node. Using third-party software in your programs can also introduce complexity to your projects. Knowing how to wrangle package.json will save you countless sleepless nights managing bugs, software updates, and other issues.
How to create a package.json file
There are two ways to create a package.json from scratch:
Option 1: Take the interview
If you run npm init from the command line, npm will interview you about your new package. It will ask you a series of questions. For each of those questions there is a default, which I've summarized in the table below.
| Question | Default |
|---|---|
package name |
The name of the current directory |
version |
1.0.0 |
description |
'' (empty string) |
entry point |
index.js |
test command |
"echo \"Error: no test specified\" && exit 1" |
git repository |
'' |
keywords |
[] |
author |
'' |
license |
ISC |
The entire interview looks like this:
$ npm init
This utility will walk you through creating a package.json file.
It only covers the most common items, and tries to guess sensible defaults.

See `npm help json` for definitive documentation on these fields
and exactly what they do.

Use `npm install <pkg>` afterwards to install a package and
save it as a dependency in the package.json file.

Press ^C at any time to quit.
package name: (unit-8)
version: (1.0.0)
description:
entry point: (index.js)
test command:
git repository:
keywords:
author:
license: (ISC)
About to write to package.json:

{
  "name": "unit-8",
  "version": "1.0.0",
  "description": "",
  "main": "index.js",
  "scripts": {
    "test": "echo \"Error: no test specified\" && exit 1"
  },
  "author": "",
  "license": "ISC"
}


Is this OK? (yes) yes
$
Option 2: Accept the defaults
The quickest way to create a package.json is to accept all the defaults, then change what you want later. Fortunately, there's an easy way to instruct npm init to just accept the defaults, using the npm init -y command:
$ npm init -y
Wrote to package.json:

{
  "name": "Unit-8",
  "version": "1.0.0",
  "description": "",
  "main": "index.js",
  "scripts": {
    "test": "echo \"Error: no test specified\" && exit 1"
  },
  "keywords": [],
  "author": "",
  "license": "ISC"
}


$
If you haven't already done it, open a terminal window or command prompt and navigate to an empty directory. All the source code for this tutorial is on GitHub, but I want you to build this example from scratch. That way you'll own it, and you'll understand it more deeply.
Managing dependencies in Node
Relying on third-party software is part of Node-based development, and most Node applications have numerous dependencies. As software evolves, these dependencies can cause quite a mess for Node.js applications. Once you've installed dependencies they also have to be managed. In this section, I show you how to manage all the dependencies.
Before you go any further, modify the package.json you generated in the previous section so it looks like this (just so we're on the same page):
{
  "name": "Unit-8",
  "version": "1.0.0",
  "description": "Node.js Course Unit 8 Example Code",
  "main": "unit-8.js",
  "scripts": {
    "test": "echo \"Error: no test specified\" && exit 1"
  },
  "keywords": [],
  "author": "J Steven Perry <jstevenperry@gmail.com>",
  "license": "Apache-2.0"
}
Feel free to replace your name as the author in your local copy.
There are two ways to add a new package as a dependency to your Node project. Let's look at both options below.
Option 1: Use npm to install a new package
You can use npm to directly install a new package. From the command line, enter this command: npm install makoto-logger
You should see something like this:
$ npm install makoto-logger
npm notice created a lockfile as package-lock.json. You should commit this file.
npm WARN Unit-8@1.0.0 No repository field.

+ makoto-logger@1.0.2
added 1 package and audited 1 package in 3.706s
found 0 vulnerabilities

$
Look at package.json and you'll notice two differences from before you installed makoto-logger.
First, there's a new dependencies section just below license, which looks like this:
"dependencies": {
    "makoto-logger": "^1.0.2"
  }
Second, notice that npm created the node_modules directory and placed the newly installed dependency there.
Option 2: Specify a new dependency in package.json
Another way to install a new package is to specify it as a dependency in package.json, then run npm install with no arguments. The new dependency and all of its dependencies will be installed.
To see this in action, add the following dependency to the dependencies element in your package.json (don't forget to add a comma after the makoto-logger dependency):
"sqlite3": "^4.0.1"
Now run npm install with no arguments. You should see output like this:
$ npm install

> sqlite3@4.0.1 install node_modules/sqlite3
> node-pre-gyp install --fallback-to-build

node-pre-gyp WARN Using needle for node-pre-gyp https download
[sqlite3] Success: "node_modules/sqlite3/lib/binding/node-v64-darwin-x64/node_sqlite3.node" is installed via remote
npm WARN Unit-8@1.0.0 No repository field.

added 68 packages from 48 contributors and audited 98 packages in 11.595s
found 0 vulnerabilities

$
Installing multiple packages
In "Introduction to Node package manager," I introduced eslint, which looks for potential errors in your JavaScript code. Run this command to install eslint and a few companion tools (note that i is short for install):
npm i --save-dev eslint babel-eslint eslint-config-strongloop
This installs the following packages and their dependencies (which are installed recursively):
eslintbabel-eslinteslint-config-strongloop
The --save-dev flag is used to save the package dependencies to package.json in an element named devDependencies. Here's the output:
$ npm i --save-dev eslint babel-eslint eslint-config-strongloop
npm WARN Unit-8@1.0.0 No repository field.

+ eslint-config-strongloop@2.1.0
+ babel-eslint@8.2.6
+ eslint@5.1.0
added 148 packages from 186 contributors and audited 431 packages in 10.889s
found 0 vulnerabilities

$
You've just added a handful of dependencies to your project. Your package.json should now look like this:
{
  "name": "Unit-8",
  "version": "1.0.0",
  "description": "Node.js Course Unit 8 Example Code",
  "main": "unit-8.js",
  "scripts": {
    "test": "echo \"Error: no test specified\" && exit 1"
  },
  "keywords": [],
  "author": "J Steven Perry <jstevenperry@gmail.com>",
  "license": "Apache-2.0",
  "dependencies": {
    "makoto-logger": "^1.0.2",
    "sqlite3": "^4.0.1"
  },
  "devDependencies": {
    "babel-eslint": "^8.2.6",
    "eslint": "^5.1.0",
    "eslint-config-strongloop": "^2.1.0"
  }
}
You may wonder what the caret (^) just before each version numbers means. That's Semantic Versioning (SemVer) syntax, which we'll look at next.
Specifying version numbers
Semantic Versioning (or SemVer) is a formal way to specify version numbers. It was created by Tom Preston-Warner, one of the cofounders of GitHub. As of this writing the latest SemVer specification is 2.0.0.
SemVer uses a three-part numbering scheme to specify a release label, which looks like this:
Major.Minor.Patch
Here's what each placement means:
Majoris used for a new public API that breaks (is not backward-compatible with) a previous version (forMajor> 0, that is).Minoris used for new features that are backward-compatible (or non-breaking) only with the current major version.Patchis used for a bug fix that is non-breaking.
The SemVer spec also has extensions for creating pre-release labels, but I won't cover those here.
Examples and rules for using SemVer
Let's look at a few examples:
1.0.0is always the first release of the public API.1.1.1indicates the release is the first patch, of the first feature release after the first release of the public API.2.0.4indicates the fourth patch after the release of the first breaking change (that is from1.xto2.0.0).
Don't skip integers (to go from, say, 1.2.4 to 1.2.6, skipping 1.2.5); always increment them.
Numbers always increase within any subordinate version component, and reset to zero when their superior changes. For example, a feature release of version 1.2.3 becomes 1.3.0 where Patch resets to zero. A breaking change from 2.9.11 becomes 3.0.0 and resets both of the subordinate Minor and Patch numbers.
Managing version tolerance
Dependencies change, and if you don't tend to them those changes can break your code.
SemVer's version numbers gives a package author a way to qualitatively declare the impact of a given change relative to the previous version. As a package consumer, it also gives you a way to specify how much change you are willing to tolerate for a given dependency.
As a package producer, you can follow the SemVer guidelines to easily inform package consumers of how much a dependency has changed from one release to the next.
As a package consumer, you can follow the SemVer guidelines to enable your package manager (npm, yarn, and more) to automatically handle those upgrades.
Used properly, SemVer will save you from having to read hundreds of release notes, just to figure out if your code is going to break when you do an upgrade.
Automatic upgrades
When you have hundreds or thousands of dependencies, tool support for SemVer really matters. So let's see how to use SemVer to tell your package manager how much version tolerance you are willing to accept on a package-by-package basis.
We'll use the following dependencies snippet from package.json as our example:
.
.
  "dependencies": {
    "foo-a": 1.2.3,
    "bar-a": ~2.1.4,
    "baz-a": ^1.2.5
  }
  .
  .
The syntax can get complicated, depending on what you're trying to tell npm to do. This course limits examples to the syntax you're most likely to use.
Example 1: Accept a single version only
Let's say you are not willing to tolerate any change to the current version of a dependency. In this case, you would specify just the version number with no special characters:
"foo-a": 1.2.3,
This tells npm, "For package foo-a, only use version 1.2.3 no matter what."
Use this command when you don't want npm to automatically upgrade foo-a.
Example 2: Accept a range of patches for a minor update only
Now let's say you want to allow a range of patches for a single minor version of a given component. In this case, you would use the tilde (~) character:
"bar-a": ~2.1.4,
This tells npm: "For package bar-a any approximate release from 2.1.4 up to the next feature release (which would be 2.2.0) is acceptable." In other words, 2.1.5 would be fine (as would 2.1.6, 2,1,7, and so on), but 2.2.0 would not.
Use this command when you're willing to accept bug fixes (patches) but don't want npm to automatically upgrade to new feature releases.
Example 3: Accept a range of minor feature releases
If you can tolerate bug fixes and minor feature releases within a major release, use the caret (^) character:
"baz-a": ^1.2.5
This tells npm: "For package baz-a any compatible release from 1.2.5 up to the next major release (which would be 2.0.0) is acceptable."
In this case, npm would automatically update baz-a to, say, 1.2.6 or 1.3.0, but not to 2.0.0.
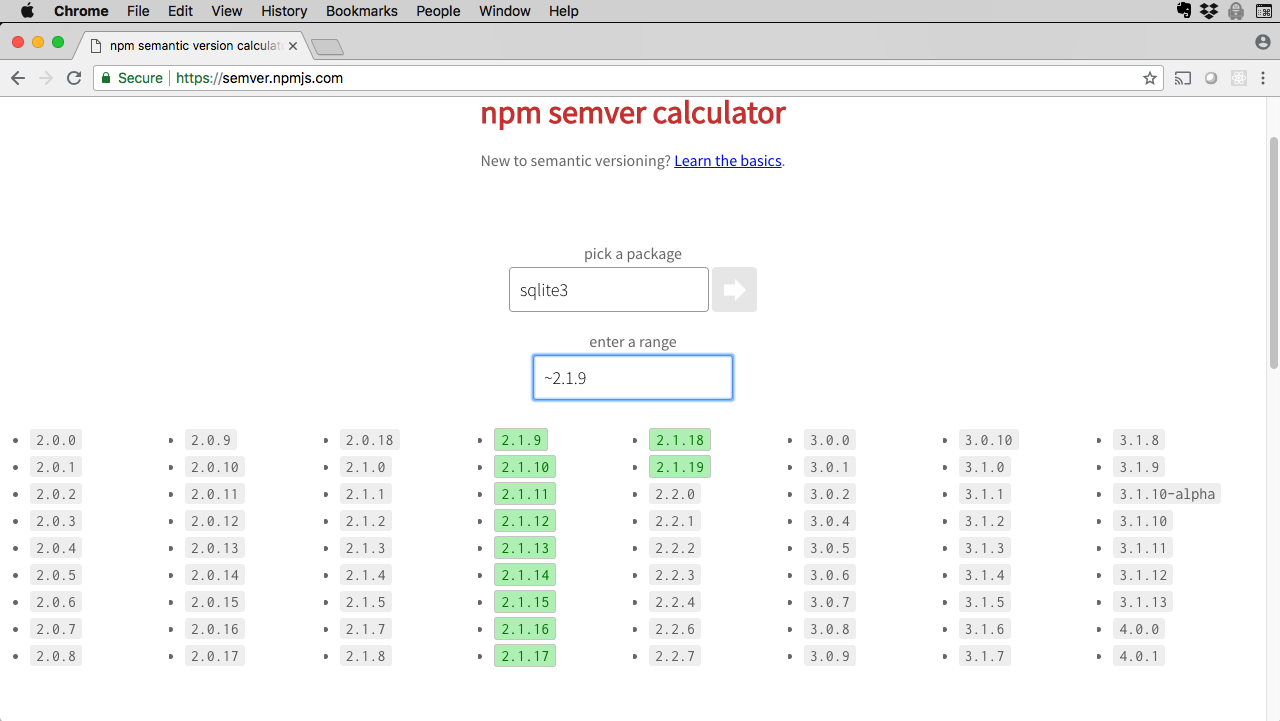
The SemVer calculator
You can use the npm semver calculator to get the exact rule you need for a given dependency. All you have to do is choose a package, then input a SemVer rule. The tool will show you which versions of that package match the given rule.
Here's output for the approximately equal rule in the sqlite3 module:
Figure 1. npm semver calculator showing ~2.1.9 approximately equal rule for sqlite3
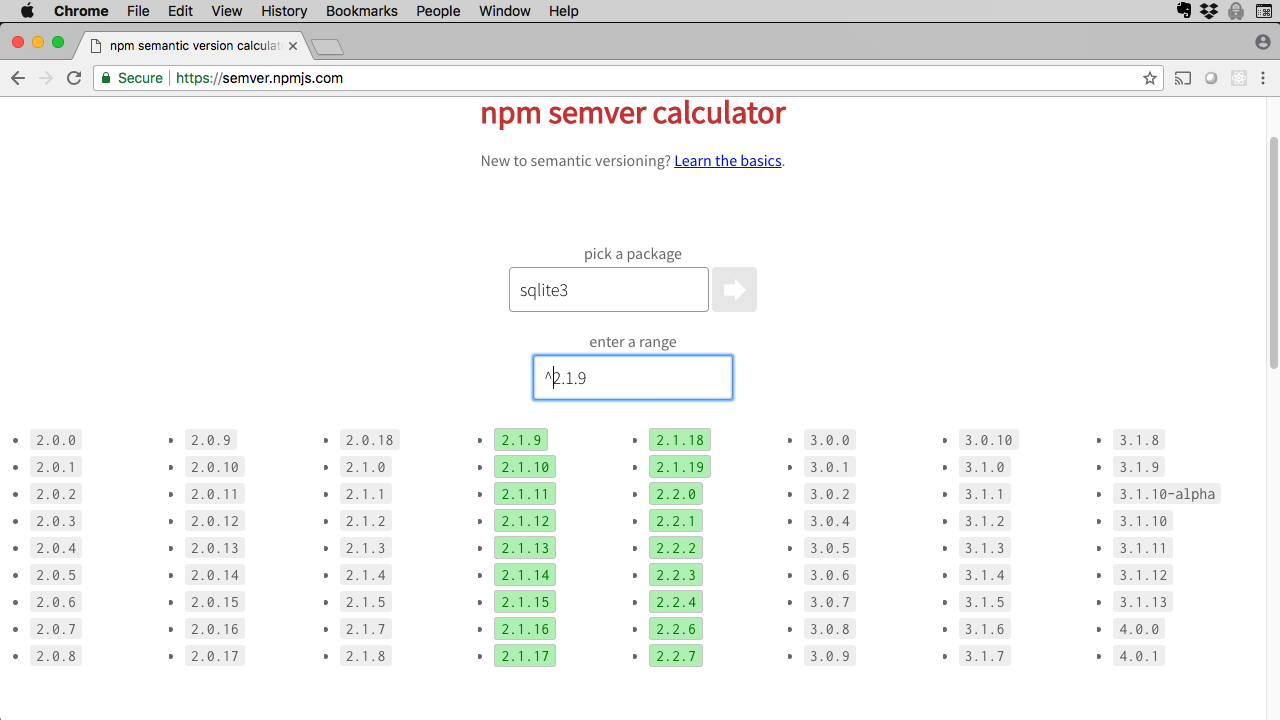
And here's output for the compatible rule:
Figure 2. npm semver calculator showing ^2.1.9 compatible rule for sqlite3
Play around with the SemVer calculator, which is a great way to learn SemVer syntax.
Package locking: package-lock.json
If you've worked in Node, you've probably noticed the file called package-lock.json. Turns out it's an important file that solves a dependency-related problem. Let's take a look.
Example scenario
To get at the problem, let's go back in time to the days before npm release 5.
We'll use sqlite3 as an example. At the time of this writing, the current version is 4.0.1.
Suppose that I write a package that specifies a dependency on sqlite3 like this:
"dependencies": {
    "sqlite3": "^4.0.1"
  }
I've specified the dependency on sqlite3 as: "any change that is backward-compatible with major release 4."
I publish my package to the npm registry and life is good.
Some months later, the sqlite3 team publish a new feature release (4.1.0) that is completely backward compatible with 4.0.1. Around the same time, you decide you want to use my package, so you specify it as a dependency in your package.json.
When you run npm install you will get sqlite3 version 4.1.0. So far, so good.
The problem
Now let's suppose that the way my package uses sqlite3 conflicts with the new feature and creates a bug (to be clear, this is my fault, not sqlite3's). My code breaks, which means your code breaks. That's not good.
The problem is this: based on the loose specification of the dependent version of sqlite3, the structure of your node_modules directory will be different following npm install than it was for me when I created my package.
When two people can run npm install and get different results, we call those results non-deterministic, meaning that you can't always determine what a given node_modules directory will look like.
The solution
The non-determinism in this scenario is caused by the loose specification of dependent versions. What's needed is a way to lock the specifications in place so that they are not loose. package-lock.json was introduced in npm version 5 for this purpose.
Now, whenever you run npm install, the exact version of every dependency is listed in a package-lock.json file, which is automatically generated. The file is used to resolve dependencies and install the correct dependency tree in node_modules.
In the case of our example, assuming there are no other dependencies on sqlite3 in your code, and given how I specified the dependency in my package.json when I published the package to the npm registry, you should always be able to determine which version of the package is installed for your project.
Bottom line: Commit package-lock.json to your source control if you want deterministic installs. (Trust me, you do.)
Popular third-party packages for your Node projects
We've worked through the first few tutorials in this learning path using "Vanilla Node", meaning we've written all the code ourselves. Now we're ready to move beyond this restriction, and start incorporating third-party code in our projects.
The npm ecosystem provides so much code you can reuse with a quick addition to your package.json and an npm install. I'll introduce a few of those packages in the next sections, and we'll use them in upcoming tutorials.
Mocha and Chai for testing
Mocha is a testing framework for JavaScript applications, and is one of the most popular frameworks for Node.js applications.
Chai is an assertion library that replaces the Node assert module, and provides support for multiple styles of assertion:
- Assert-style: For example,
assertEqual(actualValue, expectedValue). - Behavior-driven development (BDD) style: For example:
expect(expectedValue).to.equal(actualValue).
Together, Mocha and Chai make a powerful, must-have combination for Node projects. We'll use Mocha and Chai in "Unit testing in Node.js".
Winston logging
Winston is a logging framework with the notion of transports, which are storage devices for logs (such as the console, files, and so forth) with additional community contribs for other transports like MongoDB.
Winston bills itself as "A logger for just about everything."
I'll let you be the judge, because we'll use Winston in "Logging Node.js applications with Winston and Log4js".
Express web framework
Express is arguably the most popular web framework for Node, with millions of downloads per week.
It has lots of features you look for in a web framework: it's fast, offers extensive templating support, has robust, easy-to-use routing, and more.
We'll use Express in "Using Express.js for Node applications".
Mongoose for MongoDB
MongoDB is one of the most popular NoSQL databases in the world.
Mongoose is an object data modeling (ODM) tool for MongoDB.
We'll convert the Shopping List application from "Create your first Node.js application" to use MongoDB and Mongoose in "Use MongoDB with Node.js".
And a few more
Node has so many popular packages that I can't list them all here, let alone talk about them. But here are a few more you're likely to run across:
These are just a few of the most popular packages for Node. Be sure to visit the npm website or npms.io to search for more packages you might want to use in your Node projects.
Conclusion
This tutorial has introduced you to package.json and using it to manage the challenges of software evolution in Node.
You've seen some of the elements this very important file contains, and you've learned how to create a package.json file from scratch.
We also looked at Semantic Versioning (SemVer), and I showed you how to use it to denote and manage updates in your Node applications. SemVer automates many aspects of dependency management, but it only works if everyone (package producers and consumers) follows the rules.
We also looked at how package-lock.json solves the problem of non-deterministic installation.
Finally, you got a first look at some Node packages we'll work with in upcoming tutorials. These are all packages you should know about, and you'll get to know them better very soon.
We'll start integrating third-party packages in "Unit testing in Node.js", where you'll learn all about testing with Mocha and Chai.
Video

Quiz: Test your knowledge
Answer true or false
SemVer was created to deal with the complexity of package dependency resolution in an automated fashion, when there are hundreds of thousands of dependencies.
The author and repository elements are required in
package.jsonif you plan to publish your package to the npm registry.
Choose the best answer
Which of the following
package.jsonelements are required?A. author
B. name
C. repository
D. description
E. B and D
F. A and B
Which of the following tells
npmto match version1.2.4or higher and any compatible version up to version1.3.0?A.
^1.2.4B.
1.2.4C.
~1.2D.
~1.2.4E.
<1.2.5 || <1.3.0Which of the following best describes the purpose of
package-lock.jsonfor packagemy-utility?A. Ensures deterministic installation; that is, the same
node_modulestree for any installation ofmy-utility.B. Ensures that the
node_modulesdirectory cannot be deleted during a failed unit test.C. Ensures that a change to
package-lock.jsonis immediately reflected inpackage.jsonso the build does not fail.D. Ensures the project is consistent across hardware architectures where packages tend to float freely.
Fill in the blank
If the current release is 2.3.0, the next Patch release number will be _.
If the current release is 3.10.2, the next Minor release number will be _.
If the current release is 1.0.0, the next Major release number will be _.
In the space next to the description of a hypothetical change, indicate the SemVer release type that would be triggered (Major, Minor, or Patch), and what the release number should be. Assume the current release number is 1.2.3:
A. Bug fixes, compatible with the previous release. Release type is _ and the version number is _.
B. New features, not compatible with the previous release. Release type is _ and the version number is _.
C. New feature, compatible with the previous release. Release type is _ and the version number is _.
D. Breaking change to the public API. Release type is _ and the version number is _.
E. Bug fix, not compatible with the previous release. Release type is _ and the version number is _.
F. Addition to the public API, compatible with the previous release. Release type is _ and the version number is _.
If the current release of
package-ais1.2.3, the SemVer syntax to indicate "starting with1.2.3, any Patch and Minor release up to release2.0.0is acceptable" would be: _.If the current release of
package-ais1.2.3, the SemVer syntax to indicate "any1.2.xPatch release up to release1.3.0is acceptable" would be: _.If the current release of
package-ais1.2.3, the SemVer syntax to indicate "starting with1.2.3, any1.2.xPatch release up to release1.3.0is acceptable" would be: _.If the current release of
package-ais1.2.3, the SemVer syntax to indicate "only release1.2.3is acceptable" would be: _.If the current release of
package-ais1.2.3, the SemVer syntax to indicate "any release including and above1.2.3is acceptable" would be: _.
Check your answers
Answers for true or false questions
Answer: True: When a package changes, the package author changes the version number in accordance with SemVer guidelines. This enables package management tools like
npmto automatically resolve the resulting dependency trees.Answer: False: Only the
nameandversionelements are required, regardless of whether you publish your package to the npm registry or not. However, you are strongly encouraged to provide values for as many of thepackage.jsonelements as you can.
Answers for multiple choice questions
Answer: B: Of the elements listed, only
nameis required. The other required element isversion, which is not listed.Answer: D: Any minor release at or above
1.2.4up to1.3.0will match this SemVer rule.Answer: A: A deterministic install is one where the
node_modulestree is consistent for anyone who installsmy-utility, regardless of dependency churn sincemy-packagewas published.
Answers for fill in the blank questions
Answer: 2.3.4
Answer: 3.11.0
Answer: 2.0.0
Answers:
A: Patch - 1.2.4
B: Major - 2.0.0
C: Minor - 1.3.0
D: Major - 2.0.0
E: Major - 2.0.0
F: Minor - 1.3.0
Answer:
^1.2.3Answer:
~1.2,~1.2.xAnswer:
~1.2.3Answer:
1.2.3Answer:
>=1.2.3