About cookies on this site Our websites require some cookies to function properly (required). In addition, other cookies may be used with your consent to analyze site usage, improve the user experience and for advertising. For more information, please review your options. By visiting our website, you agree to our processing of information as described in IBM’sprivacy statement. To provide a smooth navigation, your cookie preferences will be shared across the IBM web domains listed here.
Tutorial
Create a single-node OpenShift cluster on IBM Cloud
Deploy a single-node OpenShift cluster on IBM Cloud, covering server provisioning, DNS configuration, cluster setup, storage installation, and image registry configuration
Red Hat OpenShift is available as a Platform as a Service (PaaS) on IBM Cloud. In this service, typically a minimum of two worker nodes are required in classic data centers like Chennai (with a recommendation of three worker nodes), and a minimum of three worker nodes are required in a VPC environment.
For development, demo, and Proof of Concept (PoC) use cases, the redundancy provided by multiple worker nodes is not necessary. For such use cases, you can use a single-node OpenShift (SNO) cluster to save on infrastructure costs.
Single-node OpenShift (SNO) cluster is a configuration of a standard OpenShift cluster that consists of a single control plane node that also runs workloads. This configuration combines both control and worker node functionalities, allowing users to deploy a smaller OpenShift footprint with minimal dependence on a centralized management cluster.
Single-node OpenShift cluster is not available out-of-the-box on IBM Cloud. This tutorial details the steps to create a single-node OpenShift cluster.
Prerequisites
- IBM Cloud Account: If you don’t have an IBM Cloud account, you can sign up at IBM Cloud registration to create an IBM Cloud account with USD 200 credits, which is sufficient to complete this activity.
- Access to Red Hat Hybrid Cloud Account
- Registered Domain: You can use a free domain or purchase one. Domains can be bought for as low as 300 INR per year.
Steps
Provision a Virtual Server for Classic on IBM Cloud
Navigate to the IBM Cloud portal.
Search for
Virtual Server for Classicin the IBM Cloud Catalog.Create a Virtual Server with the following details:
- Type of virtual server: Public Multi-tenant
- Hostname: Any user-friendly name. For example, sno
- Domain: Base domain name. For example, mydomain.online (you should own this domain)
- Billing Method: Select Hourly to take advantage of suspended billing. The Monthly option is also available. The virtual server instance incurs charges regardless of billing method or power status. The suspend billing feature is only available on certain hourly, public virtual servers. For more information, see Suspend billing.
- Location: CHE01 - Chennai, or you can select any classic data center
- Profile: Balanced | B1.16x64
- Operating System: Red Hat Enterprise Linux 9.x - Minimal Install (64-bit)
- Attached storage disks:
- Boot Disk: 100 GB
- Additional Disk: 500 GB (or based on your requirement)
- Network Interface: Choose network speeds, public and private VLANs, and Subnets.
Keep everything else default and click on create.
It will take 2-5 minutes for the server to be available. Once the service is up and running, make a note of the Public IP address of the server.
Configure DNS records
In this tutorial, we will use the DNS service provided by a domain service provider like GoDaddy. If you already own a domain, you can explore using the Internet Services available under IBM Cloud Catalog. In addition to DNS capability Internet Services also provides DDoS protection.
Here, we assume you already own a domain. If not, you can purchase one from a domain provider or get a free domain name.
On your domain provider's website, navigate to Manage domain -> DNS -> Add DNS Record.
Add
Atype DNS records. The IP address of the DNS record should point to the public IP address of the virtual server we created in the previous steps.
Please add the following DNS records. Note that in FQDN, we are only adding the part before the domain; this may vary depending on the provider.
| Usage | FQDN | DNS Record Type | IP Address |
|---|---|---|---|
| Kubernetes API | api.sno | A | Public IP Address of Virtual Server |
| Internal API | api-int.sno | A | Public IP Address of Virtual Server |
| Internal API | *.app.sno | A | Public IP Address of Virtual Server |
Download OpenShift Assisted Installer ISO
Access the Red Hat Hybrid Cloud Console and proceed to the Assisted Installer for OpenShift option.
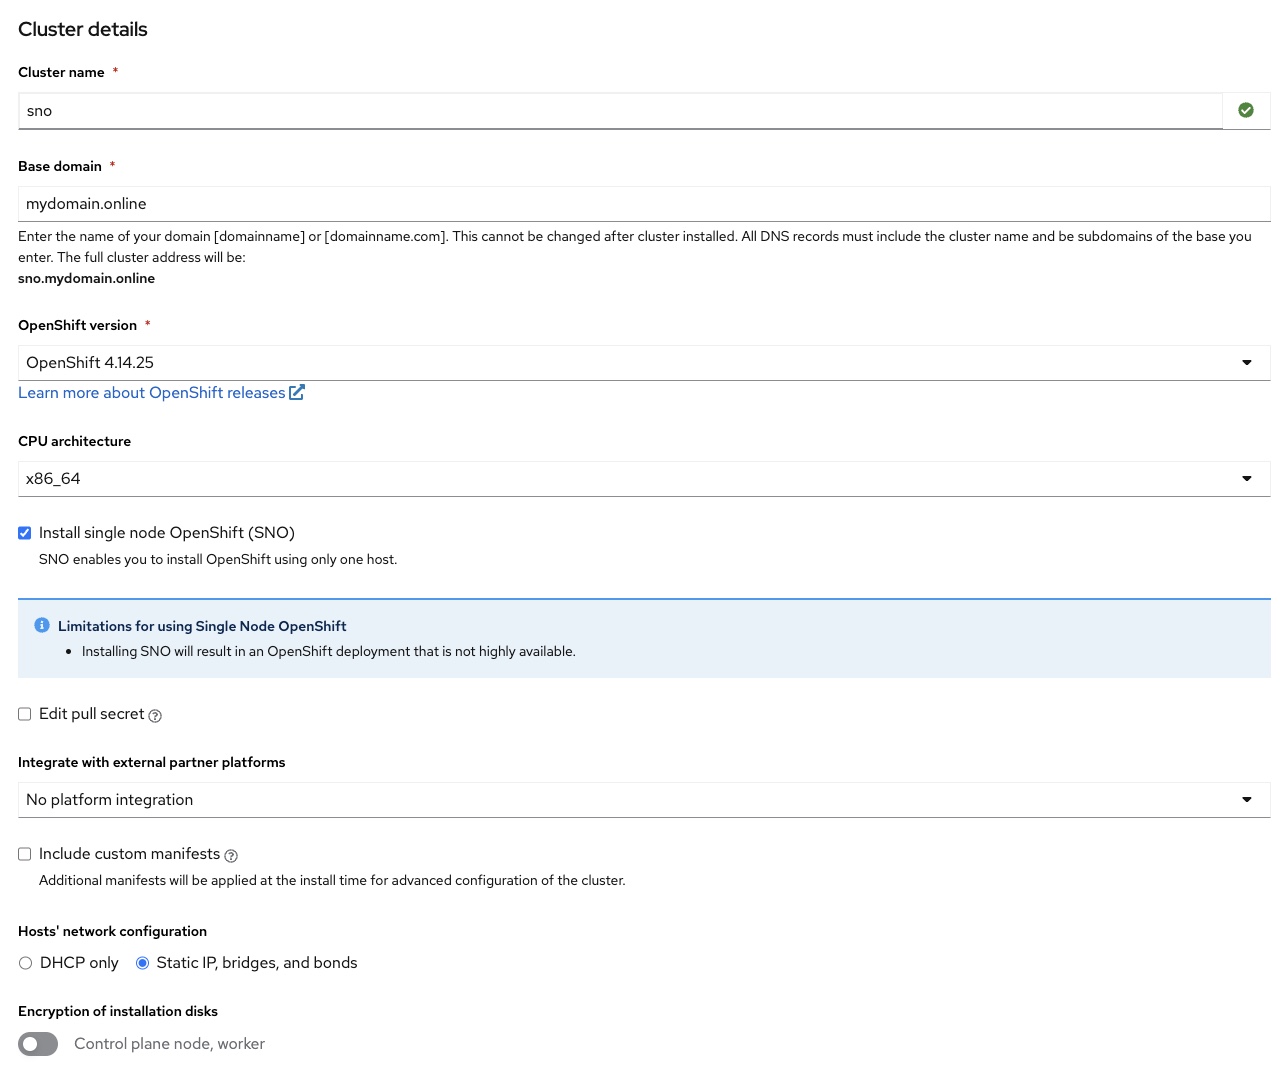
Complete the necessary cluster details and generate an Assisted Installer ISO:
- Cluster name: Enter the name of the cluster. For example: sno.
- Base domain: Enter the registered domain with the required DNS records set up. For example: mydomain.online.
- OpenShift version: OpenShift 4.14.25 or select the latest available version.
- CPU architecture: x86_64.
- Check the Install SNO Option.
- Integrate with external partner platforms: Select No platform integration.
Host’s network configuration: Select Static IP, bridges, and bonds.
Click "Next"
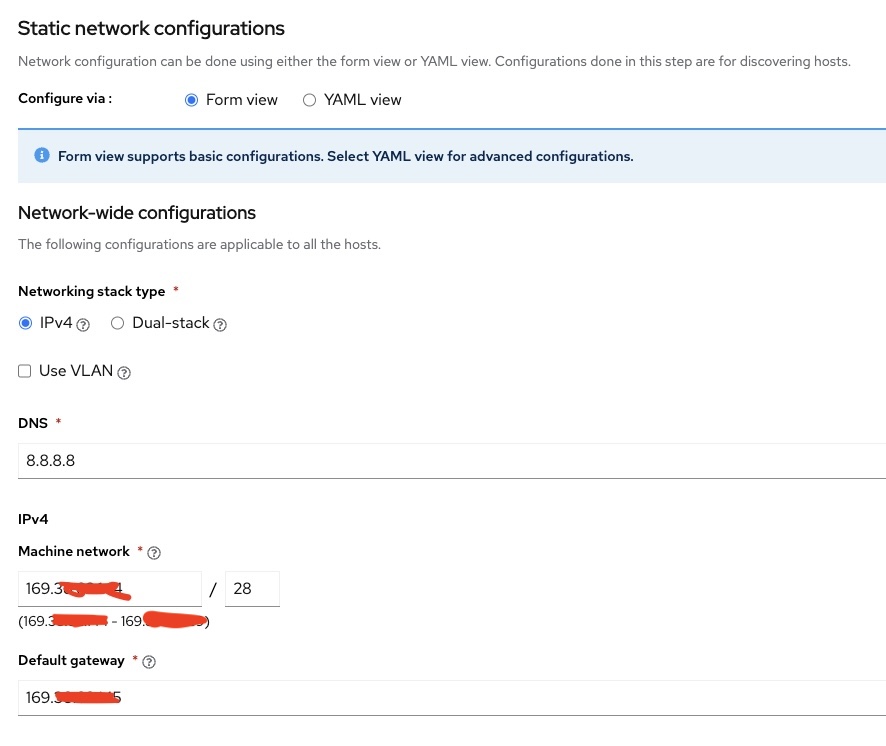
DNS: Enter Google DNS server (e.g., 8.8.8.8) or a custom DNS server.
Machine Network CIDR: Provide the Public IP subnet of the Classic VSI. You can obtain this information from the IBM Cloud UI or by checking the IP configuration after connecting to the machine via SSH.
- To obtain these details from the UI, navigate to the IBM Cloud page.
- From the navigation menu on the top left, select "Classic Infrastructure" -> "Device List" -> select the server -> select the Public IP Address under network details. Subnet CIDR information will be available at the top.
Default Gateway: Specify the gateway value for the public subnet.
Click "Next".
MAC Address: Provide the MAC address of the network interface associated with the public subnet.
For RHEL 8 and above machines, you can run the following command to get this information. Copy the MAC address for the public interface:
nmcli device showIP Address: Specify the Public Subnet IP of the VSI.
Navigate to the Operators section and uncheck all operators.
Add Host:
- On the next screen, choose "Full image file" for the Provisioning type.
- Add an SSH key to access the server later for debugging.
- Generate and download the Discovery ISO to your computer.
Create image template from the ISO
Create a bucket on an Object Storage instance and upload the ISO file downloaded in the earlier step to the bucket.
Note: Use the Aspera Plugin for the fastest upload speeds.
Create an image template from the ISO: Navigate to the Image Templates page by selecting
Classic Infrastructure>Devices>Manage>Images.
Select the
Import Custom Imagelink to open the Import tool.For the Cloud Object Storage instance details, select the COS instance and bucket that holds the ISO file uploaded in the previous step.

- OS Details: Select RHEL OS version 9.
- Boot Mode: Specify BIOS as the boot mode option.
Click on
Import Image.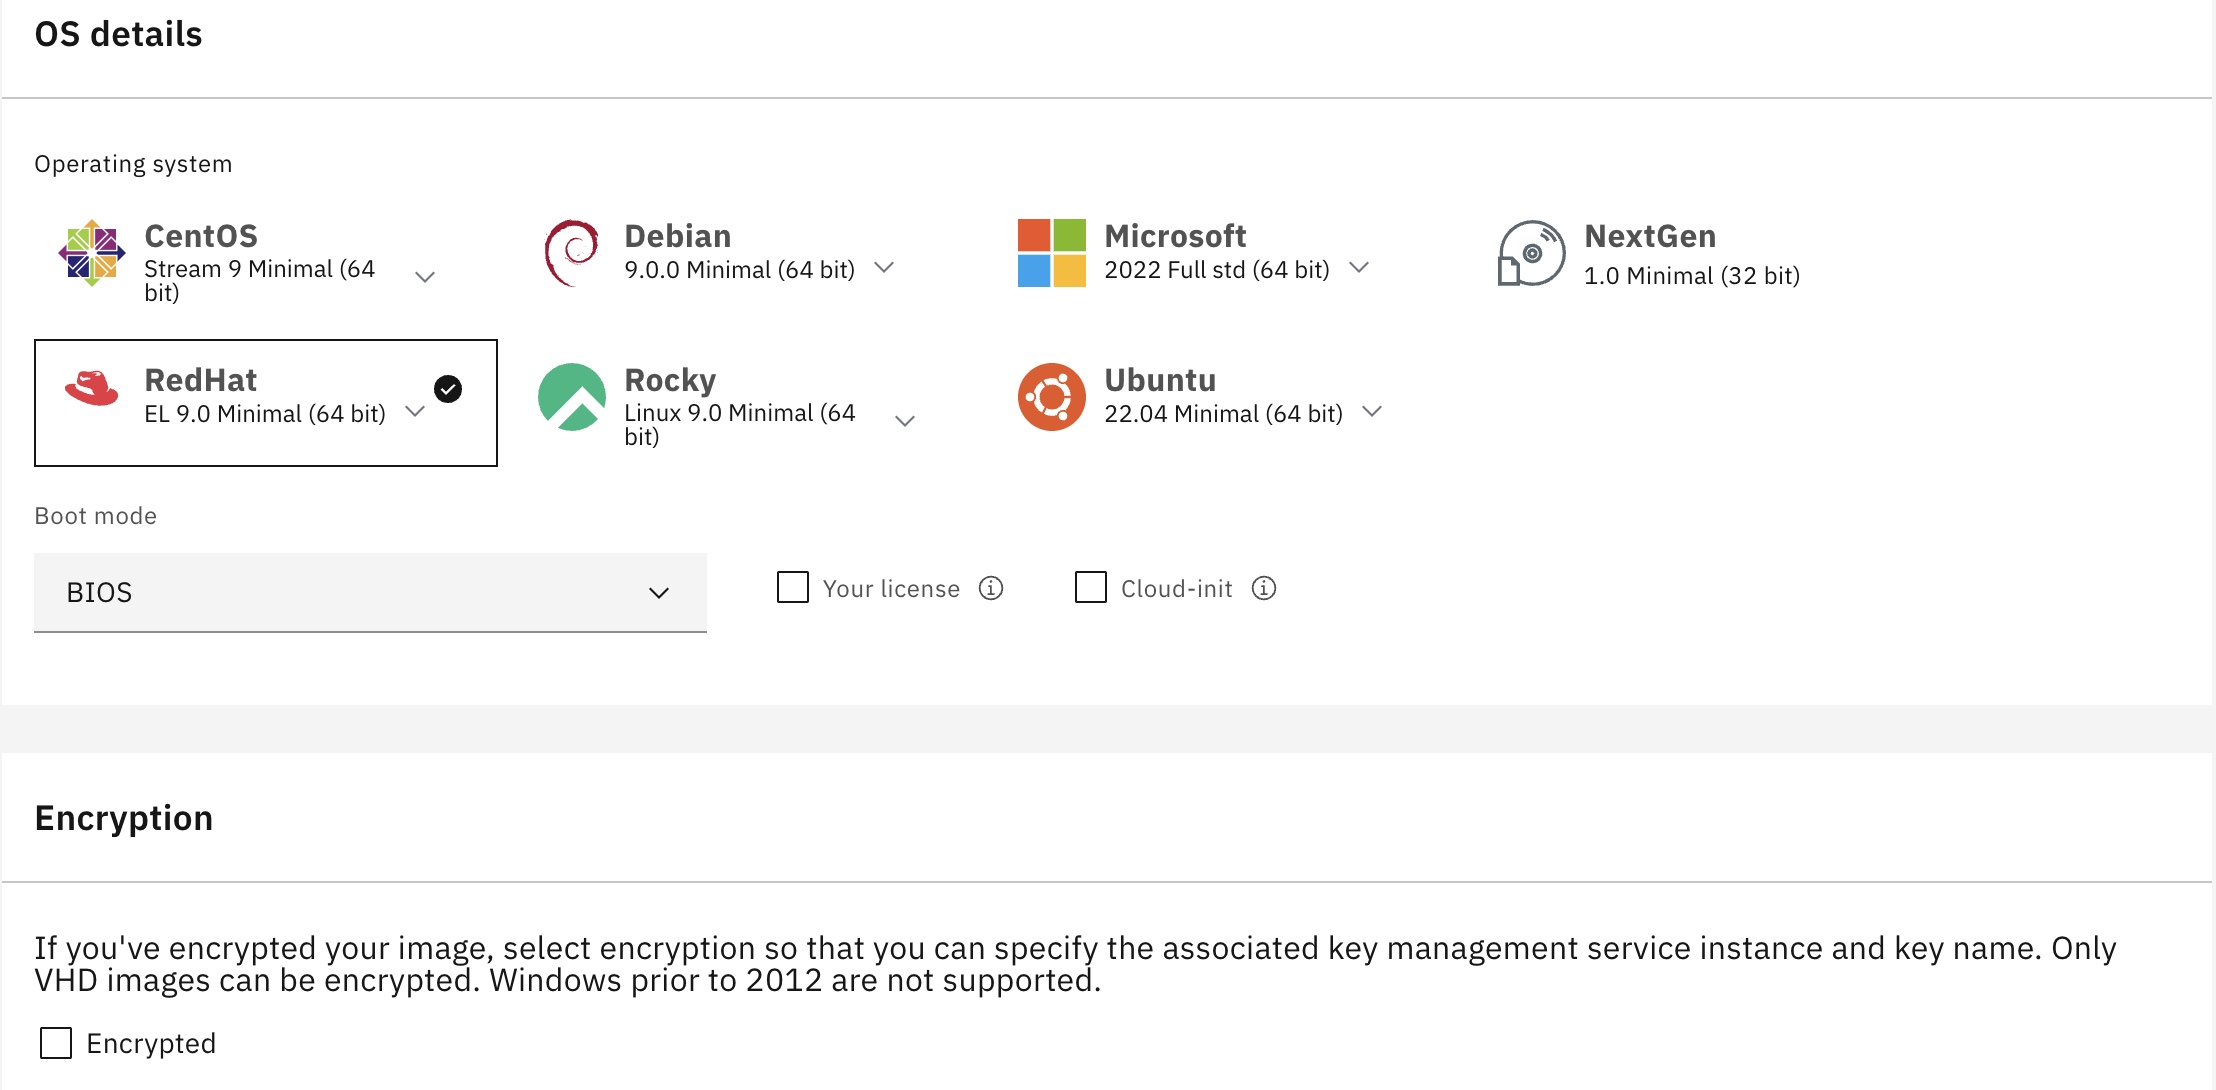
Boot VSI from the image template
Navigate to the IBM Cloud page.
From the navigation menu on the top left, select
Classic Infrastructure>Device List.Select the virtual server.
From the top right, select
Actions.Choose
Boot from Image.Select the previously created image.
Host discovery and cluster installation
In the Red Hat Hybrid Console, wait for the server to appear under Hosts in Host Discovery. Observe its state until it turns to
Ready.In the
StorageTab, leave the options at default or make necessary changes.For networking, keep everything at default. Click Next and follow the on-screen instructions.
Wait until the host passes all checks and reaches the
Readystate.Click on the
Review and Createoption to initiate the OpenShift installation.Keep an eye on the Red Hat console for a warning message
Pending User Action, asking to reboot the machine from the disk.Select the
Boot from Imageoption again, and when prompted to unmount the ISO, chooseYES. Wait for the cloud ISO teardown process to complete.Once the ISO teardown is complete, reboot the machine. The cluster installation process will resume in the Red Hat Console.
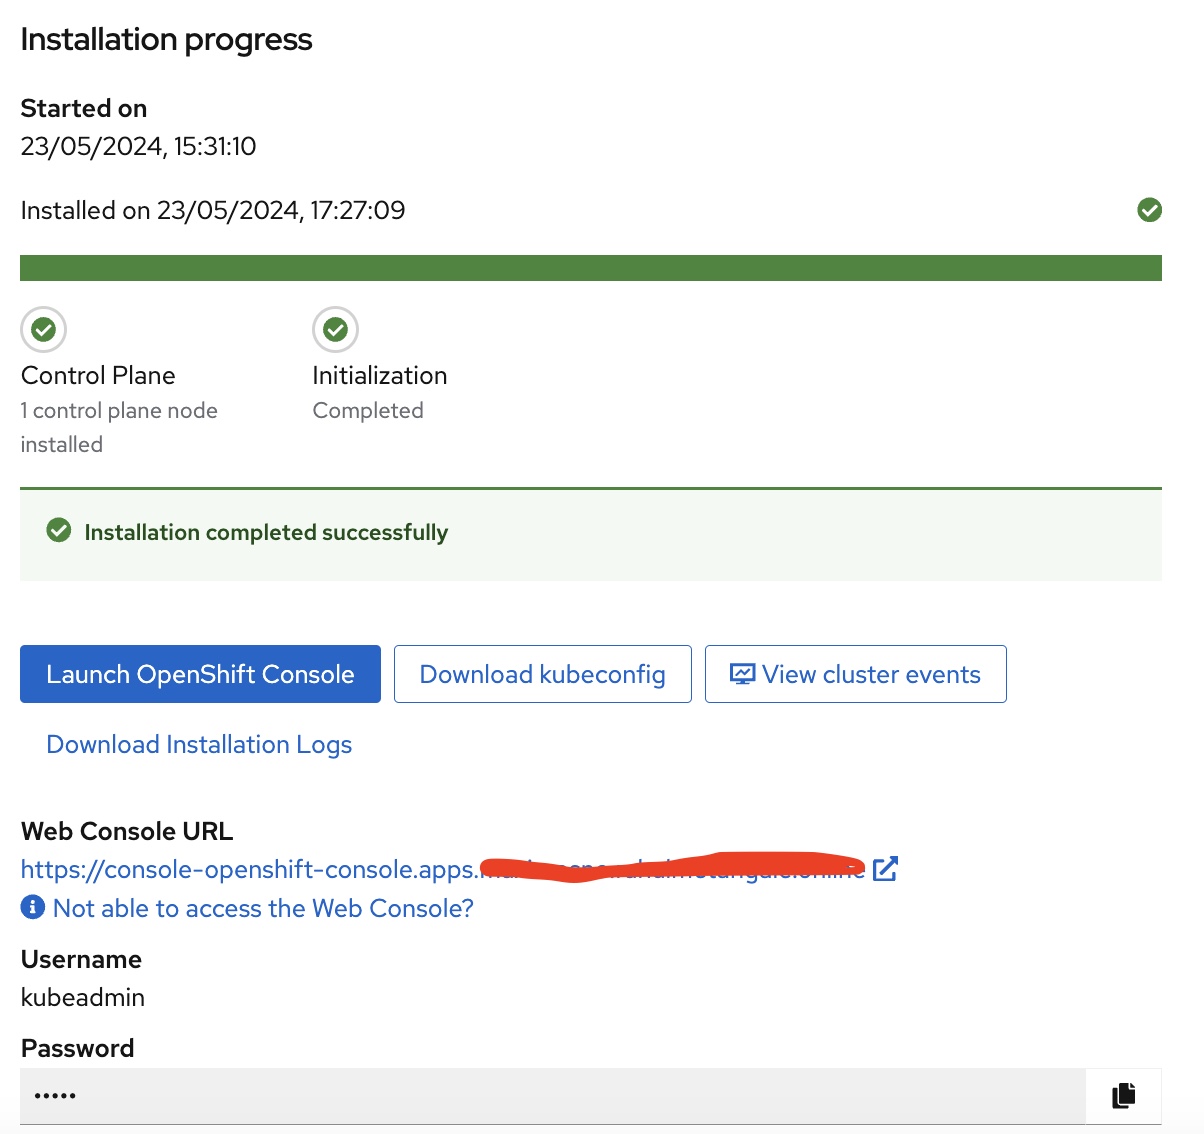
Once the cluster creation is complete and reaches 100%, the OpenShift cluster’s console URL along with the admin username and password will be displayed.
Add persistent storage using logical volume manager (LVM) storage
Logical volume manager (LVM) storage uses the TopoLVM CSI driver to dynamically provision local storage on single-node OpenShift clusters. LVM Storage creates thin-provisioned volumes using LVM and provides dynamic provisioning of block storage on resource-limited single-node OpenShift clusters.
With LVM Storage, you can create volume groups, persistent volume claims (PVCs), volume snapshots, and volume clones.
Logical volume manager (LVM) storage installation
You can install logical volume manager (LVM) storage on a single-node OpenShift cluster and configure it to dynamically provision storage for your workloads.
Prerequisites
- Minimum of 10 milliCPU and 100 MiB of RAM.
- Ensure that every managed cluster has dedicated disks for provisioning storage. LVM storage uses only those disks that are empty and do not contain file system signatures. To ensure that the disks are empty and free of file system signatures, wipe the disks before using them.
Install LVM storage using OpenShift Container Platform web console
You can install LVM Storage using the Red Hat OpenShift Container Platform OperatorHub.
Log in to the OpenShift Container Platform web console.
Click
Operators→OperatorHub.Scroll or type
LVM Storagein theFilter by keywordbox to find LVM Storage.Click Install.
Set the following options in the
Install Operatorpage:- Update Channel: stable-4.14
- Installation Mode: A specific namespace on the cluster
- Installed Namespace: Operator recommended namespace openshift-storage (If the openshift-storage namespace does not exist, it is created during the operator installation)
- Approval Strategy: Automatic or Manual
Click Install.
Create logical volume manager cluster
After installing LVM Storage, you can create a logical volume manager cluster.
In the OpenShift Container Platform web Console, click
Operators→Installed Operatorsto view all installed operators.Ensure that the selected project is openshift-storage`.
Click on
LVM Storage, then clickCreate LVMClusterunderLVMCluster`.In the
Create LVMClusterpage, select eitherForm vieworYAML view. Enter a name for the cluster.Click
Create.
Verify installation of LVM
In the OpenShift Container Platform web console, click
Storage→Storage Classesfrom the left pane.Ensure that the
lvms-<device-class-name>storage class is created with the LVM cluster creation. By default,vg1is thedevice-class-name.

Enable internal image registry
The internal image registry is typically configured by default in an OpenShift cluster. However, in the case of a single-node OpenShift (SNO) cluster, it is not configured by default.
To confirm that the internal image registry is not provisioned, run the following command:
oc get configs.imageregistry.operator.openshift.io/cluster -o jsonpath='{.spec.managementState}'
The command should return the Management State as Removed. If it returns Managed or another state, no further steps may be required.
Create PersistentVolumeClaim
In the OpenShift Container Platform Console, select
Storage→PersistentVolumeClaim.Create a PersistentVolumeClaim with the following details:
Storage Size: 150 GB (adjust this based on your requirements)

Once created, you will see the status as
waiting for the first consumer to be created before binding.
Complete the required fields and create the
PersistentVolumeClaimto allocate storage for the internal registry.Next, patch the Image Registry Operator to use the provisioned
PersistentVolumeClaimby executing the following command:oc patch configs.imageregistry.operator.openshift.io/cluster --patch '{"spec":{"storage":{"pvc":{"claim":"image-registry-storage"}}}}' --type=mergeConfigure the number of replicas:
oc patch configs.imageregistry.operator.openshift.io/cluster --patch '{"spec":{"rolloutStrategy":"Recreate","replicas":1}}' --type=mergeSet the image registry to be
Managed:oc patch configs.imageregistry.operator.openshift.io/cluster --patch '{"spec":{"managementState":"Managed"}}' --type=mergeFinally, define an External Route to the image registry.
oc patch configs.imageregistry.operator.openshift.io/cluster --patch '{"spec":{"defaultRoute":true}}' --type=mergeTo confirm that everything went well and that the image registry is now usable, run the following command:
oc get co image-registry -o jsonpath='{.status.conditions[?(@.type=="Available")].message}'You should see the status as follows:

Summary
This tutorial guided you through the creation of a single-node OpenShift cluster on IBM Cloud, offering a cost-effective solution for development, demo, and Proof of Concept (PoC) scenarios. It outlines step-by-step instructions for provisioning a virtual server, configuring DNS records, and deploying OpenShift using the Assisted Installer. Furthermore, it covers the installation and configuration of Logical Volume Manager (LVM) Storage for dynamic storage provisioning. Additionally, it demonstrates the setup of the internal image registry and the creation of a PersistentVolumeClaim. Finally, it ensures the successful verification and utilization of the Image Registry, providing a comprehensive overview of setting up a functional OpenShift environment.