About cookies on this site Our websites require some cookies to function properly (required). In addition, other cookies may be used with your consent to analyze site usage, improve the user experience and for advertising. For more information, please review your options. By visiting our website, you agree to our processing of information as described in IBM’sprivacy statement. To provide a smooth navigation, your cookie preferences will be shared across the IBM web domains listed here.
Tutorial
Deploying McP Tools on watsonx Orchestrate by using contextForge McP Gateway
A hands-on guide for exposing McP tools on contextForge McP Gateway to consume them with watsonx Orchestrate
On this page
AI agents are no longer just answering questions, they are starting to take actions, like booking a venue, checking a teammate’s calendar, fetching the latest sales report, or even kicking off a workflow in your cRM. To take these actions well, they need a standard way to connect with external services without custom glue code for each integration. That’s exactly what the Model context Protocol (McP) delivers: a consistent JSON-RPc based approach that lets agents discover available tools, call them, and exchange context reliably across different environments. You can check out the McP Documentation for more details.
The contextForge McP Gateway (hereafter simply called McP Gateway) takes this a step further by acting as a bridge between your agents and the real world of services they depend on. It can wrap REST APIs as McP-compliant tools, federate multiple servers into one registry, and provide built-in features like JWT-based authentication, retries, and observability. For developers building agentic workflows using watsonx Orchestrate, the McP Gateway means that you can focus on designing what your agent should do, while it handles how those tools are exposed, secured, and monitored.
Designed with developers in mind, McP Gateway standardizes how tools and services are integrated into agent frameworks. Instead of managing custom integrations, multiple authentication flows, or error-handling logic in every workflow, teams gain a consistent layer for service orchestration. The McP Gateway not only reduces repetitive engineering tasks but also improves operational reliability with built-in observability and retry mechanisms. Its multi-protocol support ensures that tools remain usable across McP and REST clients, while central configuration simplifies scaling across environments. check out the official contextForge McP Gateway GitHub page for more details.
In this step-by-step tutorial, you will learn how to expose your McP tools using the McP Gateway. You will then consume these tools from agents built on watsonx Orchestrate. After completing this tutorial, you will have the skills to include your own McP tools in McP Gateway, and integrate them into agents for flexible, secure, and reusable automation.
Agentic AI architecture
The architecture illustrates how watsonx Orchestrate agents combine the reasoning capabilities of large language models (LLMs) with the precision, security, and interoperability of McP tools and using the McP Gateway.
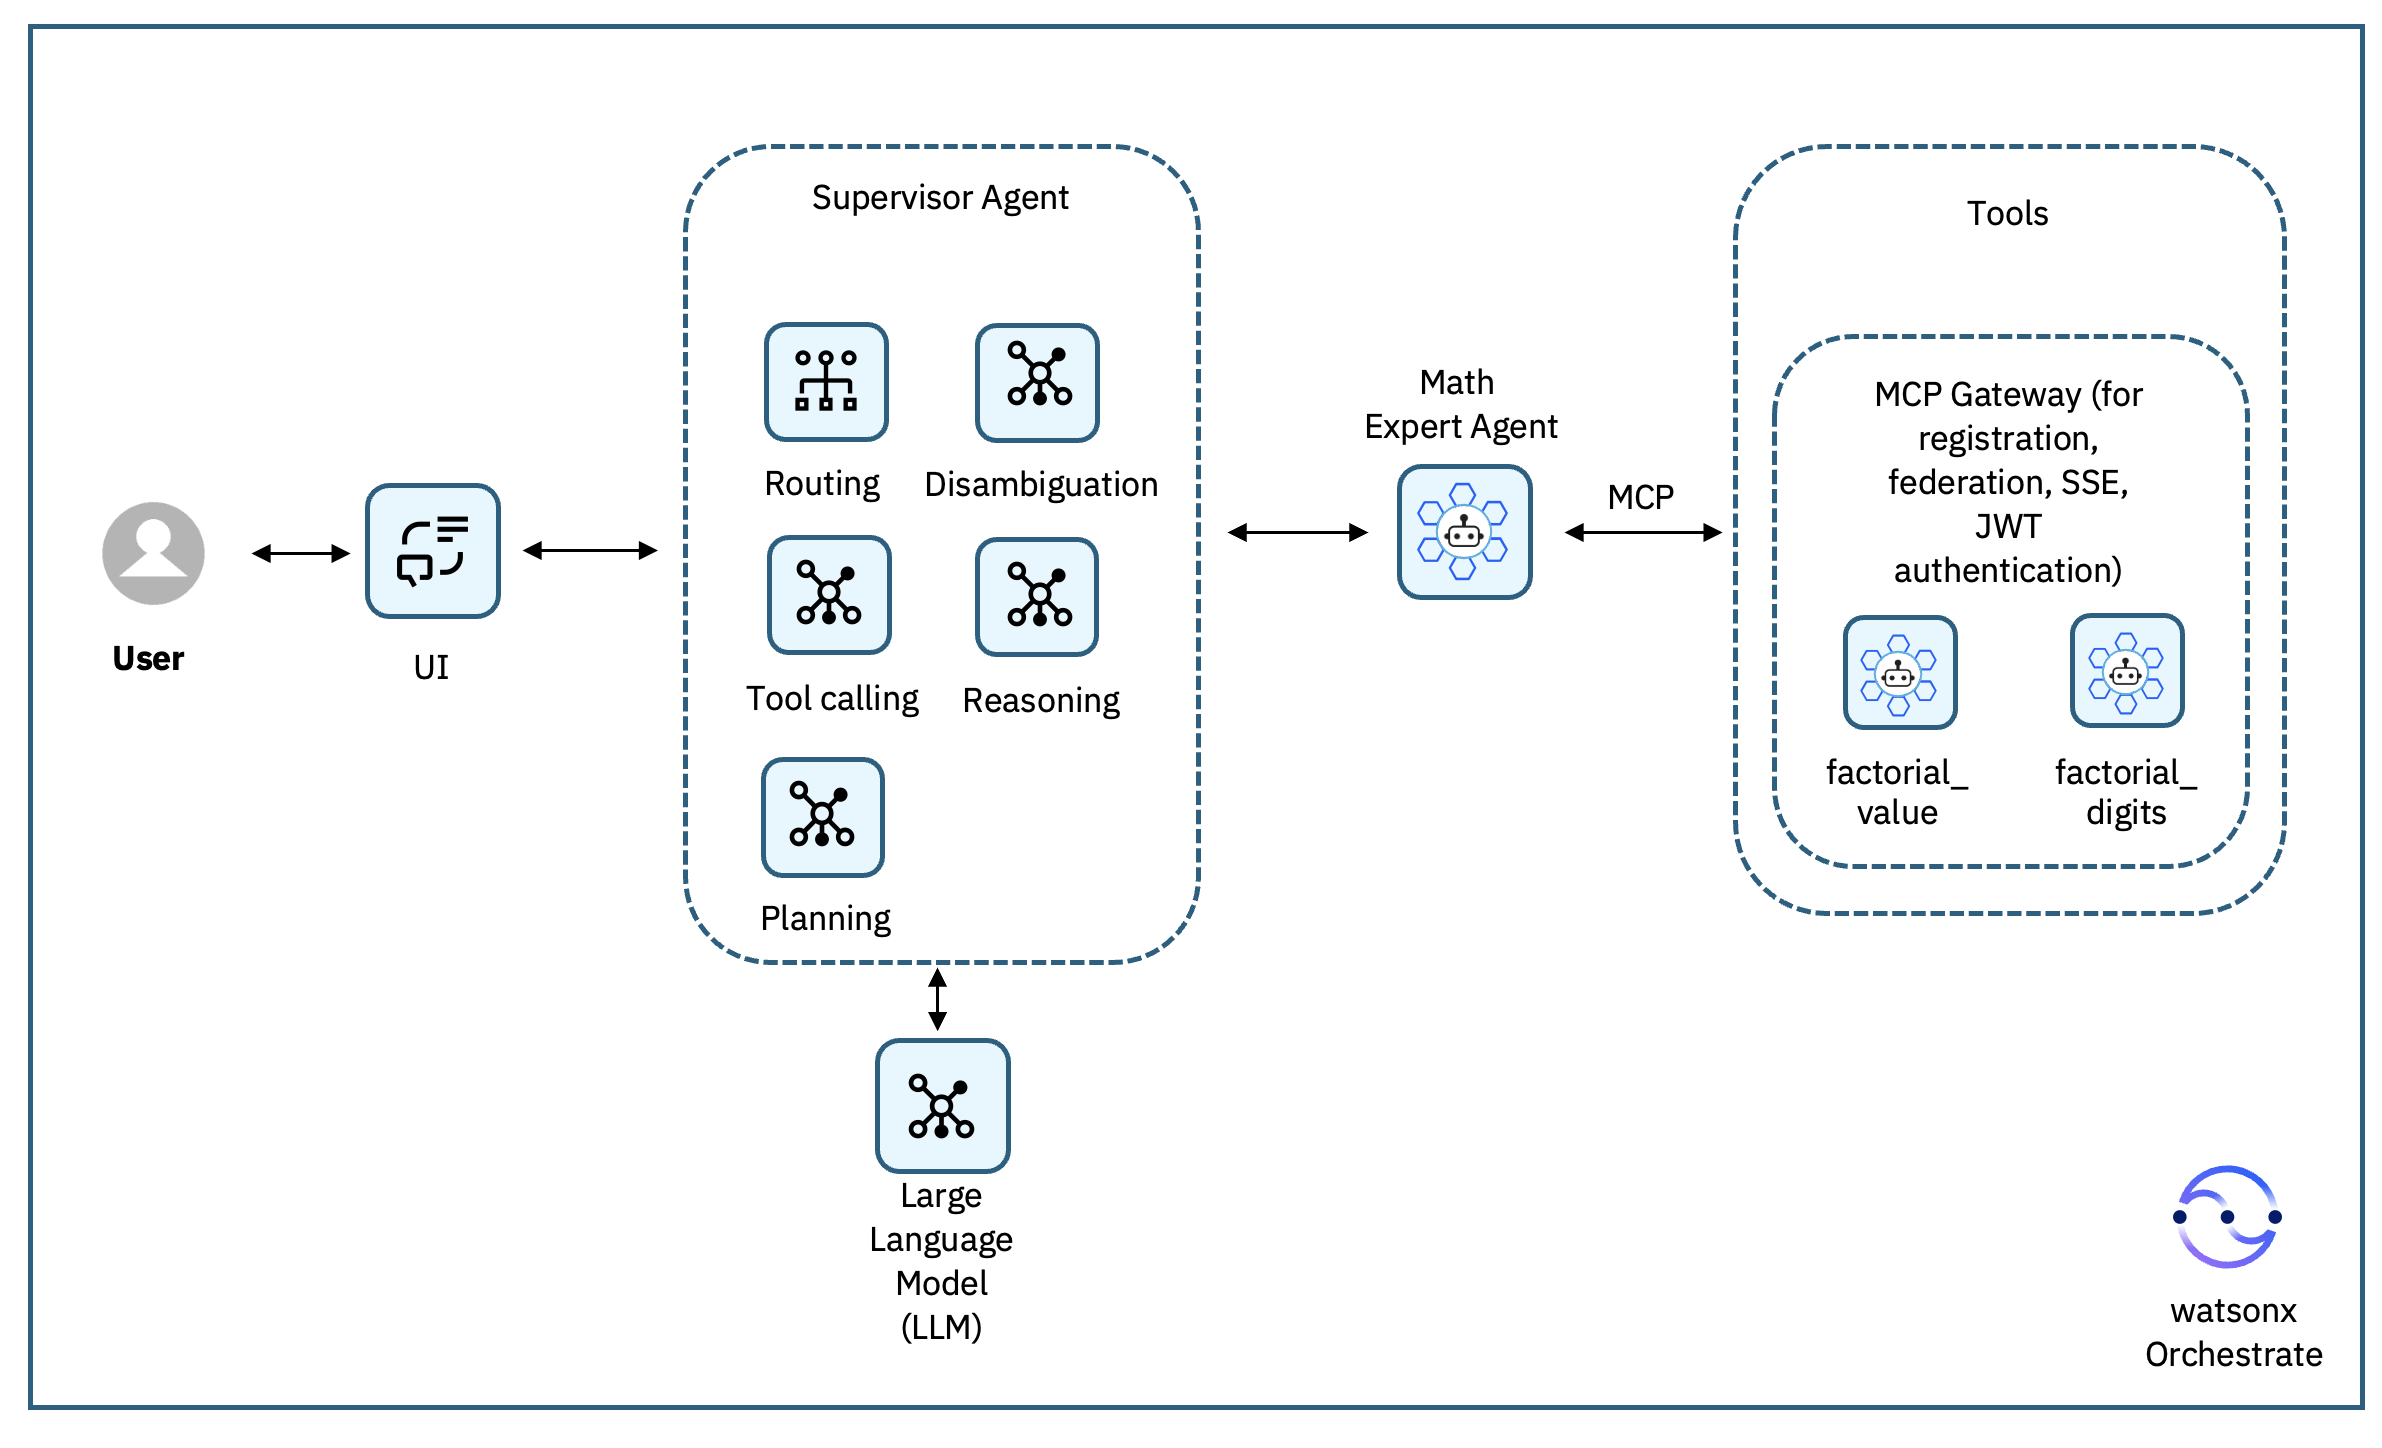
First, the user interacts with the user interface, providing their query in natural language. These requests are sent to the Supervisor Agent, which uses an LLM for tasks such as interpreting instructions, reasoning through the problem, planning the next steps, and deciding whether a tool call is necessary. This stage leverages the LLM’s strengths: understanding language, managing conversation flow, and orchestrating high-level logic.
When the Supervisor Agent determines that precise, real-time, or secure execution is needed, it triggers the Math Expert Agent that communicates through the Model context Protocol (McP) with two tools are deployed on the McP Gateway, factorial_value (to return the exact value of n!) and factorial_digits (to return the number of digits in n!).
Let’s look at an example of our sample agent architecture:
- A user asks through the UI: “How many digits are there in a factorial of 10000?”
- The Supervisor Agent processes the request with the LLM and identifies that it relates to the Math Expert Agent, then delegates the request.
- The Math Expert Agent reasons through the problem and recognizes that it requires a level of precision beyond what the LLM can reliably provide.
- The Math Expert Agent calls the factorial_digits tool via the McP Gateway, which calculates the factorial and returns only the count of digits rather than the full value, since the complete number would be too large to display.
- The Supervisor Agent then returns the result to the UI, ensuring the response is accurate, fast, and free from LLM-generated errors.
By adopting the McP Gateway, the same tools can be reused across multiple agents and workflows without rewriting integrations for each LLM or platform. This makes the architecture highly scalable, easier to maintain, and adaptable to both experimental and production-grade enterprise use cases.
Prerequisites
You must complete the tutorial “connecting to McP tools with watsonx Orchestrate” before starting this tutorial.
Additional prerequisites:
- This tutorial assumes you have a running local environment of watsonx Agent Development Kit (ADK). check out the getting started guide if you don’t have an active instance. This tutorial has been tested on watsonx Orchestrate ADK version 1.12.0.
- Python version 3.11. It should work with later versions, but it has been tested with Python 3.11.
- Your favorite IDE for editing Python code, such as Visual Studio code.
- IBM cloud account and familiarity with IBM cloud code Engine.
Before you begin
Before starting this tutorial, let’s recap the “connecting to McP tools with watsonx Orchestrate” tutorial.
In the McP tools tutorial, you built a complete example showing how watsonx Orchestrate can combine the reasoning power of LLMs with the precision and reliability of McP tools. Starting from the simple idea of calculating factorials accurately, you created an McP server, tested it locally, and then connected it to a watsonx Orchestrate agent. Along the way, you saw how the LLM decides when to handle a request directly and when to call a tool for exact results.
Specifically, you built two McP tools that can be discovered and called by any McP-enabled client. The first tool, factorial_value, calculates and returns the exact value of n! (the factorial of a given non-negative integer). The second tool, factorial_digits, returns only the number of decimal digits in n!, which is useful when the factorial is too large to display in full.
You also created an agent on watsonx Orchestrate called Math Expert Agent. This agent provides precise math calculations that go beyond what large language models can do on their own. It can return the exact value of a factorial or tell you how many digits it contains, even for very large numbers through calling the 2 McP tools that you created.
In this McP Gateway tutorial, you are going to onboard these 2 McP tools on McP Gateway and update the Math Expert Agent to call the McP tools on the McP Gateway.
Steps
Step 1. Register the tools in McP Gateway
In this step, you will connect your McP tools to the McP Gateway.
1.1 Install McP Gateway locally and start it
First, follow the steps in the McP Gateway documentation to install it in an isolated environment.
The McP Gateway can be started in different modes. By default, it runs silently as a backend server. But you can optionally enable an Admin UI and an Admin API to make it easier to inspect and manage your tools. (It is recommended to enable the Admin UI and API for testing purposes.)
export McPGATEWAY_UI_ENABLED=true
export McPGATEWAY_ADMIN_API_ENABLED=true
Start the McP Gateway with basic authentication where `BASIc_AUTH_PASSWORD` secures the Admin UI with a password for the admin user, and `JWT_SEcRET_KEY` secures the Admin API by requiring a signed JSON Web Token (JWT) for any calls secret. Make sure to change the PLATFORM_ADMIN_PASSWORD.
BASIc_AUTH_PASSWORD=pass \
JWT_SEcRET_KEY=my-test-key \
PLATFORM_ADMIN_EMAIL=admin@example.com \
PLATFORM_ADMIN_PASSWORD=changeme \
PLATFORM_ADMIN_FULL_NAME="Platform Administrator" \
mcpgateway --host 0.0.0.0 --port 4444 &
This command does the following:
- Runs the gateway server on all interfaces (
--host 0.0.0.0) so it’s accessible locally and remotely. - Uses port 4444 to serve requests.
- Runs the process in the background (&) so your terminal remains usable.
- BASIc_AUTH_PASSWORD sets the HTTP basic auth password.
- JWT_SEcRET_KEY sets the signing key for tokens the gateway issues or validates.
- PLATFORM_ADMIN_EMAIL, PLATFORM_ADMIN_PASSWORD, PLATFORM_ADMIN_FULL_NAME set the first admin user details.
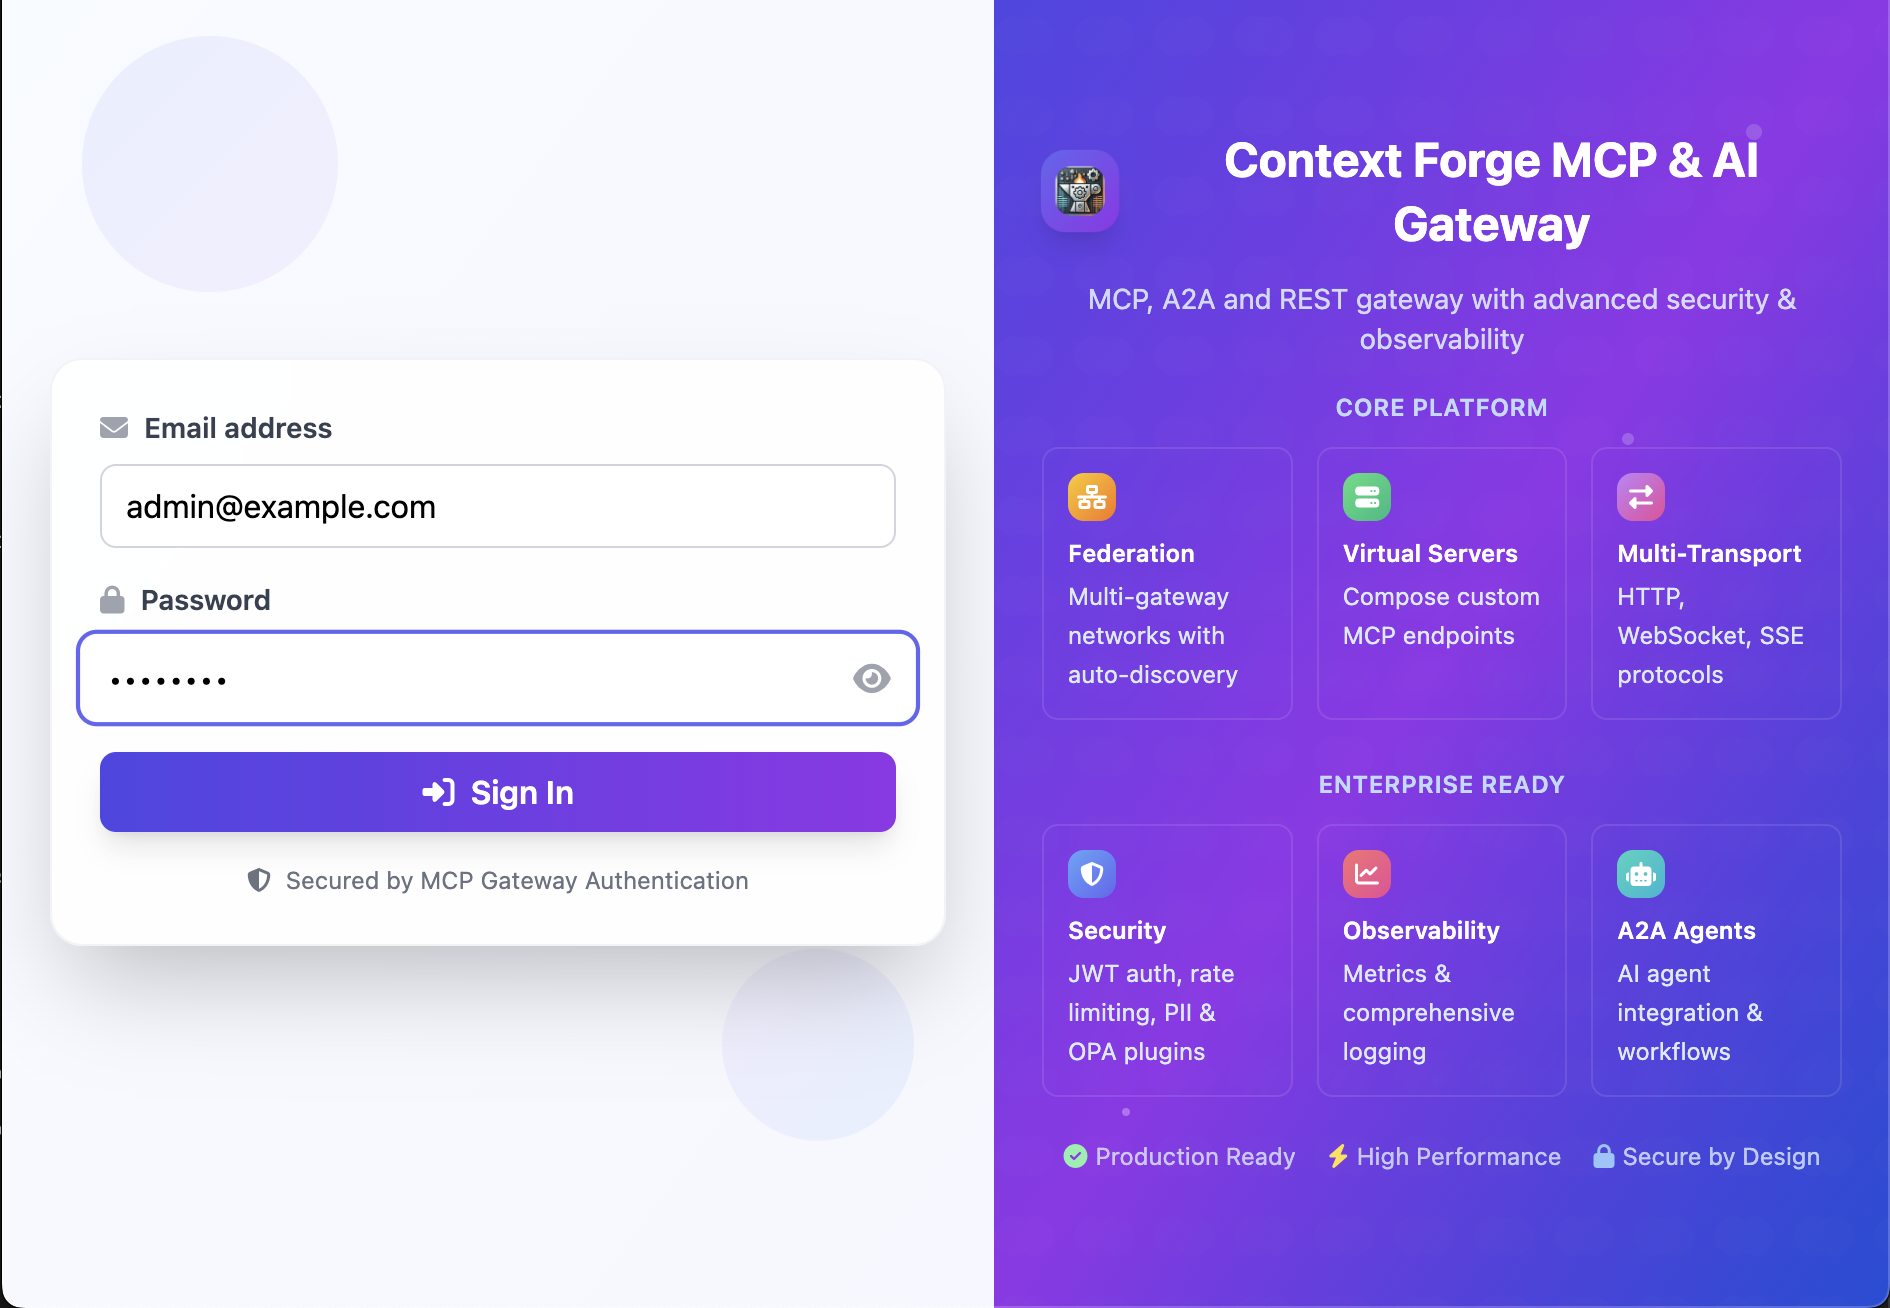
You can now open the Admin UI at: http://localhost:4444/admin. Log in with the user name and password that you just specified in the previous step.
The McP Gateway Admin UI opens.
You can also open the API Docs at http://localhost:4444/docs.
If you see the “address already in use” message, either stop the process on that port or change the port on the mcpgateway command.
1.2 Generate a JWT token
You can use the mcpgateway.utils.create_jwt_token utility to create a JSON Web Token (JWT). A JWT is a signed token that proves your identity to the McP Gateway when making API calls.
export McPGATEWAY_BEARER_TOKEN=$(
  python3 -m mcpgateway.utils.create_jwt_token \
    --username admin@example.com \
    --exp 10080 \
    --secret my-test-key
)

echo $McPGATEWAY_BEARER_TOKEN
This token authenticates your API calls to the McP Gateway. The --secret must match JWT_SEcRET_KEY used to start the McP Gateway:
--username admin@example.com: Embeds the usernameadmin@example.cominto the token payload. This identifies the caller.--exp 10080: Sets the token’s expiration in minutes (10080 minutes = 7 days). After that time, the token becomes invalid.--secret my-test-key: This is the signing secret. It must match theJWT_SEcRET_KEYyou used when starting the McP Gateway. Otherwise, the McP Gateway will reject the token as invalid.
The command saves the generated token into an environment variable called McPGATEWAY_BEARER_TOKEN so you can reuse it easily.
1.3 Run your McP server through the McP Gateway translate bridge
When you create an McP server (for example, the FastMcP server where you defined tools like factorial_value and factorial_digits in the McP tools tutorial), it communicates through stdio (standard input and output). This is fine for running locally in your terminal, but other systems like the McP Gateway expect to talk over the web.
So, you run McP Gateway Transport Bridge. The bridge runs your FastMcP server over stdio (so your tools keep working the way they were designed), but it exposes your McP server as an SSE (Server-Sent Events) endpoint over HTTP. Therefore, your tools are accessible through a web address that the McP Gateway and other McP-compatible clients can consume. With the bridge, they become reusable components in larger workflows, available to any agent that connects through the McP Gateway.
Think of the bridge as a translator: it takes your FastMcP server’s stdio interface and re-publishes it as a web-based event stream that the McP Gateway can talk to. Without this bridge, the McP Gateway wouldn’t know how to connect to your local tools.
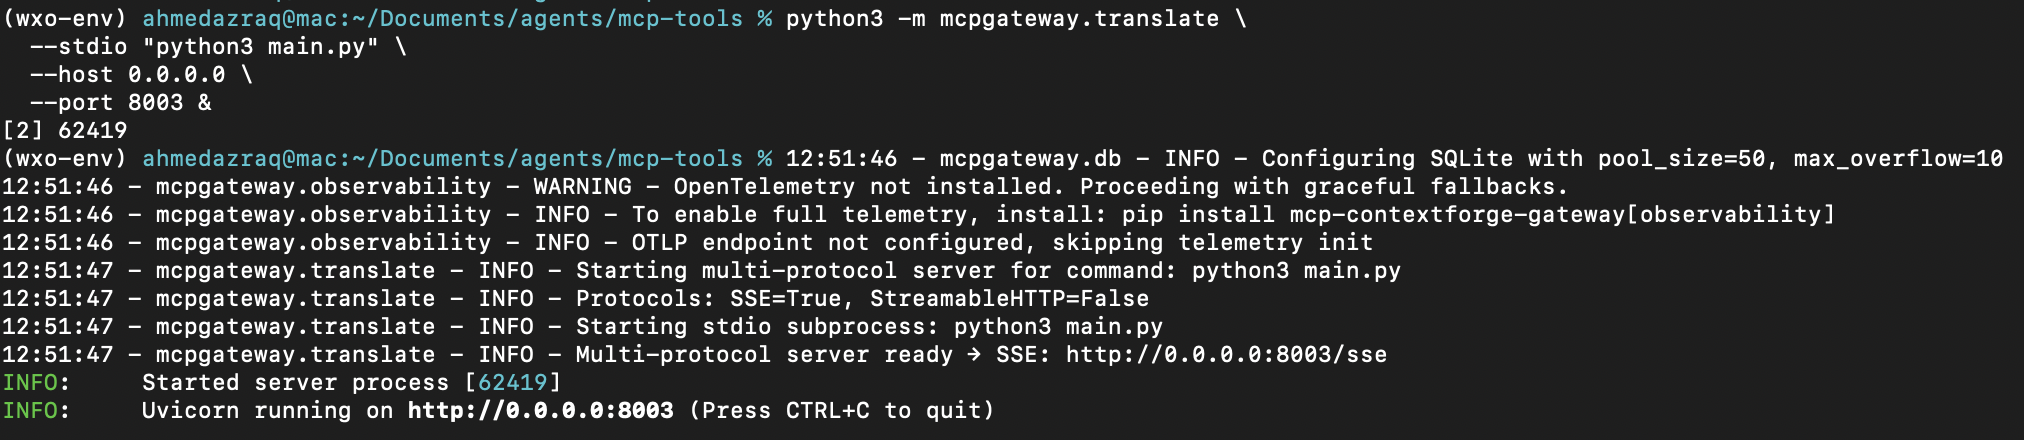
Make sure you are still in the same folder, where you developed your McP server, that is `agents/mcp-tools`, and run the mcpgateway.translate command to launch a stdio-to-SSE bridge that starts your FastMcP server and runs it in the background.
python3 -m mcpgateway.translate \
  --stdio "python3 main.py" \
  --host 0.0.0.0 \
  --port 8003 &
You’ll see messages similar to the ones in the next image.
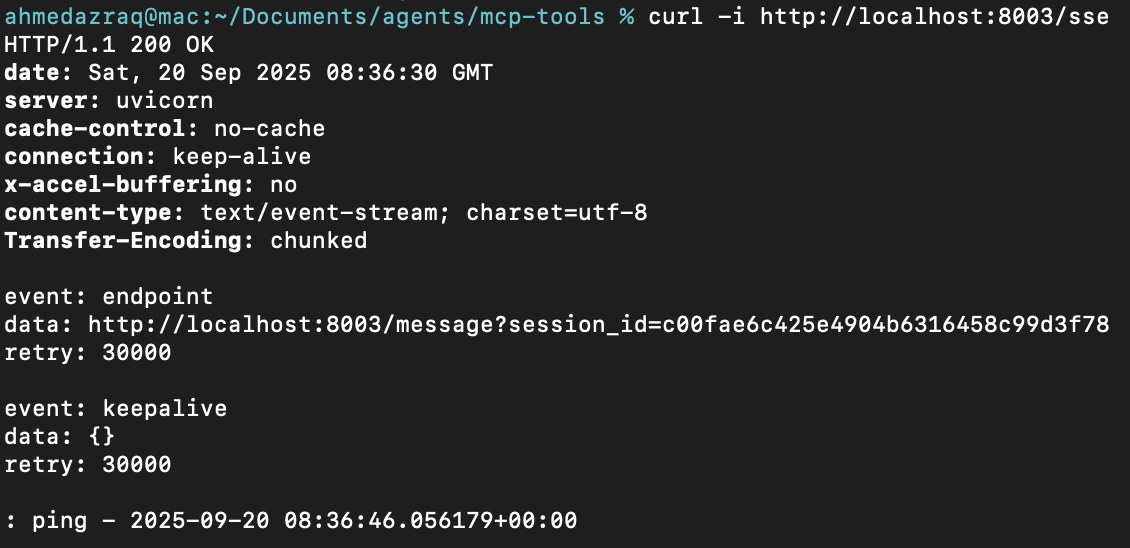
Your factorial McP tools are now exposed in McP Gateway at: http://localhost:8003/sse. Do a quick check, in a new terminal, run the curl command:
curl -i http://localhost:8003/sse
You should get a 200 response with content-Type: text/event-stream on the header. This confirms that the server is exposing a Server-Sent Events (SSE) stream. Unlike a normal HTTP response that ends after sending data, an SSE connection is designed to remain open and active, continuously streaming data to the client.
Getting a 200 OK with content-Type: text/event-stream means that your server is successfully running an SSE endpoint, which stays open, pushes events, and sends keepalive pings so clients like the McP Gateway can maintain a stable, real-time connection. Press ctrl+c to terminate the SSE connection.
1.4 Register your McP tools with the McP Gateway
In this step, you are telling the McP Gateway (running on port 4444) to register your FastMcP server (running on the bridge localhost:8003/sse) as a remote McP server. This makes the McP Gateway aware of your math tools so that other agents or clients can discover and use them.
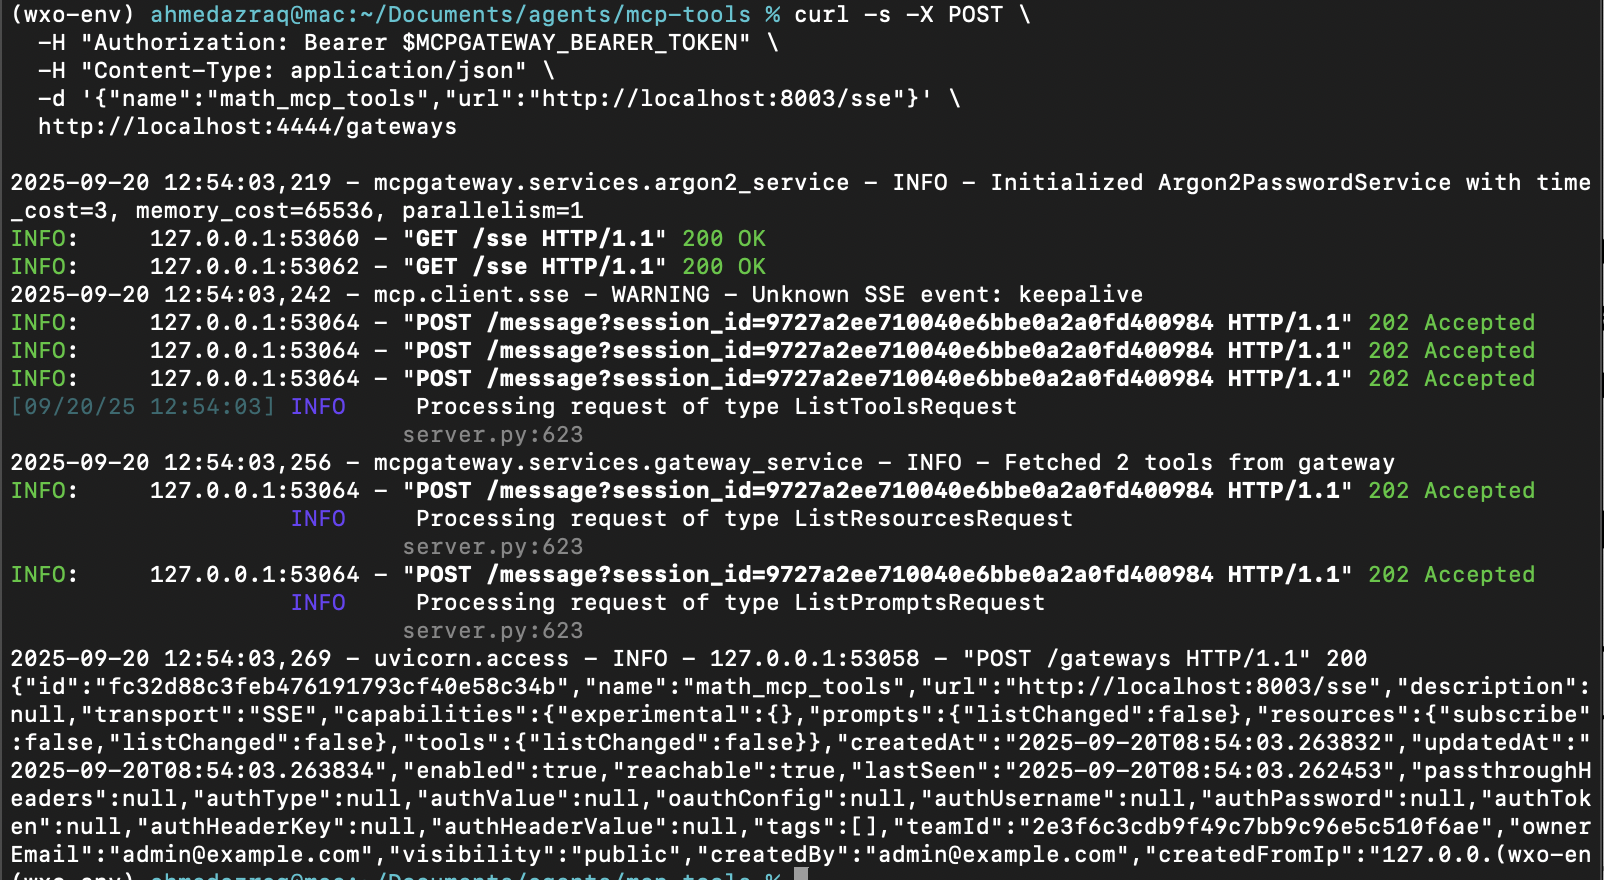
curl -s -X POST \
  -H "Authorization: Bearer $McPGATEWAY_BEARER_TOKEN" \
  -H "content-Type: application/json" \
  -d '{"name":"math_mcp_tools","url":"http://localhost:8003/sse"}' \
  http://localhost:4444/gateways
This is an explanation of the curl command:
curl -s -X POST: Makes a POST request silently (-shides progress output).-H "Authorization: Bearer $McPGATEWAY_BEARER_TOKEN": This authenticates the request with your JWT token so only authorized users can register servers.-H "content-Type: application/json": This tells the McP Gateway that you’re sending JSON.-d '{"name":"math_mcp_tools","url":"http://localhost:8003/sse"}': The body of the request including the server name (math_mcp_tools) and the SSE endpoint for the bridge.http://localhost:4444/gateways: The name of the McP Gateway’s admin API endpoint that handles server registration.
You’ll see messages similar to the ones in the next image.
Next, you need to verify that your tools are registered.
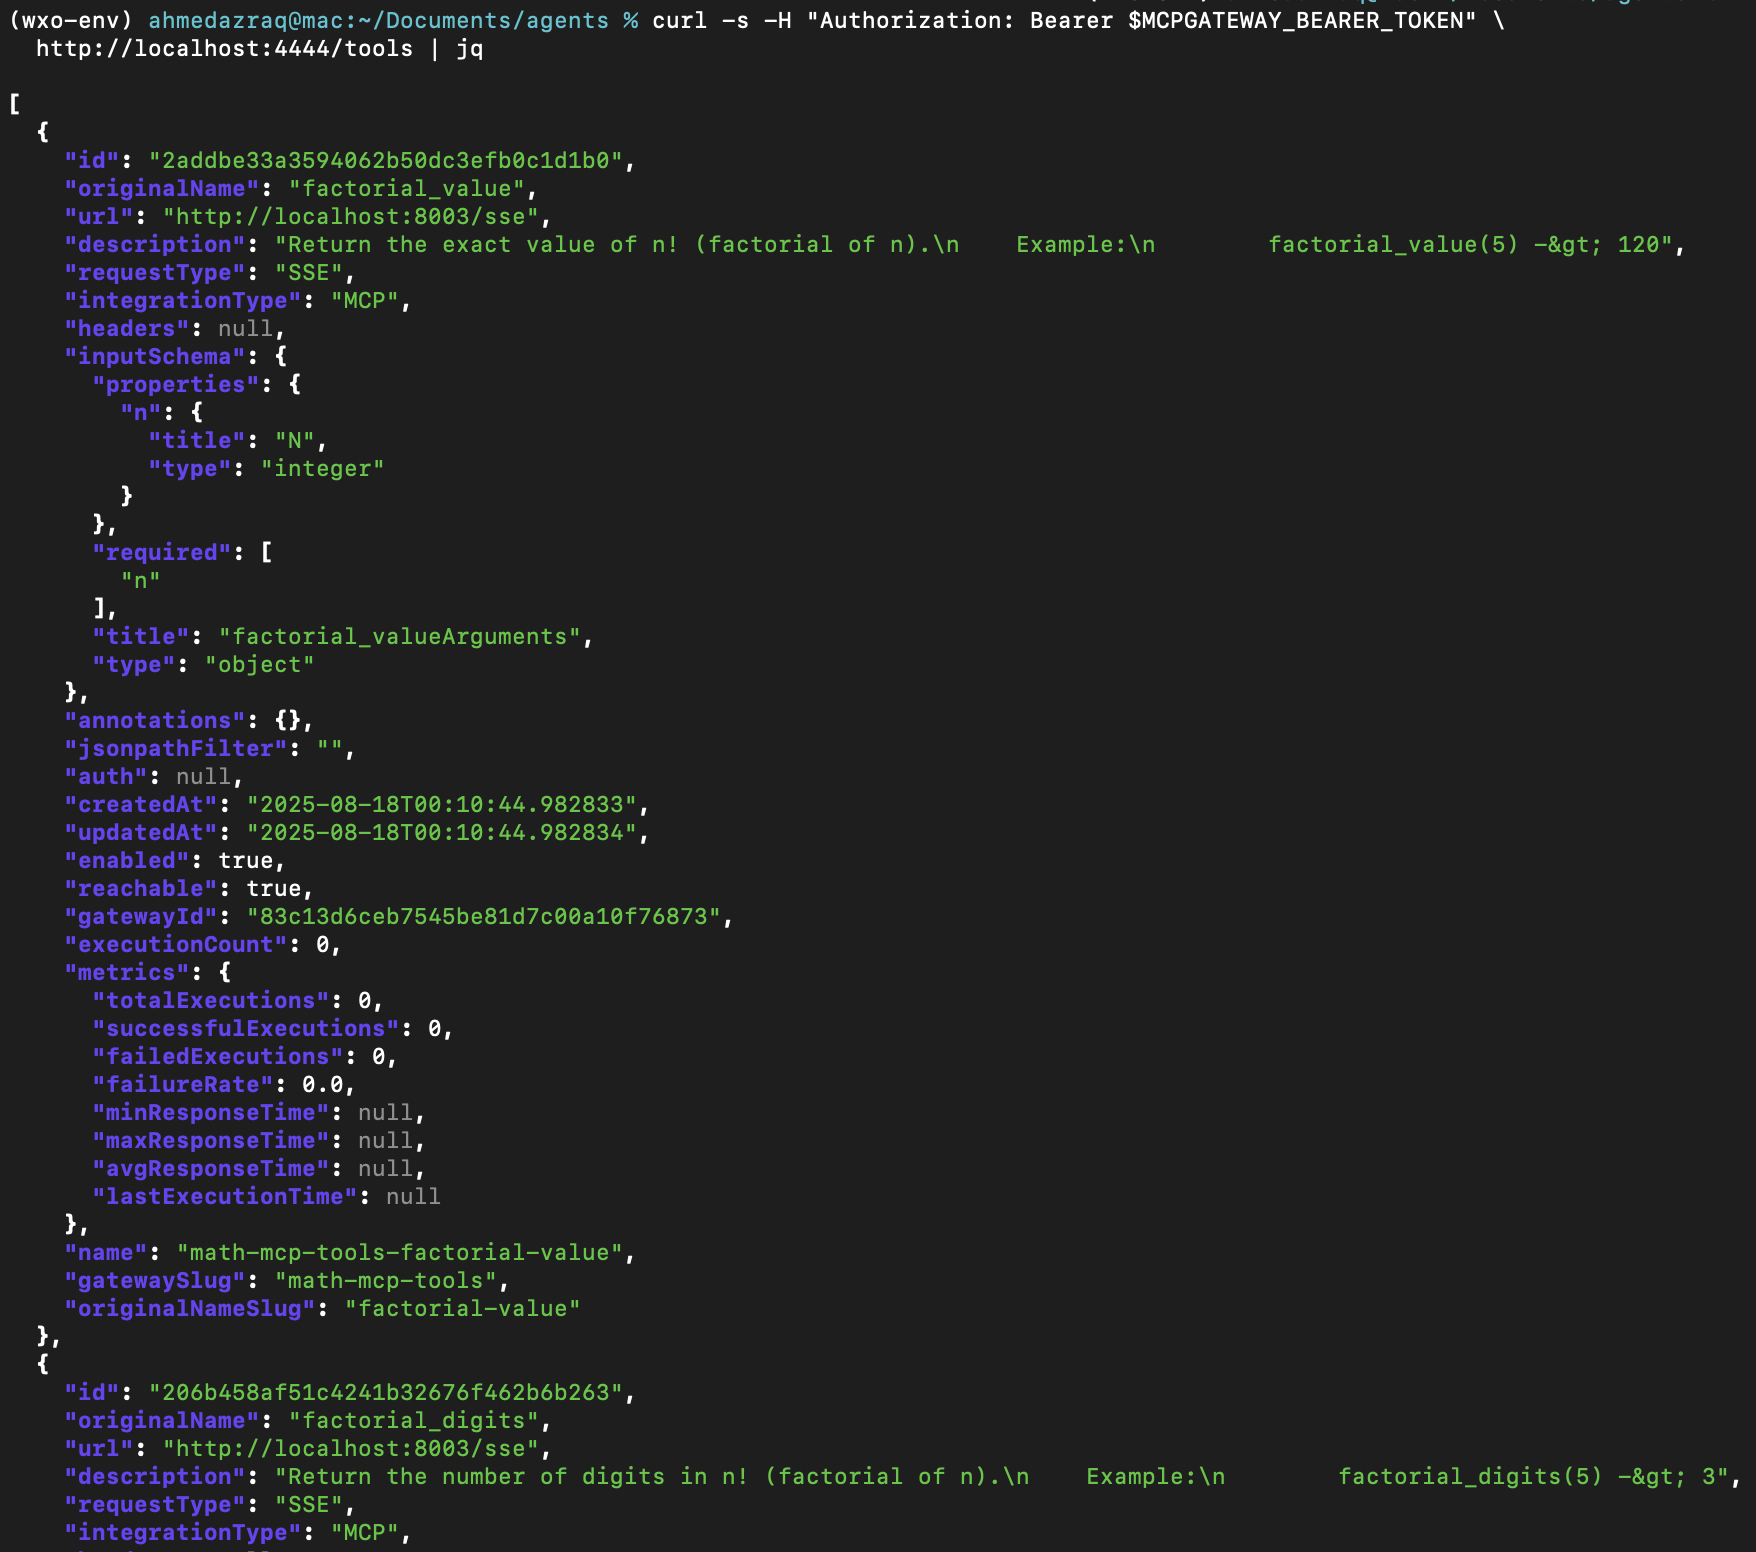
curl -s -H "Authorization: Bearer $McPGATEWAY_BEARER_TOKEN" \
  http://localhost:4444/tools | jq
You should see factorial_value and factorial_digits listed as active tools.
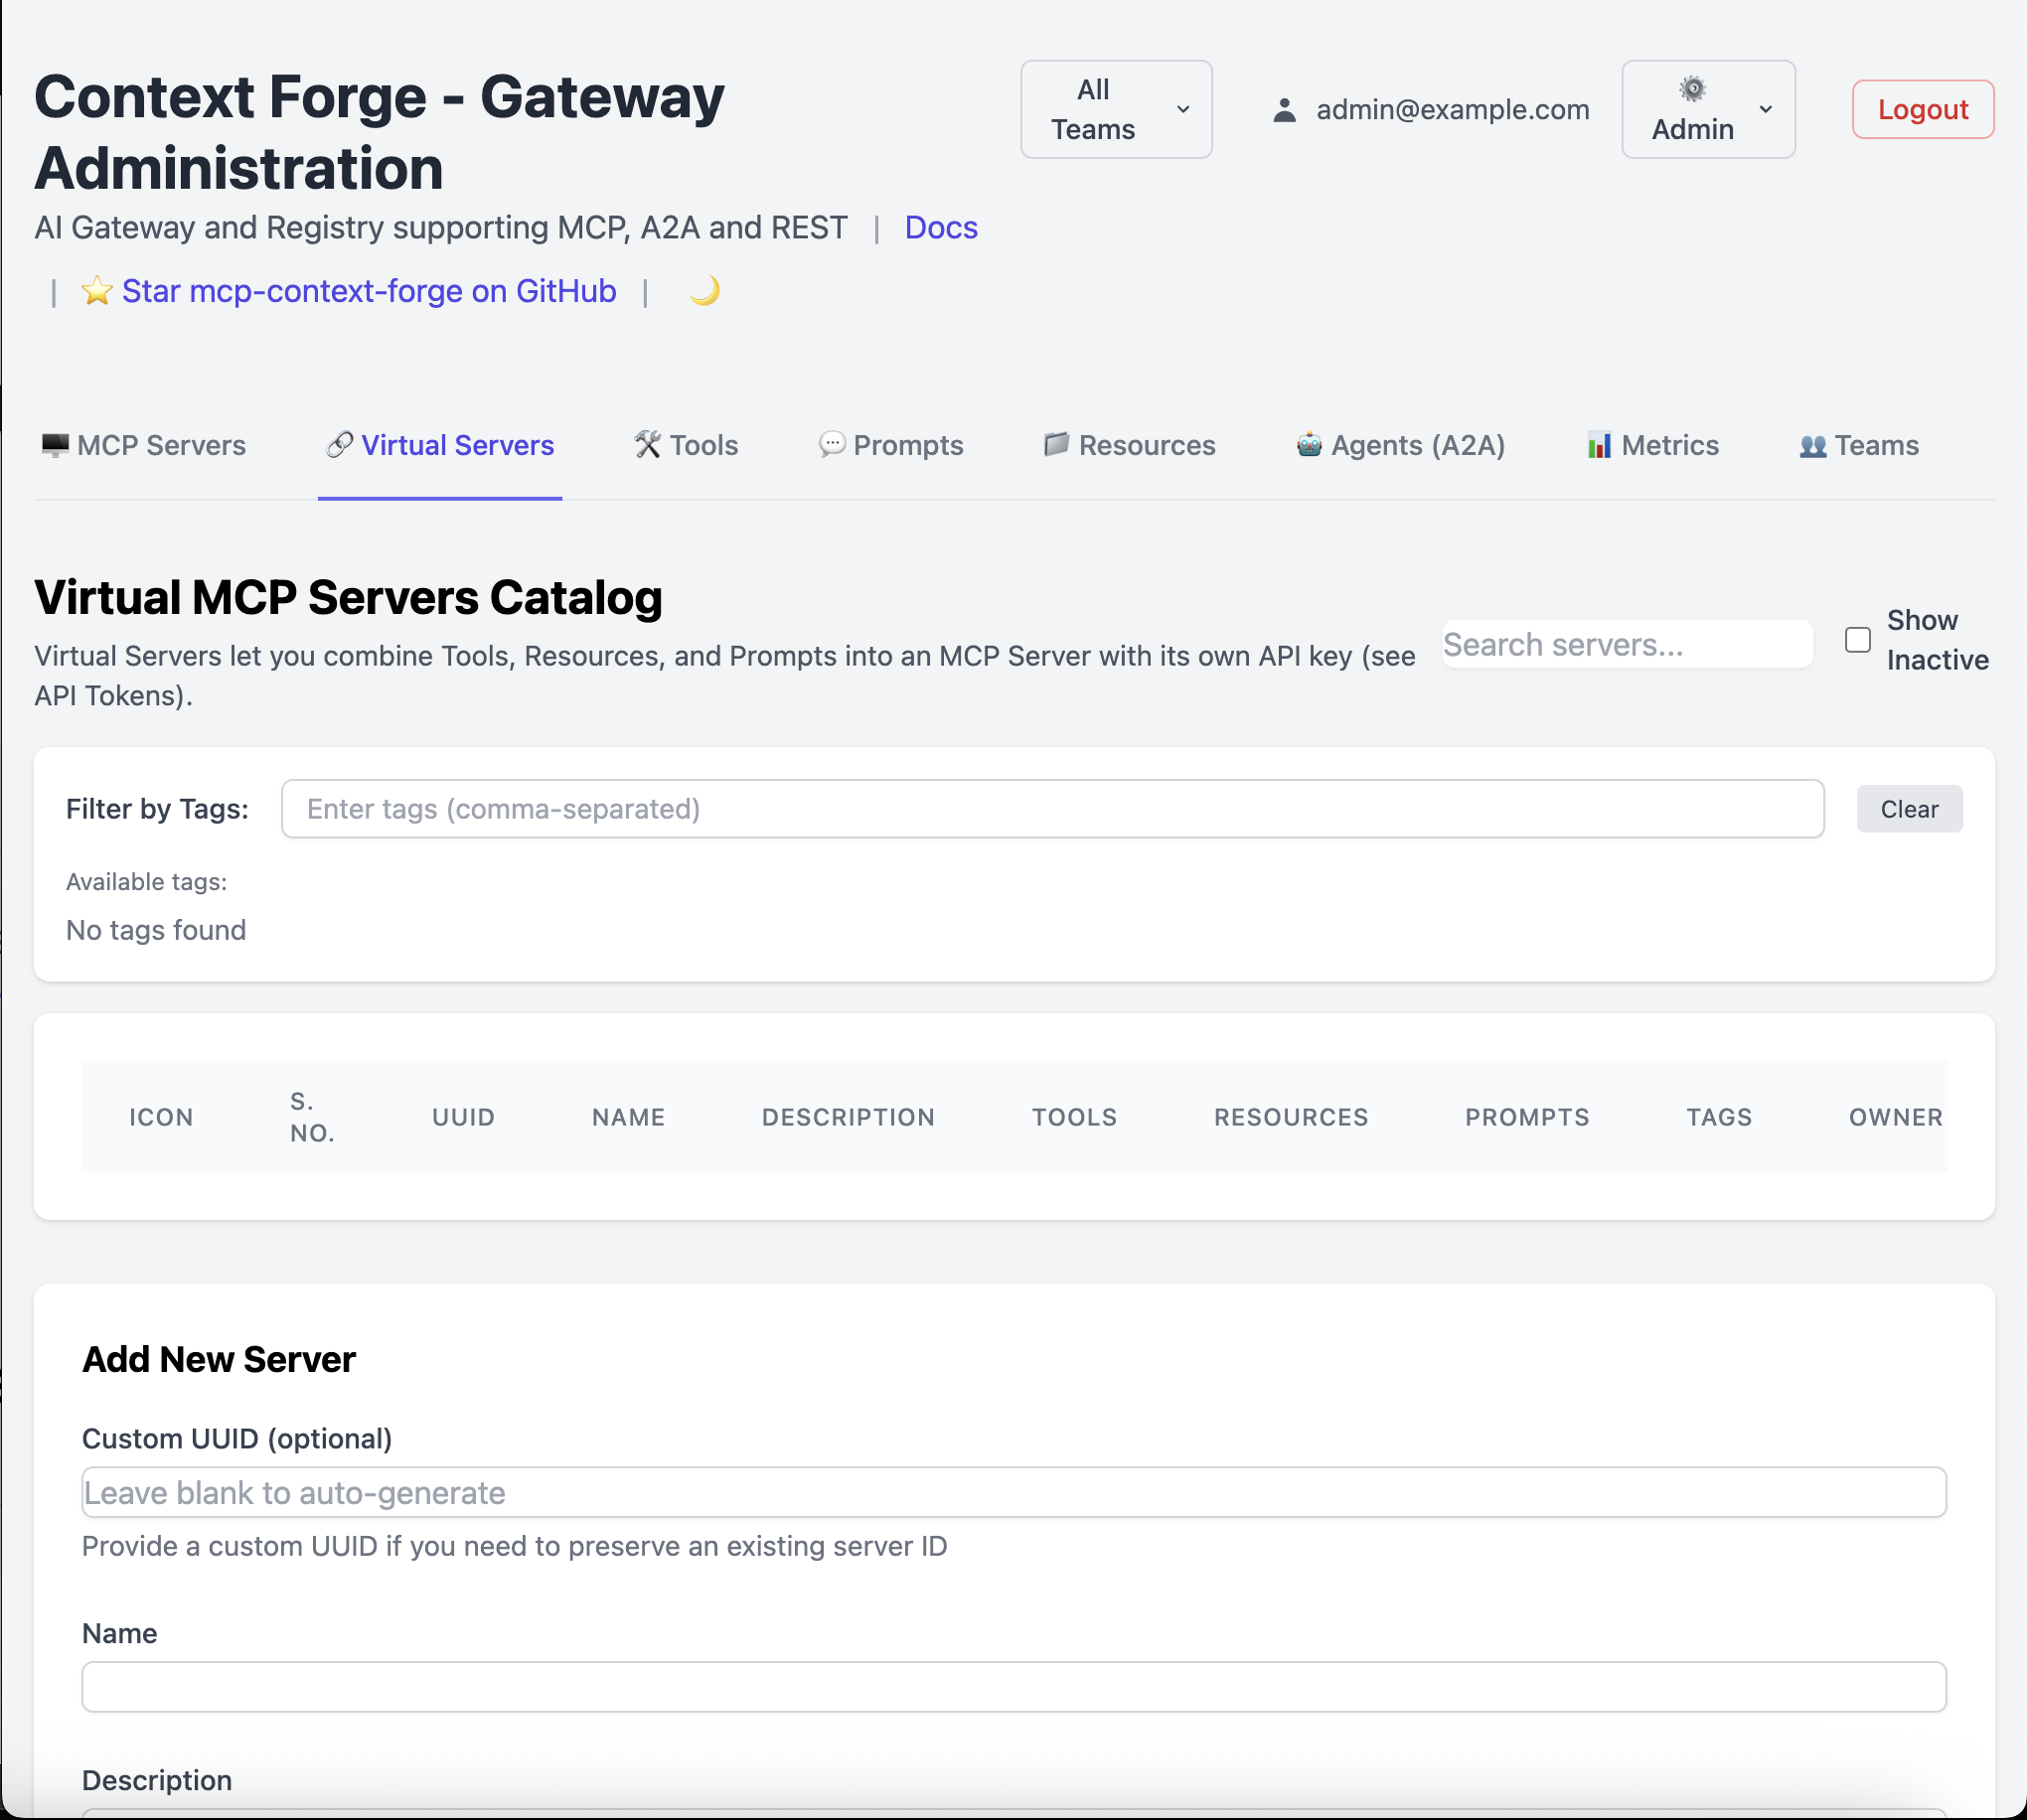
Step 2. create a virtual server on McP Gateway and point clients to it
A virtual server in McP Gateway acts as an abstraction layer. It bundles one or more registered tools behind a single server URL that clients can use directly. This makes it easier for agents or applications to consume tools without needing to know each tool’s individual ID or configuration. Instead, they just point to the virtual server’s URL and get access to all its associated tools.
First, query the list of tools that the McP Gateway knows about, to get the IDs of the tools. Use jq to list each tool’s ID with its name so you can quickly identify the one you need:
curl -s -H "Authorization: Bearer $McPGATEWAY_BEARER_TOKEN" \
  http://localhost:4444/tools | jq -r '.[] | "\(.id) \(.name)"'
copy the id of both tools.

Now, create a virtual server by providing a name, description, and the list of tool IDs that you want it to expose, including the two tool IDs for the factorial McP tools.
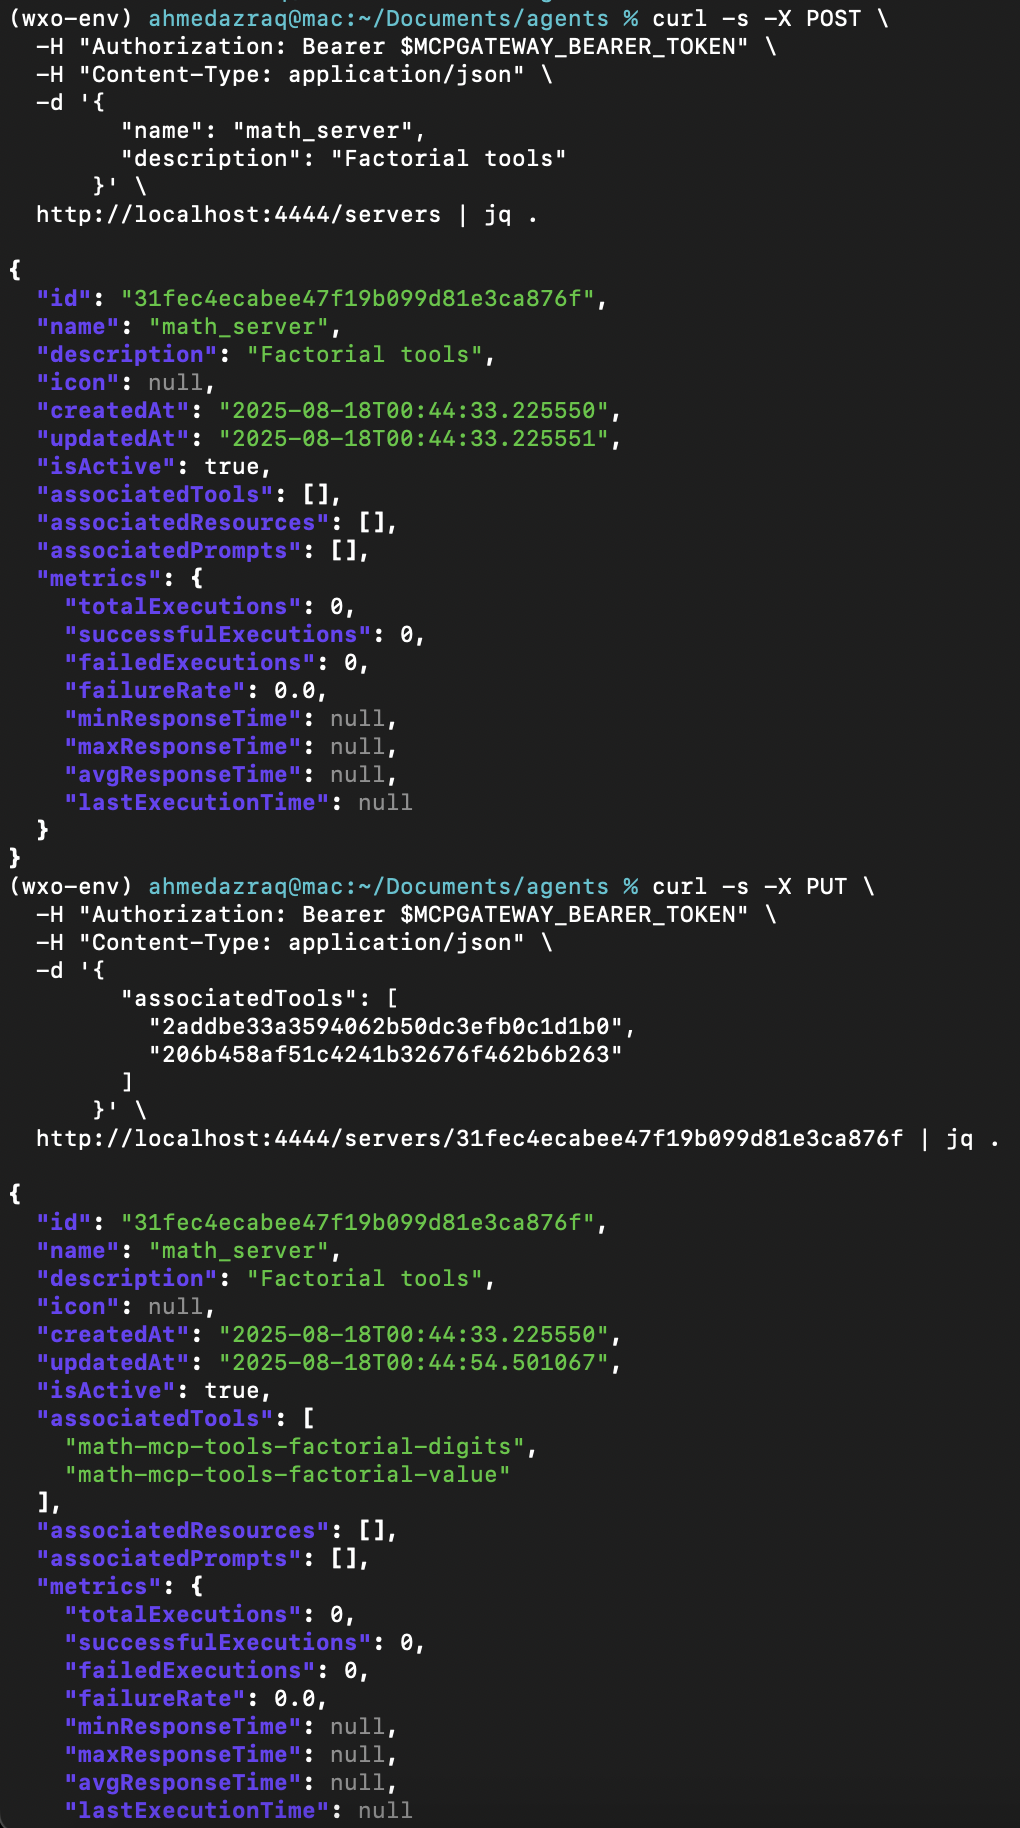
curl -s -X POST \
  -H "Authorization: Bearer $McPGATEWAY_BEARER_TOKEN" \
  -H "content-Type: application/json" \
  -d '{
        "server": {
          "name": "math_server",
          "description": "Factorial tools"
        }
      }' \
  http://localhost:4444/servers | jq .
This creates the McP server on the McP Gateway and gives you a server ID.
Update the server with the tool IDs.
curl -s -X PUT \
  -H "Authorization: Bearer $McPGATEWAY_BEARER_TOKEN" \
  -H "content-Type: application/json" \
  -d '{
    "associatedTools": [
      "TOOL_ID_1",
      "TOOL_ID_2"
    ]
  }' \
  http://localhost:4444/servers/SERVER_ID | jq .
You’ll see messages similar to the ones in the next image.
List the servers if you need to retrieve the server ID later:
curl -s -H "Authorization: Bearer $McPGATEWAY_BEARER_TOKEN" \
  http://localhost:4444/servers | jq .
Finally, test the McP tools using McP Gateway Admin UI:
Open the Admin UI at
http://localhost:4444/admin. Sign in with your username and password that you set earlier.Go to Tools.
Find
factorial_valueandfactorial_digits.click Test next to a tool and input the value of n (as shown below), and click Run Tool.
Inputs and expected outputs
factorial_value- Input: 5
Expected output:
120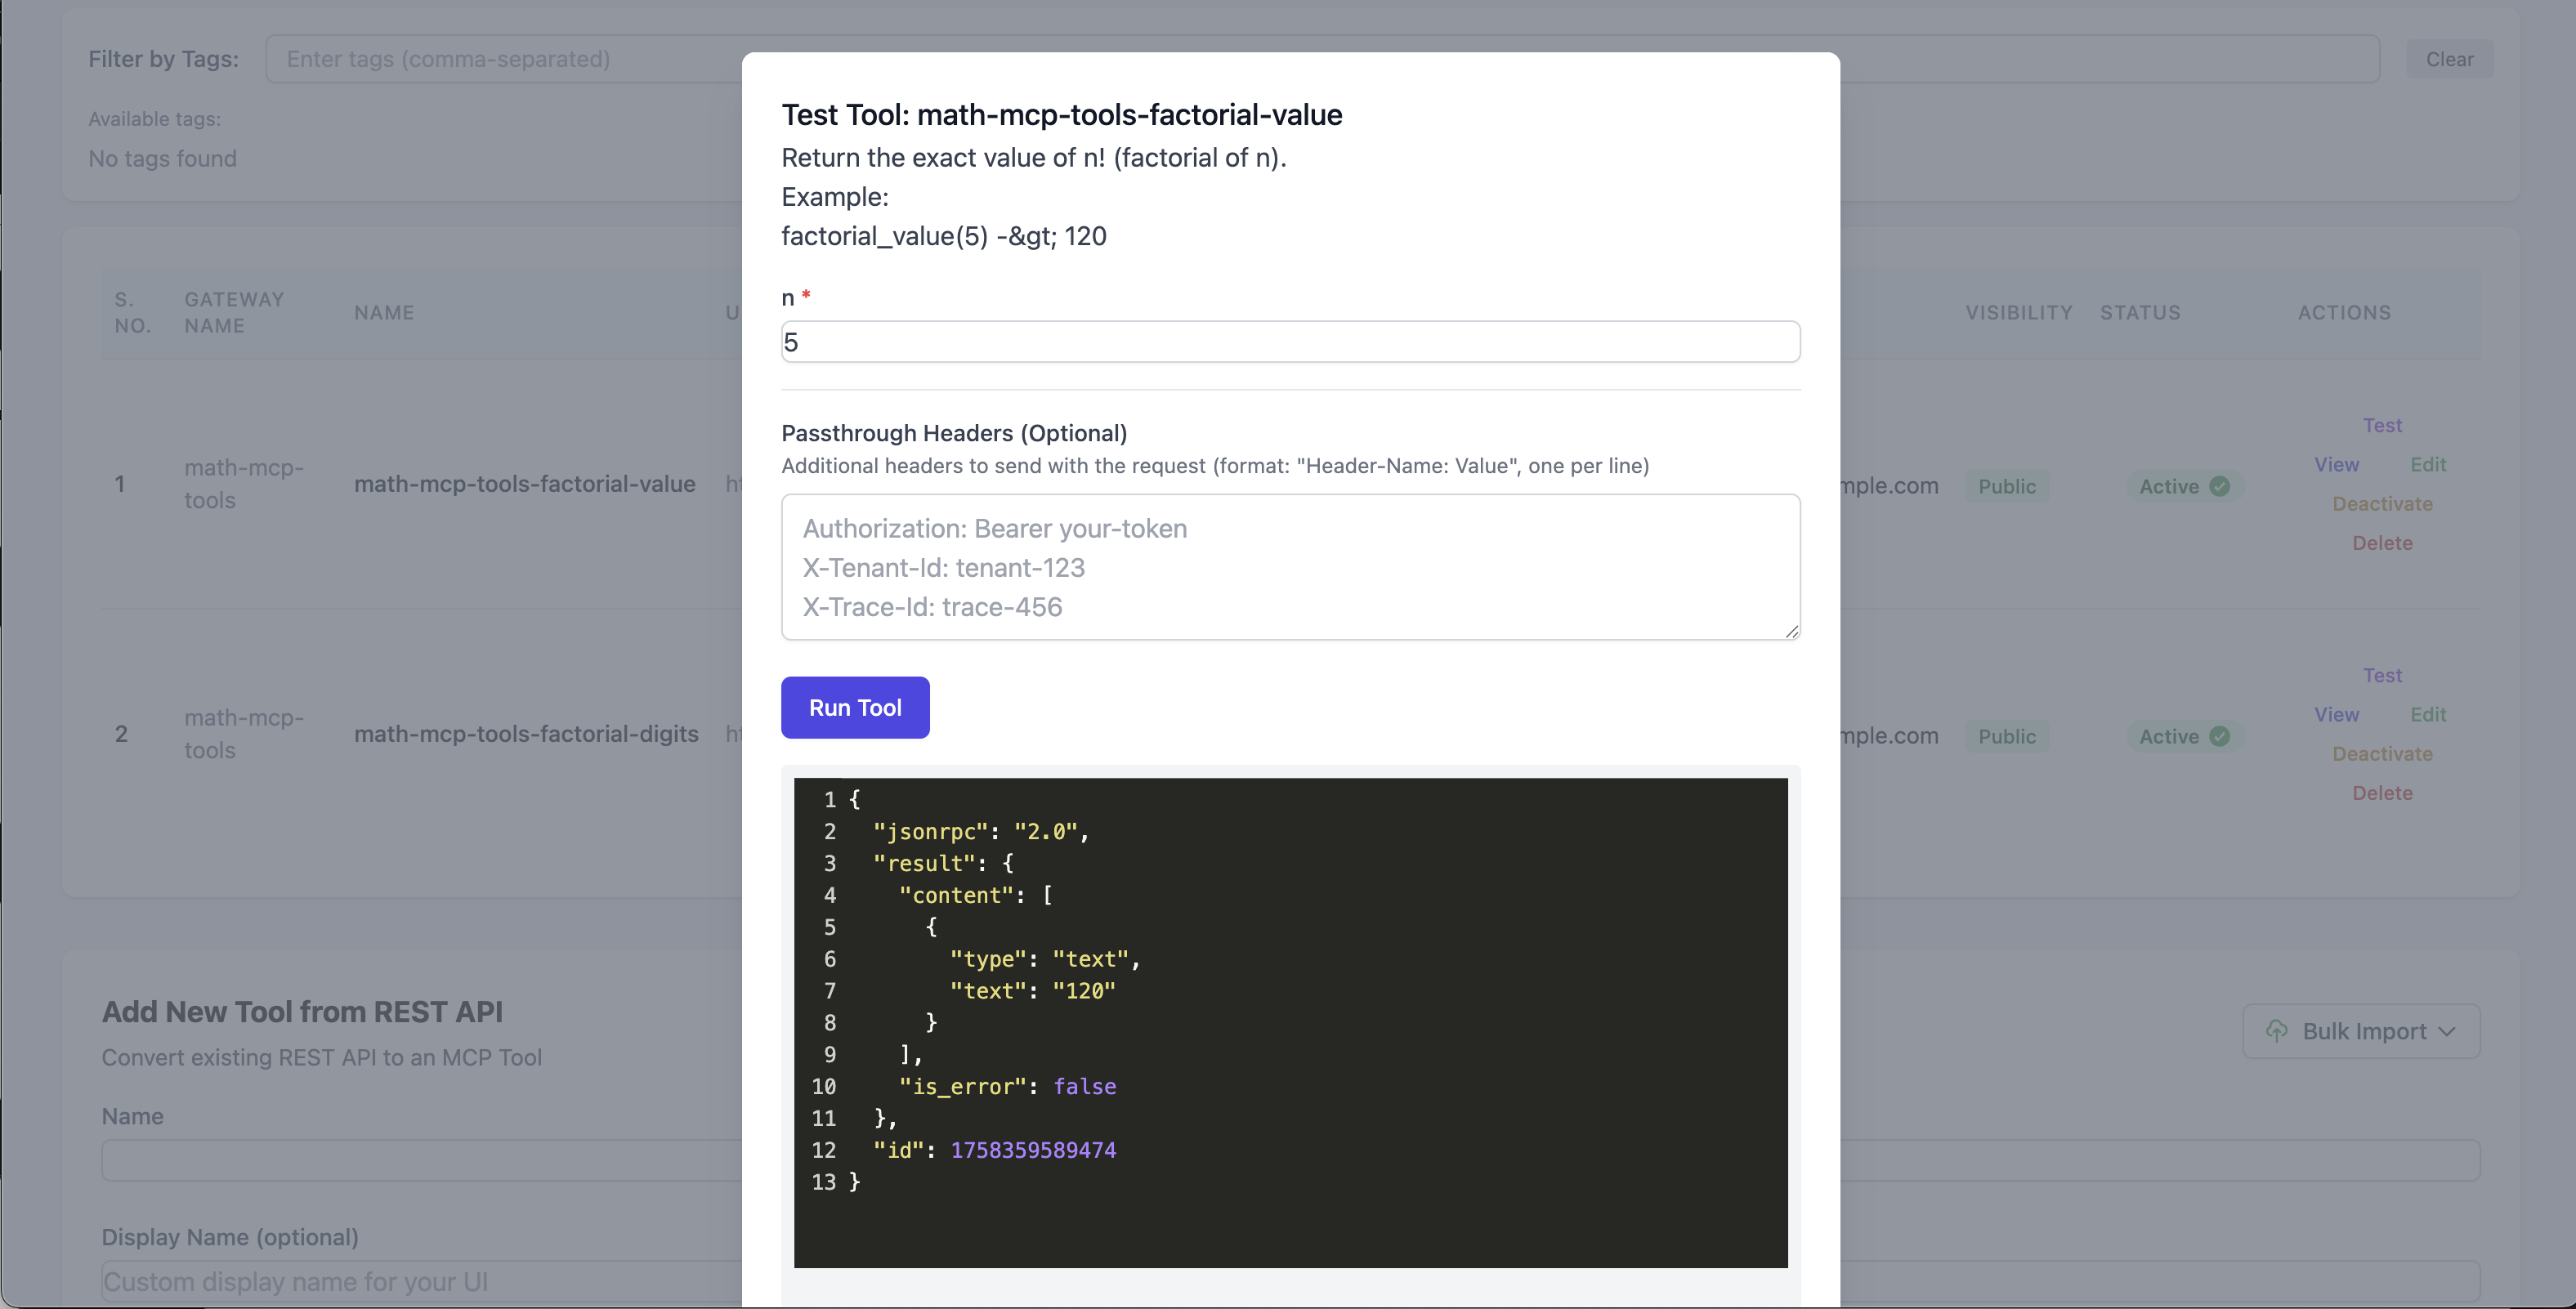
You can also test the factorial digits tool using McP Gateway Admin UI:
Open the Admin UI at
http://localhost:4444/admin. Sign in with your username and password that you set earlier.Go to Tools.
Find
factorial_digits.click Test next to a tool and input the value of n (as shown below), and click Run Tool.
Inputs and expected outputs
factorial_digits- Input: 5
- Expected output:
3
Step 3. Deploy McP Gateway on IBM code Engine
In this step, you will deploy the McP Gateway to IBM code Engine, so your tools run as a managed web service. You can either run the official public image or build your own and push it to IBM container Registry.
You can follow the detailed steps in the IBM code Engine docs, but we present a summary of the steps here:
Login to IBM cloud cLI.
ibmcloud login –ssoGet resource group ID and set the target resource group in your region.
ibmcloud resource groups ibmcloud target -r us-south -g RESOURcE_GROUP_IDcreate code Engine project or get the ID of an already created code Engine project and set it to the project.
ibmcloud ce project create --name mcp-gateway
 ibmcloud ce project list
Login to IBM cloud container registry, and get an existing IBM cloud container registry namespace.
ibmcloud plugin install container-registry ibmcloud cr region-set us-south ibmcloud cr login ibmcloud cr namespacesSet the variables for the script.
# --- Variables you set once --- export PROJEcT="ce-itz-wxo-68c293dc1642d9f9c32780" # your code Engine project name export IBM_API_KEY="<YOUR_IBM_cLOUD_API_KEY>" # your IBM cloud API Key for the registry secret # Pick an EXISTING IcR namespace from `ibmcloud cr namespaces` export NS="cr-itz-8y7jh5y9" export IMG="us.icr.io/$NS/math-mcp-gateway-bridge:latest"create a containerfile named
containerfilein the same directory that have the python file defining the tools.FROM python:3.11-slim WORKDIR /app cOPY main.py /app/main.py RUN pip install --no-cache-dir mcp-contextforge-gateway mcp cMD ["python3","-m","mcpgateway.translate","--stdio","python3 /app/main.py","--host","0.0.0.0","--port","8003"]create the pull secret (one time per cE project).
ibmcloud ce registry create \ --name icr-secret \ --server us.icr.io \ --username iamapikey \ --password "$IBM_API_KEY"Build and push the image for linux/amd64.
colima start docker login docker buildx create --use >/dev/null 2>&1 || true docker buildx inspect --bootstrap docker buildx build --platform linux/amd64 \ -t "$IMG" \ -f containerfile \ --push .create the app on code Engine, and serve /sse on 8003.
ibmcloud ce application create \
   --name mcp-gw-bridge \
   --image "$IMG" \
   --registry-secret icr-secret \
   --port 8003 \
   --min-scale 1 \
   --max-scale 1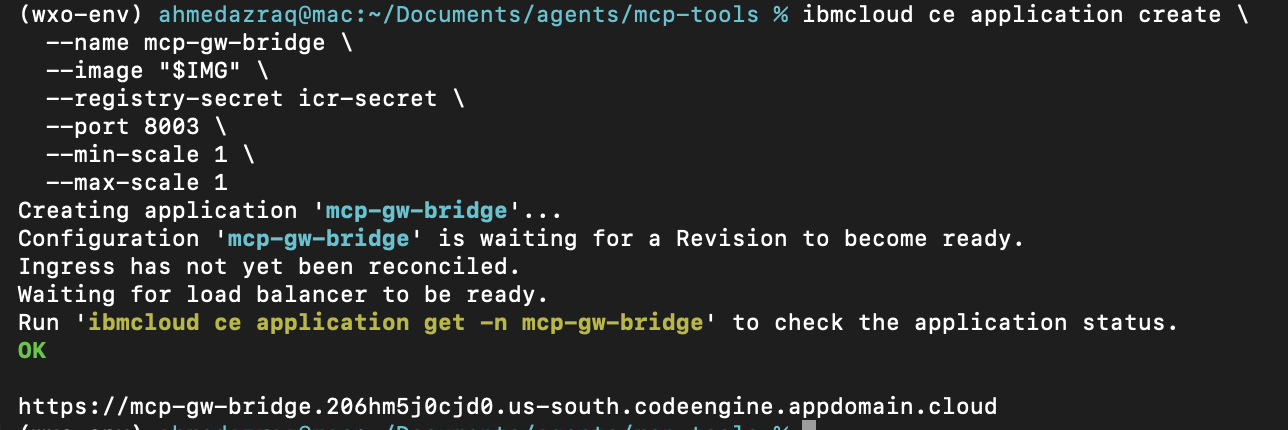
Get the URL and test the SSE endpoint.
McP_GW_BRIDGE_URL=$(ibmcloud ce application get -n mcp-gw-bridge -o url -q)
echo "$McP_GW_BRIDGE_URL"

# Expect: HTTP/2 200 and content-Type: text/event-stream
curl -v -N -H 'Accept: text/event-stream' -m 45 "$McP_GW_BRIDGE_URL/sse"
Step 4. Update the Math Expert Agent to use McP Gateway
In this step, you are going to update the Math Expert Agent to use the tools that are now available through the McP Gateway.
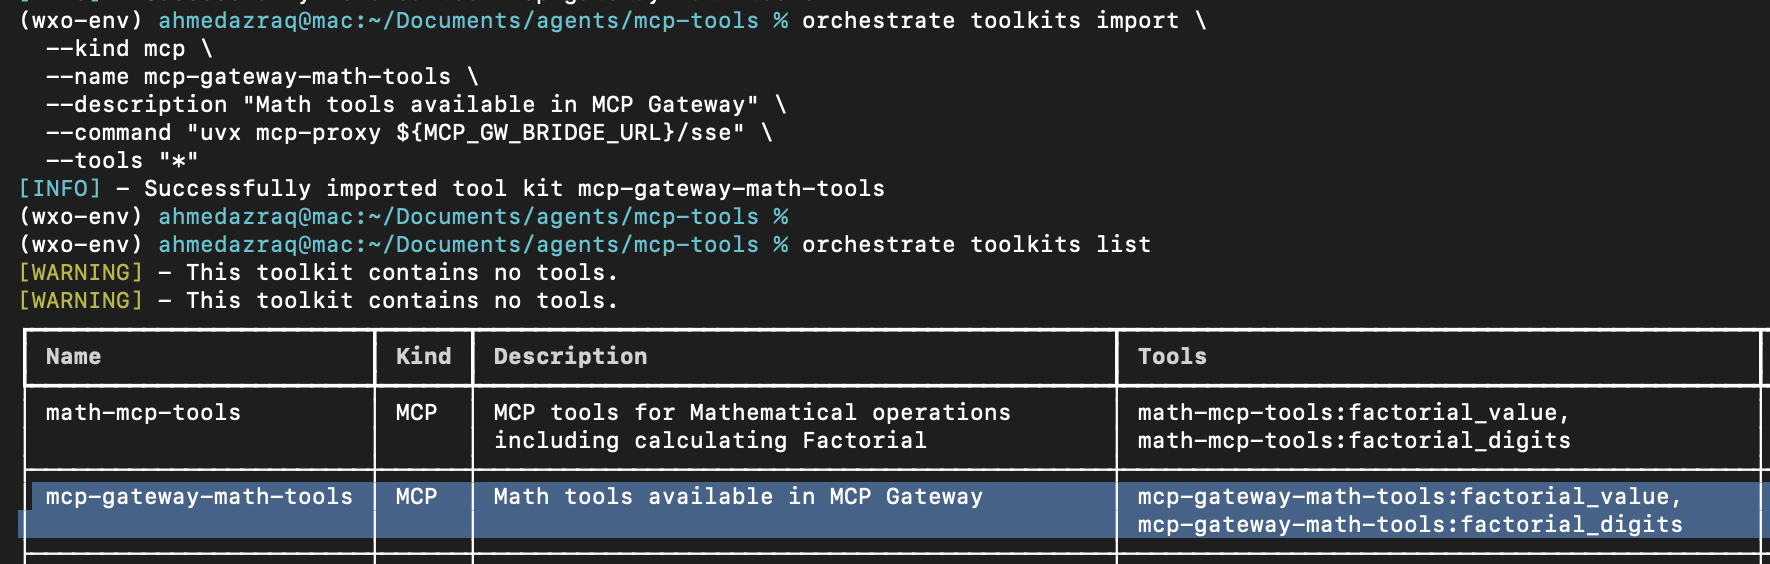
Import all the tools available (factorial-value and factorial-digits) on the McP Gateway by using the watsonx Orchestrate Agent Development Kit, and verify that they are imported:
orchestrate toolkits import \ --kind mcp \ --name mcp-gateway-math-tools \ --description "Math tools available in McP Gateway" \ --command "uvx mcp-proxy ${McP_GW_BRIDGE_URL}/sse" \ --tools "*" orchestrate toolkits listYou should see messages similar to those in the following image.
Open the Math Expert Agent on watsonx Orchestrate and remove the previous two McP tools.
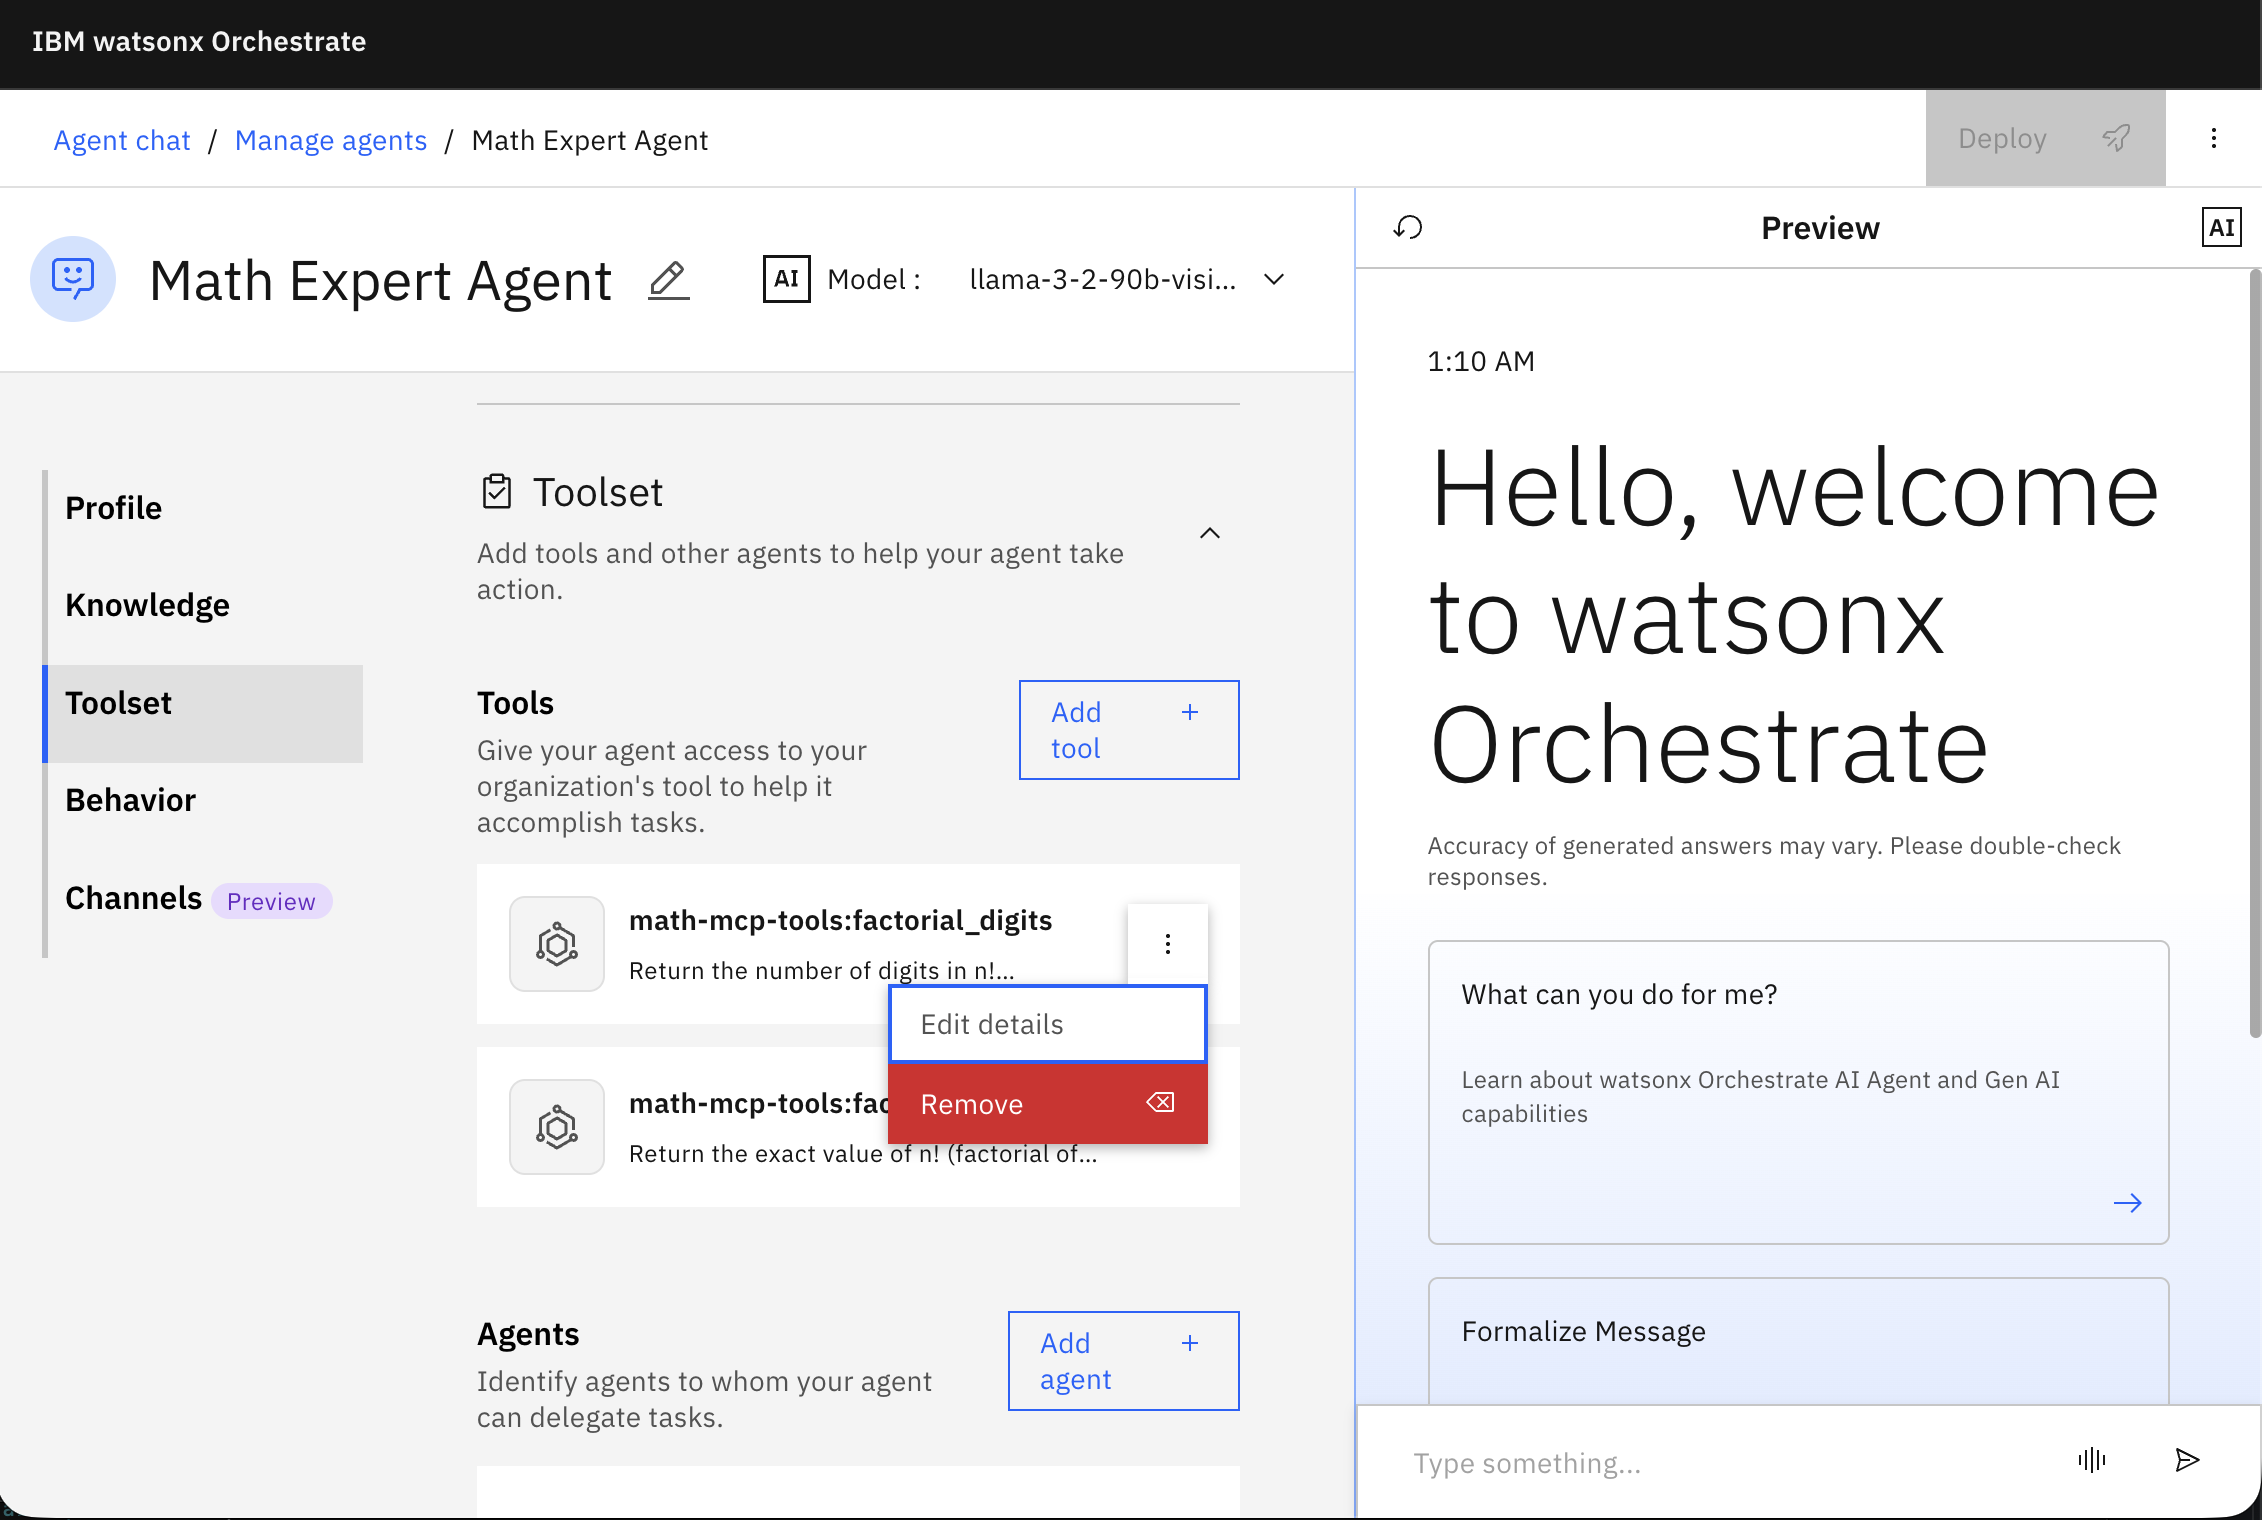
click on Add tool, then click on Add from local instance.
Select the two new tools that you deployed on McP Gateway then click Add to Agent.
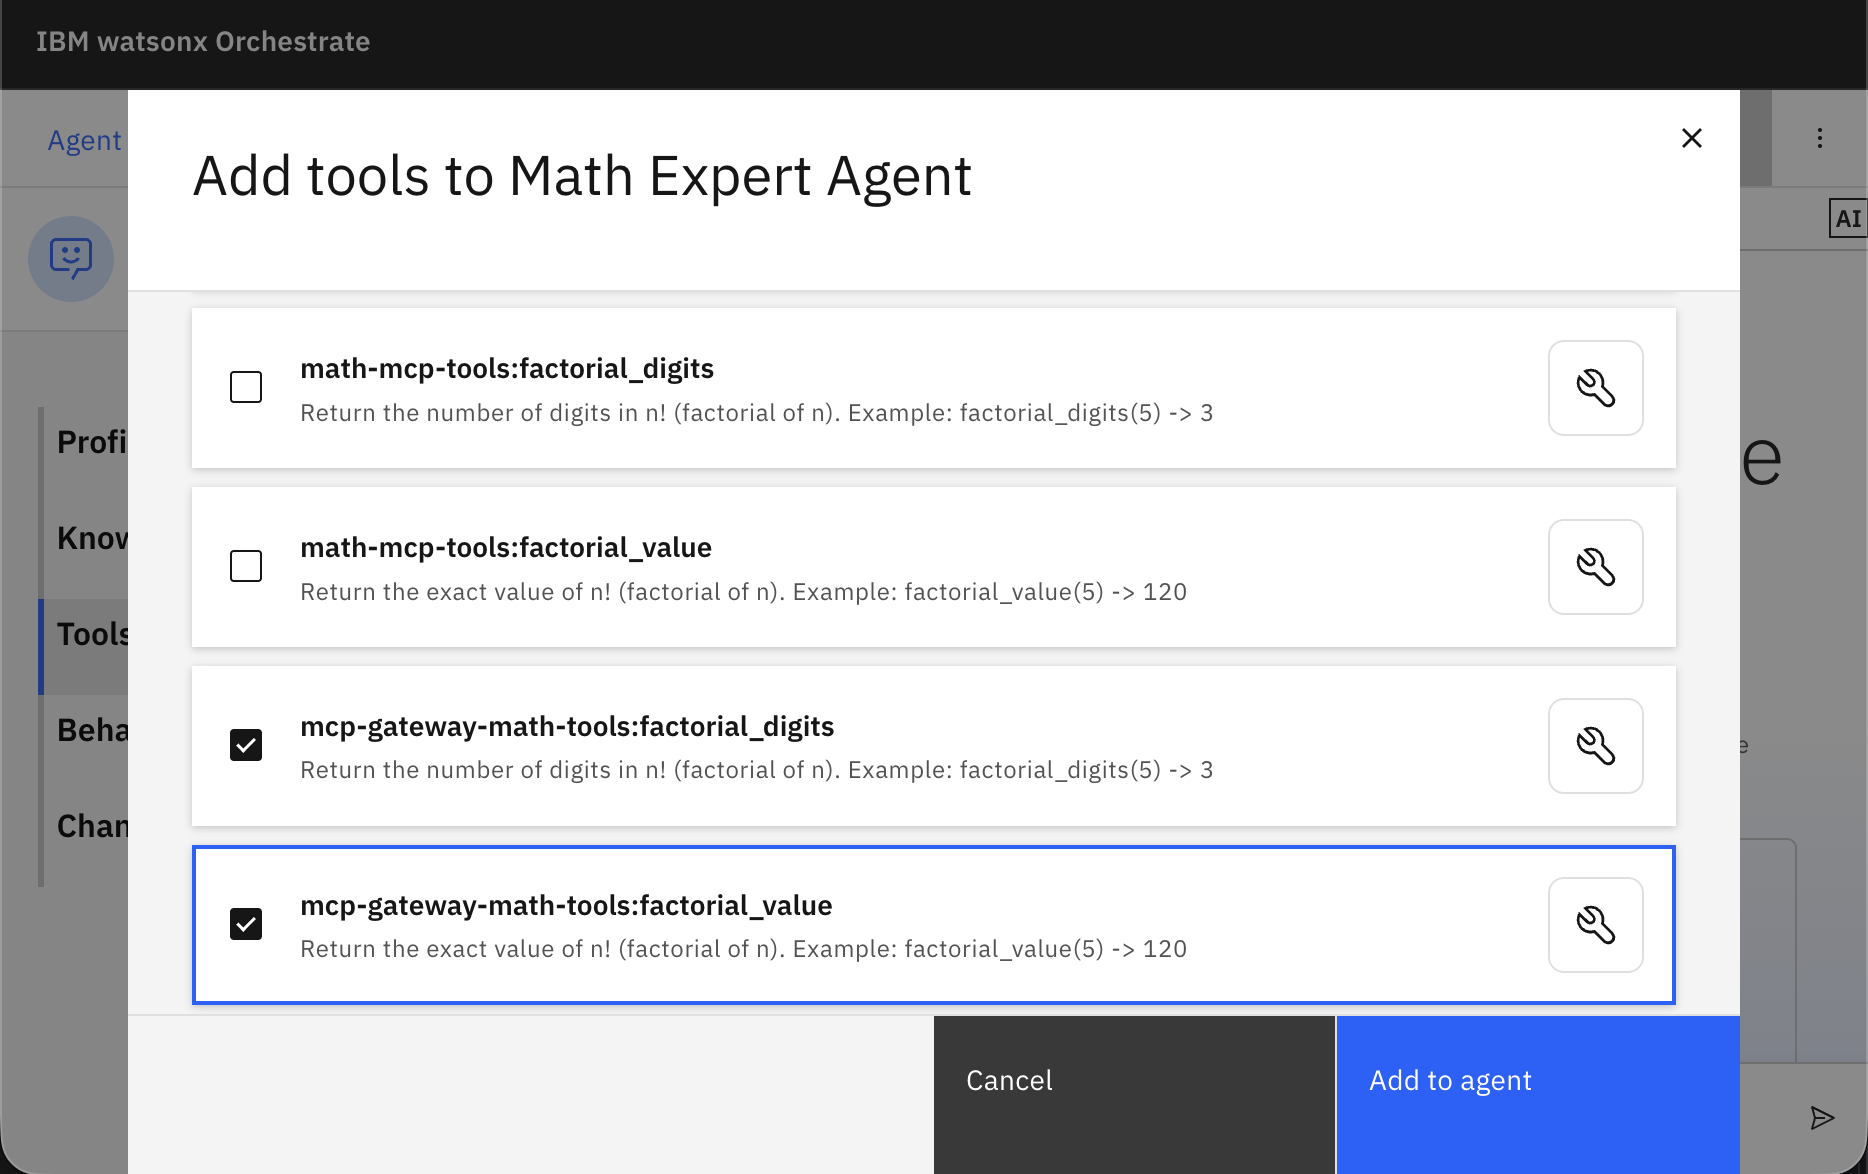
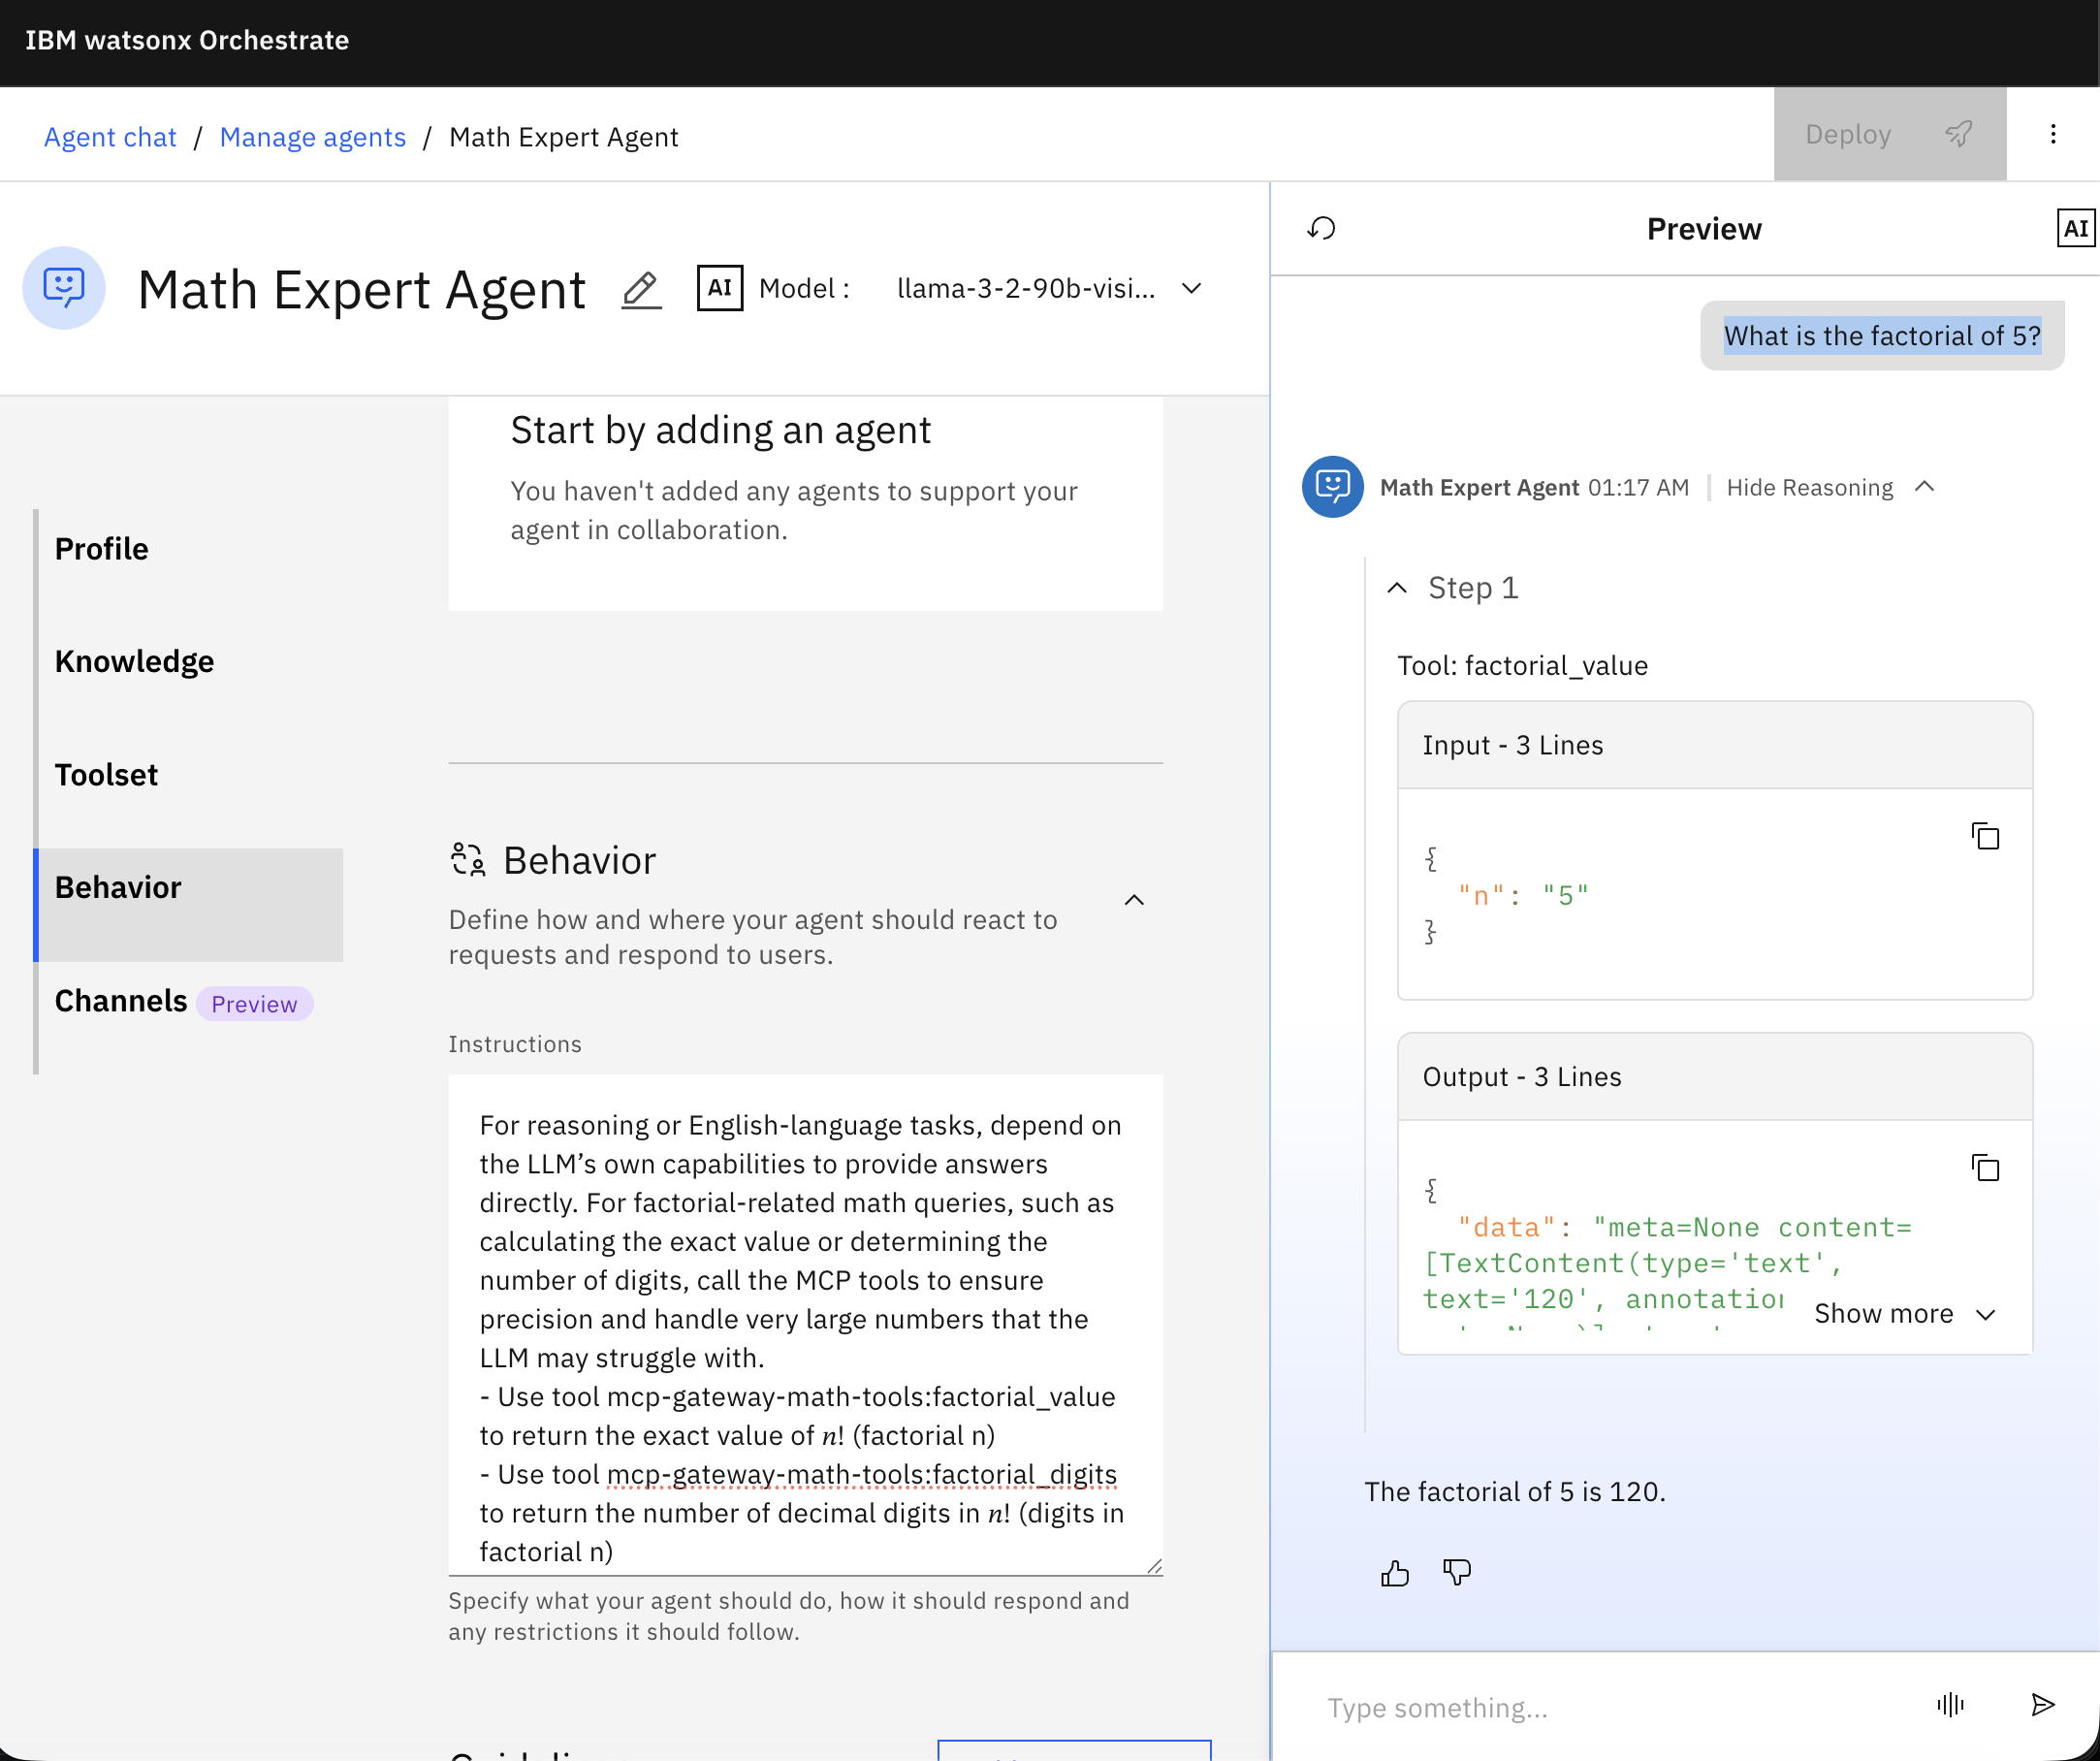
Update the Behavior to refer to the new tools.
For reasoning or English-language tasks, depend on the LLM’s own capabilities to provide answers directly. For factorial-related math queries, such as calculating the exact value or determining the number of digits, call the McP tools to ensure precision and handle very large numbers that the LLM may struggle with. Use tool mcp-gateway-math-tools:factorial_value to return the exact value of 𝑛! (factorial n) Use tool mcp-gateway-math-tools:factorial_digits to return the number of decimal digits in 𝑛! (digits in factorial n)Test the agent, with this query,`What is the factorial of 5?`. Notice its reasoning, it’s using the tools available on McP Gateway.
Summary and next steps
In this tutorial, you learned how to expose McP tools on the McP Gateway, which acts as a bridge between your agents and the real world of services they depend on. McP Gateway allows you to manage and secure your tools in a centralized manner, making them accessible to multiple agents and workflows without requiring custom glue code for each integration. By using the McP Gateway, you focused on designing the workflows and let the McP Gateway handle the underlying complexities.
You also learned how to register your McP tools with the McP Gateway, making them discoverable and callable by other agents. You created a virtual server that bundles your tools together, making it easier for clients to access them without needing to know each tool’s individual details. Additionally, you tested your tools through the Admin UI, ensuring that they are working as expected. You also deployed McP Gateway on IBM cloud code Engine.
Finally, you learned how to integrate your McP tools into agents built on watsonx Orchestrate, allowing you to create powerful workflows that leverage the strengths of both McP tools and multi-agent orchestration provided by watsonx Orchestrate. By following this tutorial, you gained the skills to include your own McP tools into the McP Gateway, enabling flexible, secure, and reusable automation that can scale across your projects and workflows.
Acknowledgments
This tutorial was produced as part of the IBM Open Innovation community initiative: Agentic AI (AI for Developers and Ecosystem).
The authors deeply appreciate the support of Mihai criveti, Ela Dixit, Sebastian Iozu, and Michelle corbin for the guidance and expertise on reviewing and contributing to this tutorial.