About cookies on this site Our websites require some cookies to function properly (required). In addition, other cookies may be used with your consent to analyze site usage, improve the user experience and for advertising. For more information, please review your options. By visiting our website, you agree to our processing of information as described in IBM’sprivacy statement. To provide a smooth navigation, your cookie preferences will be shared across the IBM web domains listed here.
Tutorial
Build Sterling OMS Custom Images using OpenShift Buildconfig
Learn how to customize and deploy IBM Sterling OMS container images using OpenShift BuildConfig
OpenShift Build Configuration (BuildConfig) defines a process to create new container images. IBM Sterling Order Management (OMS) provides base container images that customers can customize based on business needs. These customizations can include:
- User-exit implementation in the form of Java code
- Property changes
- Database extensions
The typical steps involved in building custom images are:
- Pull the IBM Sterling OMS base image from the IBM repository (
cp.icr.io). - Run the base image.
- Copy the required customization files into the OMS container.
- Access the container terminal.
- Execute the necessary customization steps and run the
generateImages.shcommand. - Tag the generated images.
- Push the tagged images to the container repository.
For more details on container customization, visit IBM Documentation.
Automating customization with OpenShift BuildConfig
OpenShift BuildConfig helps automate the customization process for OMS container images by streamlining the following tasks:
- Integrating with the source image repository containing the base image.
- Linking to a Git repository with the required customization files.
- Pulling and running the base image.
- Generating, tagging, and pushing the customized image.
- Connecting to the destination image repository for deployment.
The following diagram illustrates the BuildConfig architecture for customizing Sterling OMS container images.

Figure 1: BuildConfig architecture for Sterling OMS container customization
Once the images are generated and stored in the destination repository, they are ready for deployment in the production environment.

Figure 2: Customized containers deployment
This tutorial focuses on automating the process of building customized container images for IBM Sterling OMS using OpenShift BuildConfig.
Prerequisites
To follow this tutorial, you should have a basic understanding of the following:
- Docker and container concepts
- OpenShift architecture and commands
- Using the OpenShift Console
- IBM Sterling Order Management (OMS) deployment strategies
Steps
Step 1. Get entitlement key for IBM Sterling base images
IBM Sterling OMS base images are hosted on cp.icr.io. To download these images, you must obtain an entitlement key, which serves as authentication.
You can generate the entitlement key from the following link:
This key is required by BuildConfig to pull the base image for customization.
Step 2. Creating an OpenShift Project
You can create a project in OpenShift either through the console or the command line. For this guide, most configurations will be done using the command line.
Create a new project named oms-build with the following command:
oc new-project oms-build --description="oms-build" --display-name="oms-build"
Once created, the project should appear in the Projects section of the OpenShift console.

Figure 3: oms-build project
Step 3. Configuring ImageStream for pulling image from source repository
In this section, we will configure the ImageStream to pull the IBM Sterling OMS base image from the source repository. This setup ensures that any subsequent customizations are built upon the correct base image. To accomplish this, we need to create a secret for authentication, link it to the default service account, and configure the ImageStream for tracking the container image. Complete the following procedures:
Create secret for pulling image from source repository
To authenticate with the IBM container registry, we must create a secret containing the entitlement key. This key enables access to the OMS base image hosted on cp.icr.io.
Set the entitlement key and project namespace as environment variables:
export ENTITLEDKEY="<place here the entitlement key>"export NAMESPACE="oms-build"Create the secret with the following command:
oc create secret docker-registry ibm-entitlement-key \
--docker-server=cp.icr.io \
--docker-username=cp \
--docker-password=${ENTITLEDKEY} \
--namespace=${NAMESPACE}
Link the ibm-entitlement-key secret to the default service account. This allows any builds under this service account to use the secret for pulling the base image:
oc secrets link default ibm-entitlement-key --for=pullConfigure the ImageStream: ImageStreams provide a way to manage and track container images. You can use tags to monitor image versions and trigger updates based on changes.
Create a YAML configuration file named oms-imagestream.yaml with the following content:
apiVersion: image.openshift.io/v1 kind: ImageStream metadata: name: om-base namespace: oms-build spec: tags: - name: 10.0.2409.0-amd64 from: kind: DockerImage name: cp.icr.io/cp/ibm-oms-enterprise/om-base:10.0.2409.0-amd64Apply the ImageStream configuration using the following command:
oc apply -f oms-imagestream.yaml -n oms-buildThe om-base ImageStream is now configured to track the image located at cp.icr.io/cp/ibm-oms-enterprise/om-base:10.0.2409.0-amd64.
Step 4. Setting up the Git repository
The next step is to configure a GitHub repository named oms-custom-build. This GitHub repository will host all necessary artifacts for customizing the Sterling OMS images.
The repository consists of the following directories:
jars – Contains JAR files to be installed using the
install3rdPartyutility.properties – Includes a customized
sandbox.cfgfile with the following setting:DATABASE_PROPERTY_MANAGEMENT=truebuild-script – Contains a build.sh file, which serves as the entry point for the BuildConfig execution.
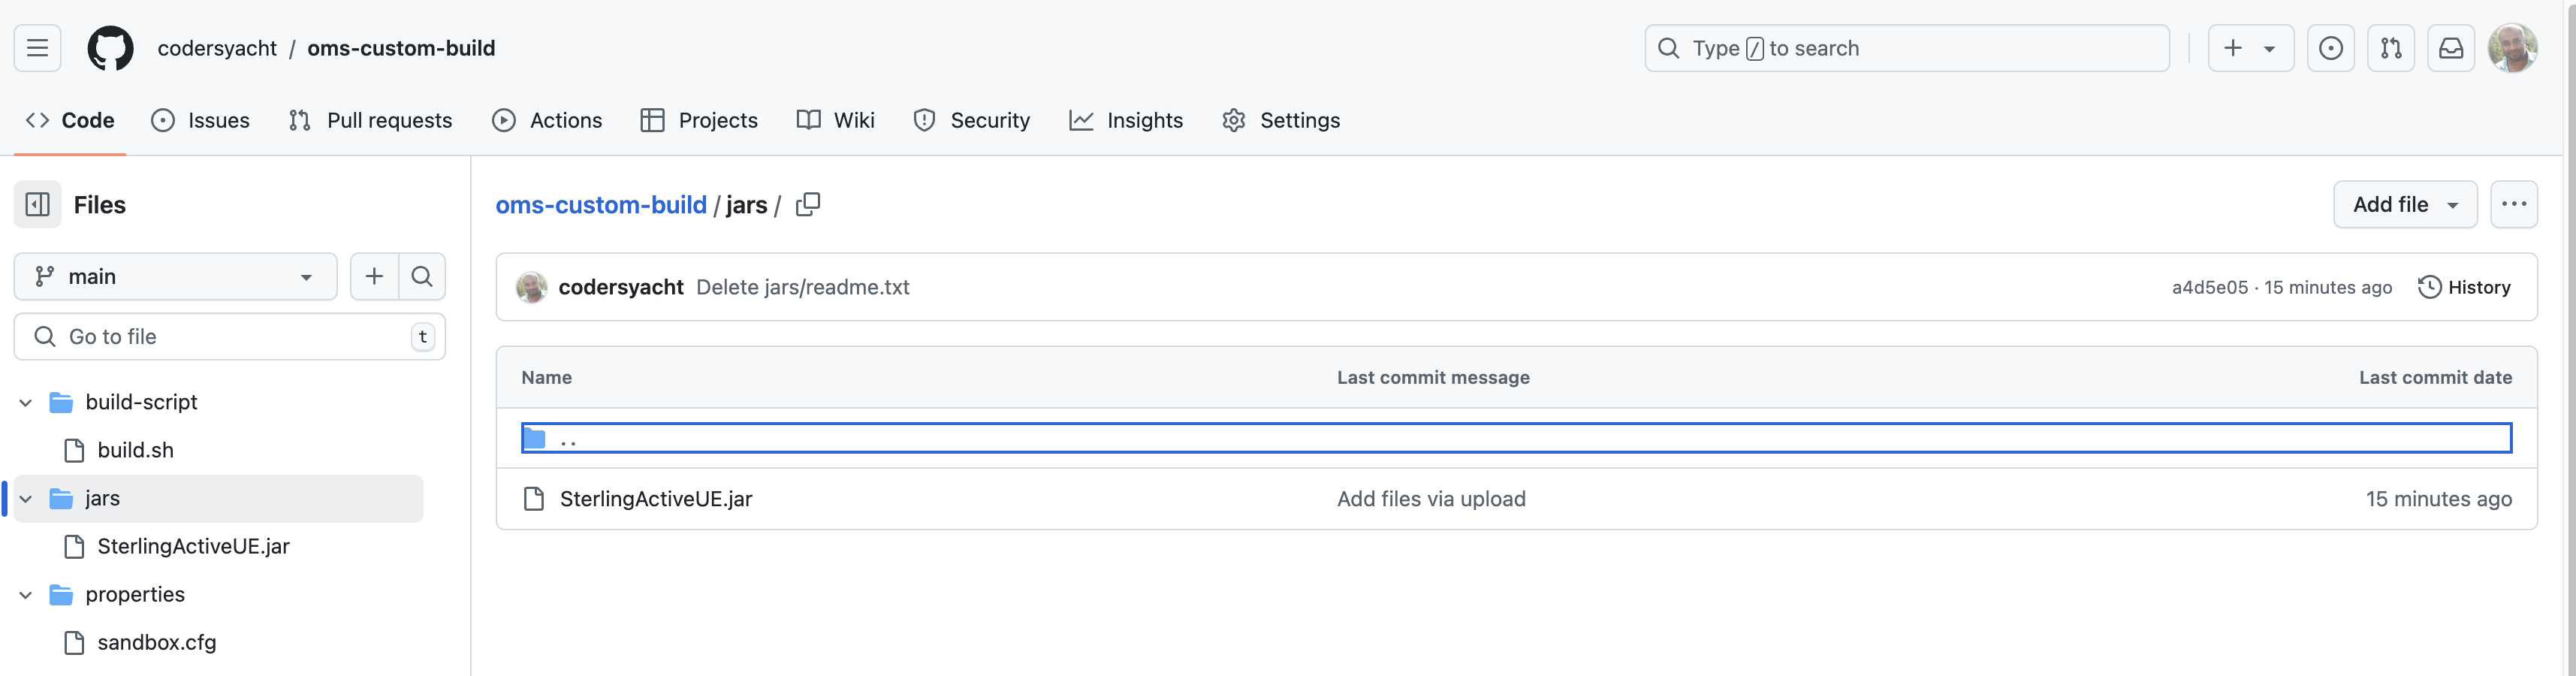
Figure 4: Github repository
Customization flow overview
A high-level flow of the customization process follows:

Figure 5: Customization flow
Build Script: build.sh
The build.sh script automates the customization and image-building process. Its contents are as follows:
#!/bin/bash
mkdir -p /opt/ssfs/customization
cp -r ../* /opt/ssfs/customization
chmod 777 -R /opt/ssfs/customization
chown omsuser:omsuser -R /opt/ssfs/customization
sudo -E -u omsuser /bin/bash
source ~/.bashrc
sudo cat $PUSH_DOCKERCFG_PATH/.dockerconfigjson > /tmp/.dockercfg
cp -f /opt/ssfs/customization/properties/sandbox.cfg /opt/ssfs/runtime/properties/sandbox.cfg
echo "sandbox.cfg copy completed"
cd /opt/ssfs/runtime/bin
./setupfiles.sh
echo "setupfiles execution completed"
./install3rdParty.sh yfsextn 1_0 -j /opt/ssfs/customization/jars/* -targetJVM EVERY
echo "3rd party jars installation completed"
cd /opt/ssfs/runtime/container-scripts/imagebuild
./generateImages.sh --MODE=app,agent --REPO=localhost --WAR_FILES=smcfs,sbc,sma --DEV_MODE=true --EXPORT=false
echo "Custom build completed"
echo "Generated images"
buildah images
echo " Tagging and pusing image : " ${OUTPUT_IMAGE}
buildah tag om-app:10.0 ${OUTPUT_REGISTRY}/${OUTPUT_IMAGE}
buildah push --tls-verify=false --authfile=/tmp/.dockercfg ${OUTPUT_REGISTRY}/${OUTPUT_IMAGE}
export OUTPUT_IMAGE=${agentimage}
echo "Tagging and pusing image : " ${OUTPUT_IMAGE}
buildah tag om-agent:10.0 ${OUTPUT_REGISTRY}/${OUTPUT_IMAGE}
buildah push --tls-verify=false --authfile=/tmp/.dockercfg ${OUTPUT_REGISTRY}/${OUTPUT_IMAGE}
echo "Custom Imagea Push conmpleted"
sleep 100
During execution, the Git repository is cloned into /opt/ssfs/sources, which serves as the working directory.
Generate a Git personal access token
If you don’t have a personal access token, generate one by following these steps:
Navigate to GitHub Profile Settings → Developer Settings → Personal Access Token → Tokens.
Create a new token to authenticate your access.
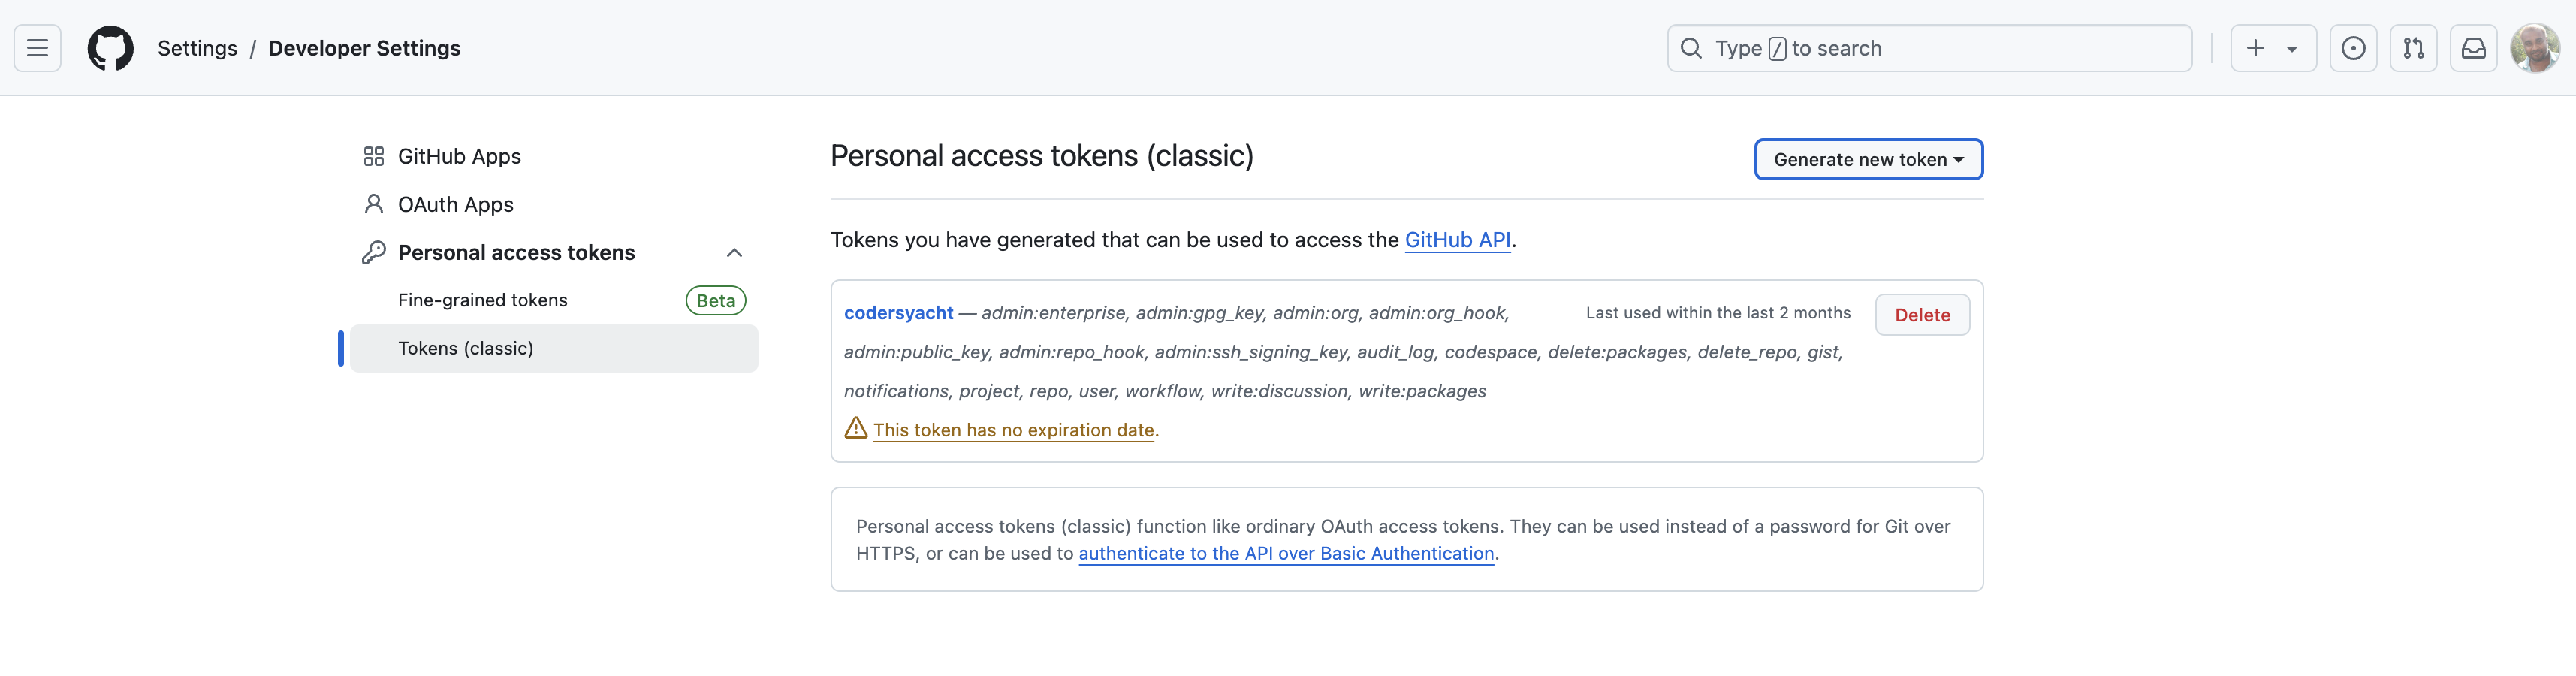
Figure 6: Generating access token in GitHub
Step 5. Set Git secret in OpenShift
Configure a Git secret in OpenShift to authenticate the repository access during the build process.
Set the Git token as an environment variable:
export GITKEY="<place here the git key>"export NAMESPACE="oms-build"Create the secret using the following command:
oc create secret generic git-key \
  --type=string \
  --from-literal=username=codersyacht \
  --from-literal=password=${GITKEY} \
  --namespace=${NAMESPACE}
Step 6. Setting up Docker Hub to push output image
To push the customized images, two Docker repositories are configured: oms-app and oms-agent.

Figure 7: Docker repositories
Generate DockerHub token for authentication
To authenticate DockerHub during the image push, you need to generate a personal access token. Follow these steps:
Go to DockerHub Profile → Account Settings → Personal Access Tokens.
Generate a docker-access-token for secure authentication.
Configure Docker secret in OpenShift
Once the DockerHub access token is generated, use it to create a Docker secret in OpenShift. This will allow the OpenShift BuildConfig process to push images to the DockerHub repositories.
Set the DockerHub access token and namespace as environment variables:
export DOCKERKEY="<place here the docker-access-token>"export NAMESPACE="oms-build"Create the Docker secret using the following command:
oc create secret docker-registry docker-key \
  --docker-server=docker.io \
  --docker-username=codersyacht \
  --docker-password=${DOCKERKEY} \
  --namespace=${NAMESPACE}
This Docker secret will enable the OpenShift BuildConfig to securely push the customized oms-app and oms-agent images to the respective DockerHub repositories.
Step 7. BuildConfig setup
Create a file named buildconfig.yaml with the following content:
apiVersion: build.openshift.io/v1
kind: BuildConfig
metadata:
  name: omsbuild
  namespace: oms-build
spec:
  serviceAccount: default
  nodeSelector: {}
  source:
    type: Git
    git:
      uri: "https://github.com/codersyacht/oms-custom-build.git"
    sourceSecret:
      name: git-key
    contextDir: build-script
  strategy:
    type: Custom
    license:
      accept: true
    customStrategy:
      forcePull: true
      exposeDockerSocket: true
      from:
        kind: ImageStreamTag
        name: om-base:10.0.2409.0-amd64
        namespace: oms-build
      env:
       - name: OMS_RHOS_CUSTOM_BUILD
         value: "true"
       - name: LICENSE
         value: "accept"
       - name: agentimage
         value: codersyacht/oms-agent:v1
  output:
    to:
      kind: DockerImage
      name: docker.io/codersyacht/oms-app:v1
    pushSecret:
      name: docker-key
status:
  lastVersion: 0
Configure the build in OpenShift
Execute the following command to apply the BuildConfig in OpenShift:
oc apply -f buildconfig.yaml -n oms-build
Set Docker secret for pushing custom images
At this point, the secret for pulling the om-base image from cp.icr.io is already configured. Now, set the Docker secret to allow OpenShift to push the output images to DockerHub.
oc set build-secret --push bc/omsbuild docker-key -n oms-build
With this setup, your BuildConfig will use the custom strategy to pull the base image, apply your customizations, and push the final output images to DockerHub.
Step 8. Verifying the setup
Follow these steps to ensure the setup is correctly configured:
Verify Secrets in the OpenShift Console
Navigate to the
oms-buildproject in the OpenShift console and check the Secrets section.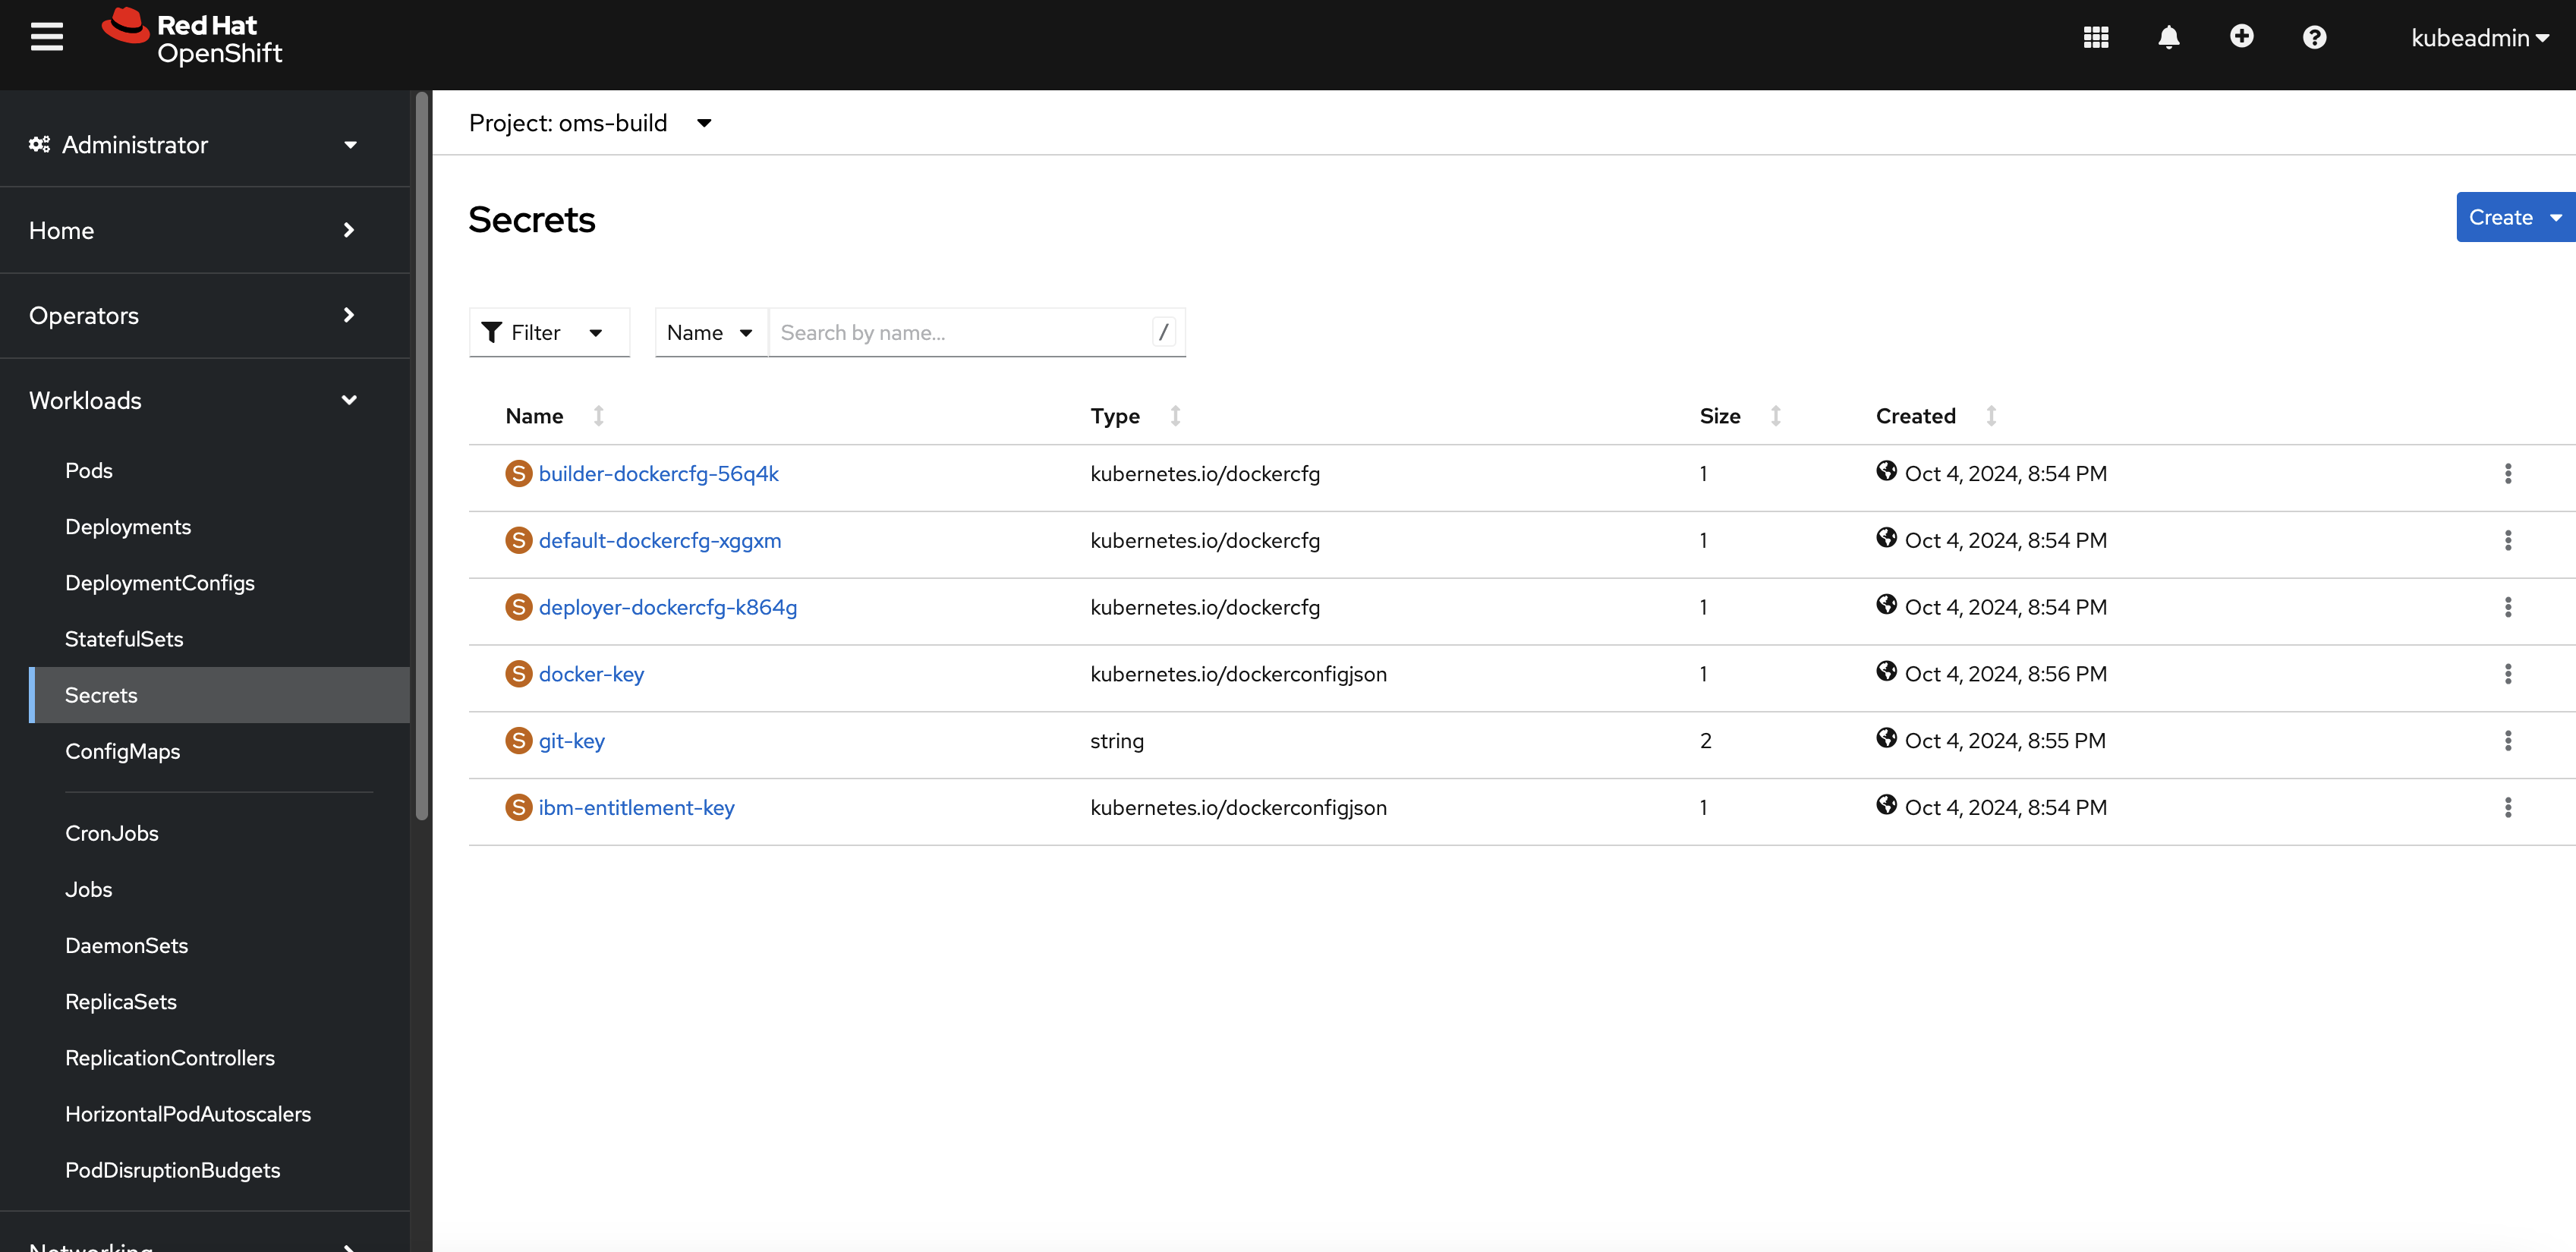
Figure 8: OpenShift secrets
The following three secrets should be present:
ibm-entitlement-key: Used for pulling theom-baseimage from the IBM repository.docker-key: Used for pushing the generated image to Docker Hub.git-key: Used for accessing the customization repository on GitHub.Note: The
git-keysecret is configured directly in thebuildconfig.yamlfile.
Verify ImageStream in the OpenShift Console
Check the ImageStream section under the
oms-buildproject to ensure that theom-baseImageStream has been correctly configured.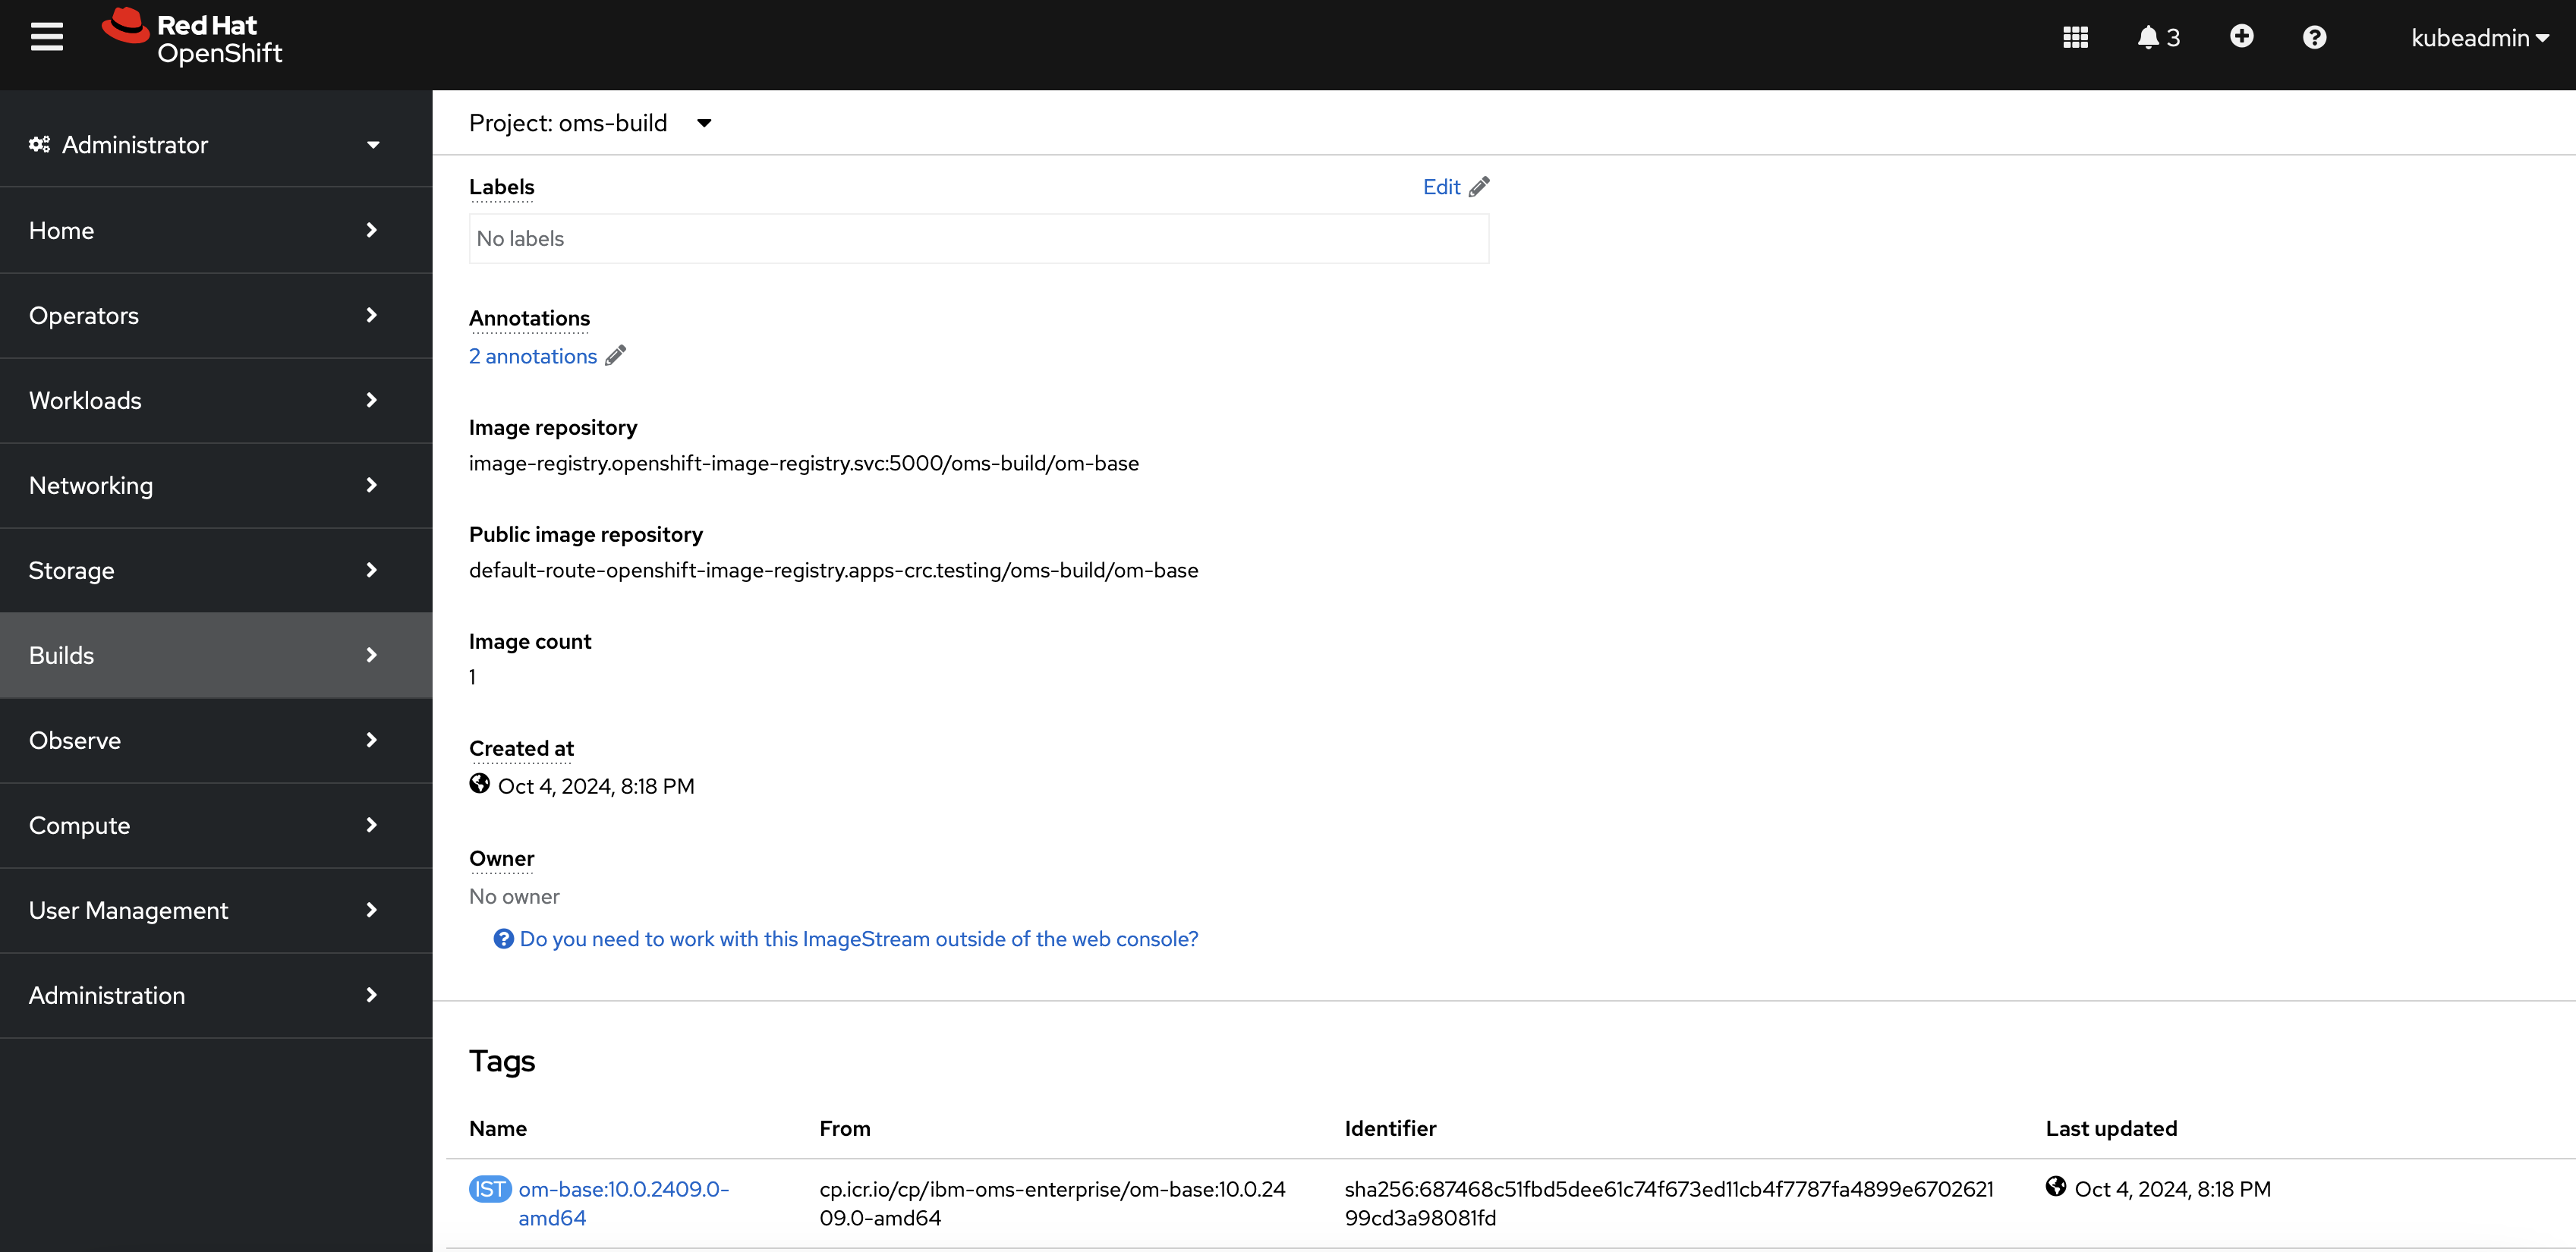
Figure 9: ImageStream
This confirms that the base image has been mapped successfully, allowing further customization and image builds to proceed smoothly.
Step 9. Executing the build
To initiate the build process, follow these steps in the OpenShift console:
Go to Builds -> BuildConfig in the
oms-buildnamespace. You should see the deployed BuildConfig namedomsbuild.Click the three dots on the right side of the
omsbuildentry and select Start Build.
Figure 10: Executing the build
Verifying the build pod
If the build starts successfully, a new pod will be created and should transition to Running status. This pod handles the customization process and generates the custom images.
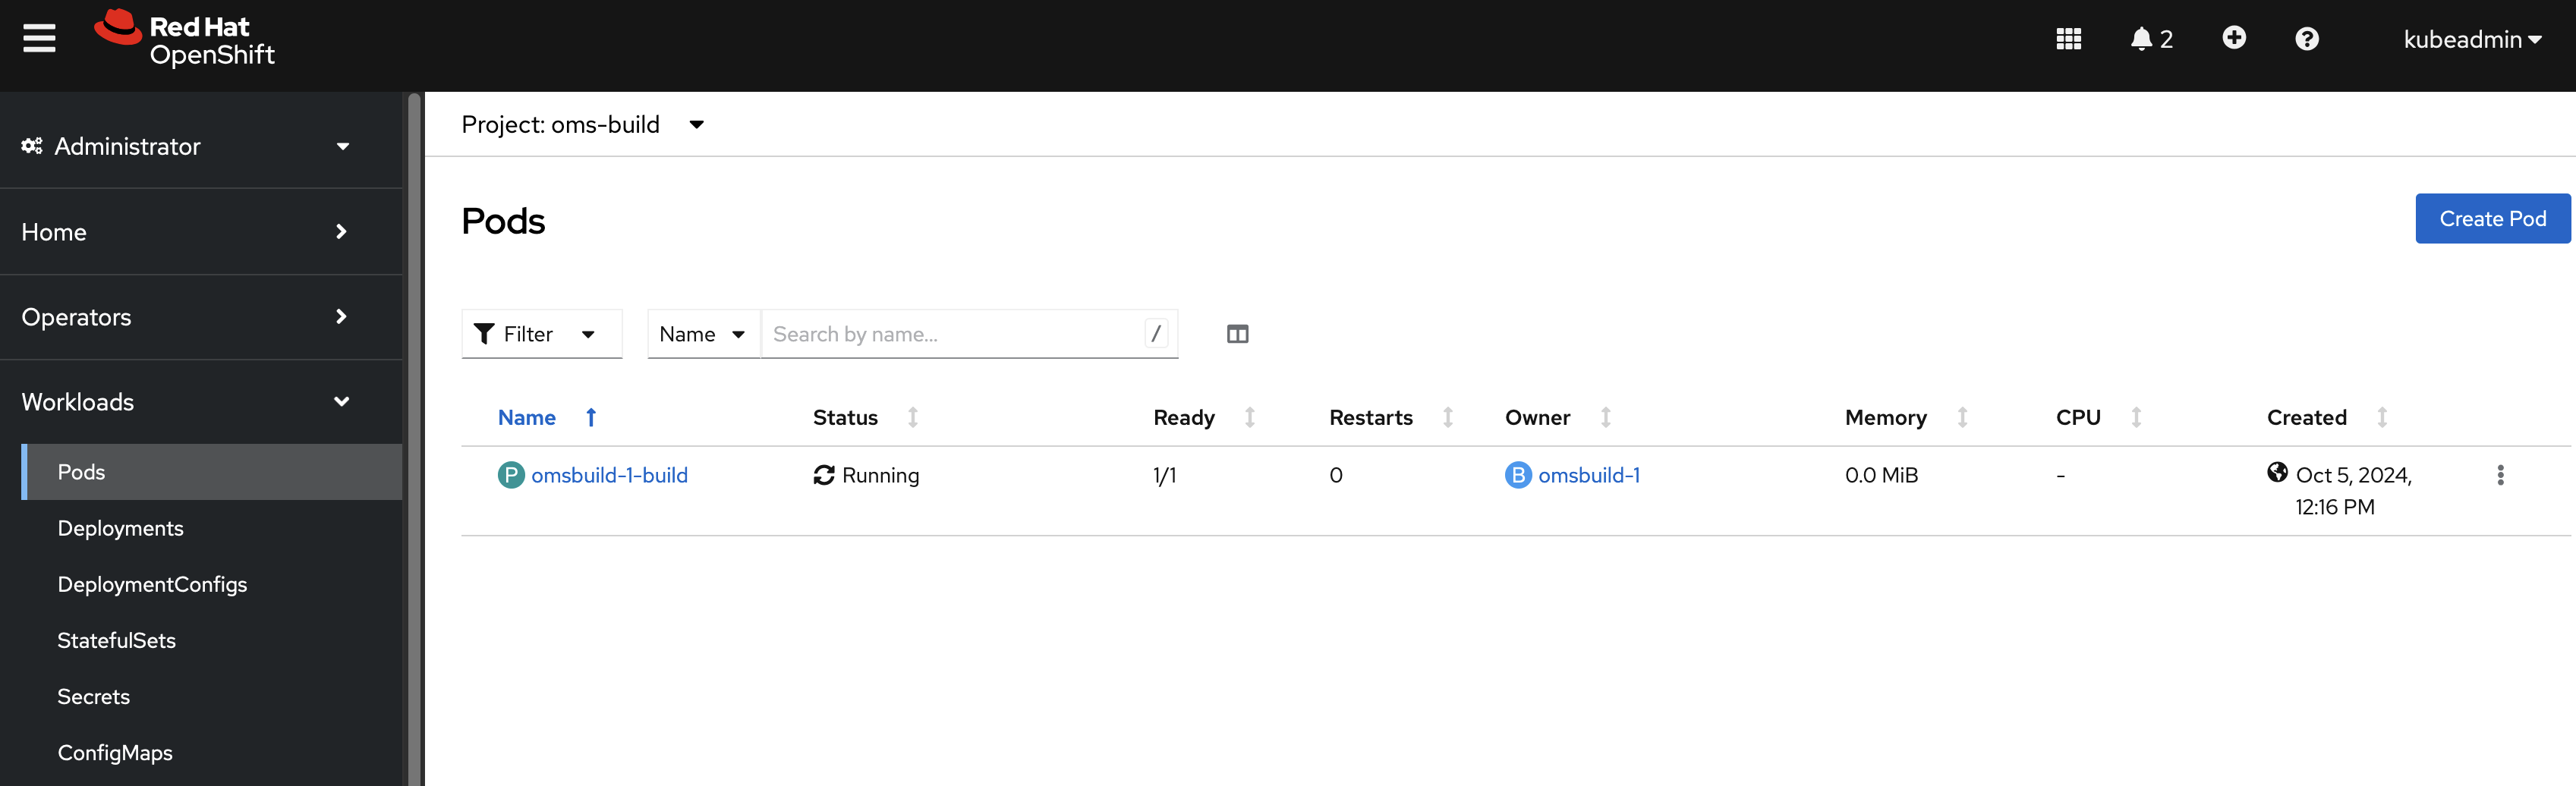
Figure 11: Verifying the pod
Viewing build logs
To monitor the build process in real time, use the following command from the terminal:
oc logs --follow omsbuild-1-build -n oms-build
The omsbuild-1-build pod is automatically triggered by the BuildConfig to execute the image customization.
If the build completes successfully, the logs will conclude with messages indicating the generation and tagging of the custom images.
generateImages.sh finished in 0 hours, 11 minutes and 33 seconds
-----------------------------------------------------------------------------------------
Custom build completed
Generated images
REPOSITORY                            TAG                                 IMAGE ID       CREATED          SIZE
localhost/om-agent                    10.0                                74ba04da3a0a   44 seconds ago   842 MB
localhost/om-app                      10.0                                3a7929ab19c2   3 minutes ago    2.17 GB
localhost/om-app-libs                 10.0                                fda6d6280ce8   4 minutes ago    1.15 GB
icr.io/appcafe/websphere-liberty      24.0.0.6-kernel-java8-ibmjava-ubi   e40dac968a33   28 hours ago     487 MB
registry.access.redhat.com/ubi8/ubi   latest                              4f03f39cd427   13 days ago      212 MB
Tagging and pusing image :  codersyacht/oms-app:v1
Getting image source signatures
..
..
Writing manifest to image destination
Tagging and pusing image :  docker.io/codersyacht/oms-agent:v1
Getting image source signatures
Copying blob sha256:8d857307bafd94f34bd49b7904355b4824bacb63e4be7f219c26e5d99184e6e3
Copying config sha256:74ba04da3a0af994e22a55d96afb1fcaee1b24f6064a9b3865312d93300515d7
Writing manifest to image destination
Custom Imagea Push conmpleted
Custom images in the repository
After a successful build, the generated custom images will be uploaded to the specified output repository.
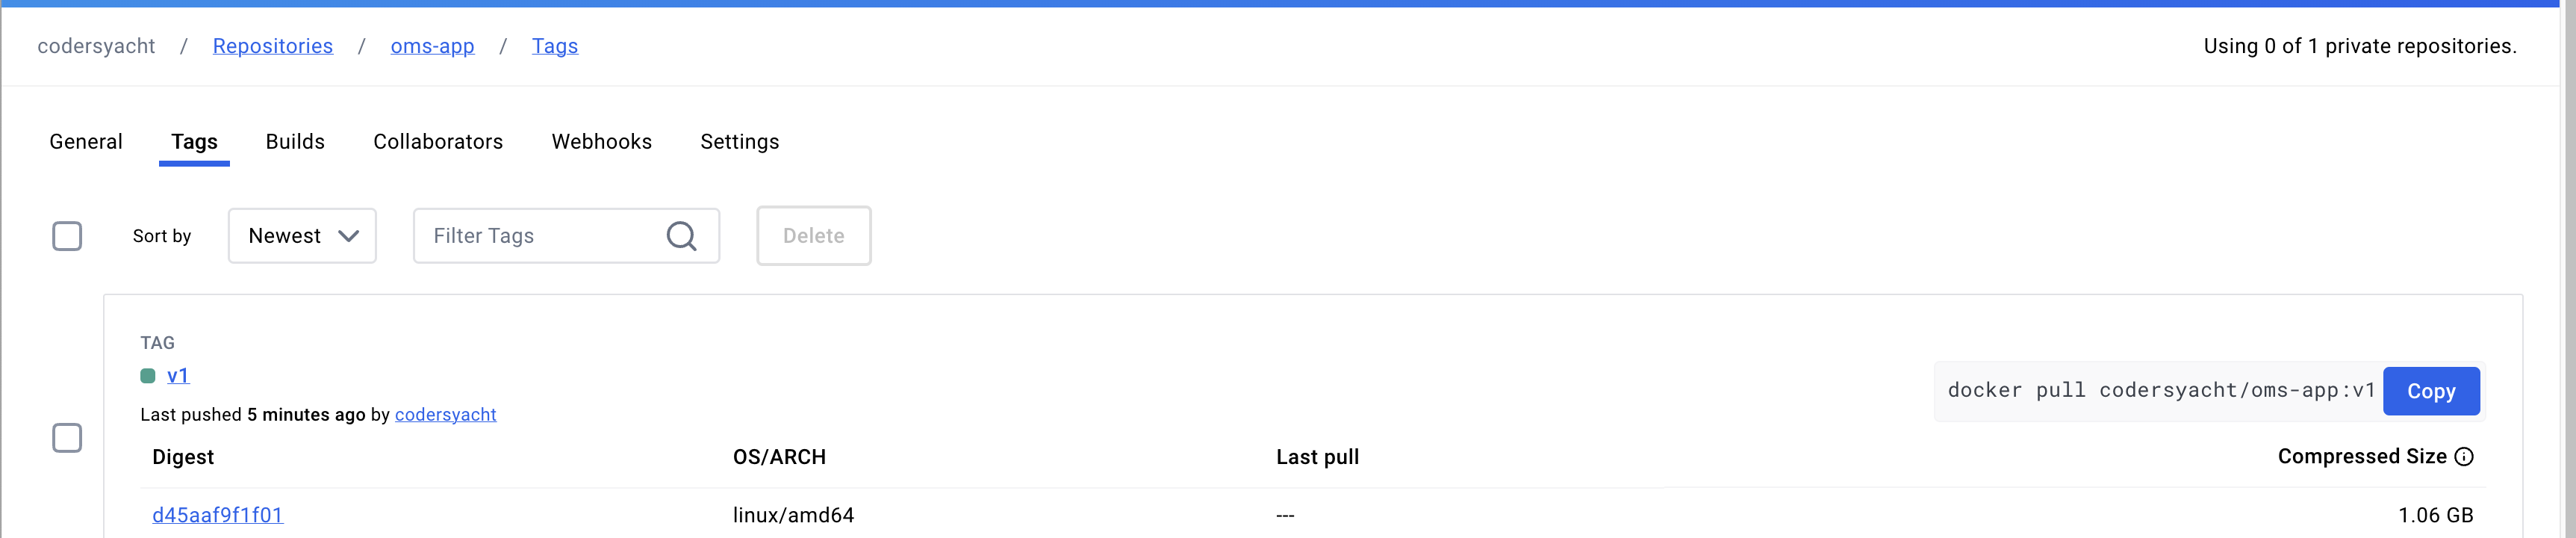
Figure 12: oms-app image

Figure 13: oms-agent image
These images are now available for deployment or further testing based on your requirements.
Summary
This tutorial covered the process of customizing IBM Sterling OMS container images using OpenShift. It detailed the setup of ImageStreams, secrets, and BuildConfig to automate the customization and image generation. Key steps included pulling the base image, configuring a Git repository for customization artifacts, and setting up Docker Hub for pushing output images. The tutorial also explained how to trigger the build in OpenShift and verify the generated images in the repository. With this setup, you can streamline the customization of OMS containers for deployment.