About cookies on this site Our websites require some cookies to function properly (required). In addition, other cookies may be used with your consent to analyze site usage, improve the user experience and for advertising. For more information, please review your options. By visiting our website, you agree to our processing of information as described in IBM’sprivacy statement. To provide a smooth navigation, your cookie preferences will be shared across the IBM web domains listed here.
Tutorial
Creating intelligent, reusable agentic workflows on watsonx Orchestrate with no code
A hands-on guide for creating AI‑driven, human‑in‑the‑loop workflows without writing code
On this page
In this tutorial, learn how to create agentic workflows on watsonx Orchestrate without needing to write any code. These workflows help AI agents carry out tasks step-by-step using a reusable structure.
A developer uses agentic workflows in watsonx Orchestrate to quickly build intelligent, reusable automation with minimal effort. While the platform offers a no-code experience ideal for rapid development, it also supports Python code blocks for custom logic, data transformation, and advanced decision-making. This flexibility allows developers to start with visual design and scale into more complex scenarios when needed. Although this tutorial focuses on the no-code approach, future tutorials will explore how to extend workflows using Python for deeper control and customization.
This hands-on guide for creating agentic workflows with human-in-the-loop user activities, forms, document extraction, and generative prompts shows how to mix smart AI with clear rules and human feedback.
Architecture of the AI agent system
In this tutorial, you will build the Account Opening Agent, an AI agent that helps users open new bank accounts through a guided, automated process. At the core of this agent, you will build the “Create New Bank Account” agentic workflow tool, entirely with no code on watsonx Orchestrate. This agentic workflow handles the key steps in creating a new bank account, such as uploading a passport, extracting user details, checking nationality using deterministic logic, and routing users accordingly. It also includes human-in-the-loop activities like form submissions and AI-generated confirmation messages. Once the workflow is complete, you’ll connect it to the agent, enabling seamless account onboarding.
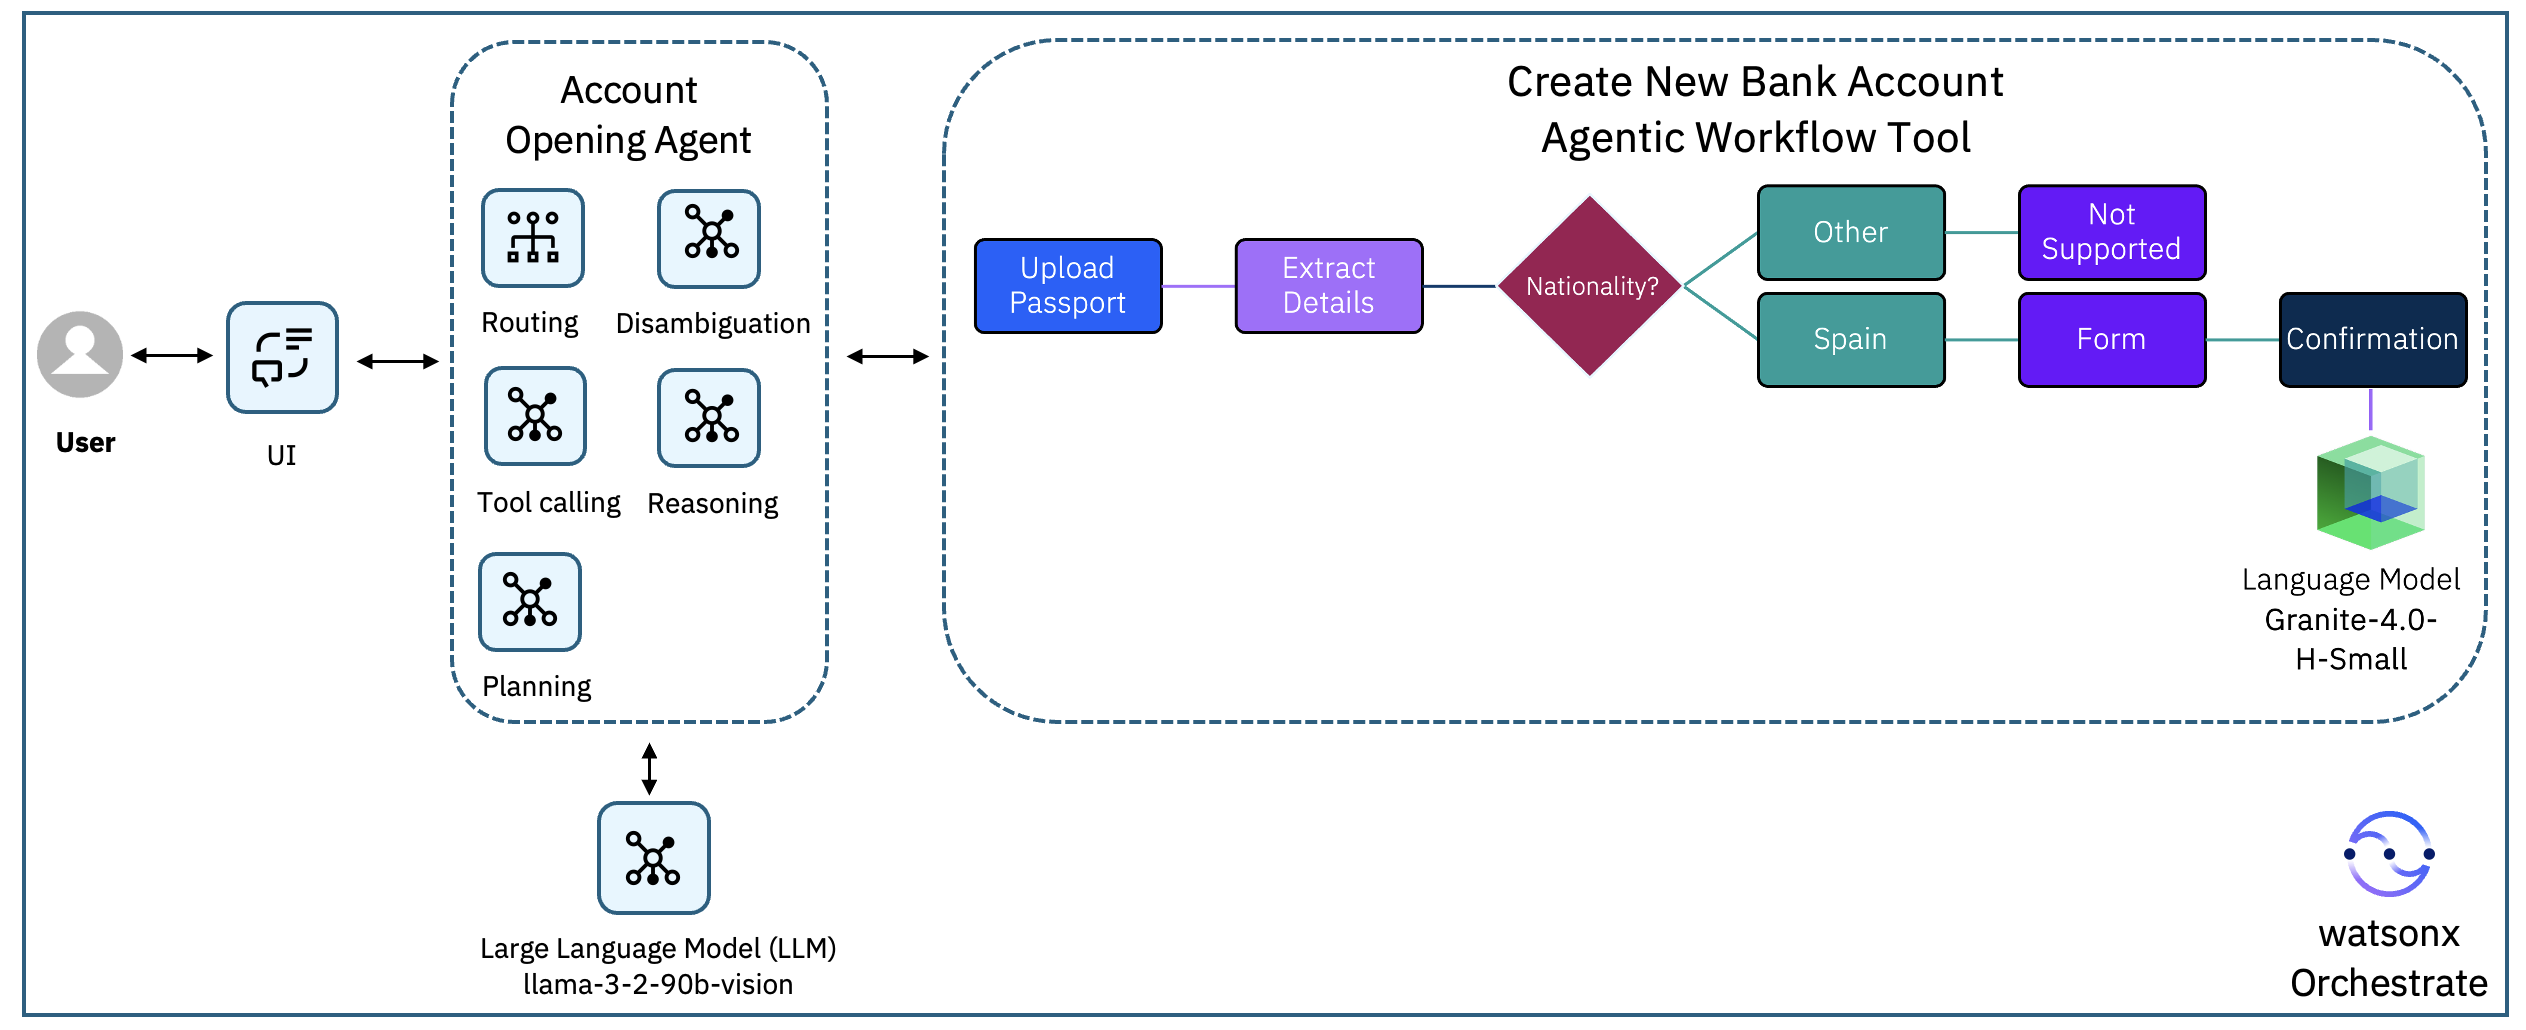
The user interacts with the user interface UI, asking to open a new bank account. This request is sent to the Account Opening Agent in watsonx Orchestrate, which uses an LLM for tasks such as interpreting instructions, reasoning through the problem, planning the next steps, and deciding whether a tool call is necessary.
When the Account Opening Agent determines that the request involves an account opening request, it communicates with Create New Bank Account tool, which will be created as an agentic workflow on watsonx Orchestrate.
The agentic workflow tool performs the following:
- It asks for the image of the passport.
- It extracts the details of the passport including name, passport number, and nationality.
- If the nationality is not Spanish, then it stops the flow with a message informing the user to go the branch.
- If the nationality is Spanish, it sends the user a form to provide additional details like a phone number and an account type.
- It generates confirmation message using the Granite 4.0 Small model.
As a next step, you could also add integration with core banking to open the account opening request in the core banking service.
Prerequisites
To complete this tutorial, you’ll need a free trial instance of watsonx Orchestrate on IBM Cloud or AWS:
Steps
These are the steps you are going to follow in this tutorial:
- Create the agent.
- Create Agentic Workflow tool.
- Extract details from document.
- Configure conditional logic.
- Create form for human in the loop.
- Create generative prompt.
- Deploy the agent.
- Test the agent.
Step 1. Create the agent
In this step, you are going to create a new agent in the watsonx Orchestrate user interface that guides users through the process of opening a bank account. You do this by defining the agent’s name and description, customizing its welcome and prompt messages, and configuring the agent behavior to call the Create New Bank Account Agentic Workflow tool.
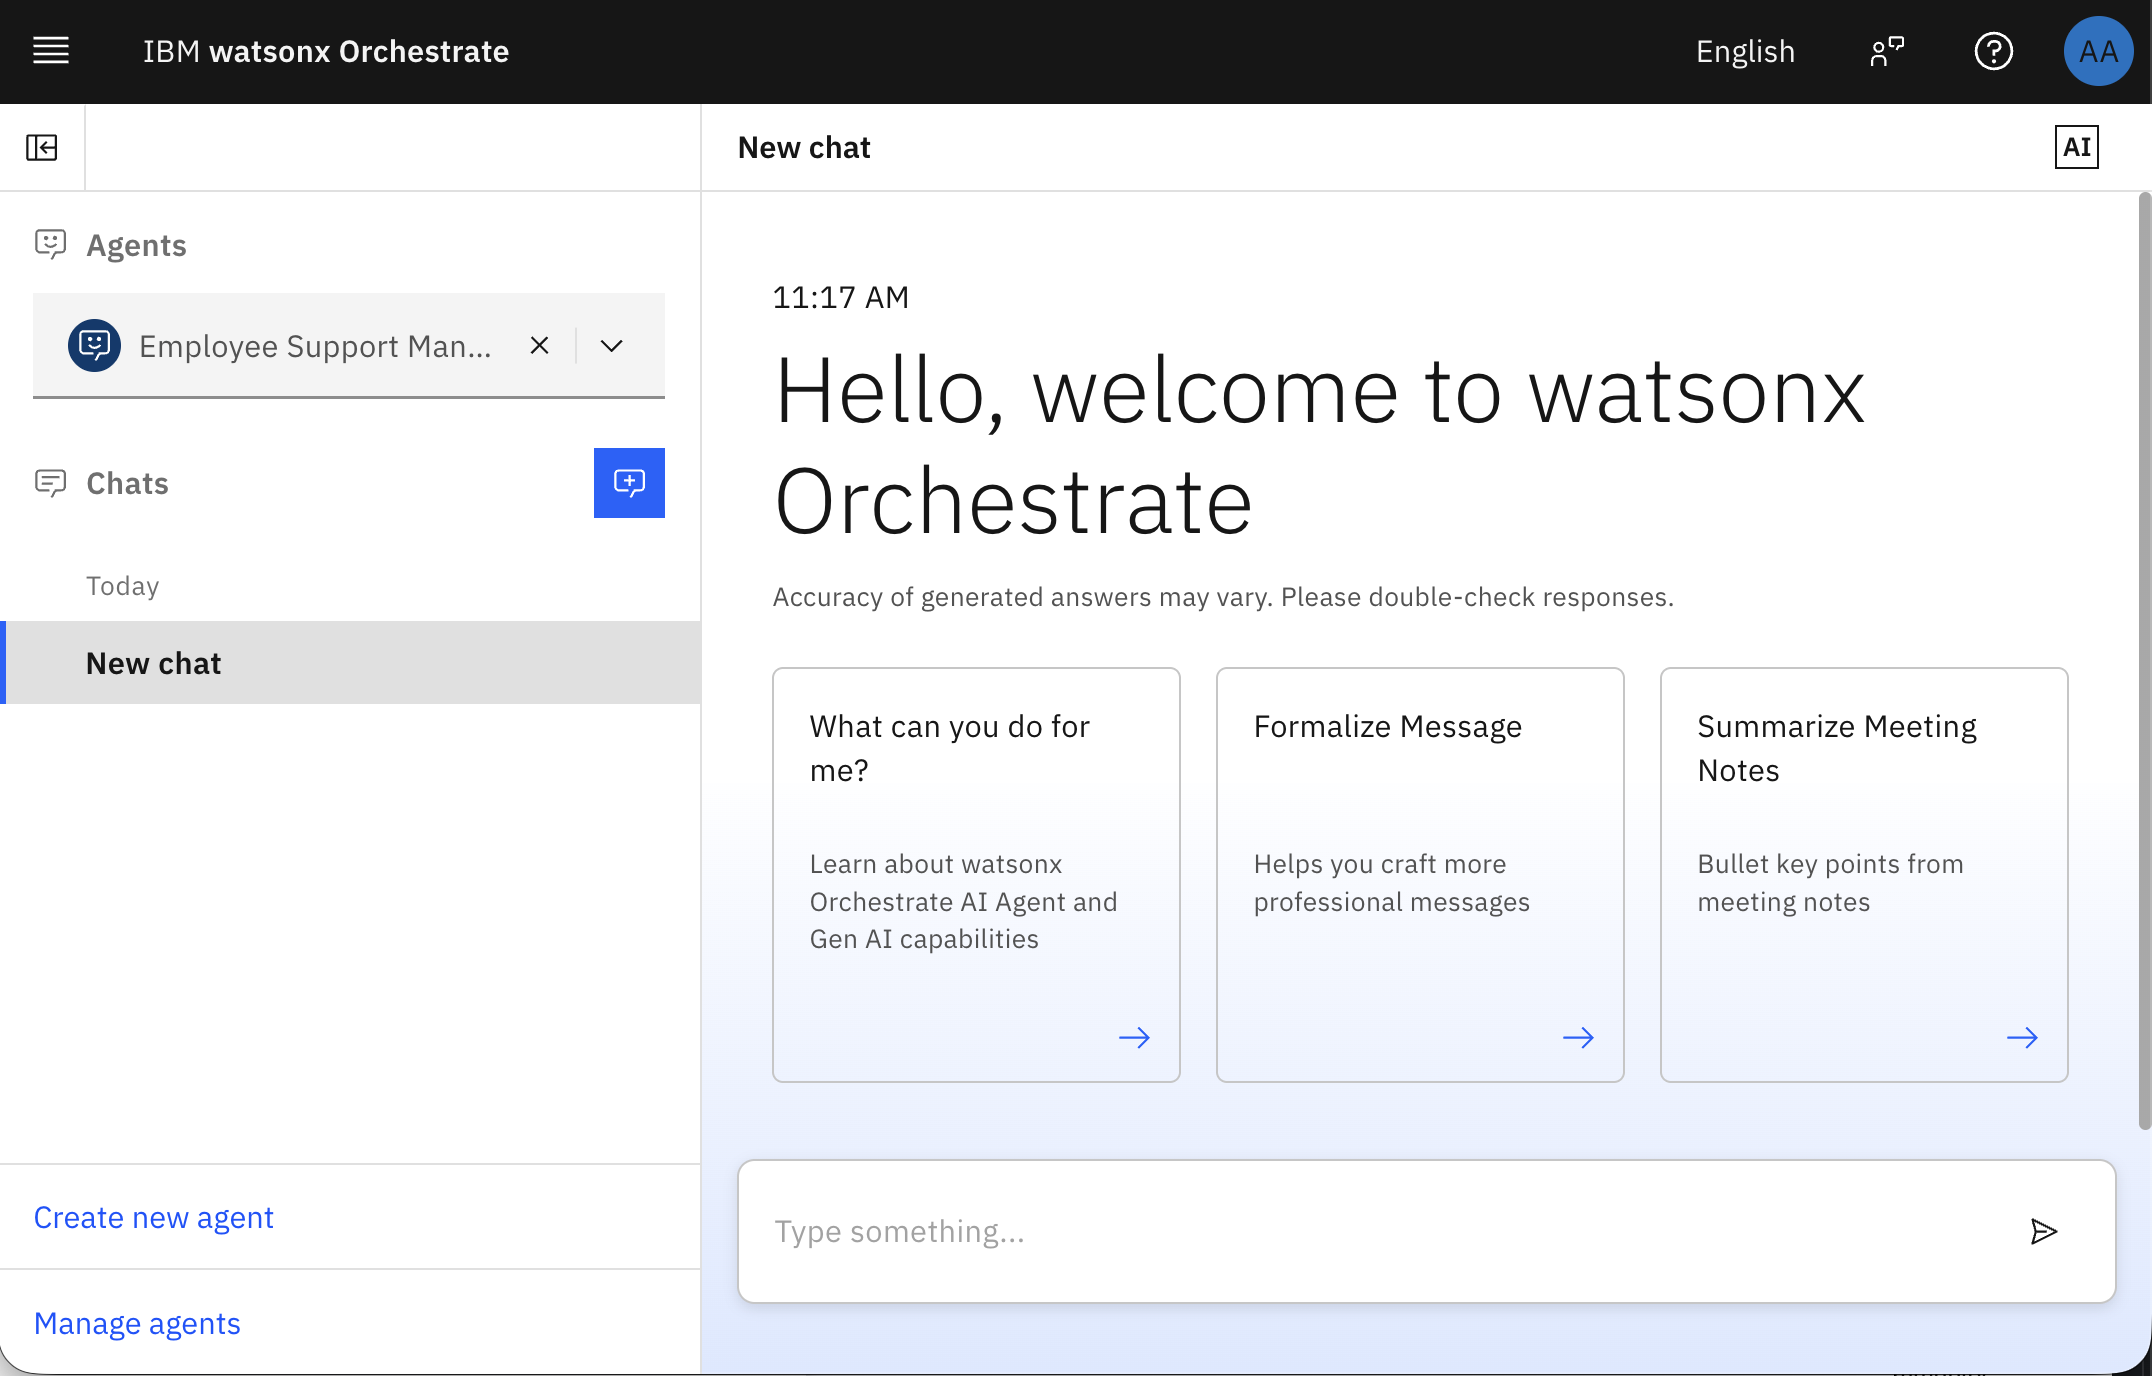
- Open the watsonx Orchestrate UI in your browser.
Click Create new agent to access the Agent Builder.
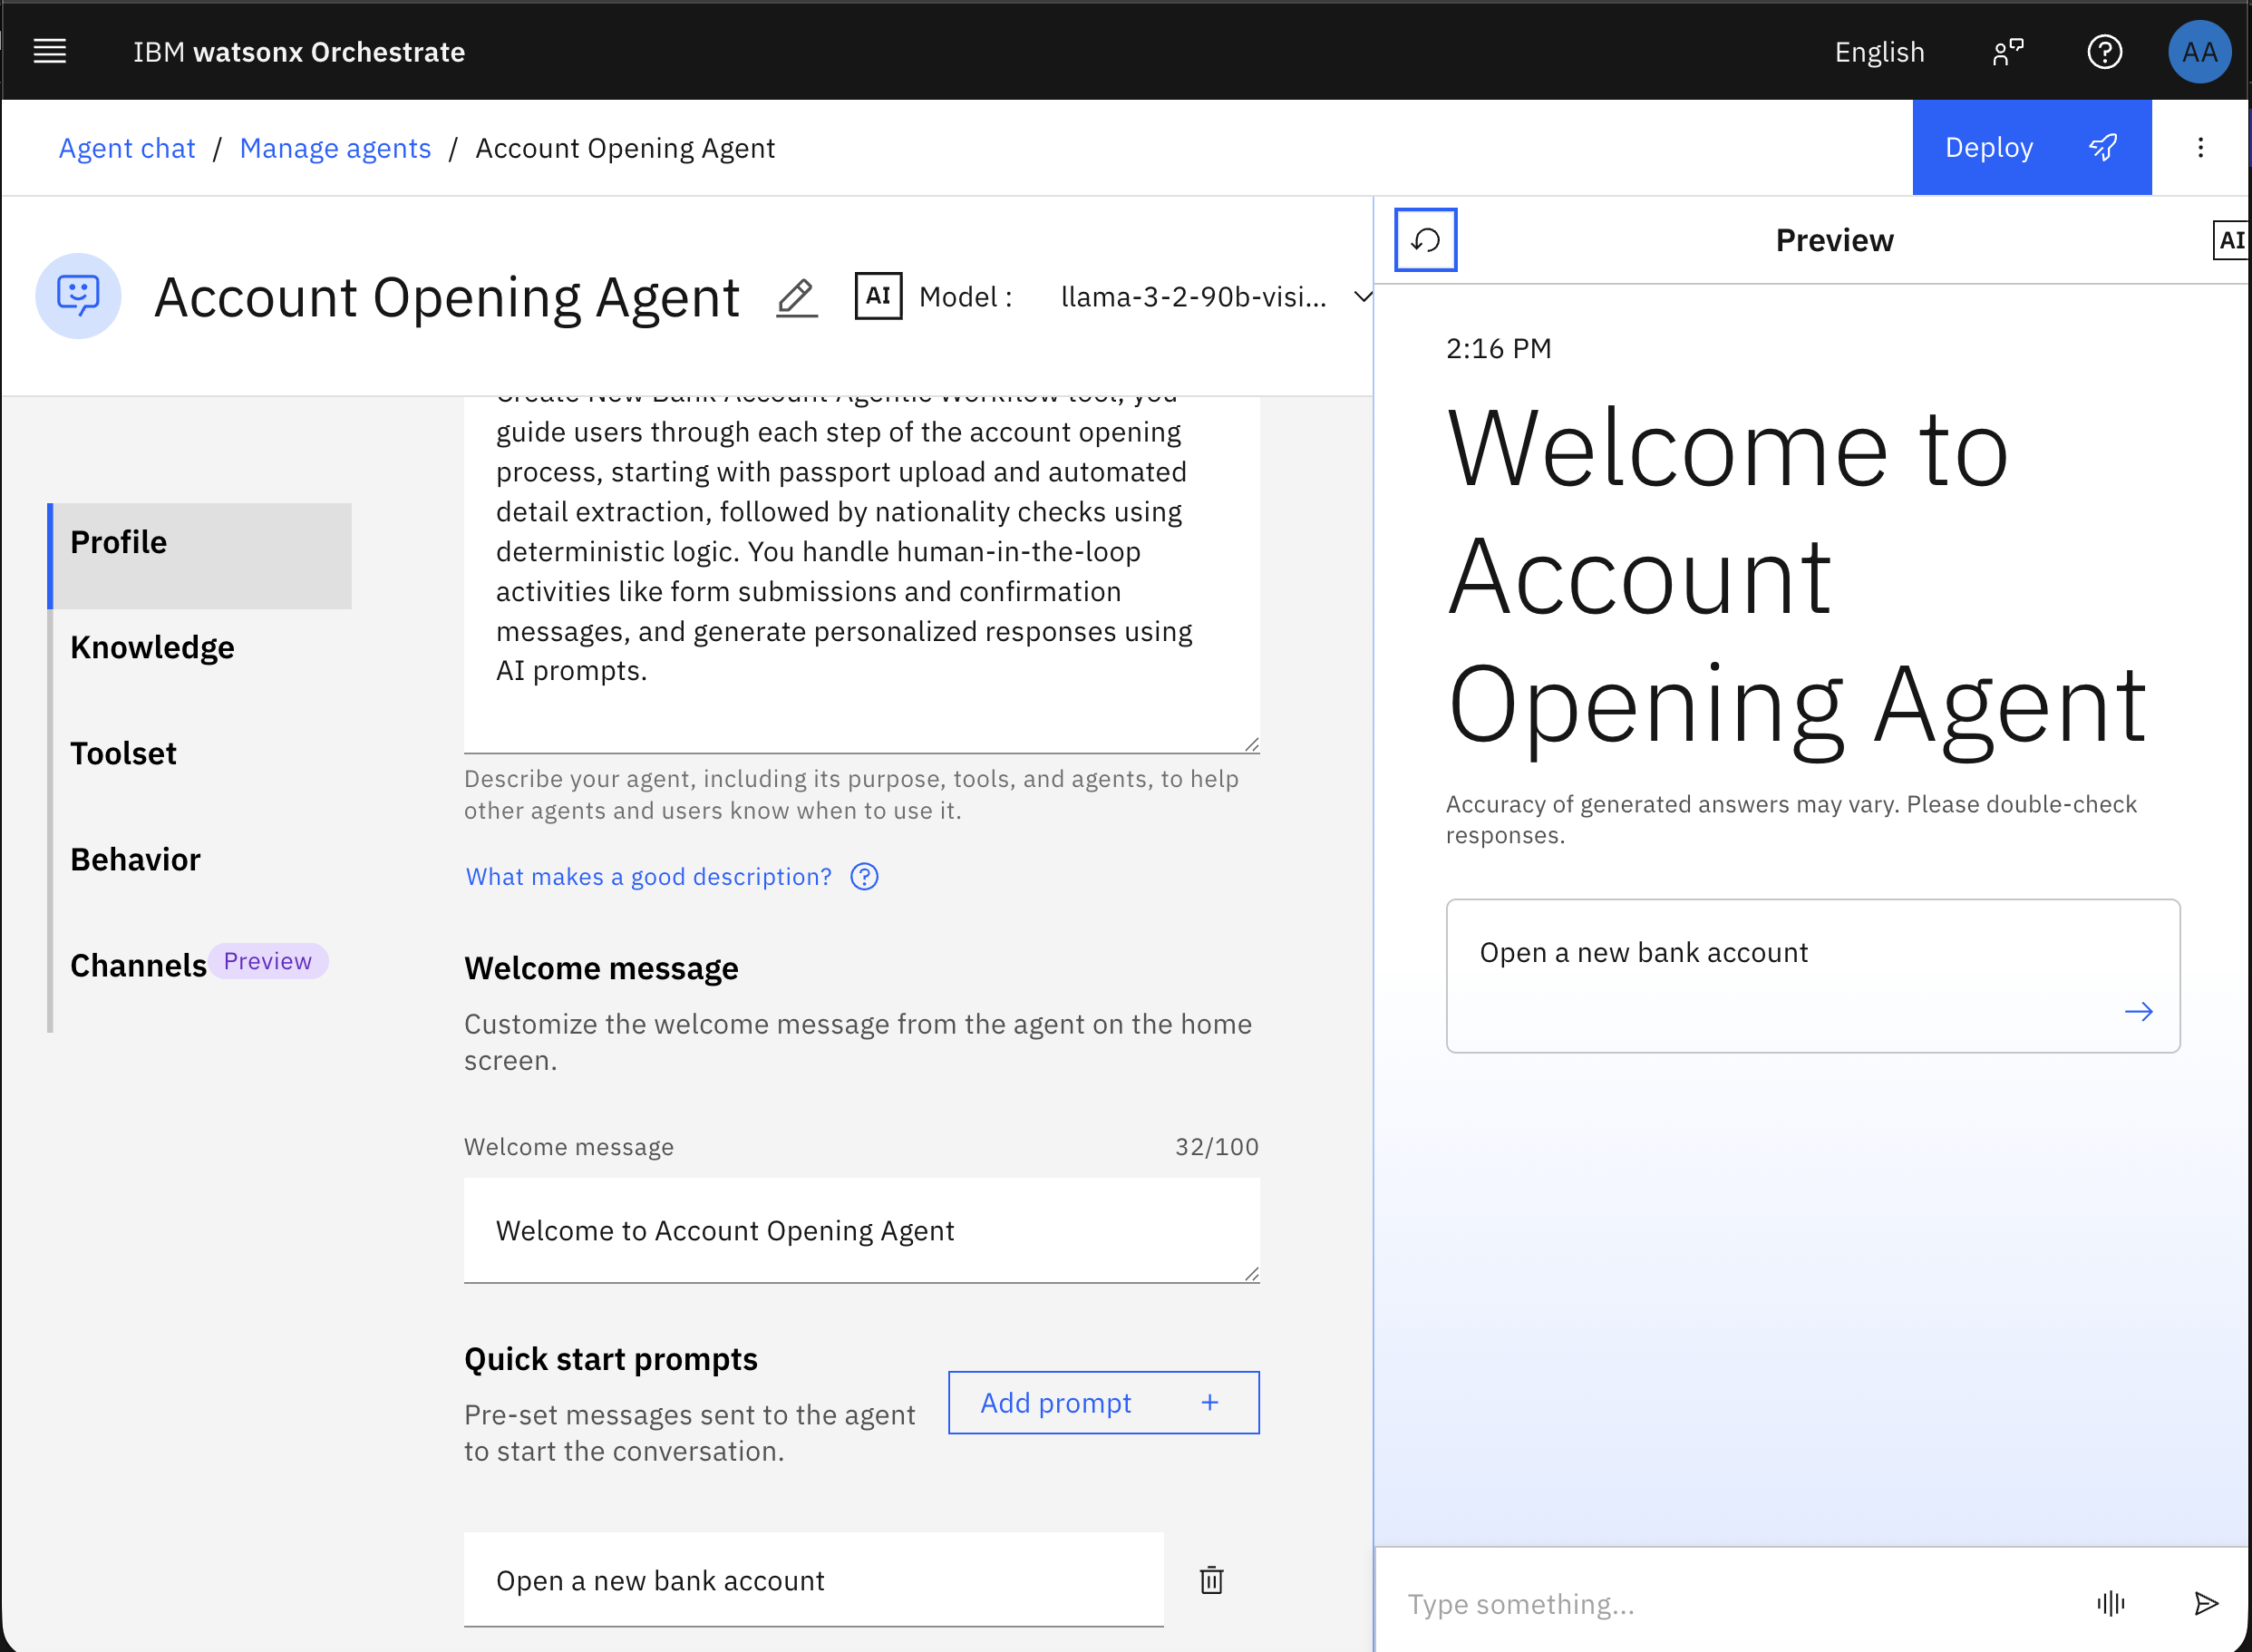
Fill the name and description of the agent as follows. The description is not optional, as it outlines the scope of the agent and makes it easy for other agents and users to know when to interact with this agent. Then, click Create.
Name: Account Opening Agent
Description: You are an Account Opening Agent to help users open new bank accounts quickly and efficiently. Using the Create New Bank Account Agentic Workflow tool, you guide users through each step of the account opening process, starting with passport upload and automated detail extraction, followed by nationality checks using deterministic logic. You handle human-in-the-loop activities like form submissions and confirmation messages, and generate personalized responses using AI prompts.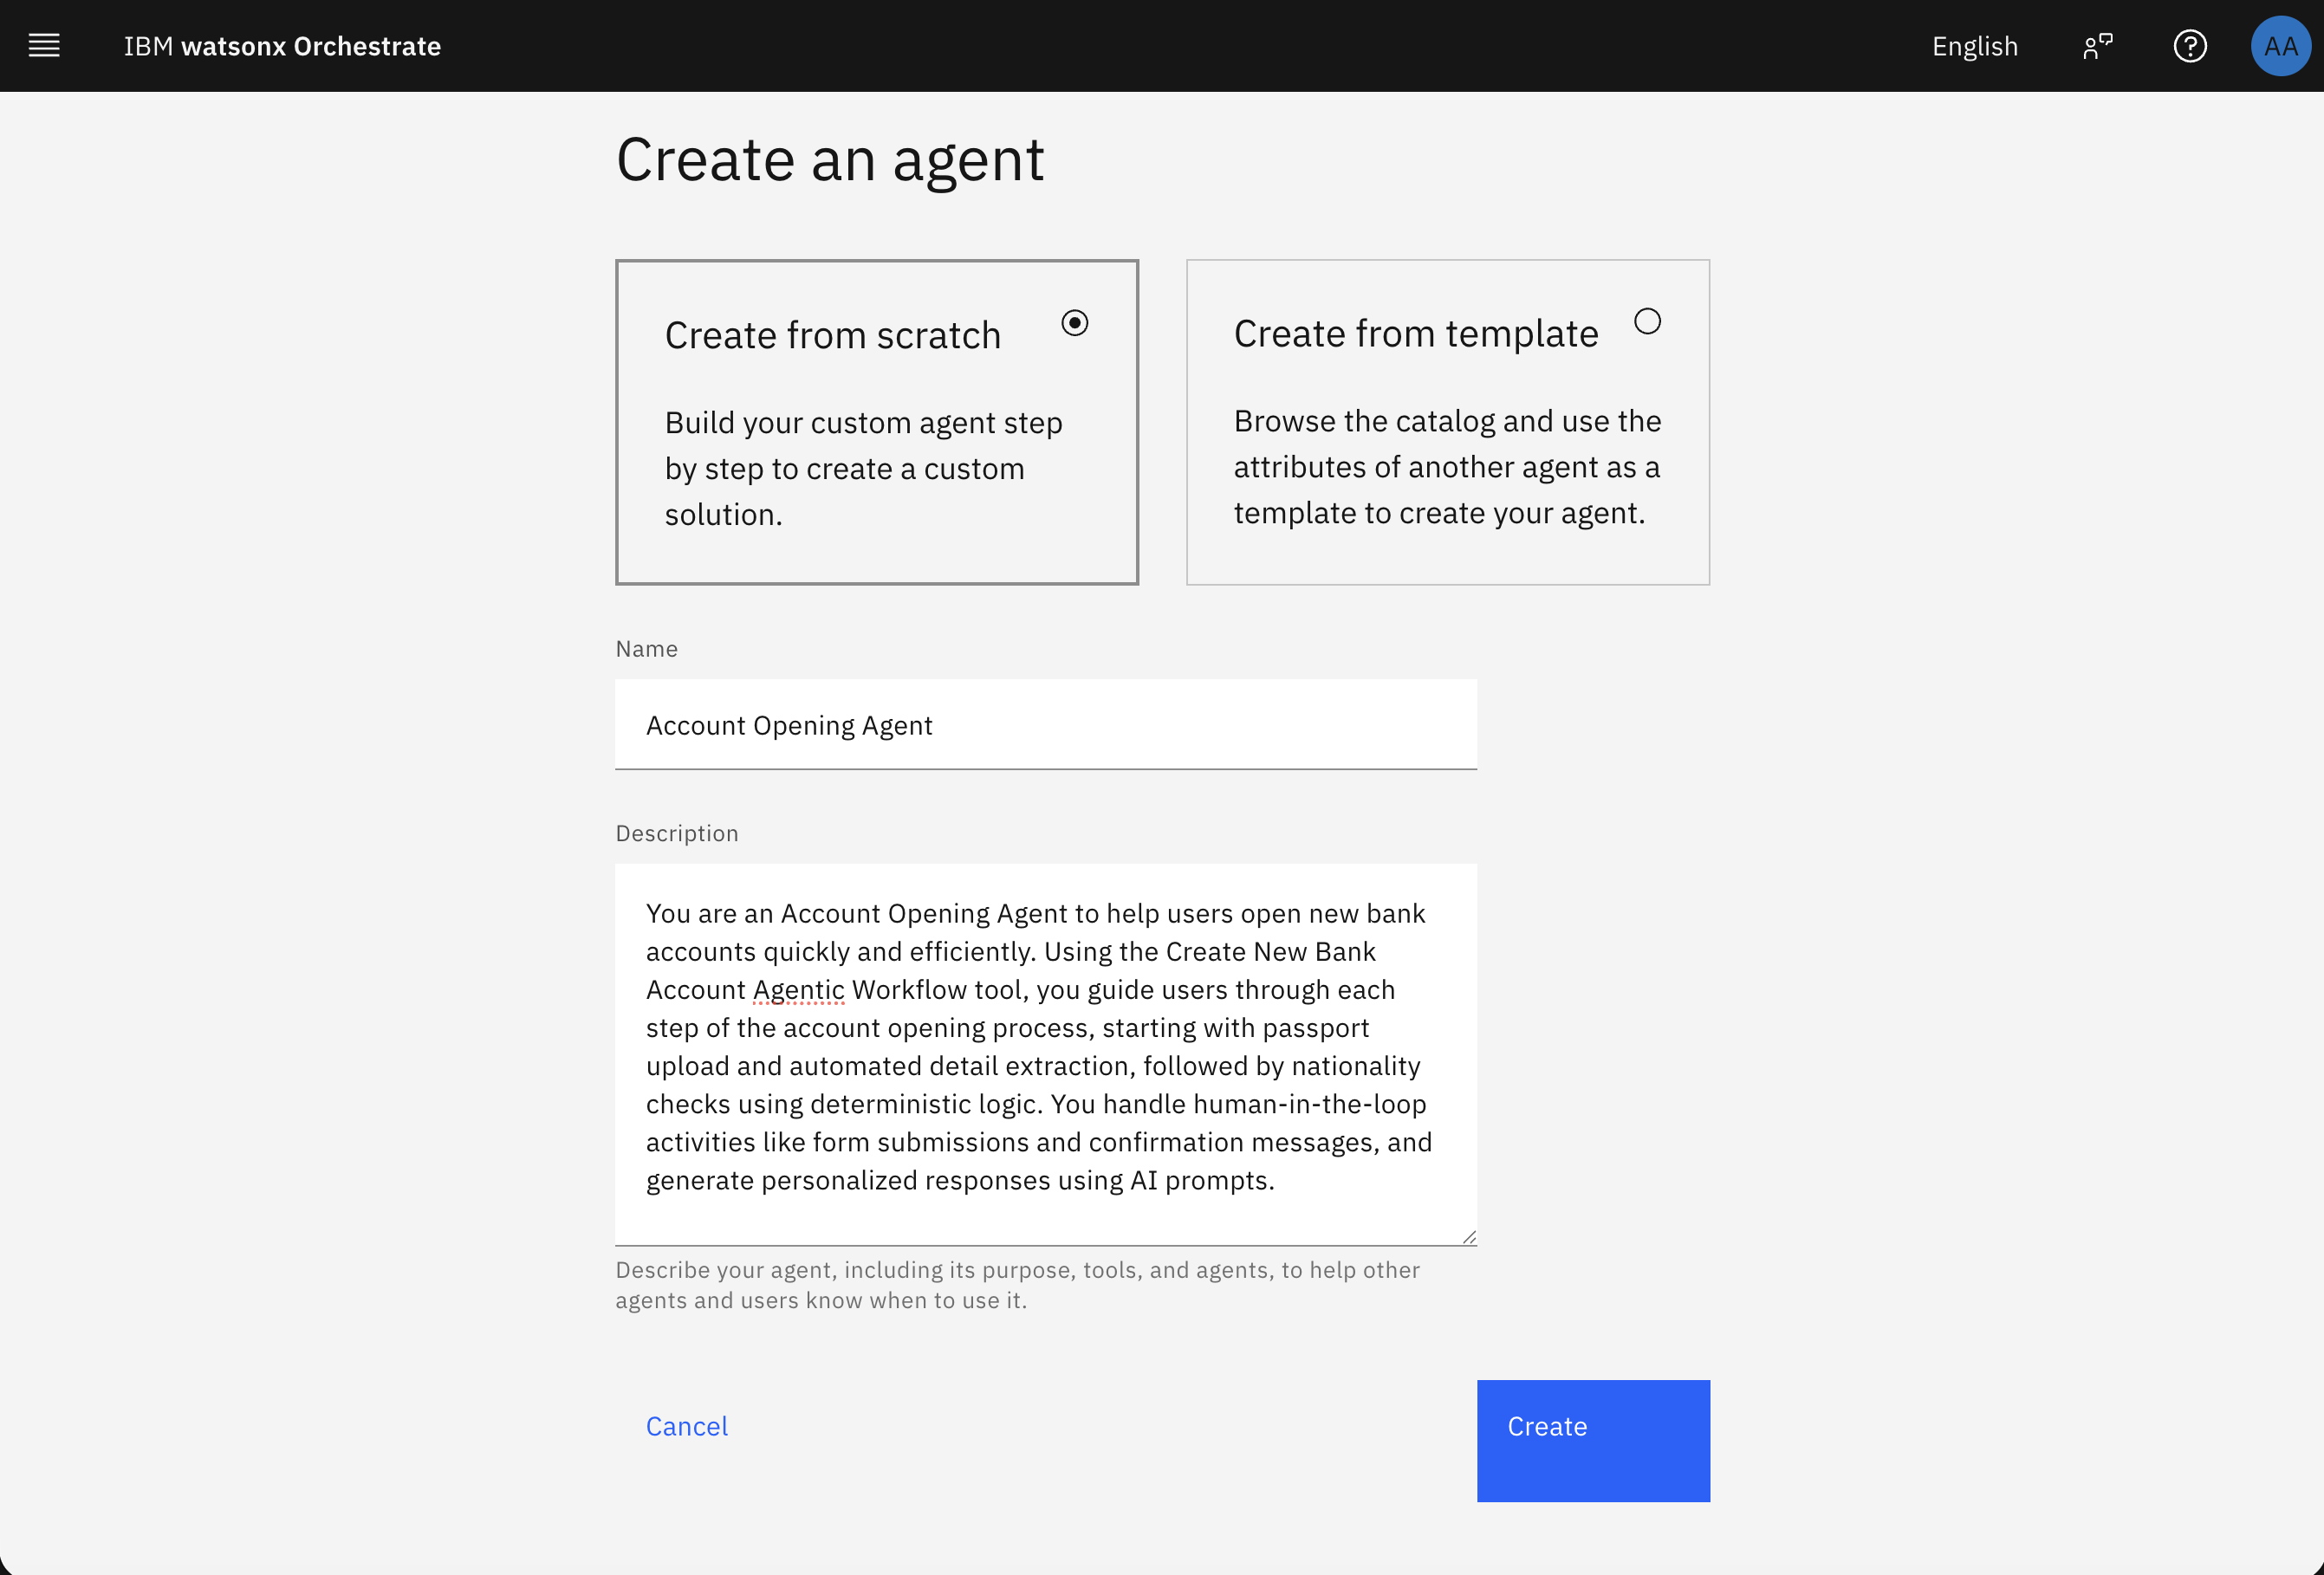
In the Profile section, customize the welcome message from the agent on the home screen to “Hello, welcome to Account Opening Agent”, and then click the reset icon in the Preview tab.
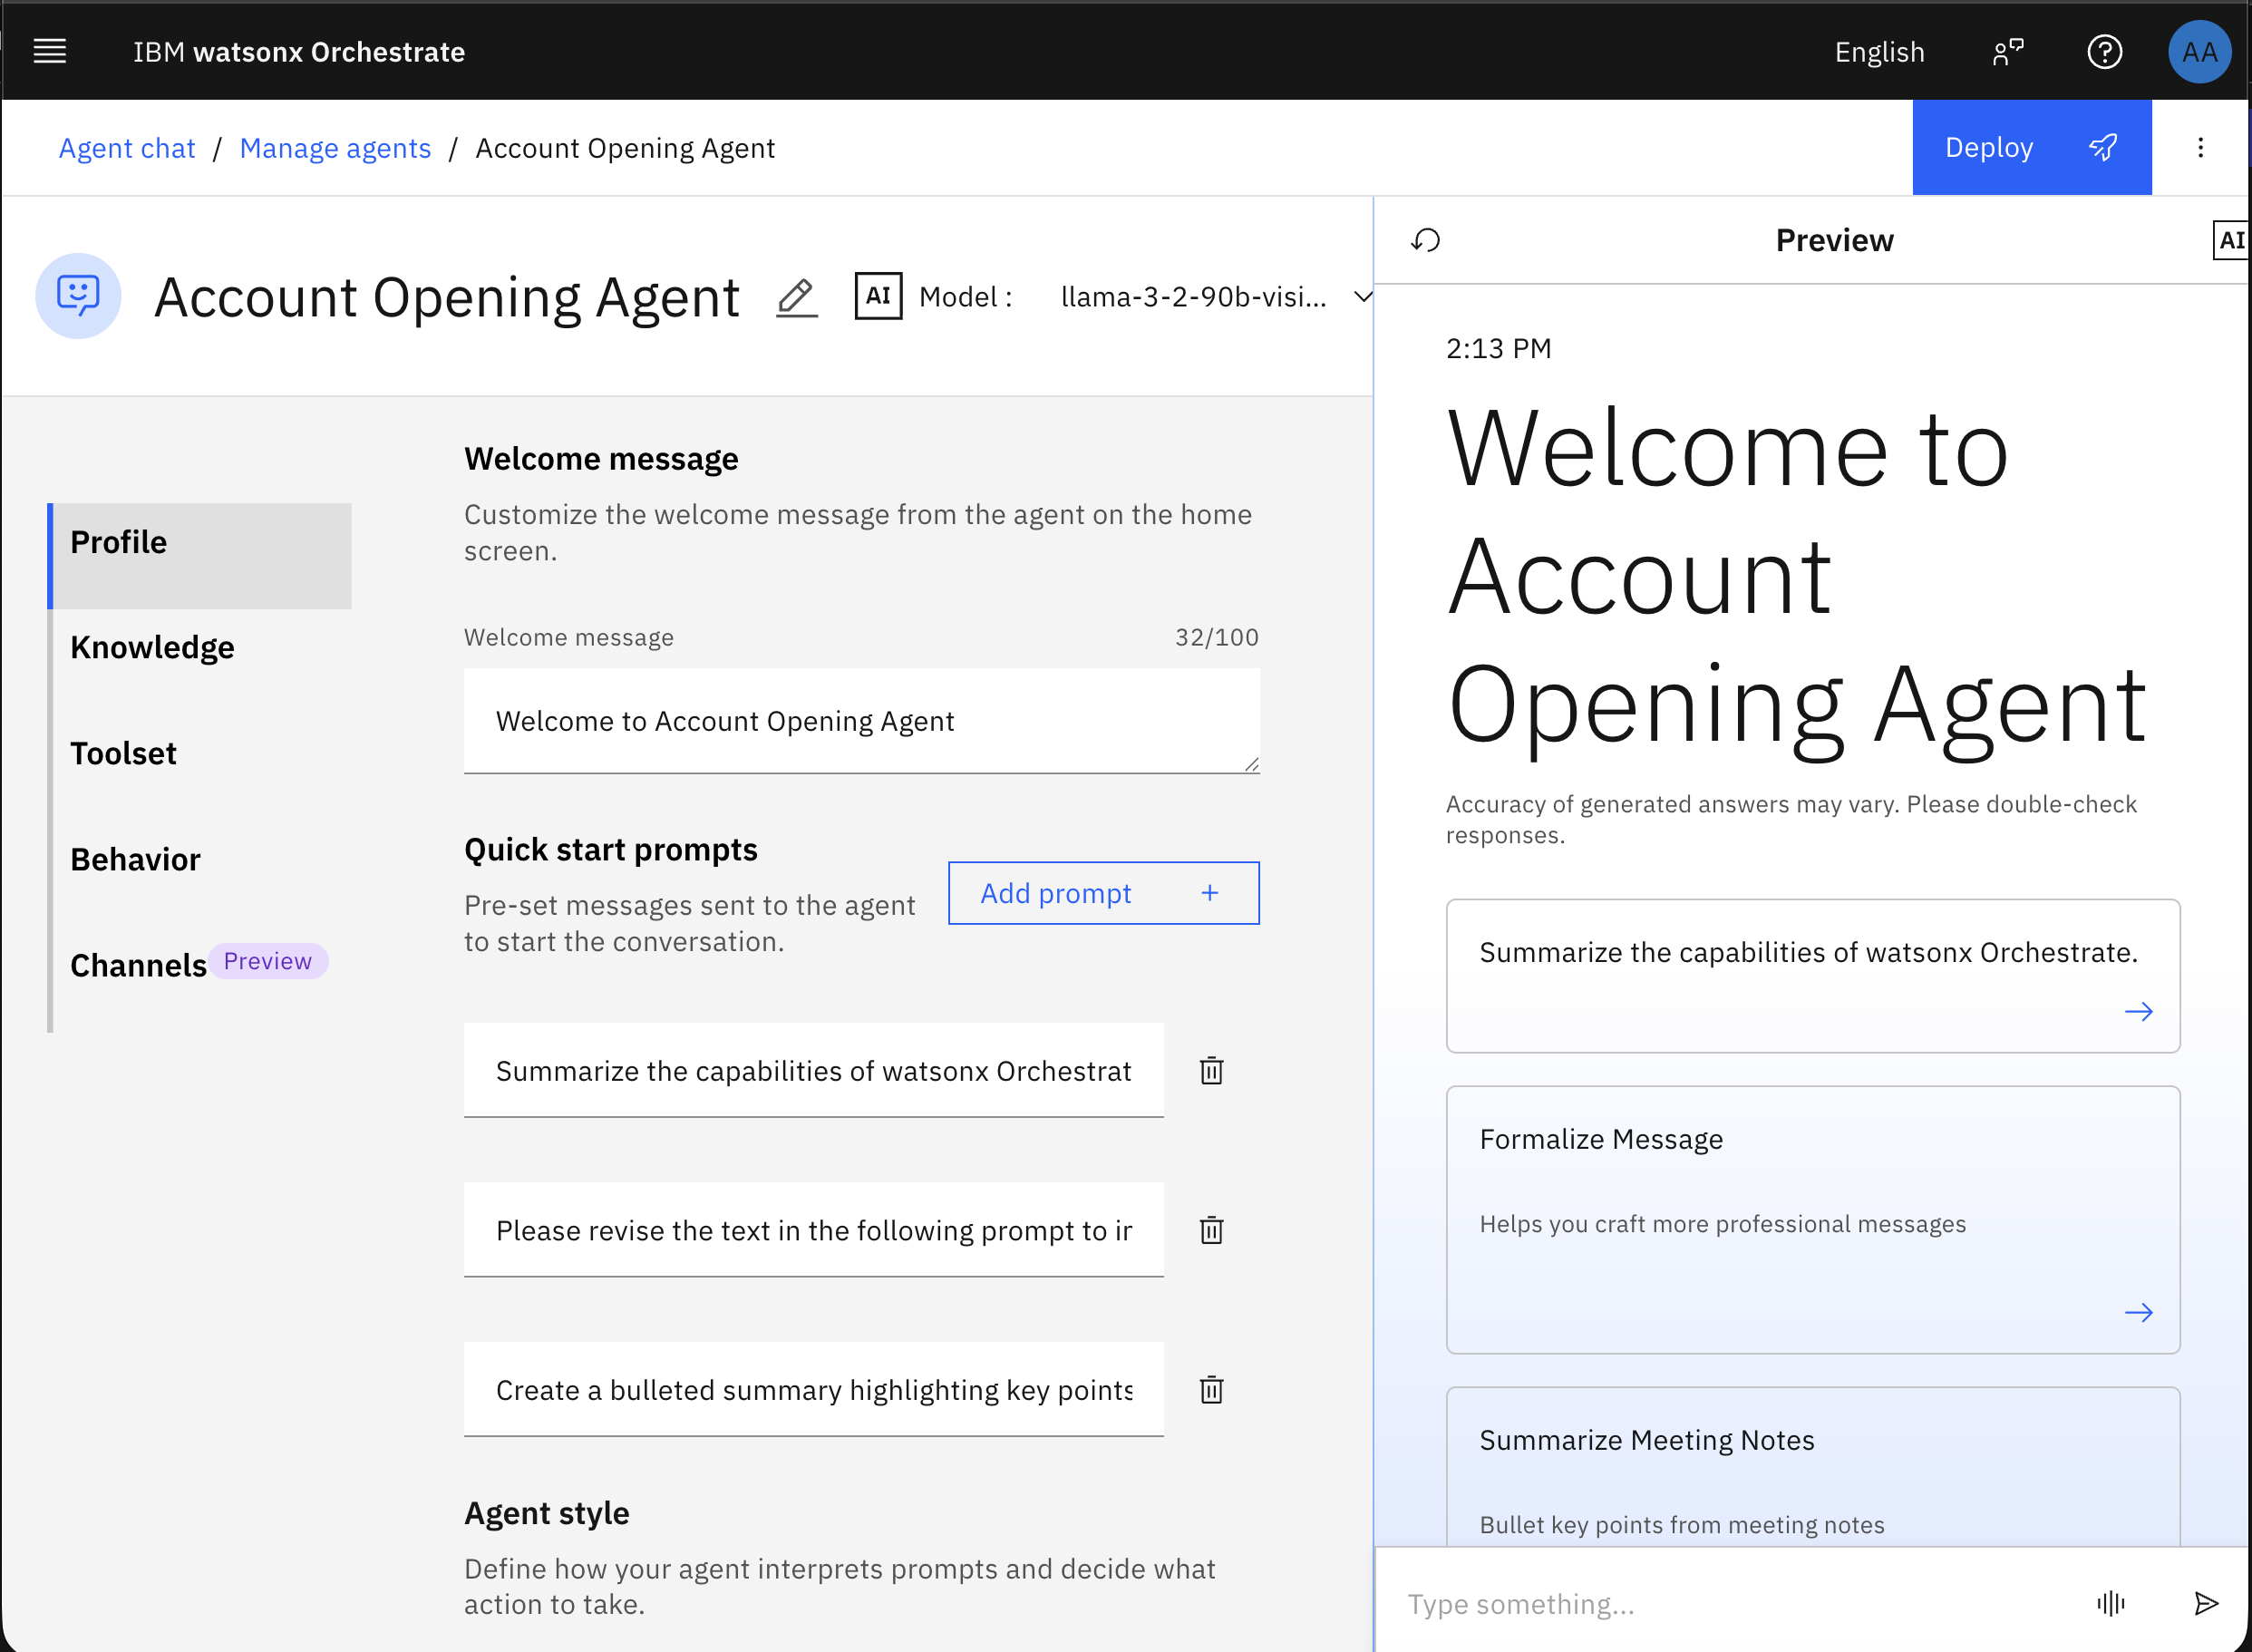
Click Add Prompt to add a pre-set message to start the conversation, and add this message, “Open a new bank account”, and then remove the remaining default 3 messages. Then, click Reset.
Go to the Behavior section to define how the agent should react to requests and respond to users. Instruct the agent to call the Agentic Workflow tool “Create New Bank Account” that you will create in the next step. Write the following in the Behavior section:
When the user requests to open a new bank account, call the tool "Create New Bank Account Agentic Workflow" and do not generate or display any additional output. The tool is fully responsible for handling the process and presenting the final response to the user. Your role is strictly to delegate the task to the tool. Do not repeat, summarize, or echo the tool’s output, as it already includes the necessary user-facing messages.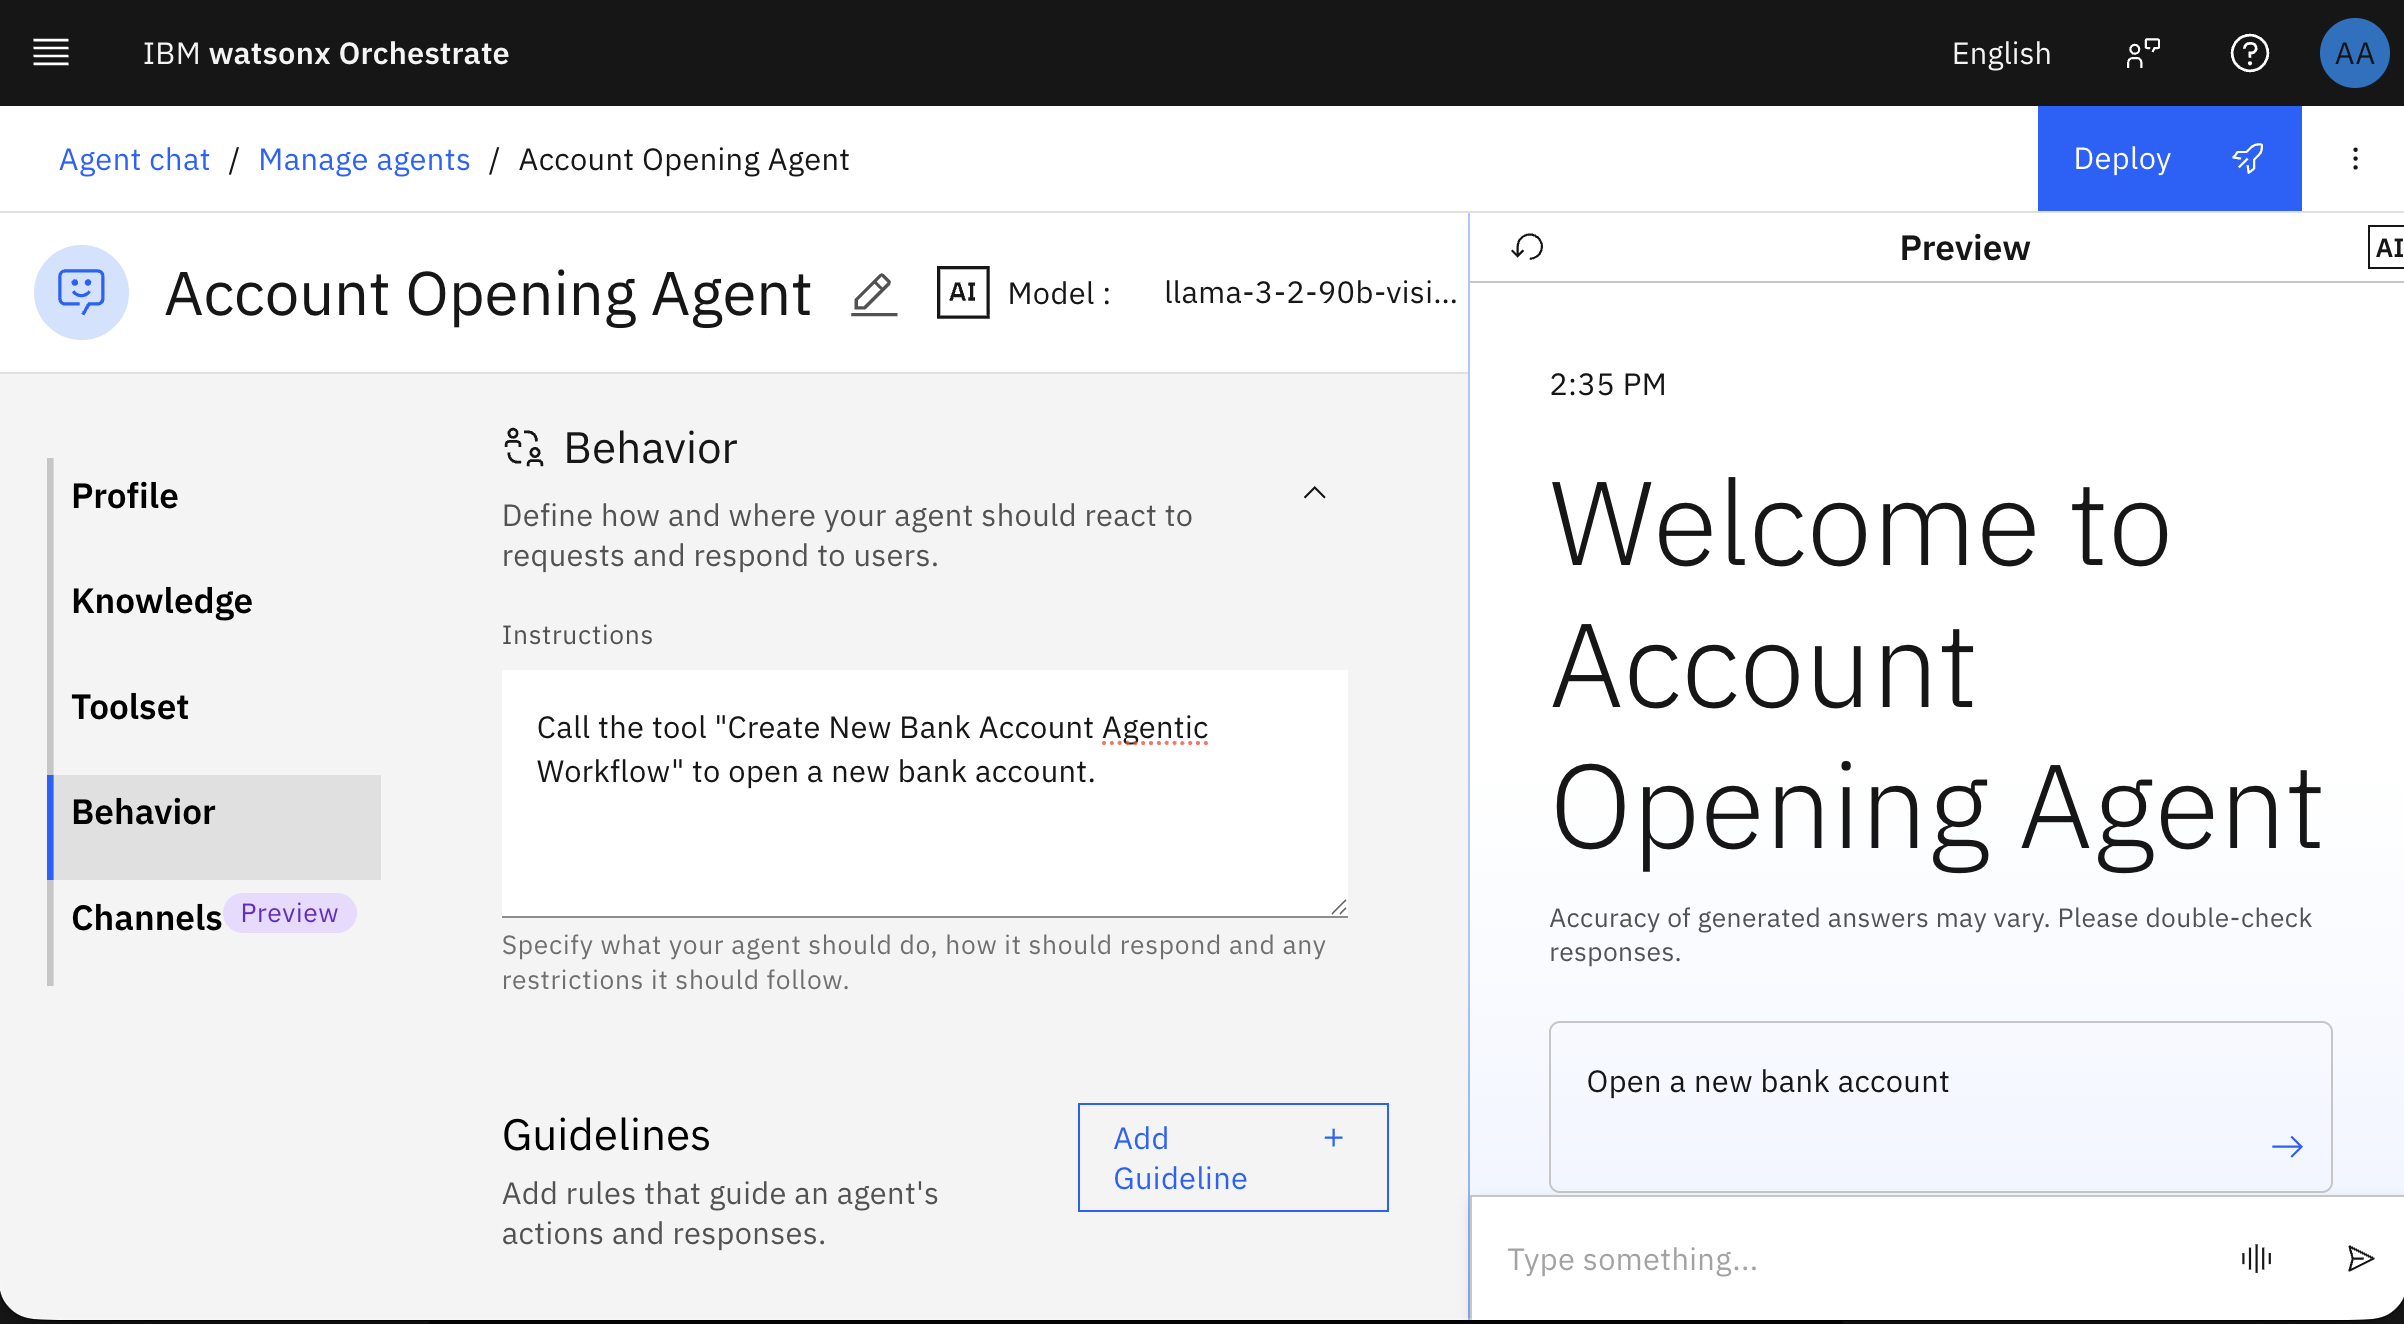
Step 2. Create the agentic workflow tool
In this step, you are going to define a new agentic workflow tool that will handle the logic and automation for opening a new bank account. This tool encapsulates the process that the agent will invoke, ensuring a modular and reusable design.
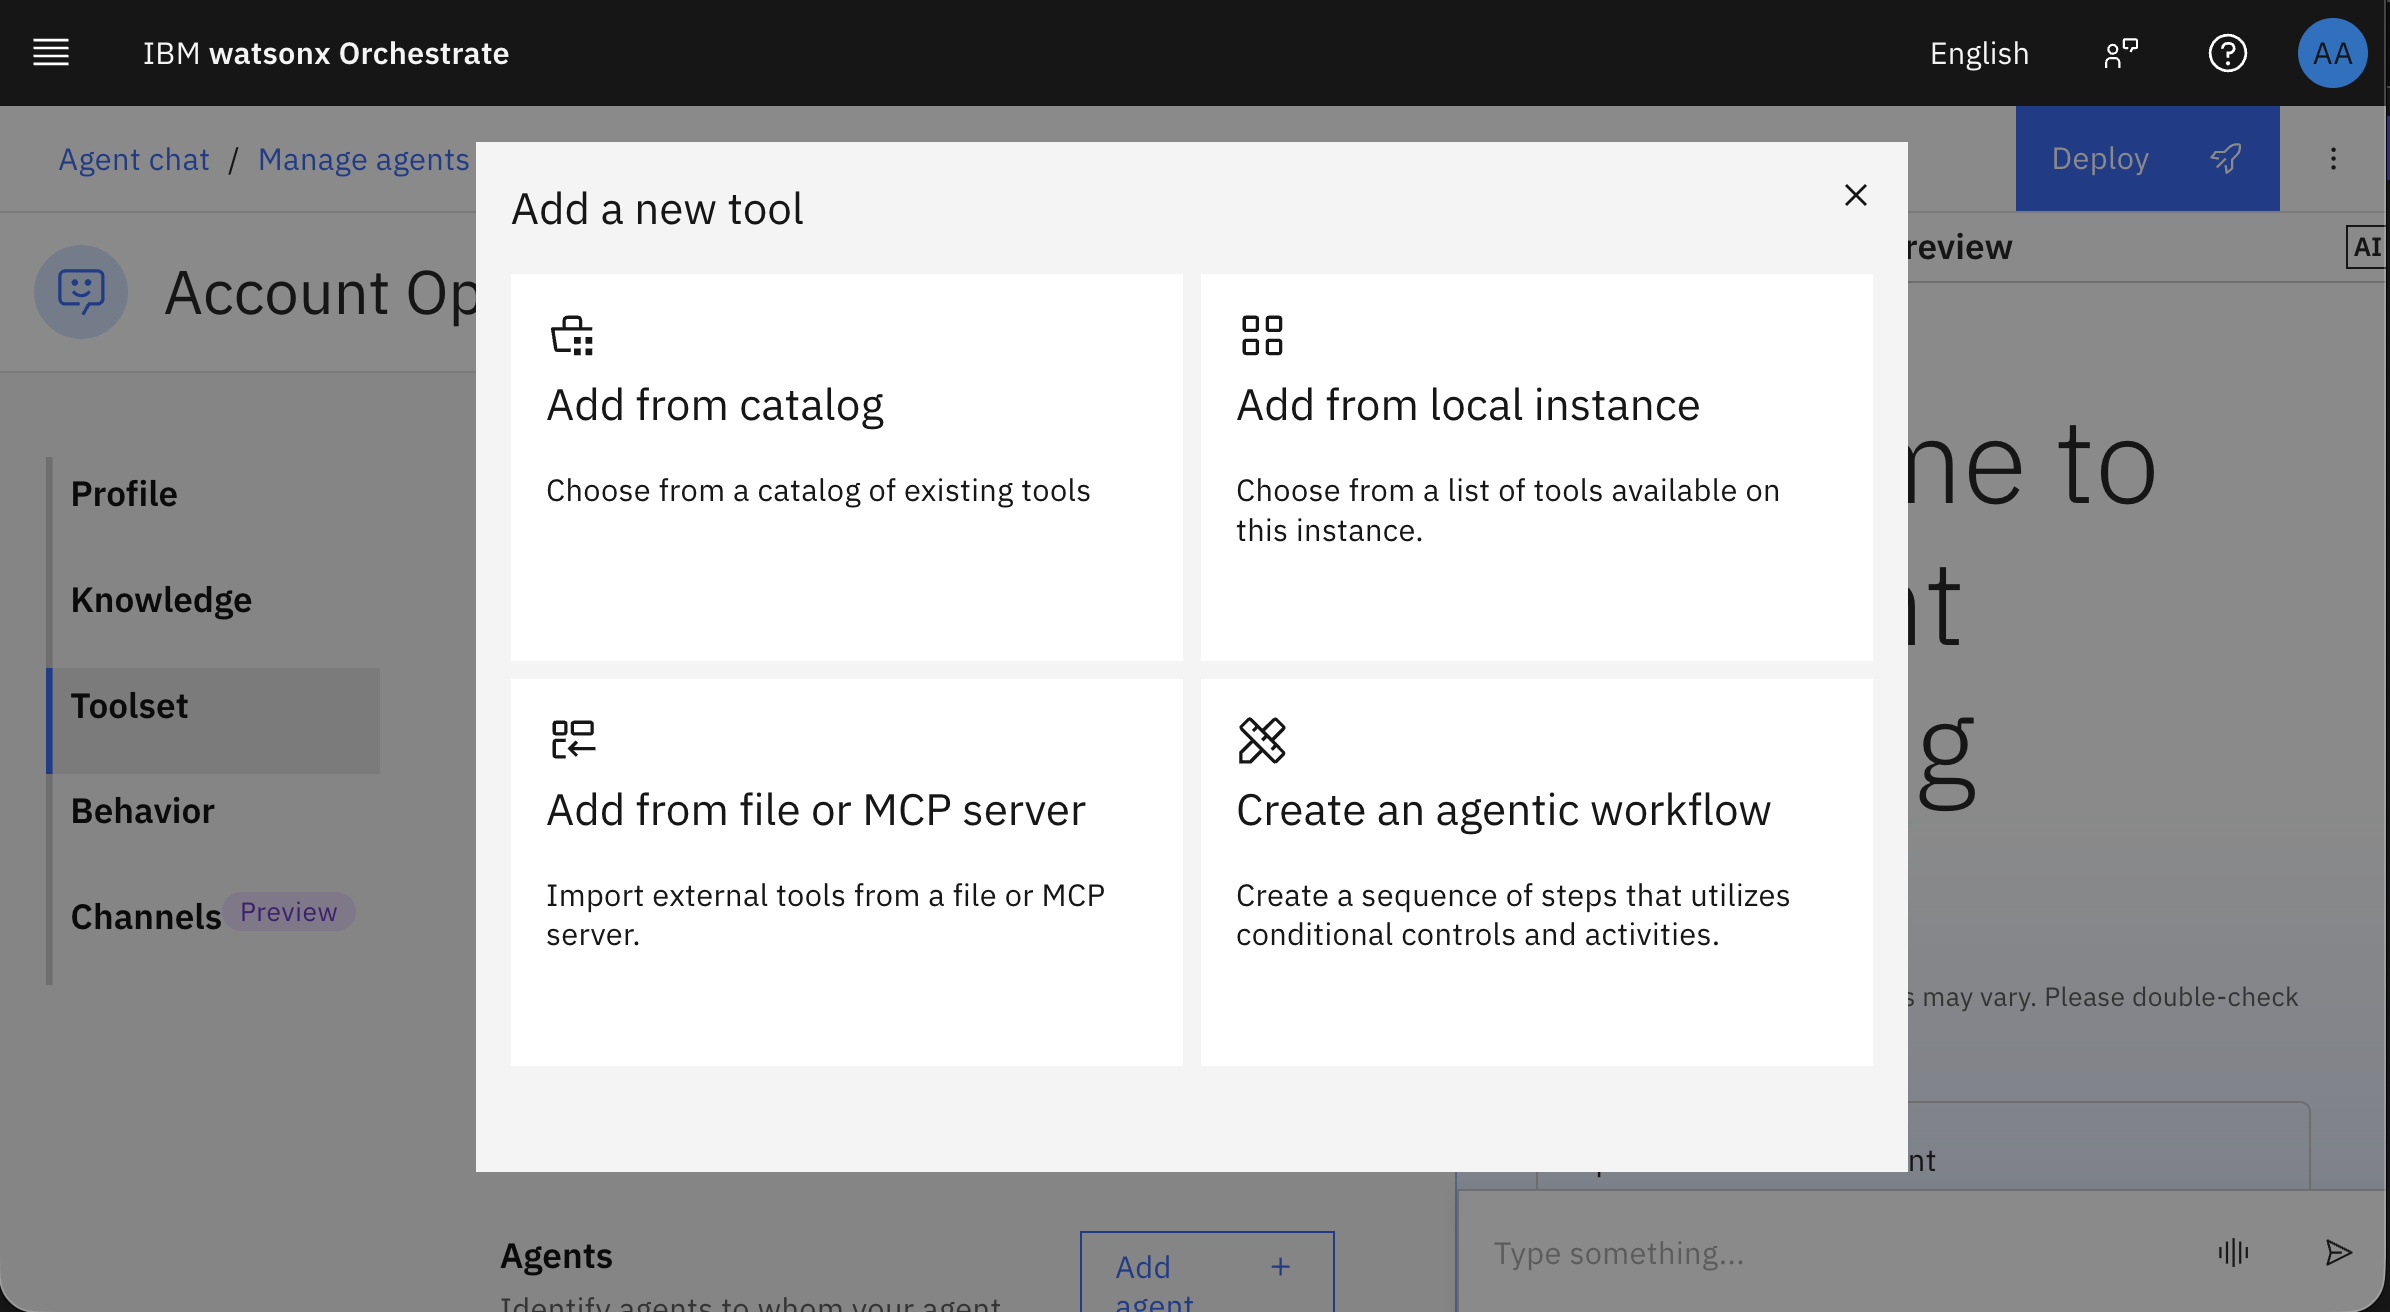
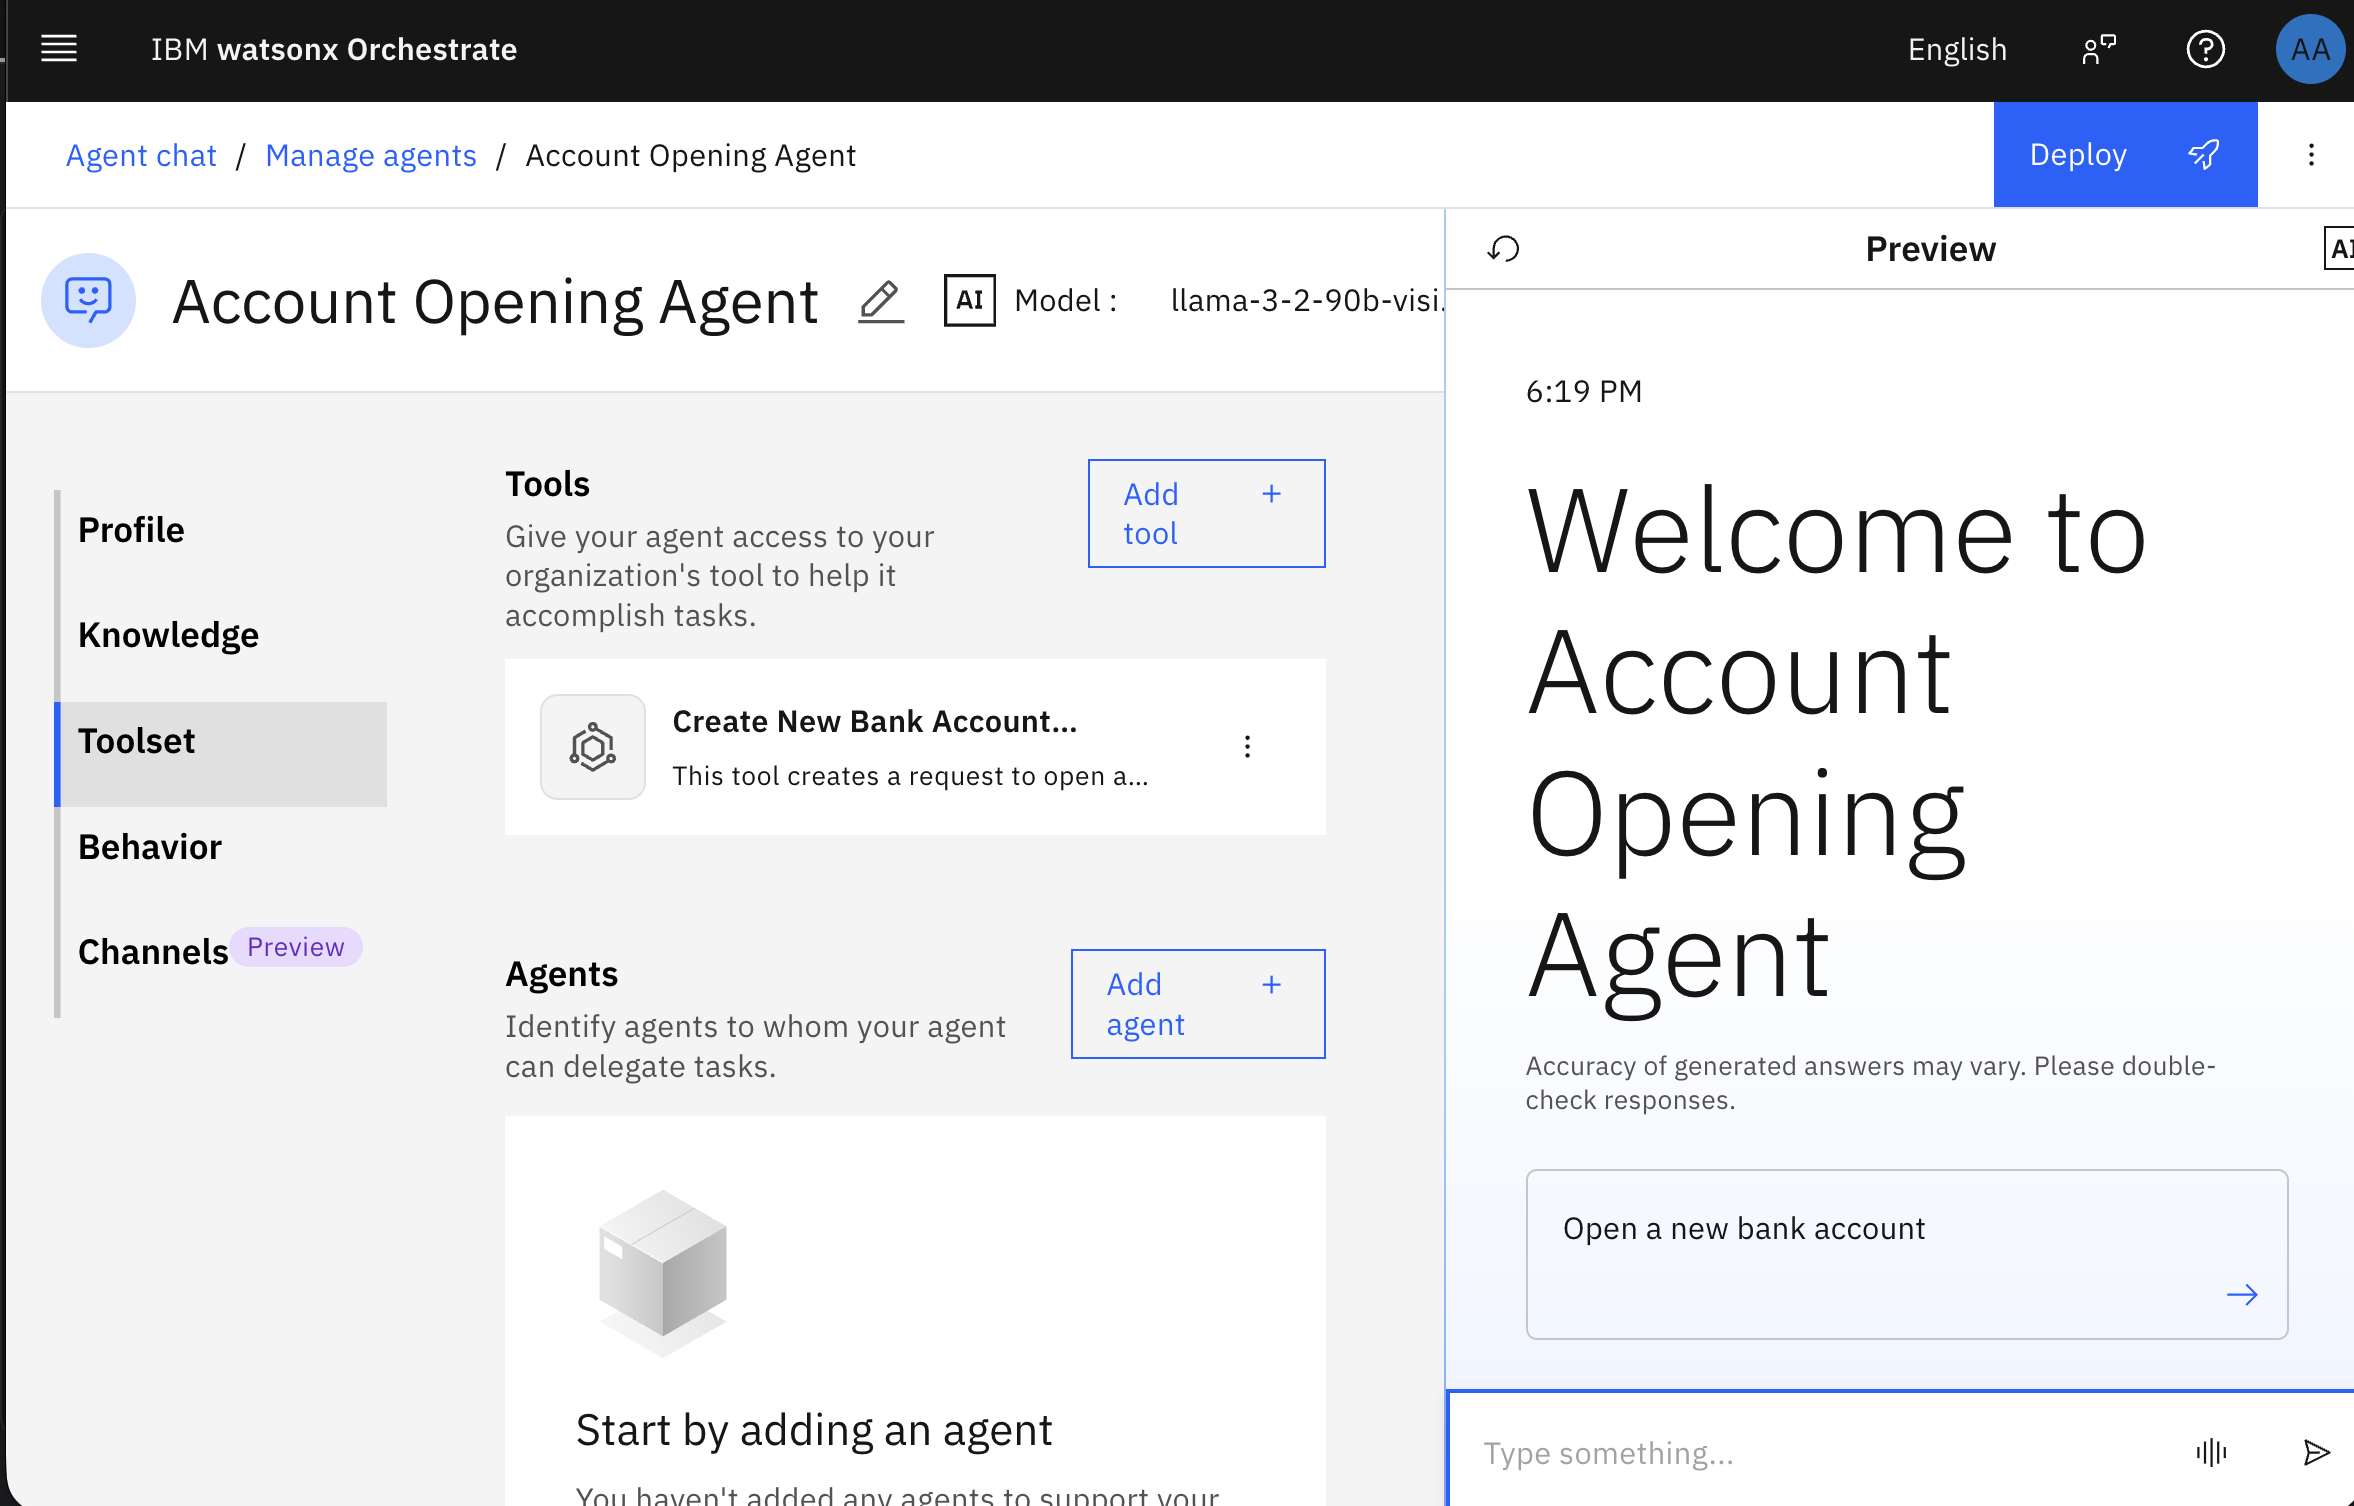
- Go to the Toolset section, and then click Add tool to create the agentic workflow tool.
Click Create an agentic workflow.
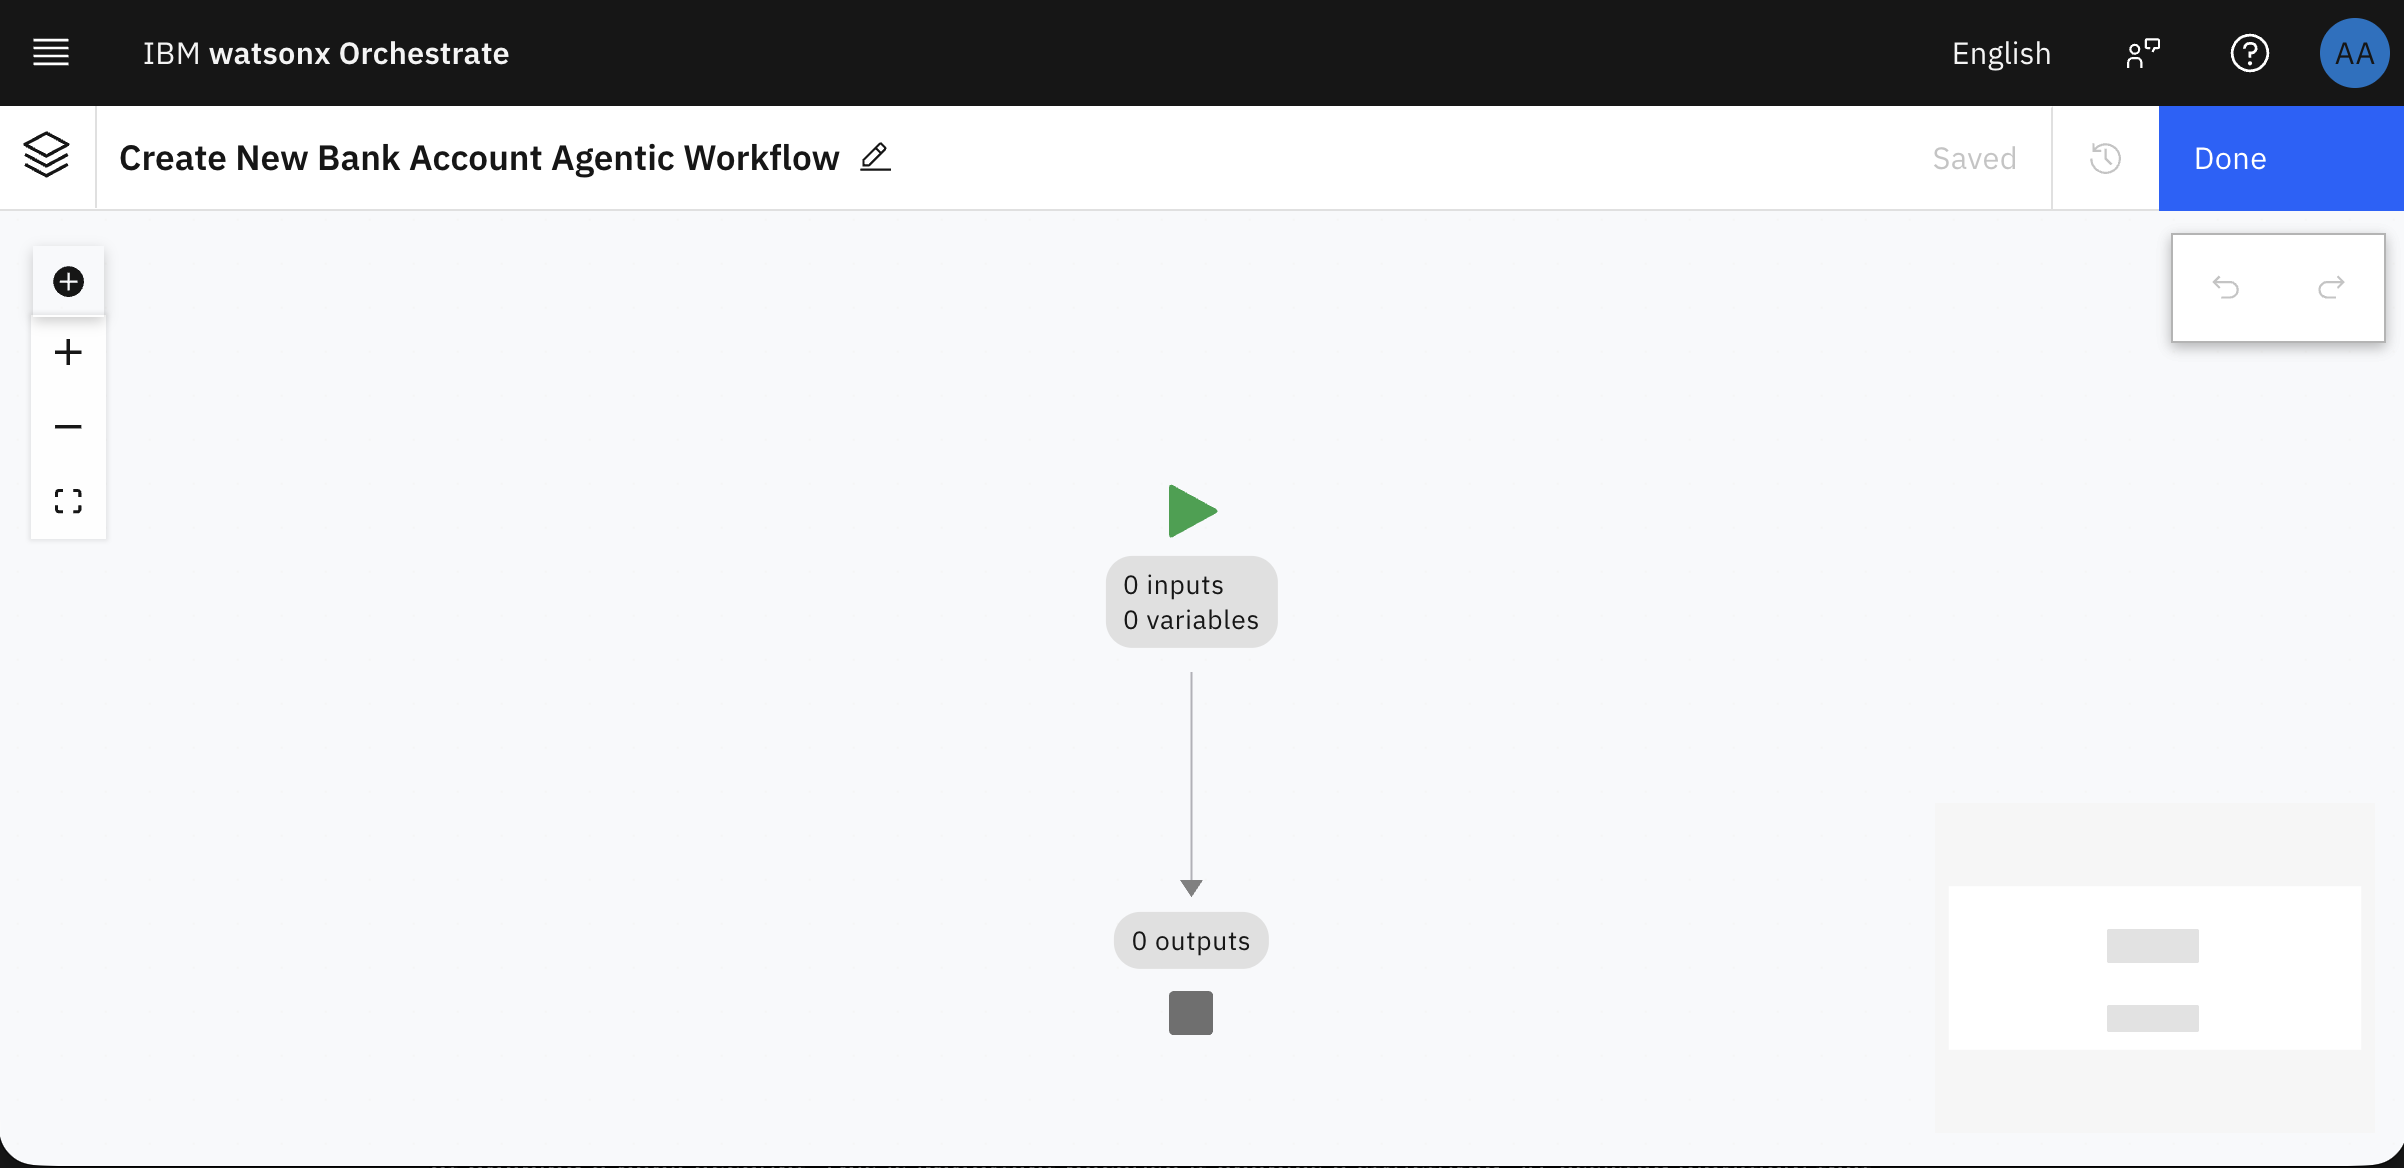
Click the pencil icon on the top left of the screen, and edit the name and description of the tool as follows, and then click Save.
Name: Create New Bank Account Agentic Workflow
Description: This tool creates a request to open a new bank account, it doesn't require any input.
Your view will look similar to this with an empty flow.
Step 3. Extract details from a document
In this step, you are going to configure a user activity and document extraction activity to collect and extract details from passport images for account opening. This part of the agentic workflow enables the agent to extract structured data like passport number, nationality, and names from uploaded documents, forming the foundation of information for downstream automation. You define the agentic workflow to prompt the user to upload a passport, trains the document extractor with sample images, defines key fields, and enhances accuracy through normalization and examples.
Download these synthetic passport images from this paper: SynID: Passport Synthetic Dataset for Presentation Attack Detection. The first 2 images will be used for training, and the second 2 will be used for testing.
- Passport Image 1, name it: passport-1.jpg
- Passport Image 2, name it: passport-2.png
- Passport Image 3, name it: passport-3.png
- Passport Image 4, name it: passport-4.png
Go back to the agentic workflow in watsonx Orchestrate, click the blue circle (+) icon, and then click User activity to add a new user activity to the agentic workflow to get input from the user on the passport.
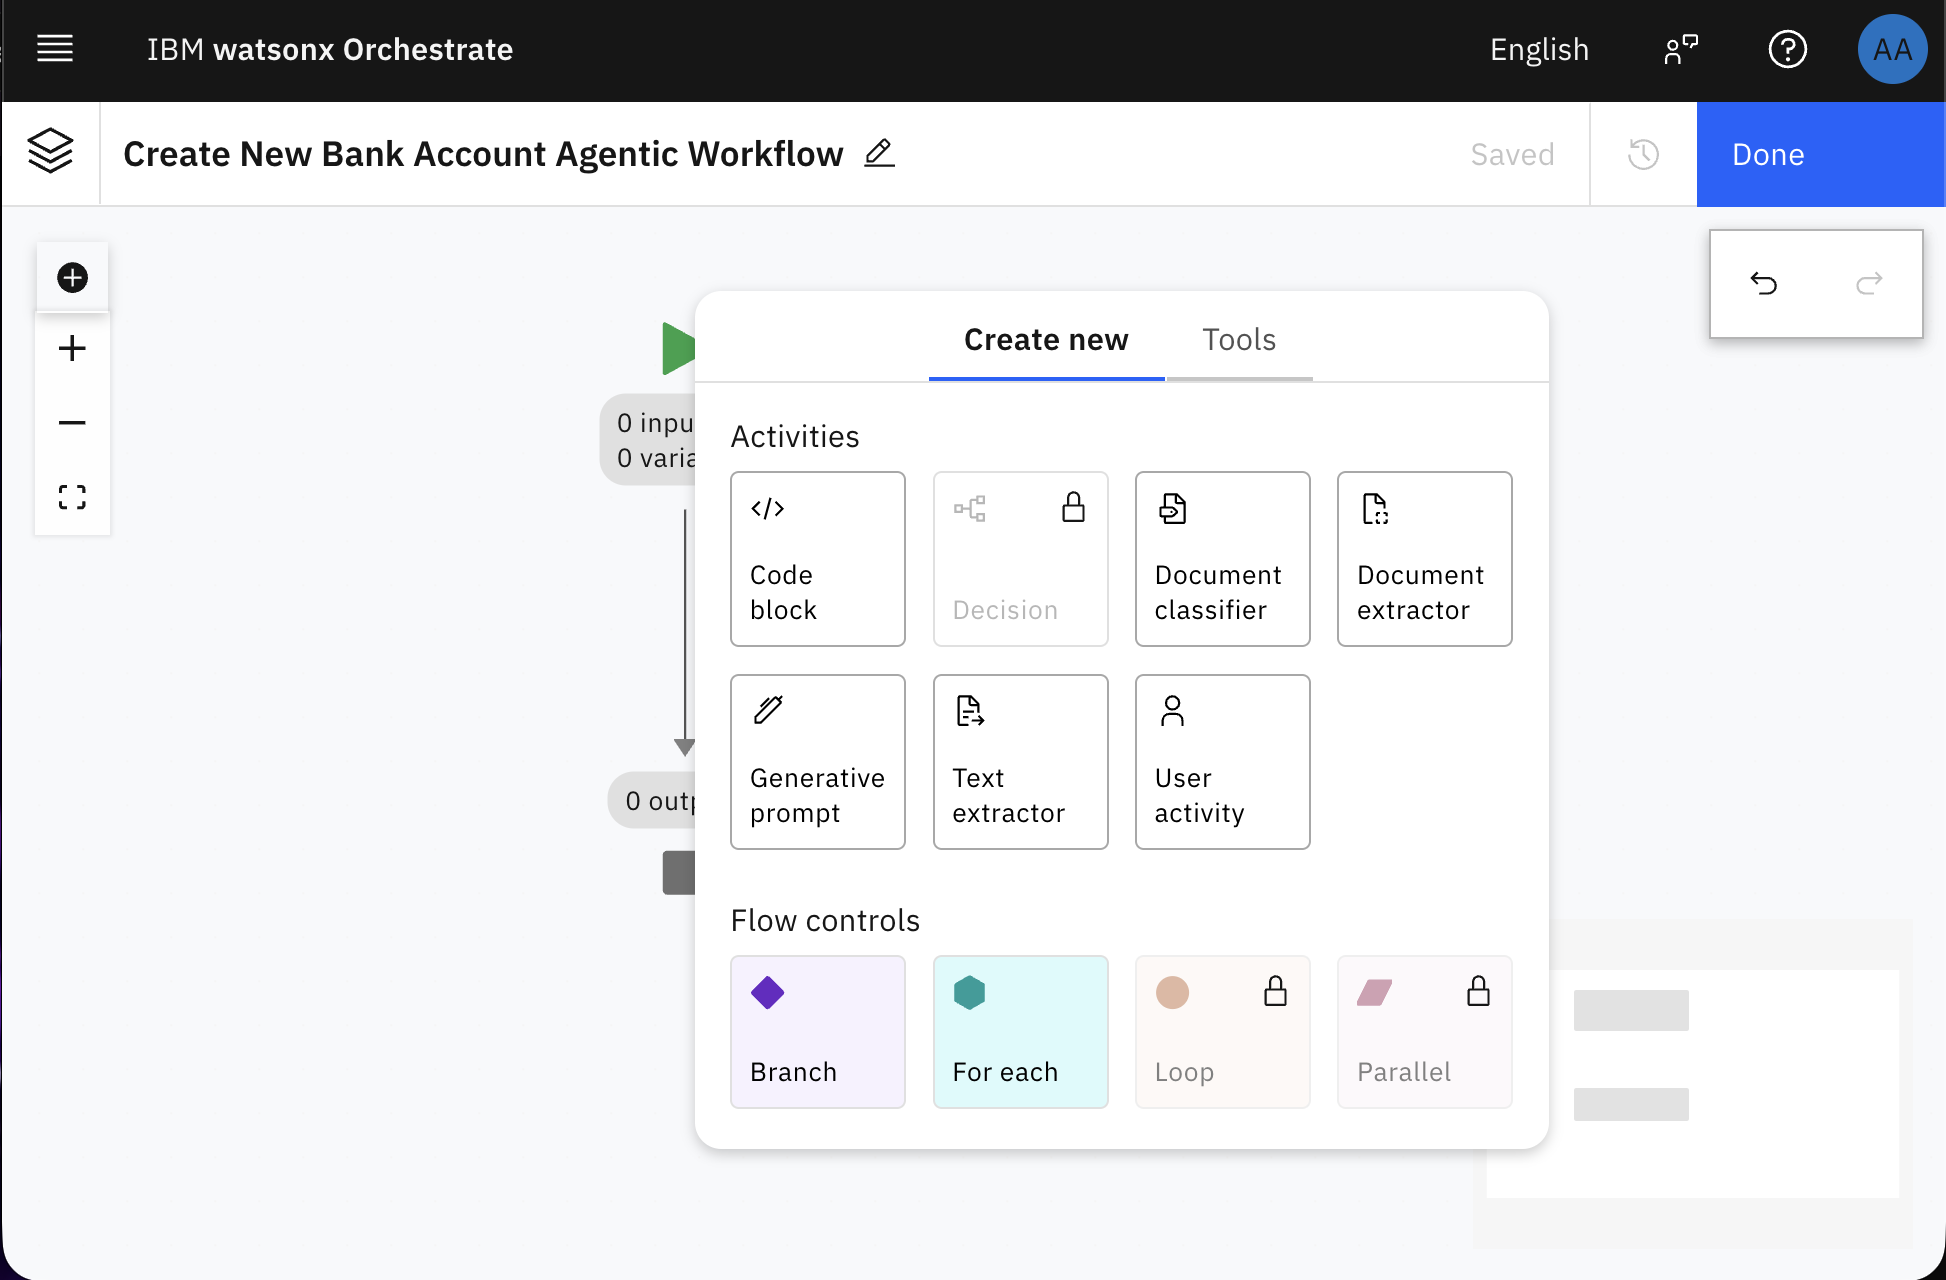
Click User Activity 1 to rename it to “Upload Passport.”
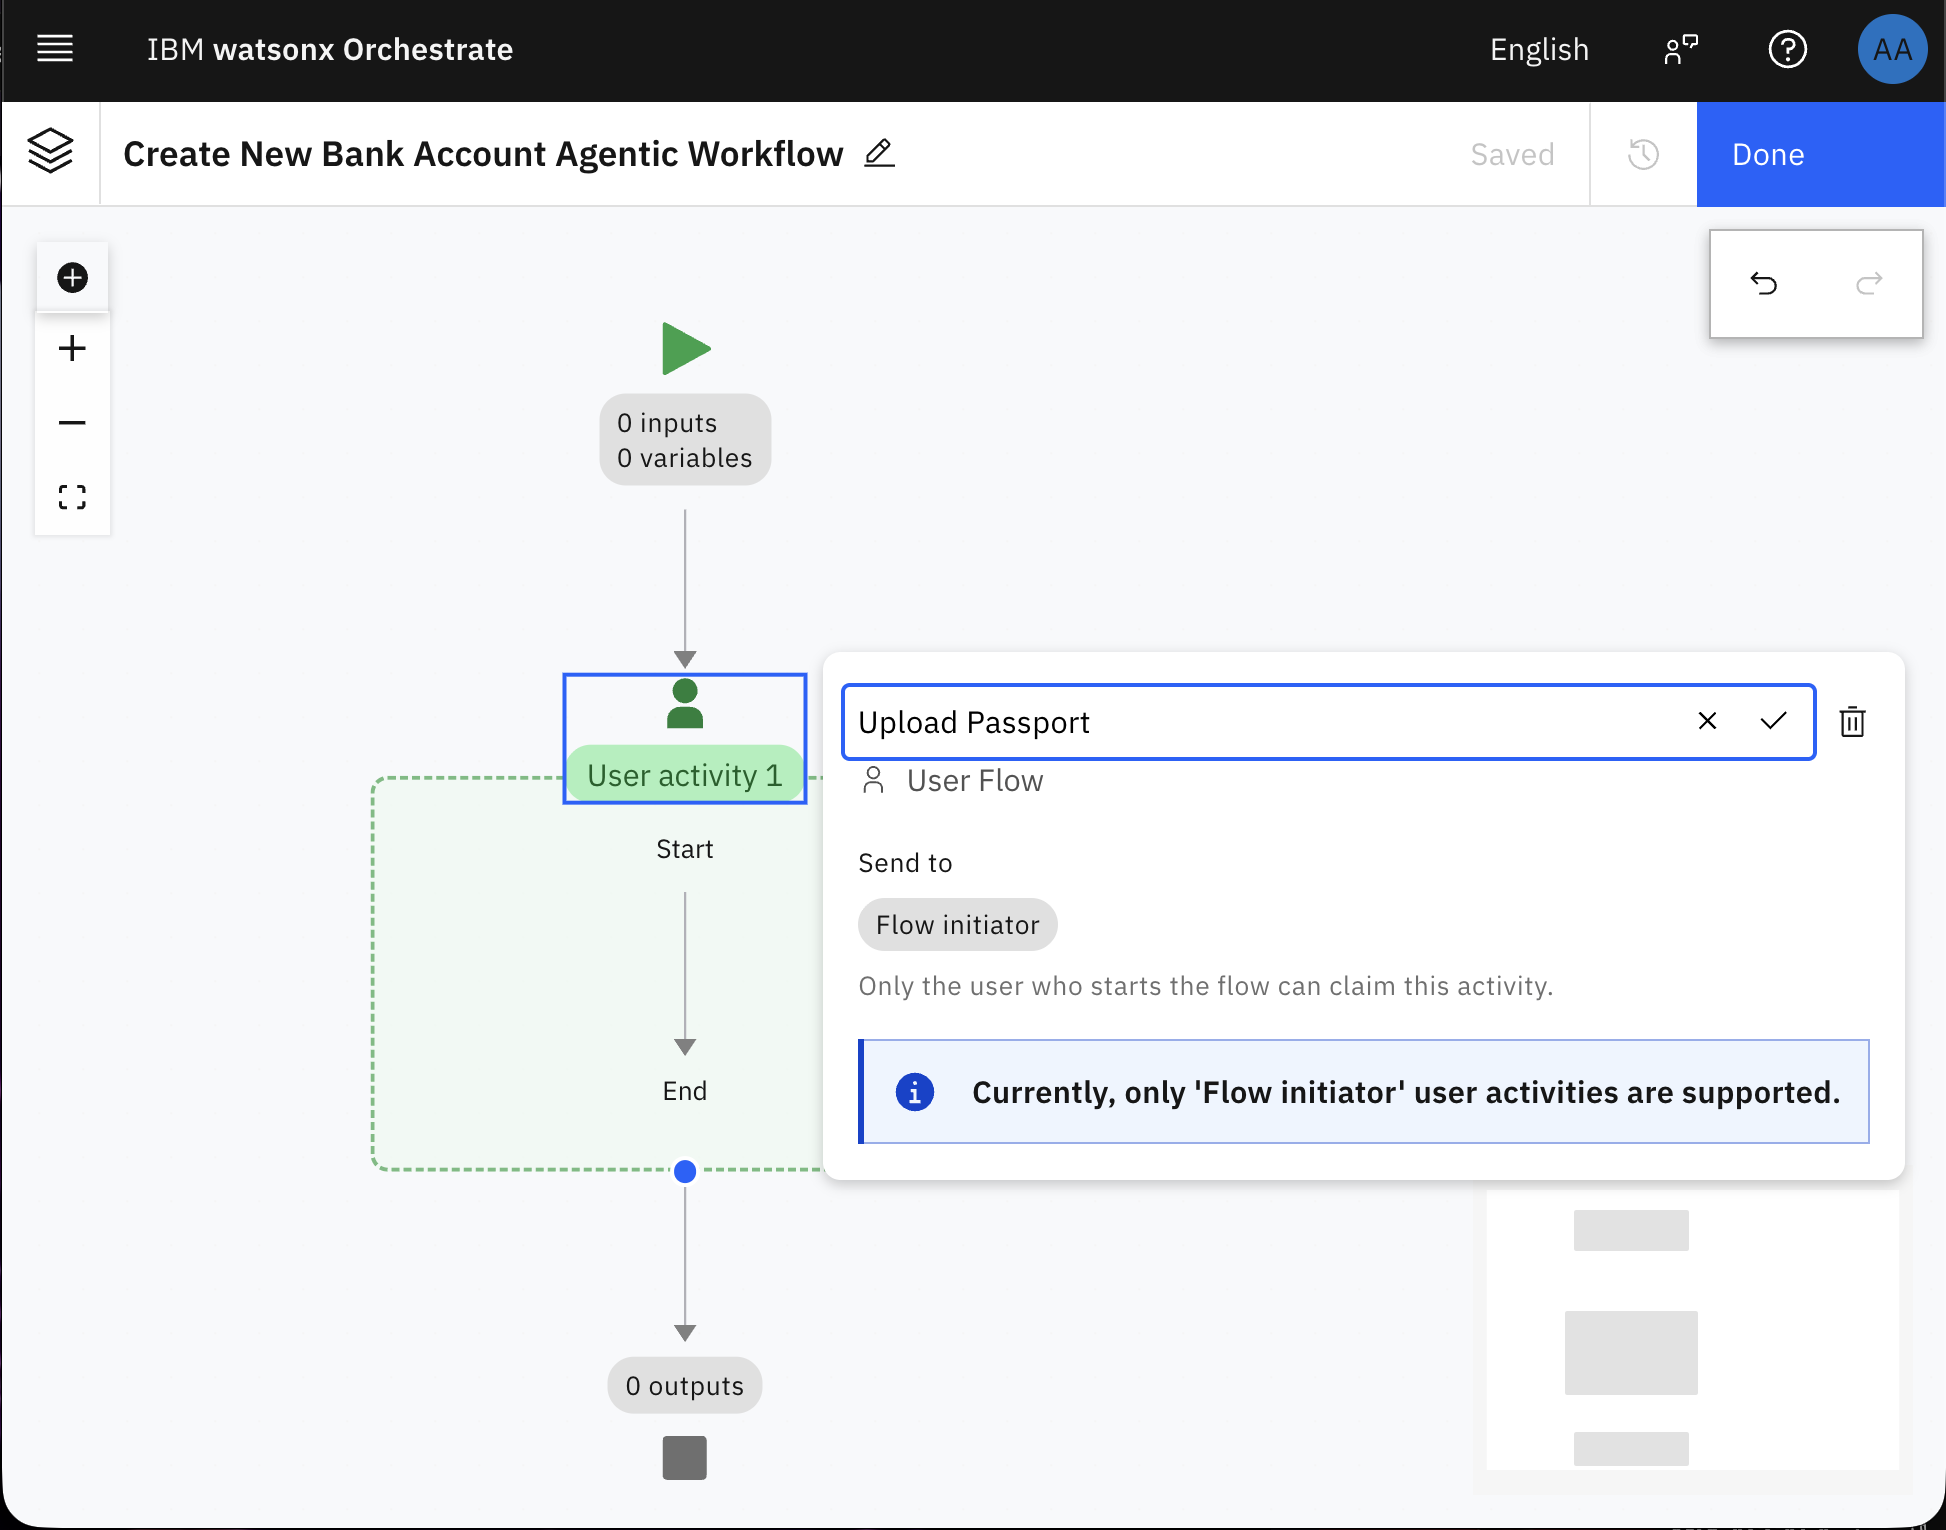
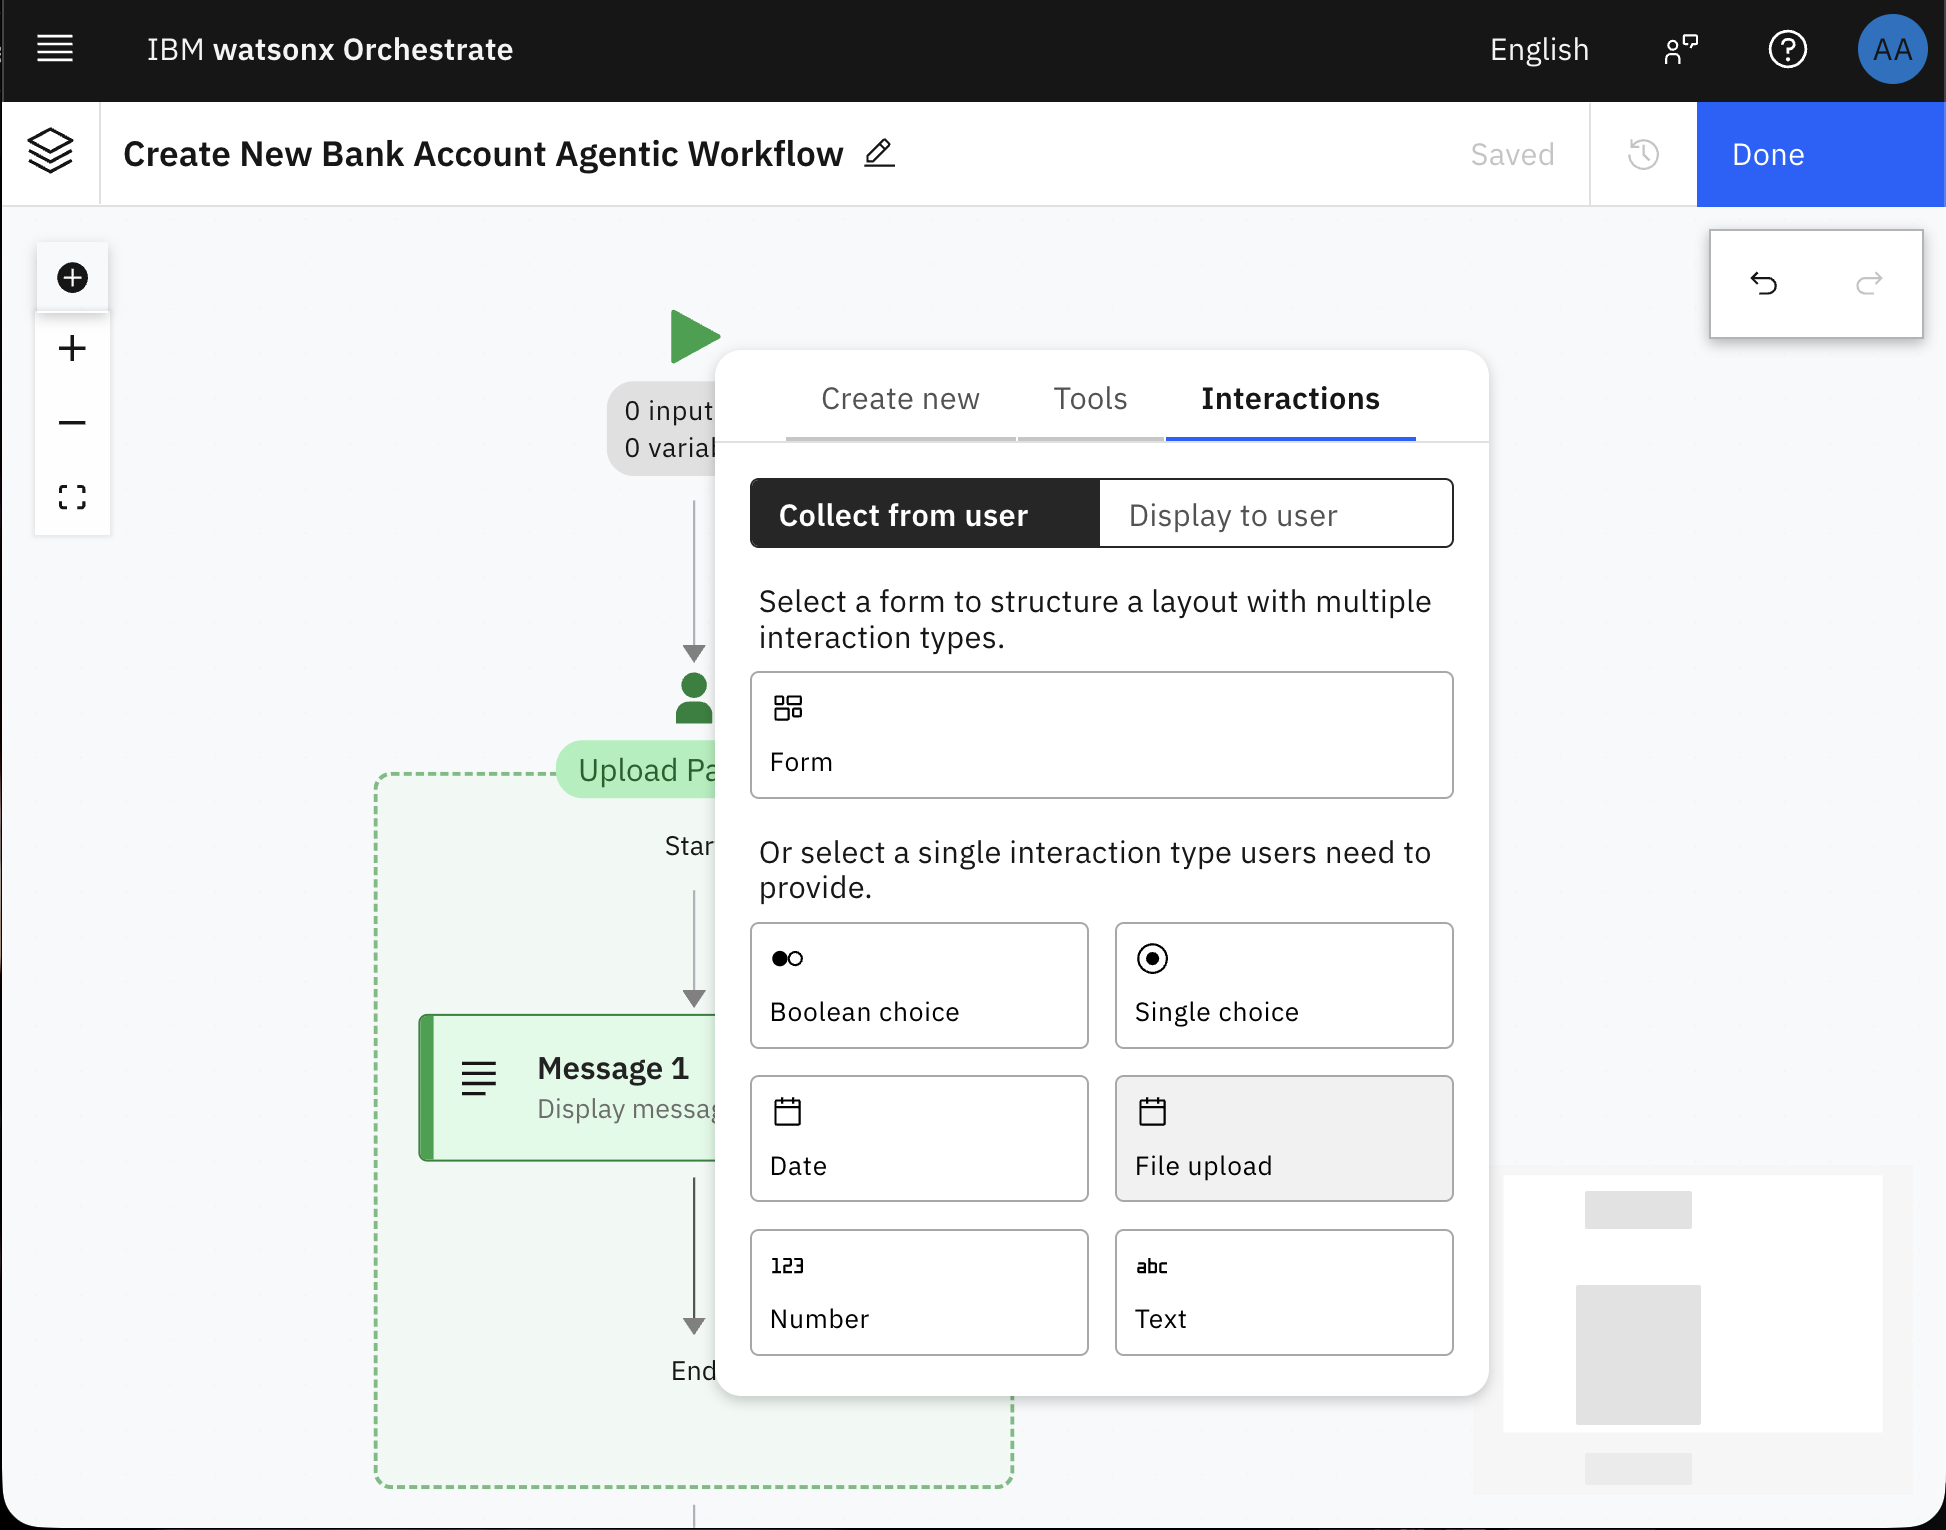
In the user activity, add a message by clicking the + icon and then click Display to user and then Message.
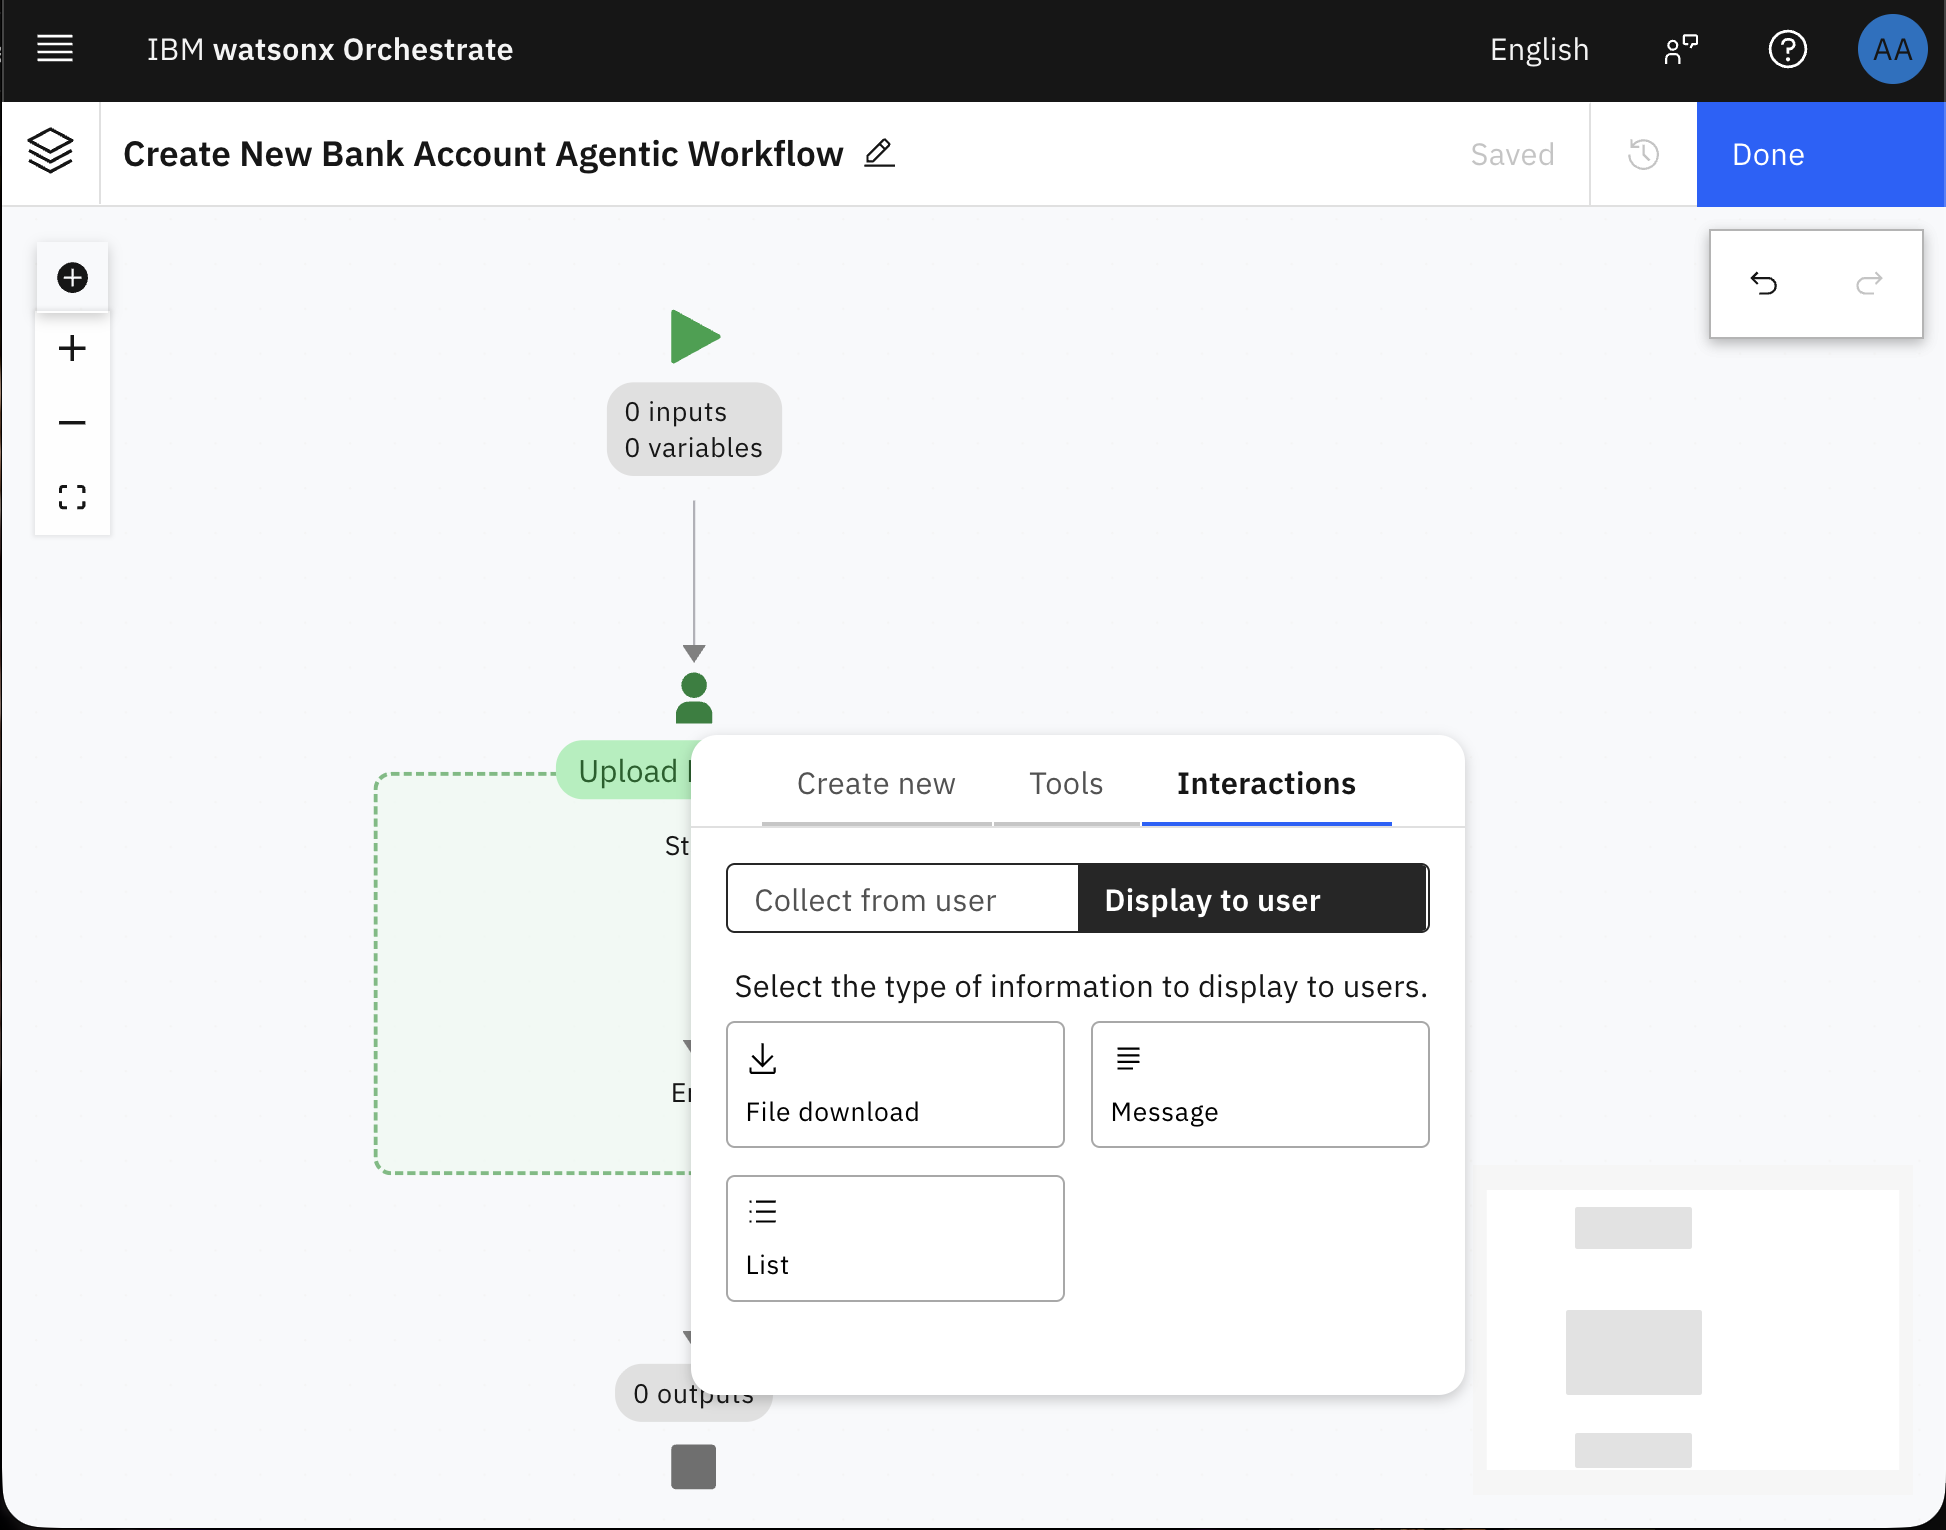
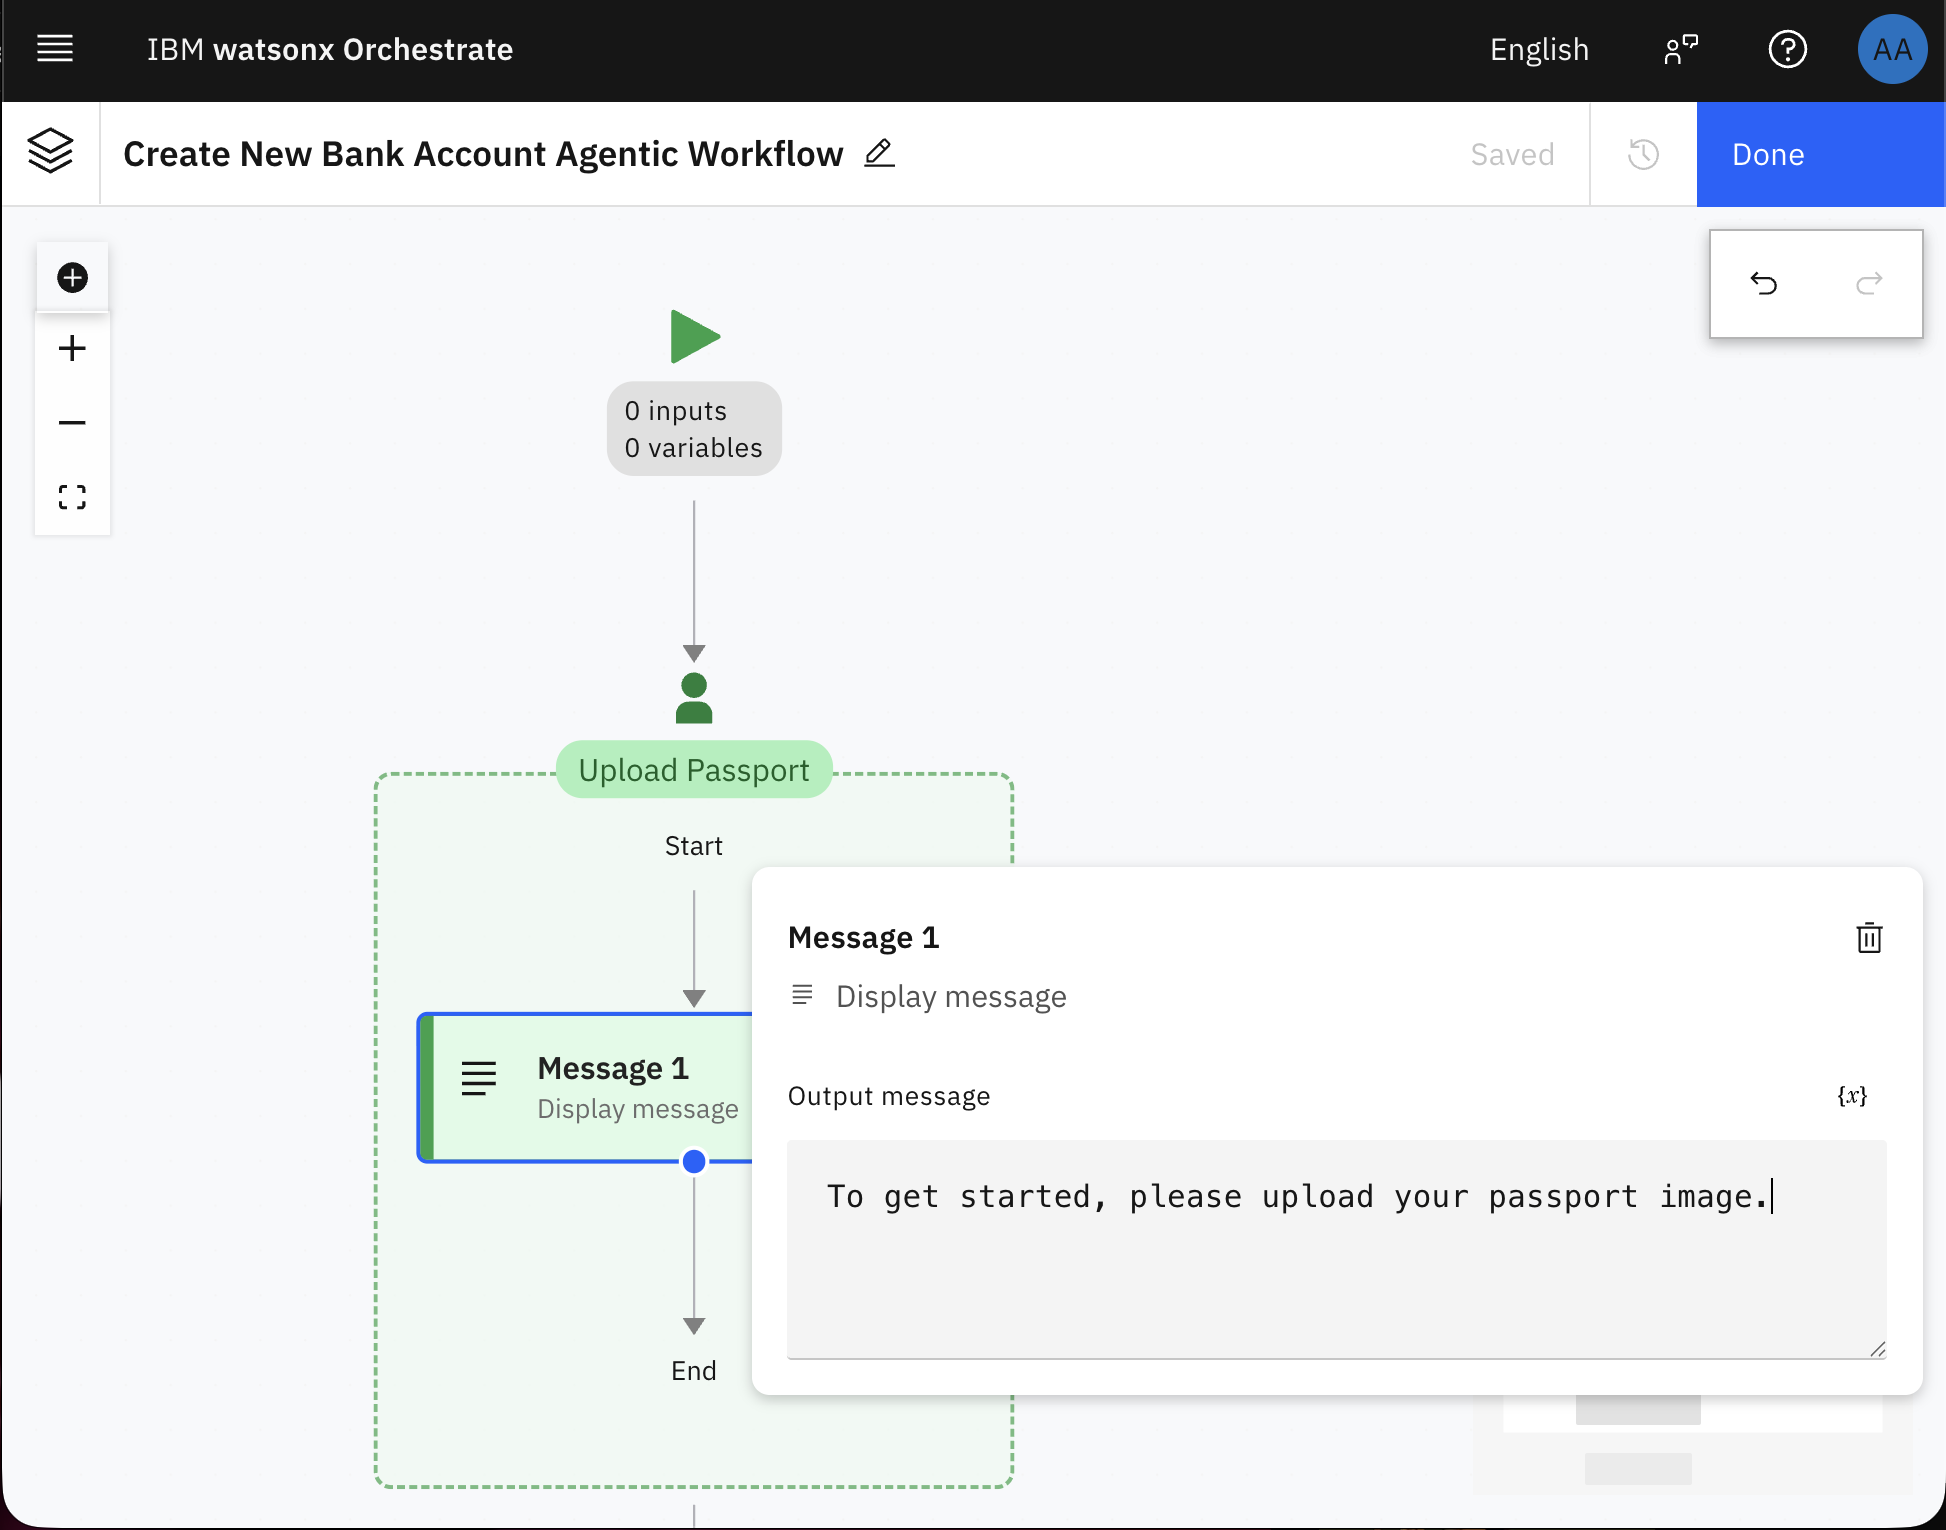
Click the message box you just created, and add this message: “To get started, please upload your passport image.”.
Add the File upload interaction to allow the user to upload their passport.
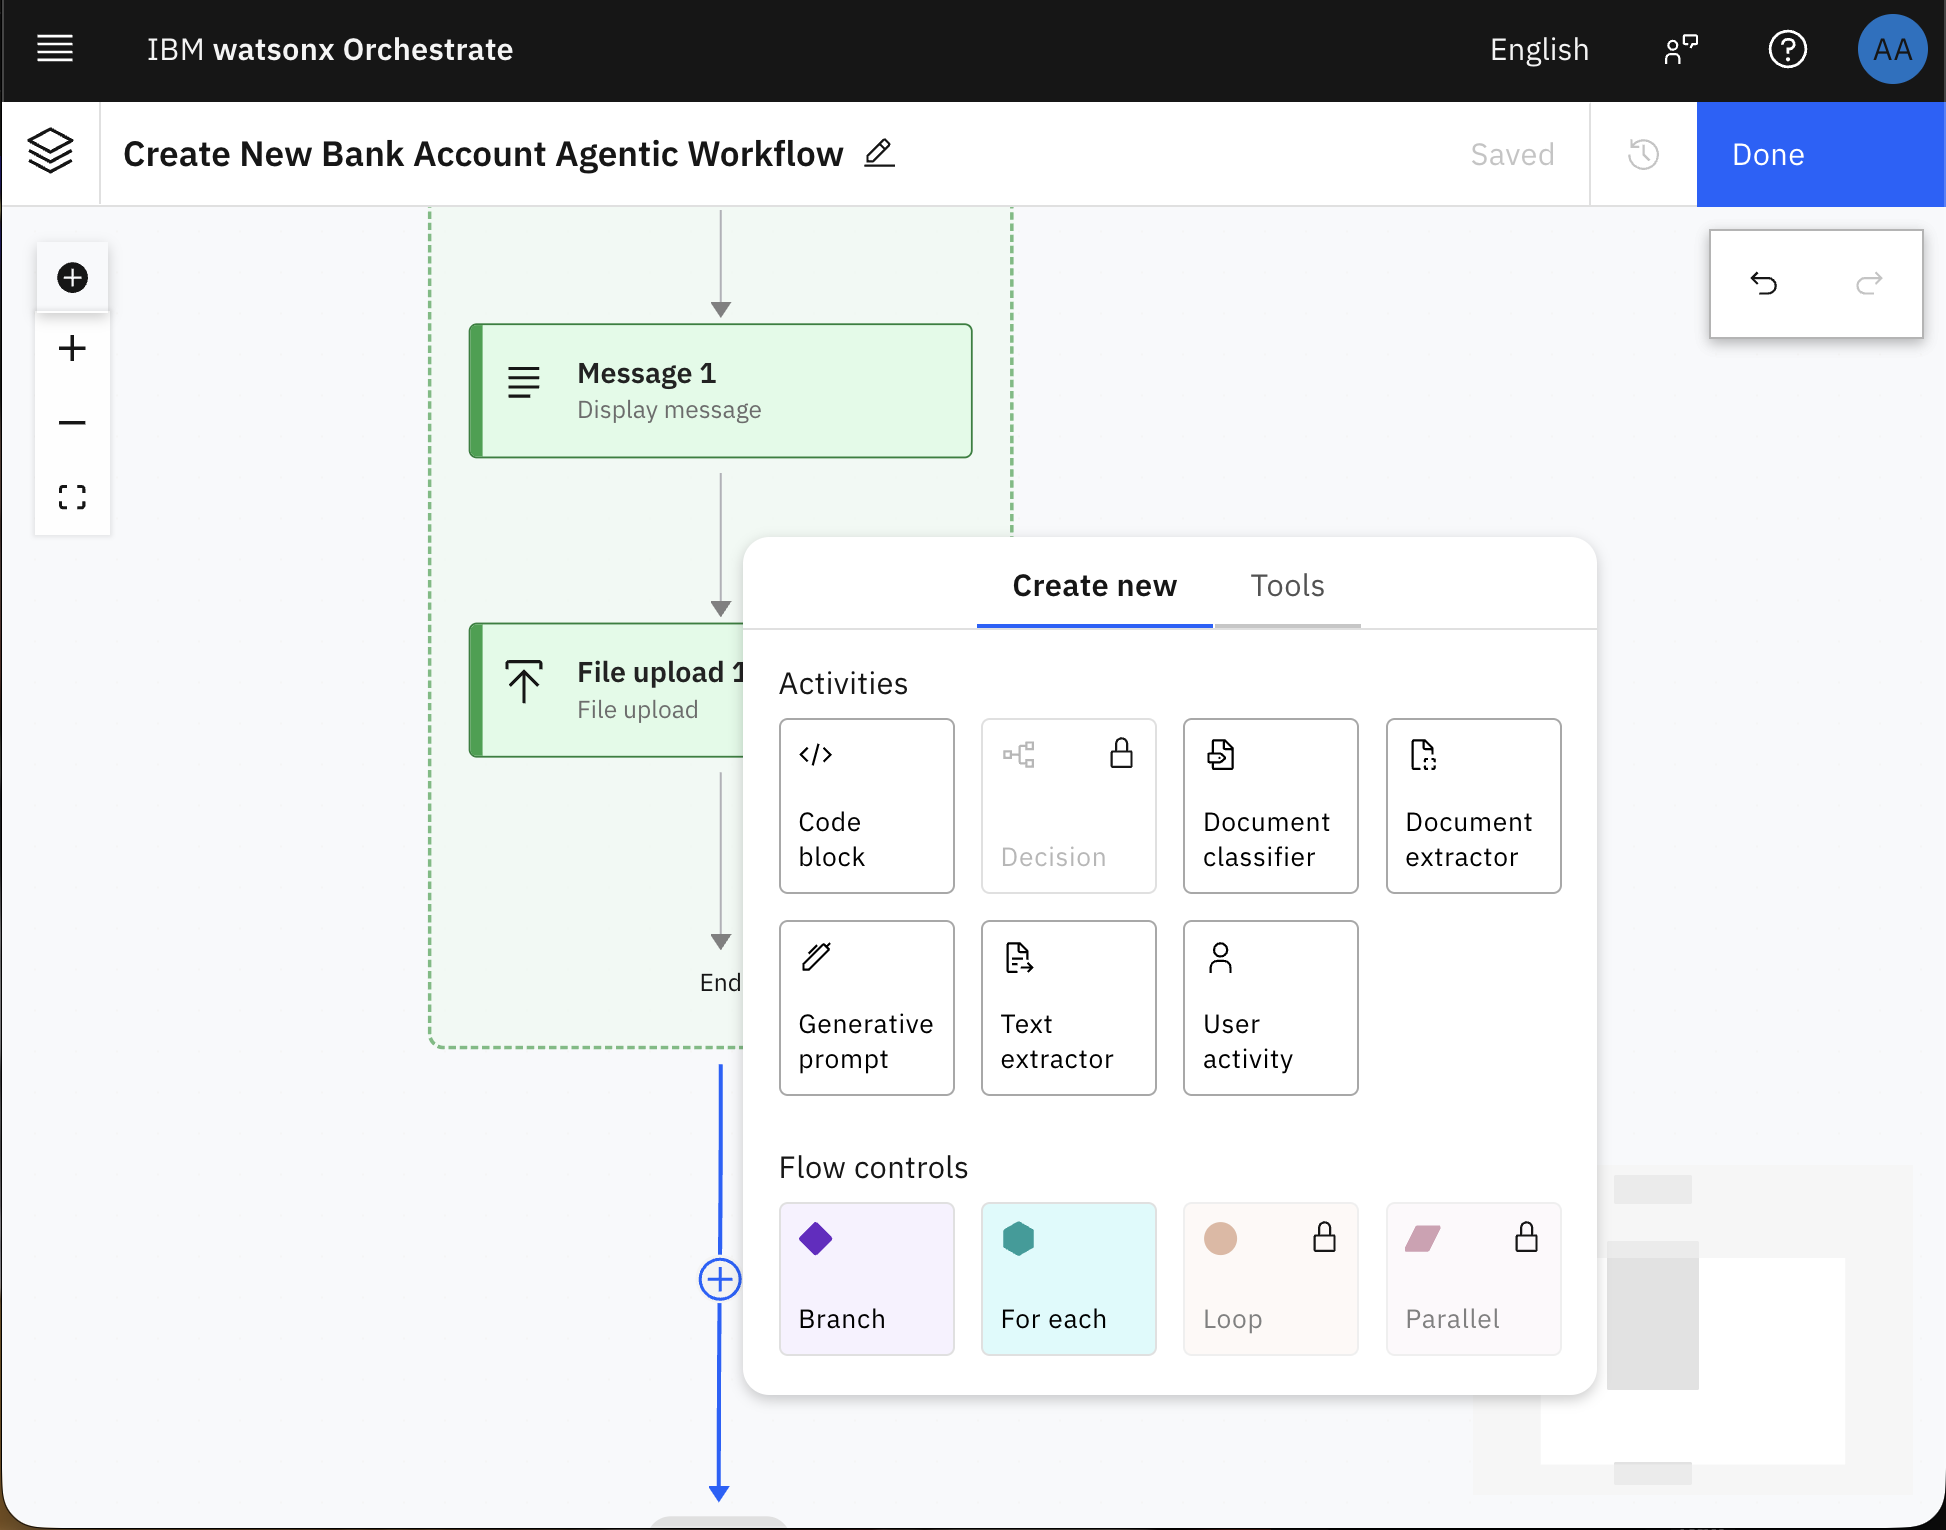
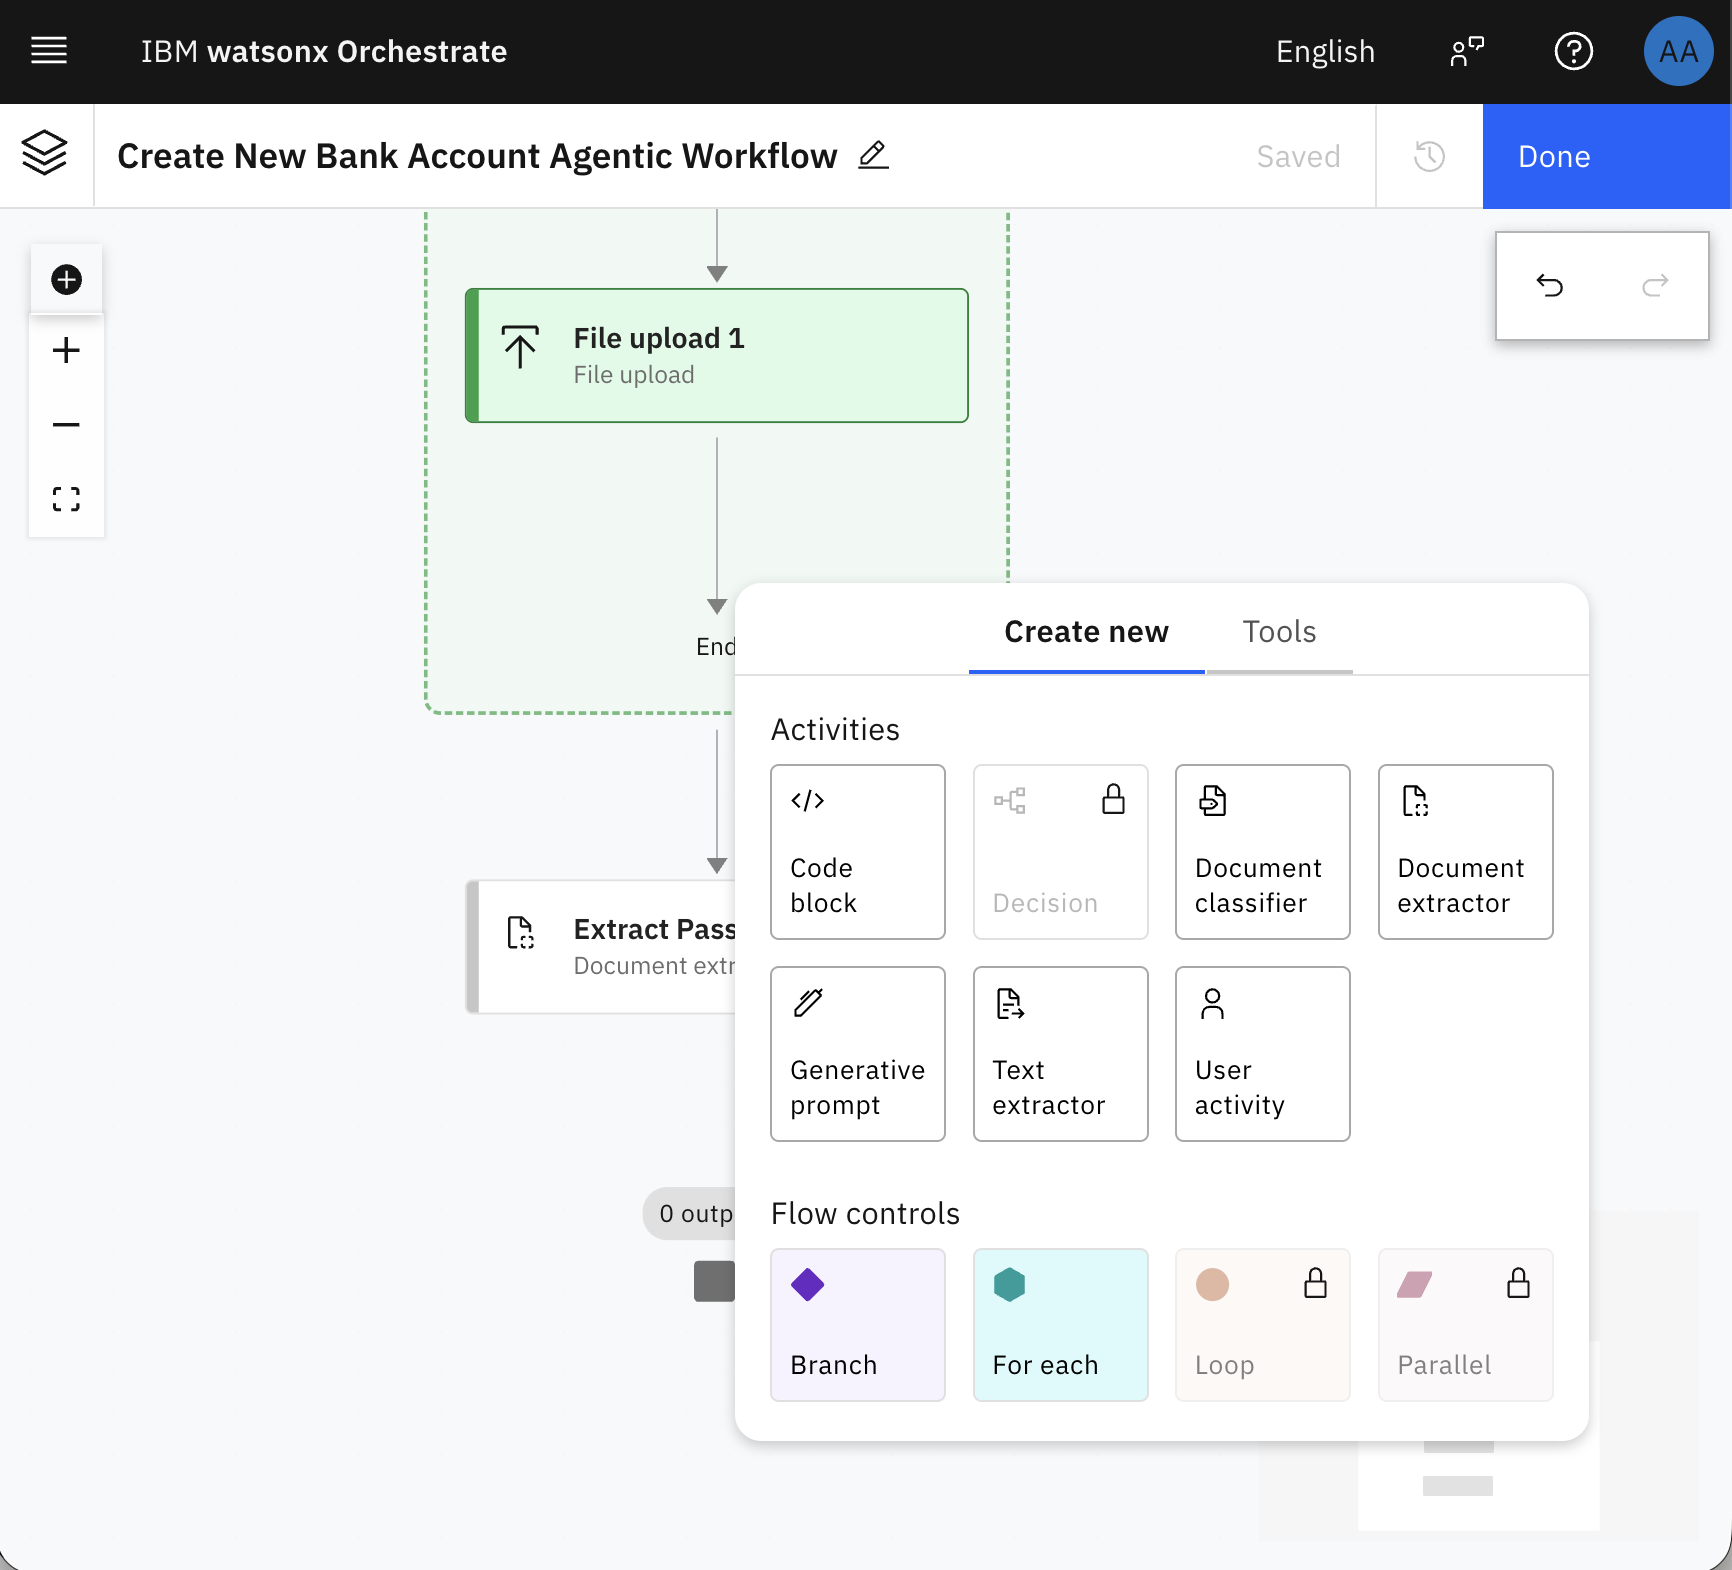
After the user activity green box, click the + icon, and then add a Document extractor activity.
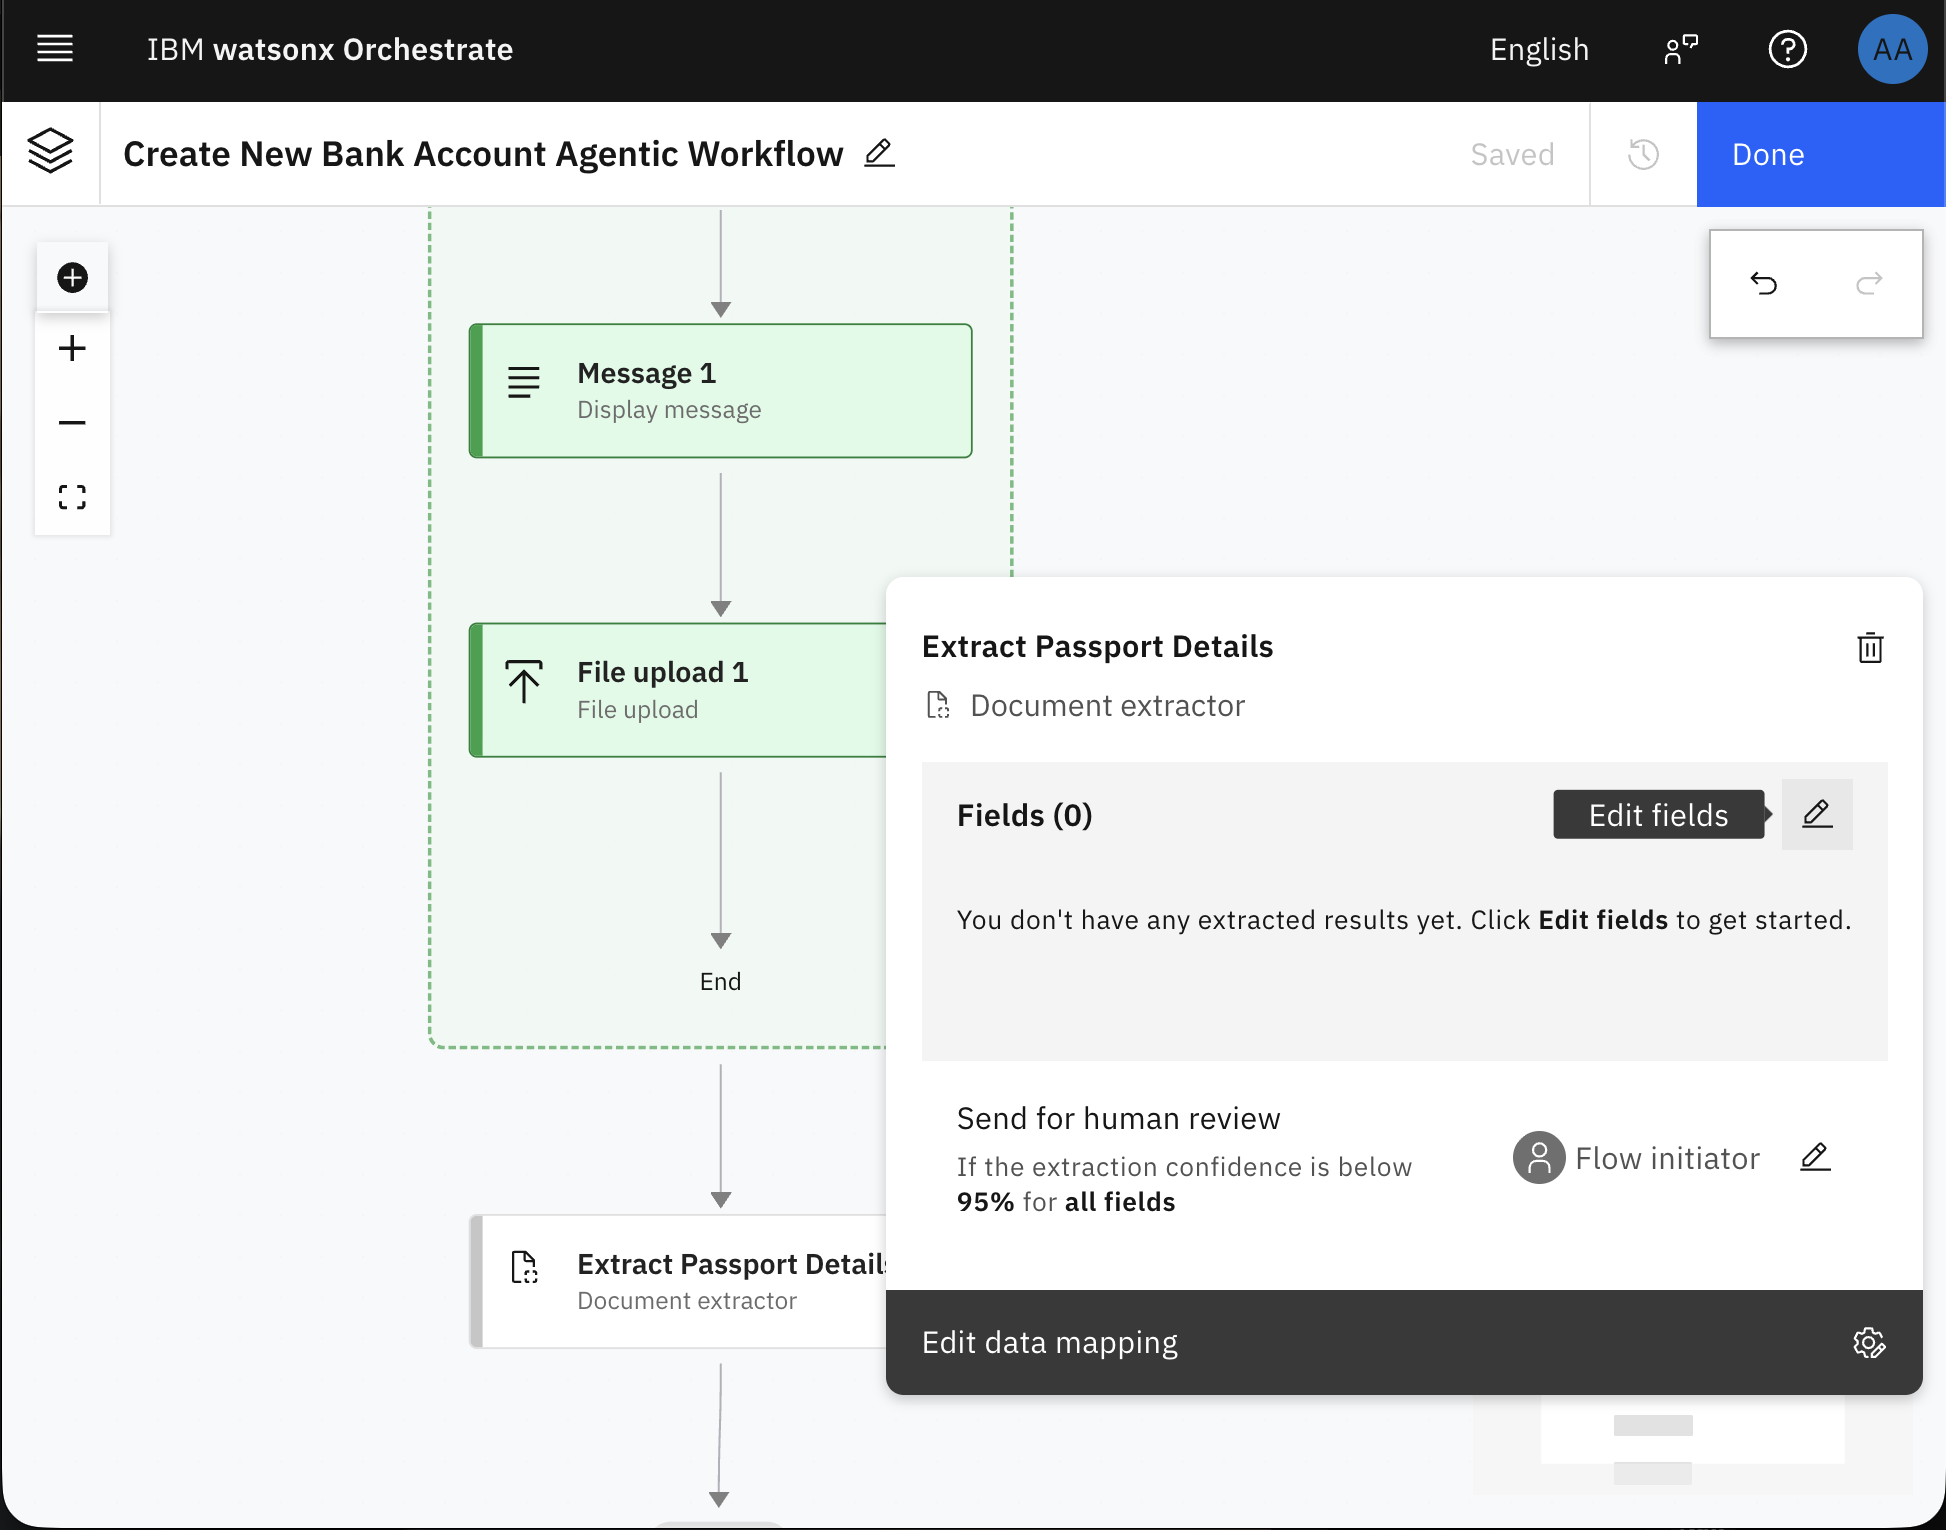
Click the file upload activity you just created, and edit its name to “Extract Passport Details”, and then click the Edit fields pencil icon to start the training.
Upload passport-1.jpg, and passport-2.png, this will be used to train the document extractor.
Click Add field, and add these fields:
Passport number, nationality, gven name, surname, and date of birth.
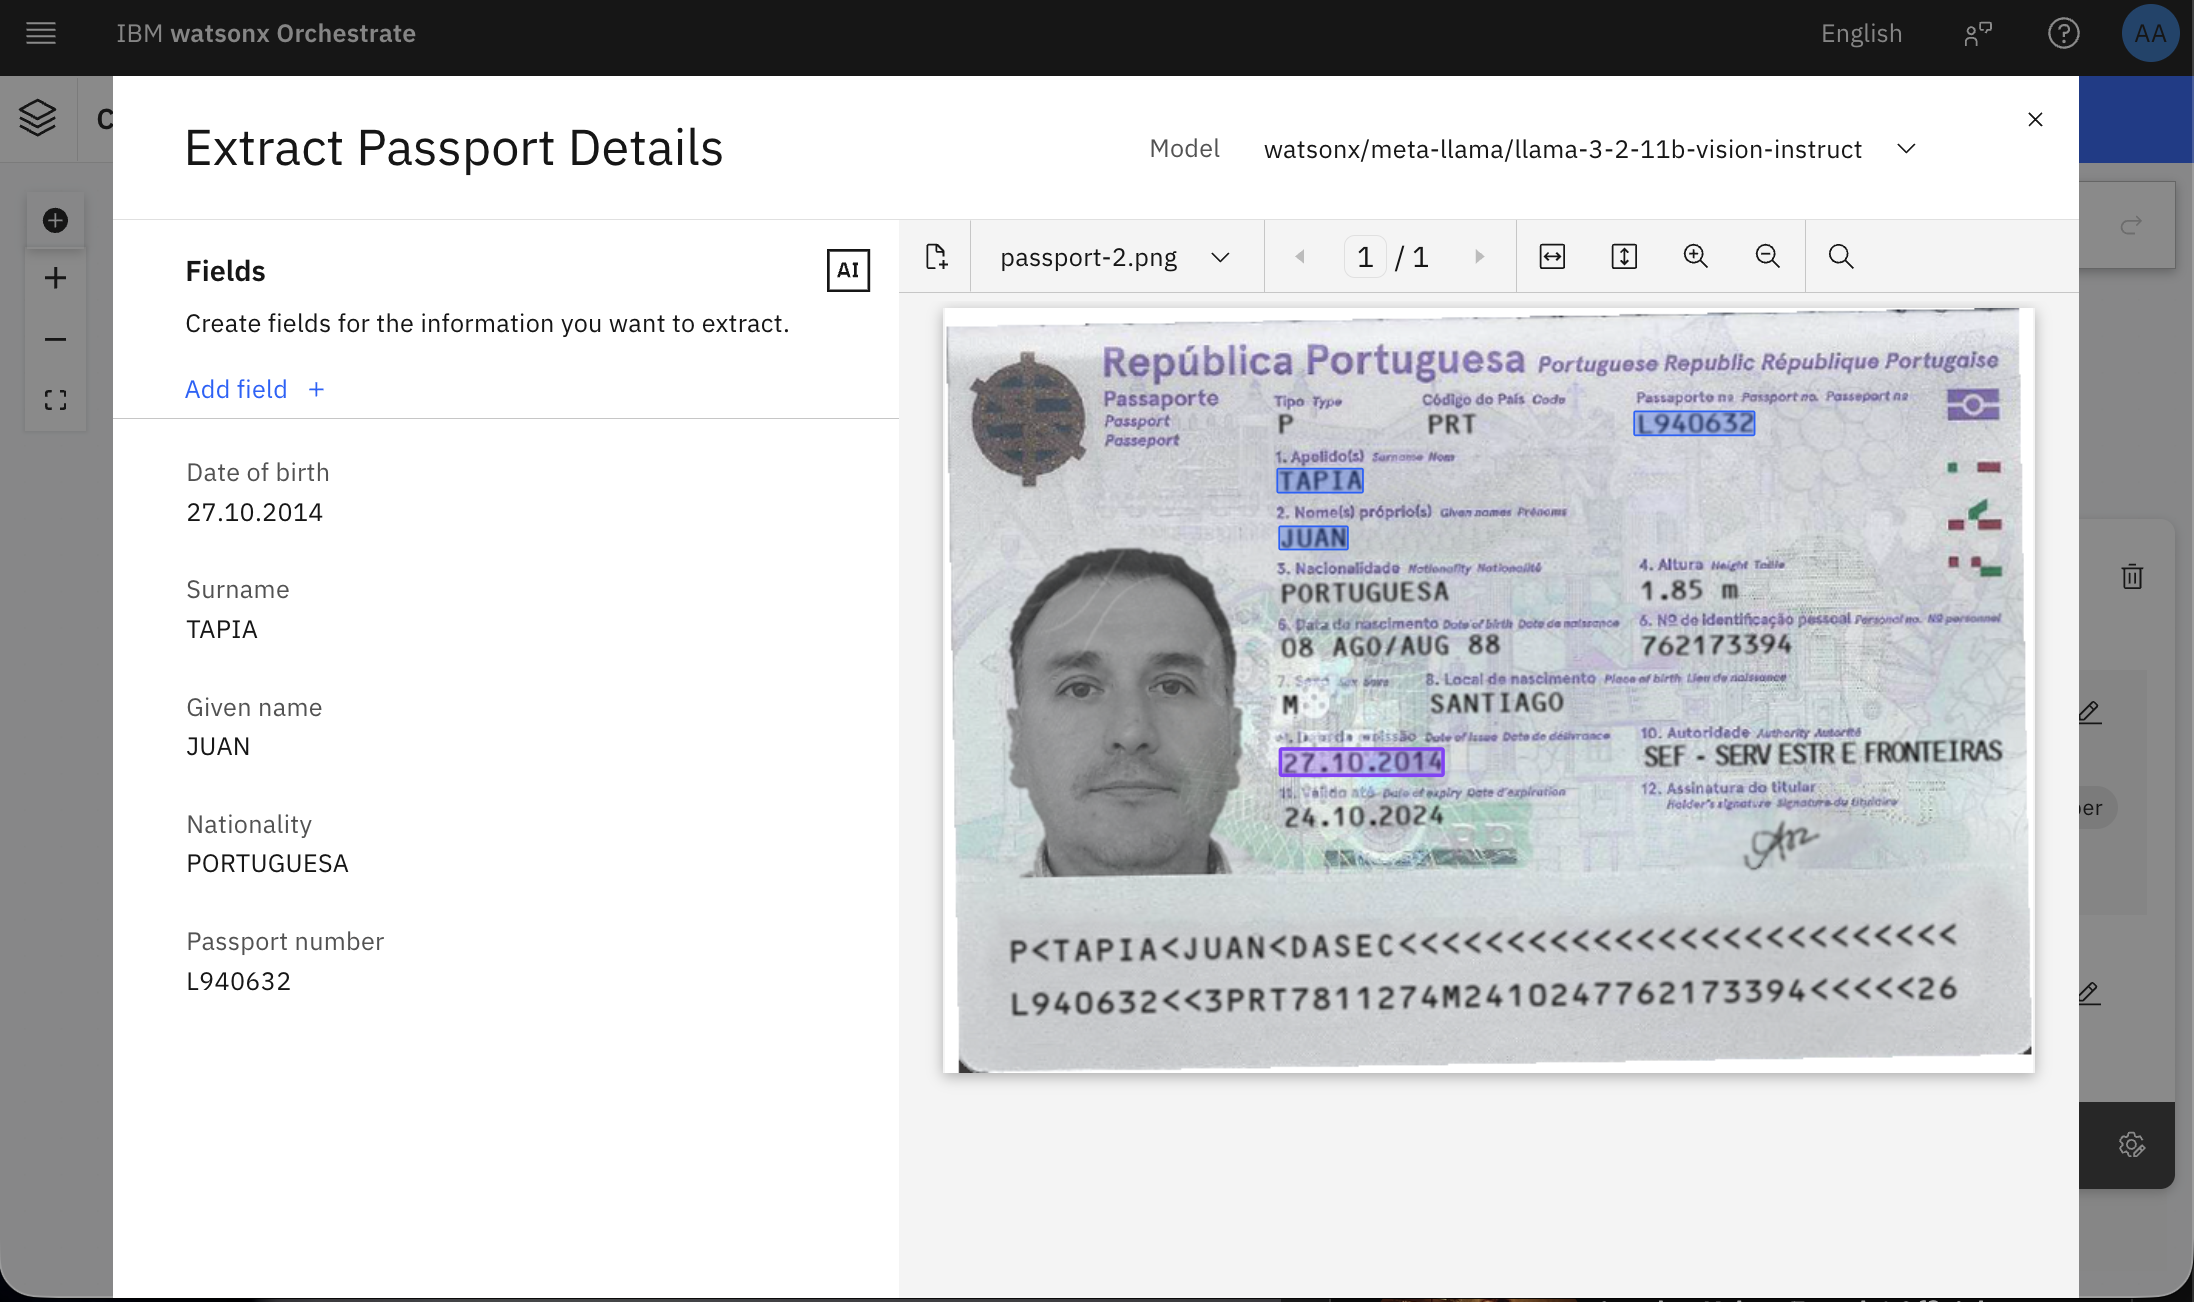
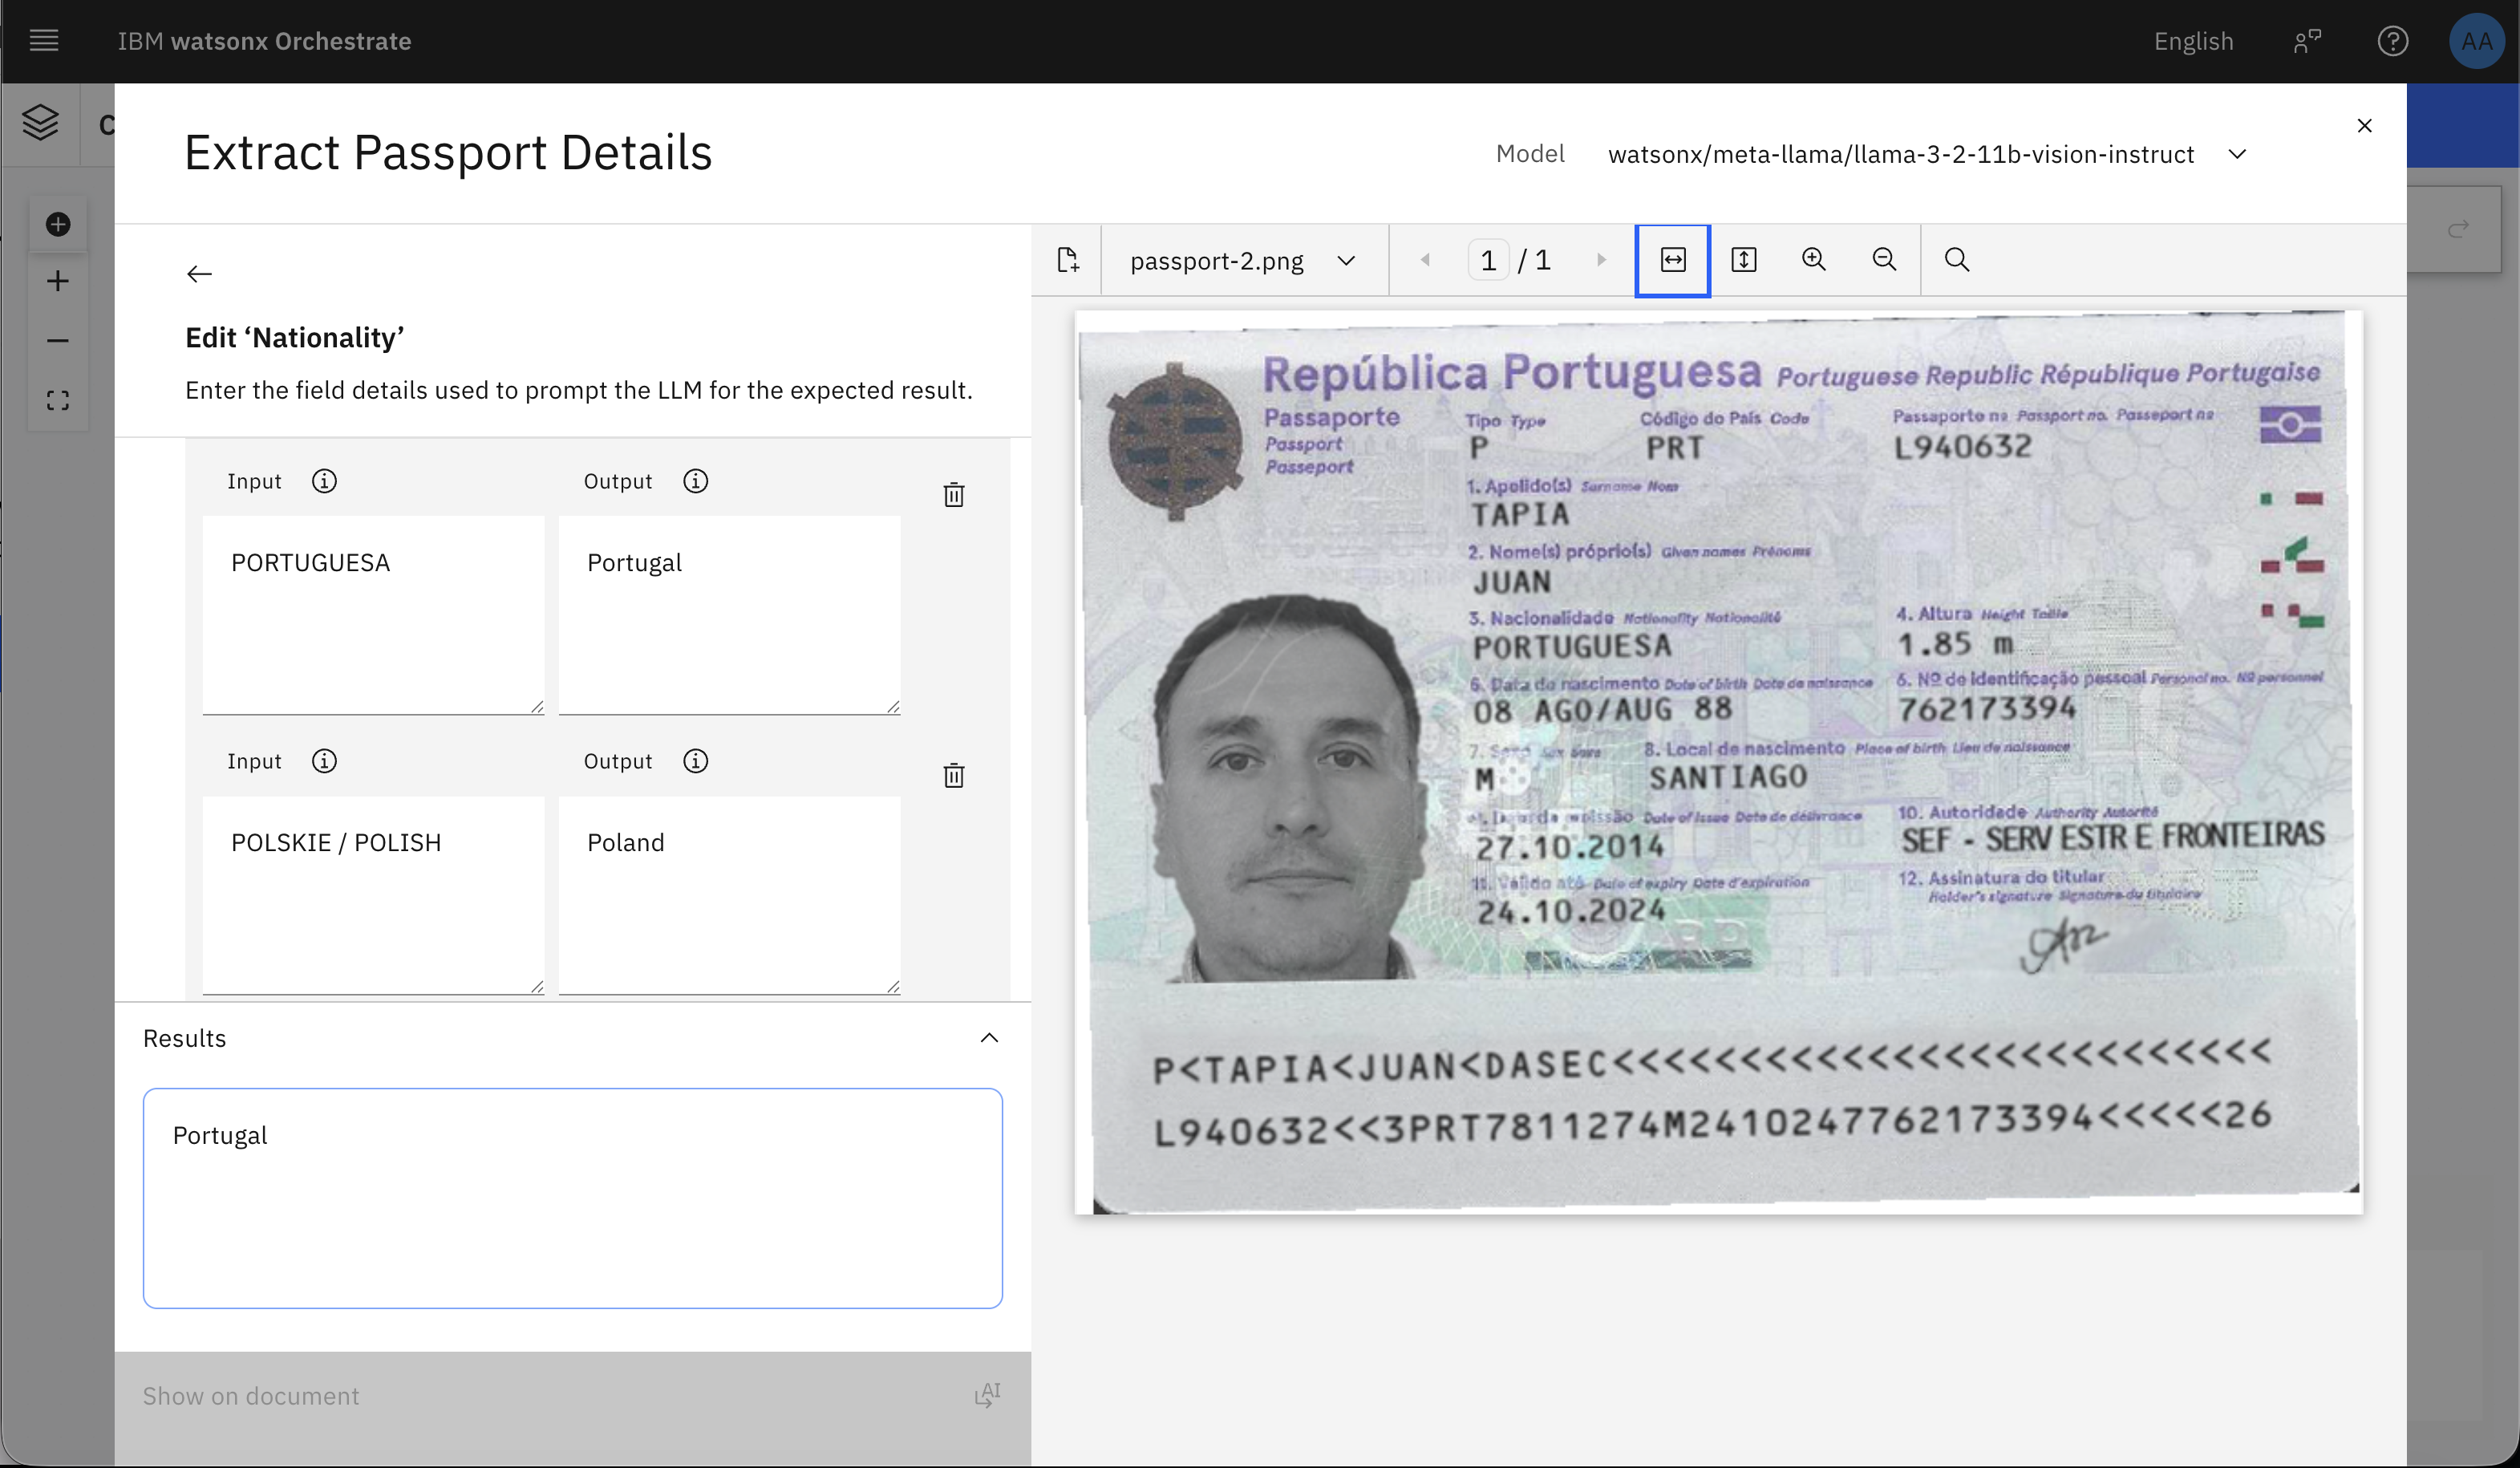
Notice that the nationality is written in the user’s native language, and you need to normalize that to English country name. Hover on the nationality field ,and then click the pencil icon to customize it.
Provide a description and an example to enable the LLM to detect more accurately.
Description: Detect the nationality. You will find it in a field called Nationality.
Examples:
Input: PORTUGUESA, Output: Portugal
Input: POLSKIE / POLISH, Output: Poland
Input: ESPAÑOLA, Output: Spain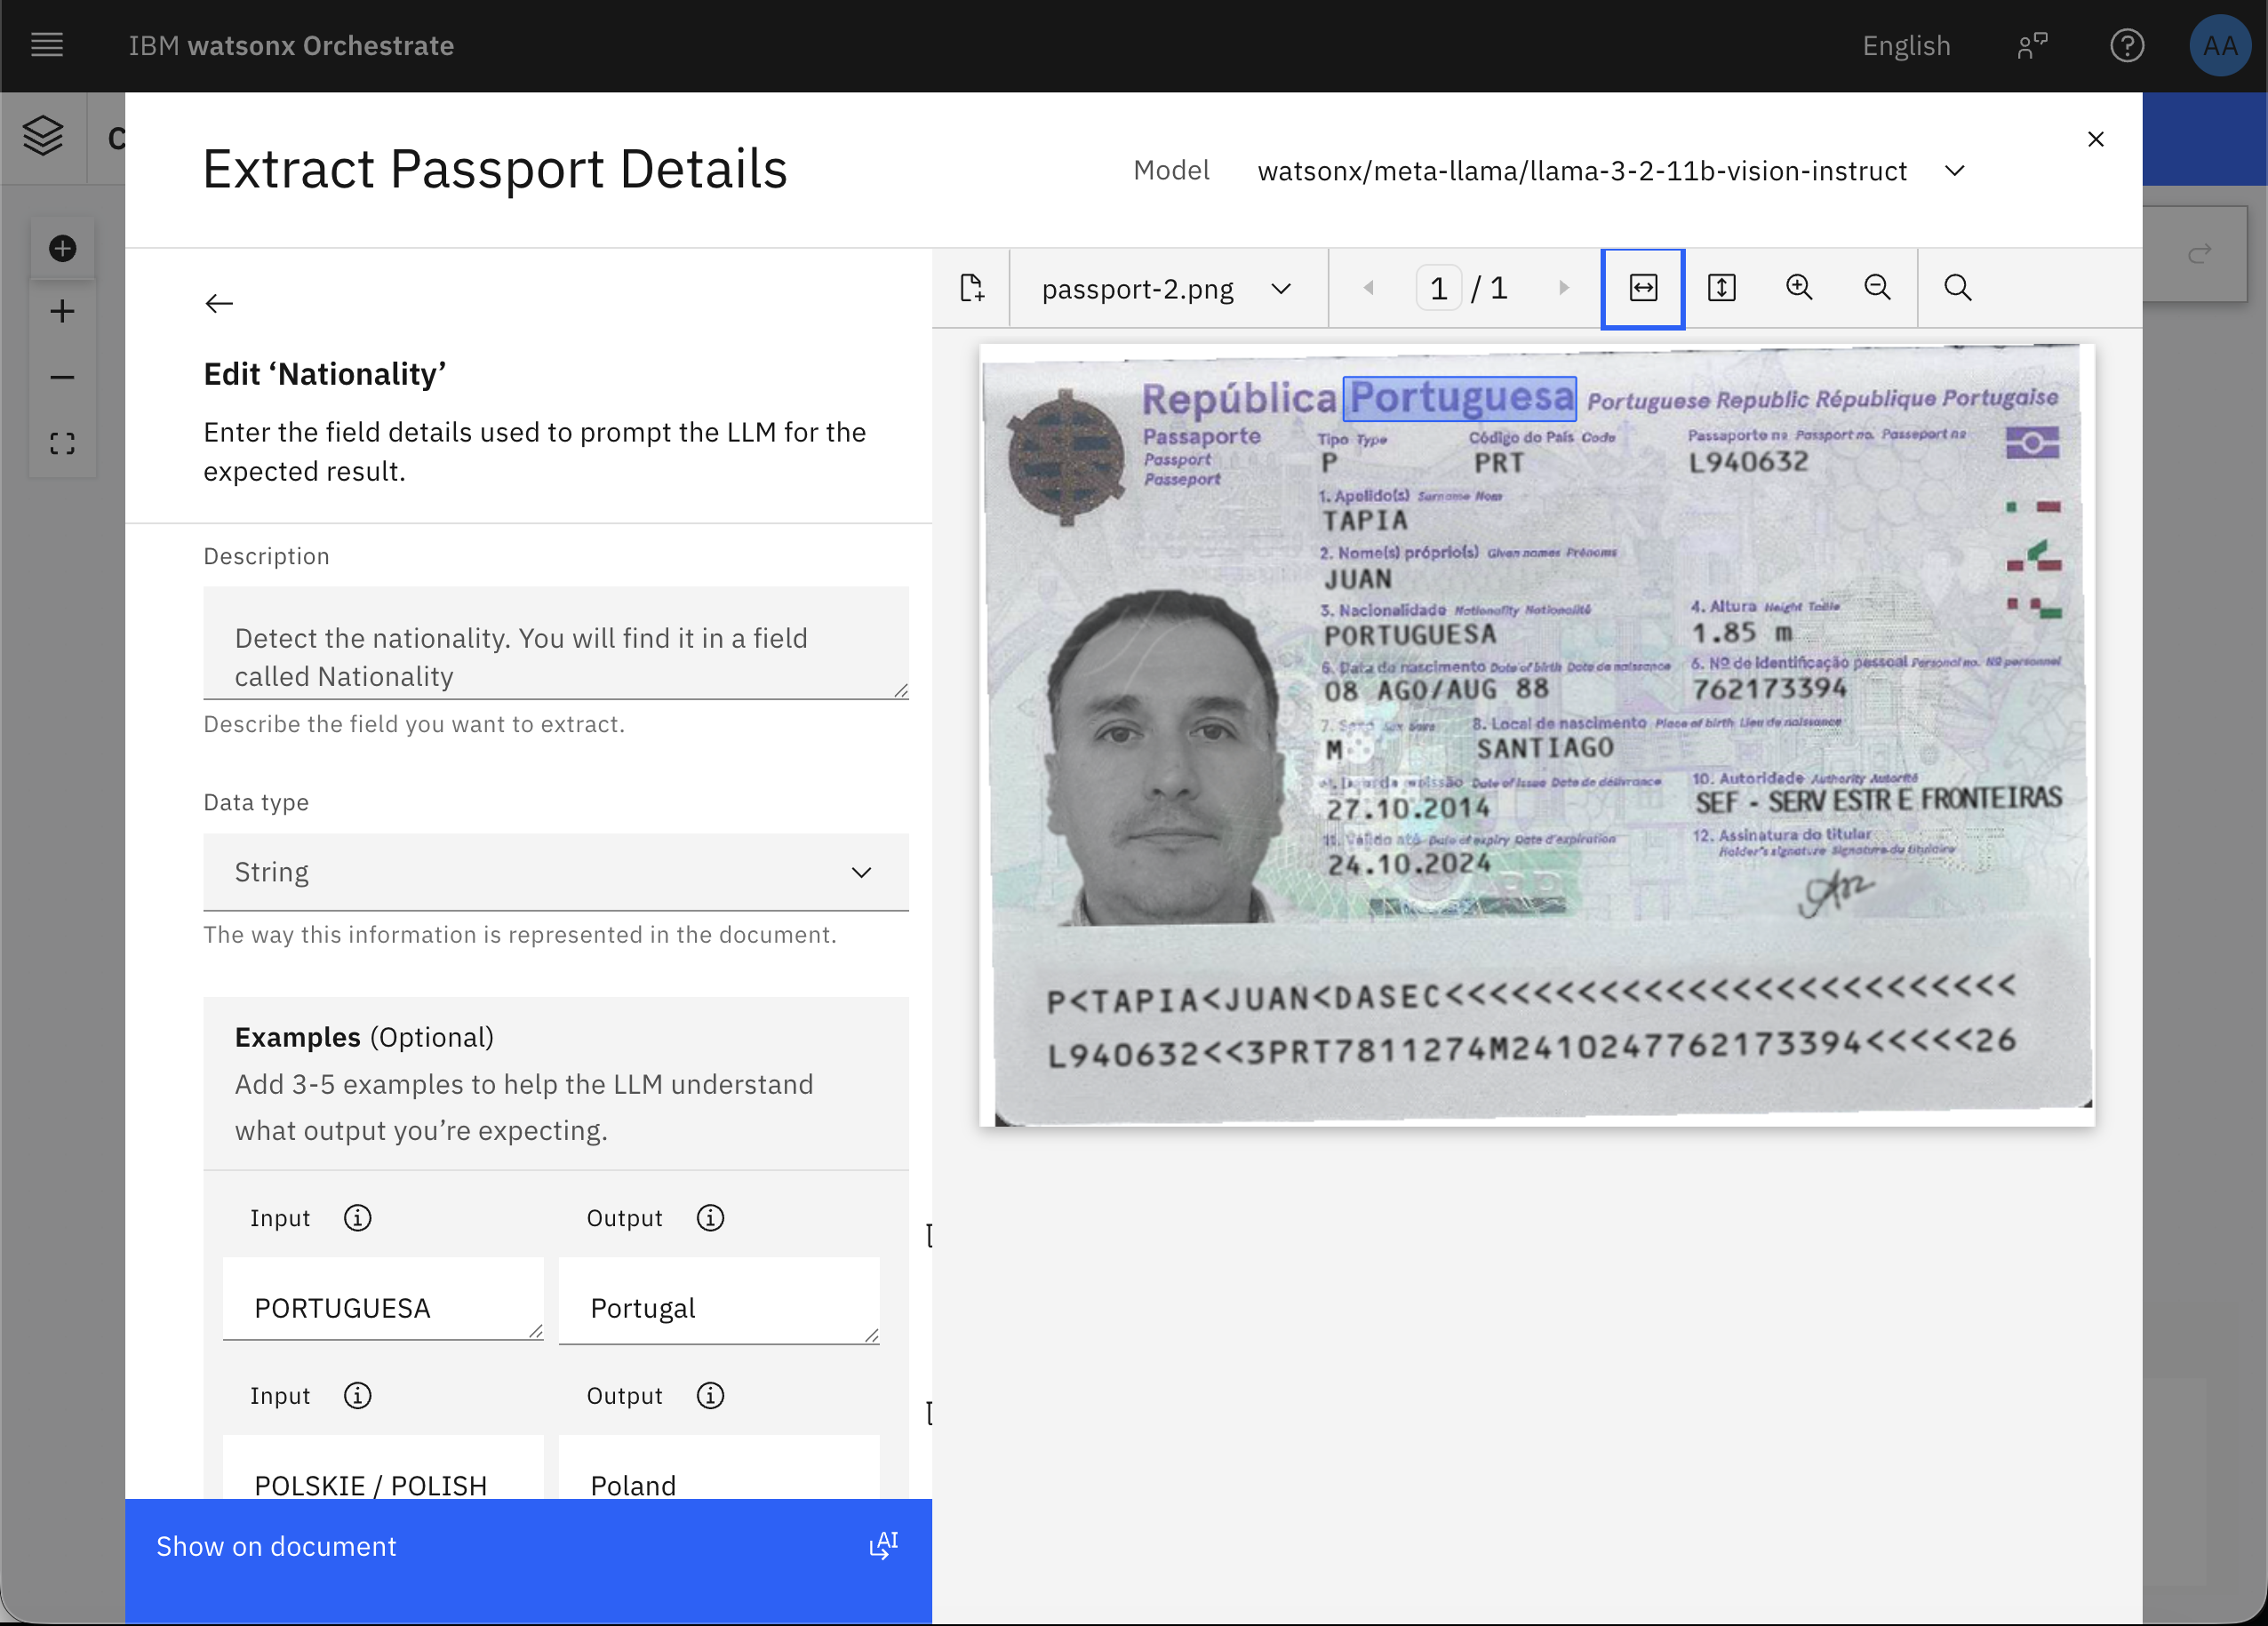
Click the Show on document button to apply the changes and observe that the output now is correct.
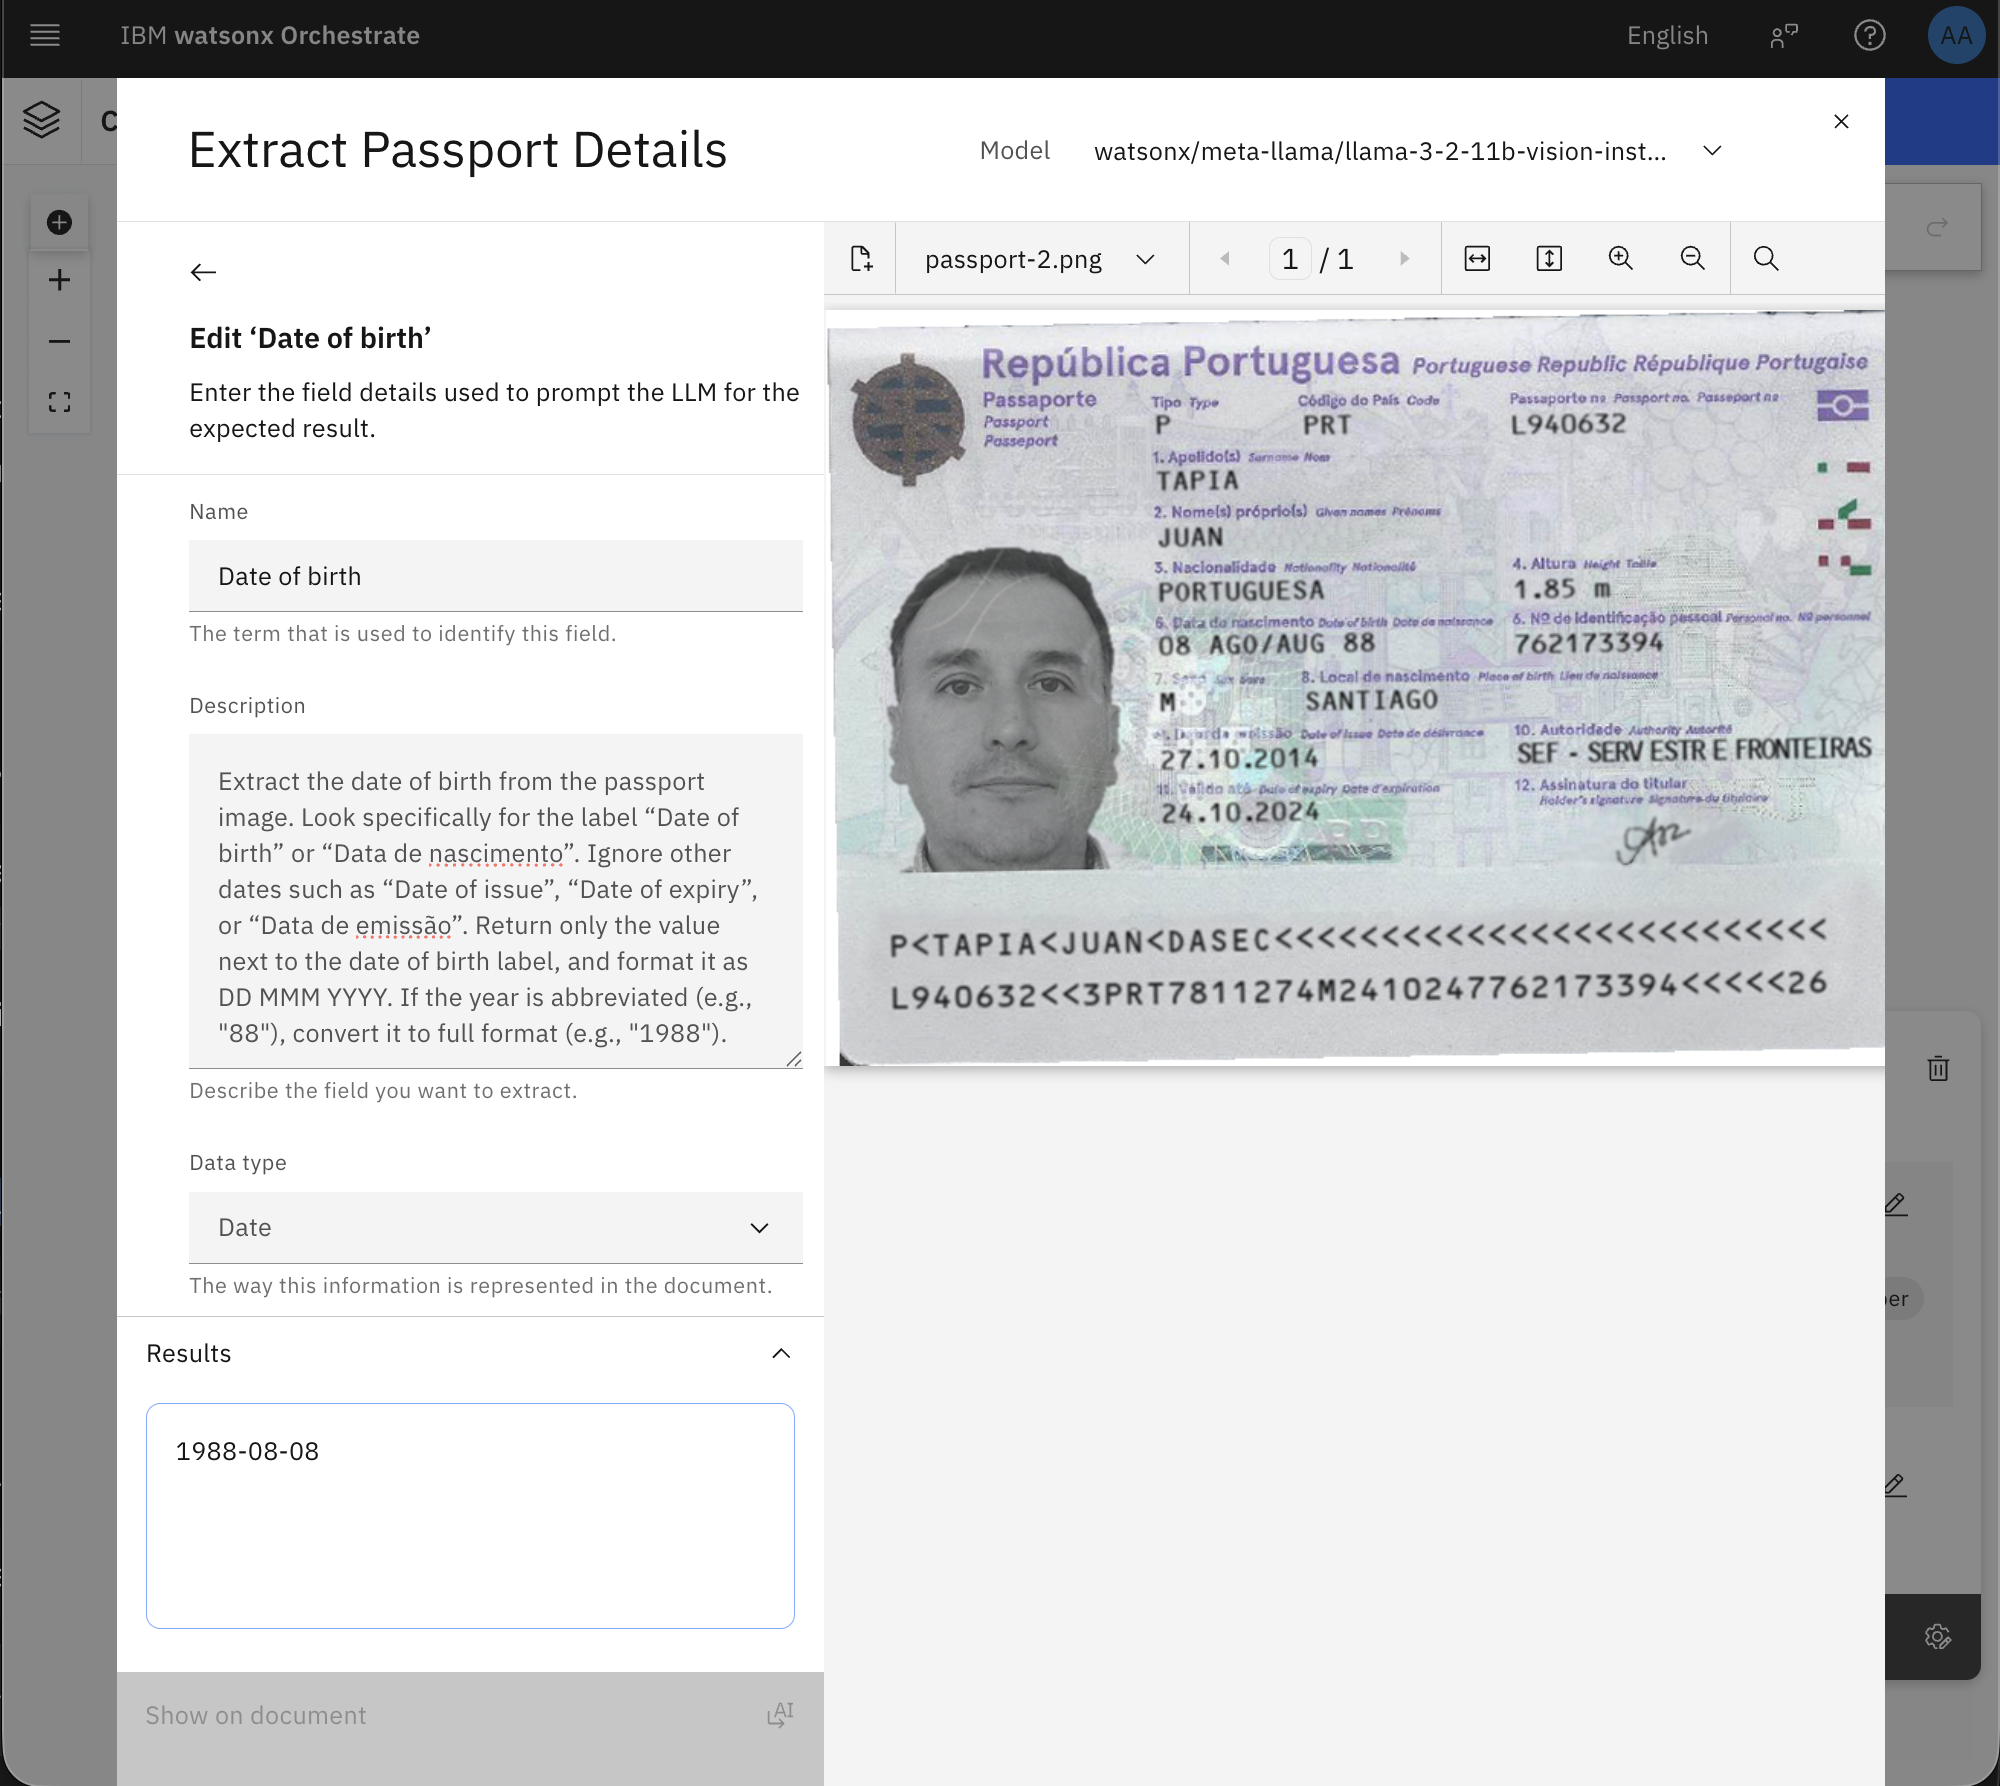
The date of birth was also incorrectly mapped to date of issue. Click the back icon, and then hover on the date of birth field, and then click the pencil icon to customize it.
Provide a description and type to enable the LLM to detect more accurately.
Description: Extract the date of birth from the passport image. Look for labels such as “Date of Birth,” “Date de naissance,” or similar multilingual equivalents. Return the date in a consistent format: DD MMM YYYY (for example, 08 AUG 1988). If multiple formats are present (for example, numeric or abbreviated month names), choose the most complete and clearly labeled version. Data type: Date
Click the Show on document button to apply the changes and observe that the output now is correct. Then, click x to close document extraction activity.
Step 4. Configure the conditional logic
In this step, you are going to add a branching condition to handle different nationalities based on the extracted passport data. The workflow can then route users with supported nationalities (Spain) through a supported path while gracefully handling unsupported cases. You’ll insert a Branch, define a condition, and then display a message for other nationalities to redirect them to in-person support.
Add Branch flow control after the document extractor activity.
Rename the branch to “Nationality?”, and click Path 1 and rename it to “Spain nationality” and click Path 2 and rename it to “Other nationalities”.
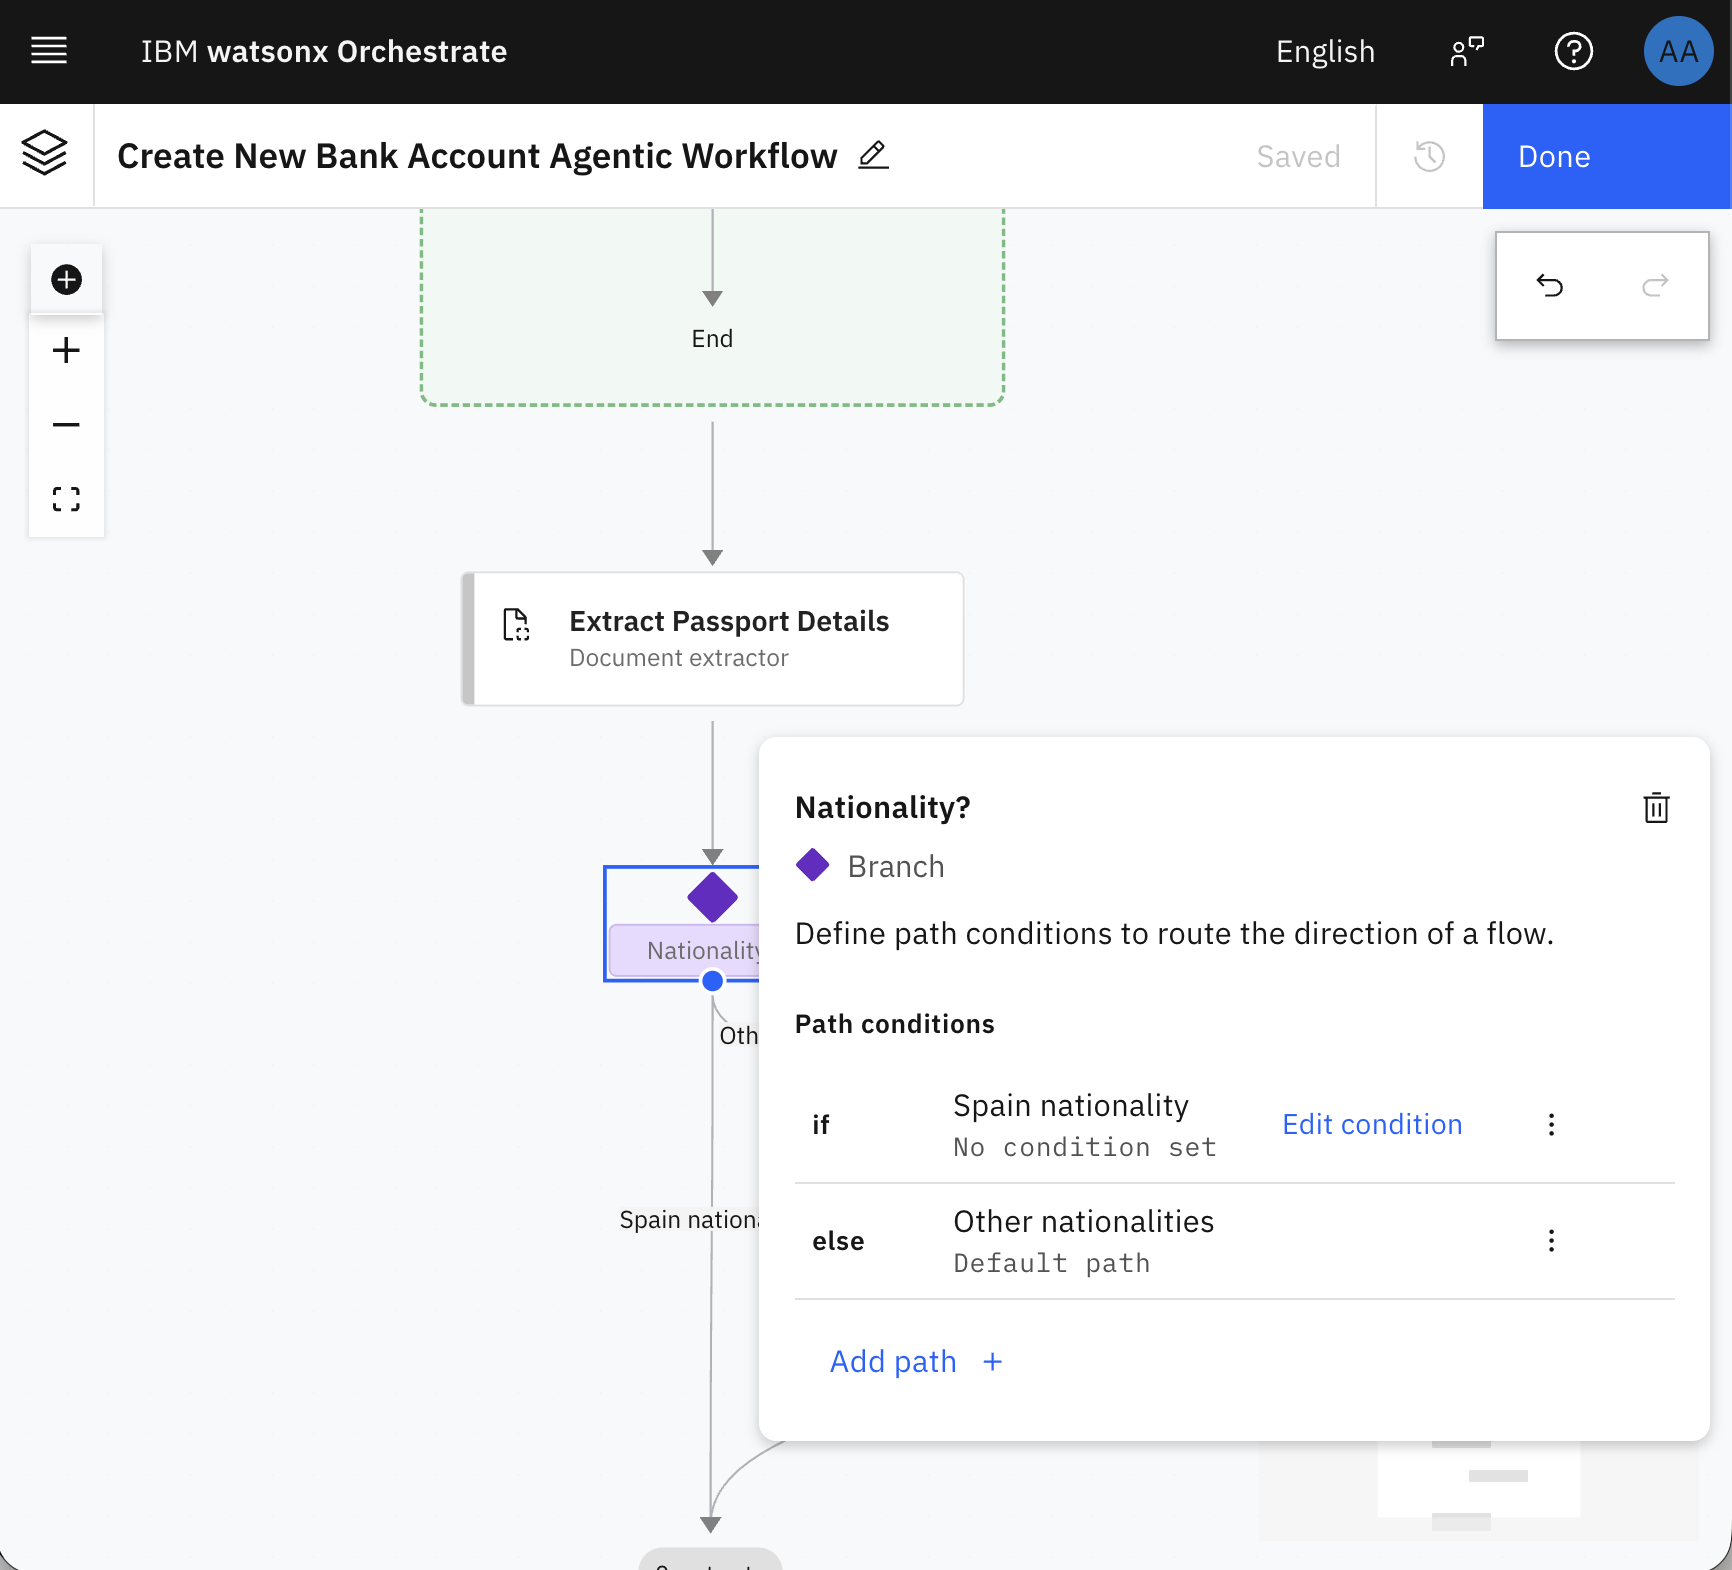
Click Edit condition next to Spain nationality.
Make the condition:
nationality == Spain.
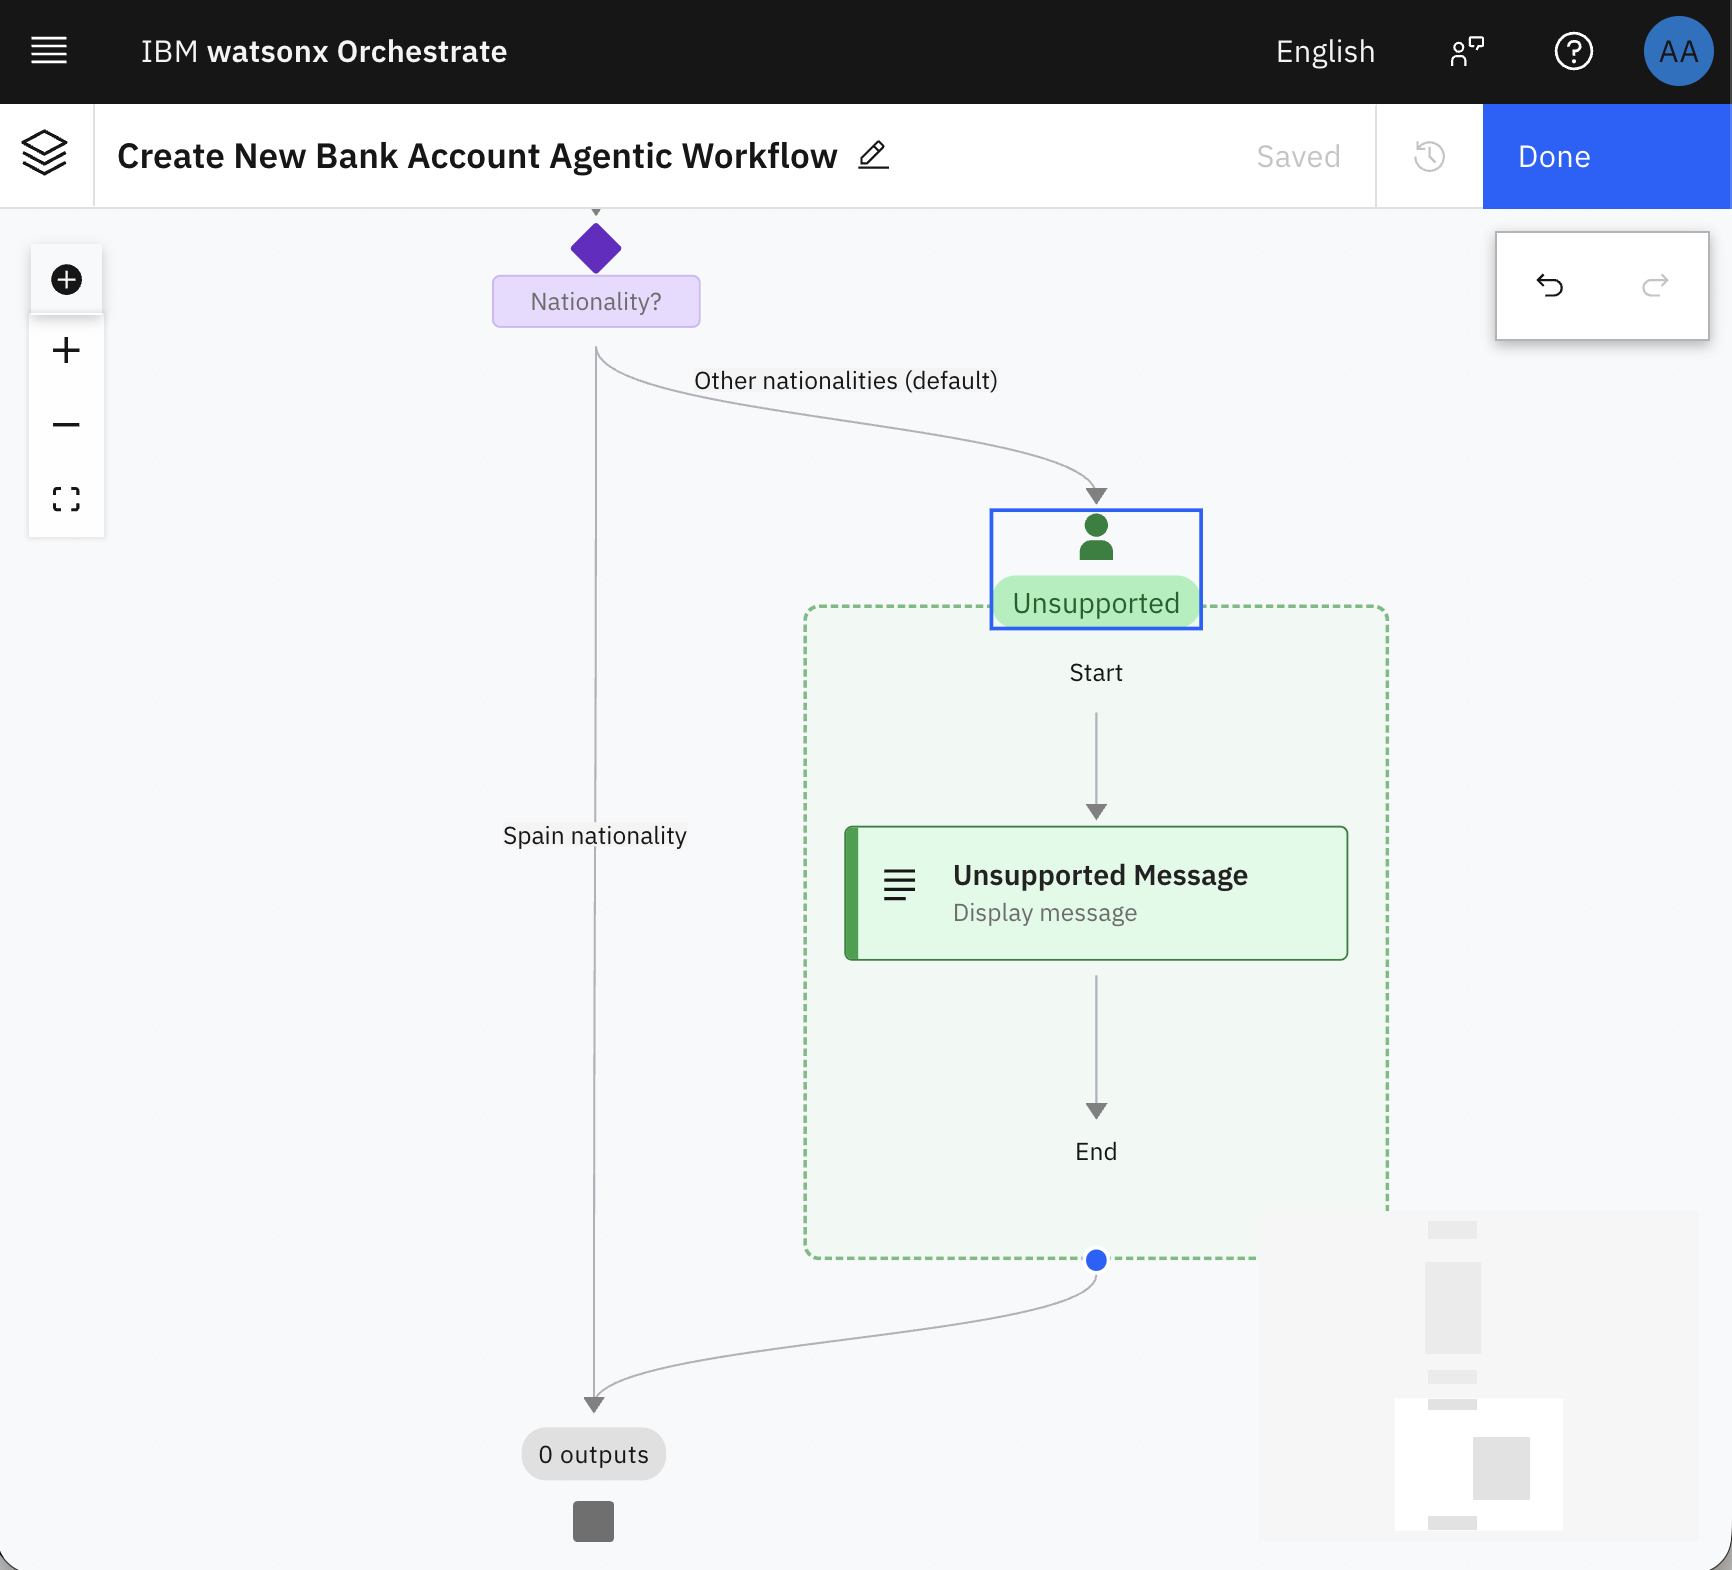
In the other nationalities, click the Add button, and add a User activity.
Rename the user activity to “Unsupported”.
Click the + icon on the user activity, and then Display to user and then Message.
Add this output message: “We currently support only Spain nationality. For other nationalities, please visit the branch.”.
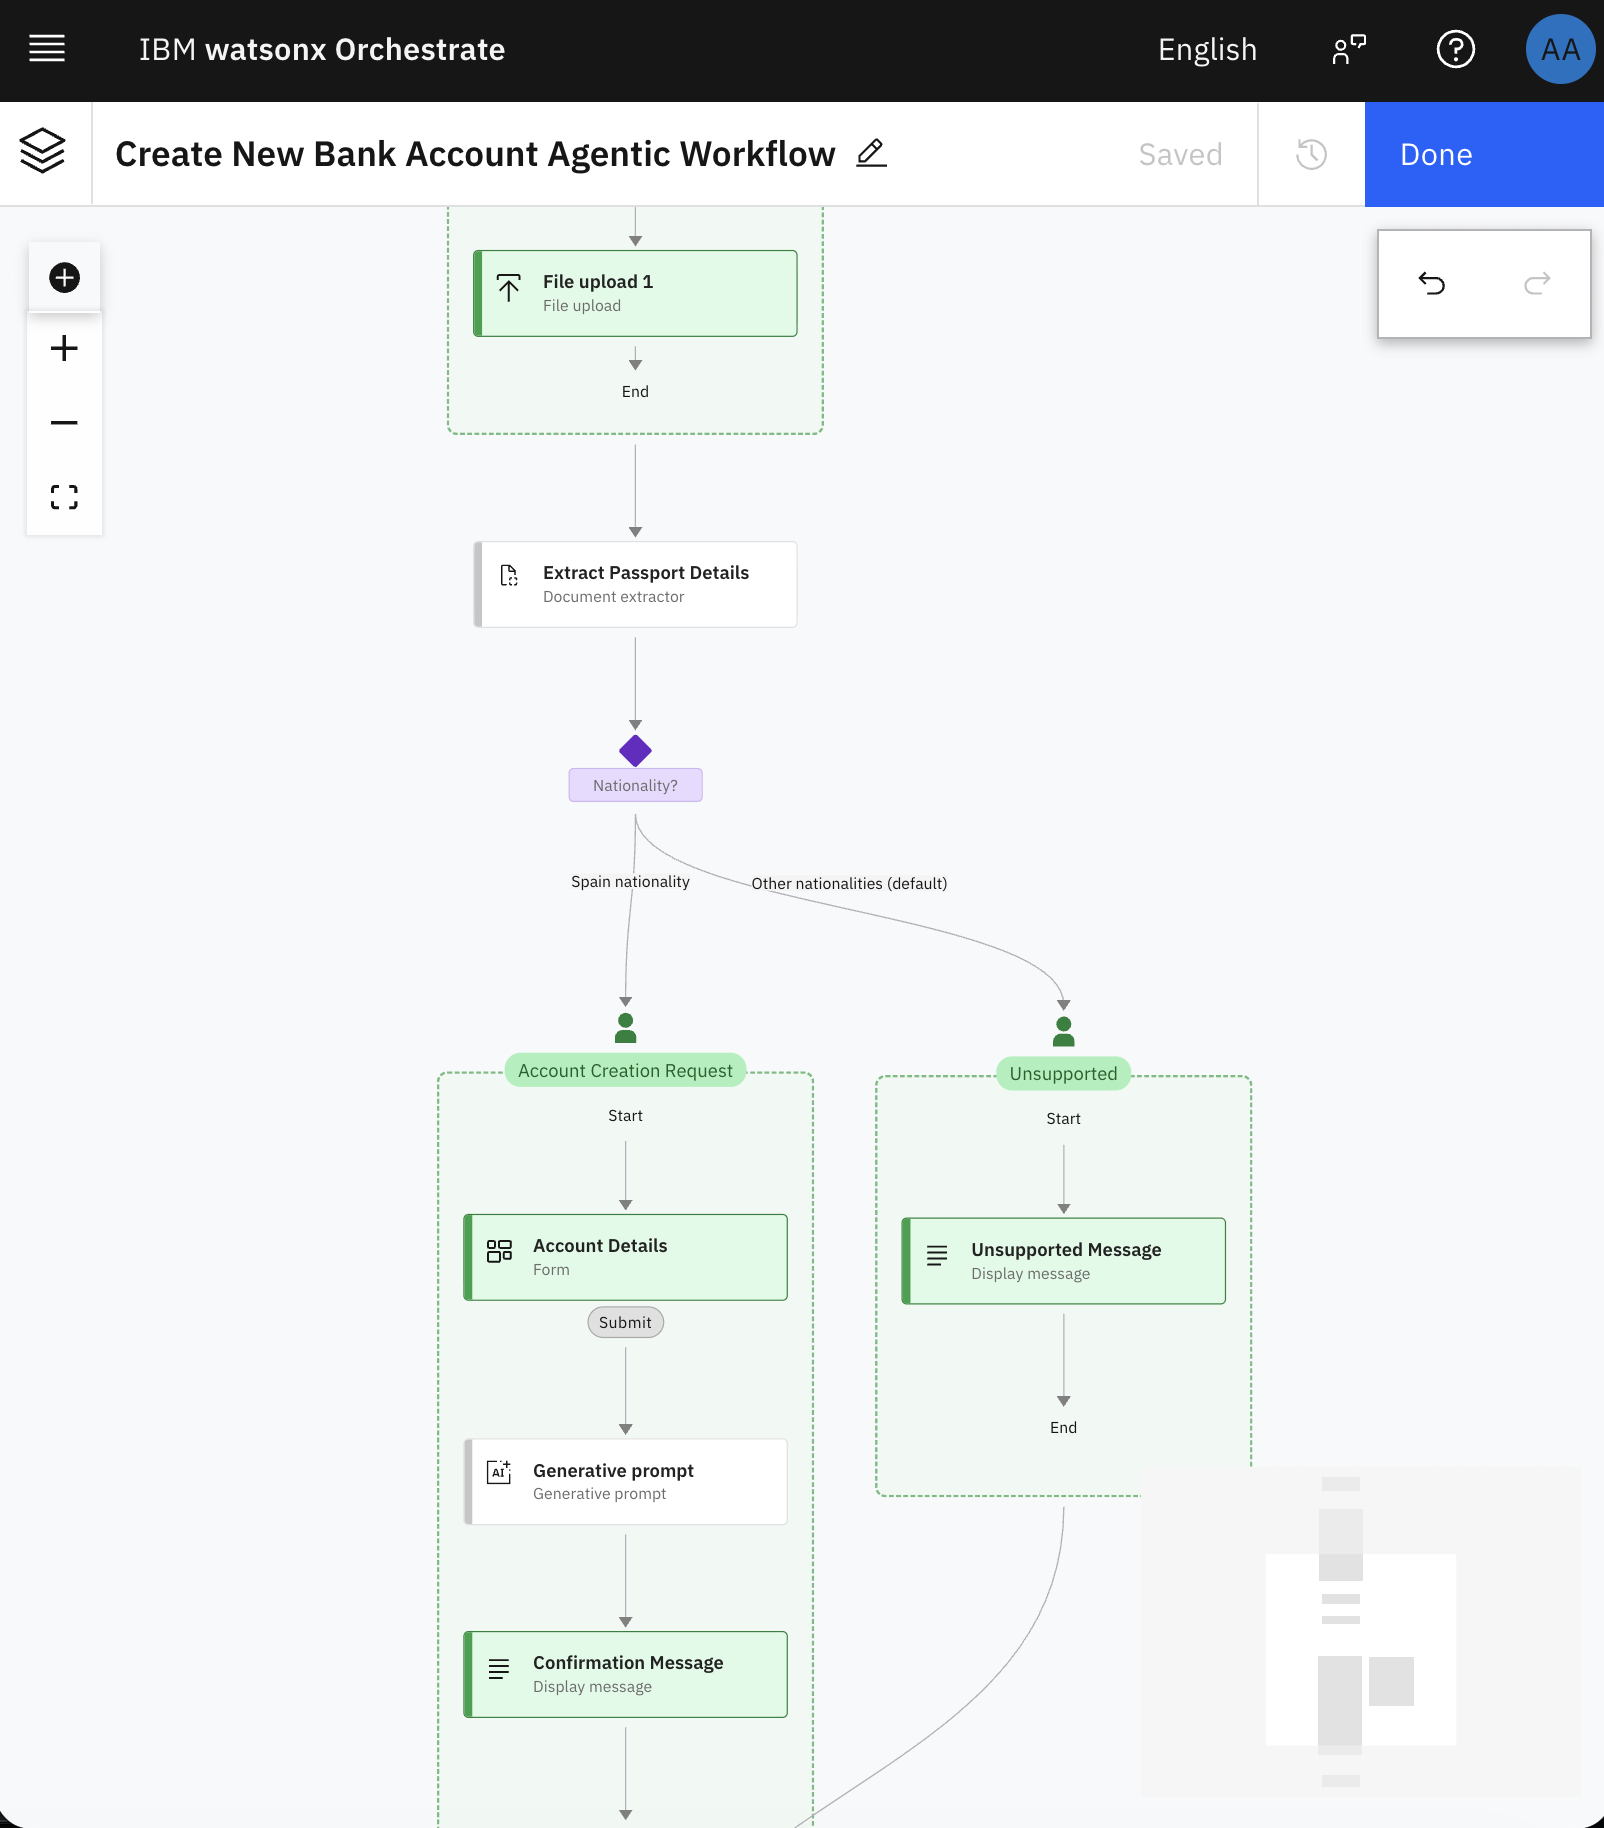
Your branch should like the following. In the next step, you will start building the logic for the Spain branch.
Step 5. Create a form for human-in-the-loop
In this step, you will collect detailed user input required for account creation by adding a structured form to the workflow. This form represents the human-in-the-loop interaction, where the user actively provides personal and account-related information such as name, nationality, passport number, contact details, and account type. By including predefined options and a user-friendly layout, the form ensures that all necessary data is captured consistently, enabling the agent to proceed with the next steps in the workflow based on the user's input.
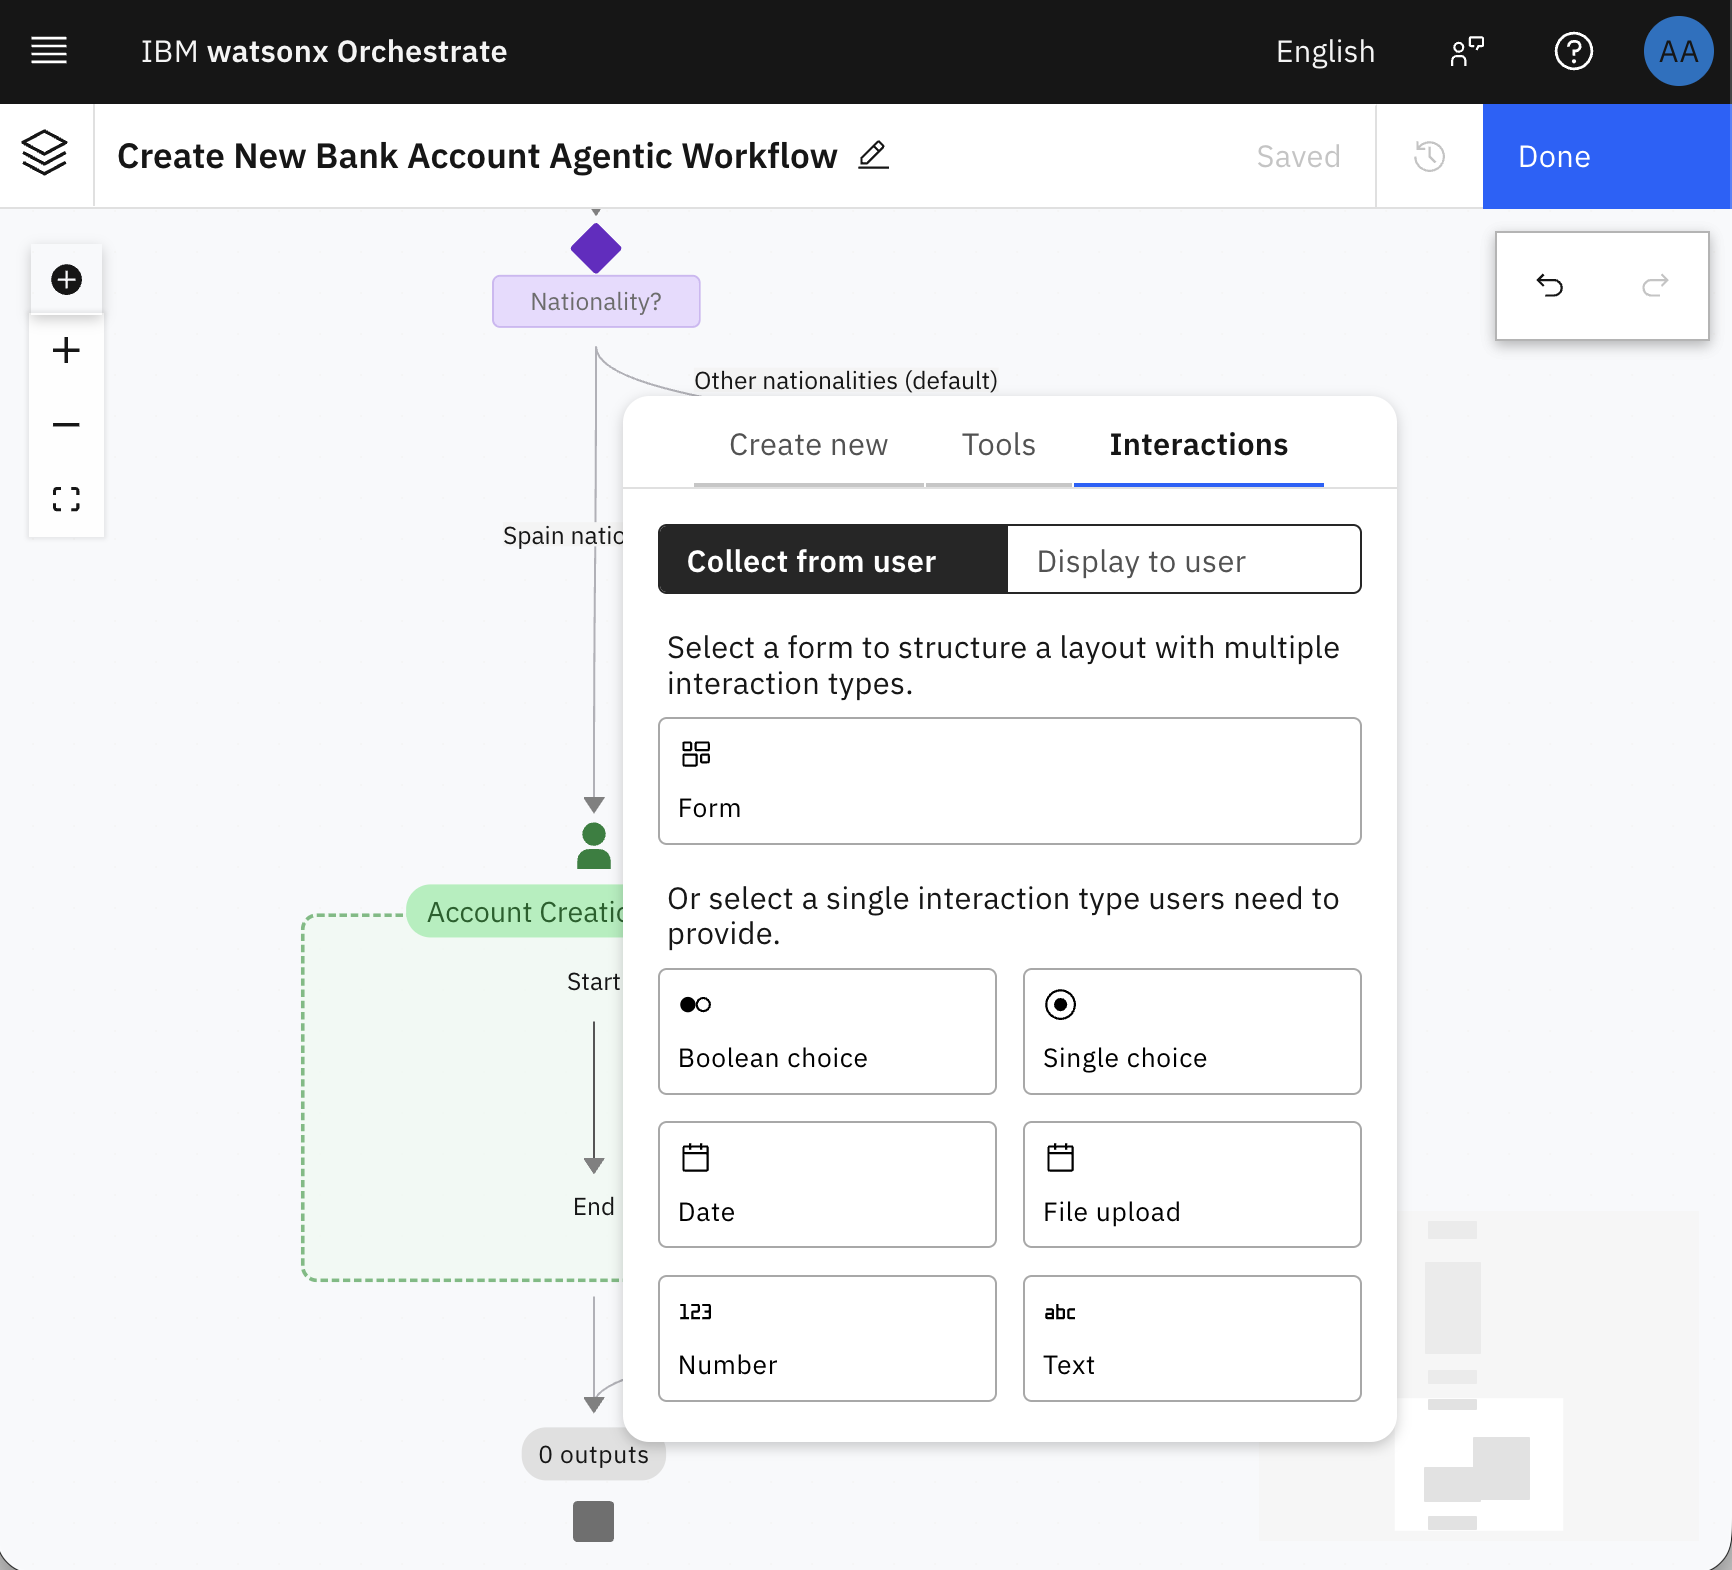
In the Spain nationality branch, click the + icon to add a new activity.
Click User activity, and rename it to “Account Creation Request”.
In the user activity, click the + icon, and then click Form.
Add these fields to the form:
- First Name (type: Text)
- Last Name (type: Text)
- Nationality (type: Text)
- Passport Number (type: Text)
- Date of Birth (type: Date)
- Contact Phone Number (type: Text)
- Annual Income (type: Number)
Account Type (type: Single choice).
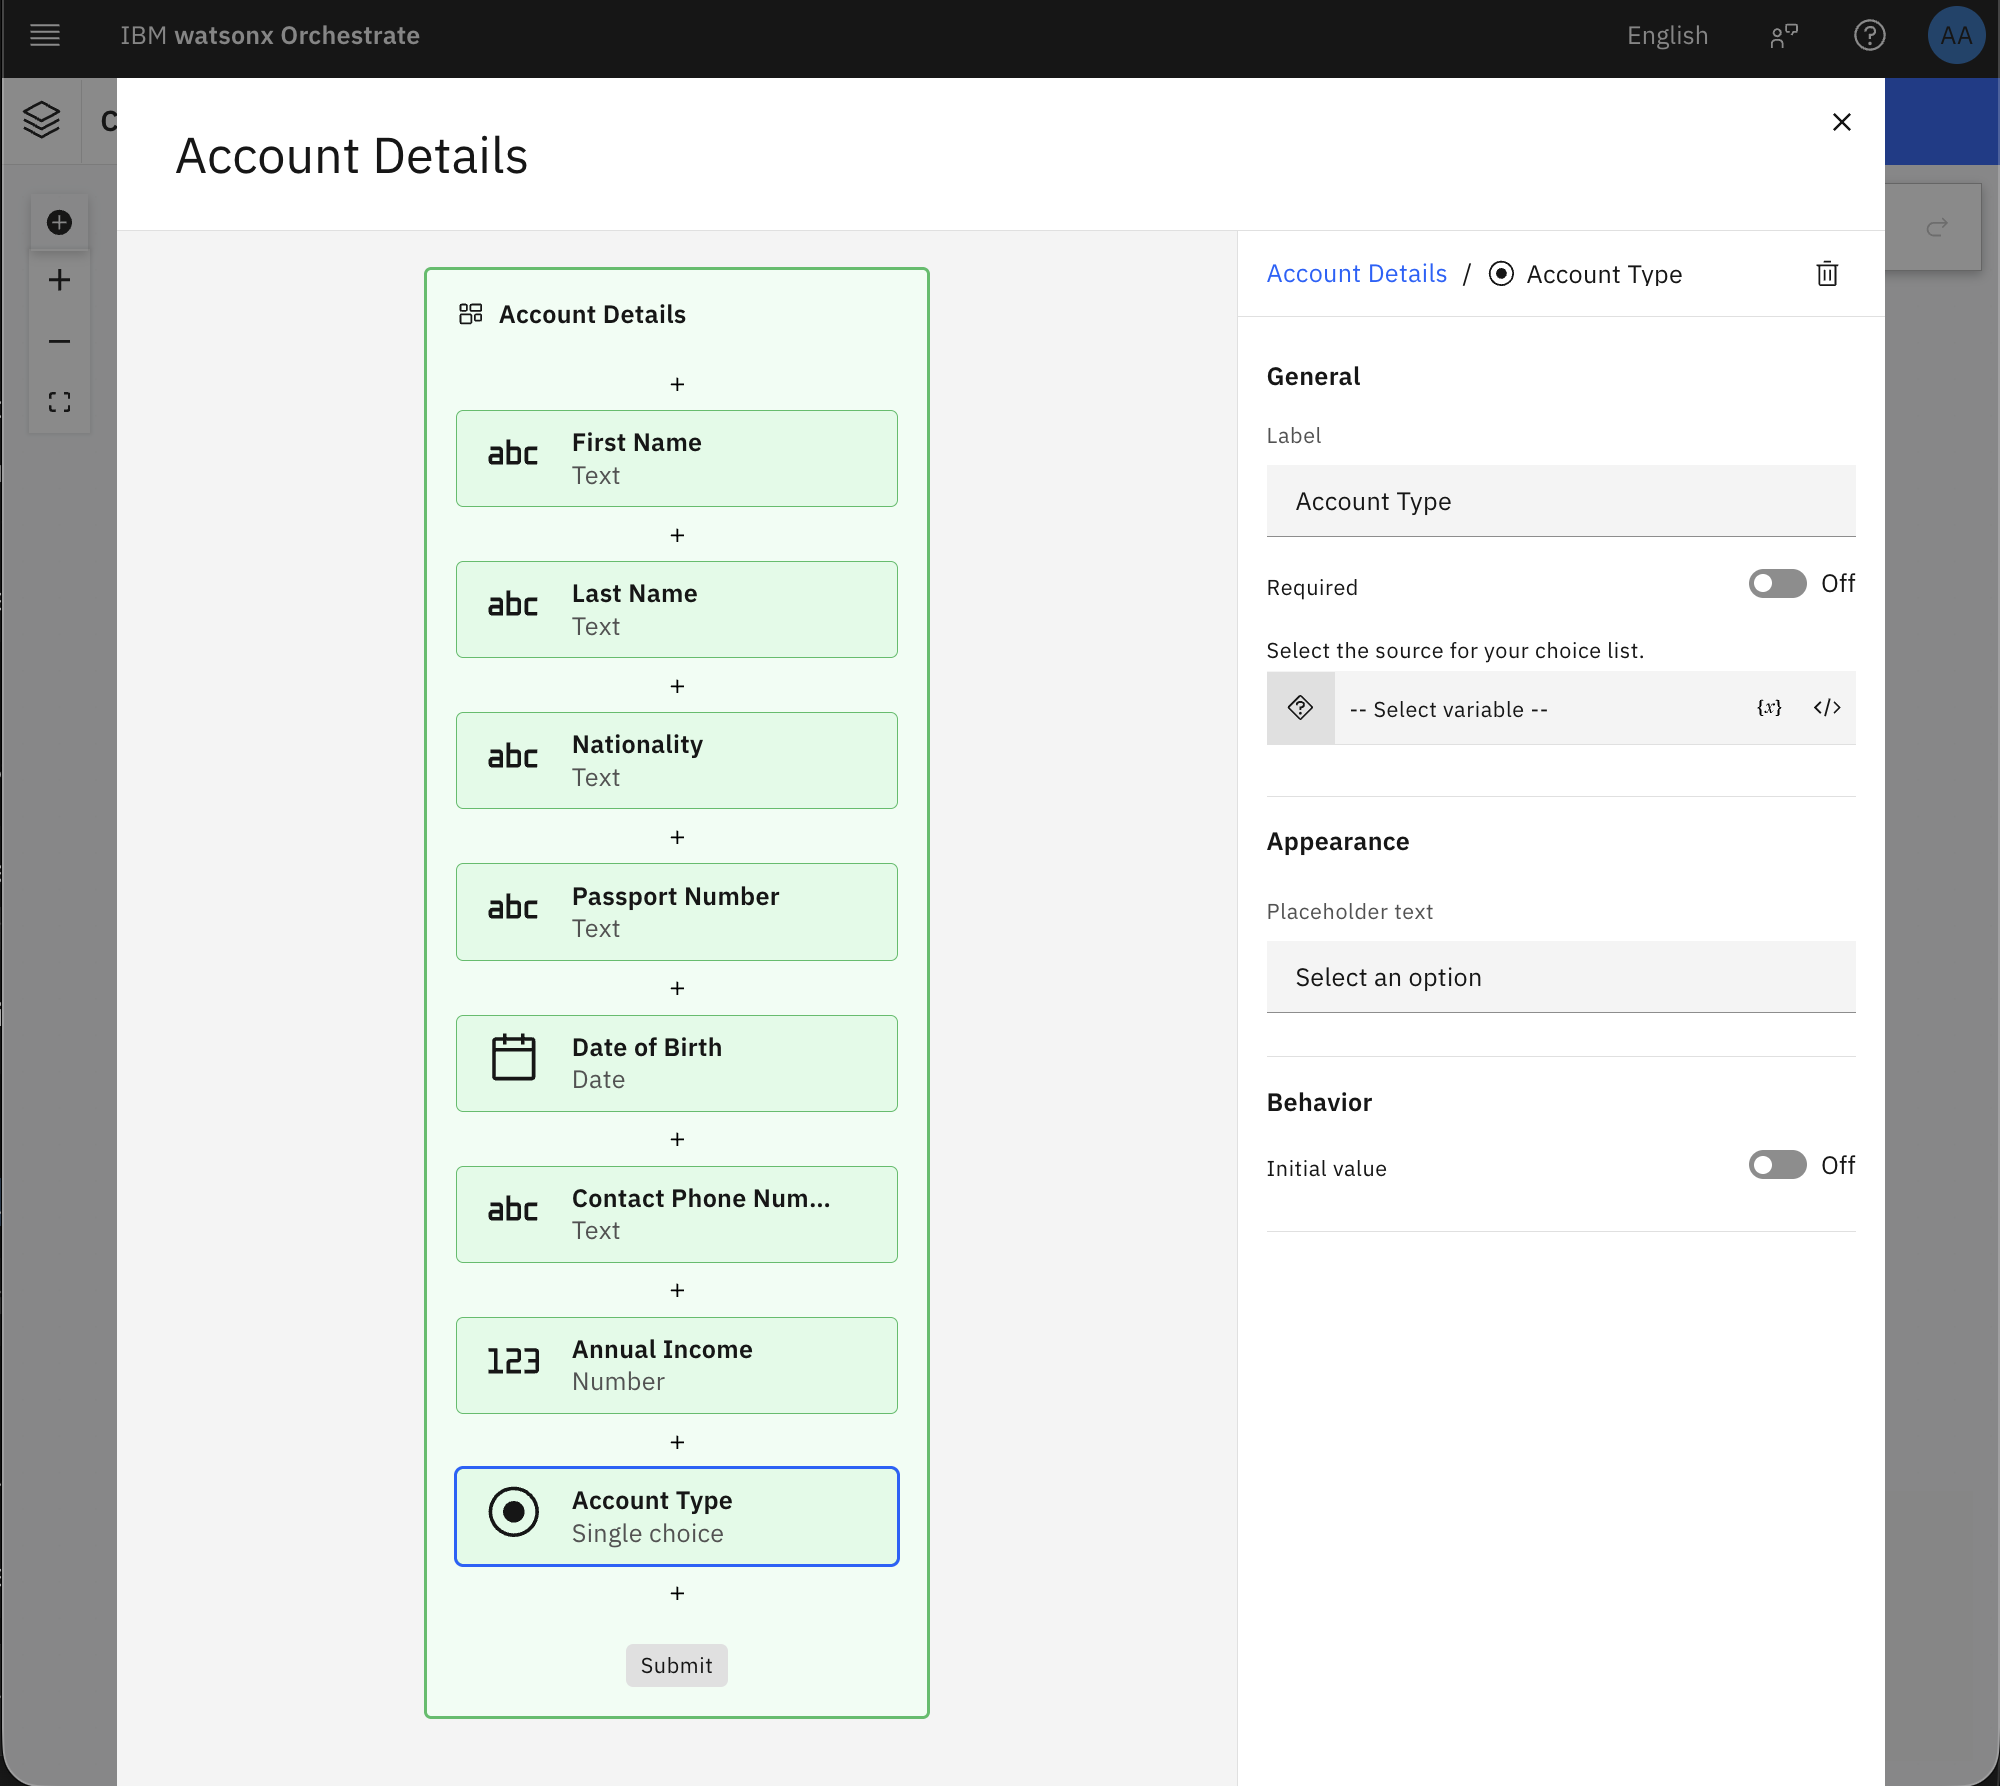
Click the </>; icon next to --Select variable-- to input the list of the account types as follow:
["Current","Saving"].In the Behavior section, for First Name, Last Name, Nationality, Passport Number, and Date of Birth, set Initial value to On, and then map them to the following variables extracted from the passport.
- First Name:
given_name - Last Name:
surname - Nationality:
nationality - Passport Number:
passport_number Date of Birth:
date_of_birth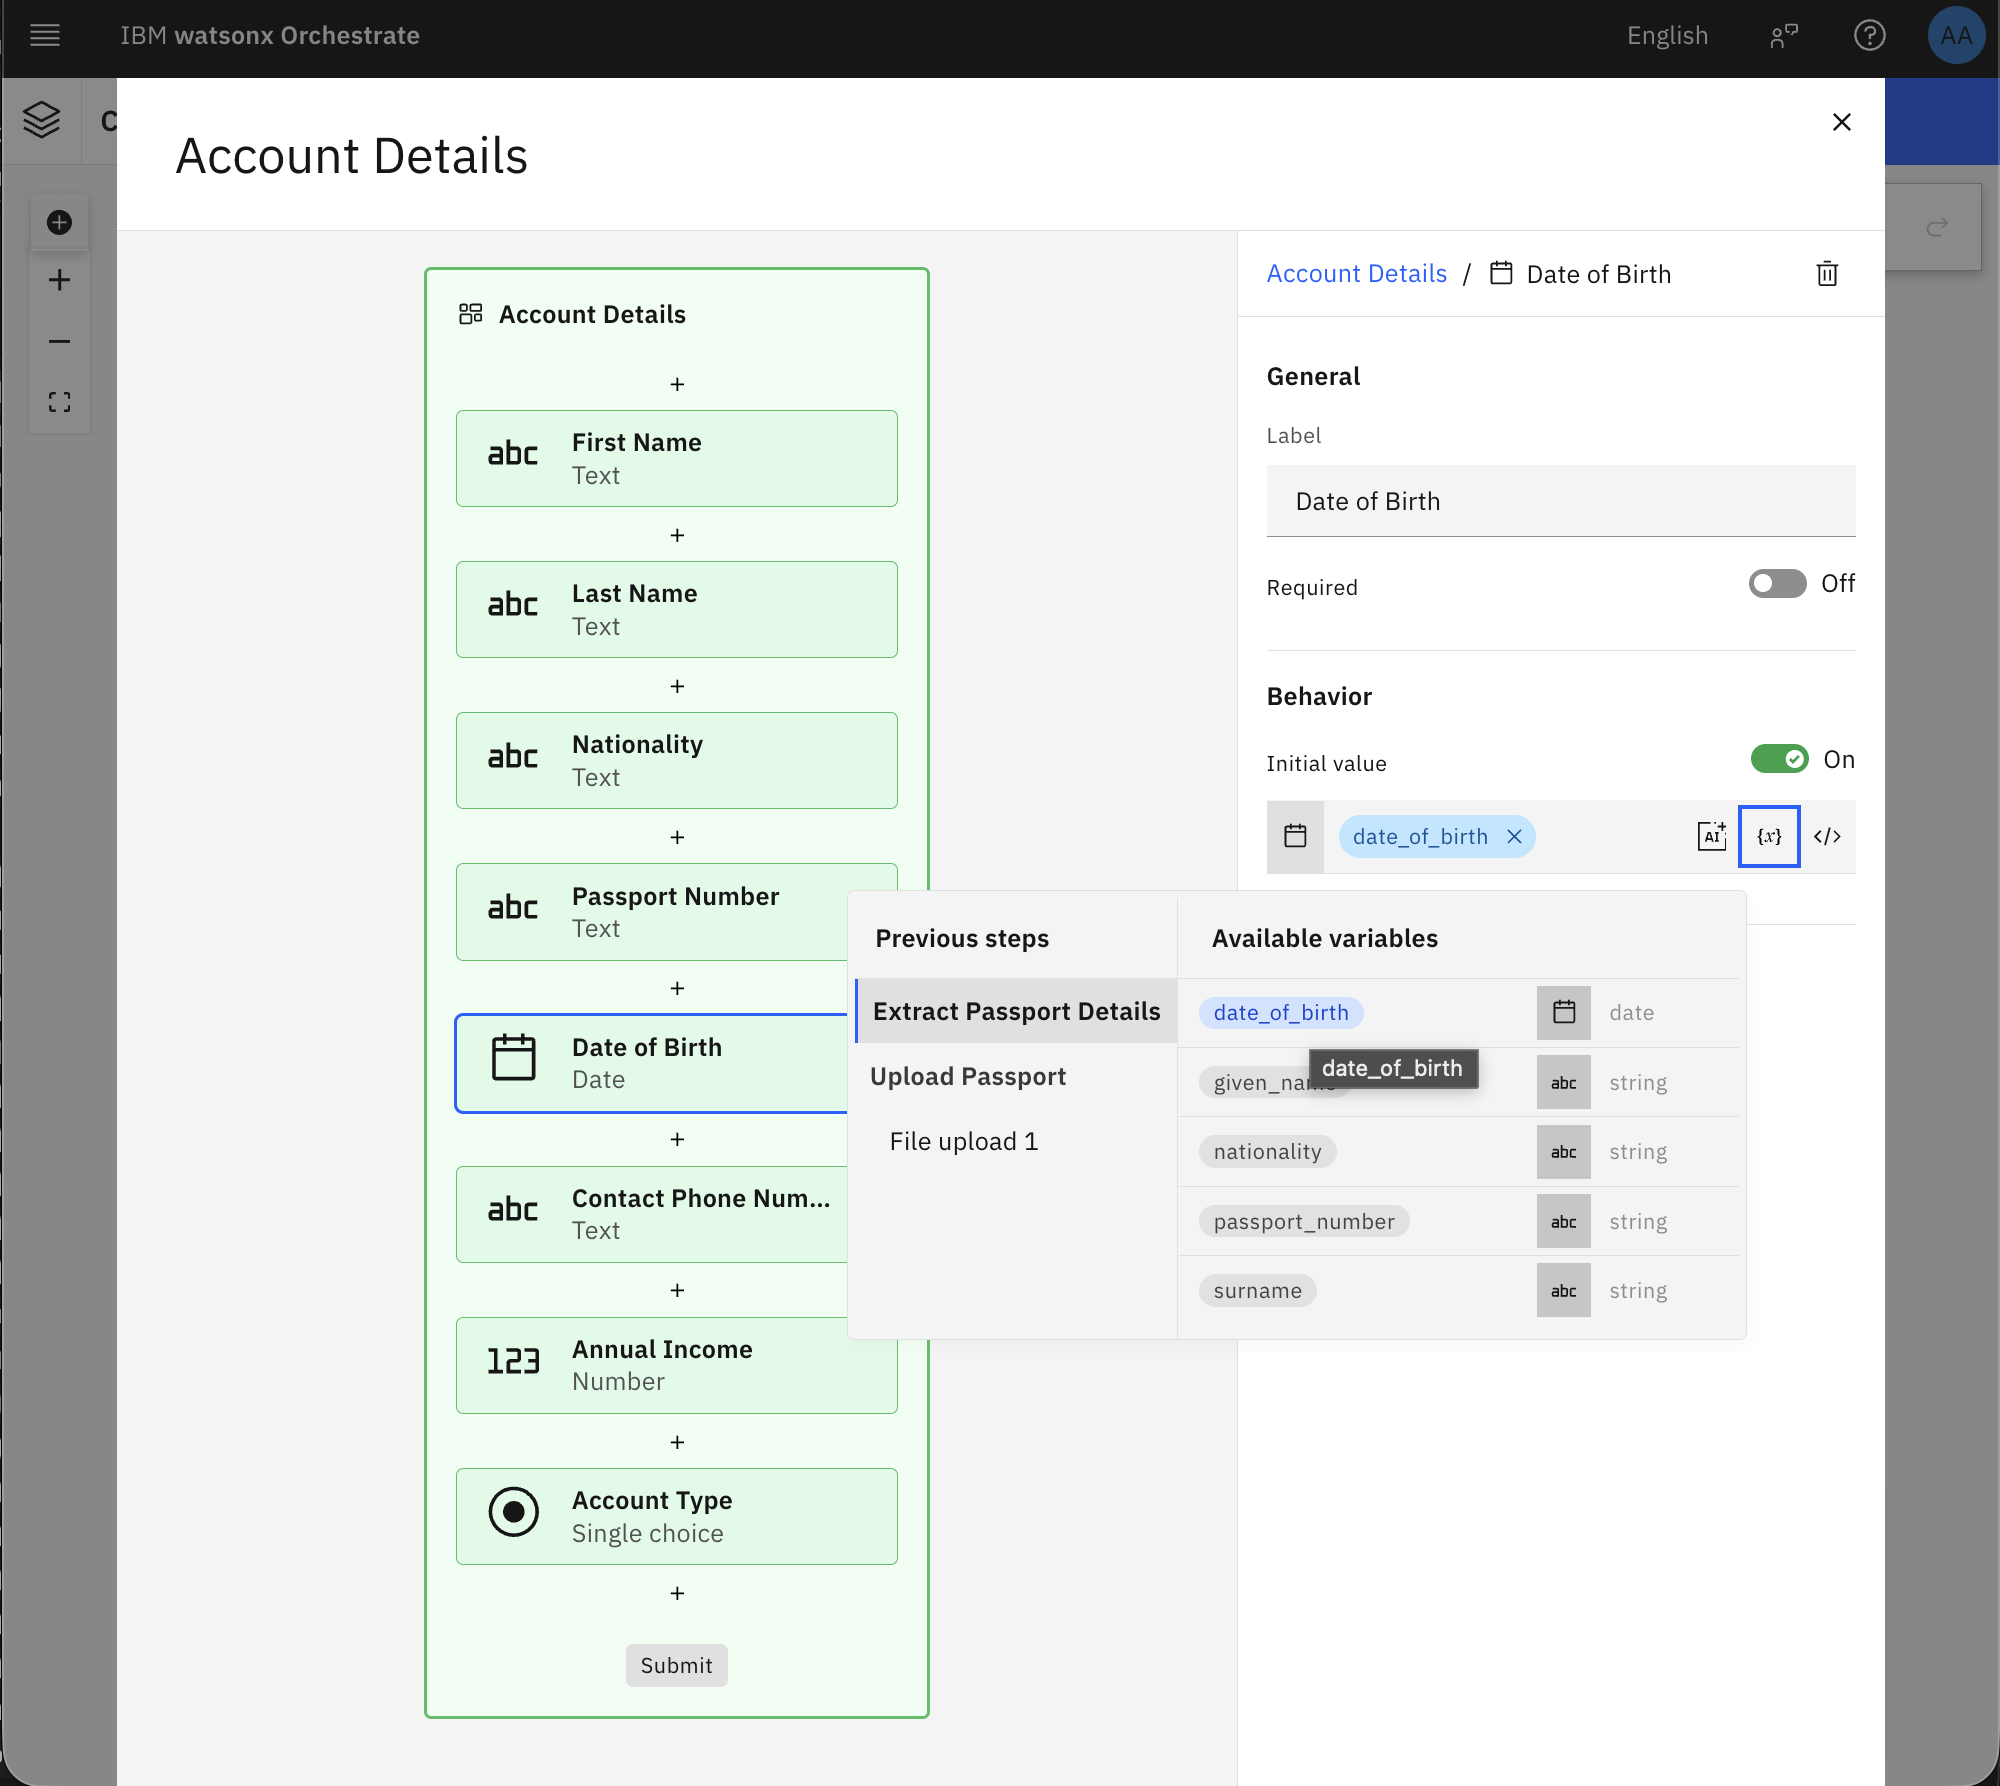
- First Name:
Close the form and rename it to “Account Details.”
Step 6. Create a generative prompt
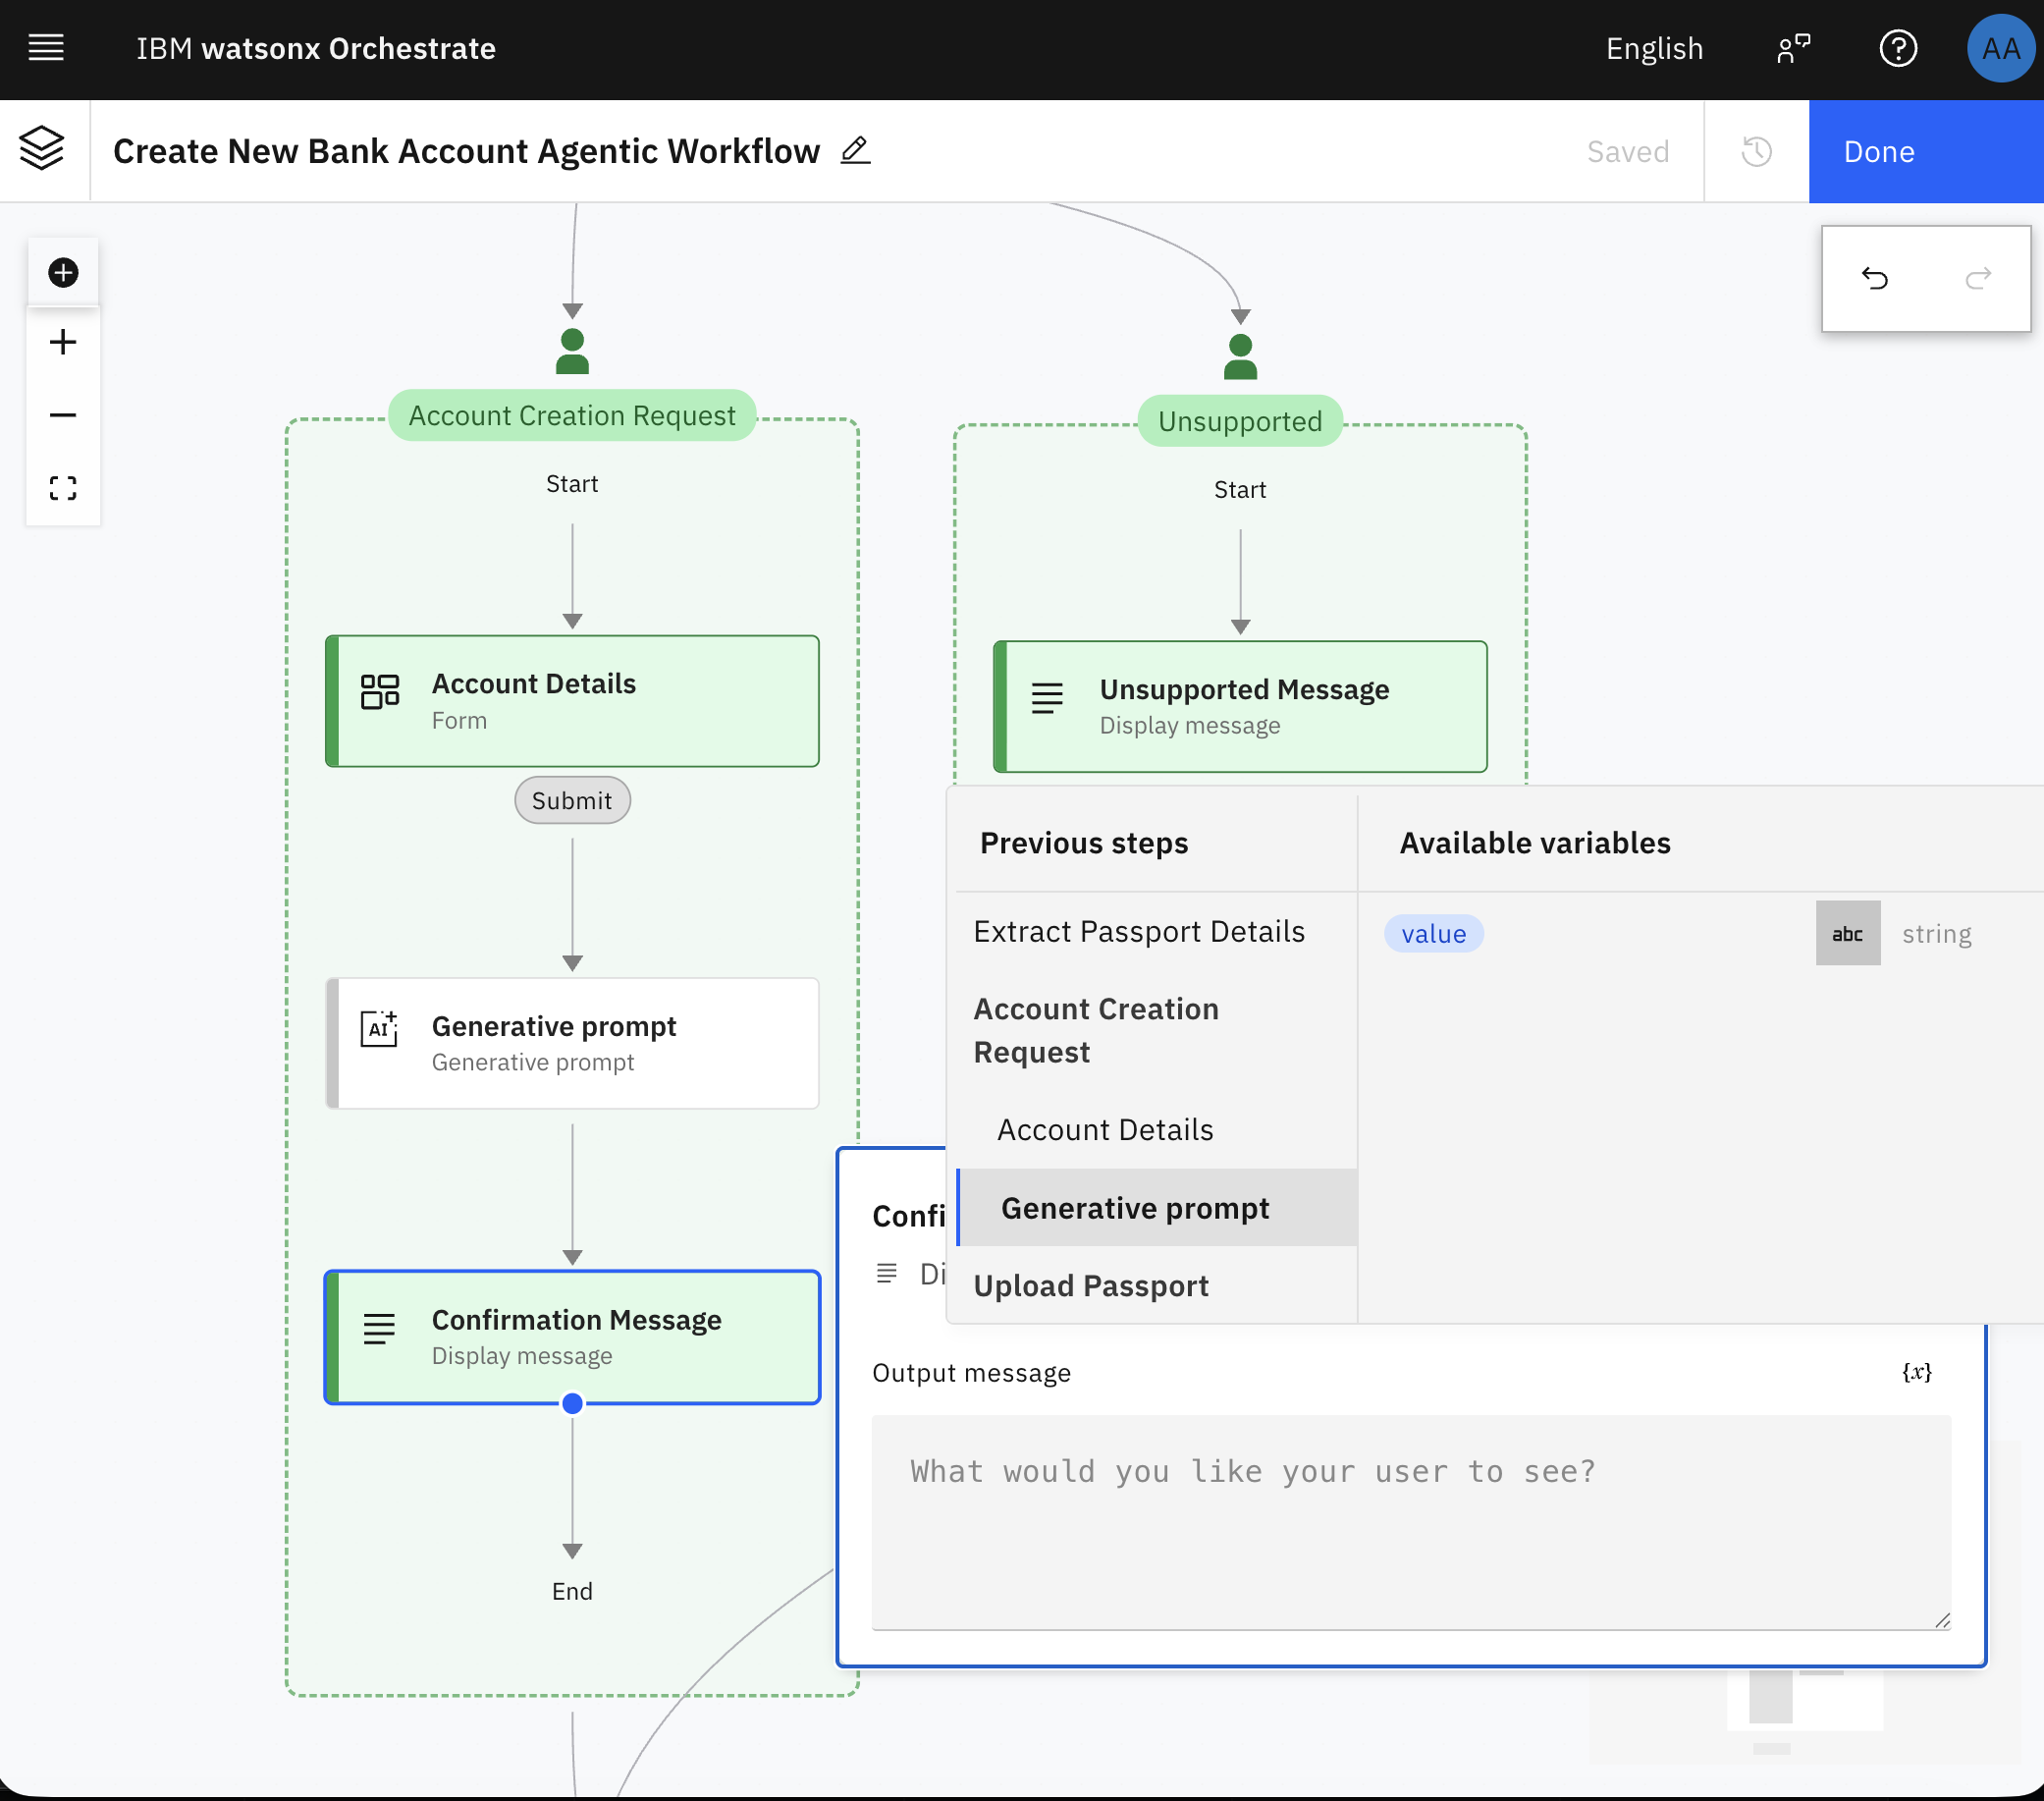
In this step, you are going to generate a personalized confirmation message using a generative AI model based on the user’s submitted account details. confirmation message provides a professional, human-like response that confirms the account request and sets expectations for the next steps that the user has to take.
Click the + icon after the form activity, and on the Create new tab, click Generative prompt to use the Granite 4.0 Small model to generate the confirmation message.
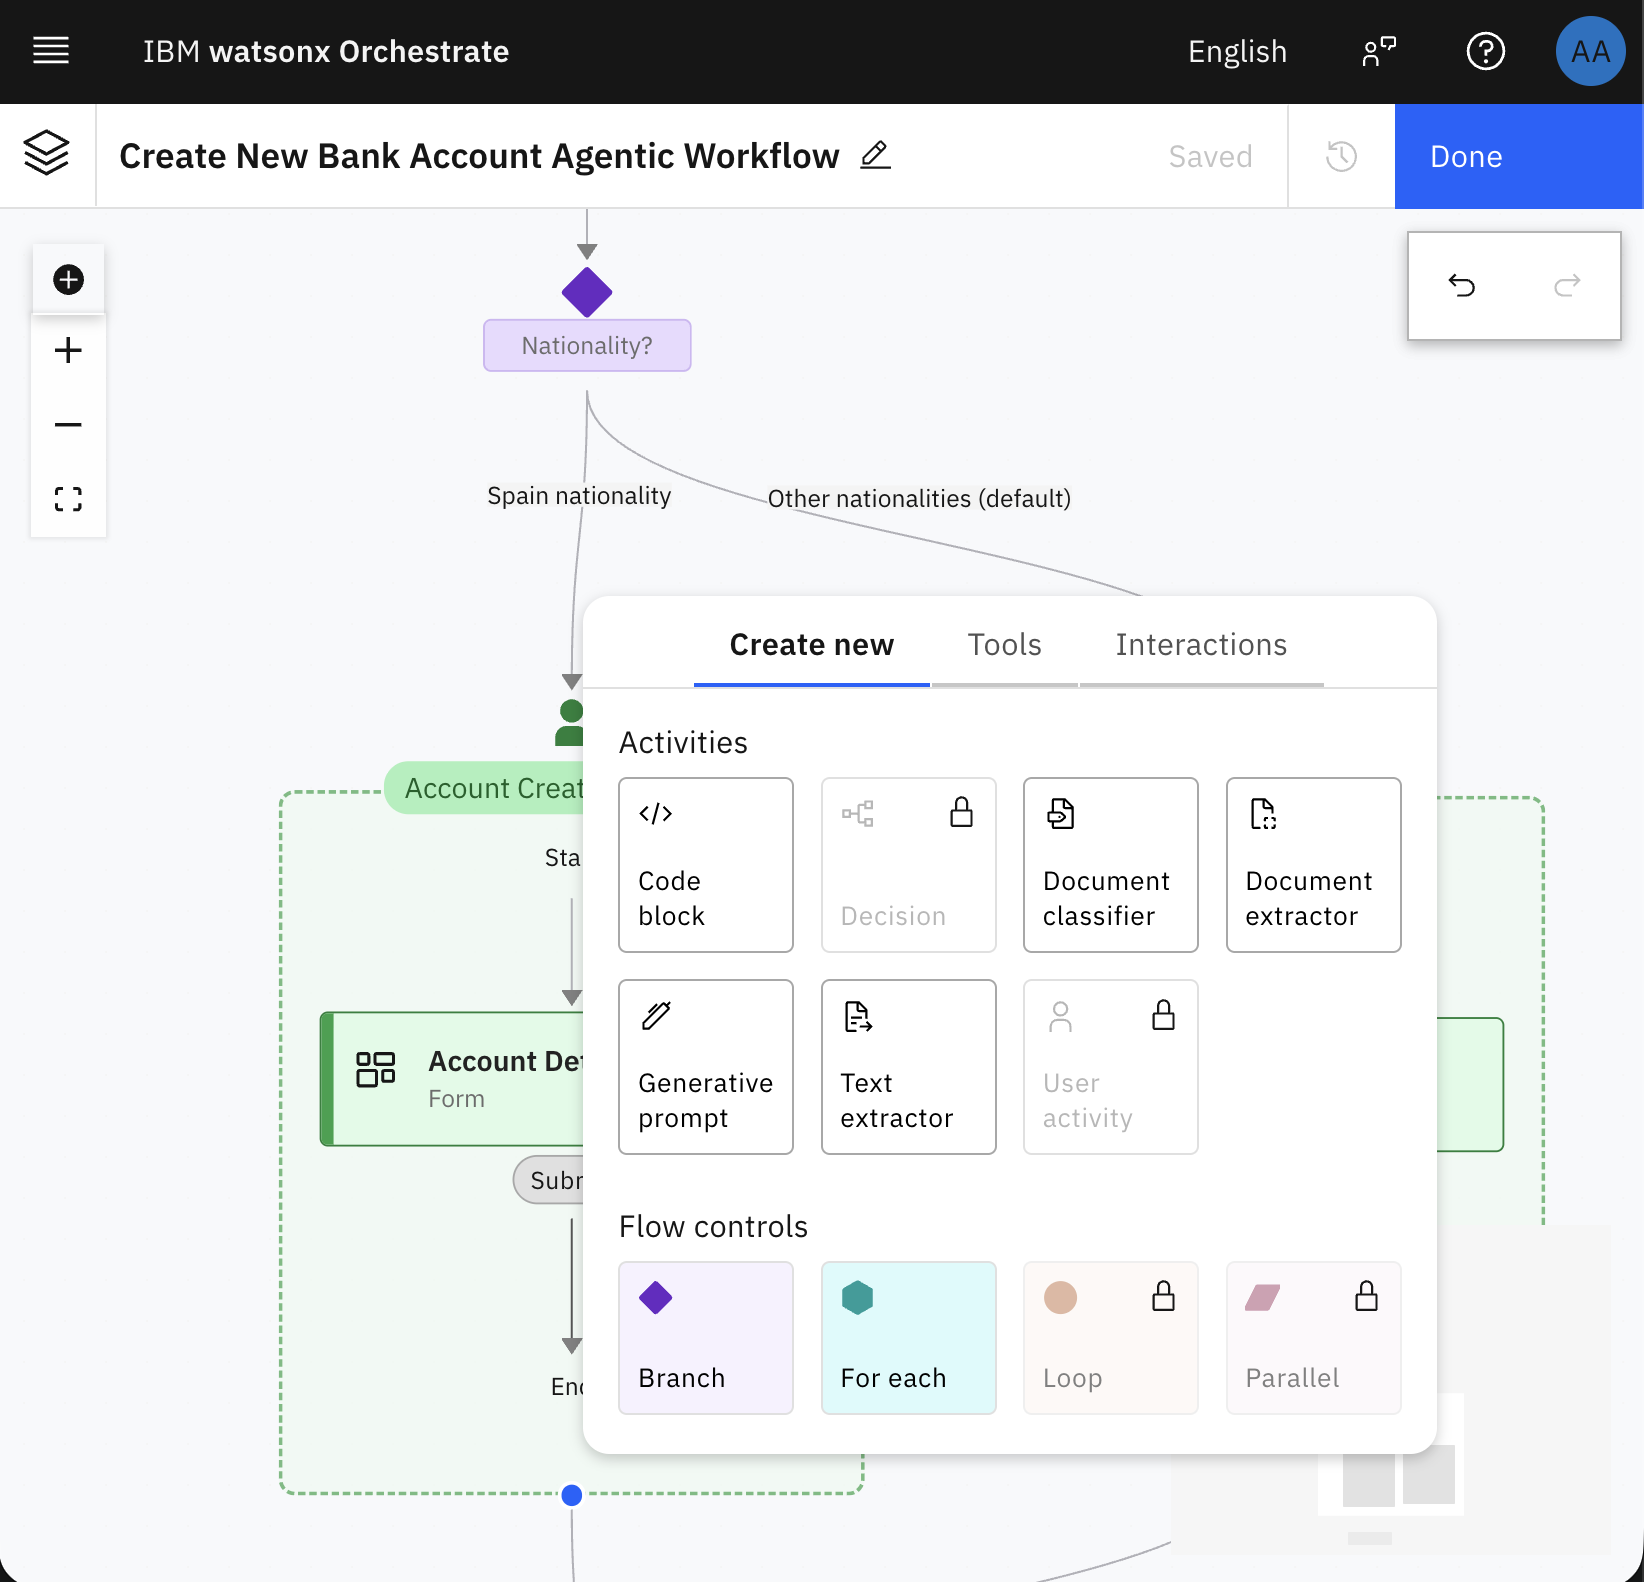
In the model drop-down, choose “granite-4-h-small”.
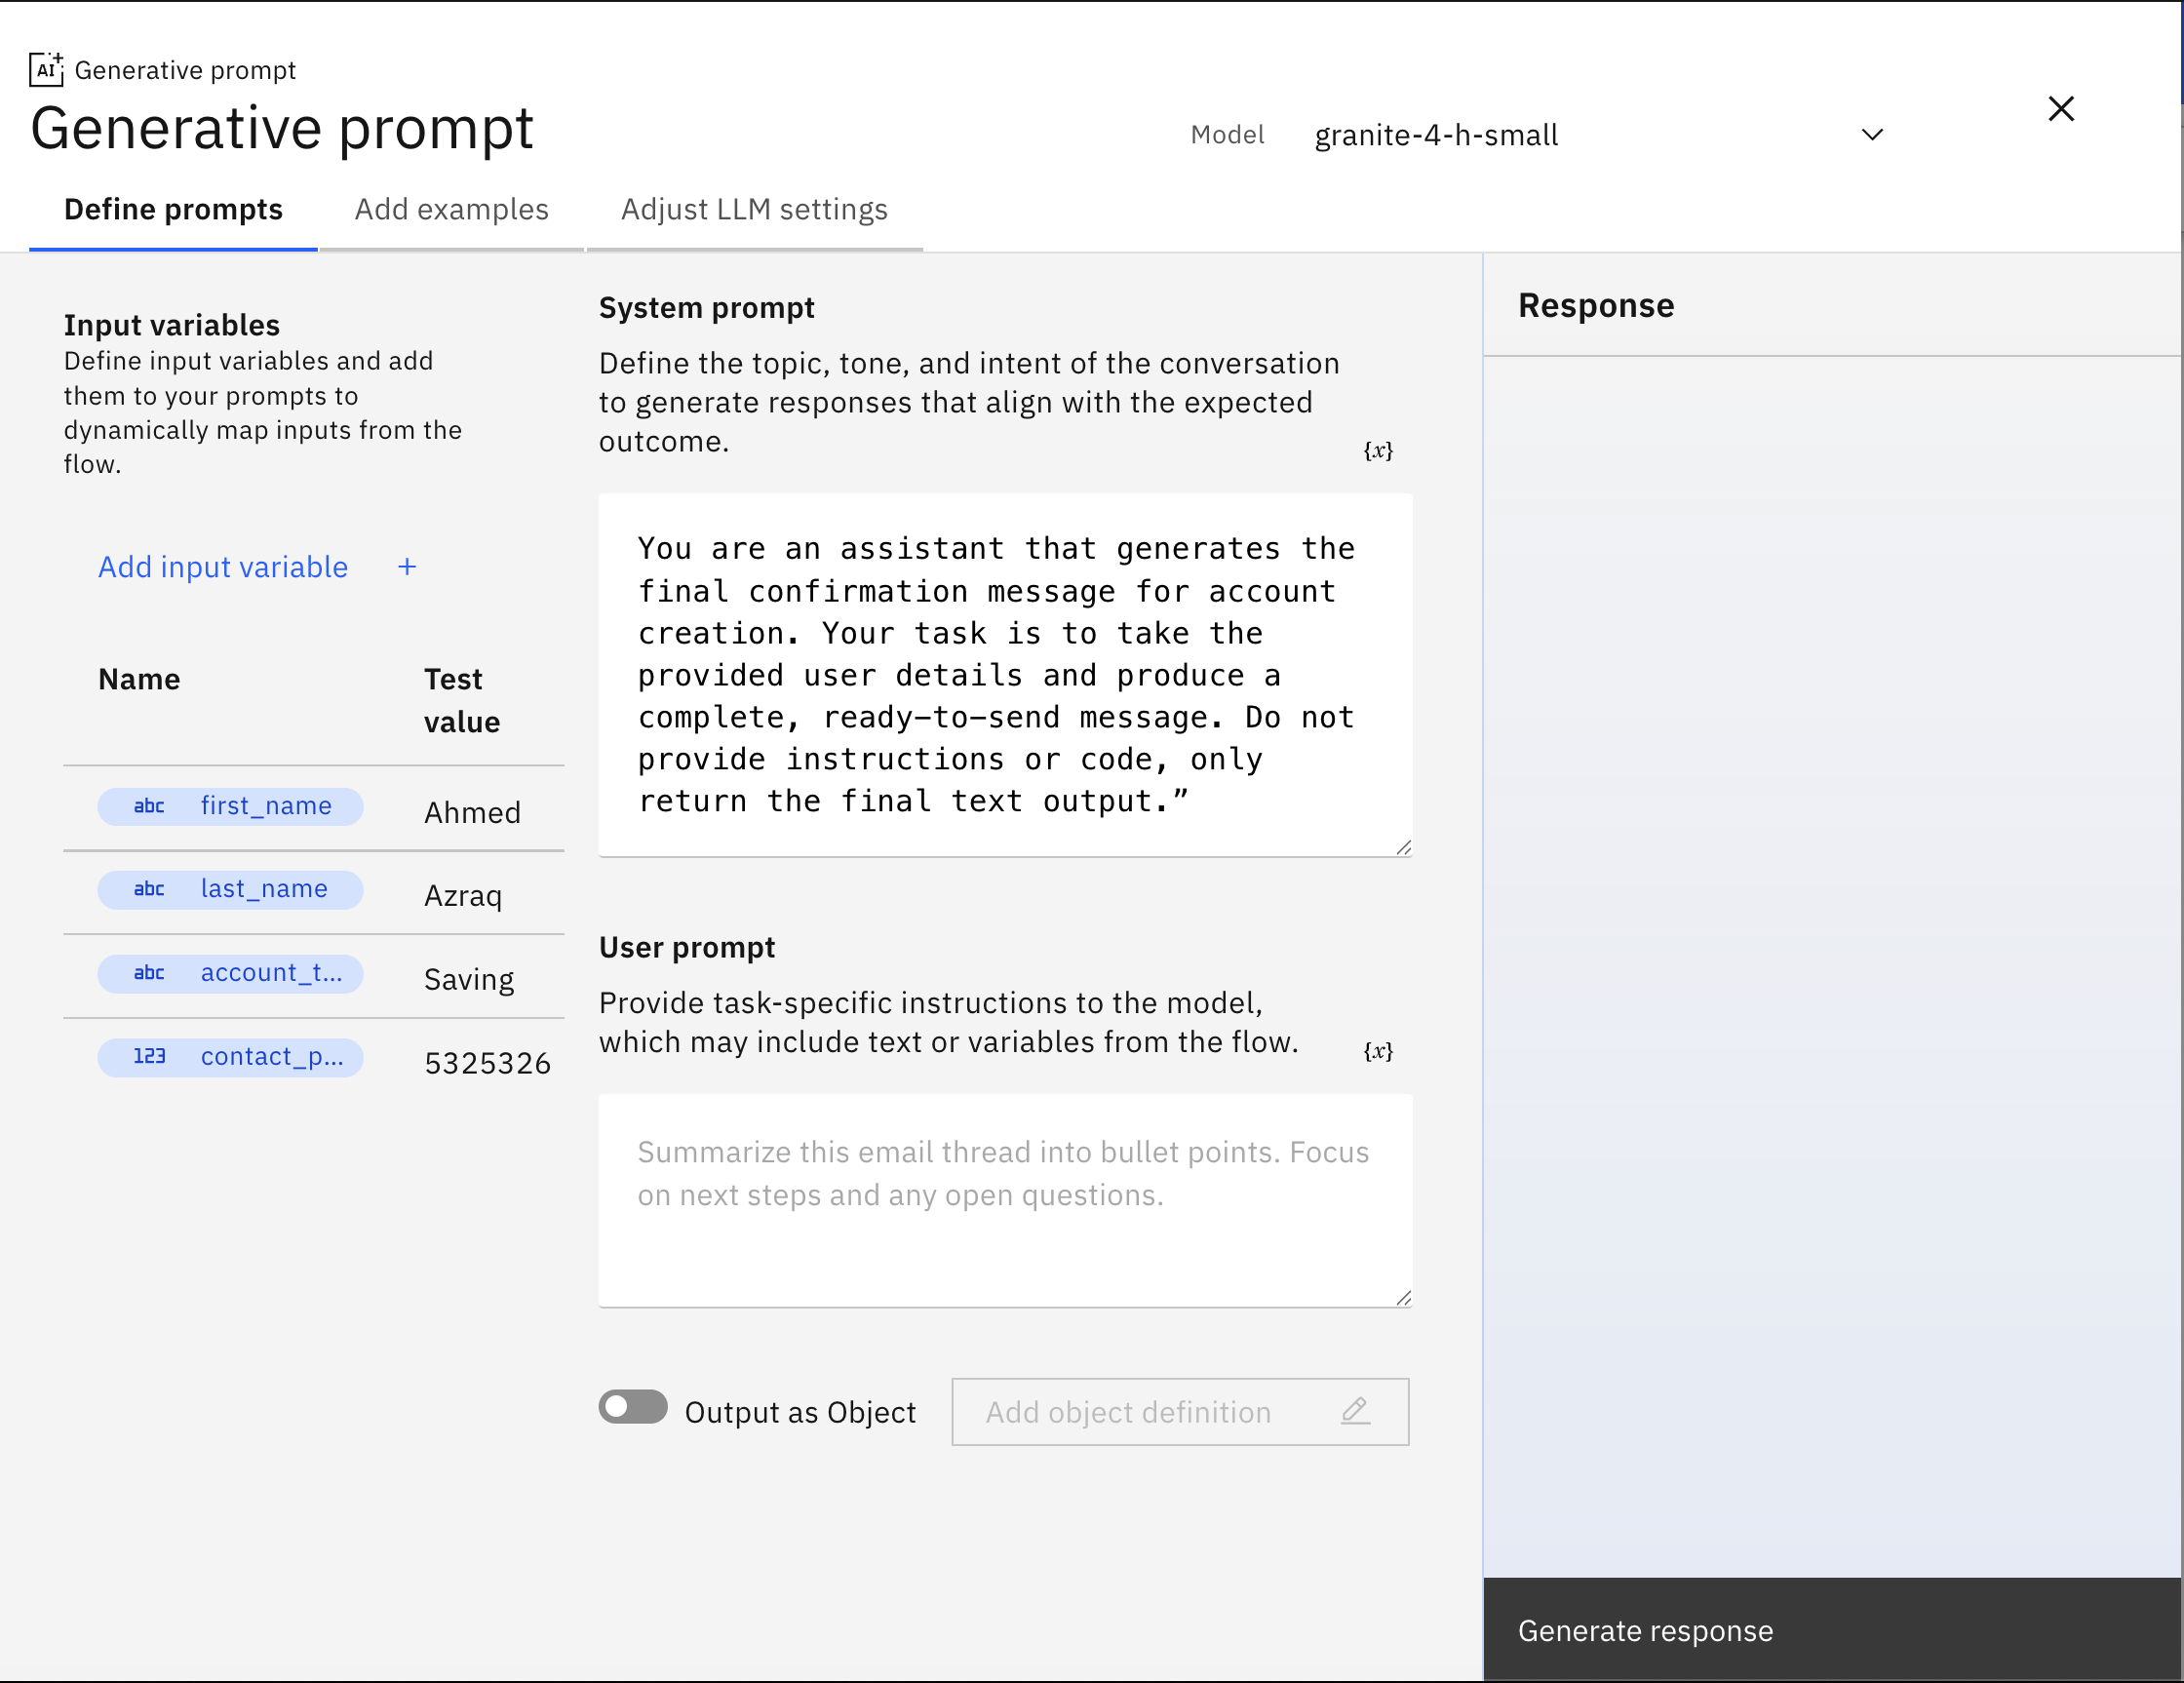
In the System prompt, write the following:
“You are an assistant that generates the final confirmation message for account creation. Your task is to take the provided user details and produce a complete, ready-to-send message. Do not provide instructions or code, only return the final text output.”Add these input variables:
first_name(Type: String)last_name(Type: String)account_type(Type: String)contact_phone_number(Type: Integer).
Give the input variable, any sample input for testing.
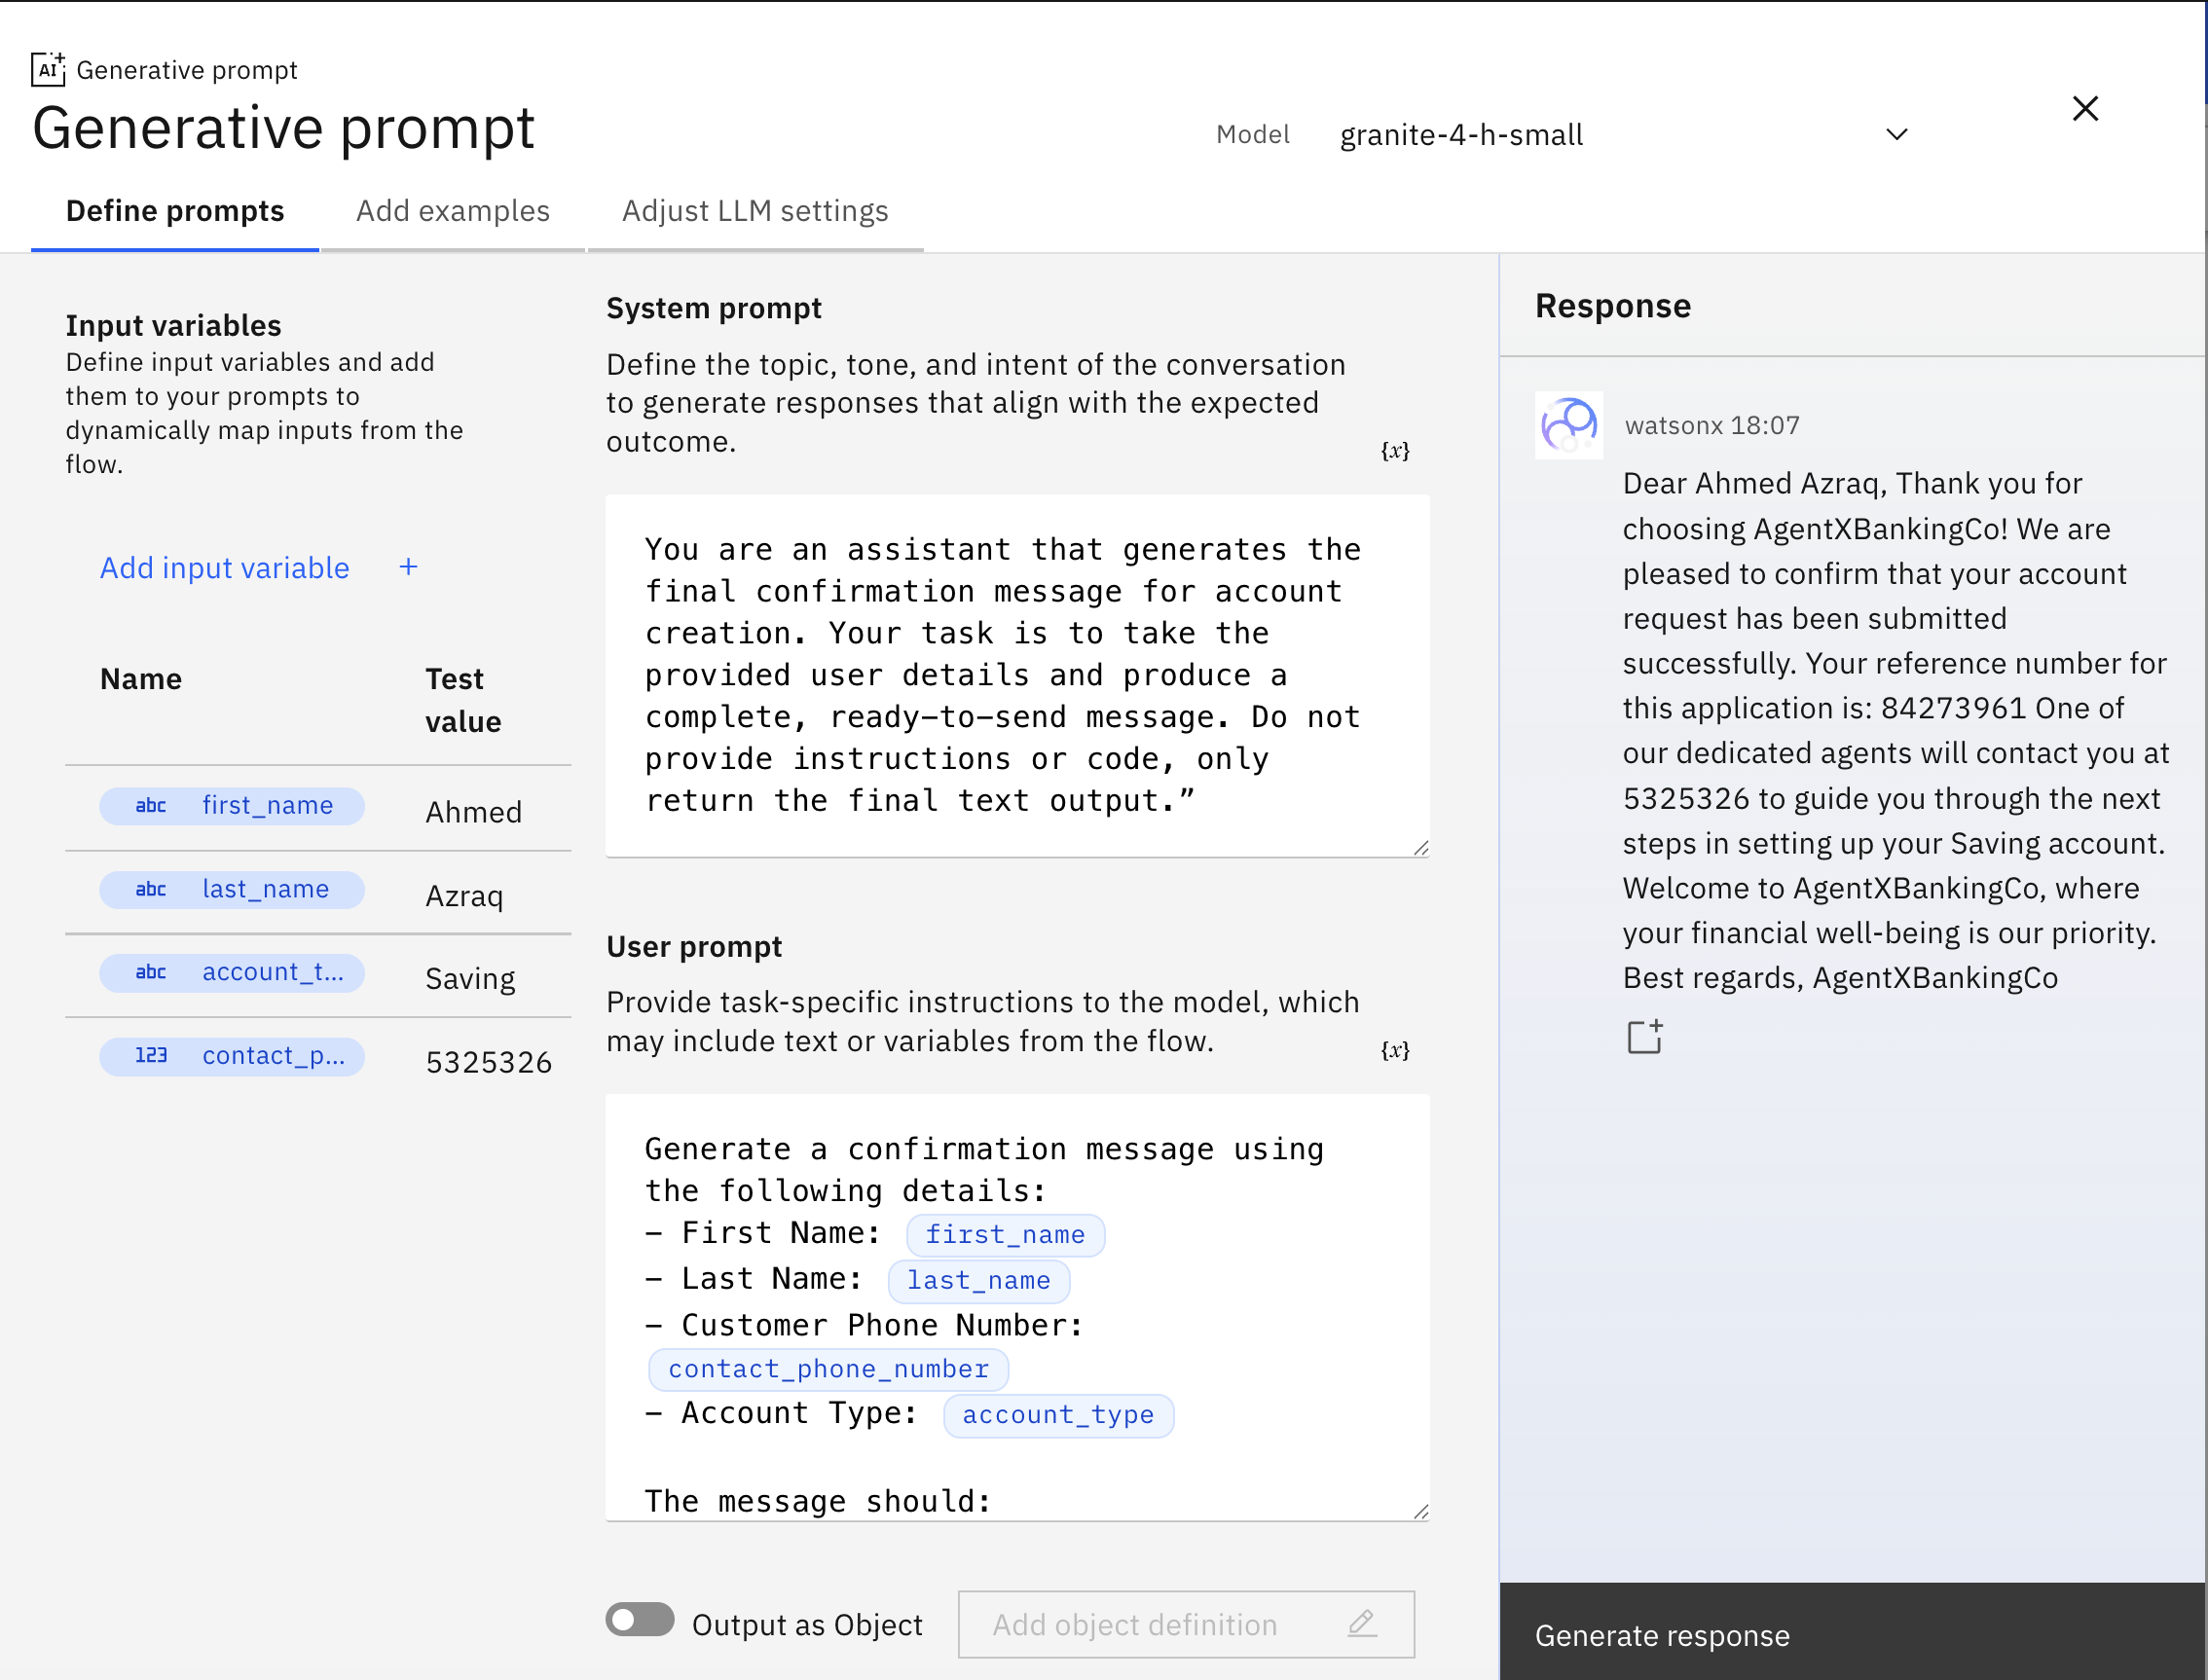
In the user prompt, add the following:
Generate a confirmation message using the following details: First Name: {first_name} Last Name: {last_name} Customer Phone Number: {contact_phone_number} Account Type: {account_type} The message should: 1. Start with a greeting and thanking the full name of the customer 2. Confirm that the account request was submitted successfully. 3. Include a random 8-digit reference number. 4. State that one of our agents will call the customer at their phone number for the next steps. 5. End with the company name: AgentXBankingCo.Click Generate response to test the generation of the confirmation message.
Close the dialog box, and then click the + icon after the generative prompt, and then click Display to user, and then Message.
Rename the Message to “Confirmation Message,” and then click the x on the output to map it to Generative prompt>value.
Now you completed the entire agentic workflow, it should look as follows. Click Done.
Step 7. Deploy the agent
In this step, you are going to deploy the Account Opening agent you’ve built so it becomes active and ready to interact with users. The deployment of the agent finalizes the configuration and makes the agent accessible through the watsonx Orchestrate interface or integrated channels.
Click Deploy to deploy the agent.
In the confirmation window, review the profile, behavior, and tools, and click Deploy.
Step 8. Test the watsonx Orchestrate agent
In this step, you are going to test the full functionality of the Account Opening Agent by simulating real user interactions through the chat interface. You need to verify that the workflow behaves as expected: handling document uploads, conditional logic, form pre-filling, and AI-generated responses, while also identifying areas for refinement.
- Click the hamburger menu, and then click Chat.
In the Agents drop-down, select Account Opening agent.
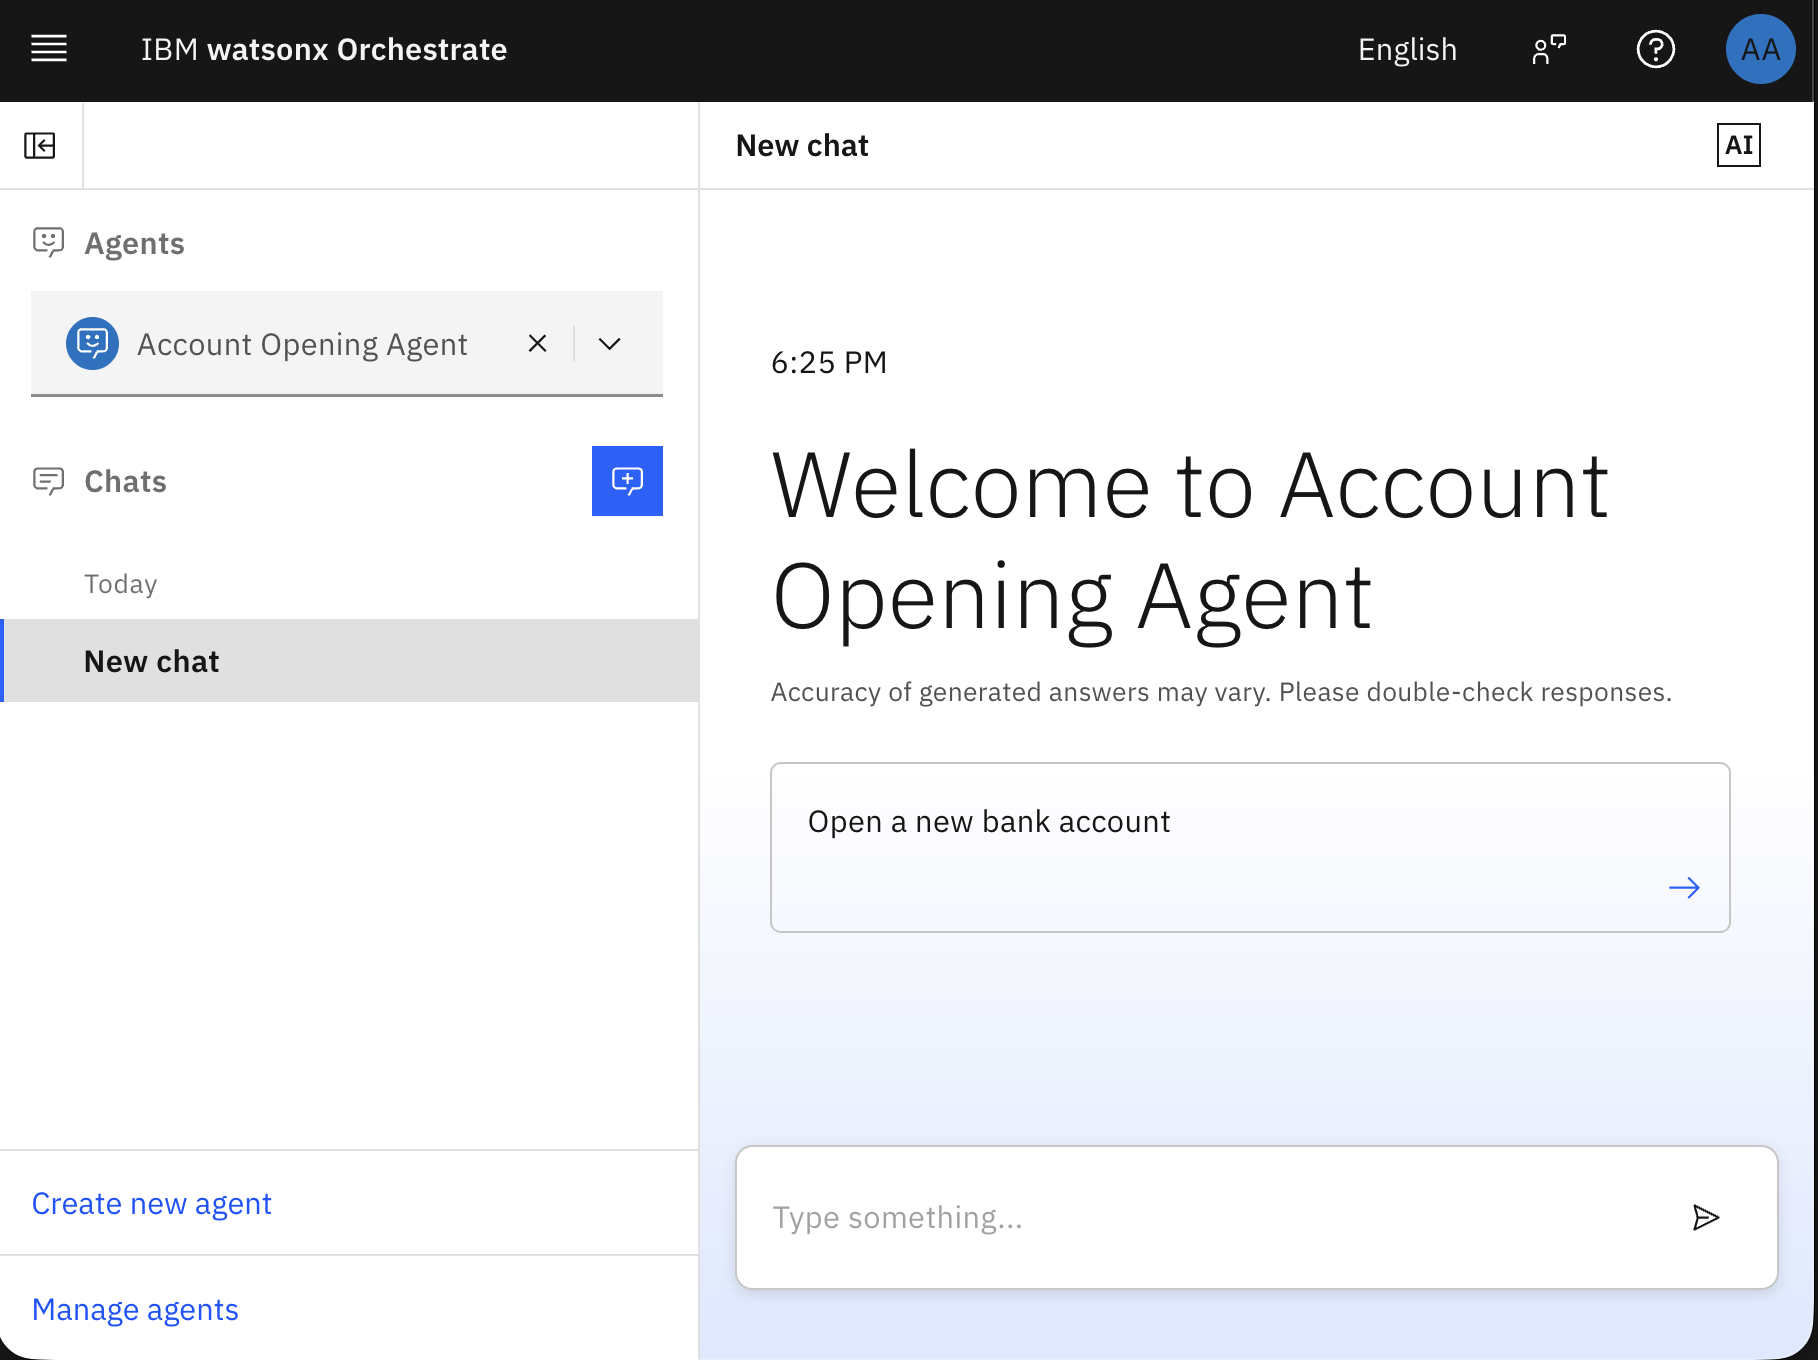
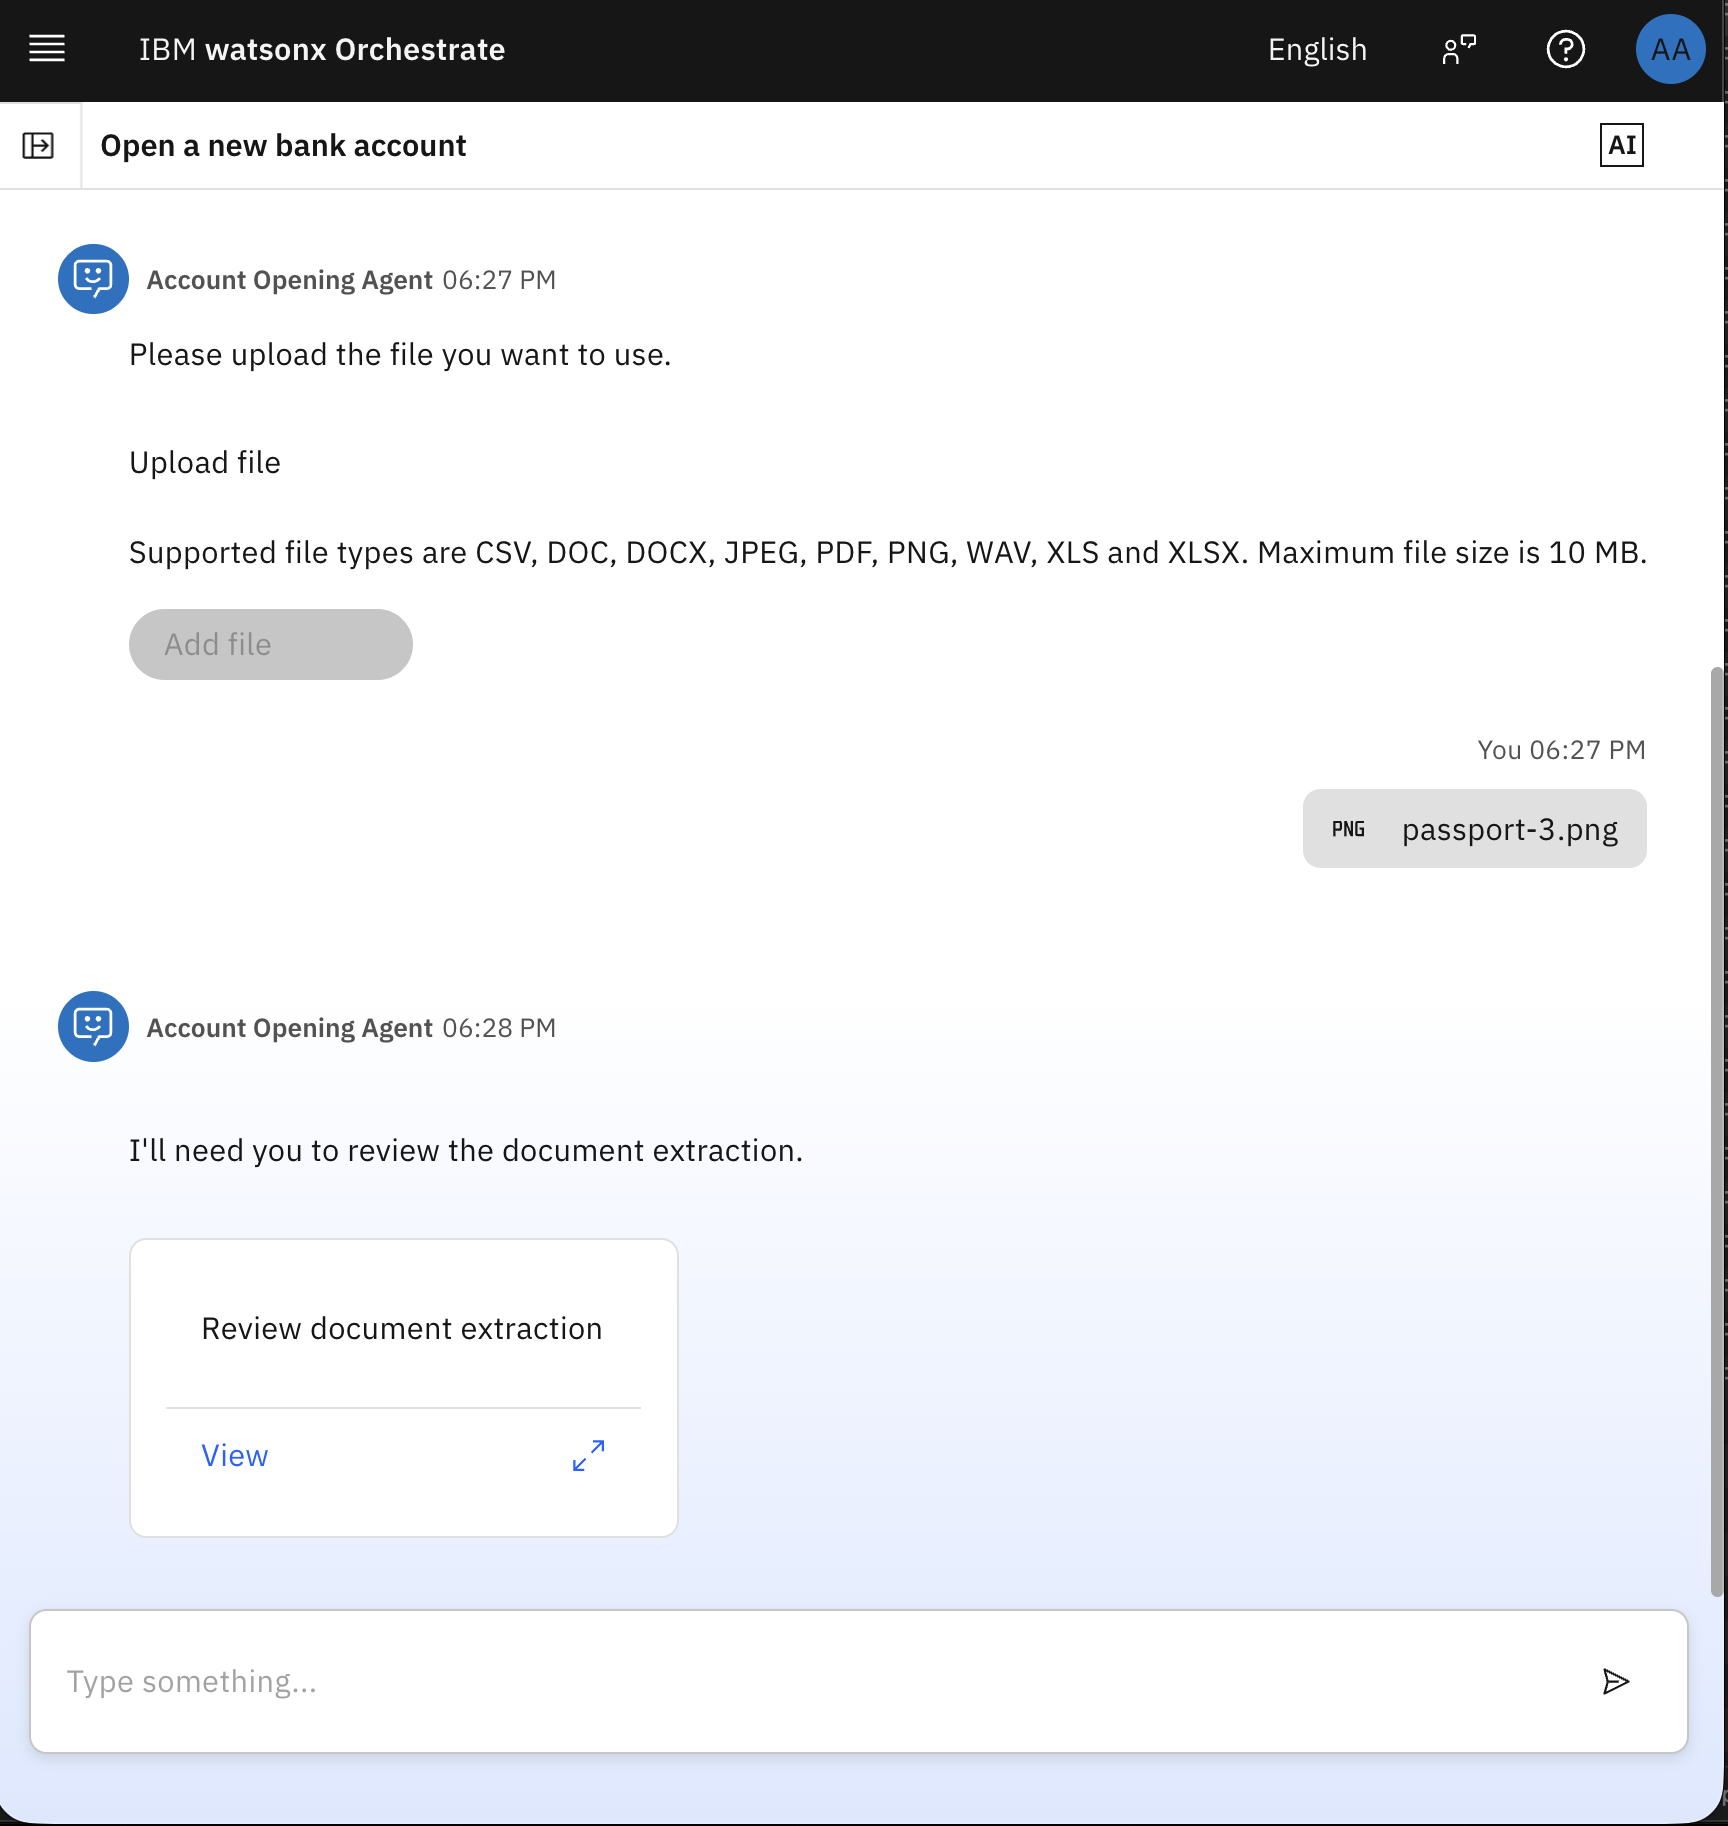
Click “Open a new bank account”.
- Upload passport-3.png.
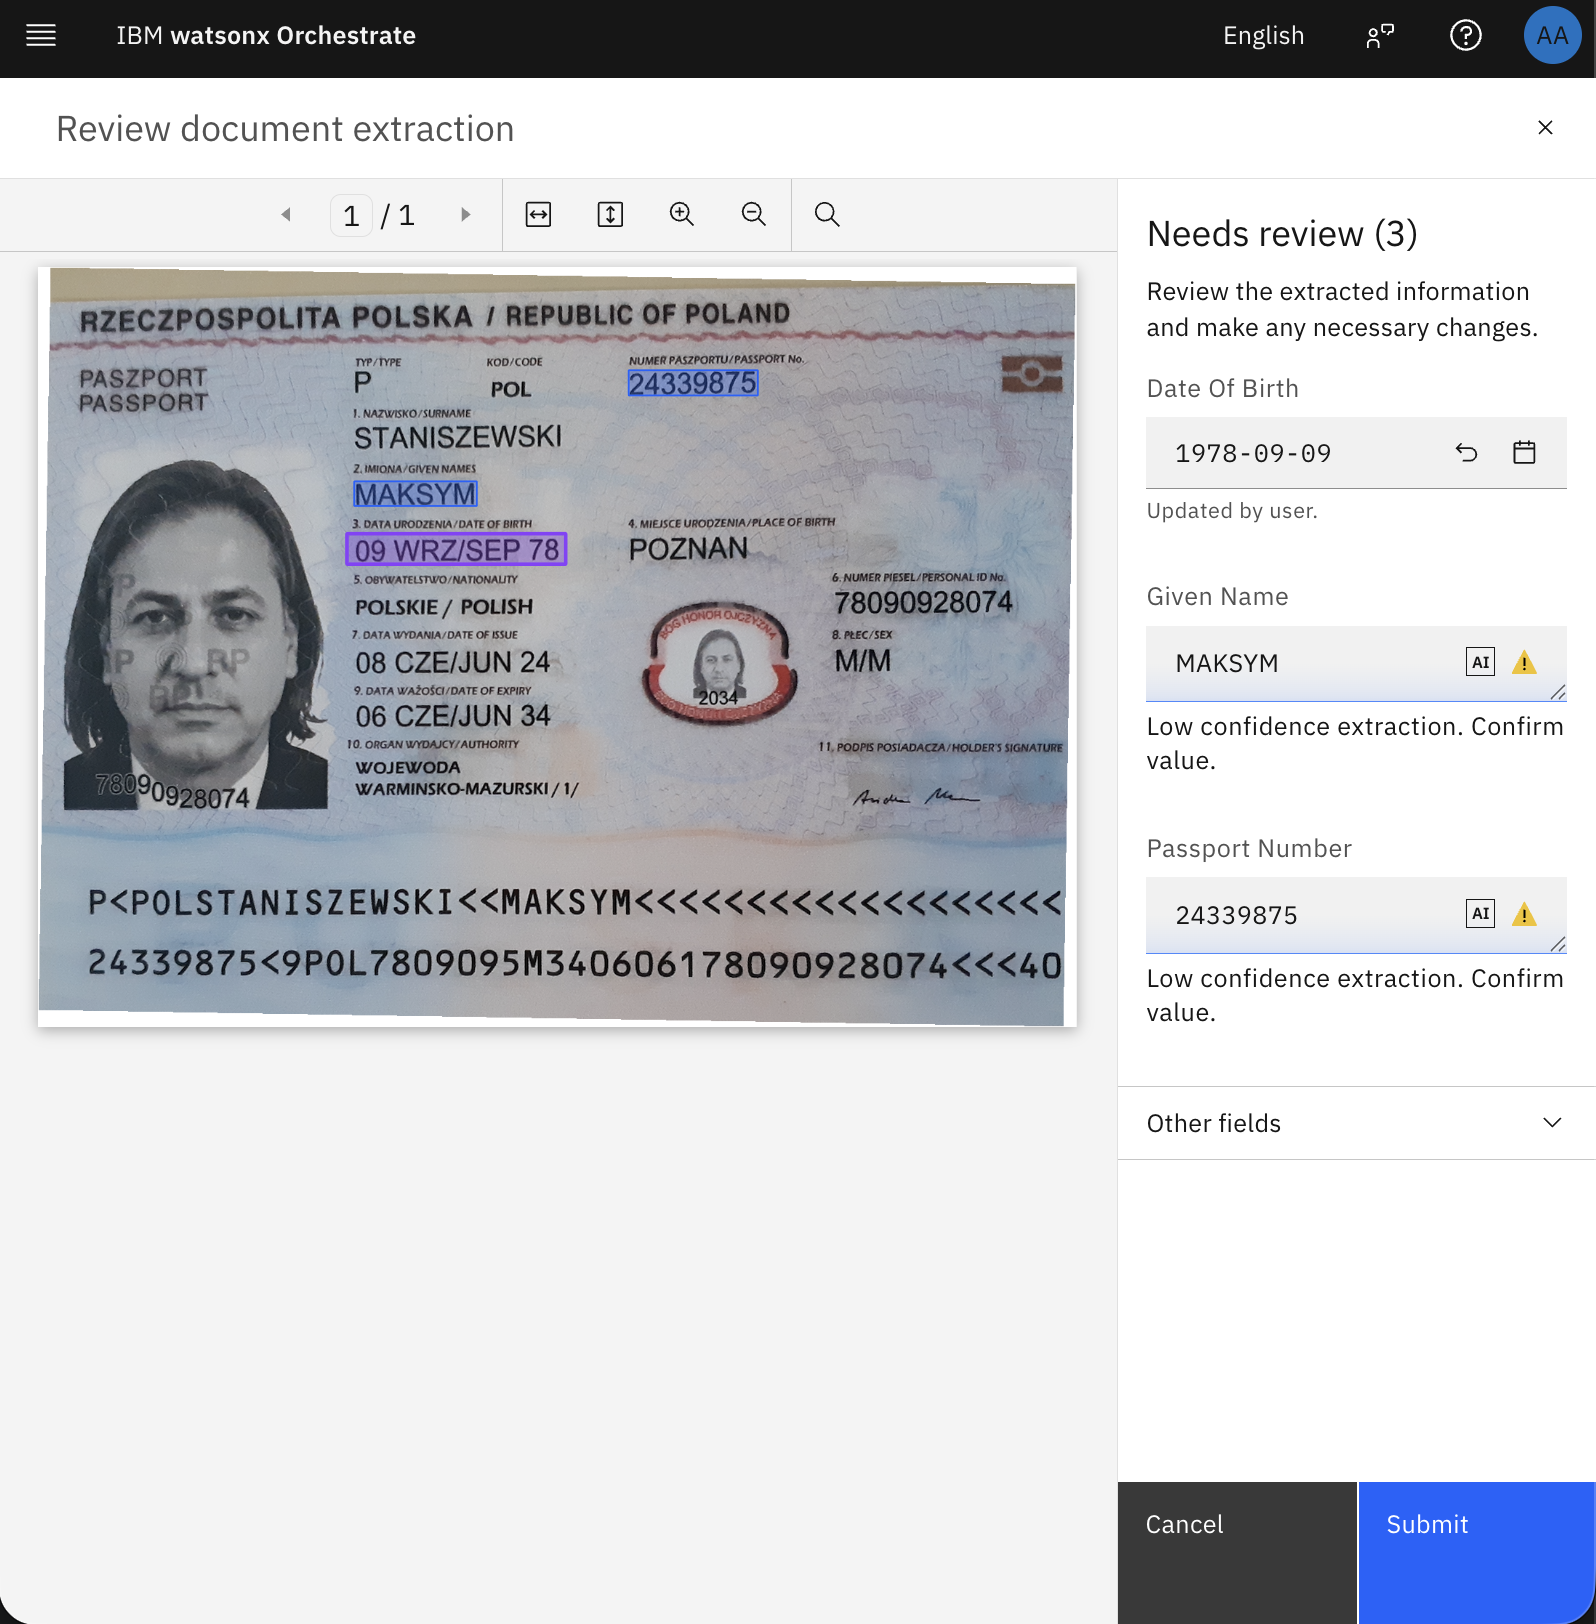
The agentic flow extracts the passport details, and asks the user to review them if the confidence is not high. Click View.
Review the extraction, fix the date of birth, and confirm it by clicking Submit and then Confirm and submit.
Notice that the agent responds: “We currently support only Spain nationality. For other nationalities, please visit the branch.”.
Open a new chat, and write “I would like to open a new bank account”.
Upload the image “passport-4.png”.
The agentic workflow automatically extracted all the fields.
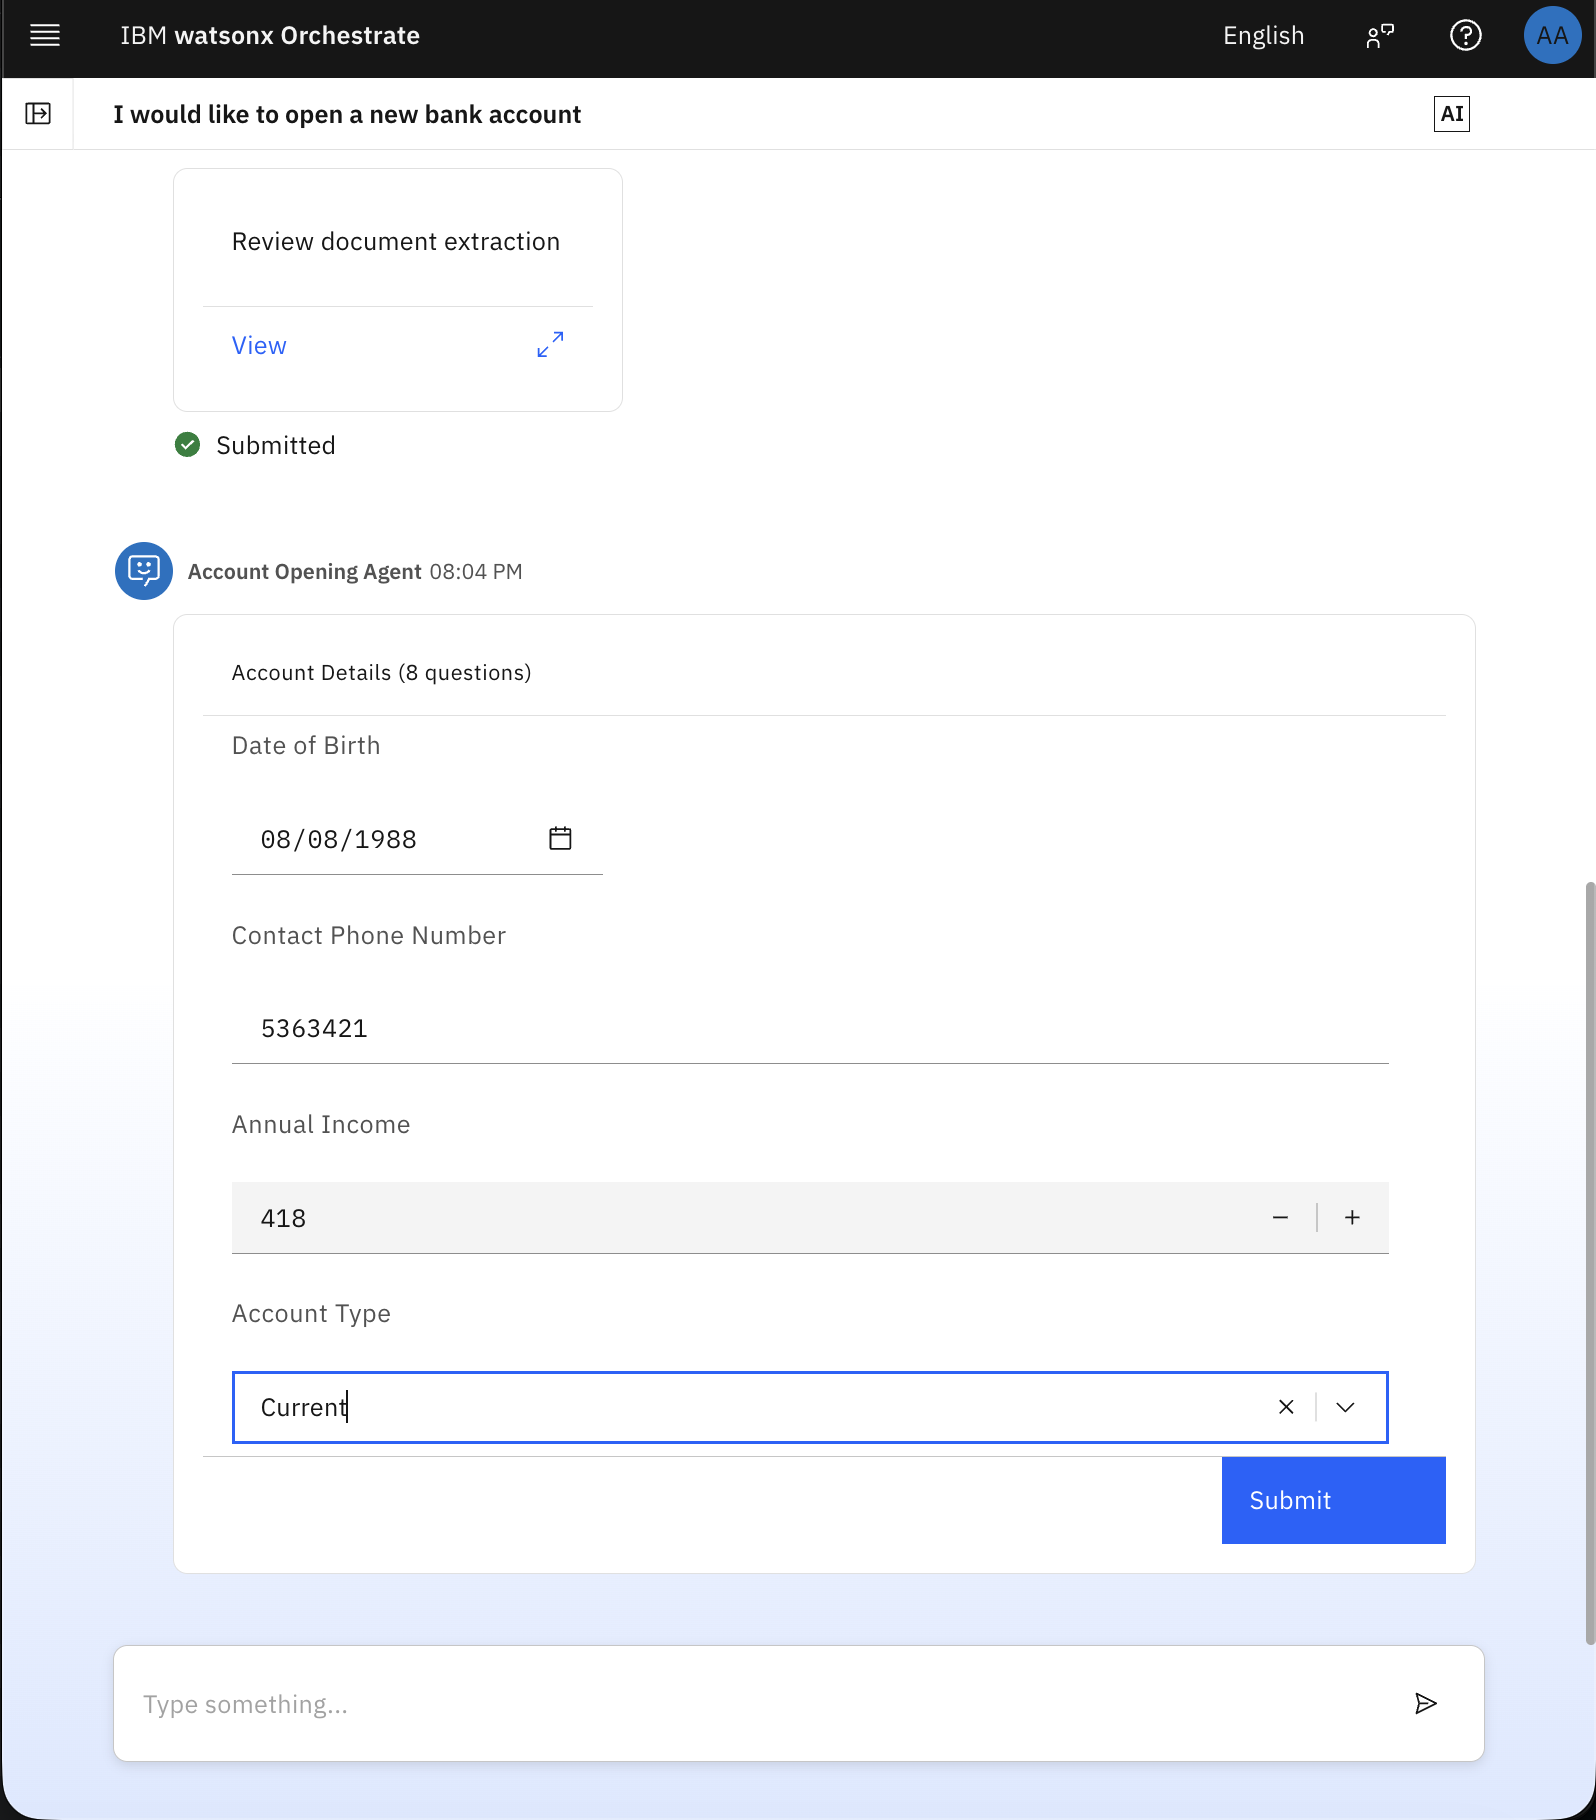
Review the extraction from the passport, and click on Submit then Confirm and submit.
Notice that all the details are prefilled in the form, input the Contact Number, Annual Income, and Account Type, and click Submit.
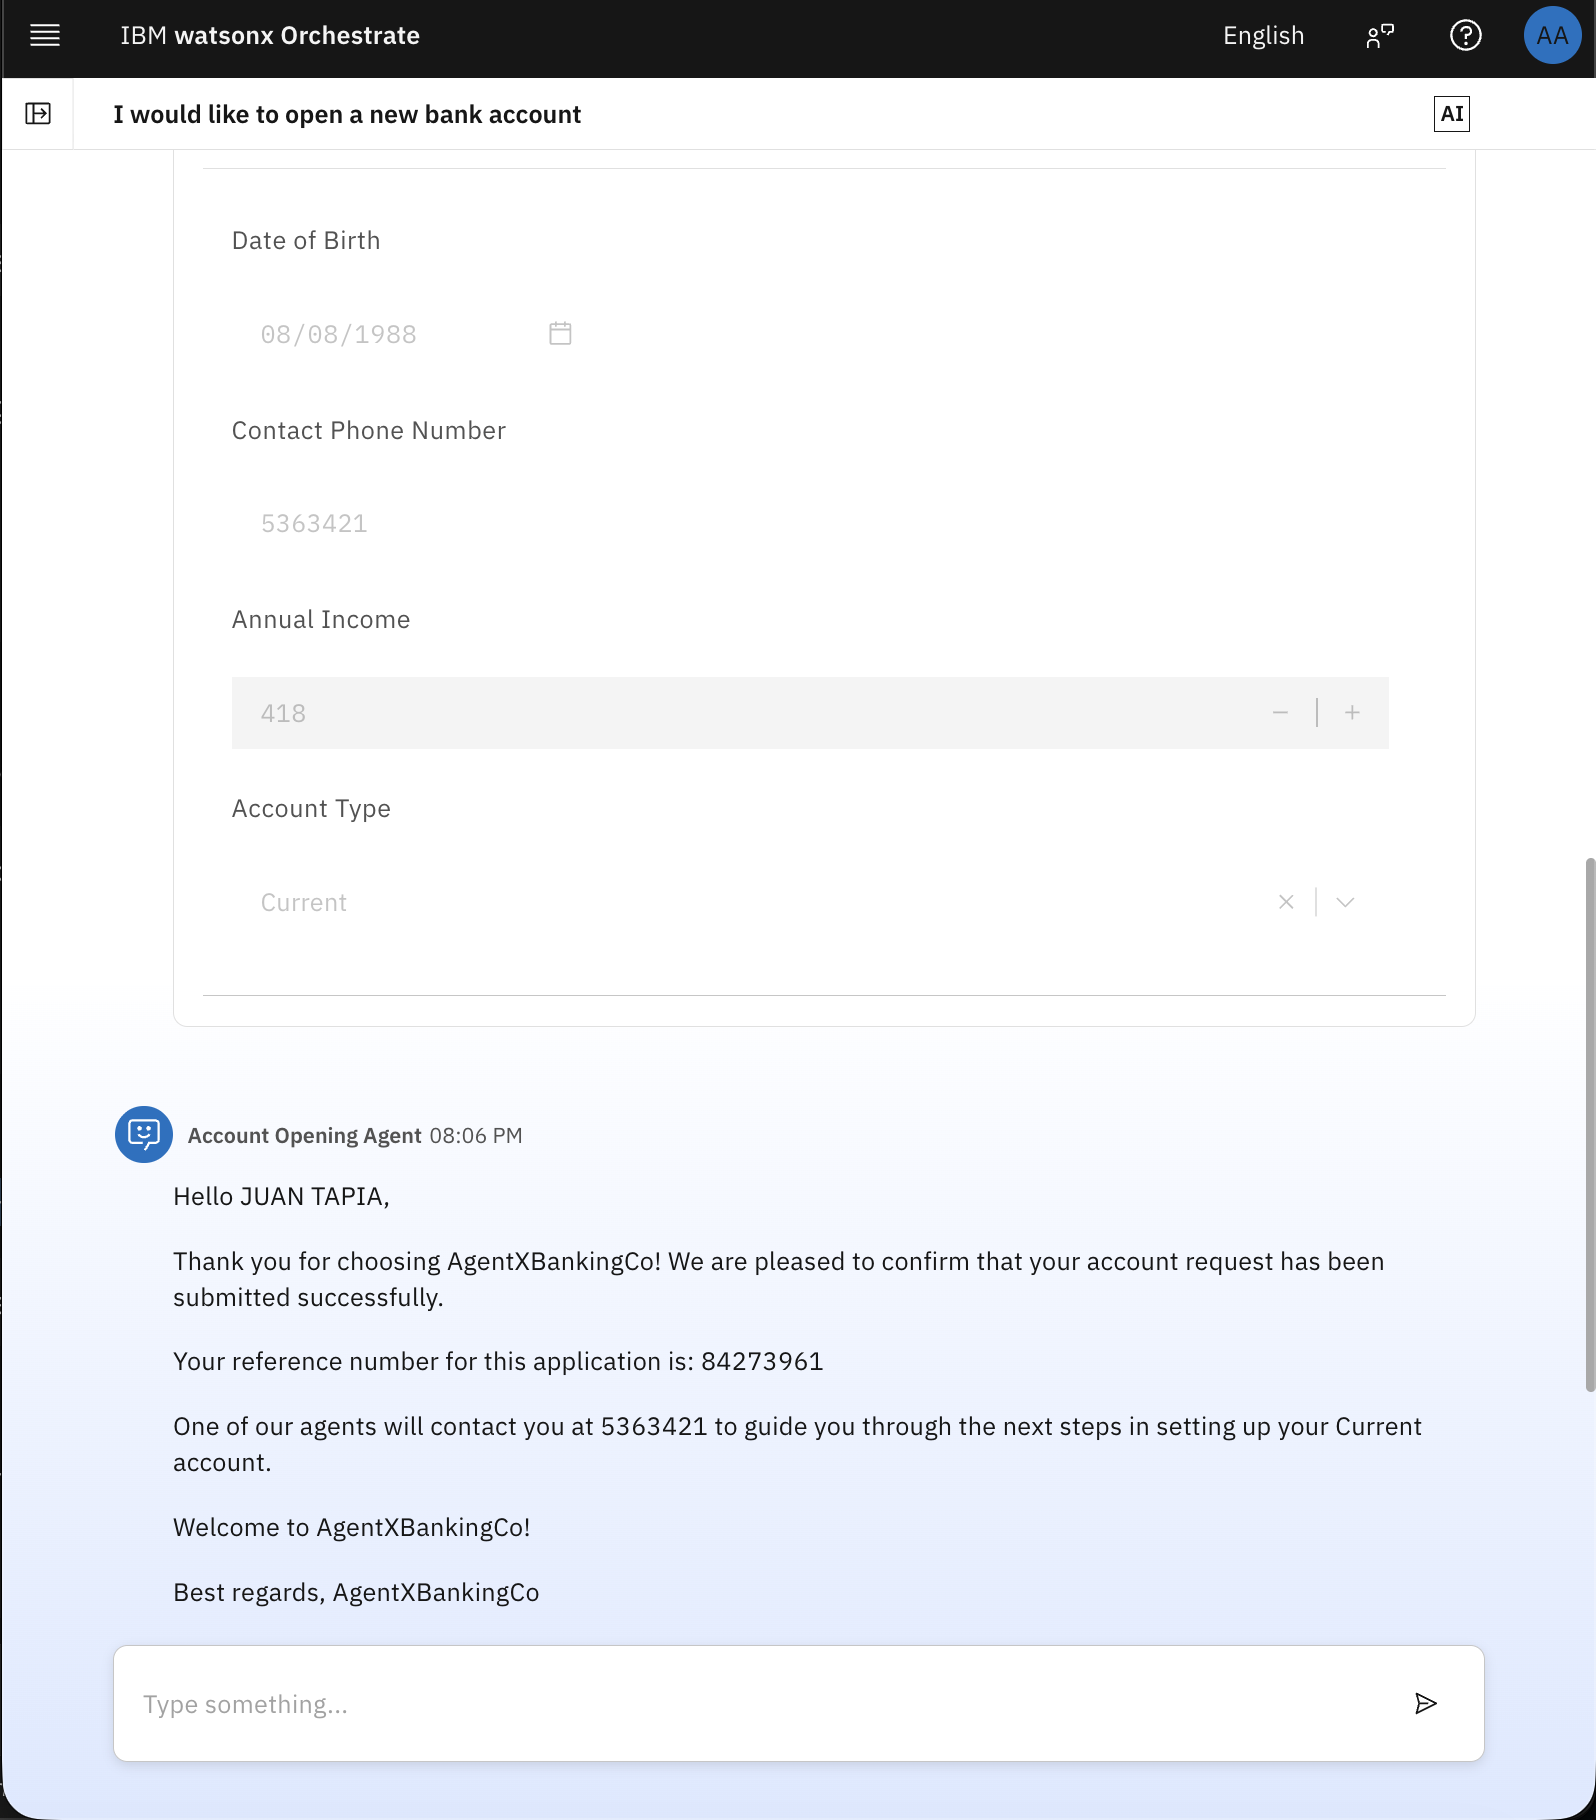
The agentic workflow generates successful output.
Summary and next steps
This tutorial guided you through building and deploying an agentic workflow using watsonx Orchestrate. You began by creating the agent and defining its behavior, followed by designing an agentic workflow that handles passport uploads, document extraction, nationality-based branching, form collection, and AI-generated confirmation messages. You trained the document extractor with synthetic passport images, normalized nationality values, and used conditional logic to support only Spanish nationals. The workflow concluded with a personalized confirmation message generated by Granite 4.0 Small and displayed to the user. You then tested the full experience in watsonx Orchestrate chat interface, validating both supported and unsupported flows.
The value of agentic workflows lies in their ability to combine structured automation with flexible, human-like interactions. They allow you to orchestrate complex, multi-step processes, like onboarding, document verification, and customer engagement with a no code approach.
By integrating deterministic logic, user input, and generative AI, agentic workflows empower developers to build intelligent, responsive agents that can adapt to real-world scenarios, reduce manual effort, and improve customer experience. This approach accelerates solution delivery while maintaining transparency and control over each step in the process.
As you move forward, you can enhance your agentic workflows in watsonx Orchestrate by incorporating low-code and code features that offer developers greater flexibility and control. These include adding code blocks for custom Python logic, integrating tools, using foreach loops to iterate over lists, and applying data mapping to transform inputs and outputs. You can also work with flow variables to manage state across the workflow, use tables (single choice) for structured user input, and define complex data using the object data type.
While this tutorial focuses on the no-code experience, upcoming tutorials will explore these advanced features to help you build more dynamic and intelligent workflows. Also, consider checking the other published tutorials on watsonx Orchestrate.
Acknowledgments
This tutorial was produced as part of the IBM Open Innovation Community initiative: Agentic AI (AI for Developers and Ecosystem).
The author deeply appreciates the support of Dennis Parrott, and Michelle Corbin for the guidance on reviewing and contributing to this tutorial.