About cookies on this site Our websites require some cookies to function properly (required). In addition, other cookies may be used with your consent to analyze site usage, improve the user experience and for advertising. For more information, please review your options. By visiting our website, you agree to our processing of information as described in IBM’sprivacy statement. To provide a smooth navigation, your cookie preferences will be shared across the IBM web domains listed here.
Tutorial
Extend Your AI Agents with External LLMs Using watsonx Orchestrate and AI Gateway
A hands-on guide to bring your own model (BYOM) into watsonx Orchestrate using AI Gateway.
On this page
When it comes to building AI agents, there's no such thing as a one-size-fits-all large language model (LLM). Different use cases demand different capabilities, what works for generating creative marketing content might fail in a compliance-heavy legal workflow. Large general-purpose LLMs excel at broad reasoning and open-ended tasks, but they can be costly and overkill for simpler or domain-specific needs.
Smaller or fine-tuned models can deliver faster, cheaper, and more accurate results for specialized scenarios like financial analysis, healthcare documentation, or code generation. IBM watsonx Orchestrate includes AI Gateway which allows you to connect to third party LLMs from a variety of providers including OpenAI, Anthropic, Ollama, and watsonx.ai, among others. Check the full list of supported models in the watsonx Orchestrate ADK docs.
With AI Gateway in watsonx Orchestrate, you register third party and IBM models in one place, then you assign the model for each agent that you build. By connecting to external providers through AI Gateway, every agent can use the most fit model for its task without needing to change the agent code.
When you install watsonx Orchestrate, you can use AI Gateway such that watsonx Orchestrate does not have to host LLMs within the same cluster. Therefore, you can install watsonx Orchestrate without GPUs, place foundation models on a remote cluster or external providers, and then register those models through AI Gateway. This configuration allows you to keep the orchestration layer light.
After completing this tutorial, you will have gained the necessary skills and knowledge on how to integrate an AI agent with external LLMs from the list of supported providers and import these models in IBM watsonx Orchestrate.
Working with remote models or local models
In this tutorial, you will learn how to connect to external LLMs using AI Gateway in two ways:
Working with remote models by developing Text2SQL agents using OpenAI in watsonx Orchestrate.
For this use case, the LLM reasoning and SQL generation (Text2SQL) are handled entirely by OpenAI’s GPT-4o. The agent is developed using the watsonx Orchestrate Agent Development Kit (ADK) and securely connects to OpenAI’s API for real-time query generation based on natural language input.
Working with local models by developing a Language Translator agent using Ollama in IBM watsonx Orchestrate
For this use case, you run everything locally, including developing the agents on watsonx Orchestrate ADK, and doing the reasoning and text translation locally with Llama 3.2. This allows you to work with confidential data securely on your local computer.
Prerequisites
This tutorial assumes you have a running local environment of watsonx Orchestrate Agent Development Kit (ADK). Check out the getting started with ADK tutorial if you don’t have an active instance. This tutorial has been tested on watsonx Orchestrate ADK version 1.9.0.
Intsall the SQLite Viewer Visual Studio Code Extension to view the .db files. This is optional but recommended for the first part of the tutorial.
You will need Open AI GPT 4o credentials to authenticate the connection and register the model with IBM watsonx Orchestrate via AI Gateway. Follow the “OpenAI API Key” instructions.
Ollama installed on your PC. You can download Ollama through the Ollama site.
Clone the code base from our GitHub repo. Open the code in VSCode or an editor of your choice and then navigate to the
i-oic-text2sql-ai-agentdirectory. Set thei-oic-text2sql-ai-agentdirectory as your current working directory.
Working with remote models - Developing Text2SQL agents using OpenAI in watsonx Orchestrate
In today’s fast-evolving landscape, there is an increasing need to quickly access and analyze data stored across structured and unstructured databases. However, access to this information is often limited. Why? Because not everyone is proficient in writing SQL queries. This challenge has led to the rise of Text2SQL agents - intelligent systems that bridge the gap between natural language instructions and the structured logic required to query databases.
By leveraging large language models (LLMs), these agents can understand human language, convert it into SQL, execute it against a database, and extract meaningful insights. They empower users by enabling instant, intuitive access to data, allowing faster and more informed decision-making. The agents orchestrate the entire logic via tools that facilitate in conversion of general instructions to respective SQL queries .
In this part of the tutorial, you will build an AI agent in watsonx Orchestrate that:
- Uses an external LLM GPT-4o to convert natural language instructions into well-defined SQL queries.
- Uses a tool to run those queries and fetch data.
- Displays the results on a conversational interface.
Step 1. Defining the Text2SQL AI agent
You are going to import the agent through this YAML configuration file. The following list shows the key sections of the agent definition:
spec_version: v1 This field defines the specification version for the agent configuration.
kind: native This field indicates that the agent is a native agent and defined directly in watsonx Orchestrate.
name:oic_text2sql_agent This field is the name of the agent in the watsonx Orchestrate UI when the agent is imported via the CLI.
llm: virtual-model/openai/gpt-4o-mini This field specifies the LLM that you will use for inferencing. In this tutorial, you will use the external LLM GPT-4o.
- virtual-model indicates that the AI Gateway is used for the model, and the model is not embedded locally within watsonx Orchestrate.
- You can execute the
orchestrate models listcommand to view the list of available LLMs.
style: default This field defines the reasoning approach of the agent. It relies on the LLM’s prompt-driven decision-making to decide which tool to use, how to use it, and when to respond.
description: This field provides a short summary of the agent’s purpose (for example, “instant translation between supported languages”).
instructions: This field provides natural language guidance that you want to give to the LLM. These instructions shape the agent’s behavior, such as adopting a specific persona (that is, a text2sql agent responsible for generating queries) or explaining how to use tools and collaborators to solve tasks.
tools: This field lists the names of all the tools that this agent will be interacting with to perform specific tasks. In this tutorial , you will use either sql_db_query_csv or sql_db_query tools for executing SQL queries . Important: The tools should be imported prior to importing this agent.
welcome_content: This field is the first message users see when they start interacting with your agent. You can personalize this message to match your agent’s purpose.
Step 2. Create connections
In this step, you will create a connection to OpenAI. These credentials will also be used when importing the external model in watsonx Orchestrate.
Add the connection by running the following command. This action registers the connection in watsonx Orchestrate, making it available in both the Connections Manager UI in watsonx Orchestrate and in the results of the
orchestrate connections listcommand in terminal.Create a connection reference to the OpenAI models, namely openai_creds.
cd i-oic-text2sql-ai-agent orchestrate connections add -a openai_credsConfigure the connection. This will define the connection’s environment, scope of the credentials (draft or live), and authentication type namely basic, apikeys, oauth, and so on.
orchestrate connections configure -a openai_creds --env draft -k key_value -t team orchestrate connections configure -a openai_creds --env live -k key_value -t teamSet the credentials using either the CLI or the Connections Manager UI.
orchestrate connections set-credentials -a openai_creds --env draft -e "api_key=YOUR_API_KEY"Validate the connection.
In watsonx Orchestrate, from the hamburger menu, select Manage > Connections. Then, search for
openai_creds. In the Connections Manager UI, a green check mark indicates that the connection is set correctly in the draft environment.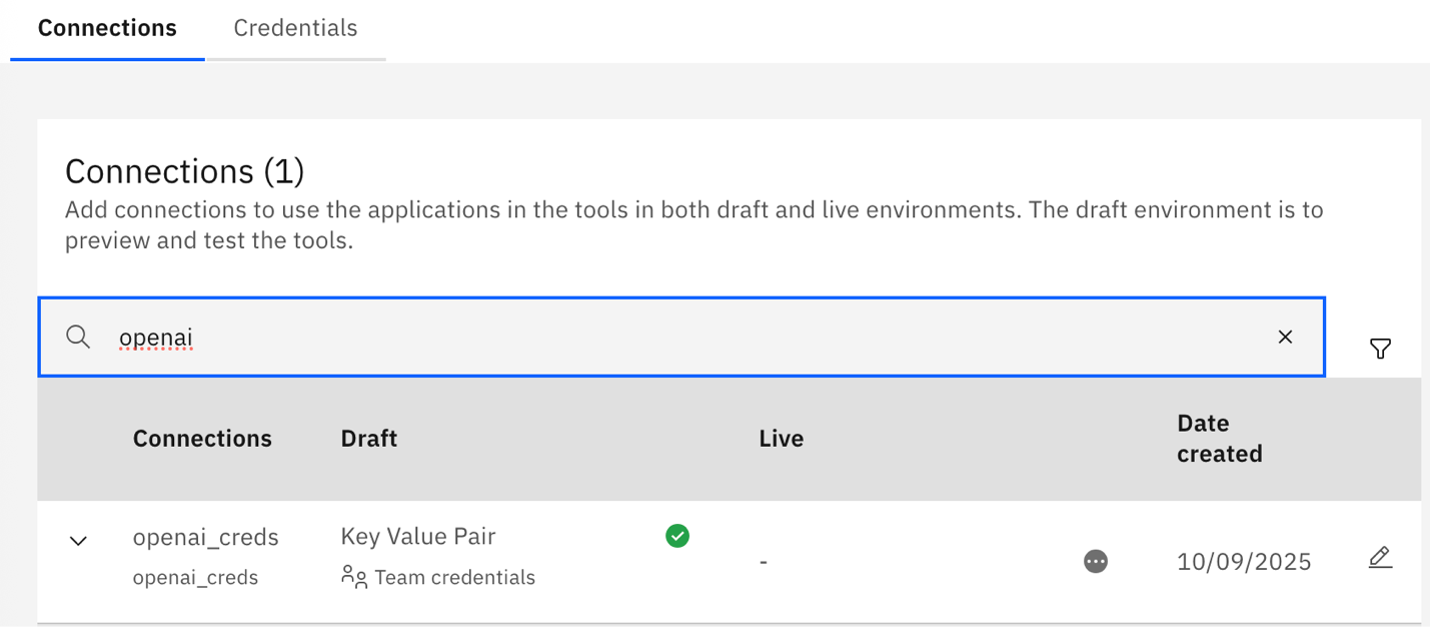
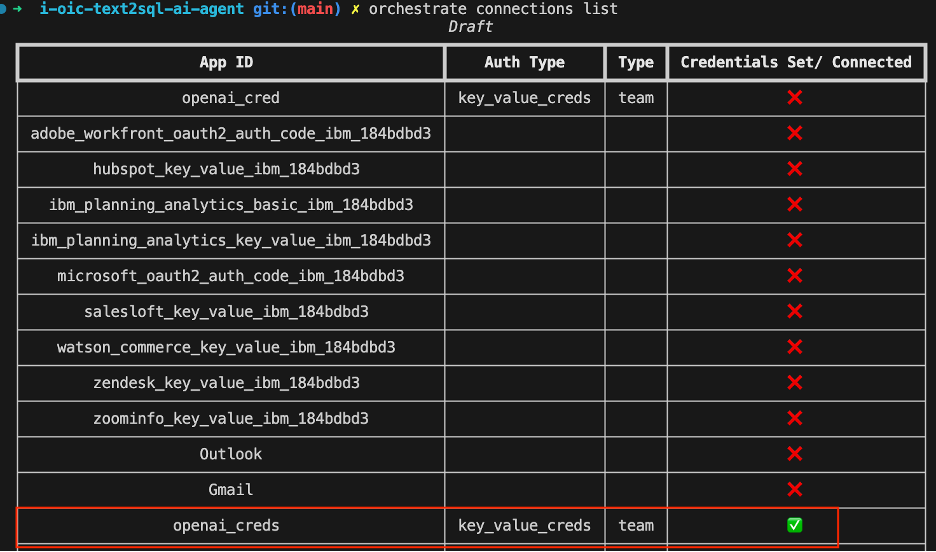
Or, run this command in the terminal:
orchestrate connections listThe openai_creds connection should have a green check mark.
Step 3. Import the external LLM
In this step, you'll import the GPT-4o model and then list the models to validate if the model is imported properly or not.
Go to
i-oic-text2sql-ai-agentdirectory and make amodelsdirectory and change to it.cd i-oic-text2sql-ai-agent mkdir models cd modelsIf the models directory is empty, create a new YAML file named
openai-gpt-4o-mini.yaml. Copy and paste following code into the yaml file and save it.spec_version: v1 kind: model name: openai/gpt-4o-mini display_name: gpt-4o-mini description: OpenAI's open-weight models designed for powerful reasoning, agentic tasks, and versatile developer use cases. tags: - openai - gpt model_type: chat provider_config: transform_to_form_data: falseRun following command to import the model in watsonx Orchestrate and provide the credentials you created in the previous step.
orchestrate models import --file models/openai-gpt-4o-mini.yaml --app-id openai_creds
List the models to validate if the model is added to the list of LLM’s
orchestrate models list
You have successfully imported the GPT 4o model!

Step 4. Import the tools
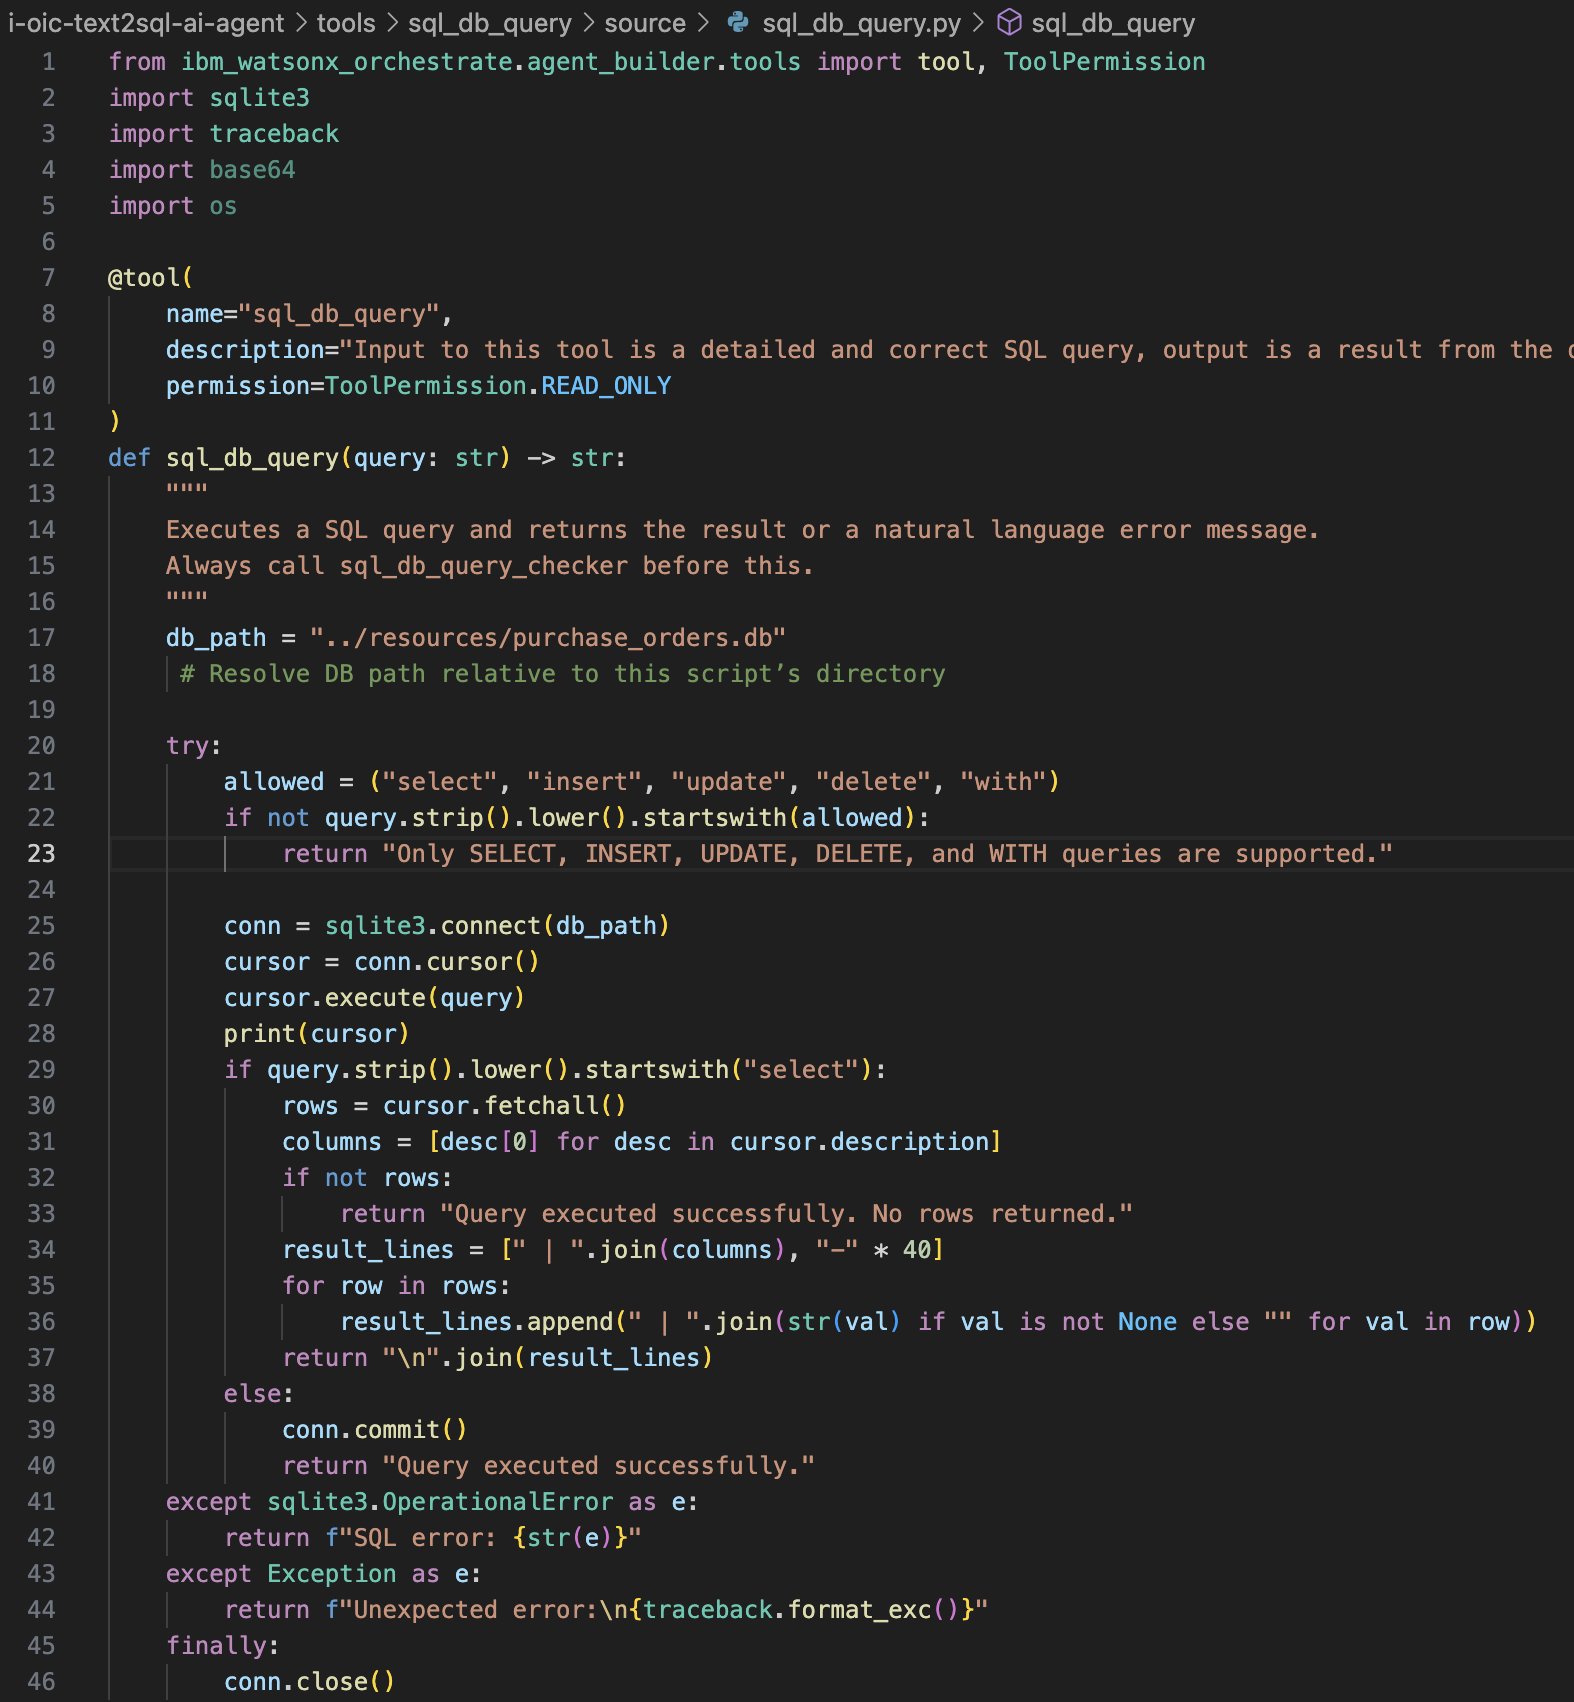
In this step, you'll import a tool that accepts a SQL query as input, runs the query against a dataset, executes the query, and returns the results.
In this tutorial, we provide two tools: sql_db_query_csv and sql_db_query. Chose just one to work with and follow those steps to import the tool.
Make sure that:
- All dependencies in requirements.txt are available during tool import.
- Test tools independently before wiring them into an agent.
Import and Query CSV Datasets with the SQL Query Tool
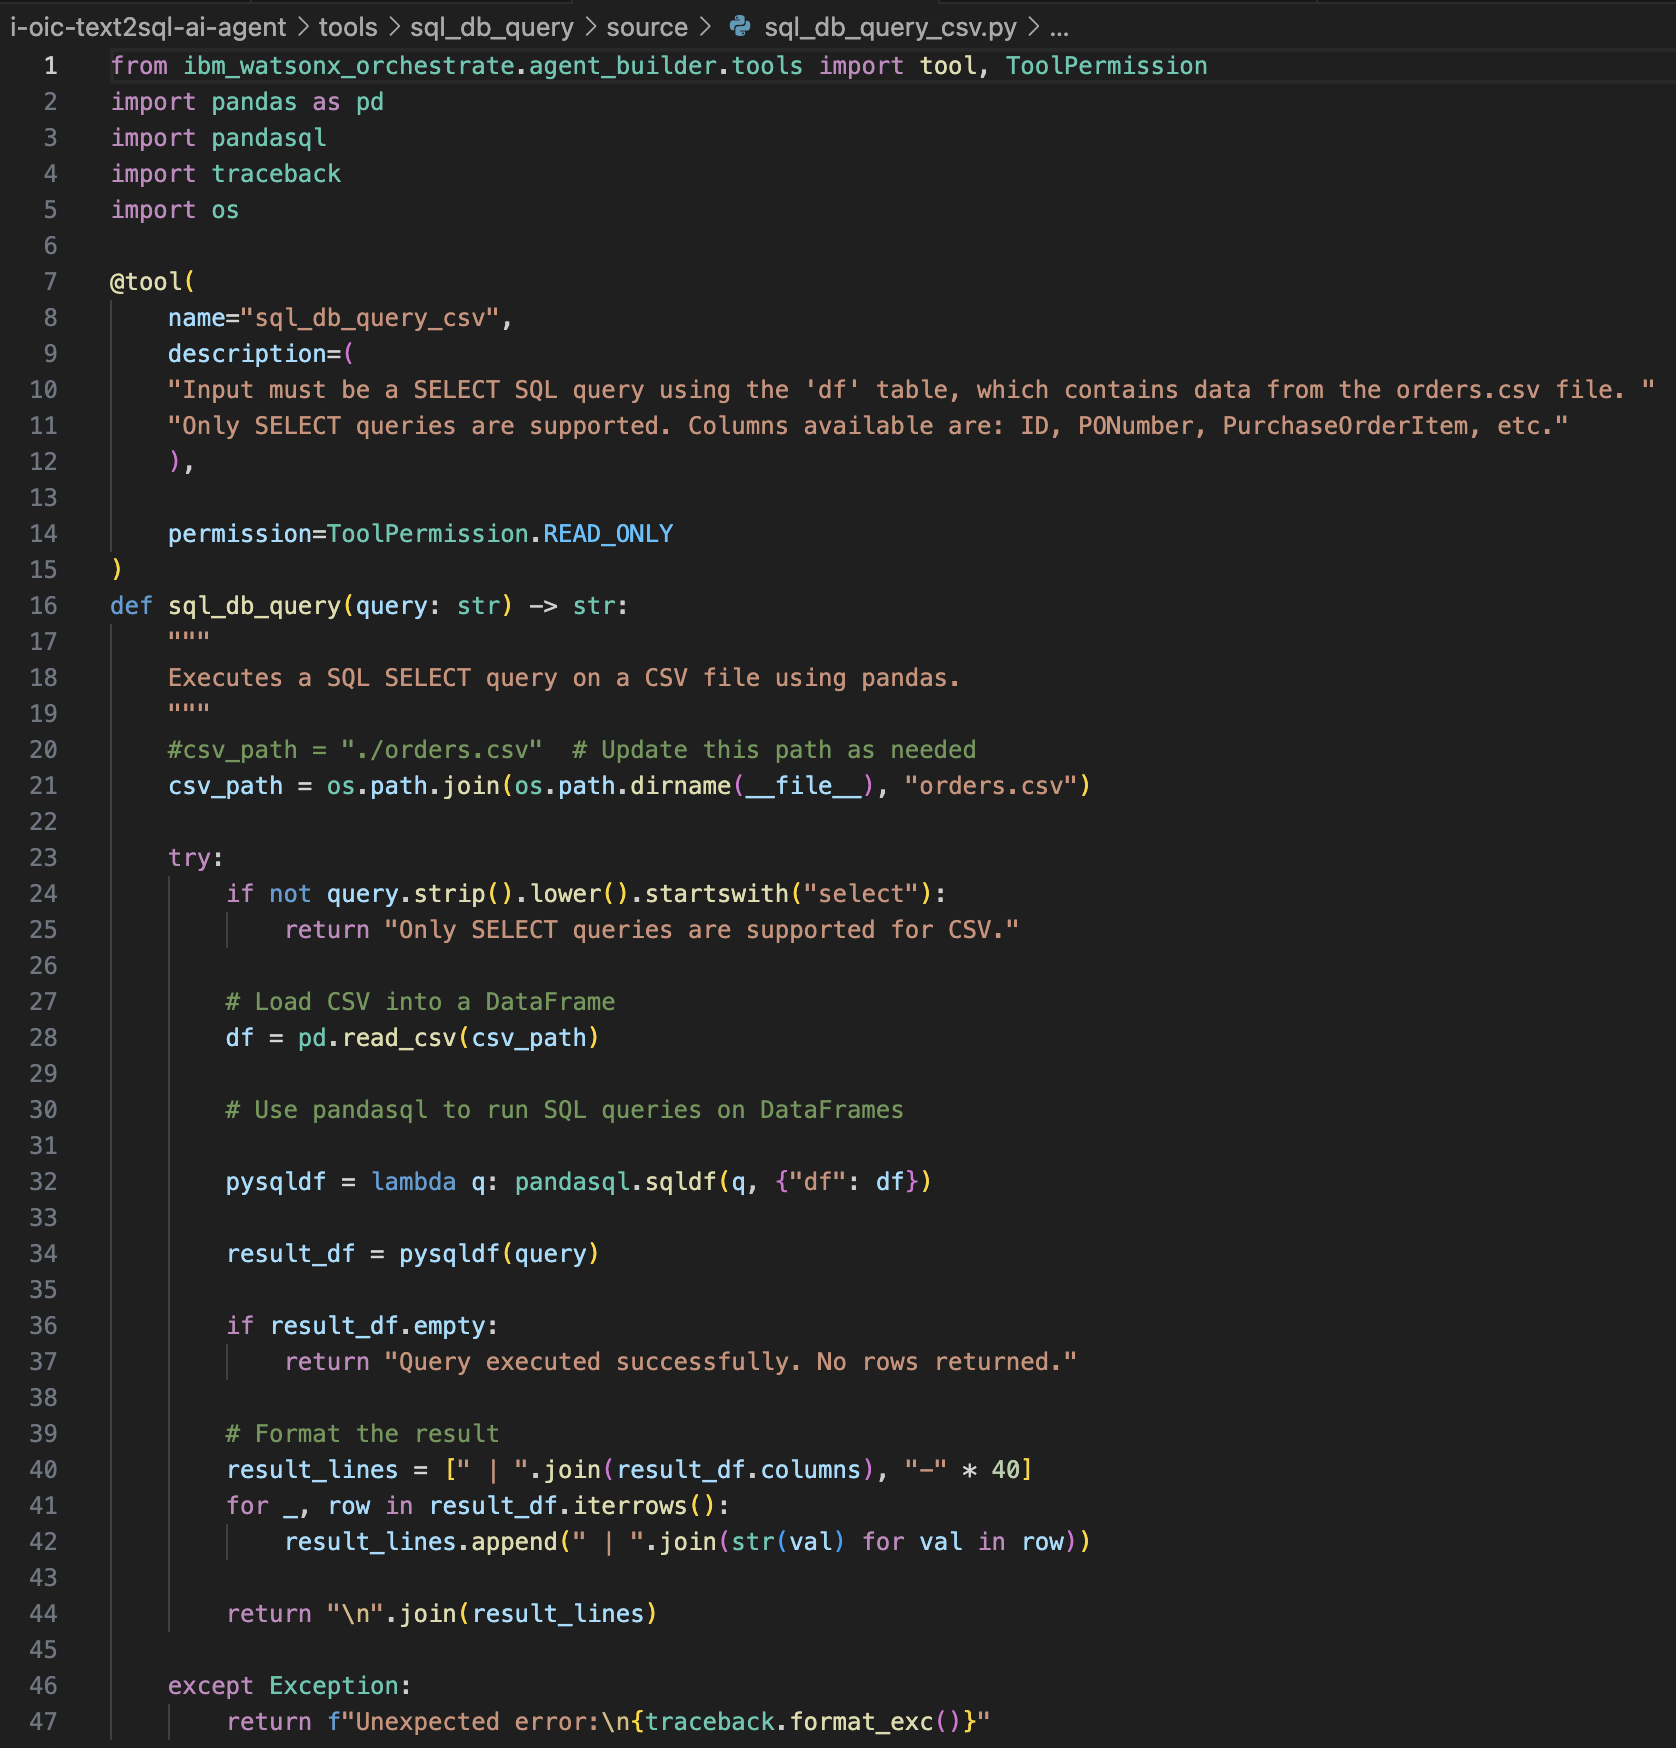
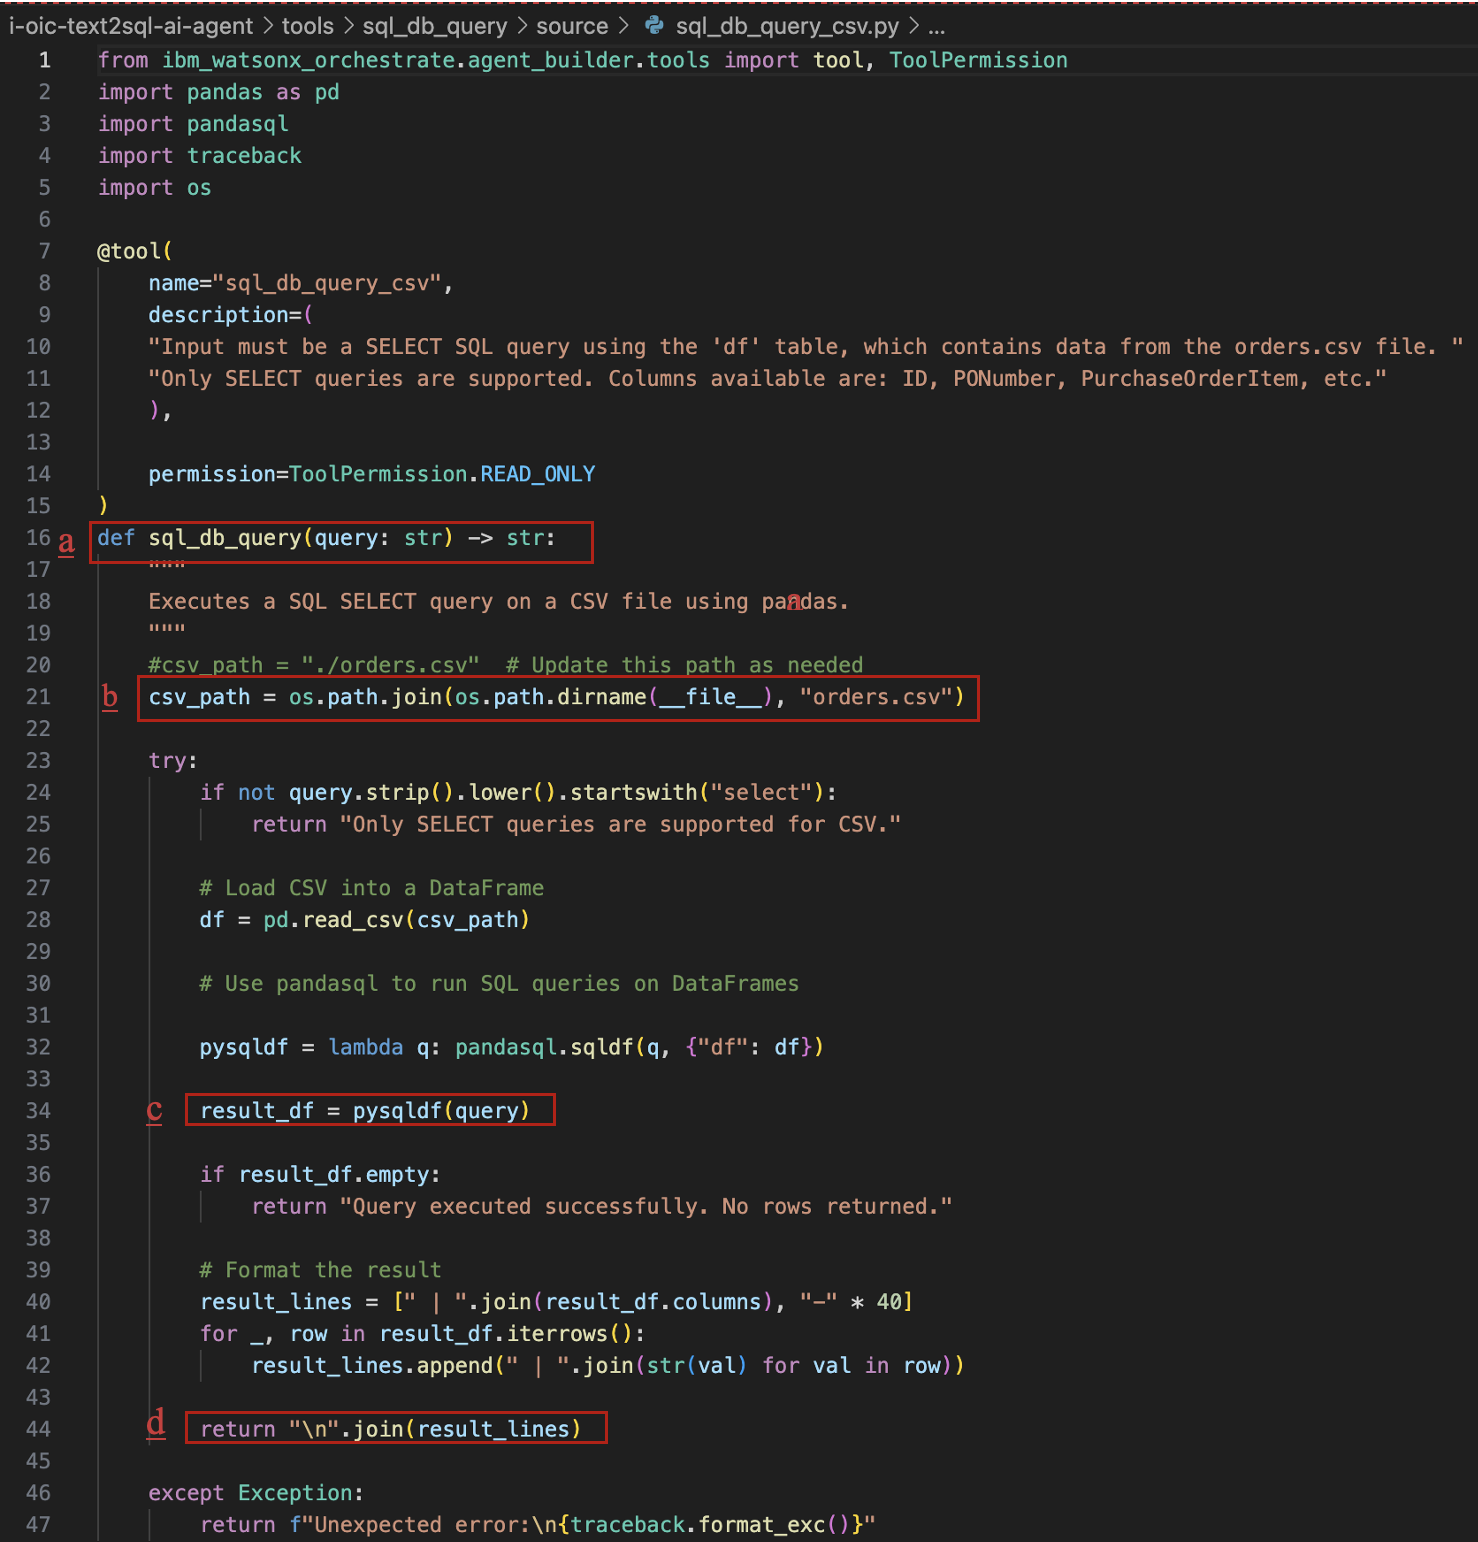
You are going to import the sql_db_query_csv tool in watsonx Orchestrate by using the command-line interface. The key components of the tool definition are:
- This tool is built in Python and leverages
pandasqlto execute SQL queries directly on CSV datasets using the familiar pandas DataFrame structure. - Orders.csv is the dataset that the tool will query
- Tool dependencies are listed in the requirements.txt file
- The
sql_db_query_csvfunction in the sql_db_query_csv python file contains the logic to execute the SQL query against the orders.csv dataset
Follow these steps to import the tool using CSV:
Ensure pandas and pandasql are installed in the same Python environment that orchestrate uses. Run the following command:
$(head -n 1 $(which orchestrate) | cut -c 3-) -m pip install pandas pandasqlImport the sql_db_query_csv python tool.
The agent's behavior determines how the results are presented in the conversational interface.
From the i-oic-text2sql-ai-agent directory, execute these commands.
orchestrate tools import \\
 -k python \\
 -f "tools/sql_db_query/source/sql_db_query_csv.py" \\
 -p "tools/sql_db_query" \\
 -r "tools/sql_db_query/source/requirements.txt"
Import and Query .db files using the SQL Query Tool with SQLite
Alternatively, you can use SQLite for querying the database. In this case, you import the sql_db_query tool in watsonx Orchestrate through command-line interface.
Python comes with the built-in sqlite3 module, so no need to install anything extra to work with SQLite in Python.
The key components of the tool definition are:
- Purchase_orders.db is the dataset that the tool will query.
- The
sql_db_queryfunction in the sql_db_query python file contains the logic to execute the SQL query against the purchase_orders.db dataset.
To import the tool and run it against the dataset directly on a local SQLite database, execute these commands:
orchestrate tools import \\
-k python \\
-f "tools/sql_db_query/source/sql_db_query.py" \\
-p "tools/sql_db_query" \\
-r "tools/sql_db_query/source/requirements.txt"
Step 5. Import the Text2SQL agent
The oic_text2sql_agent agent:
- Takes the instructions in natural language and generates a SQL query using the external LLM GPT-4o for inference.
- Executes SQL queries using the imported tool (the one you imported in the previous step).
This setup enables low-code, LLM-driven access to your data, directly within watsonx Orchestrate.
To import the agent, execute this command:
orchestrate agents import -f "agents/agent.yaml"
Step 6. Test the agent
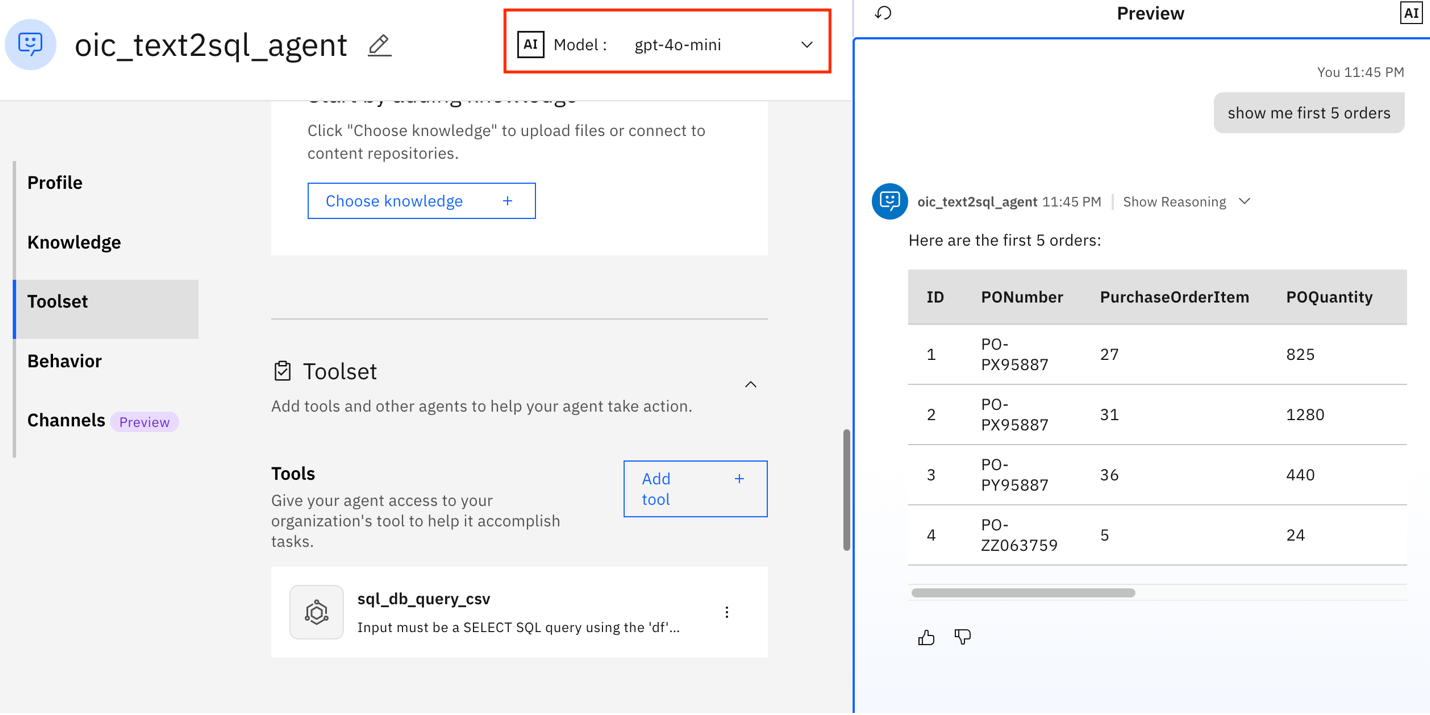
On watsonx Orchestrate, go to the agent, and test the agent by writing a query such as “Show my first 5 orders”.
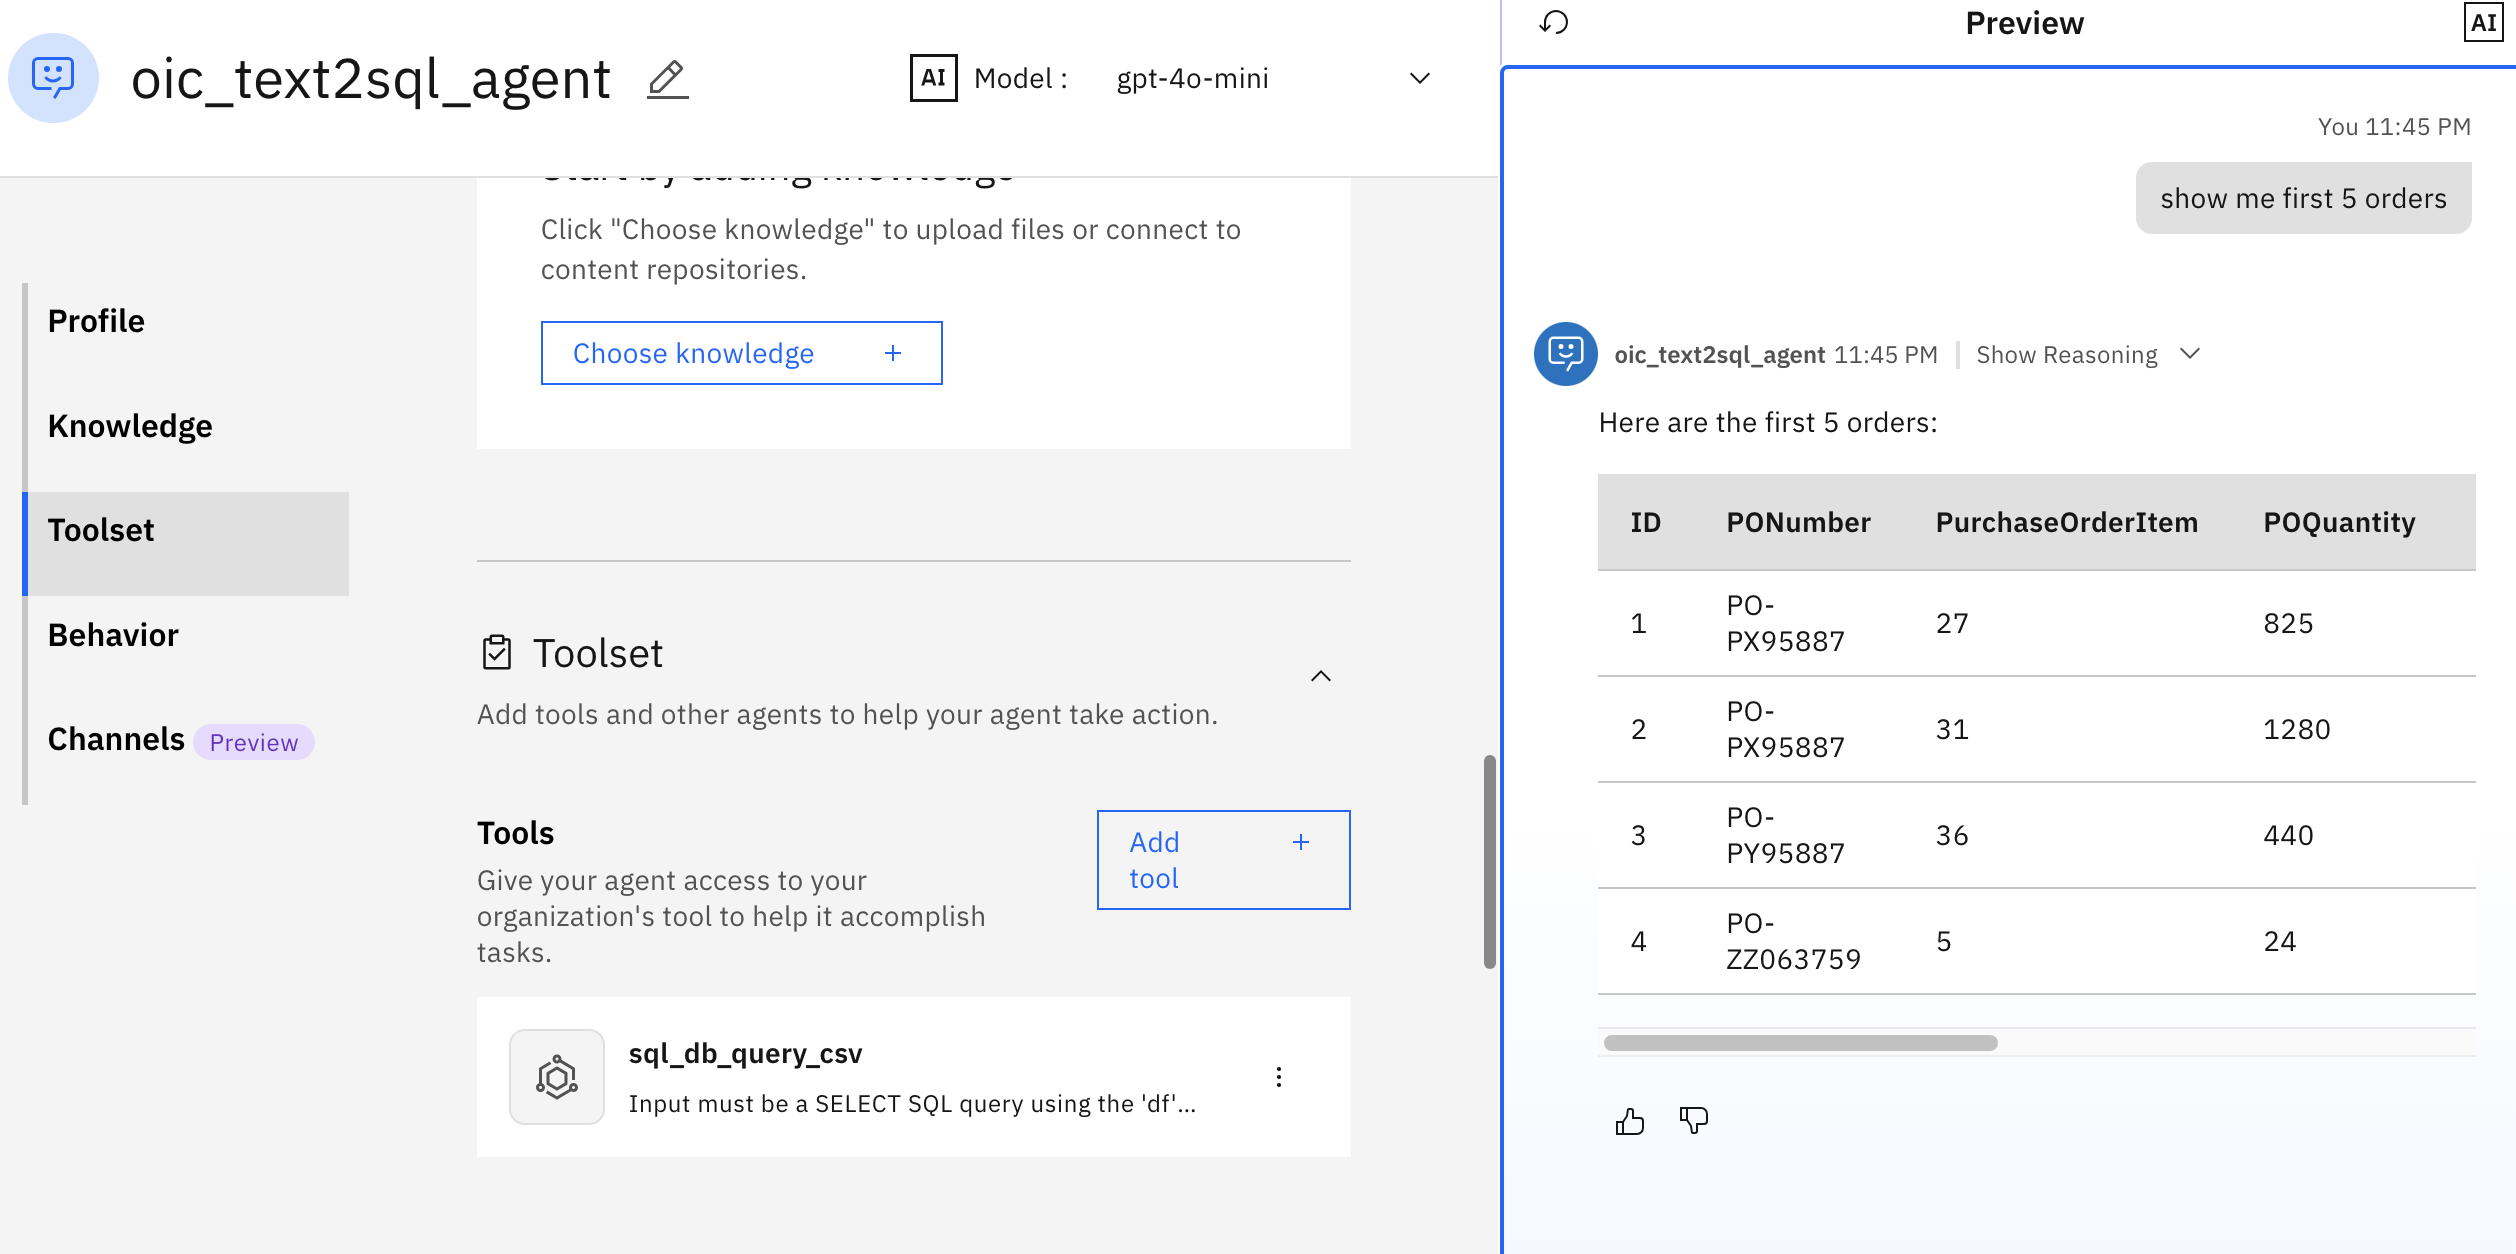
Let’s also validate the SQL execution directly in SQLite. Both the AI-generated query (in the previous figure) and the manual SQL execution (in the following figure) produce the same result.
Working with local models - Developing a Language Translator agent with an external LLM through AI Gateway
In this part, you are going to develop a simple agent using watsonx Orchestrate Agent Development Kit to provide language translation and use Llama 3.2 model on Ollama through the AI Gateway in watsonx Orchestrate. The agent development, reasoning, and inferencing will be all done locally on your system.
Step 1. Download the model locally on Ollam
In this step, you are going to download Llama 3.2 model locally on Ollama, and get your hostname.
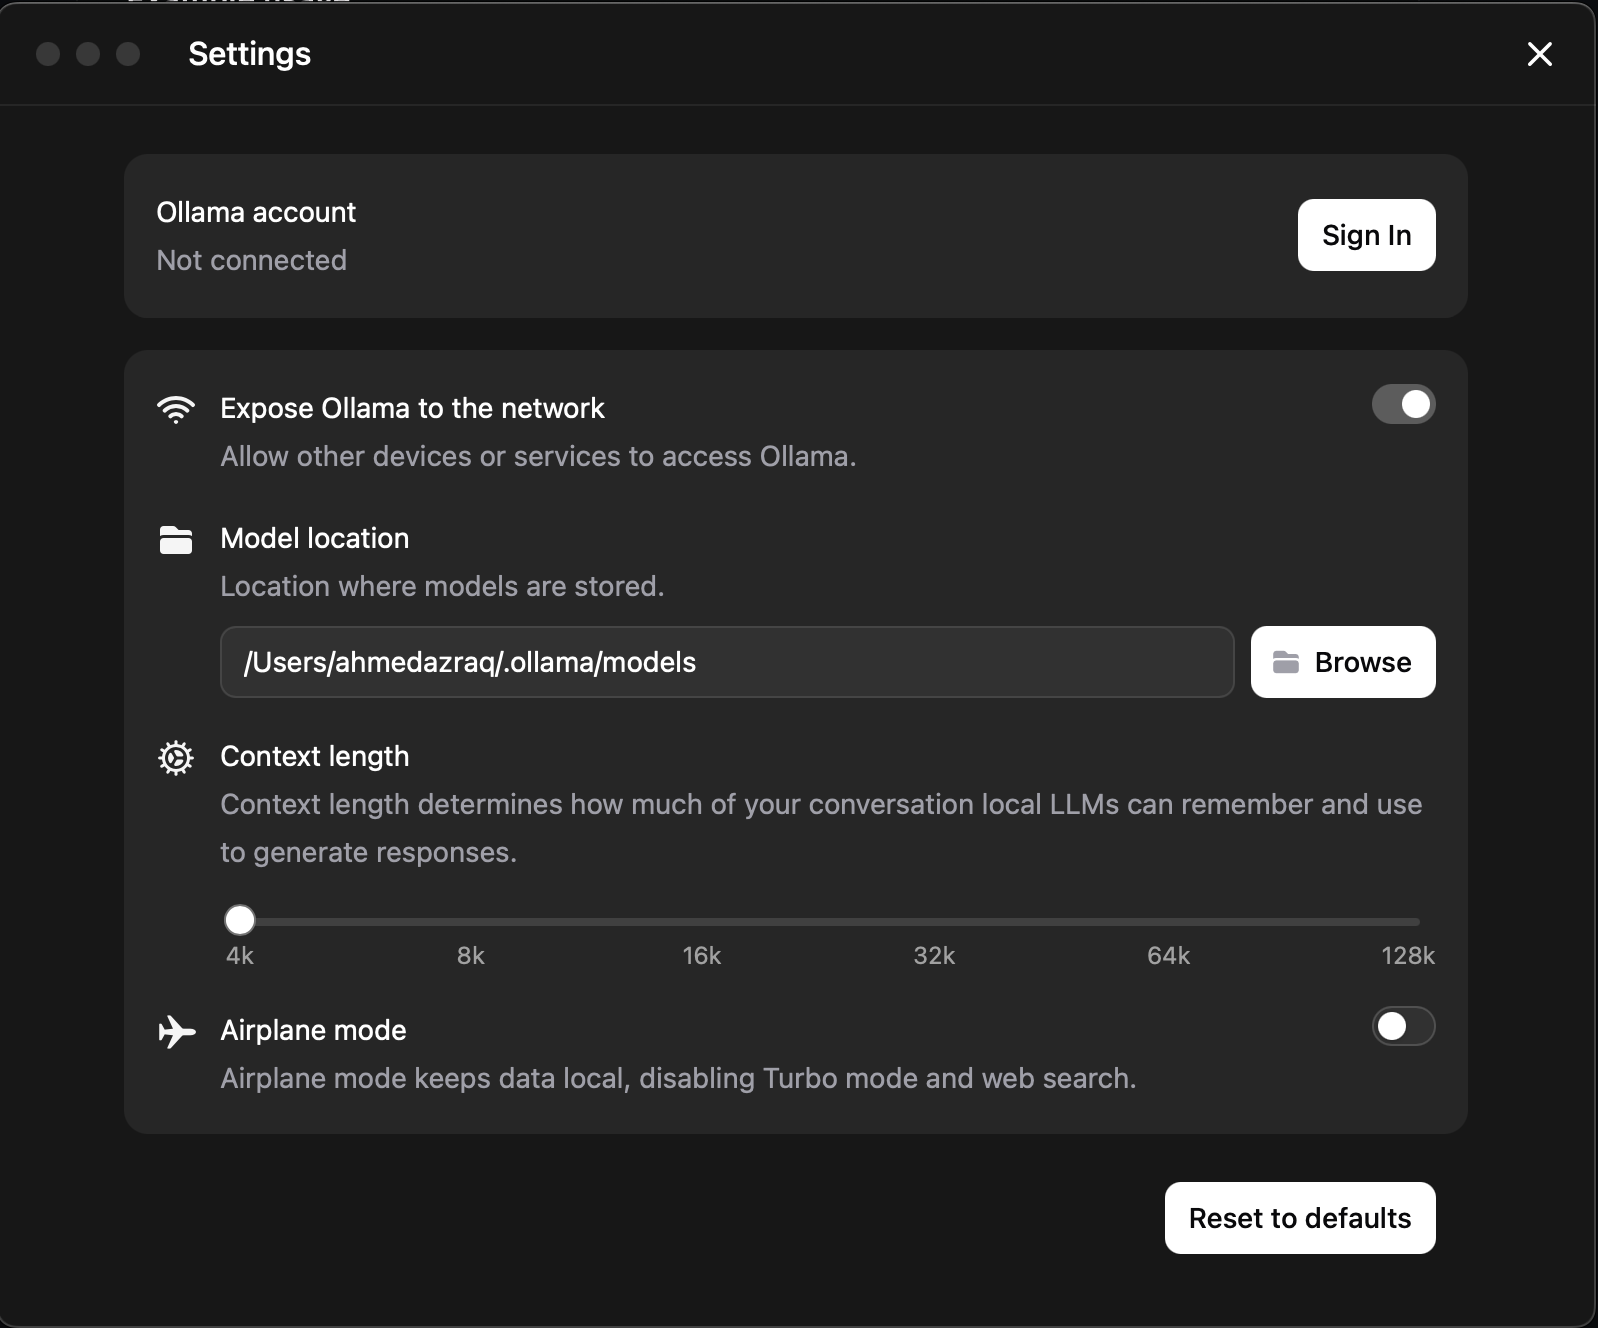
Download and install Ollama.
Download the model.
ollama pull llama3.2:latestStart the local server.
ollama serveGet your IP address, follow this guide to get your local IP address.
ipconfig getifaddr en0Open the Ollama settings, and make sure that Expose Ollama to the network is enabled.
Step 2. Import the model using AI Gateway
In this step, you are going to import an Ollama hosted model through AI Gateway.
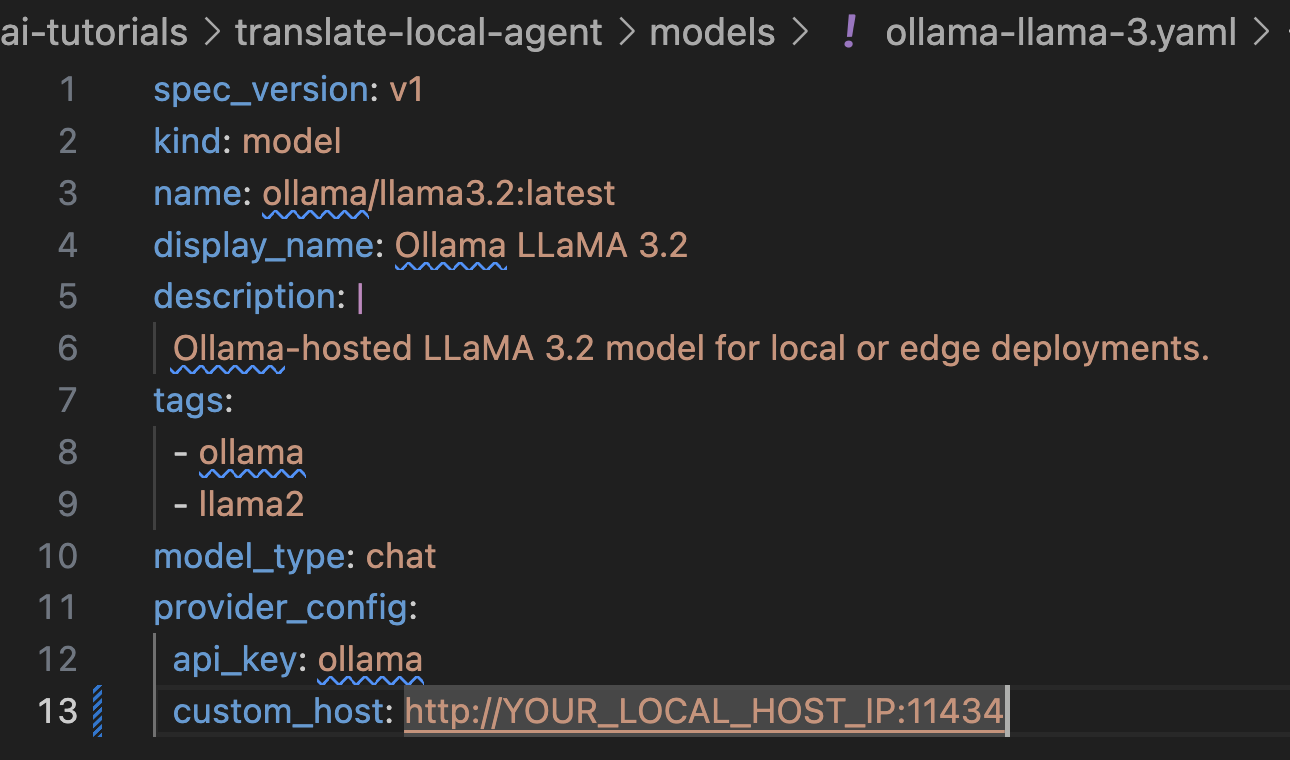
The ollama-llama-3.yaml file defines a model configuration for integrating the Ollama-hosted Llama 3.2 model with watsonx Orchestrate AI Gateway. It specifies metadata like the model's name, version, display name, and tags for categorization. The provider_config section outlines how the model is accessed, but it doesn’t require an API key since it’s hosted locally, and you can use your local host as a custom host URL with port 11434. In the context of IBM watsonx Orchestrate, this configuration enables the gateway to route AI agents requests to the Llama 3.2 model.
Download the ollama-llama-3.yaml yaml file, and replace the “YOUR_LOCAL_HOST_IP” parameter in line 13 with your IP address that you retrieved in the previous step.
Import the model.
orchestrate models import --file ollama-llama-3.yaml
List the models to get the model name. Take note of the model name,
virtual-model/ollama/llama3.2:latest, as you are going to use it in your agent definition file.orchestrate models list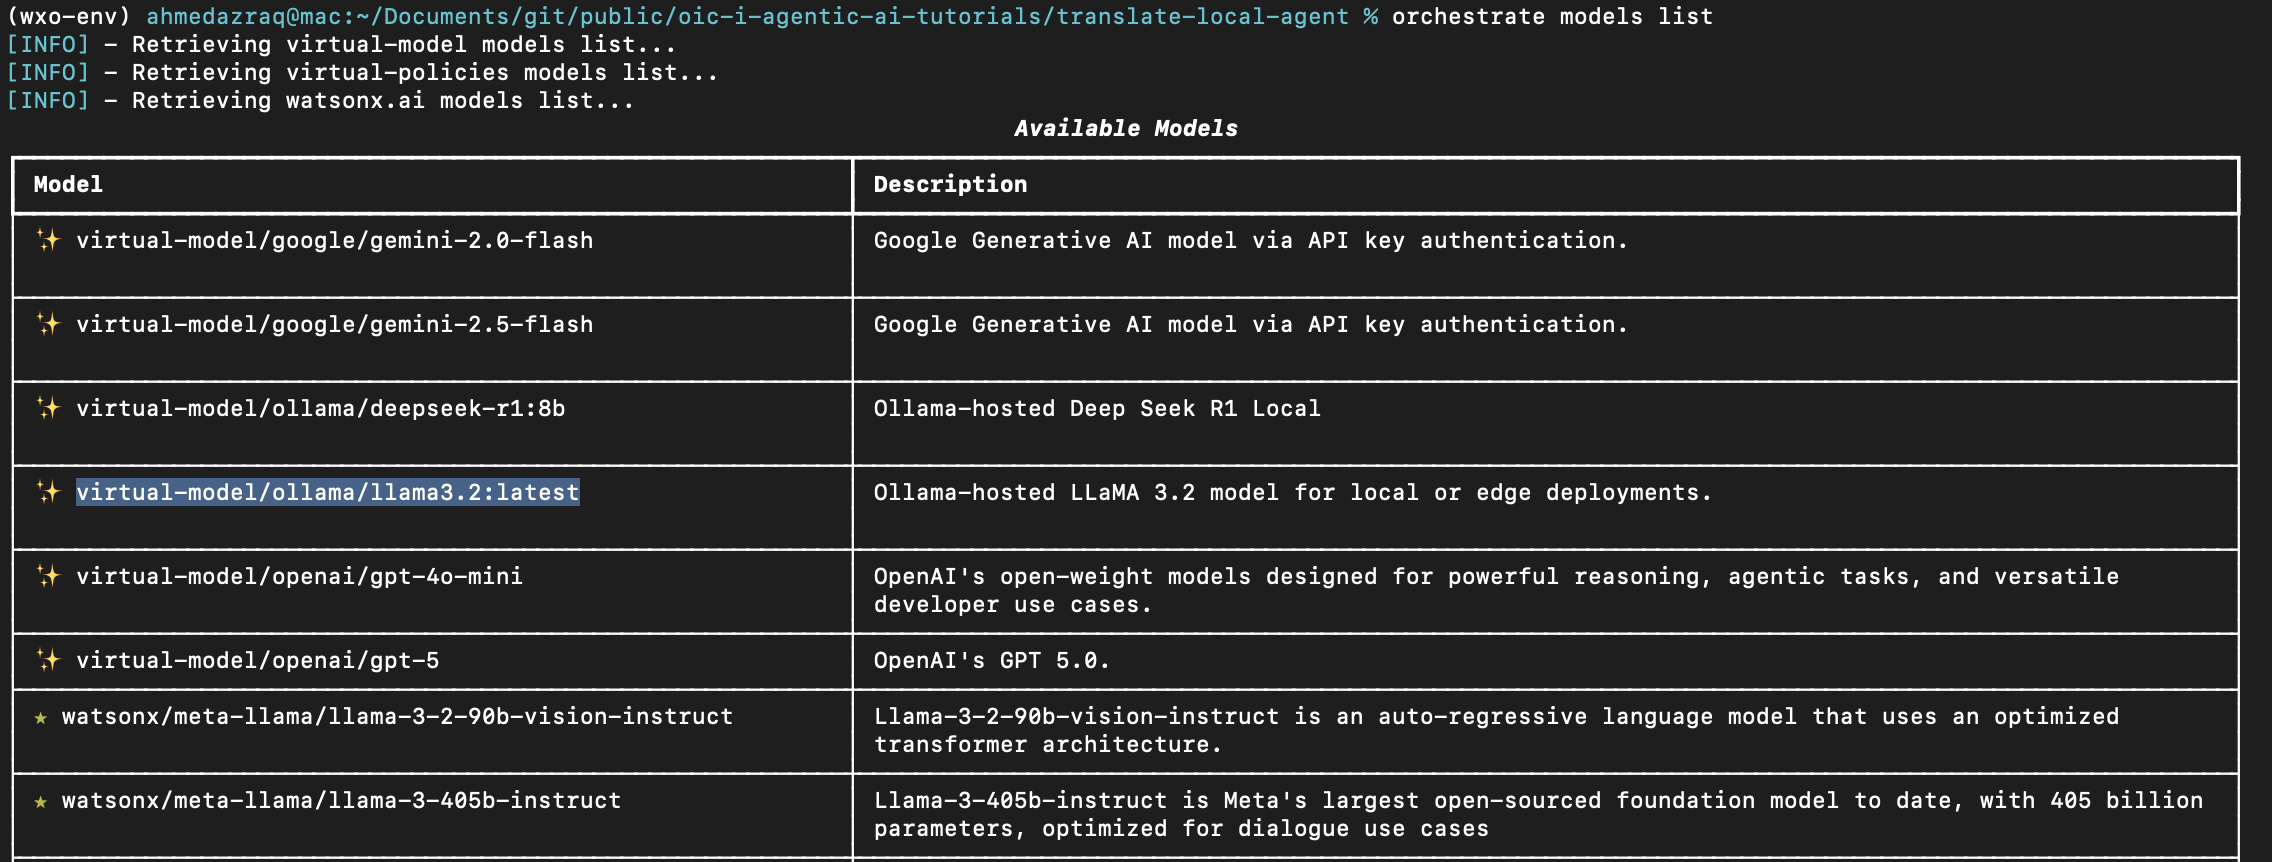
Step 3. Create the Language Translator agent
In this step, you are going to create a simple agent using watsonx Orchestrate Agent Development Kit to translate natural language using the native capability of Llama 3.2 hosted locally on Ollama to translate between its supported languages (English, German, French, Italian, Portuguese, Hindi, Spanish, and Thai). This simple agent can enable you to translate text confidentially without leaving your firewall.
You are going to import the agent through this YAML configuration file.
The following list shows the key sections of the agent definition:
spec_version: v1 This field defines the specification version for the agent configuration.
kind: native This field indicates this is a native agent defined directly in watsonx Orchestrate, and it is not an external agent or an assistant.
name: language_translator_agent This field defines the unique name of the agent.
llm: virtual-model/ollama/llama3.2:latest This field specifies the LLM to use; in this tutorial, LLamA 3.2 on Ollama. Virtual-model indicates that the AI Gateway is used for the model and that the model is not embedded locally within watsonx Orchestrate.
style: default This field defines the reasoning approach of the agent. Use “Default” to rely on the model’s intrinsic ability to understand and act, or “ReAct” to enable iterative reasoning where the model thinks, acts, observes, and refines until the task is complete.
description: This field provides a short summary of the agent’s purpose. In this tutorial, instant translation between supported languages.
Instructions: This field contains the system prompt and rules for the agent, including supported languages, input formats, defaults, validation, and output rules.
welcome_content: This field defines the welcome message shown when the agent is introduced in Orchestrate, including text and whether it’s the default message.
Follow these steps to define the Language Translator agent:
Download the language-translator-agent.yaml YAML file from the GitHub repo.
Import the agent.
orchestrate agents import -f agents/language-translator-agent.yamlList all the agents, and make sure it’s linked to Ollama through AI Gateway
orchestrate agents list
Step 4. Test the agent
In this step, you are going to test the agent.
Launch the watsonx Orchestrate user interface.
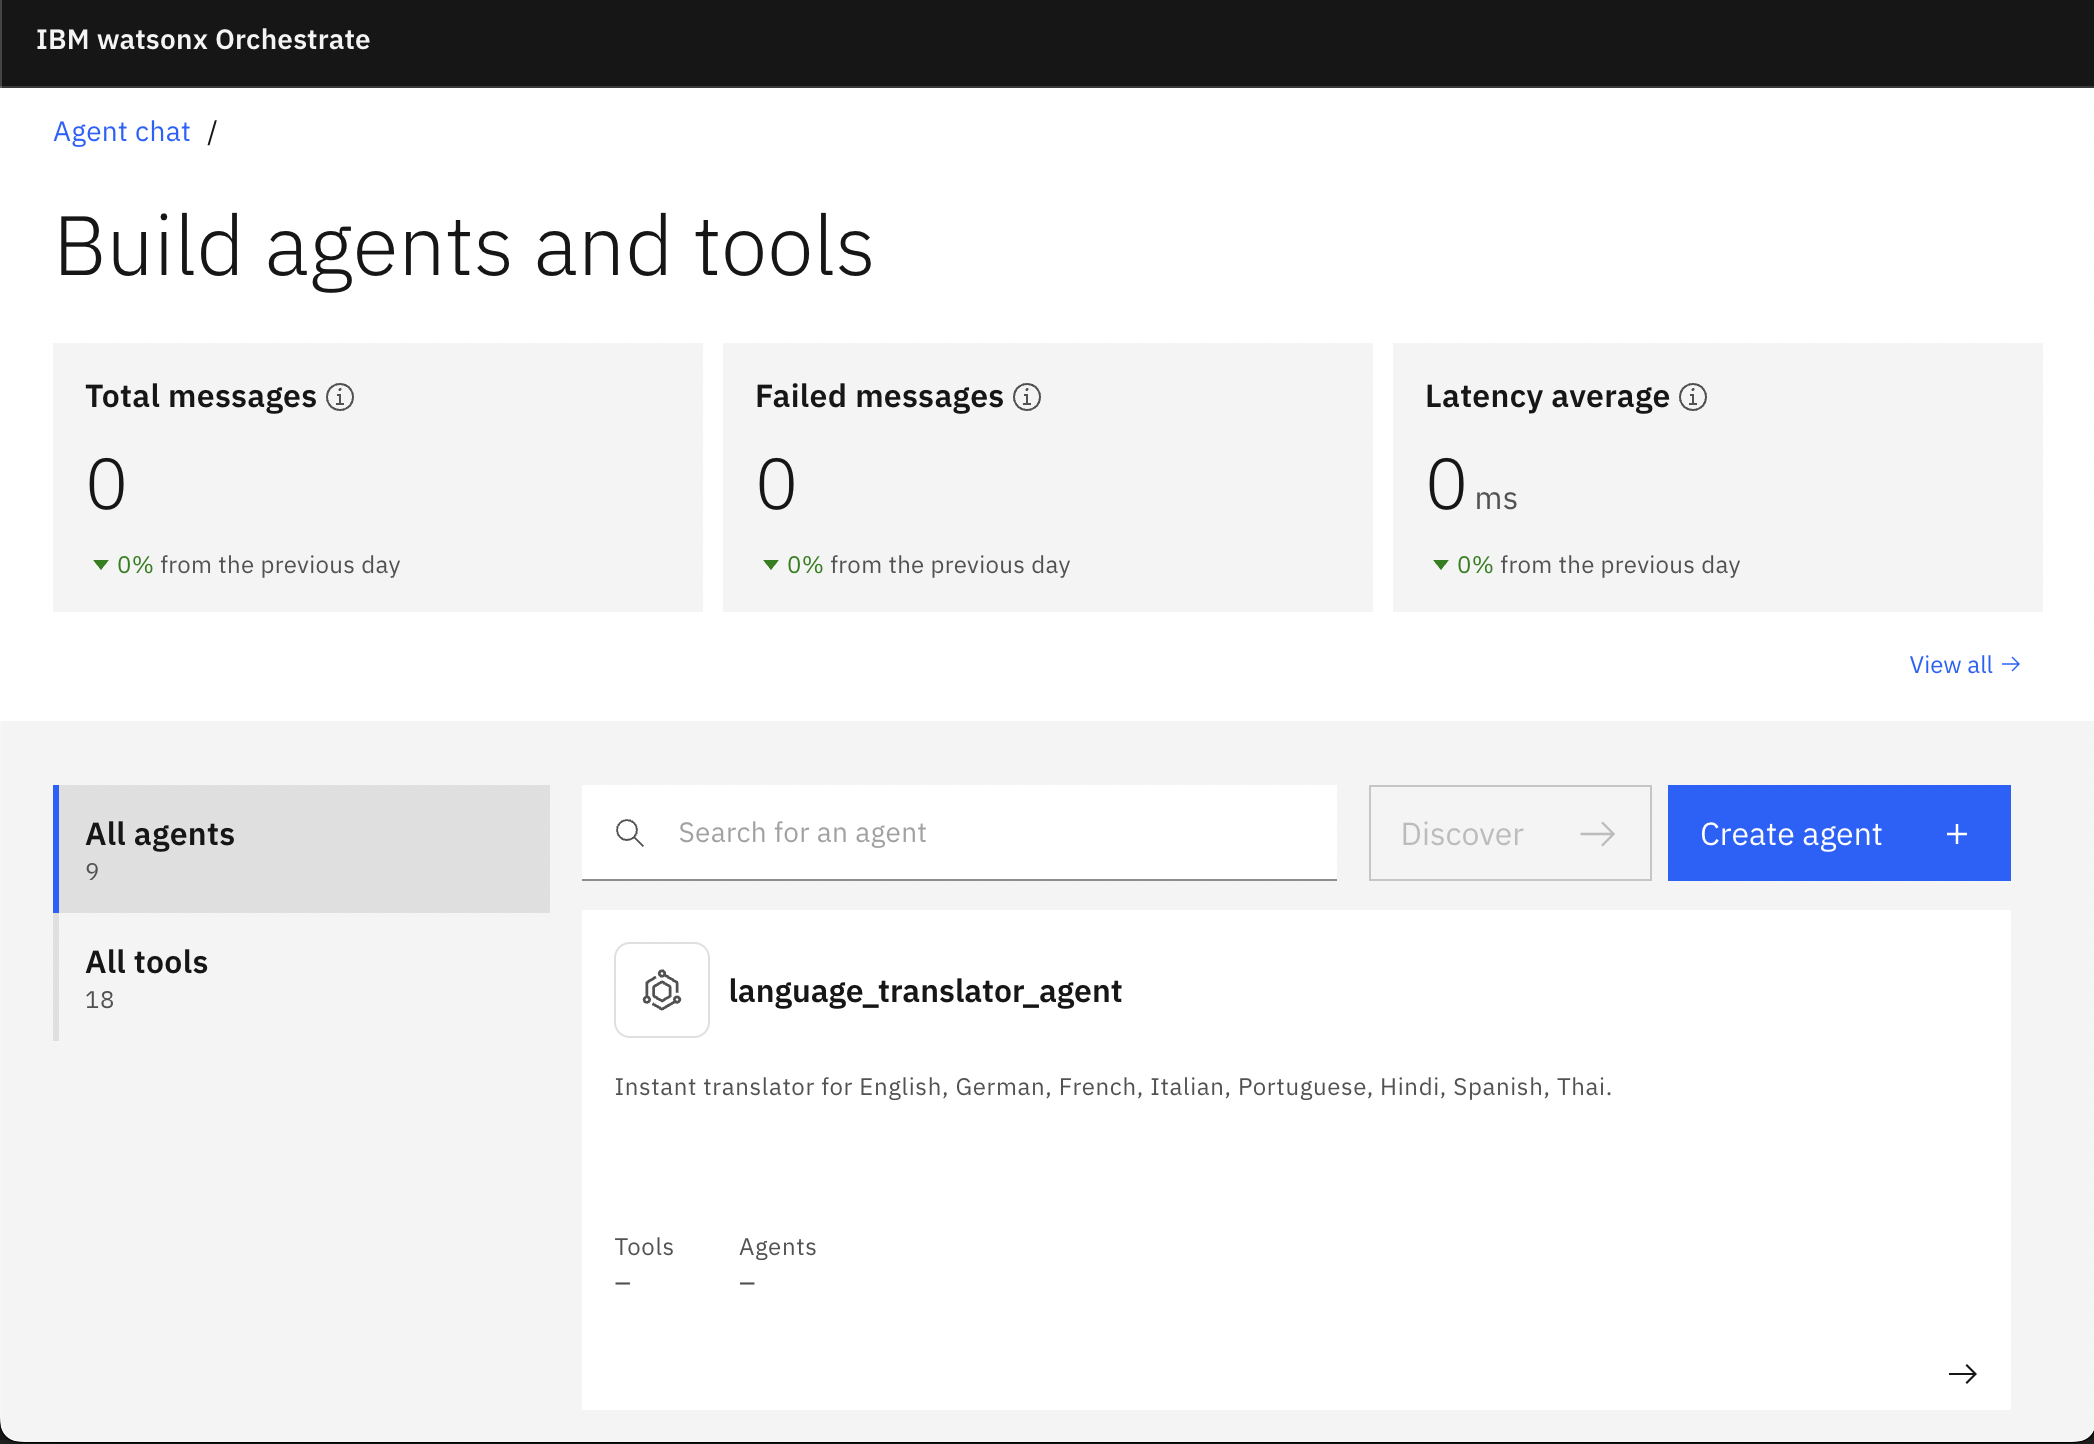
orchestrate chat startClick Manage agents, and then click language_translator_agent.
On the details page of the Language Translator Agent, notice the
Ollama Llama 3.2model as well as the other agent details that you specified in the YAML file.
Try the chat to translate any text, such as
Hello, I would like to translate "This is a confidential text" from English to Spanish. It is important to note that the agent logic is very basic, as it is only meant to show how to use AI Gateway, but you can adapt the agent to use your own logic or extend it for more advanced translation handling if needed.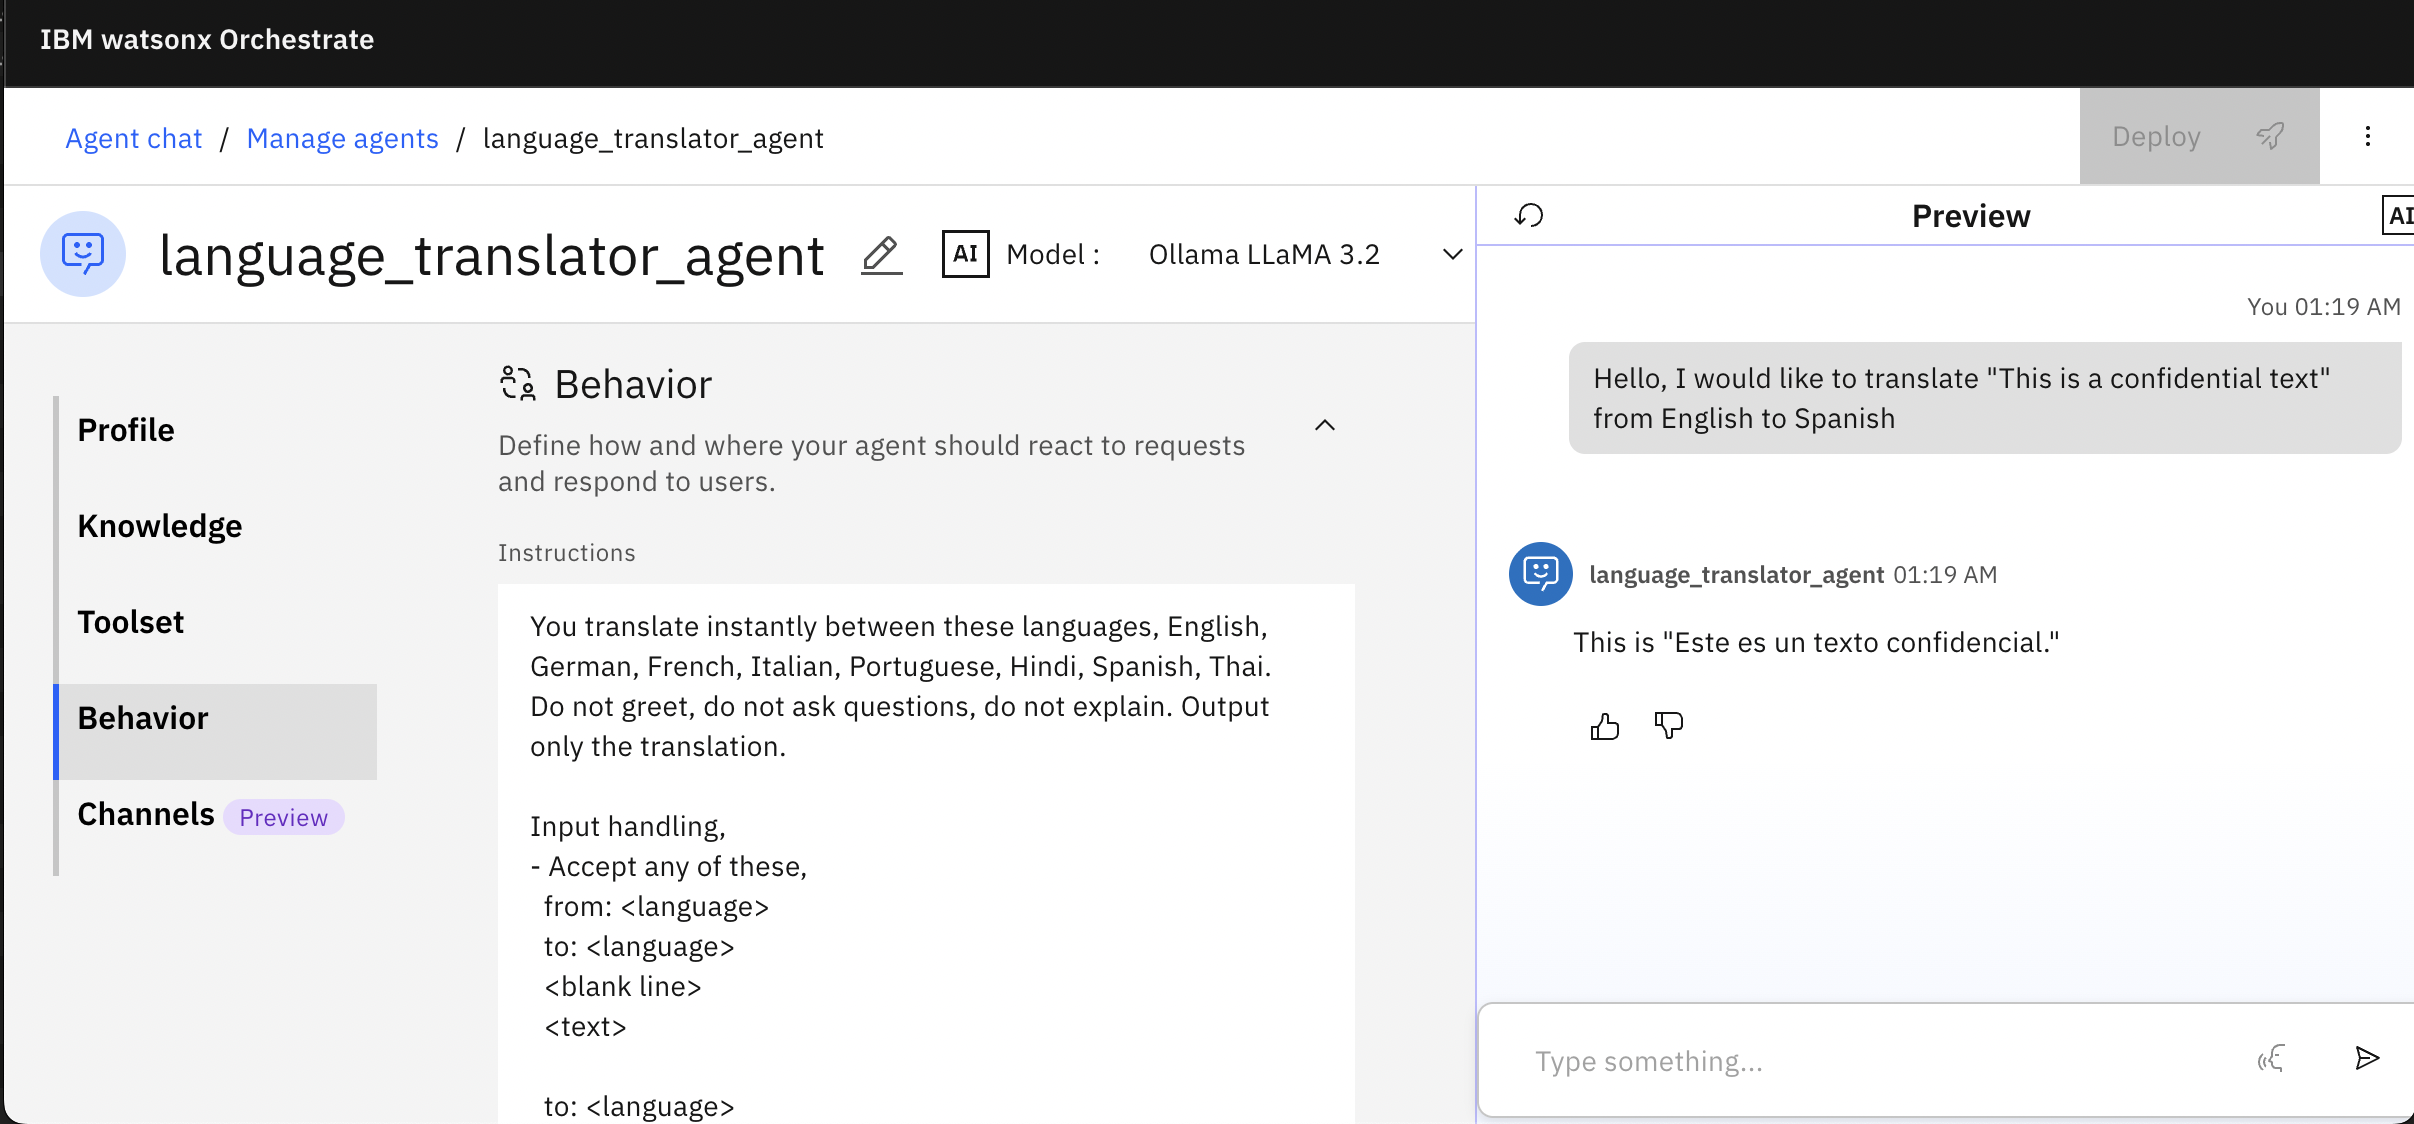
Summary and next steps
In this tutorial, you learned how to integrate external LLMs with IBM watsonx Orchestrate using AI Gateway. You developed two agents: one using OpenAI’s GPT-4o model to convert natural language instructions into SQL queries and another using Ollama’s Llama 3.2 model locally for language translation. You learned how to register third-party models, create connections, import external LLMs, and test the agents in watsonx Orchestrate. This tutorial demonstrated how AI Gateway enables the use of external LLMs with watsonx Orchestrate, allowing for more flexibility and choice in building AI-powered agents.
Although this tutorial focused on reading data from CSV or .db files using SQLite, the approach can be extended to work with other database systems as well. While the tutorial demonstrates SQL generation capabilities using GPT-4o, you can explore similar functionality by:
Importing relevant models from watsonx.ai into your agent, based on your specific use case. (Learn more about deploying custom foundation models in watsonx.ai.)
Creating domain-specific models using InstructLab. InstructLab allows you to fine-tune IBM Granite on your own datasets, enabling more accurate and context-aware SQL generation tailored to your specific needs. (Learn more about using the InstructLab UI to fine tune models.)
Acknowledgments
This tutorial was produced as part of the IBM Open Innovation Community initiative: Agentic AI (AI for Developers and Ecosystem).
The authors deeply appreciate and acknowledge the efforts of Goura Mohanty and Michelle Corbin for the guidance and expertise on reviewing and contributing to this tutorial.