About cookies on this site Our websites require some cookies to function properly (required). In addition, other cookies may be used with your consent to analyze site usage, improve the user experience and for advertising. For more information, please review your options. By visiting our website, you agree to our processing of information as described in IBM’sprivacy statement. To provide a smooth navigation, your cookie preferences will be shared across the IBM web domains listed here.
Tutorial
Implement Elasticsearch with retrieval augmented generation
Retrieval augmented generation with watsonx Discovery, watsonx.ai, and watsonx Assistant
On this page
Retrieval augmented generation (RAG) is a hybrid technique in natural language processing that combines the strengths of both retrieval-based and generative models to improve the quality and relevance of generated text. RAG has two main benefits:
- It ensures that the large language model (LLM) that is generating an answer to a question has access to the most current, reliable facts relevant to that question.
- It ensures that users (both end users and builders) have access to the LLM’s sources, ensuring that its answers can be traced, checked for accuracy, and ultimately trusted.
The use case shown in this example uses IBM watsonx Discovery for semantic search using an ELSER model and RAG using LLMs on top of it (running on watsonx.ai) to generate content-grounded responses. It's integrated it with IBM watsonx Assistant to implement conversational search.
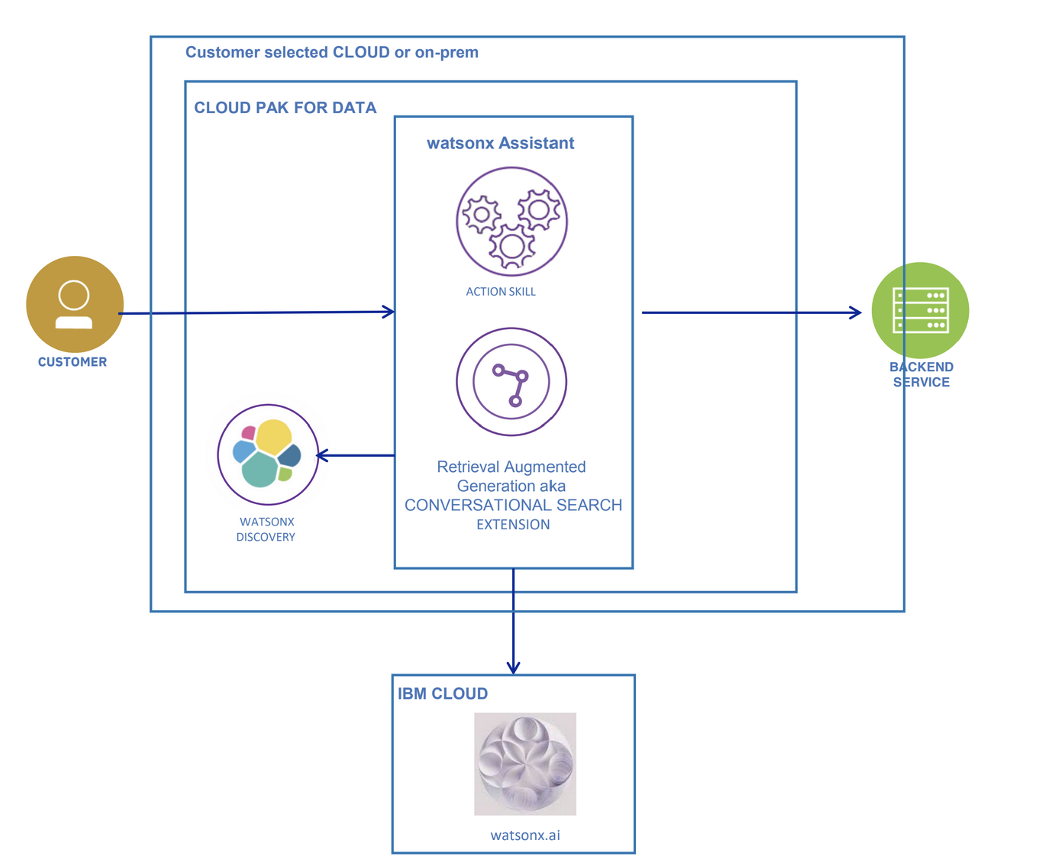
The value of watsonx Discovery
Watsonx Discovery is a search and analytics engine that is designed for real-time search based on Elasticsearch technology. It indexes and enriches many data types, including text, numeric, geospatial, pictures, and video. It's an add-on to watsonx Assistant that helps resolve informational tasks through a generative AI assistant.
The term indexing refers to the ability to store information in the watsonx Discovery repository. These indexes can then be analyzed by using vector search, machine learning, observability, and security techniques.
At the core of watsonx Discovery is the Elasticsearch Relevance Engine (ESRE). Two of its key components include:
Native vector search: Vector search is a method of information retrieval in which multimodal (text, images, video, and so on) data and queries are represented as numerical vectors instead of plain text. Frequently used for semantic search, vector search finds similar data using approximate nearest neighbour (ANN) algorithms. Compared to traditional keyword search, vector search yields more relevant results and executes faster.
ELSER (Elastic Learned Sparse EncodeR): ELSER is a proprietary LLM model. It is a retrieval model specializing in the semantic search capability. Semantic search denotes search with meaning, as distinguished from keyword search, where the search engine looks for literal matches of the query words or variants of them without understanding the overall meaning of the query. ELSER is a proprietary generic model that generalizes across domains. While you might eventually want to build a proprietary model on your data, ELSER is a great way to start and performs well in proofs of experience (PoXs). This tutorial deploys the ELSER model.
Prompt engineering
Prompt engineering is the practice of designing and refining prompts that are used to interact with language models where prompts are input queries or instructions. The various aspects of prompt engineering include:
Decoding: The process of finding the output sequence when given the input sequence. Decoding can be greedy or sampling. In greedy mode, the model selects the highest probability tokens at every step of decoding, and a model is less creative in that mode. An advantage of greedy decoding is that you see reproducible results.
In sampling mode, the model chooses the next token from a pool of the most probable next tokens. There is more creativity, but also a larger risk that the output might be nonsensical. The following parameters are only visible when in sampling mode.
- Temperature: A floating point number ranging from 0.0 (greedy) and 2.00 (which is maximum creativity). It refers to selecting high- or low-probability words. Higher temperature values lead to more variability.
- Top P (nucleus sampling): Selecting the smallest set of words whose cumulative probability exceeds p.
- Top K: Selecting k words with the highest probabilities at each step. Higher values lead to more variability.
- Random seed: An integer in the range 1 to 4,294,967,295. In sampling mode, random seed is helpful for the replicability of experiments. With everything else remaining the same, updating the random seed yields different outputs.
Repetition penalty: A value of 1 or 2 (a setting of 1 allows repetition, and 2 prohibits it). This is used to counteract a model's tendency to repeat the prompt text verbatim or get stuck in a loop in generating the same output.
Stop sequences: Sequences of characters (text, special characters, and carriage return) that are used as a stop indicator by the model. The stop sequence itself is still included in the model output, but that is the last piece of output.
Min tokens: An integer that specifies the minimum number of tokens in the model's output.
Max tokens: An integer that specifies the maximum number of tokens in the model’s output. Sometimes, when the generated output looks incomplete, your Max tokens value might be too low.
Overview
In this tutorial, learn how to implement RAG using watsonx.ai with Elasticsearch by using watsonx Discovery, and integrate it with watsonx Assistant. You learn:
- How to do document ingestion from IBM Cloud Object Storage to Databases for Elasticsearch (using watsonx Discovery) and chunk and index the documents for Elasticsearch.
- How to deploy a Python function that performs RAG using the Databases for Elasticsearch database and watsonx.ai.
After this implementation, you also learn how you can use this setup with watsonx Assistant by integrating RAG with Elasticsearch. You can further use prompt engineering to improve the response in your format.
Estimated time
It should take you approximately 3-5 hours to complete this tutorial, depending on the time to provision the TechZone environment and your other environment setups.
Prerequisites
To follow this tutorial, you need:
- An IBM TechZone environment.
- An IBM Cloud account. If you don’t have an IBM Cloud account, you can create one.
- Python skills and familiarity to notebooks.
This TechZone reservation provisions all of the required IBM Cloud services when configured with watsonx Discovery installed.
Setting up a TechZone environment
To follow this tutorial, you must have an IBM TechZone environment set up. To set up the environment:
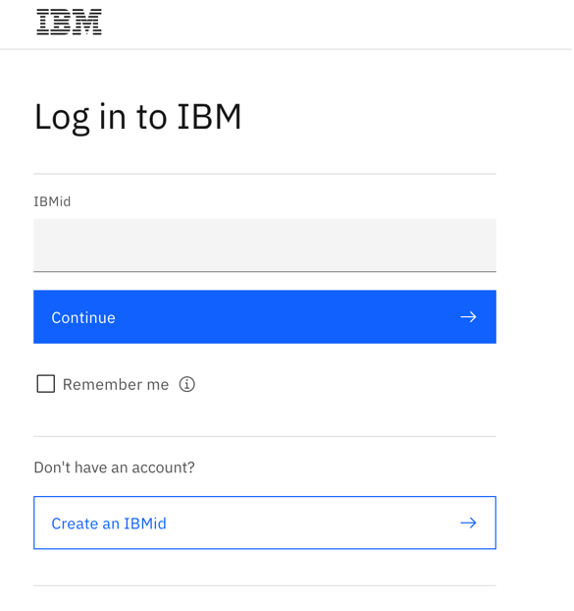
Log in in to the TechZone environment by using your IBM ID.
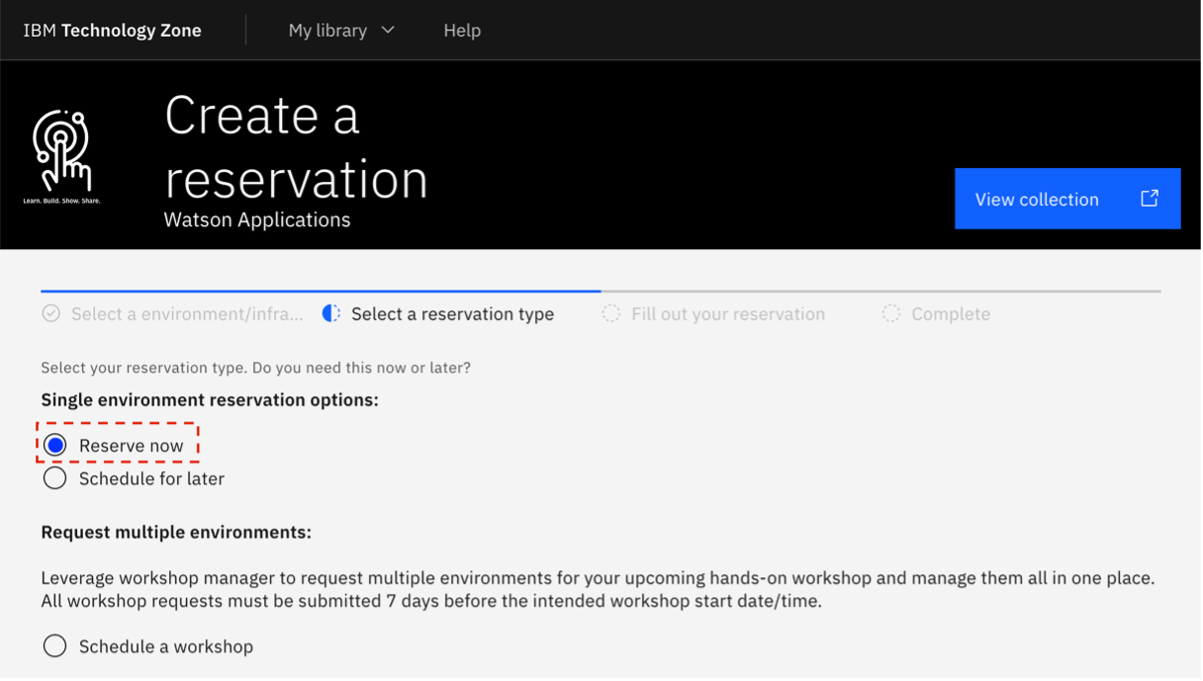
Click Reserve now to make a TechZone reservation. This provisions all of the required IBM Cloud services when configured with watsonx Discovery installed.
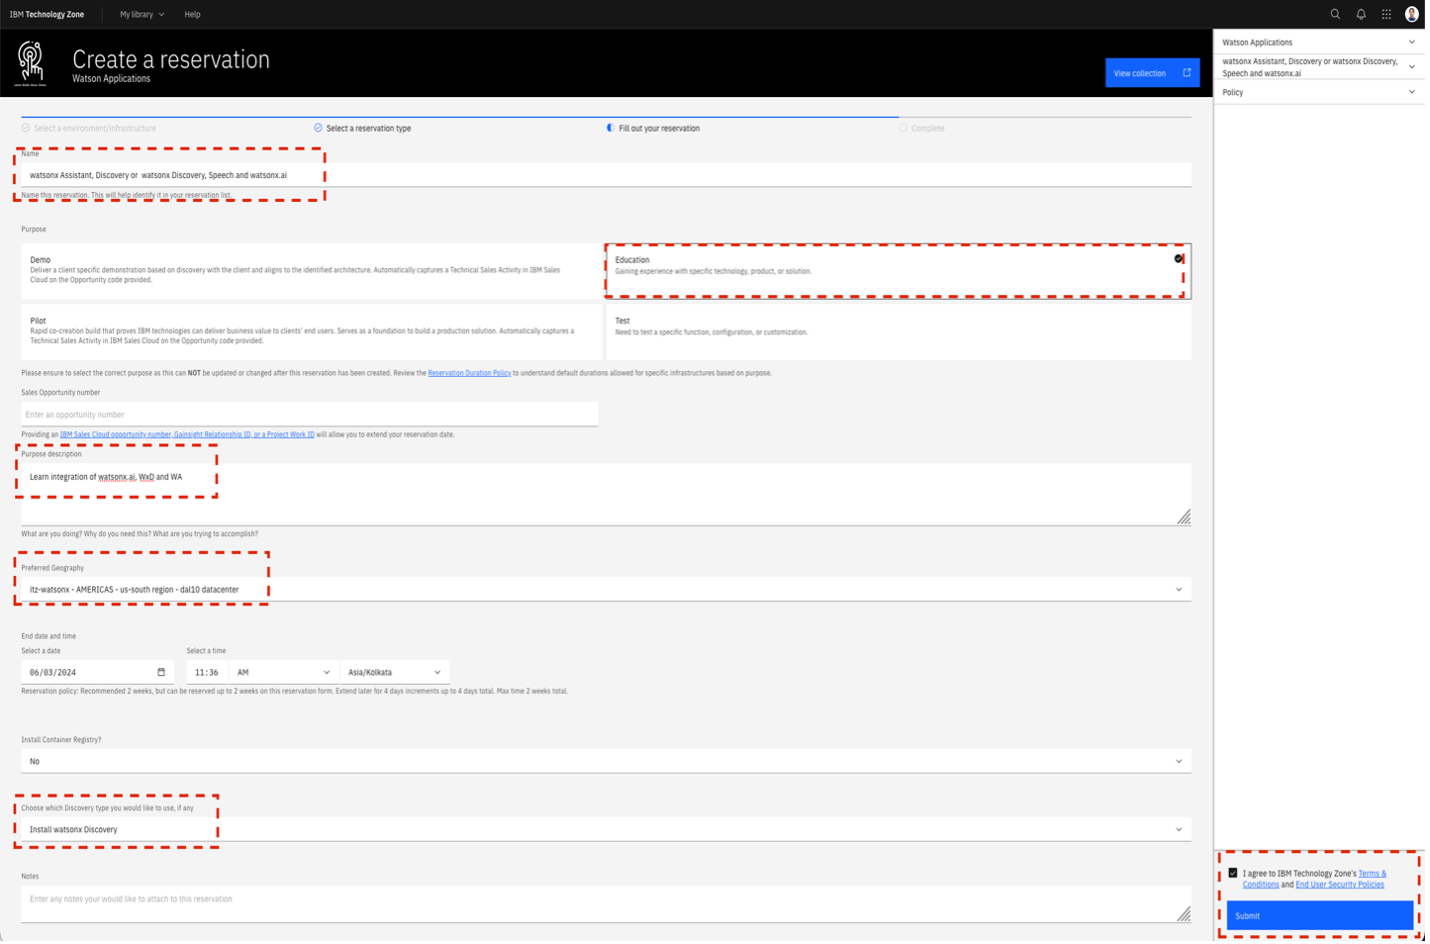
Change the name of the reservation to
WA, WxD, and wx.ai. - Select the Practice/Self-Education tile.
- For the Purpose description, enter Learning integration of WA, WxD, and wx.ai.
- Select your preferred Geography. In this example, AMERICAS is chosen.
Select Install watsonx Discovery.
For now, continue to the bottom section of the reservation page.
- Select Yes to install the container registry.
- Optionally, you can provide some additional notes.
- On the lower-right section of the page, accept the Terms and Conditions, then click Submit.
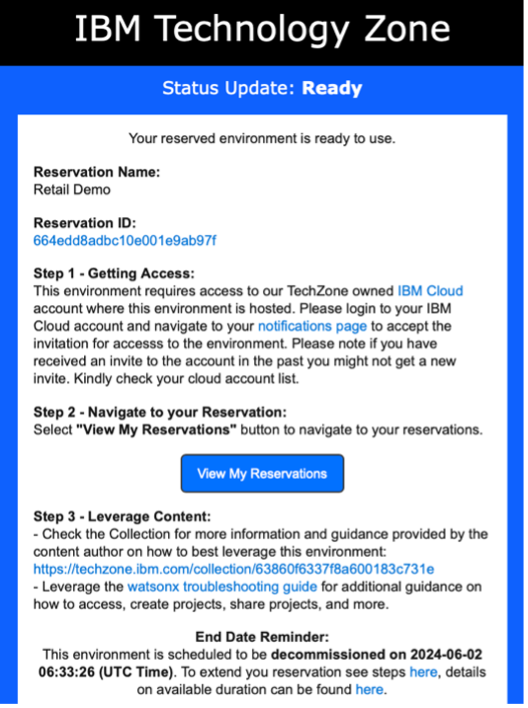
- You receive an email that is sent to your IBM email address letting you know that your reservation is being provisioned (this should happen within approximately 10-15 minutes).
After the watsonx.ai provisioning is complete, you receive a second email telling you that it is ready for use. This email looks like the following example.
Setting up an IBM Cloud account
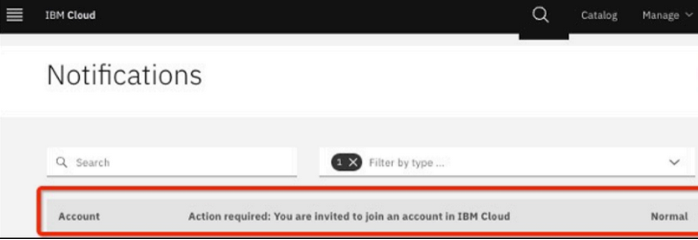
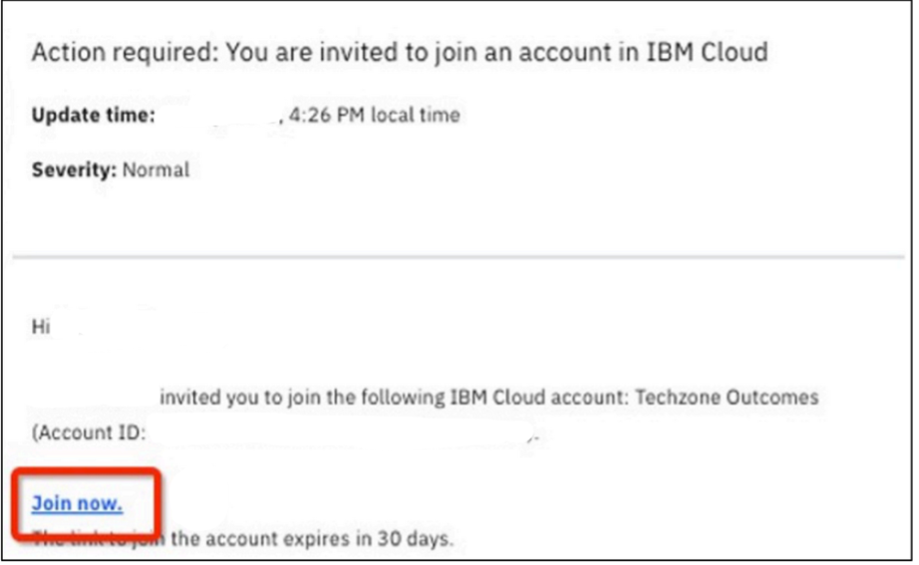
If you do not have an IBM Cloud account associated with this instance, you must click the notifications page link, click the item, and accept the invitation by clicking Join now.
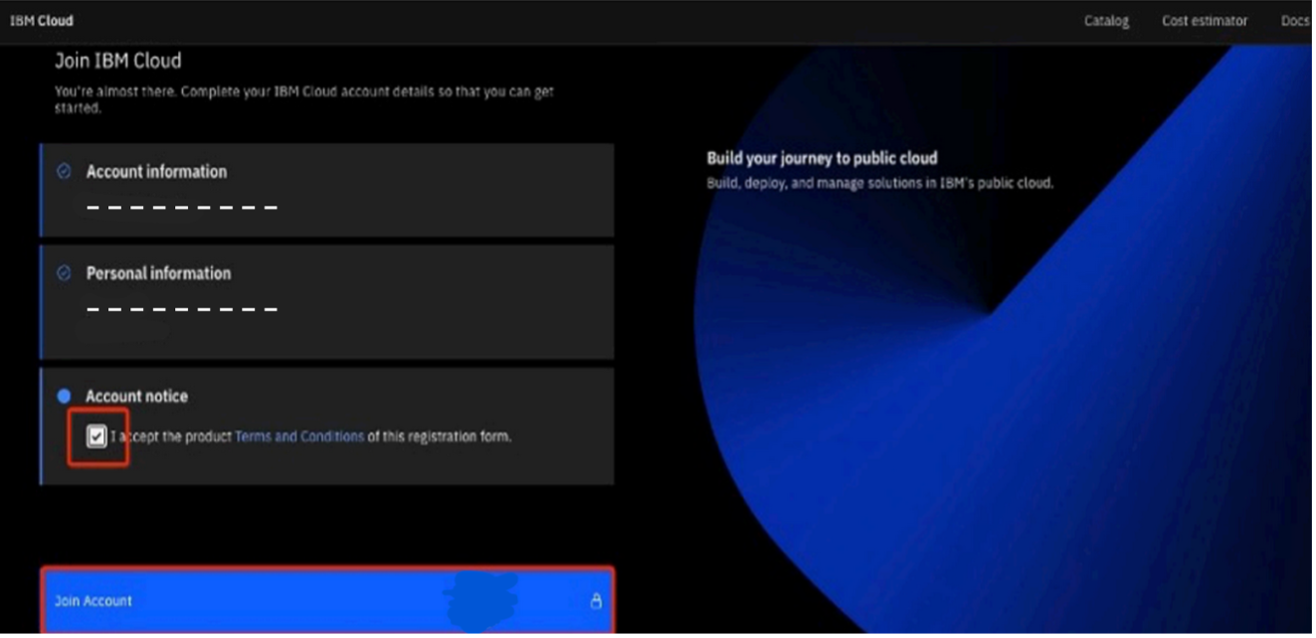
You are returned to the IBM Cloud login page. Use your IBMid to log in. You are asked to join the TechZone account. Accept the Terms and Conditions, then click Join Account.
When you log in, make sure that you’re using the right account. Assuming that you have accepted the invitation, you should have an
itz-watsonx -naccount. Go to the menu bar and click the highlighted icon to display the list of accounts available to you. Make sure that you select the account that was assigned to you from your current TechZone reservation.
You can always check your reservation to find the right account. To do so, log on to https://techzone.ibm.com.
Select the My Library pull-down menu, and click My reservations. The My reservations page opens.
- Select the correct reservation tile (you might have more than one).
Now that you have your environment set up, it’s time to continue.
Steps
Step 1. Create a project in watsonx.ai
Download the WatsonStudioProjectTemplate.zip file from GitHub.
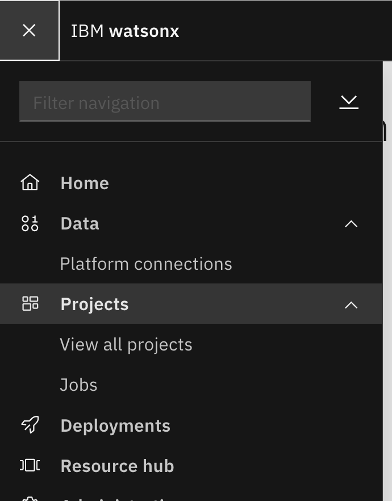
Open watsonx.ai. You see the homescreen. Open the hamburger menu at the upper-left, and select View all projects under Projects.
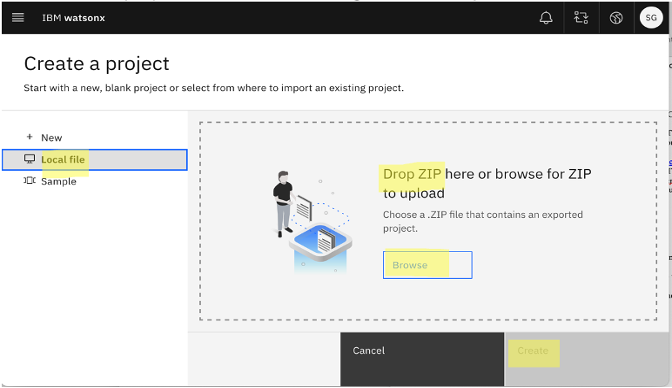
Create a new project in watsonx.ai by clicking New project.

Select Local file from the menu on the left, and upload the zip file that you downloaded in the first step. Then, click Create.
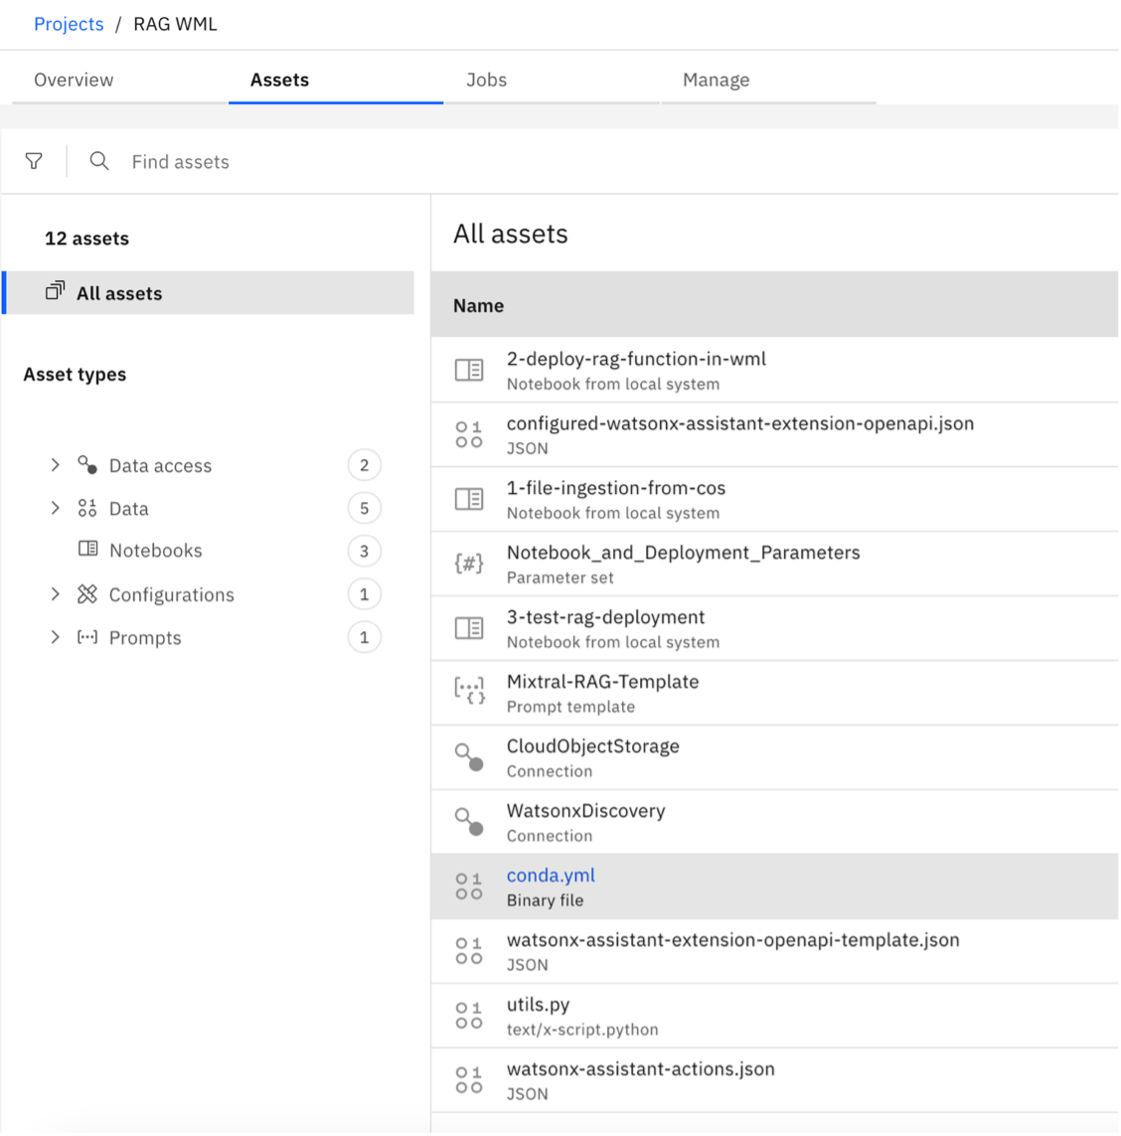
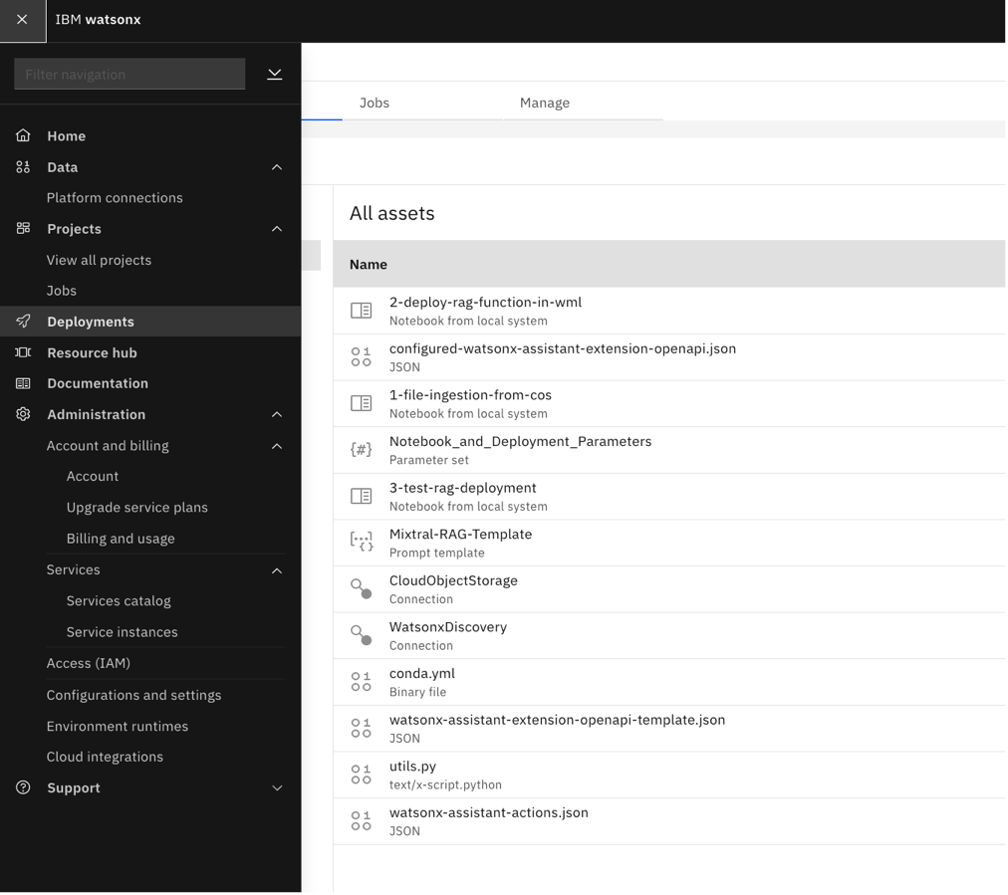
After creating the project, go to the Assets tab where you can find the connections, prpmpt templates and python notebooks.
Step 2. Add documents to Cloud Object Storage
To add documents that you want to be included in the knowledge base to Cloud Object Storage:
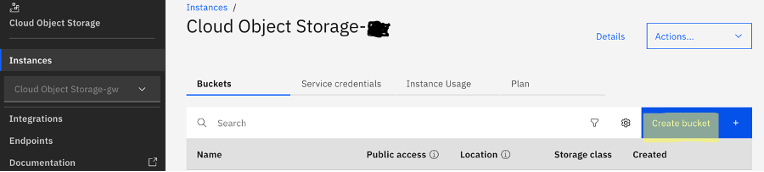
Navigate to your Cloud Object Storage resource in IBM Cloud.
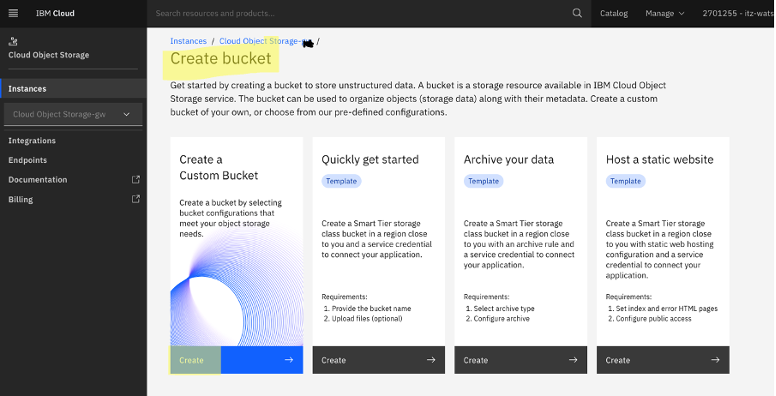
Create a bucket in Cloud Object Storage by clicking Create bucket, then Create a custom bucket.
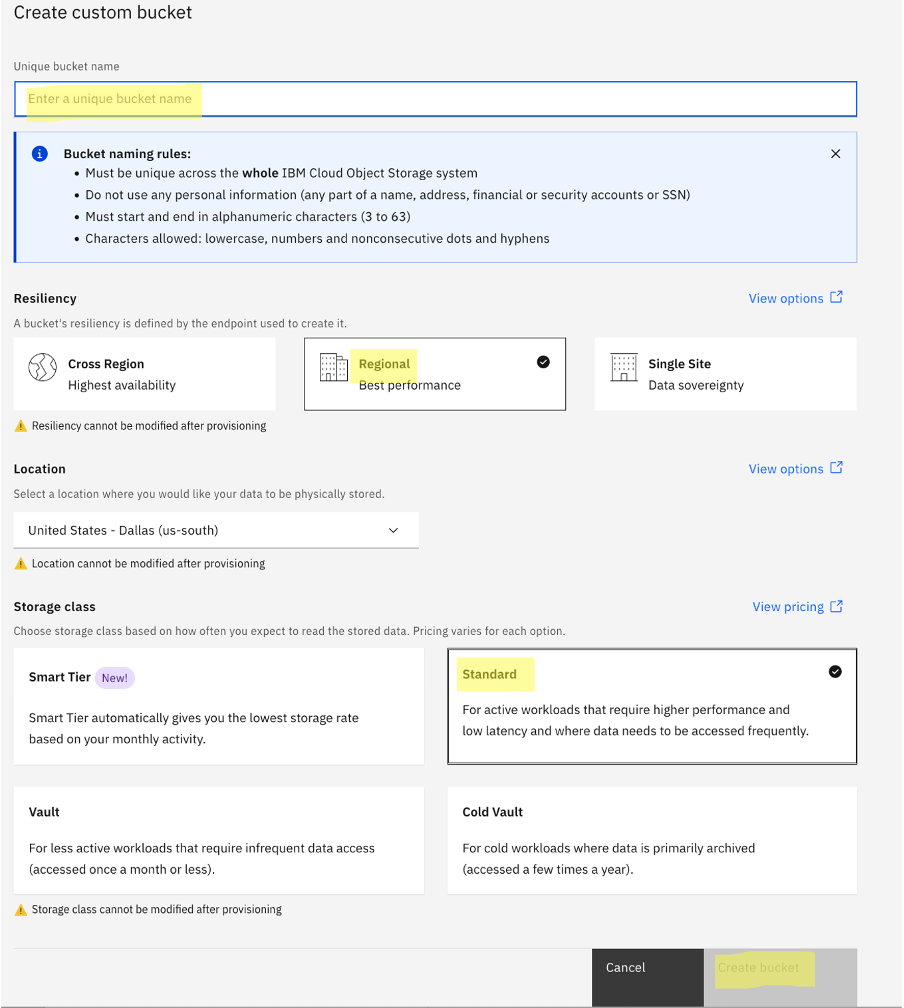
Enter a name for your custom bucket. Select Resiliency as Regional, Storage class as Standard, and click Create bucket.
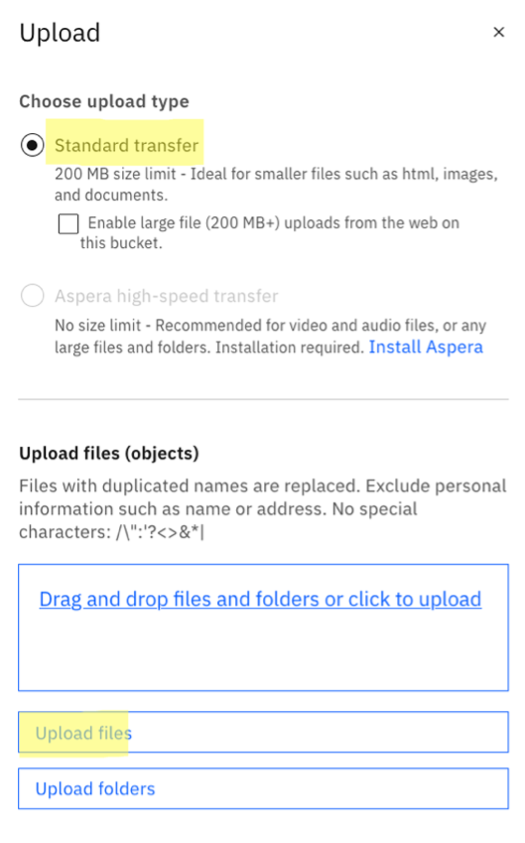
Upload your files to the bucket (for example, PDF, DOCX, PPTX, HTML, or TXT file types) by clicking Upload under the Objects tab in the created bucket, selecting Standard transfer, and dragging the files to upload.

Step 3. Complete connection to Cloud Object Storage
Create a service credential for the Cloud Object Storage instance
- Open the Cloud object storage instance.
Go to the Service credential tab, and click New credential.

Provide Service credential name, select Manager as the Role, and Auto-generated as the Service ID.
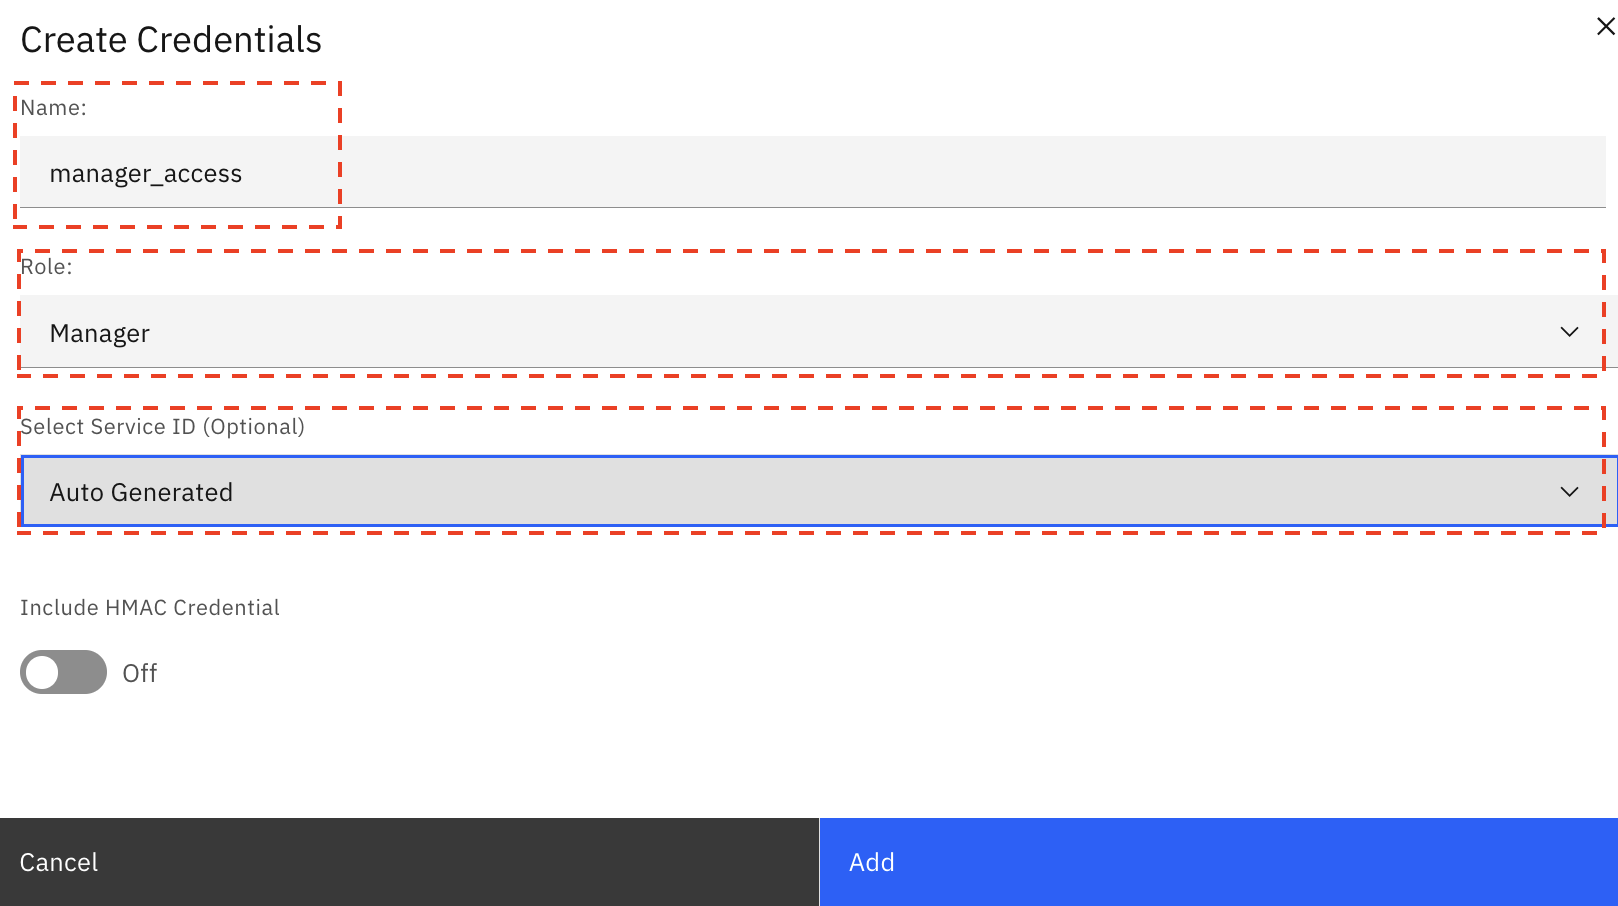
Click Add.
You have successfully added the service credential that will be used in next step.
Configure the connection to Cloud Object Storage
- Click the CloudObjectStorage connection in the watsonx.ai project.
- Set the bucket name to the name of the bucket in which the documents are present.
- In the Configuration tab of the bucket in Cloud Object Storage, copy the private or public endpoint and paste it to the Login URL field.
- Go to the Cloud Object Storage instance, open the Service Credentials tab, expand your Cloud Object Storage credential, then copy the service credentials. Paste the Cloud Object Storage service credential into the Service credentials field.
Test the connection by clicking Test connection. The test should be successful.
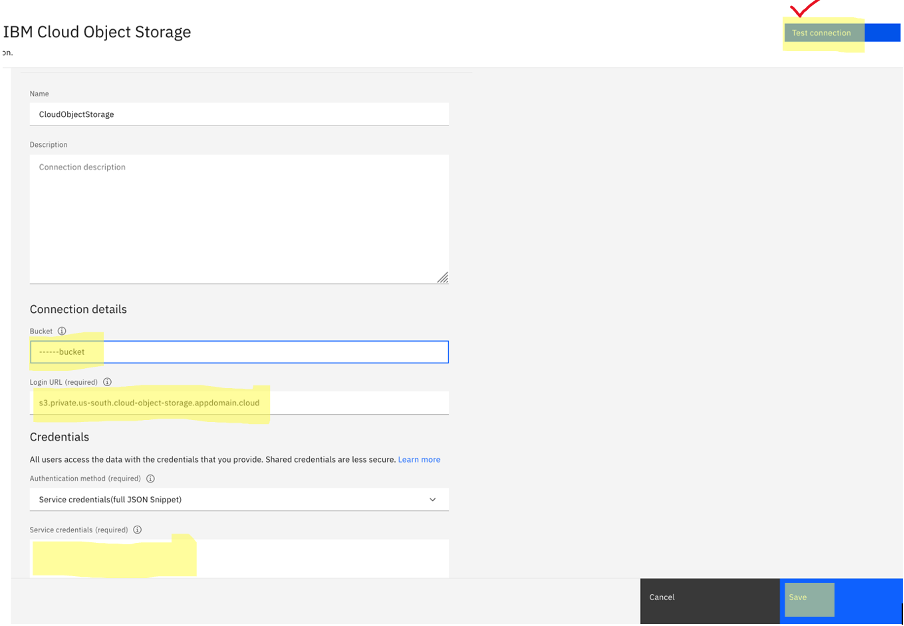
Save the connection.
Step 4. Complete connection to Databases for Elasticsearch
Copy the Databases for Elasticsearch credentials
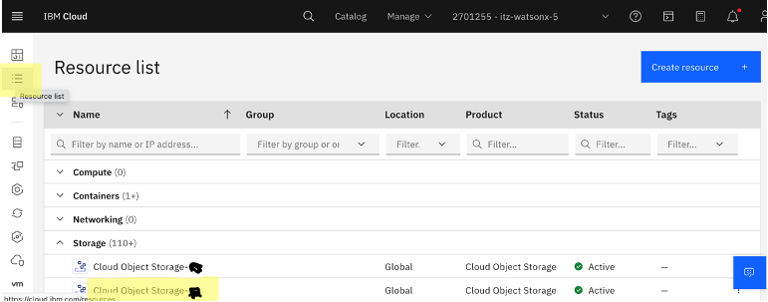
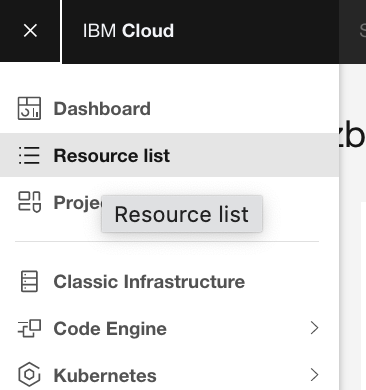
Open IBM Cloud, open the hamburger menu at the upper left, then click Resource list. Expand the Databases list.
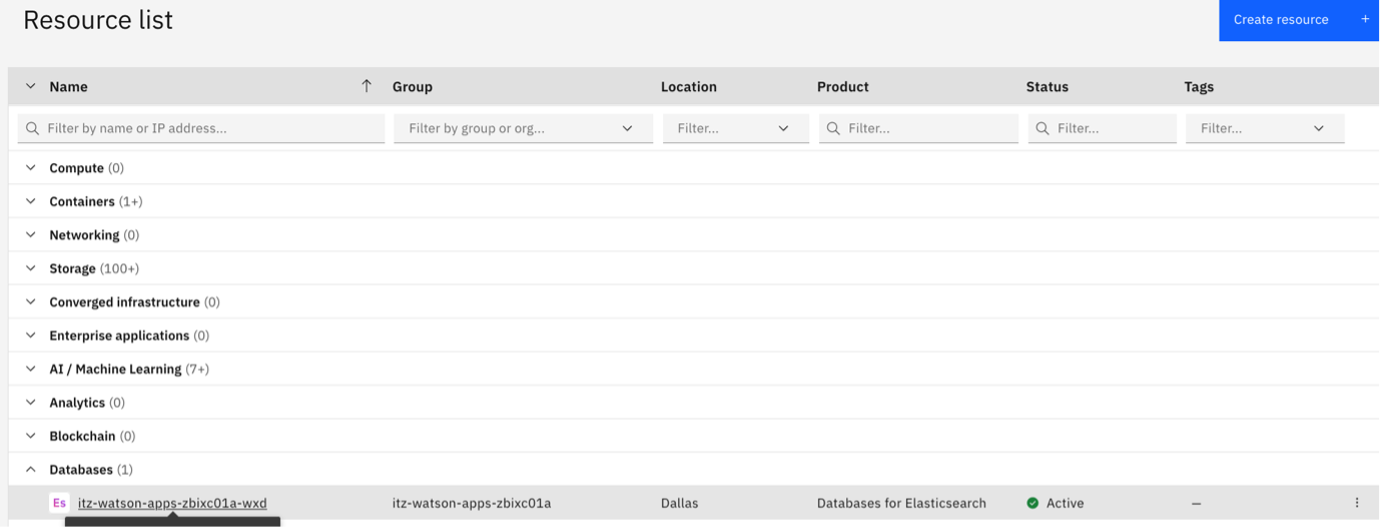
In a separate tab, navigate to the Databases for Elasticsearch service under databases.
- Open the Overview tab
Under the Endpoints section, go to the HTTPS tab.
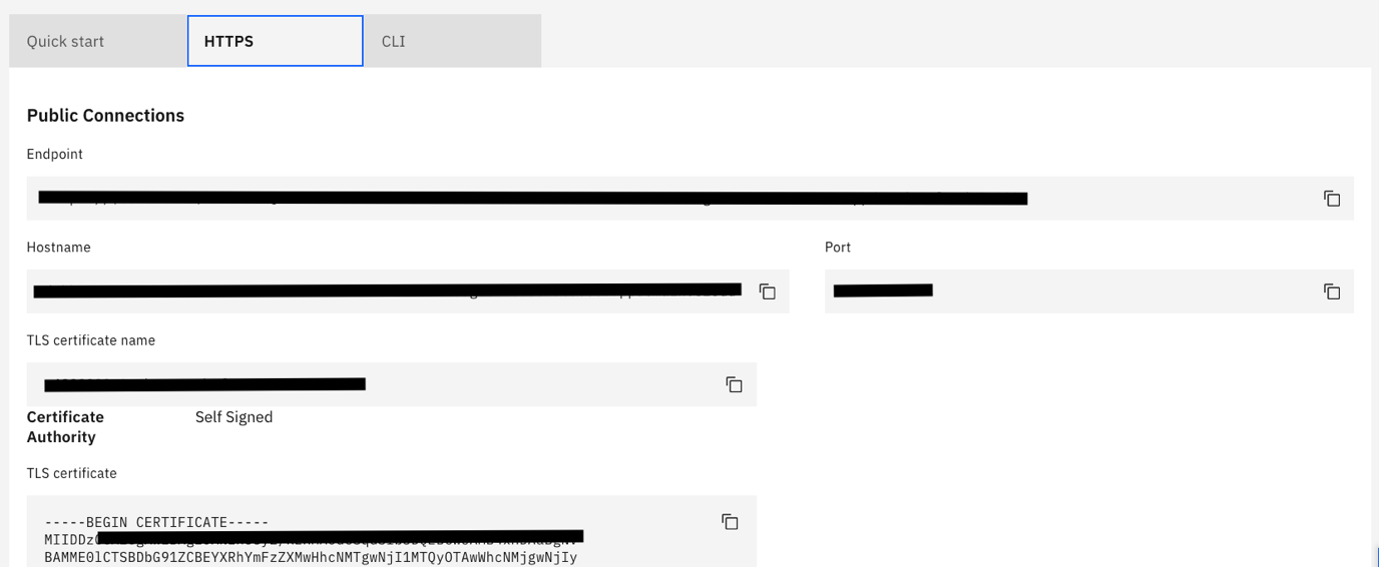
Copy the hostname, port, and TLS certificate and save it somewhere.
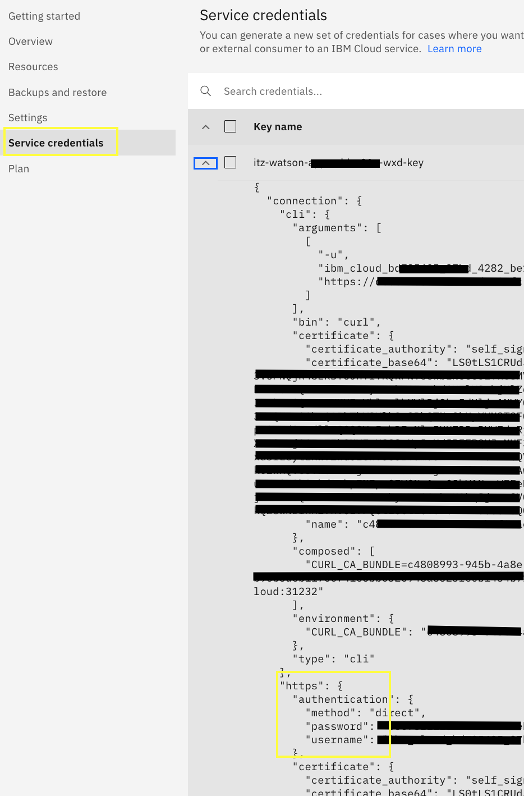
Go to the Service credentials tab of the service and copy the username and password under connection.https.authentication in the Service credential JSON.
Configure the connection to watsonx Discovery and Databases for Elasticsearch.
- Open your watsonx.ai project created in Step 1.
Go to the Assets tab, and open the WatsonxDiscovery connection.
Set the details that you copied in the previous steps.
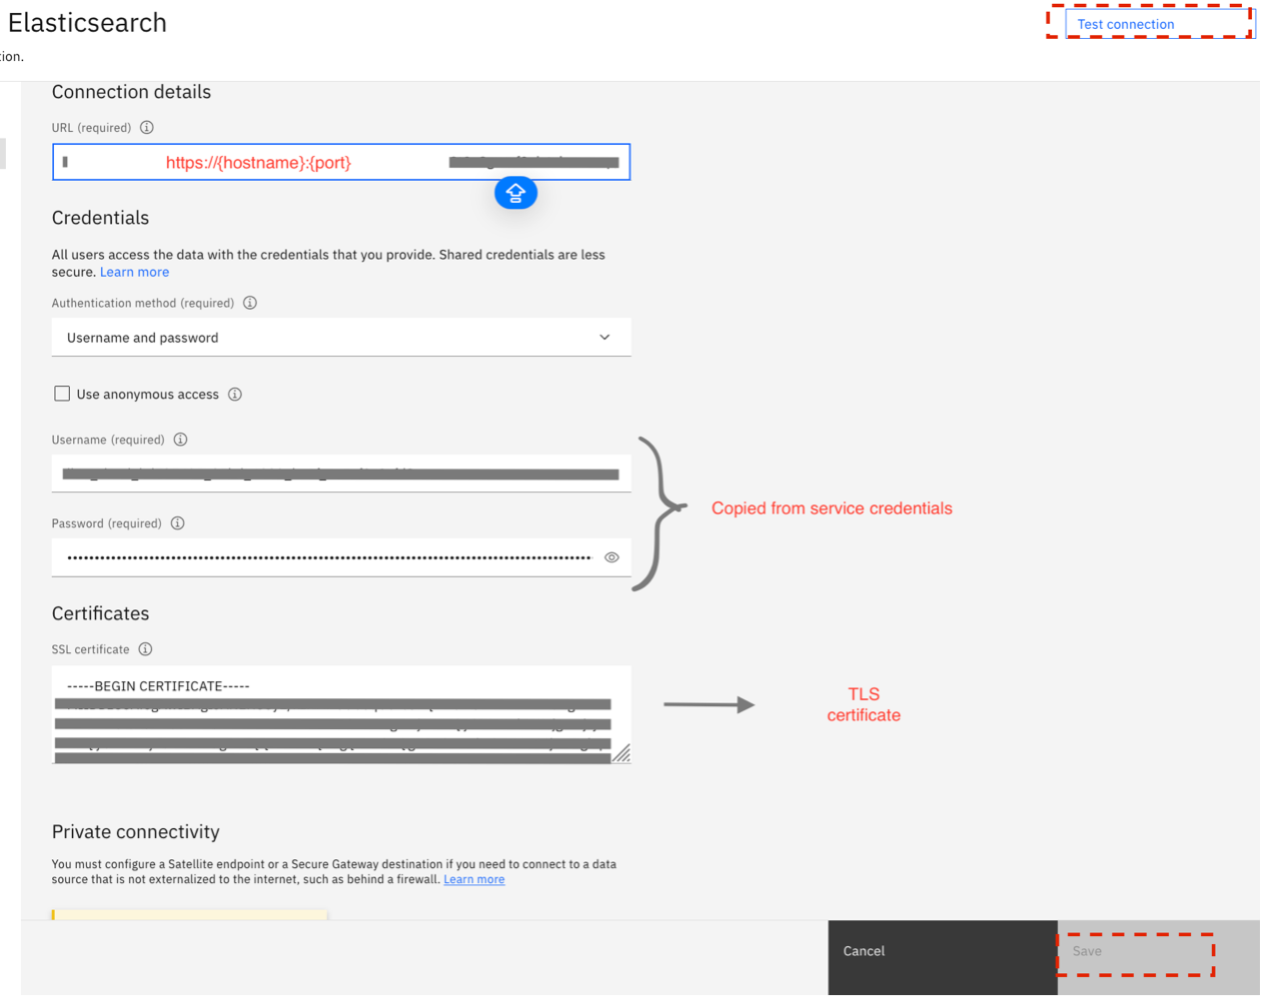
Click Test connection and there should be Test Successful message that will appear on the screen
- Save the connection details.
Step 5. Update PARAMETER SET
Create the Watson Machine Learning deployment space
To create the Watson Machine Learning deployment space:
- Open the watsonx.ai project, then open the hamburger menu from upper left.
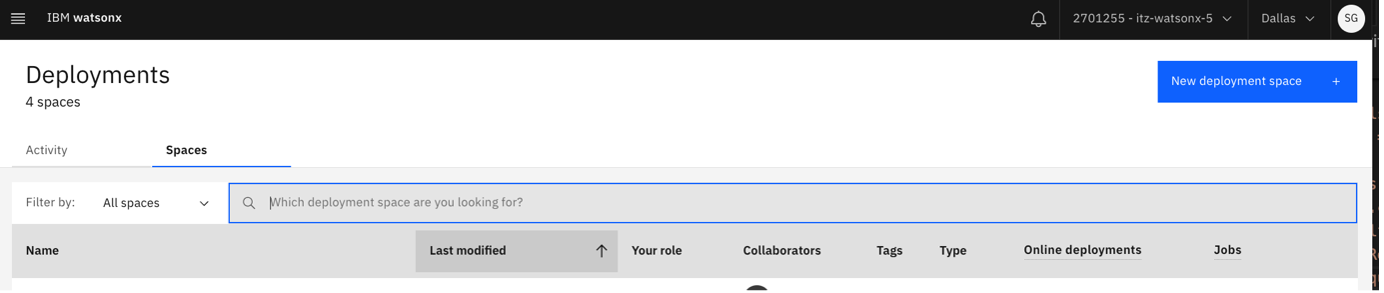
Navigate to the Deployments section.
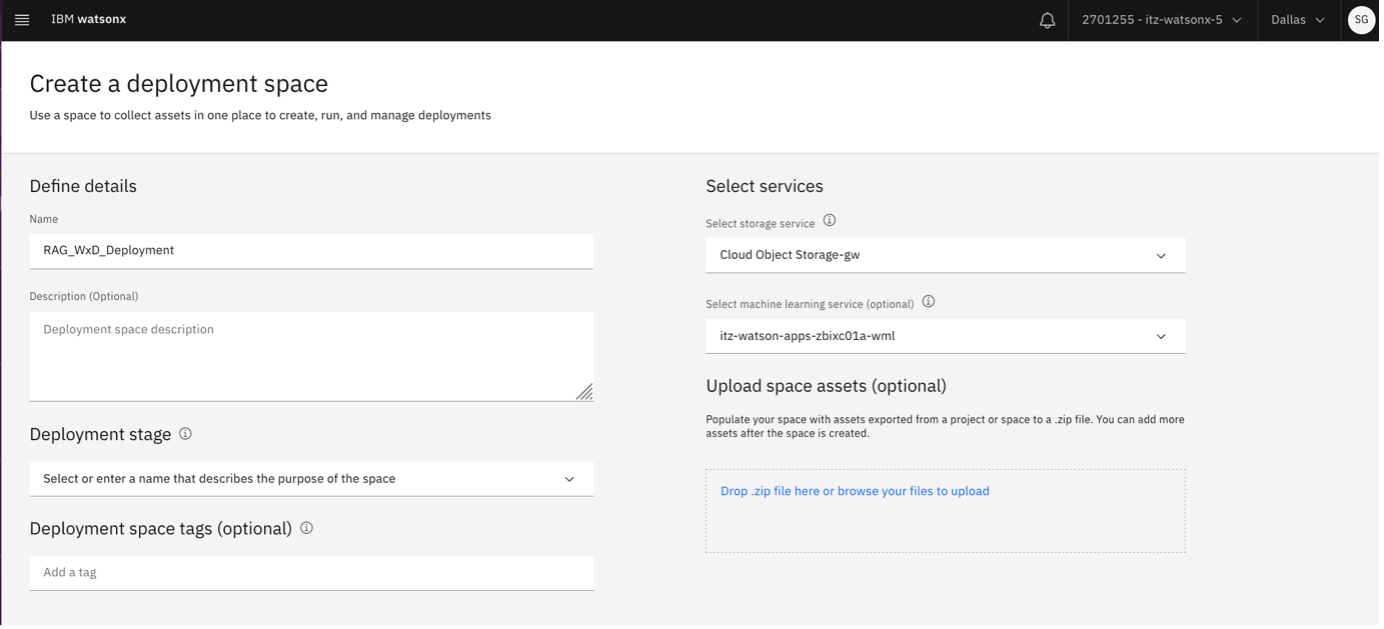
Click New deployment space to create a new deployment space.
The storage service should automatically be assigned to your Cloud Object Storage service.
Assign your Watson Machine Learning service to the Machine Learning Service.
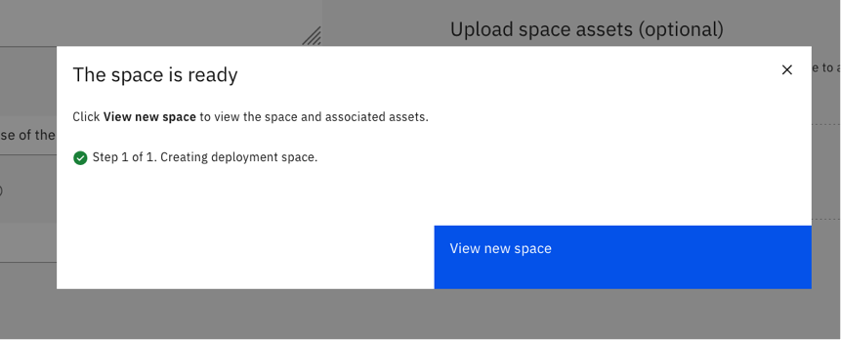
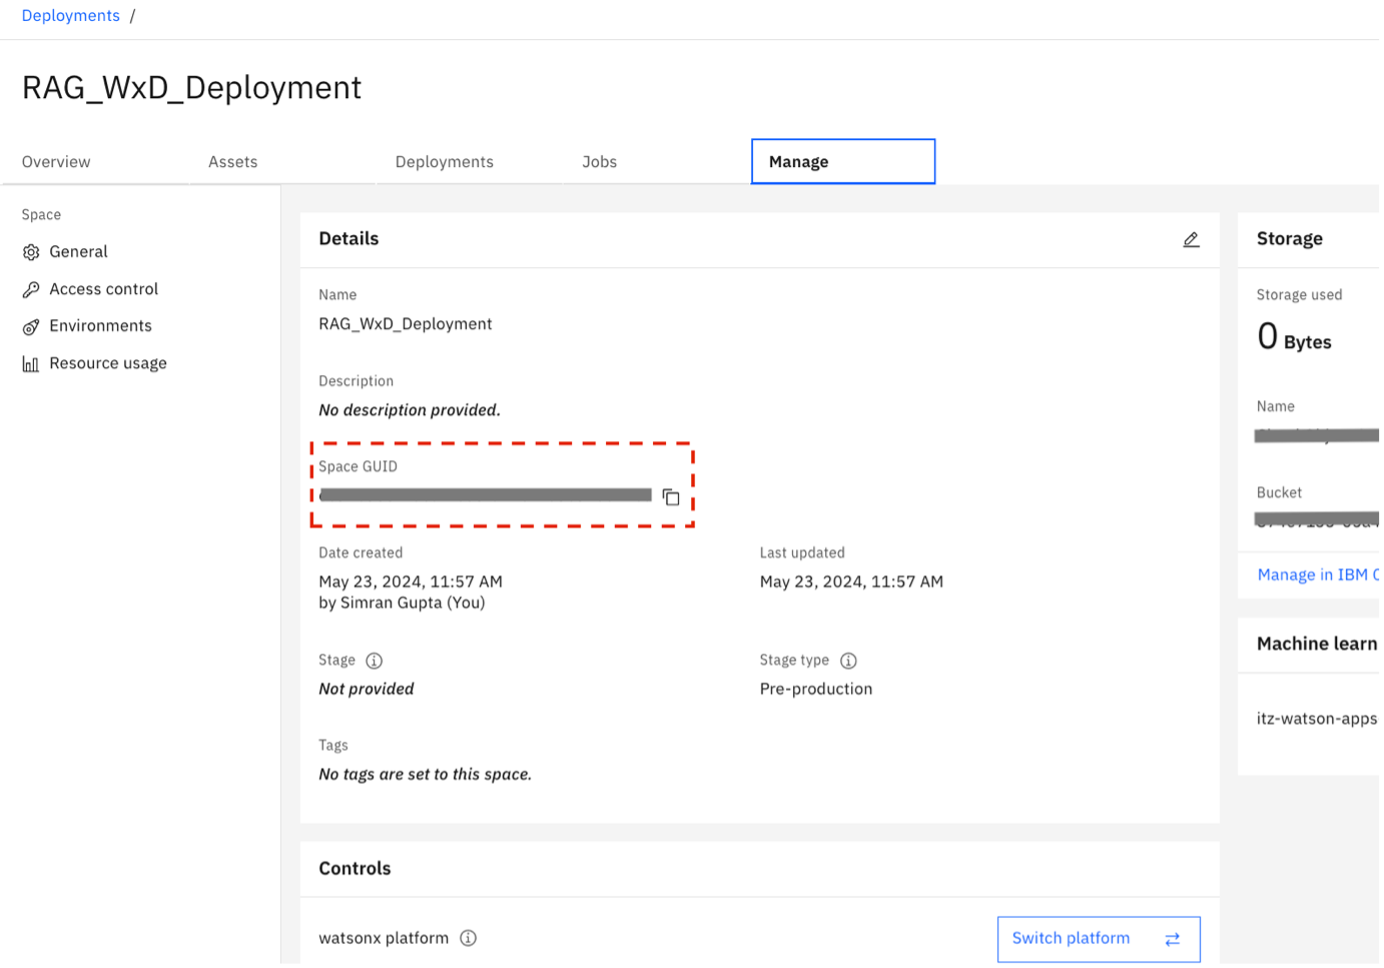
After the deployment space is created, navigate to the space's Manage tab and copy the Space GUID. Save it for now.
Create IBM API key
In this step, create an IBM Cloud API key in IBM Cloud and save it.
- Go to the IBM Cloud account.
- Under the Manage drop-down menu at the top, select Access IAM.
Select API keys from the left pane.
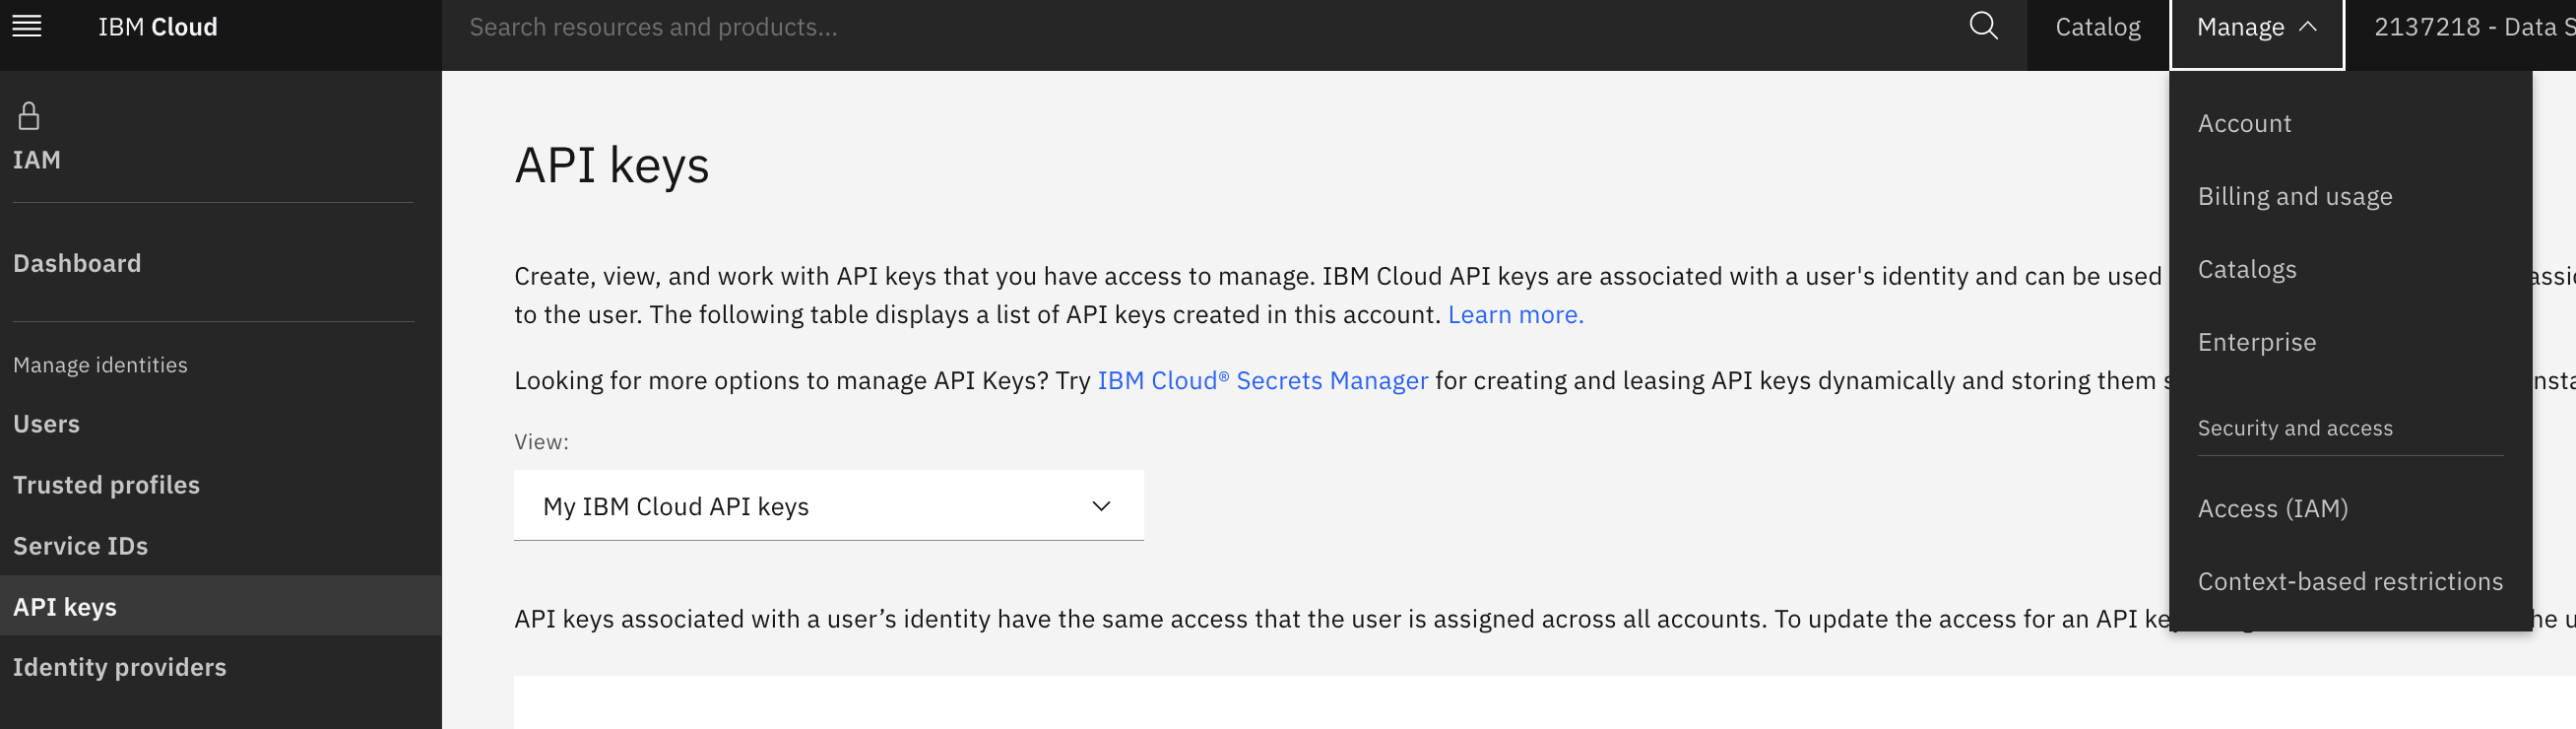
Click Create.
- Provide a name for the api_key, and click Create.
- Copy the key, save it, and download it.
Populate parameter set
- Open the watsonx.ai project.
- Go to the Assets tab, and open the Notebook_and_Deployment_Parameters parameter set in the project.
- Click the pencil icon to edit the parameter, set the
wml_space_idto the Space GUID copied from the earlier step, and click Save. Click the pencil icon to set the
ibm_cloud_apikeyto the IBM Cloud API key copied from the earlier step. Click Save. (Optional) You can also update the parameters, including theingestion_chunk_sizeandingestion_chunk_overlapper your requirement.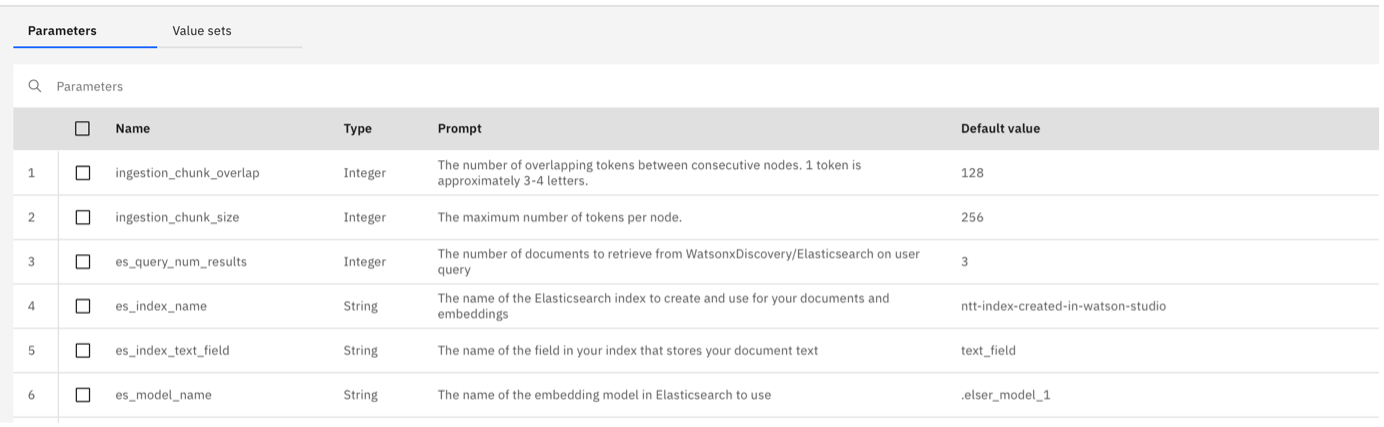
Step 6. Associate the Watson Machine Learning service with your project
- Open the watsonx.ai project.
- Go to Manage tab.
Go to Service and integrations.
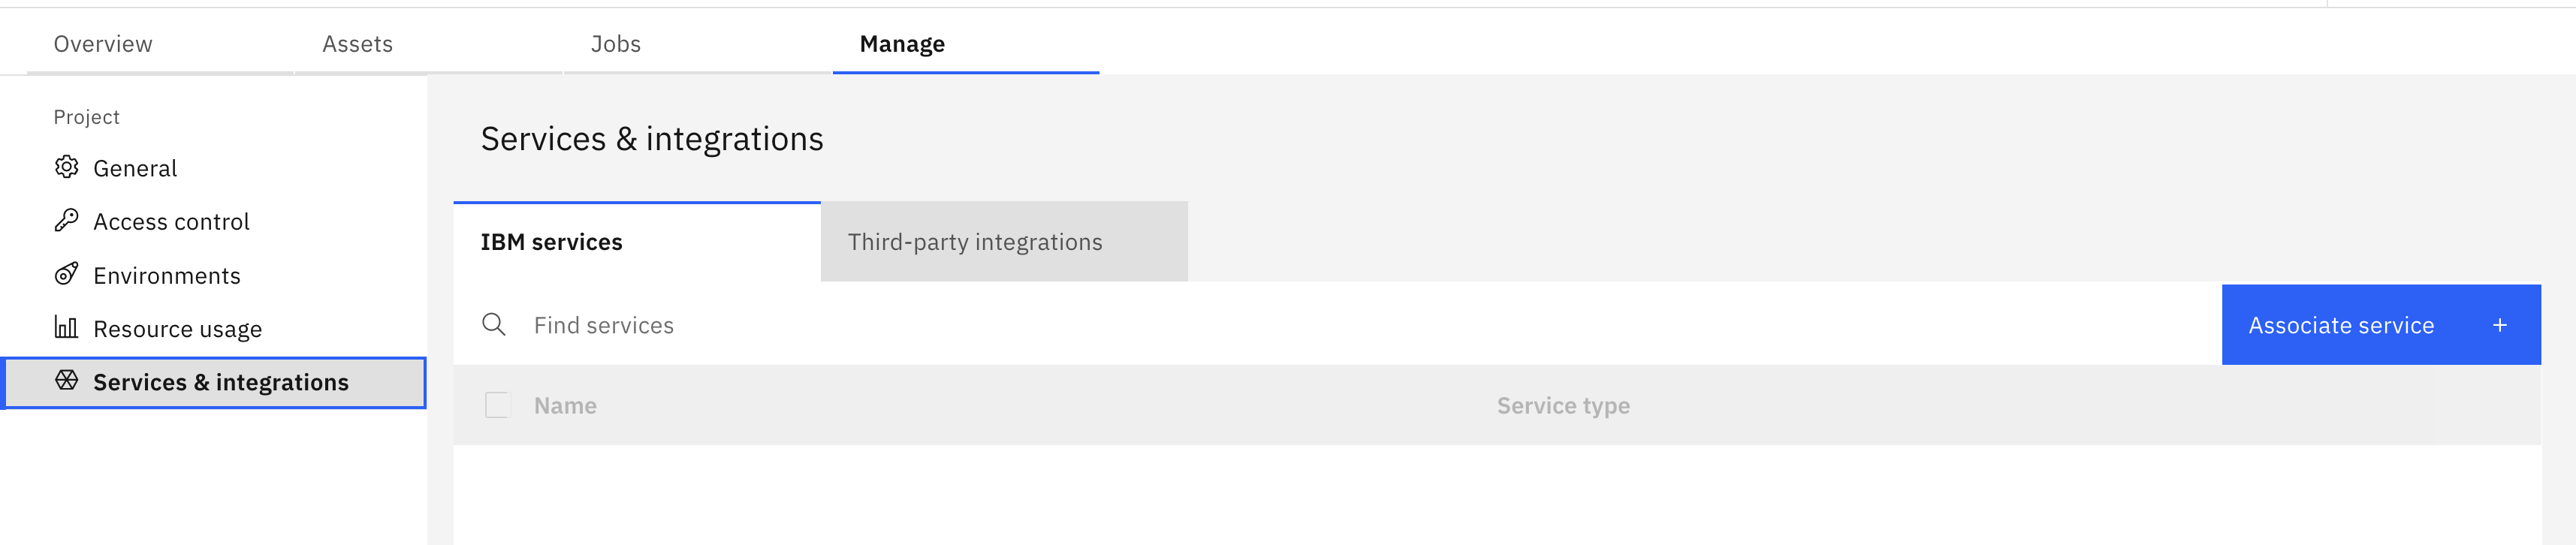
Click Associate Service, then select the Watson Machine Learning type service.
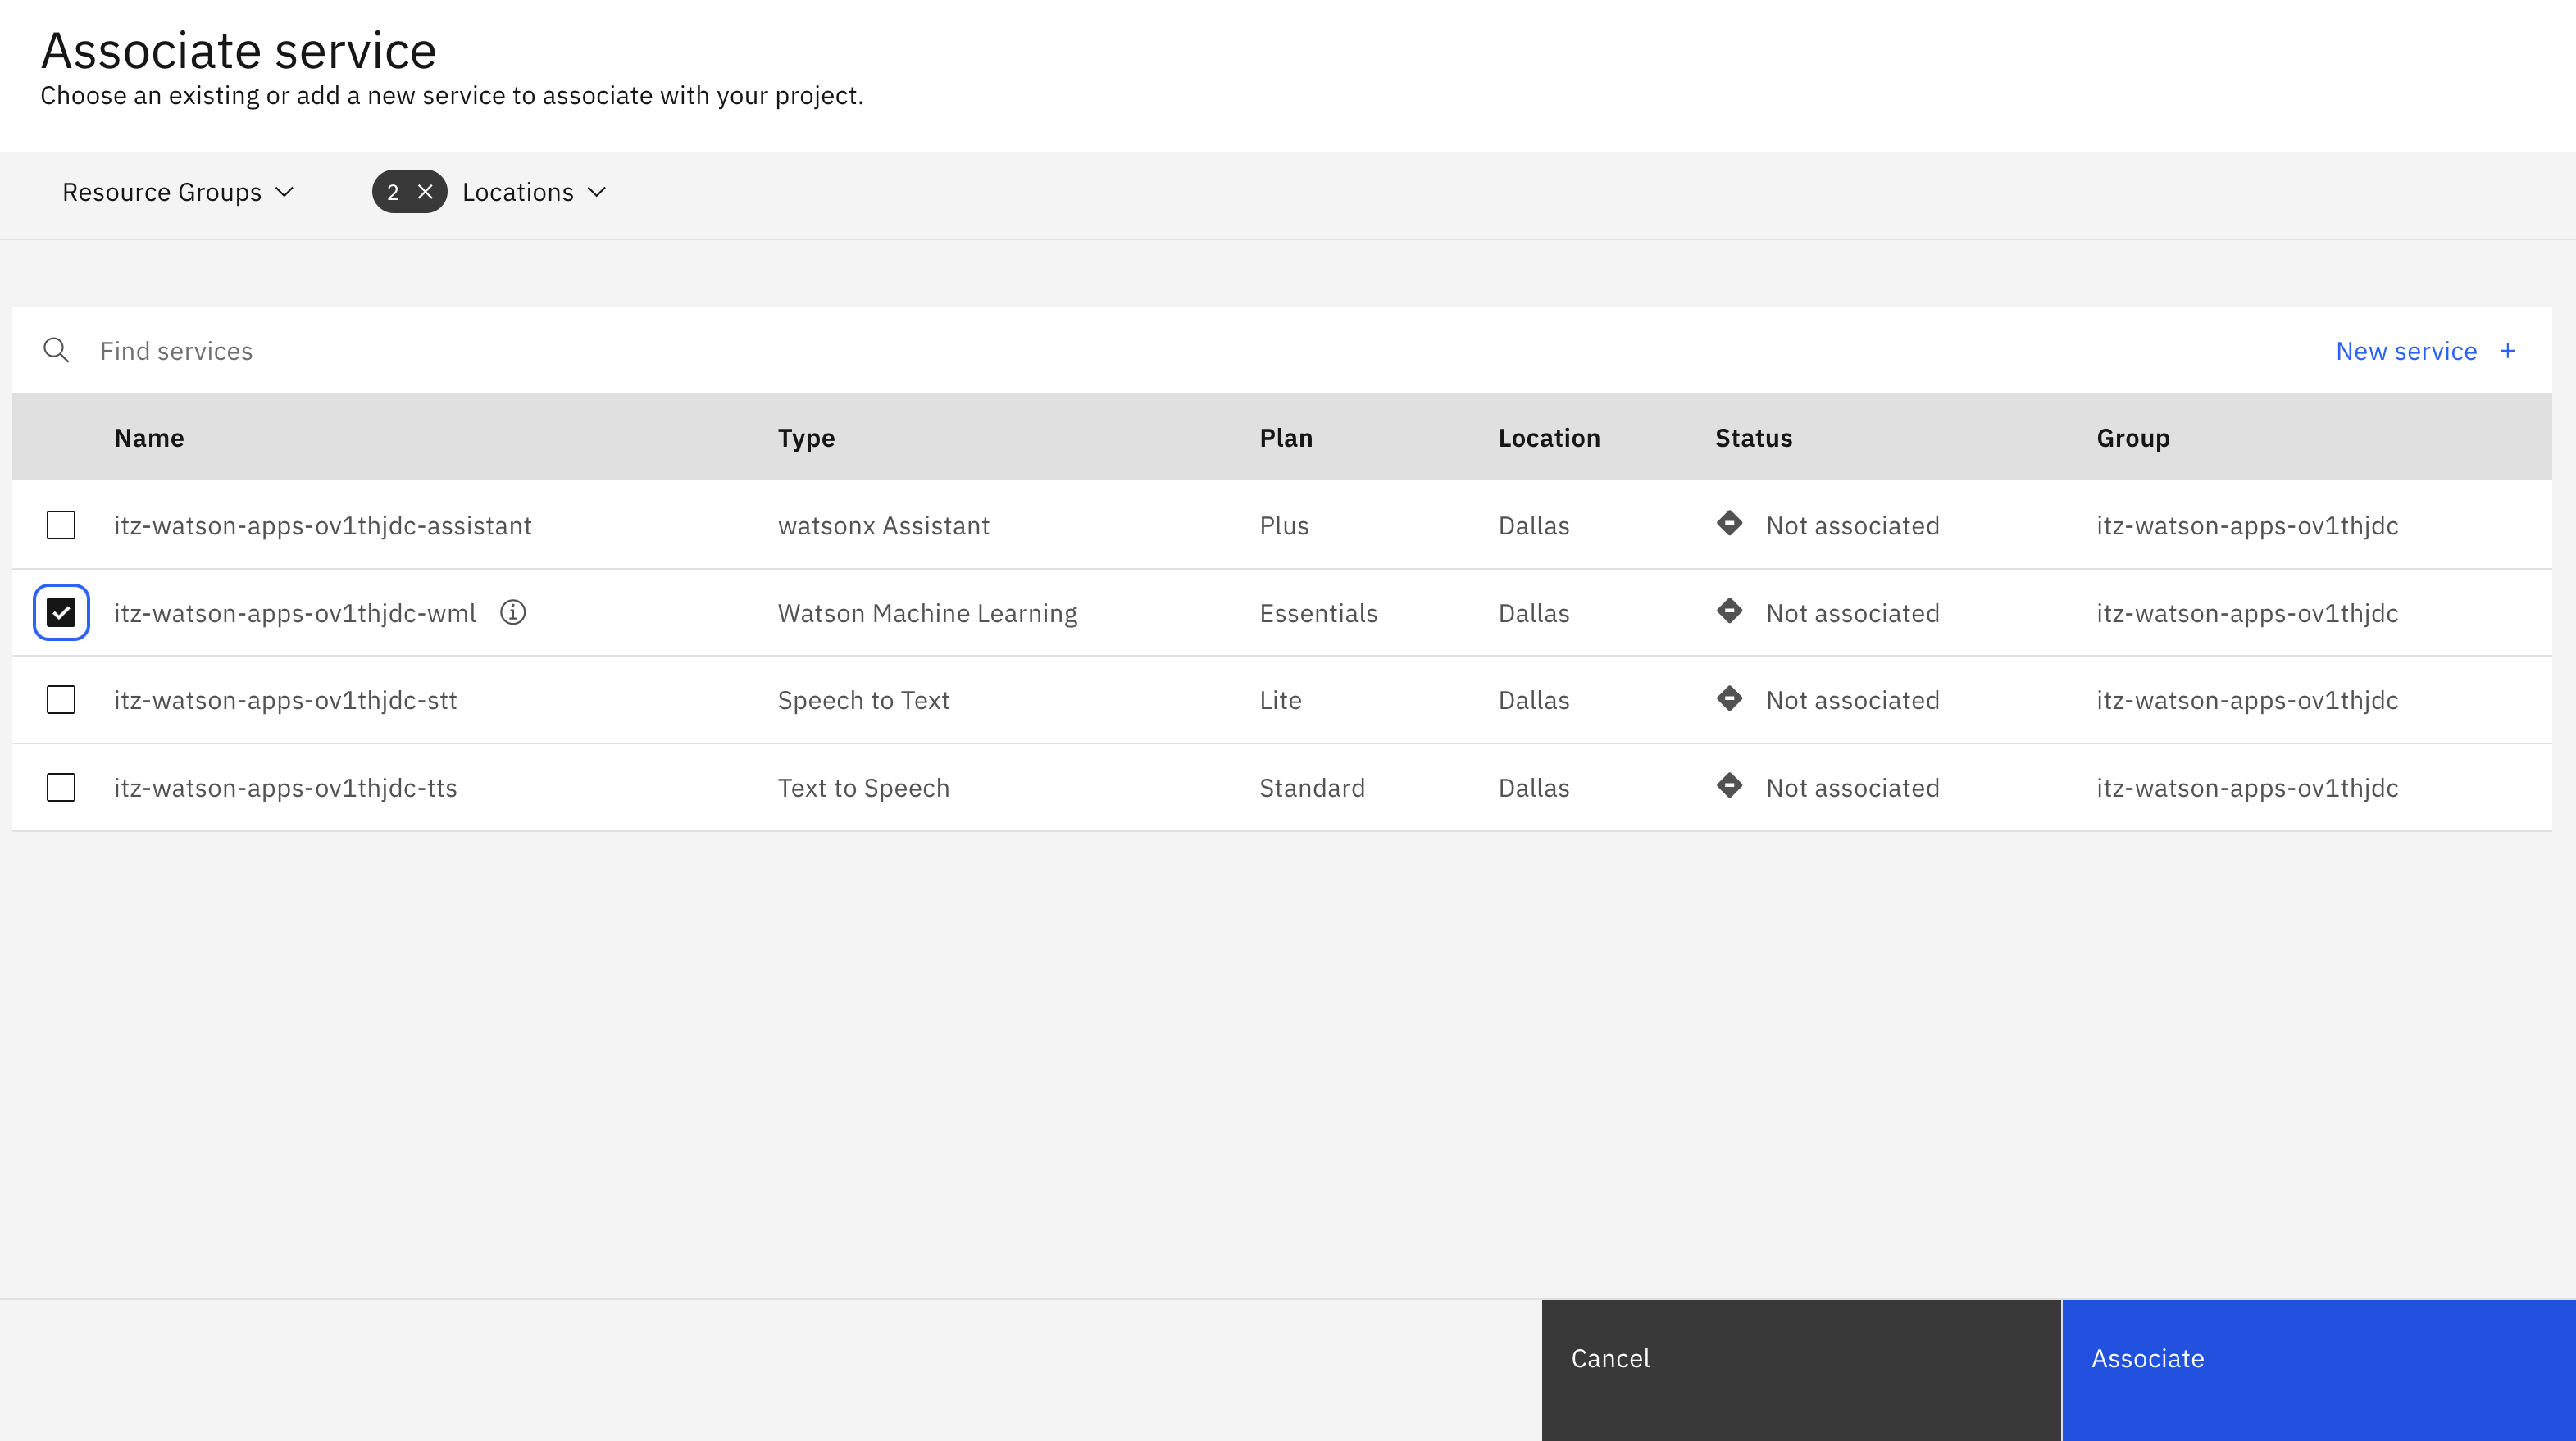
Click Associate.
Try it out (Optional)
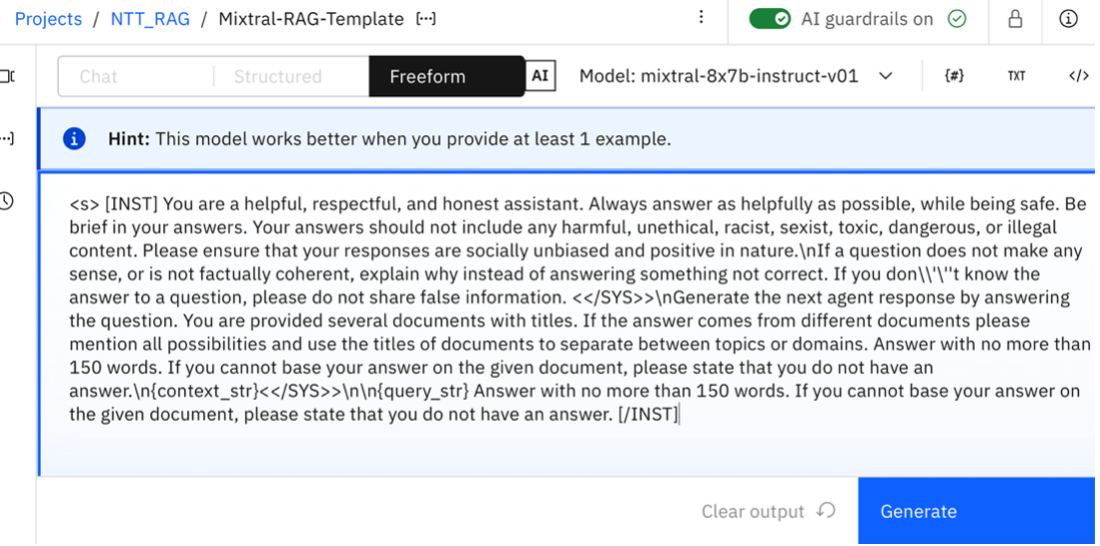
In this project, you can open the Mixtral-RAG-Template (Prompt Template). You are given a sample prompt and you can update your prompt as needed along with the model and model parameters. After you’ve made your updates, save the prompt template.
Notebooks
After the setup is complete, the notebooks in the project can be run without errors. For each of the notebooks, make sure to insert the project token by using the upper-right menu (three dots symbol) in the notebook UI before running any cells.
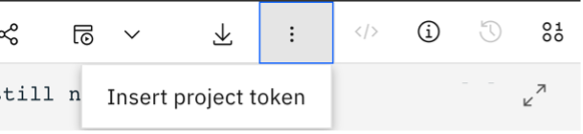
This creates a cell that connects your notebook to the project and its assets. Now, run the following notebooks one by one.
- 1-file-ingestion-from-cos
- 2-deploy-rag-function-in-wml
- 3-test-rag-deployment (optional)
Ingest documents to Databases for Elasticsearch
The 1-file-ingestion-from-cos notebook in the project handles document ingestion from Cloud Object Storage to Databases for Elasticsearch. In this notebook, the following steps are implemented:
- Configure the notebook by importing the necessary packages and adding the values configured in your project's Parameter Sets to the namespace.
- Connect to Cloud Object Storage.
- Read and prepare files from Cloud Object Storage by connecting to your Cloud Object Storage bucket. Then, the files inside the bucket are read, chunked, and formatted into JSON objects that can be ingested by watsonx Discovery. This project uses the LlamaIndex framework and LlamaIndex file readers to perform the file ingestion.
- Connect to the Databases for Elasticsearch service by using the connection in the project.
- Set up the embedding model, index, and ingestion pipeline.
- Ingest the chunked and formatted documents into Watsonx Discovery.
Deploy RAG function in Watson Machine Learning
The 2-deploy-rag-function-in-wml notebook in the project handles the deployment of a Python function that performs RAG using the Databases for Elasticsearch database and watsonx.ai. The following steps are implemented in this notebook:
- Configure the notebook by importing the necessary packages, connecting to the Watson Machine Learning client, and adding the values configured in your project's Parameter Sets to the namespace.
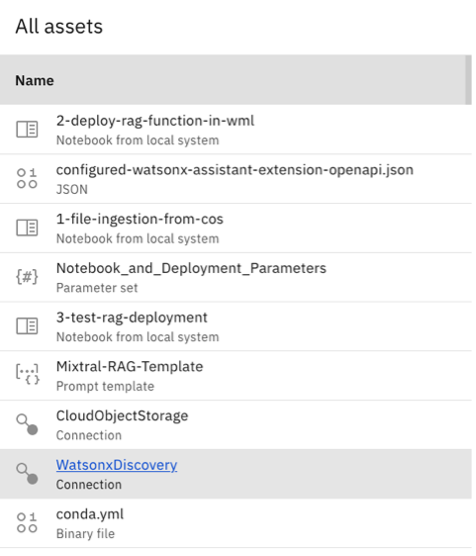
To deploy the Python function, a few assets in the project also must be promoted to the deployment space in addition to the function itself. These include those shown in the following image.

Connect to the index in the Databases for Elasticsearch service that was set up in 1-file-ingestion-from-cos and retrieve relevant documents to the query by using Elasticsearch's embedded ELSER model.
- Connect to watsonx.ai and generate a response by using the retrieved documents based on the Mixtral-RAG-Template prompt template.
- If
run_evaluatoris set to True in the code, check against potential hallucination using LlamaIndex's FaithfulnessEvaluator. - Test the scoring function locally before deployment.
- Deploy the function to space.
- Test the deployed endpoint by scoring some sample data.
- Update the OpenAPI JSON with the new
wml_deployment_idgenerated for watsonx Assistant. (This step is optional and is needed only if you are integrating this RAG approach in watsonx Assistant).
Test your deployment (optional)
Optionally, you can test your deployment by using the third notebook, 3-test-rag-deployment, in the project. This notebook calls the deployment endpoint and reformats the deployment responses for better readability.
After running the notebooks, you have implemented the RAG using Elasticsearch and deployed it successfully. You have also tested the RAG using the notebook.
Integrate with watsonx Assistant
Watsonx Assistant provides the query interface, using either the custom RAG extension deployed just now or the native Elasticsearch search extension. The assets for setting up watsonx Assistant are located in the assistant folder of this repository and are also included in the Watson Studio project for convenience.
To use watsonx Assistant with the deployed Python function through a custom extension, you must download two JSON files from the Assets tab of watsonx.ai project:
- configured-watsonx-assistant-extension-openapi.json
- watsonx-assistant-actions.json
This must be done after running 2-deploy-rag-function-in-wml because the JSON file requires the deployment_id of the RAG function.
Now, continue with the following steps:
Custom extension using RAG function deployment
To set up the custom extension:
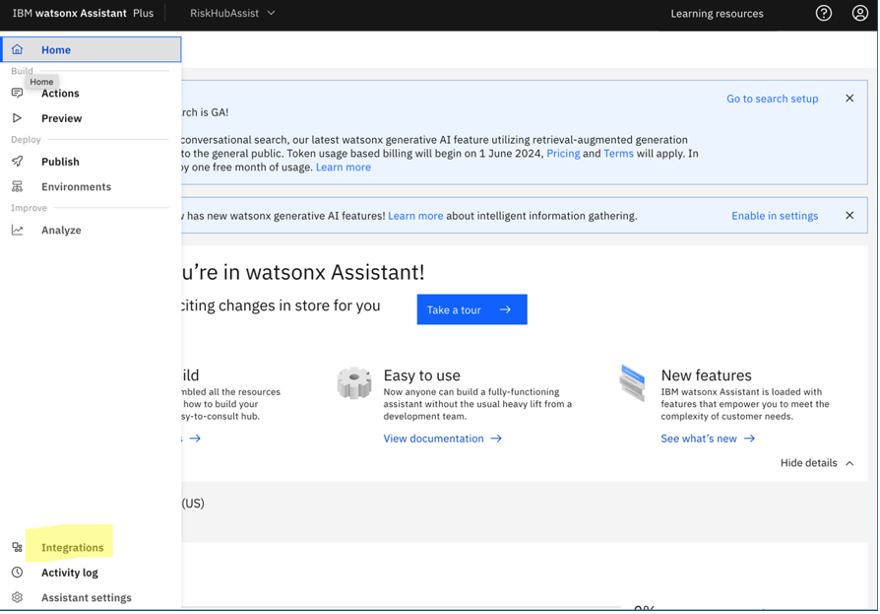
- Open watsonx Assistant.
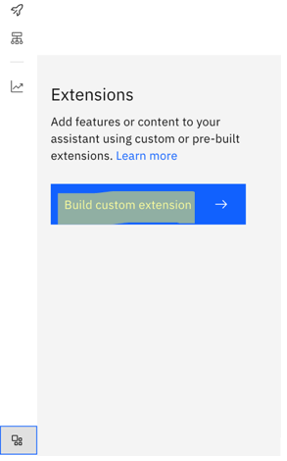
From the hamburger menu at the upper left, select Integrations.
Select Build custom extensions.
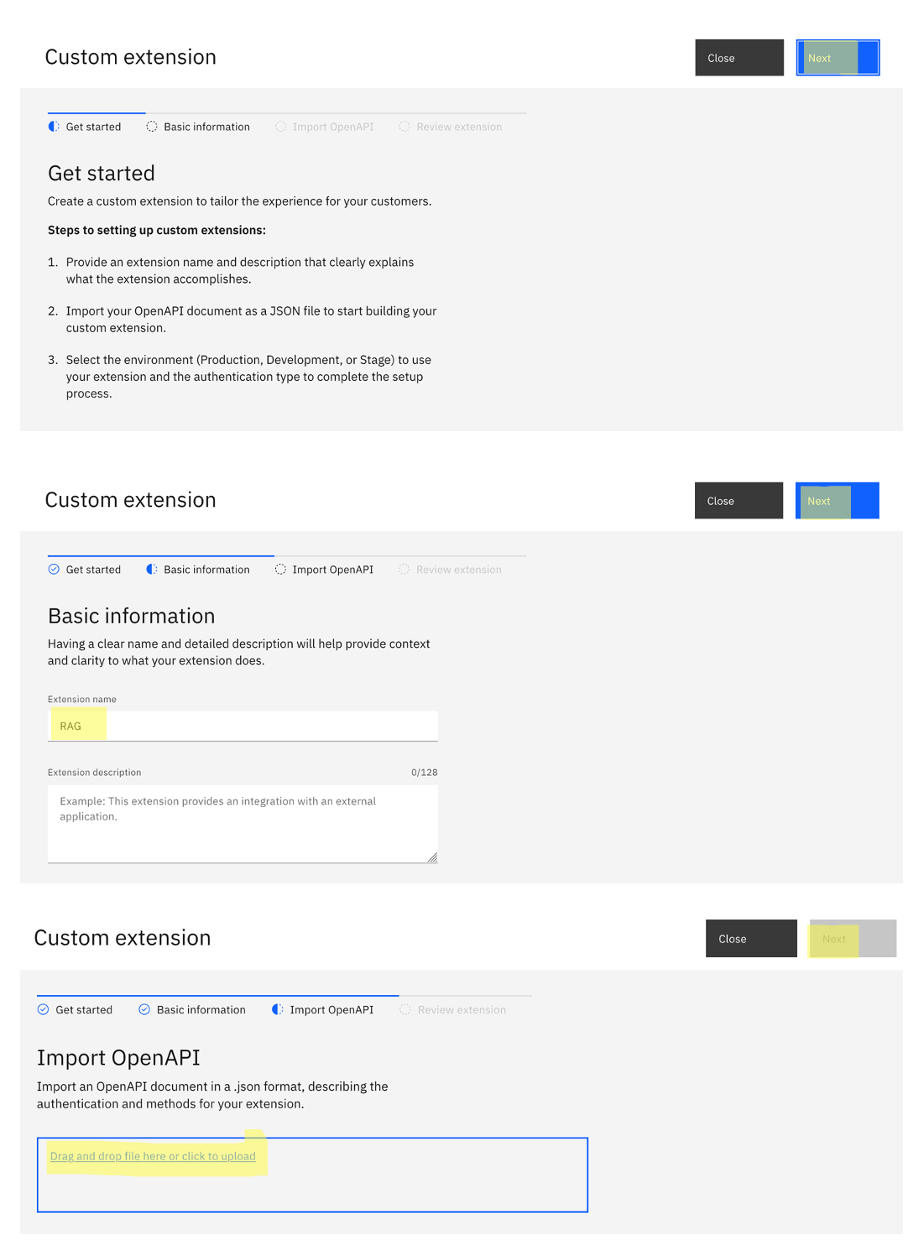
In the Import OpenAPI section, upload the configured-watsonx-assistant-extension-openapi.json file that you downloaded, and finish creating the extension.
Add the extension to the assistant by clicking Add under the newly created extension.


In the authentication section, set the Authentication type to
OAuth 2.0, add your IBM Cloud API key to theApikeyfield under Custom Secrets, and finish adding the extension.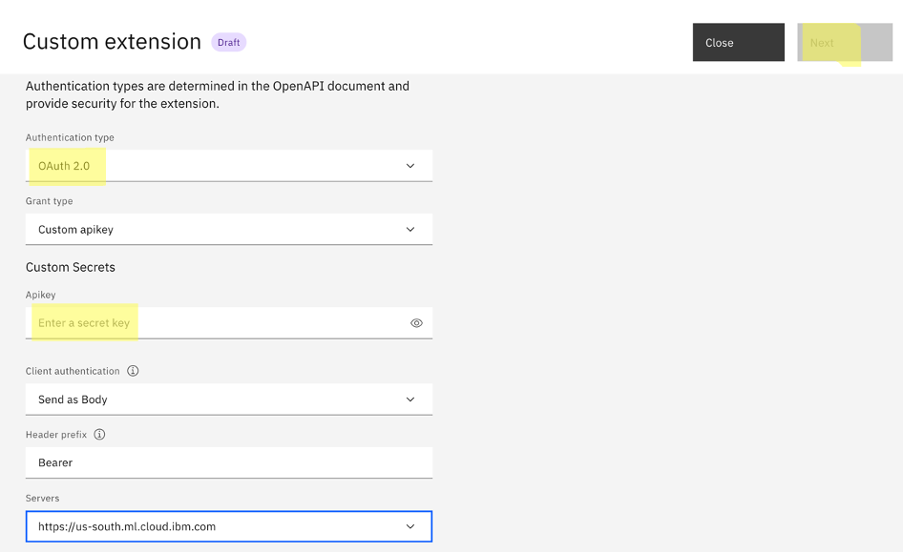
Configure Actions to use the extension
- Download the watsonx-assistant-actions.json file from the Assets tab under the watsonx.ai project used in Deploy RAG function step.
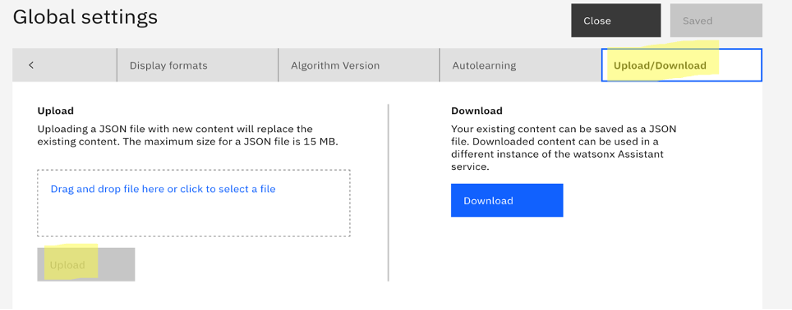
Navigate to Actions -> Global Settings.
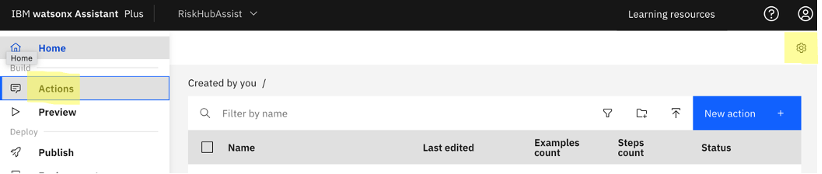
Under Global Settings, scroll to the right, navigate to the Upload/Download tab, and upload the JSON file.
Go back to Actions -> Variables -> Created by you ->New Variable -> create variables for the wml_deployment_id and wml_deployment_version variables. Initialize these variables with your
deployment_idandversion.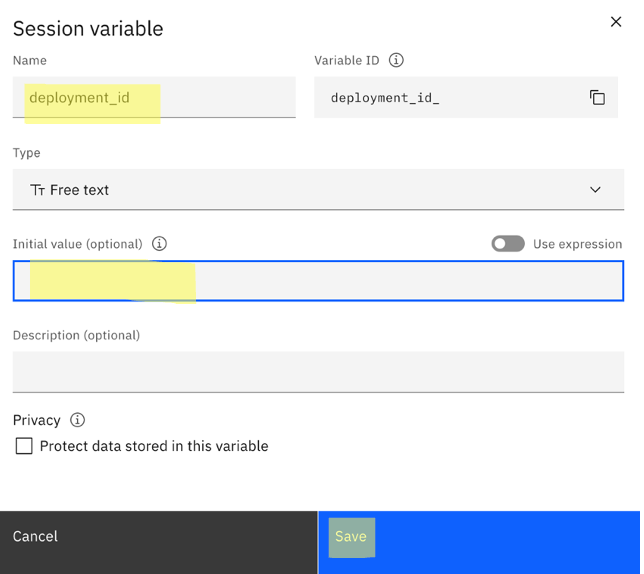
Go to Actions -> Set by assistant -> No action matches, configure the extension, and select the extension that you added earlier.
- Set the input_data parameter in the extension configuration to:
session variable -> extension_input_data - Confirm that the
wml_deployment_idparameter andversionare set to your respective setting. - Save your action and navigate to the preview tab.
Your assistant is now configured.
Test
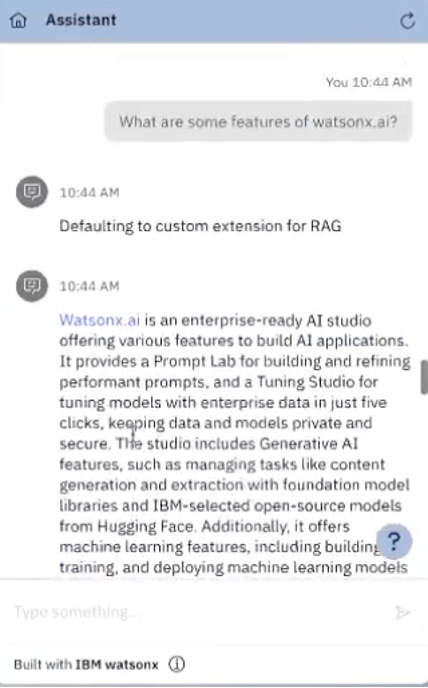
- Go to the Preview tab.
- Open the assistant from the bottom right.
- Enter your query and submit.
You are able to see a response. For example:
Summary
In this tutorial, you learned how to implement RAG using watsonx.ai with Elasticsearch by using watsonx Discovery. You can experiment with it by using it with your own use case. This allows you to use prompt engineering for improving the model responses to be specific to your format and expectation by experimenting with the Prompt Template available under the assets of the watsonx.ai project. You can also experiment with the chunk size and model parameters in the prompt template.
If you have any questions about the tutorial, please contact Simran Gupta.
References
This GitHub repository contains the necessary assets to implement a comprehensive RAG solution using watsonx Discovery and Databases for Elasticsearch, watsonx.ai, and watsonx Assistant.
This TechZone reservation provisions all of the required IBM Cloud services when configured with watsonx Discovery installed.
A more general repository is skol-assets, which contains Python modules and scripts for ingesting various file types into watsonx Discovery: skol-assets/watsonx-wxd-setup-and-ingestion