About cookies on this site Our websites require some cookies to function properly (required). In addition, other cookies may be used with your consent to analyze site usage, improve the user experience and for advertising. For more information, please review your options. By visiting our website, you agree to our processing of information as described in IBM’sprivacy statement. To provide a smooth navigation, your cookie preferences will be shared across the IBM web domains listed here.
Tutorial
Install Red Hat OpenShift Virtualization on IBM cloud to run virtual workloads
Learn how to install OpenShift Virtualization on IBM cloud, configure storage, and run virtual machine workloads efficiently
On this page
Red Hat OpenShift Virtualization is an operator in Red Hat OpenShift that lets you run and manage virtual machines (VMs) alongside containerized applications on a single platform. It uses Kubernetes and container technologies to simplify and improve virtualization. This allows you to run traditional applications in VMs while benefiting from features such as automated deployment, scaling, and management. By combining VMs and containers, Red Hat OpenShift Virtualization provides a consistent experience for managing different types of workloads.
This tutorial provides detailed instructions on installing Red Hat OpenShift Virtualization on IBM cloud, with a focus on IBM cloud-specific configurations and requirements.
Benefits of using Red Hat OpenShift Virtualization on IBM cloud
Key advantages of running Red Hat OpenShift Virtualization on IBM cloud:
Virtual private cloud (VPc) bare metal server with extra local storage is optimized for virtualization workloads with high performance.
Works well with IBM cloud services such as log analysis, object storage, and DevOps tools such as
One Pipeline.Keeps your clusters secure and up-to-date with minimal downtime.
Meets enterprise standards including Payment card Industry Data Security Standard (PcI DSS), Health Insurance Portability and Accountability Act (HIPAA), and SOc 1.
Prerequisites
Before you begin, make sure that the following requirements are met:
IBM cloud Account: You need a valid IBM cloud account to access and use IBM cloud services. If you do not have one, sign up for a free trial or choose a suitable plan at IBM cloud.
IAM permissions for ROKS: To create a Red Hat OpenShift cluster (ROKS) on IBM cloud, you must have the Operator role or equivalent IAM permissions. These permissions allow you to create and manage Red Hat OpenShift clusters within your IBM cloud organization. If you are unsure about your access, contact your IBM cloud administrator or check the IBM cloud documentation: IAM roles and actions .
Steps
Step 1. create an Red Hat OpenShift cluster on IBM cloud (ROKS)
To get started with Red Hat OpenShift Virtualization, you first need to create a Red Hat OpenShift (ROKS) cluster on IBM cloud, configured with VPc bare metal nodes and running the Red Hat coreOS operating system.
For detailed instructions on creating a ROKS cluster, refer to creating VPc clusters (UI).
Note: The steps in this tutorial are tailored for Red Hat OpenShift Virtualization use cases.
Supported bare-metal node types
choose from the following VPc bare metal node types:
bx2.metal.96x384
bx2d.metal.96x384: includes an extra NVMe local disk, ideal for Software Defined Storage (SDS) like Red Hat OpenShift Data Foundation (ODF)
cx2.metal.96x192
cx2d.metal.96x192: includes an extra NVMe local disk
mx2.metal.96x768
mx2d.metal.96x768: includes an extra NVMe local disk
Note: Bare-metal node flavors with a d suffix offer extra NVMe storage, which can enhance performance for SDS solutions like ODF.
Note: Bare-metal node flavors with a ‘d’ suffix (such as bx2d or cx2d) include an extra NVMe local disk, which can be used for Software-defined storage (SDS) solutions such as Red Hat OpenShift Data Foundation (ODF). However, remote block volume attachment is not supported for VPc Bare Metal nodes, so ODF with remote provisioning is currently not available.
At the time of writing, these bare-metal flavors are available only in the ca-tor-2 and ca-tor-3 zones. Be sure to select one of these zones when creating the cluster. Otherwise, these node flavors will not appear in the UI.
creating a ROKS cluster on IBM cloud
Make sure to select Red Hat OpenShift version 4.17 or higher, as it is required for Red Hat OpenShift Virtualization. complete the following steps to create the cluster:
Log in to your IBM cloud account.
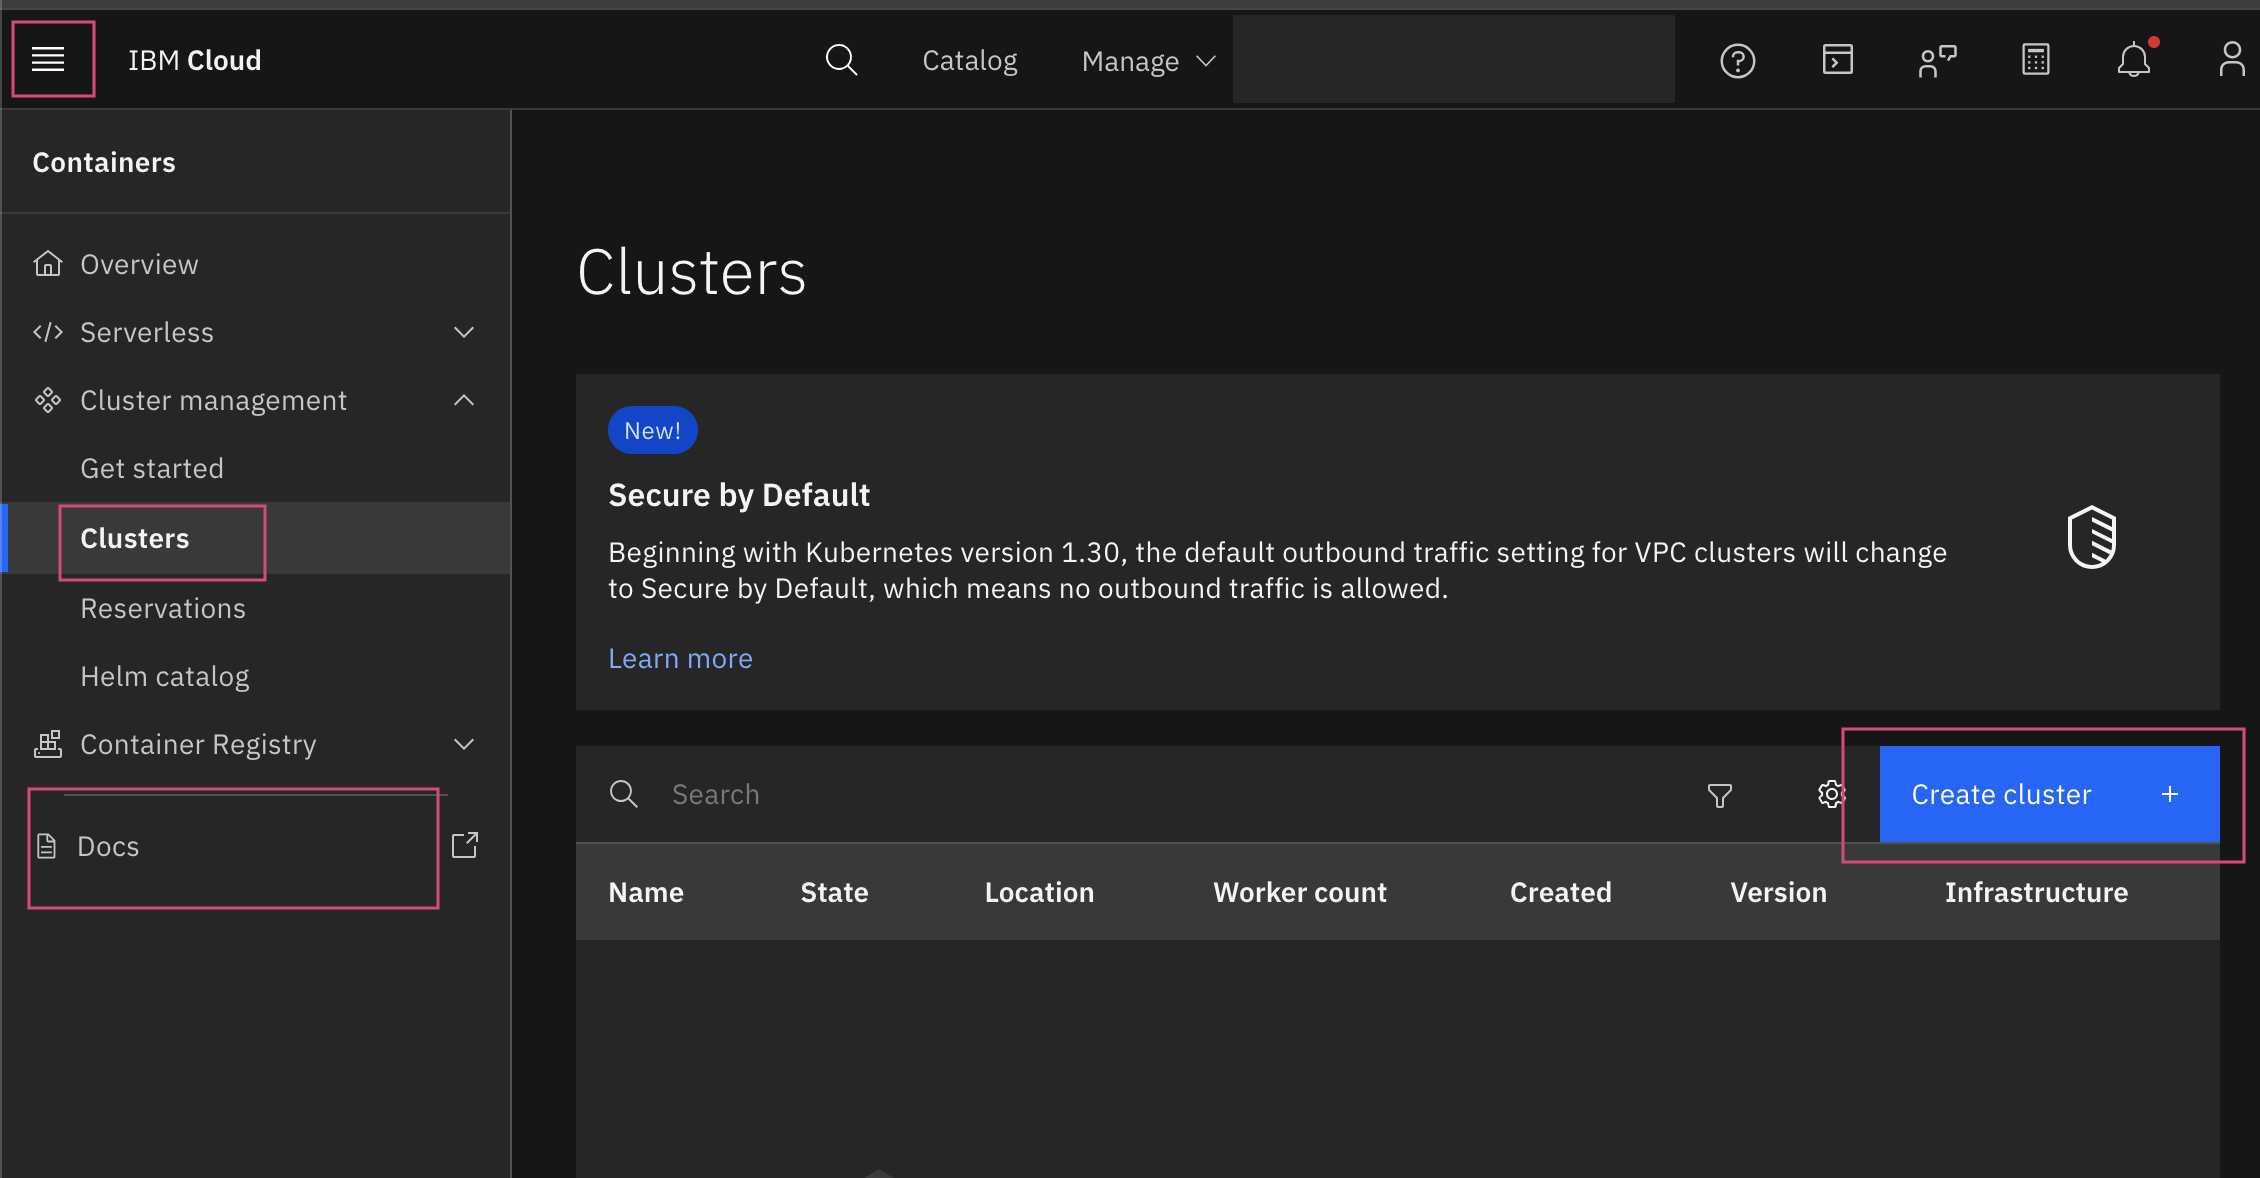
click the menu icon (☰) on the left side of the screen.
Go to containers > clusters.
click create cluster to start the setup process.
On the create cluster page, configure the following:
cluster Settings
Orchestrator: Red Hat OpenShift
Infrastructure: VPc
Virtual Private cloud: Select your existing VPc or create a new one
Location: choose or create subnets in the supported zones (ca-tor-2 or ca-tor-3)
Red Hat OpenShift Version: 4.17 or higher
Outbound Traffic Protection: Disabled
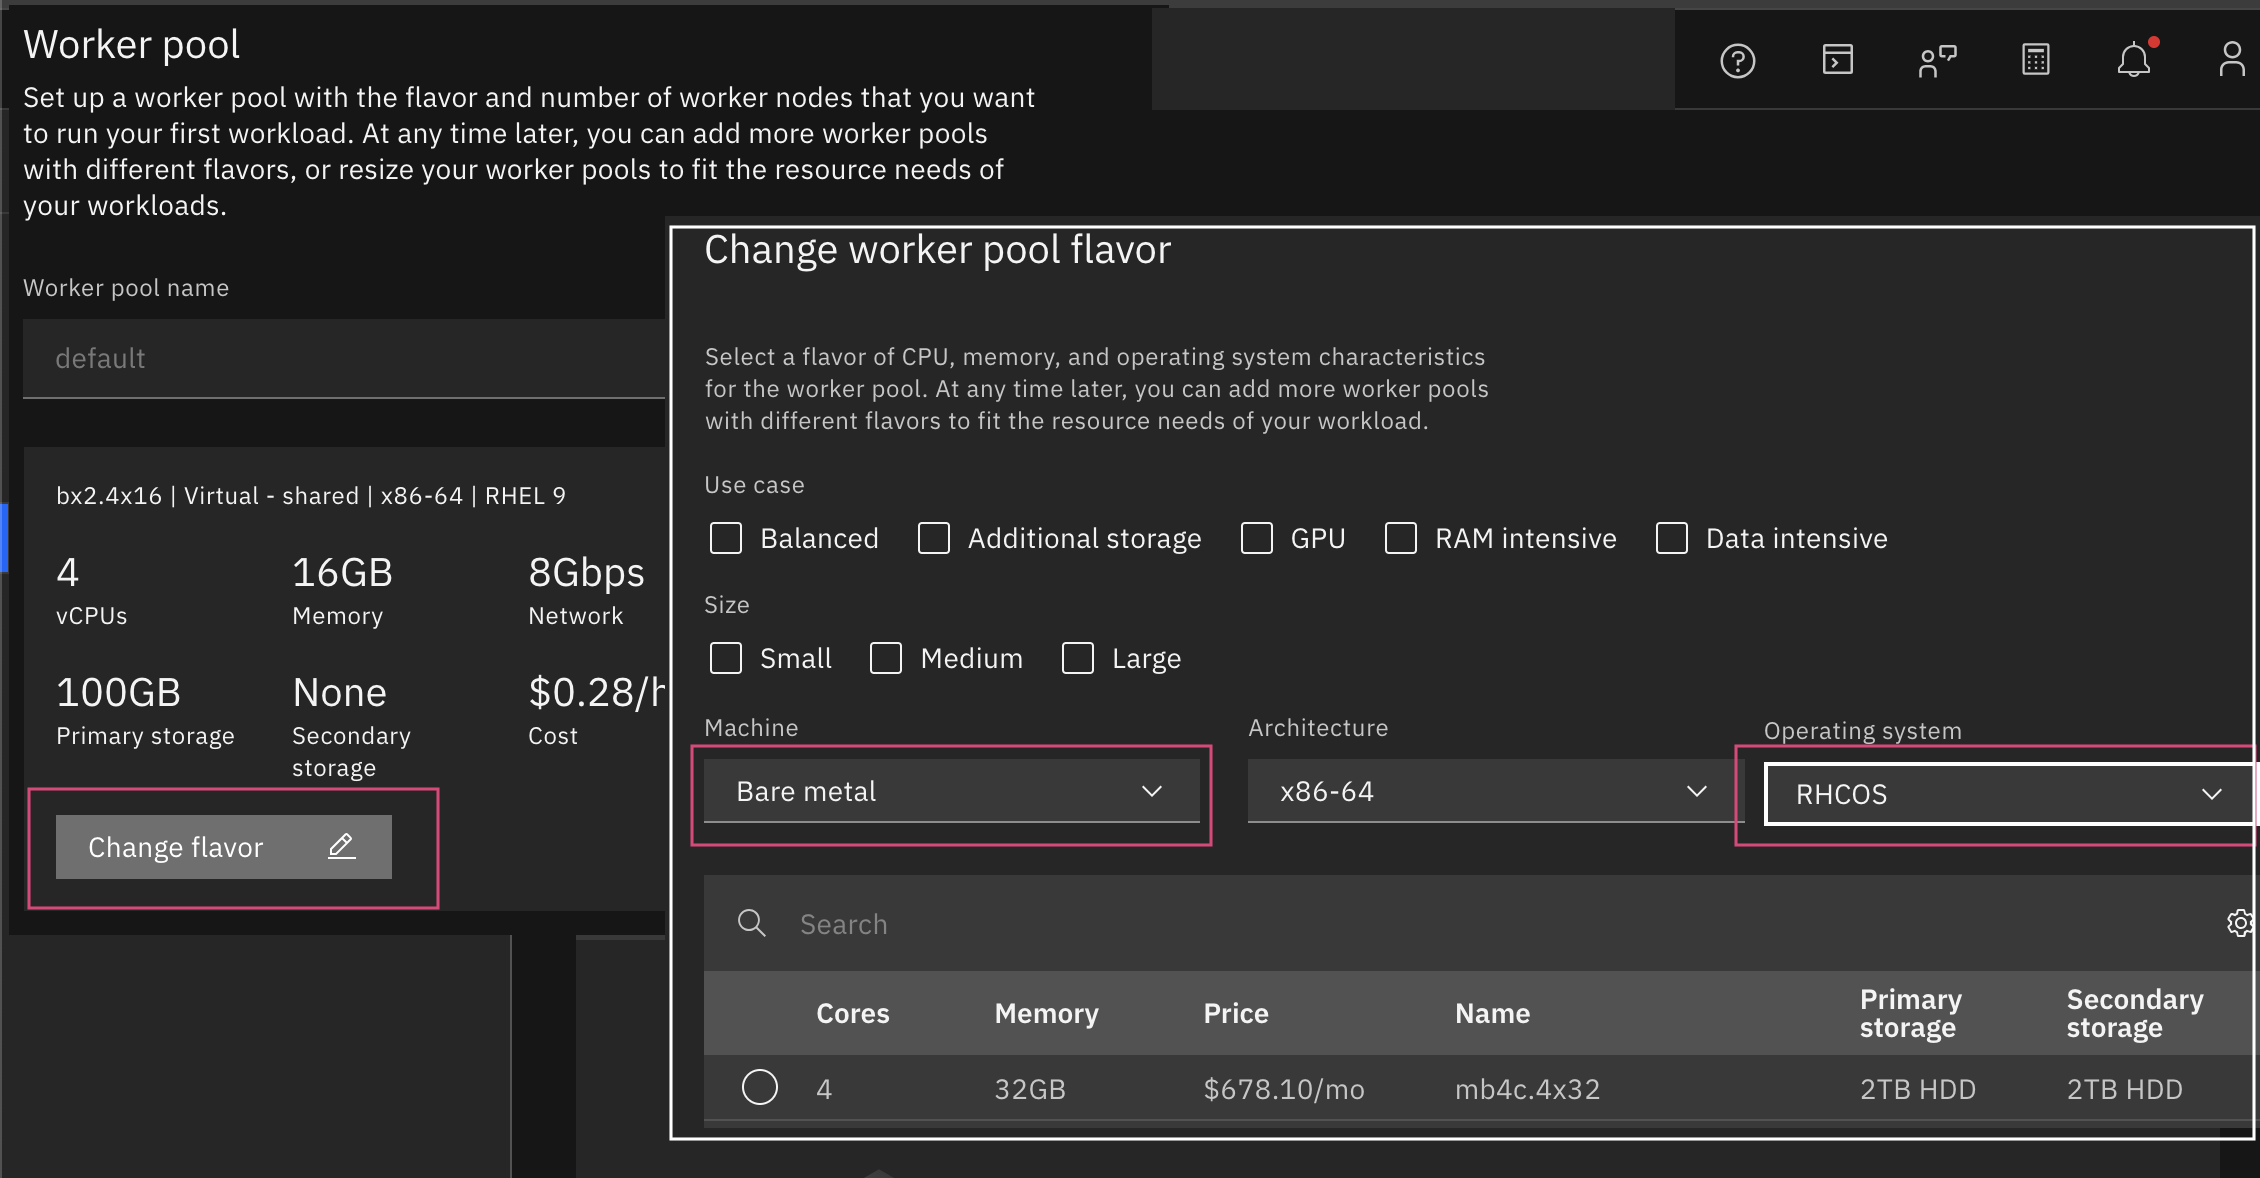
Worker Pool Settings
click change flavor
Set Machine type to Bare metal
Select Operating System as RHcOS (Red Hat coreOS)
For more detailed instructions, refer to creating VPc clusters (UI).
creating an OpenShift cluster via cLI
You can also create an Red Hat OpenShift cluster on IBM cloud using the command-line interface (cLI). For complete instructions, refer to creating VPc cluster (cLI).
Example command
ibmcloud ks cluster create vpc-gen2 \
--name cluster-overt \
--vpc-id <vpc-id> \
--subnet-id <subnet-id> \
--zone <zone> \
--flavor cx2d.metal.96x192 \
--operating-system RHcOS \
--version 4.17.18_openshift \
--workers 3
creating an OpenShift cluster using terraform
You can also automate the creation of an Red Hat OpenShift cluster on IBM cloud VPc infrastructure using Terraform. For instructions, see creating VPc cluster (Terraform).
This approach is ideal for Infrastructure as code (Iac) practices and repeatable deployments.
Step 2: Install storage add-ons on your Red Hat OpenShift cluster (ROKS)
For Red Hat OpenShift Virtualization to work properly, you need a storage solution that supports the ReadWriteMany (rwx) access mode. This is required for key features such as live migration, snapshots, and backups of virtual machines.
While Red Hat Red Hat OpenShift Data Foundation (ODF) is the recommended choice, other container Storage Interface (cSI) plug-ins are also supported, giving you flexibility based on your workload needs and infrastructure setup.
Key storage requirements for Red Hat OpenShift Virtualization
To support virtual machine workloads effectively, your Red Hat OpenShift cluster must meet the following storage requirements:
Rwx access mode: Storage must support ReadWriteMany (rwx) access, which is essential for live migration, snapshots, and backups.
Red Hat OpenShift Data Foundation (ODF): ODF, based on Red Hat ceph Storage, is a widely recommended option. It provides scalable, resilient block storage suitable for virtual machines.
Other cSI plug-ins: Red Hat OpenShift Virtualization also supports other container Storage Interface (cSI) plug-ins, giving you flexibility to use different backend storage solutions.
Storage class: Define a storage class optimized for VM workloads. This helps ensure performance, reliability, and a consistent user experience.
Dynamic storage provisioning: Use dynamic provisioning through cSI plug-ins to automatically create persistent volume claims (PVcs) as needed for your VMs.
Shared storage: For features such as live migration, shared storage is required so VMs can move between nodes without data loss.
Storage options and features
You can choose from multiple storage solutions based on your workload needs. The supported options and their capabilities follow:
Red Hat OpenShift Data Foundation (ODF)
Supports RBD block-mode volumes.
Enables VM live migration and snapshots.
Ideal for production-grade, high-performance workloads.
IBM VPc file cSI plug-in
Supports VM live migration and snapshots.
Suitable for mid-level workloads with rwx access needs.
Red Hat OpenShift Virtualization HostPath provisioner
Does not support VM live migration or snapshots.
Best suited for local testing or development environments where advanced VM operations are not required.
choosing the right storage: ODF or VPc file
Use the following table to decide between Red Hat OpenShift Data Foundation (ODF) and IBM VPc file storage, based on your workload needs.
| Use case | ODF | VPc File | Details |
|---|---|---|---|
| High Availability (Multi-Zone) | Recommended | Not Recommended | ODF supports multi-zone high availability with at least 3 zones. VPc File supports multi-zone setups but has low I/O throughput, which limits its performance. |
| High Read/Write Workloads | Recommended | Possible with high IOPS classes | ODF uses local disks for higher IOPS. VPc File can support higher throughput only when custom IOPS classes are configured. |
| Low Read/Write or Non-Production | Recommended (especially if local disks are available) | Recommended with the following size/IOPS: • 40 GB – 2000 IOPS • 100 GB – 6000 IOPS | VPc File is a cost-effective option for low-intensity or development workloads. See the VPc IOPS reference. |
| Snapshot and cloning Support | Supported | Not Supported | VPc File cSI driver does not support snapshot or cloning operations. Techniques like csi-clone are not supported. See Setting a default cloning strategy by using a storage profile. |
Step 2.1: Install Red Hat OpenShift Data Foundation (ODF)
Red Hat OpenShift Data Foundation (ODF) improves storage for your virtualized applications. For detailed instructions on installing Red Hat OpenShift Data Foundation (ODF) on IBM cloud, see Deploying OpenShift Data Foundation on VPc clusters.
The steps in this tutorial are tailored for use with Red Hat OpenShift Virtualization.
Prerequisite
An Red Hat OpenShift cluster running on IBM cloud (ROKS).
Install Red Hat OpenShift Data Foundation (ODF) using the UI
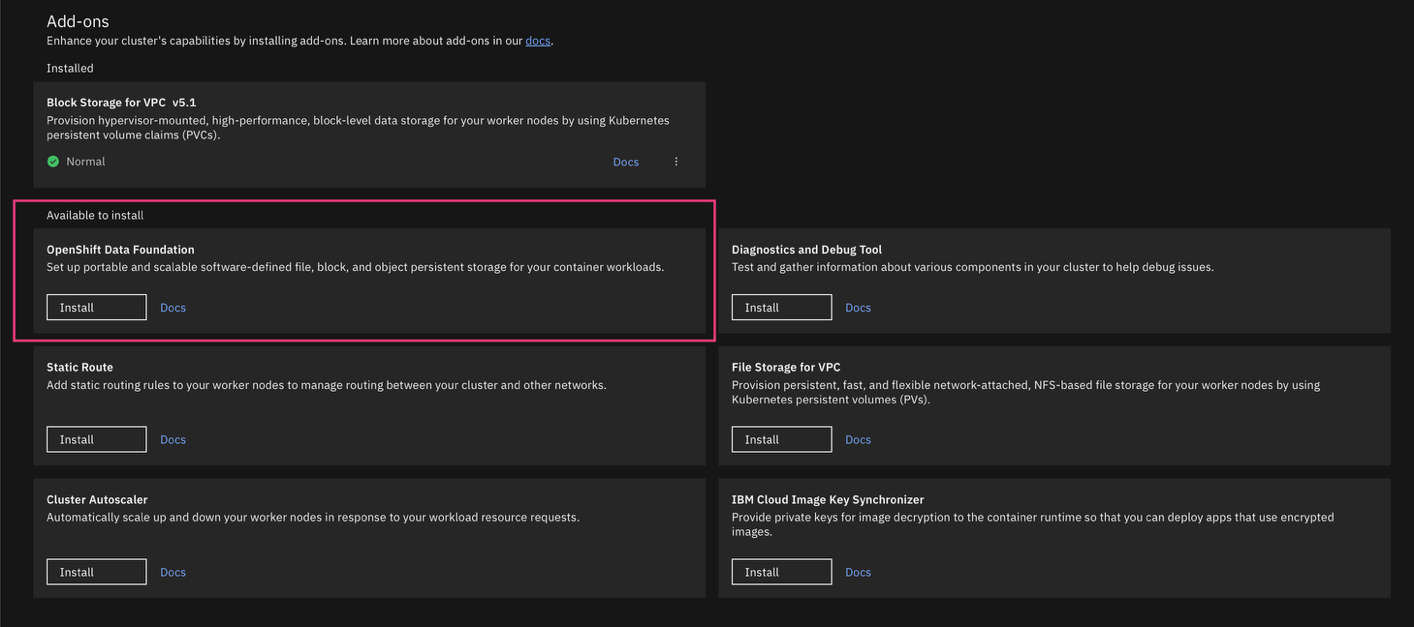
create an Red Hat OpenShift cluster and open the Red Hat OpenShift web console.
Find the Red Hat OpenShift Data Foundation card and click Install. The Installation page appears.
Select Local storage since Bare Metal worker nodes have attached drives for ODF. Remote block volume attachment is not supported for VPc bare metal nodes, so remote provisioning is not available.
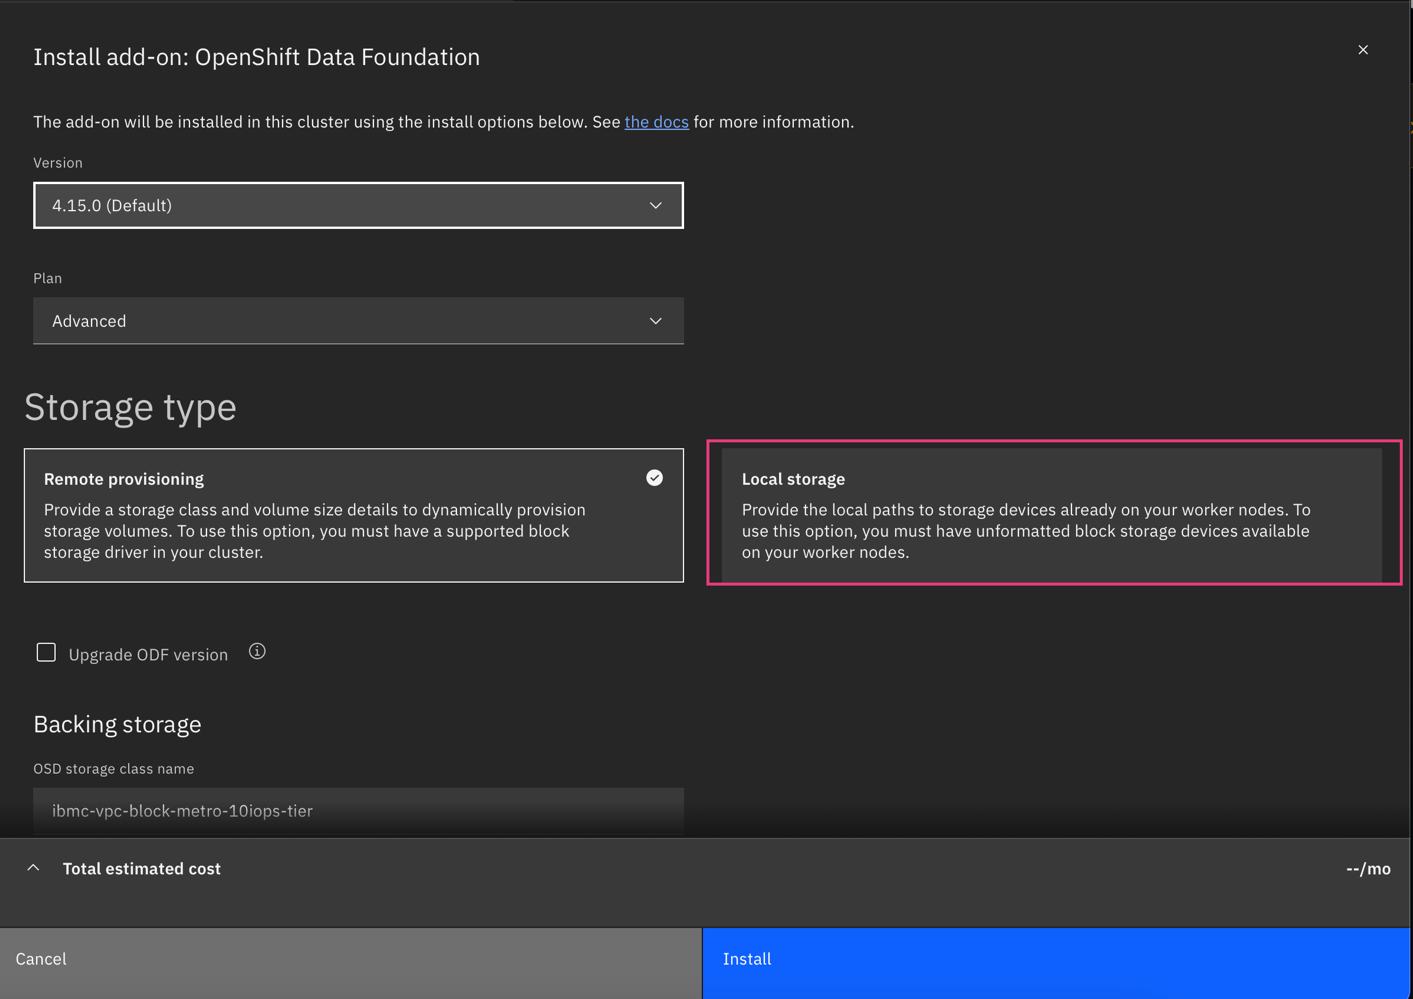
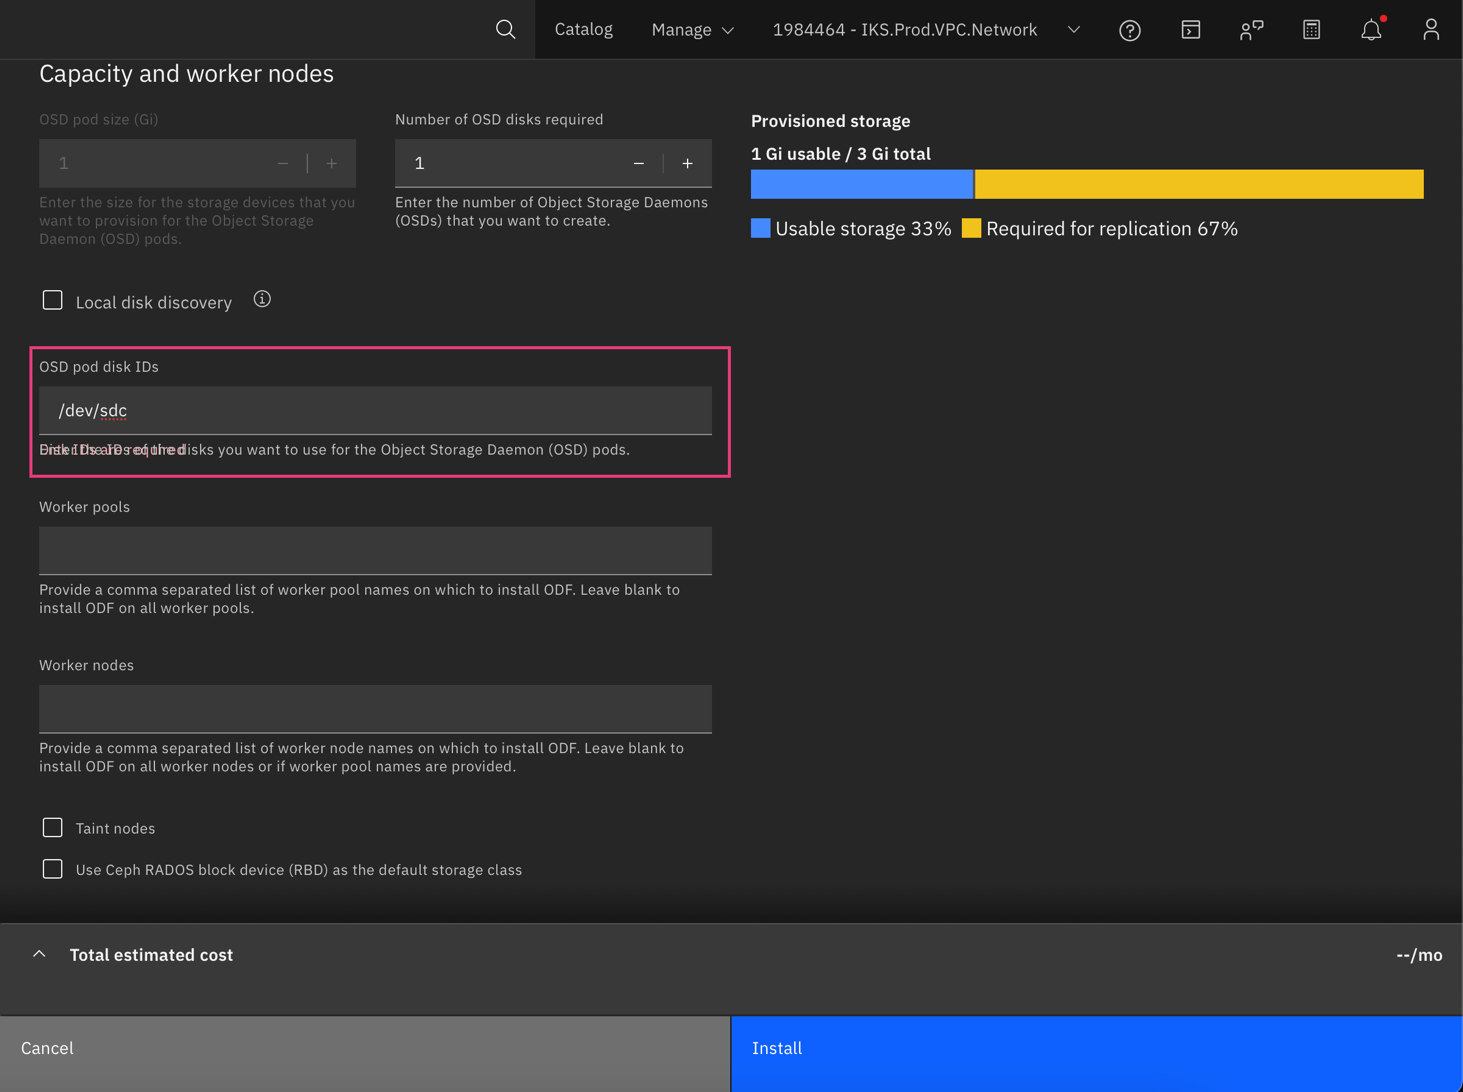
For local storage, select the Local disk discovery option to automatically detect available disks and provision Red Hat OpenShift Data Foundation.
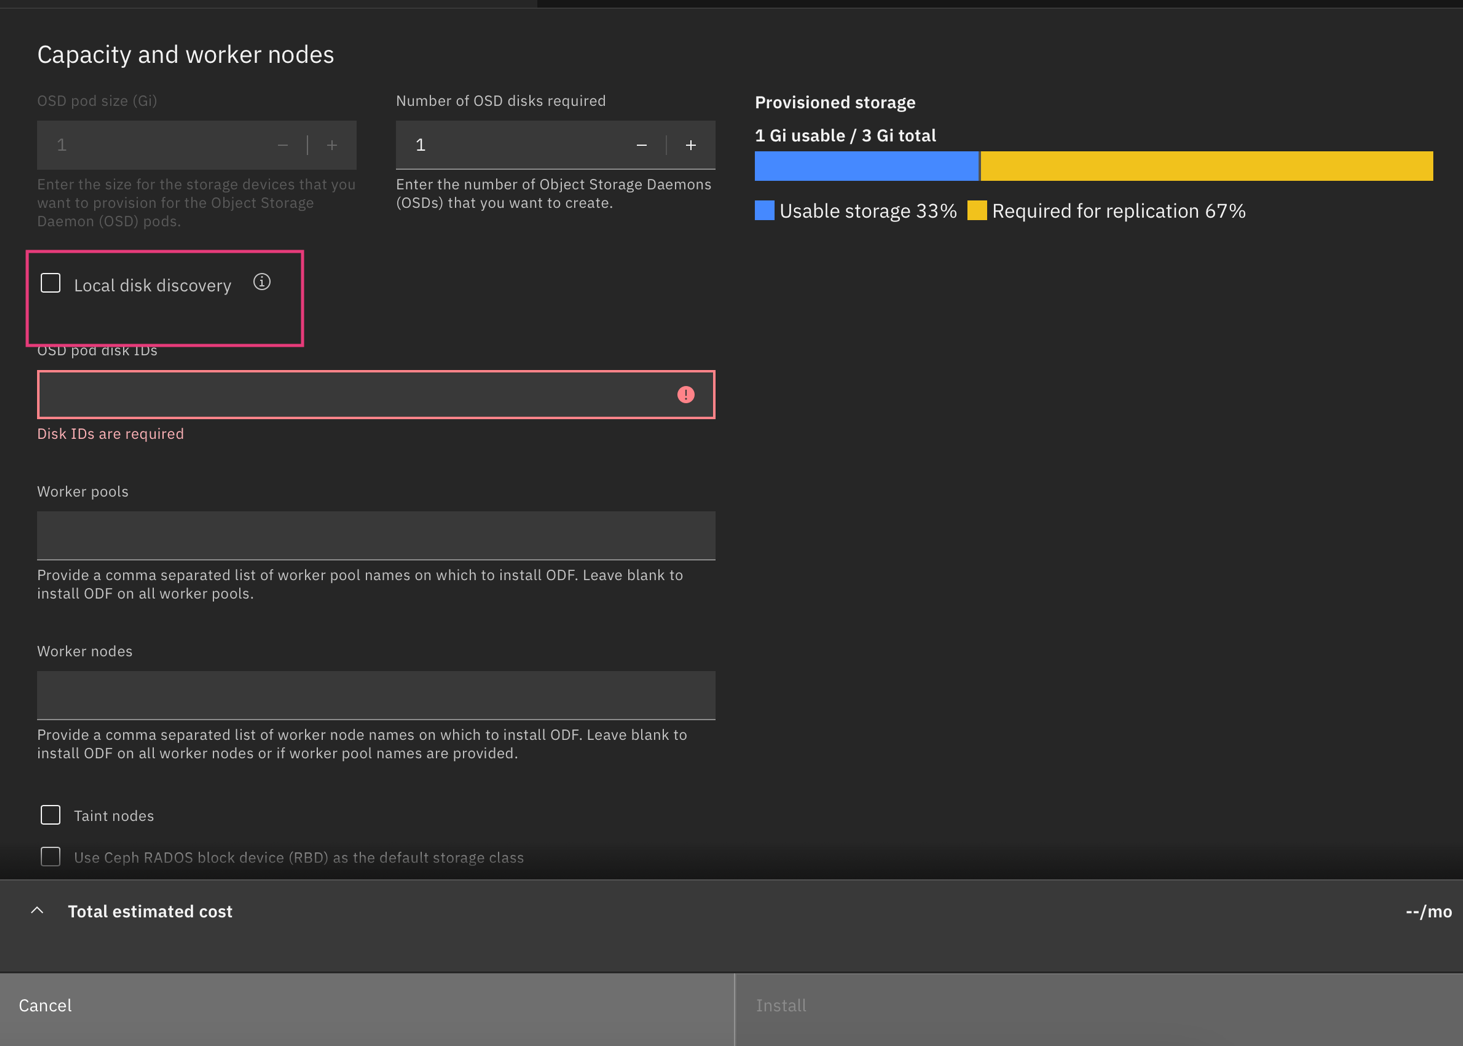
Alternatively, you can manually specify the Object Storage Daemon (OSD) pod disk IDs by following these steps:
a. Log in to each worker node you want to use for ODF:
oc debug node/<node-name>b. When the debug pod is running, list the available disks by allowing host binaries:
chroot /hostc. List available disks:
lsblkd. Review the lsblk output to find unmounted disks that can be used for ODF. Use unformatted and unmounted partitions or raw disks.
If the disk has partitions, choose the smaller one for monitor (MON) and the larger one for OSD.
If using raw disks, assign one to MON and another to OSD.
The storage capacity depends on the disk that you set for osd-device-path.
NAME   MAJ:MIN RM   SIZE RO TYPE MOUNTPOINT
sda      8:0    0   931G  0 disk
|-sda1   8:1    0   256M  0 part /boot
|-sda2   8:2    0     1G  0 part
`-sda3   8:3    0 929.8G  0 part /
sdb      8:16   0 744.7G  0 disk
`-sdb1   8:17   0 744.7G  0 part /disk1
sdc      8:32   0 744.7G  0 disk
|-sdc1   8:33   0  18.6G  0 part
`-sdc2   8:34   0 260.8G  0 part
e. Run the following command to find the by-id values for the disks you want to use, for example, sdc1 and sdc2, if they are unmounted and unformatted:
ls -l /dev/disk/by-id/Use these by-id paths when creating your ODF configuration.
f. Add the disk IDs under the OSD pod disk IDs field in the configuration.
Use the OpenShift Data Foundation add-on parameter reference information to complete your Red Hat OpenShift Data Foundation installation.
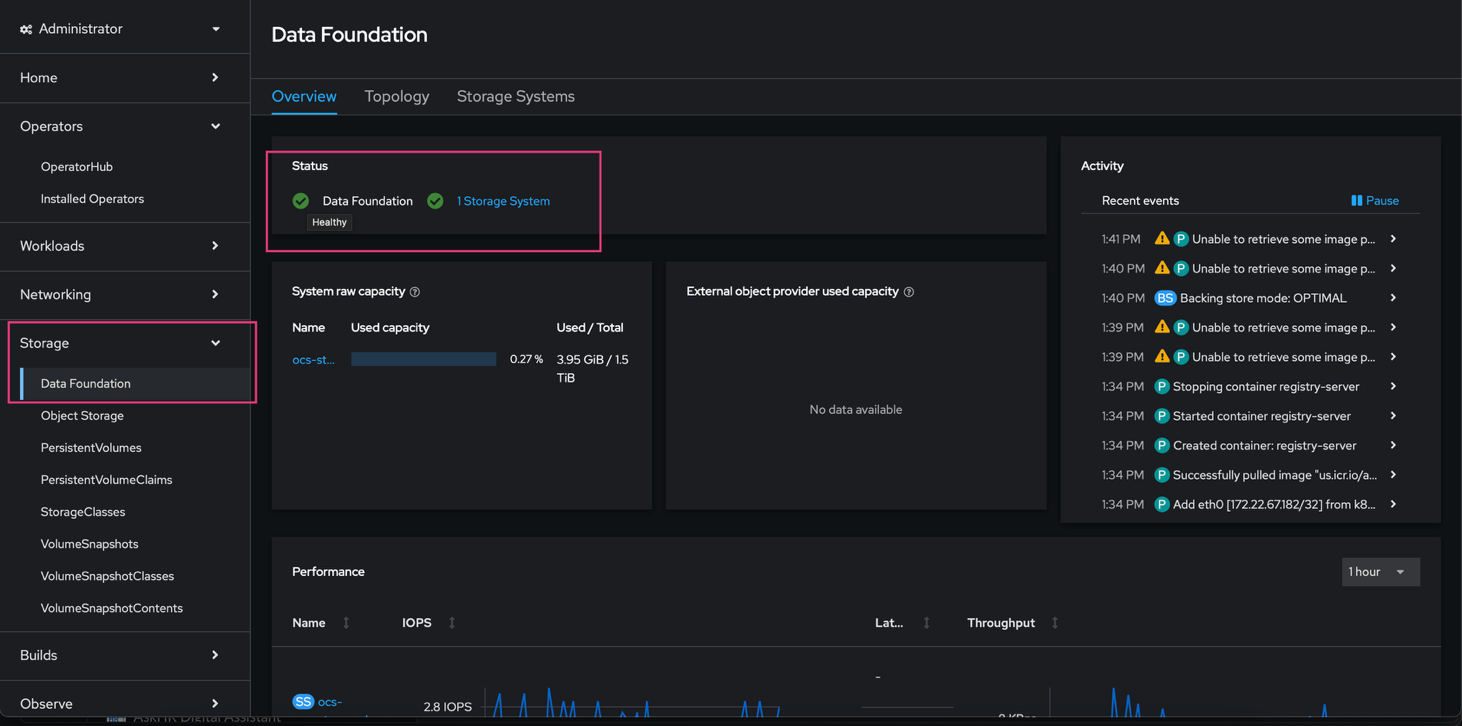
check the Red Hat OpenShift Data Foundation status in the Red Hat web console:
Install Red Hat OpenShift Data Foundation by using the cLI
check available ODF addon options before installing.
ibmcloud oc cluster addon options --addon openshift-data-foundation --version 4.17.0Enable the openshift-data-foundation add-on using the cLI. You can override the default settings with the
--param "key=value"option. To delay storage cluster creation, enable the add-on first and create the cluster later by using a custom resource. Example command with default storage cluster settings, performance profile, and encryption by using Hyper Protect crypto Services (HPcS):ibmcloud oc cluster addon enable openshift-data-foundation -c <cluster-name> --version 4.17.0 \ --param "odfDeploy=true" \ --param "osdStorageclassName=localblock" \ --param "autoDiscoverDevices=true" \ --param "resourceProfile=performance" \ --param "hpcsTokenUrl=https://iam.cloud.ibm.com/identity/token" \ --param "hpcsEncryption=true" \ --param "hpcsBaseUrl=<hpcs-instance-public-endpoint>" \ --param "hpcsInstanceId=<hpcs-instance-id>" \ --param "hpcsServiceName=<hpcs-instance-name>" \ --param "hpcsSecretName=<hpcs-secret-name>"Verify that the add-on is in a Ready state by using the following command:
oc get storagecluster -n openshift-storageExample output:
NAME                 AGE   PHASE   EXTERNAL   cREATED AT             VERSION
 ocs-storagecluster   53m   Ready              2023-03-10T12:20:52Z   4.11.0
Step 2.2: Install IBM VPc file cSI plug-in
Install and configure the IBM virtual private cloud (VPc) file container storage interface (cSI) plug-in with Red Hat OpenShift Virtualization on IBM cloud. The IBM VPc File cSI refers to the cSI driver for IBM cloud file storage shares within a VPc environment. It helps you set up VPc file storage to support your virtualized applications.
For detailed instructions on installing the VPc File add-on on IBM cloud, see Enabling the IBM cloud File Storage for VPc cluster add-on.
The steps in this tutorial are tailored for use with Red Hat OpenShift Virtualization.
Prerequisite
An Red Hat OpenShift cluster (ROKS) sets up on IBM cloud.
Install IBM VPc file cSI plug-in using the UI
create an Red Hat OpenShift cluster and open the cluster UI. By default, the VPc Block cSI plug-in is already installed.
By default, the following storage classes are available:
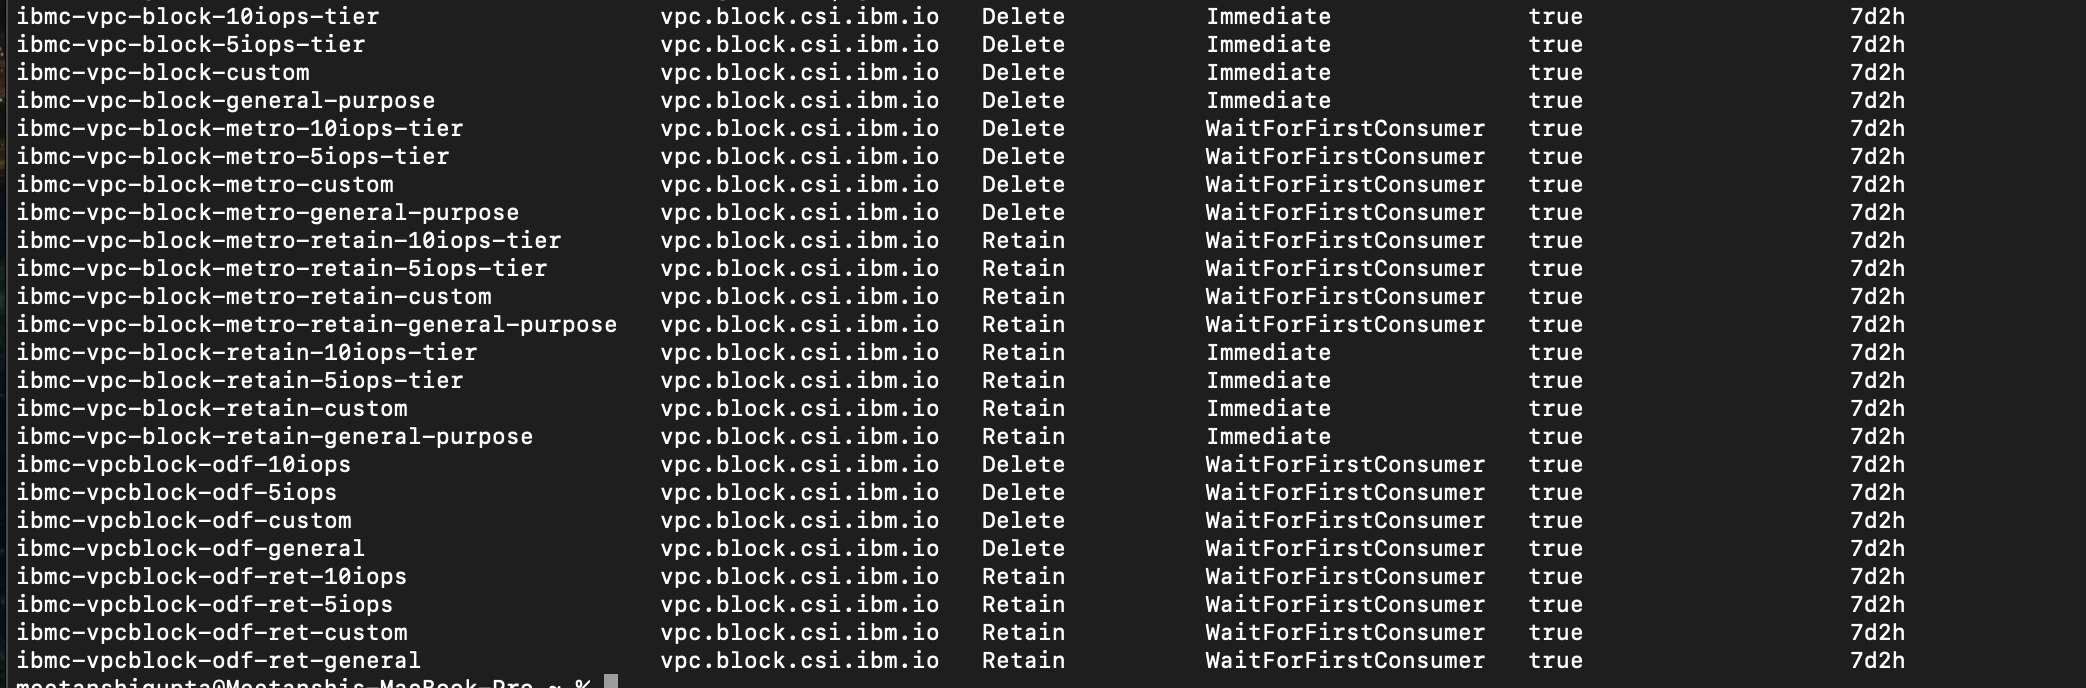
However, Red Hat OpenShift Virtualization does not support the VPc block cSI plug-in. You need to install the VPc file cSI plug-in instead.
Enable VPc file cSI driver using UI.
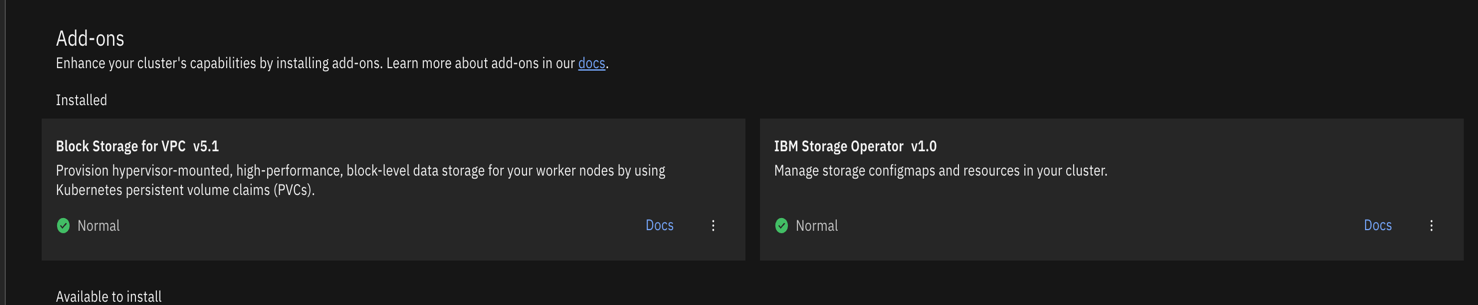
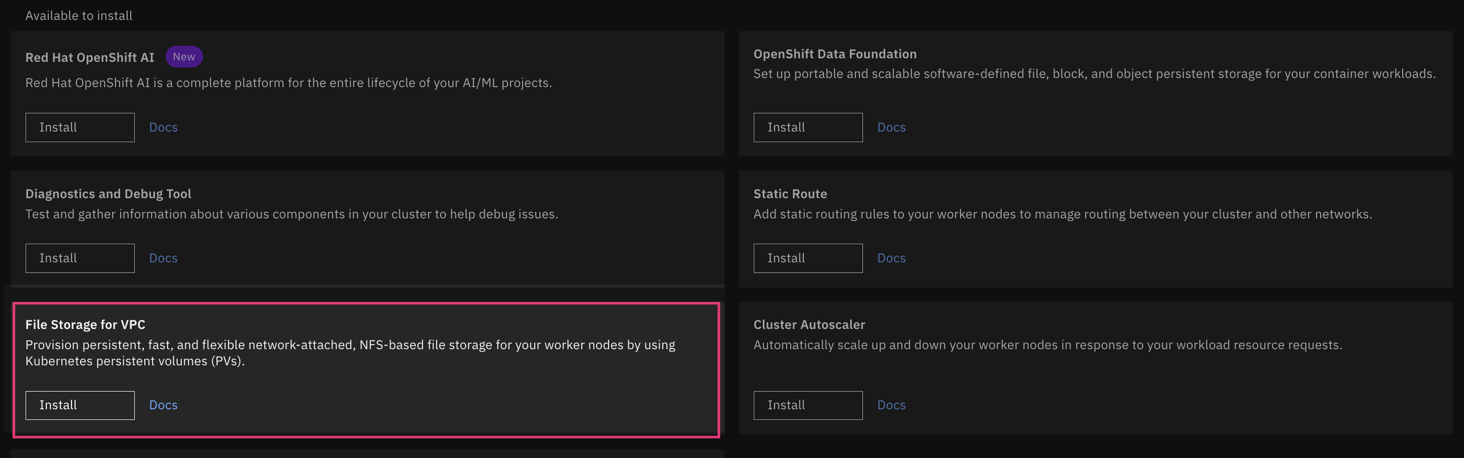
In the cluster UI, go to the list of available add-ons.
Find File Storage for VPc.
click Install to enable the add-on.
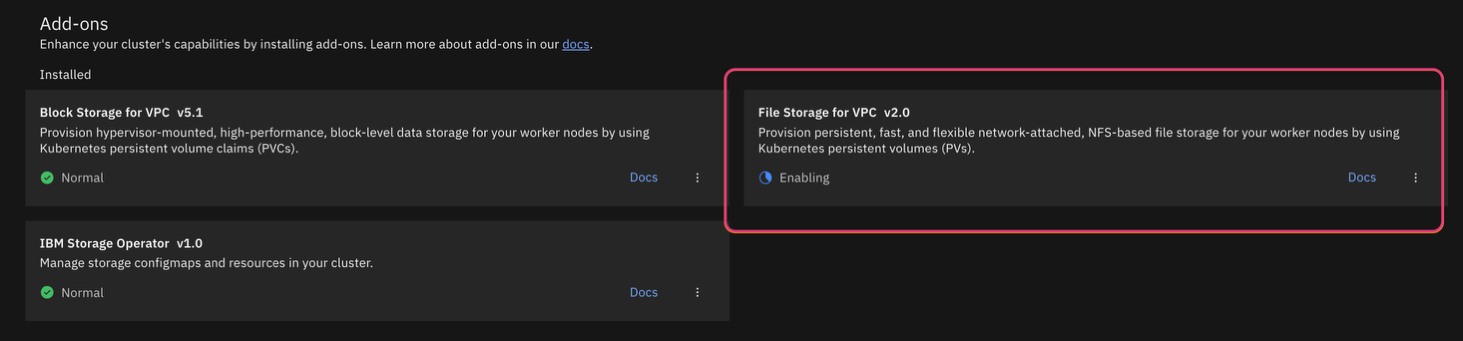
After installing the add-on, wait until its status changes to Normal.
Enable VPc file cSI driver using cLI
Run the following command to enable the VPc file cSI driver:
ibmcloud ks cluster addon enable vpc-file-csi-driver -c <cluster-name or ID>
Wait a few minutes for the add-on to reach the Normal state. Then, run the following command to list all available add-ons:
ibmcloud ks cluster addon ls -c <cluster-name or ID>
create a storage profile. For instructions, see customizing the storage profile for more details.
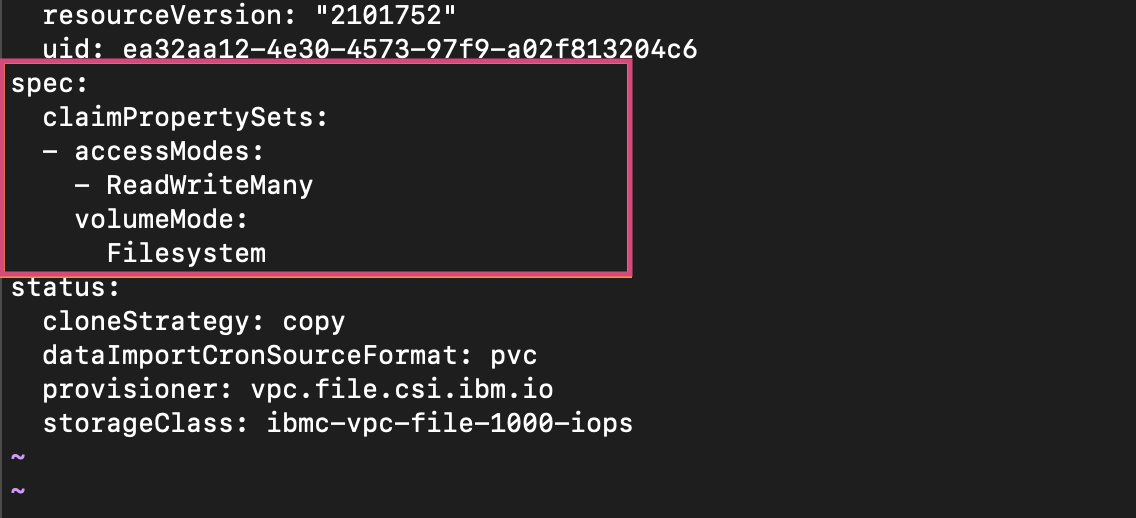
At the time of writing, the
vpc.file.csi.ibm.ioprovisioner is not yet recognized by the container Disk Importer (cDI), so it doesn’t automatically addclaimPropertySetslikeaccessModeandvolumeModein the StorageProfiles.These profiles are created only after the Red Hat OpenShift Virtualization operator and Hyperconverge resource are installed. Ensure both are installed before proceeding.
a. Run the following command to edit the storage profile. It is recommended to update the profile for the default storage class:
oc edit storageprofile <storage-class-name>b. In the storage profile YAML, add the following snippet under
claimPropertySetsto define access and volume modes:claimPropertySets: - accessModes: - ReadWriteMany volumeMode: FilesystemBefore editing
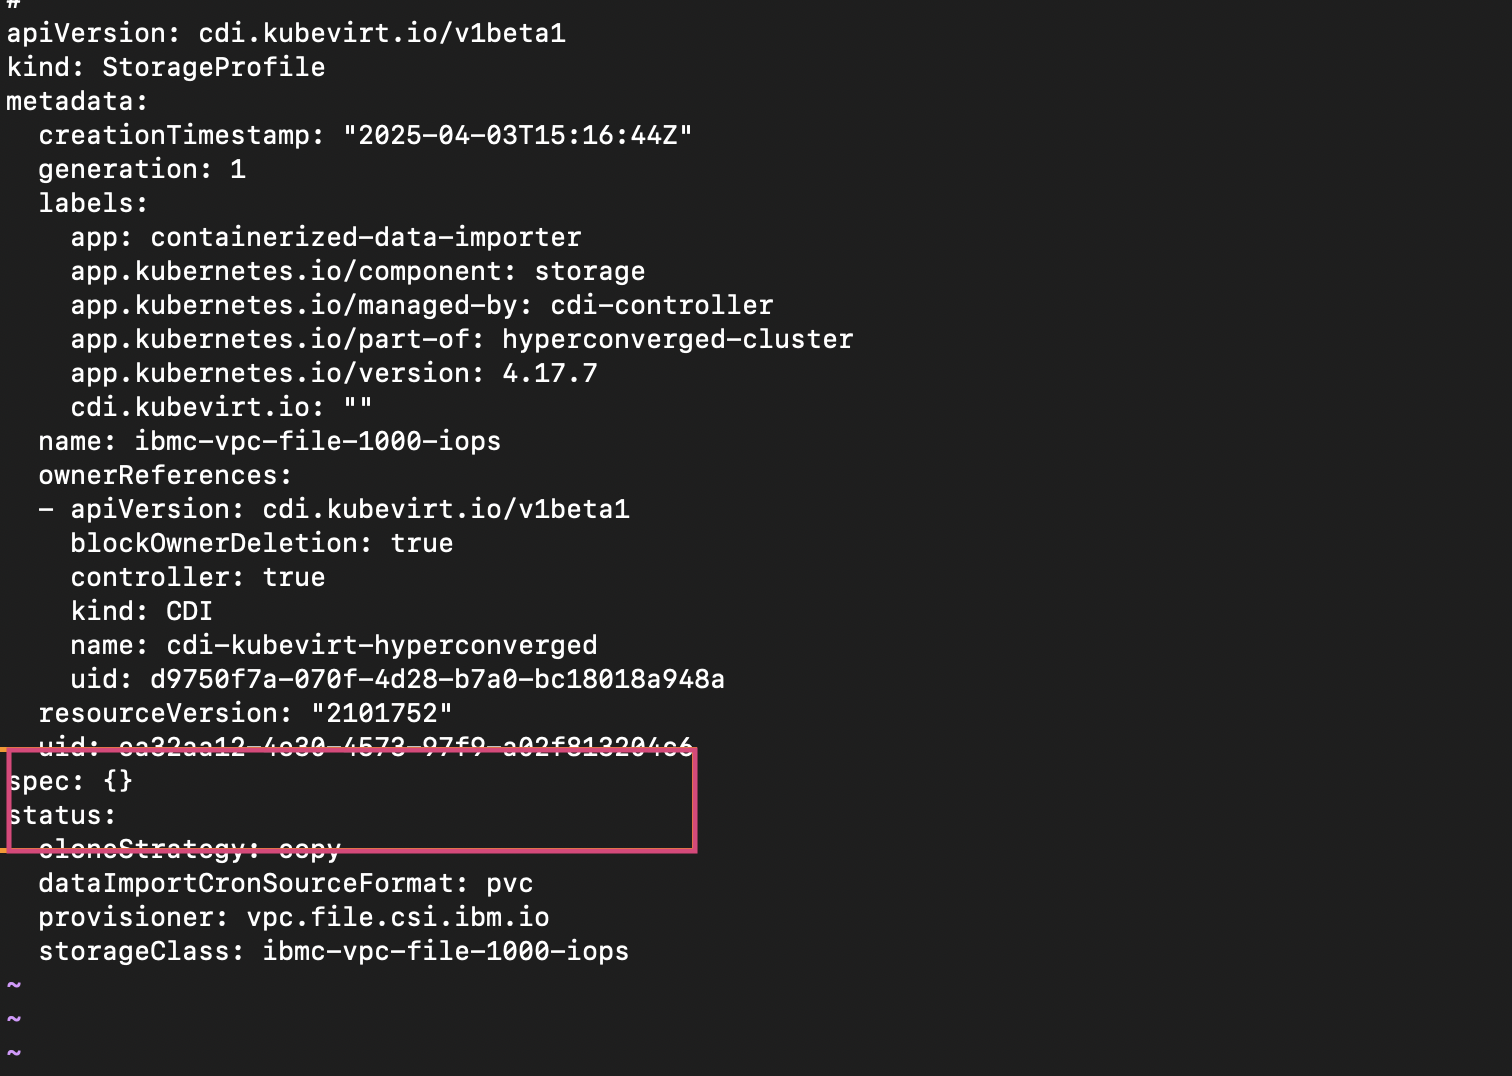
After editing
c. Use the following command to patch all storage profiles for the IBM VPc File cSI plug-in:
for sp in $(oc get storageprofile.cdi.kubevirt.io -o json | jq -r '.items[] | select(.status.provisioner == "vpc.file.csi.ibm.io") | .metadata.name'); do oc patch storageprofile.cdi.kubevirt.io "$sp" --type=merge -p '{ "spec": { "claimPropertySets": [ { "accessModes": ["ReadWriteMany"], "volumeMode": "Filesystem" } ] } }' doneEdit configmap to set the default storage class.
a. Run the following command to remove the default storage class from
BlocktoFile.oc edit cm addon-vpc-block-csi-driver-configmap -n kube-system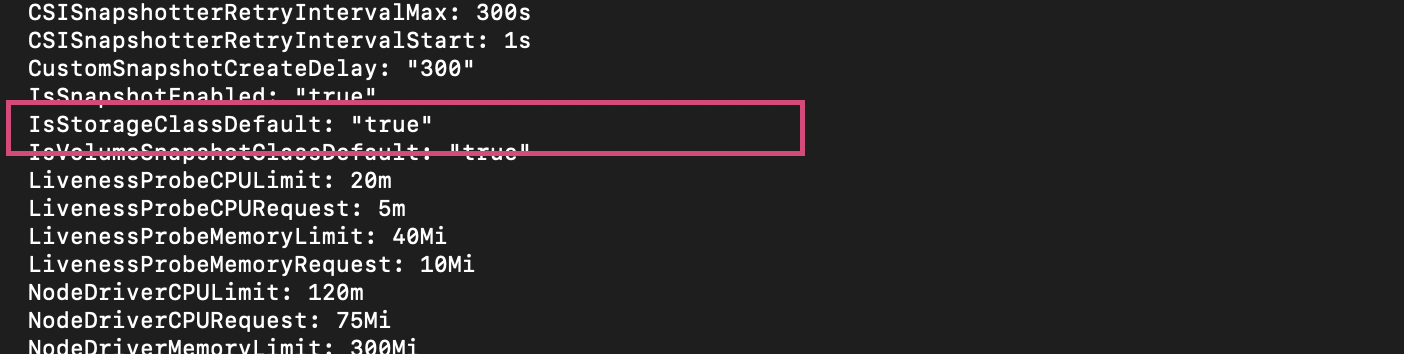
b. In the opened configmap, locate the
IsStorageclassDefaultfield and change its value tofalse.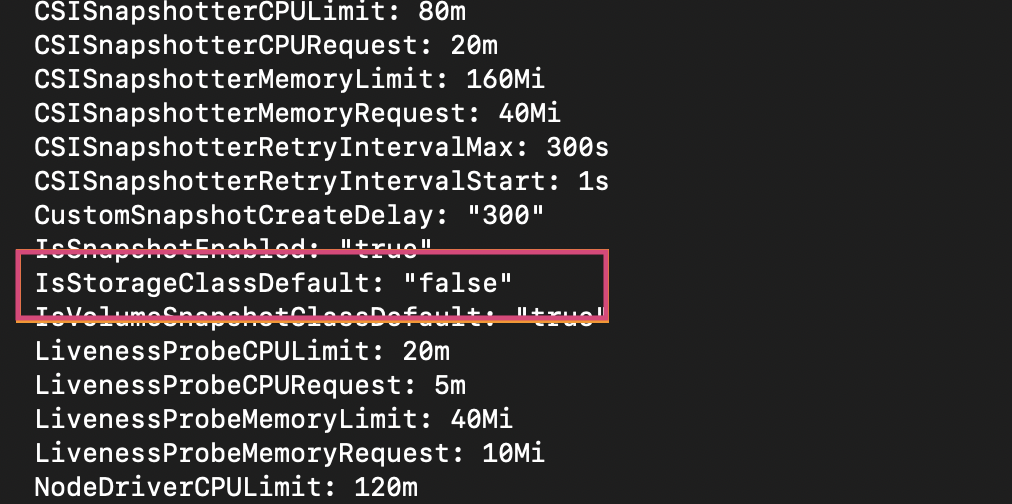
Set a VPc file as the default storage class.
a. check the available storage classes.
oc get scb. choose a storage class, for example
ibmc-vpc-file-1000-iops, and set it as the default by editing the VPc File cSI configmap.oc edit cm addon-vpc-file-csi-driver-configmap -n kube-systemAfter editing
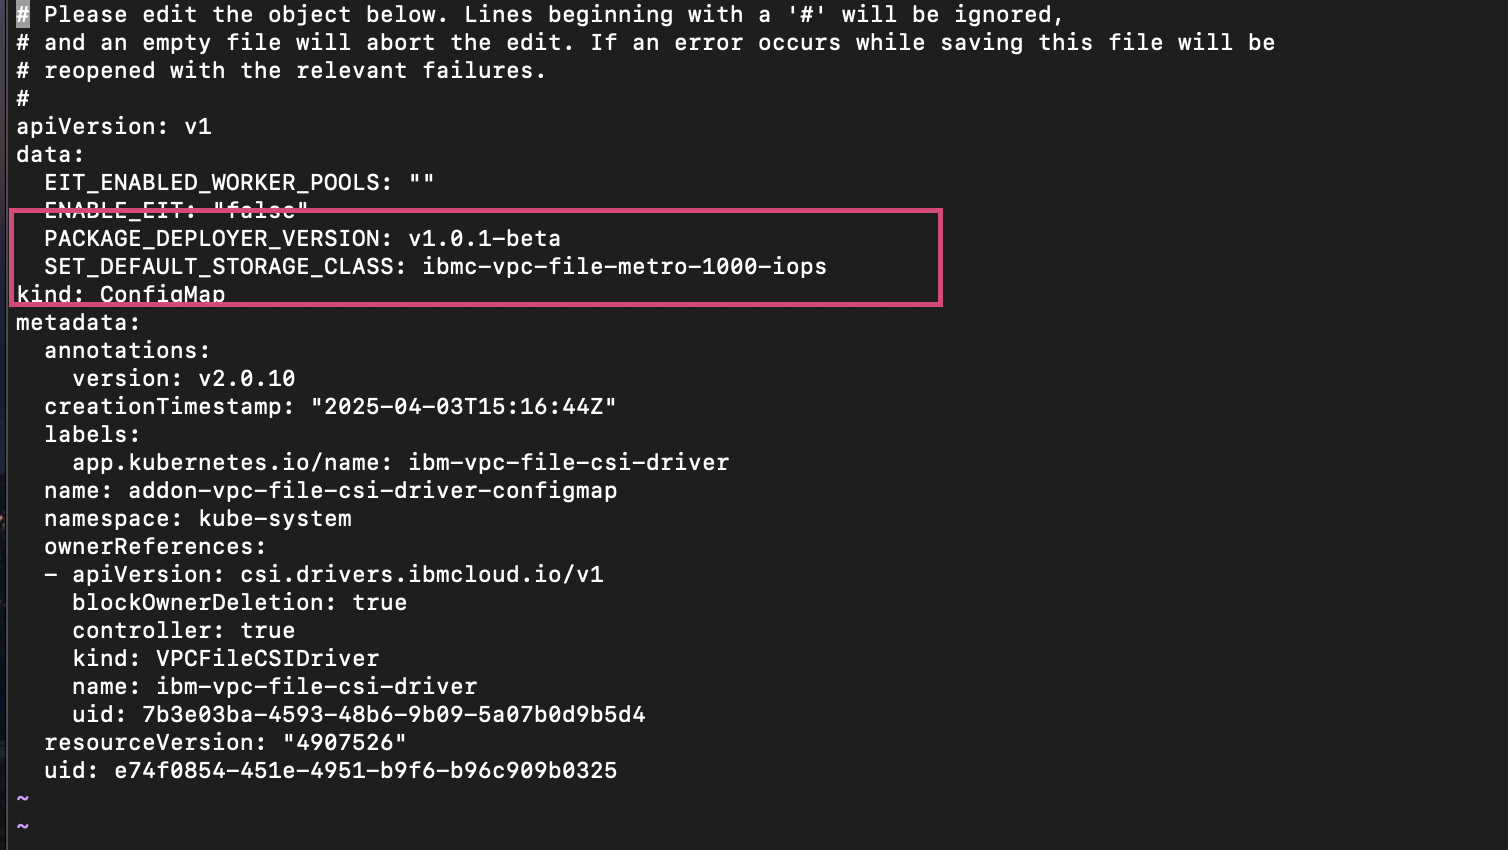
After setting the default storage class

Step 2.3. Install hostpath provisioner
To set up the hostpath provisioner (HPP) on your Red Hat OpenShift (ROKS) cluster for Red Hat OpenShift Virtualization, see configuring local storage by using the hostpath provisioner.
Step 3. Install Red Hat OpenShift Virtualization Operator
Install the Red Hat OpenShift Virtualization Operator on your Red Hat OpenShift (ROKS) cluster.
For detailed instructions on installing an Red Hat OpenShift Virtualization Operator, see Installing the Red Hat OpenShift Virtualization Operator.
The steps in this tutorial are tailored for IBM cloud-specific setup.
Prerequisite
An Red Hat OpenShift cluster deployed on IBM cloud (ROKS).
Steps
The Red Hat OpenShift Virtualization Operator is available from the Red Hat Operator catalog.
If your cluster was created with Outbound traffic protection: disabled (as recommended earlier), you can skip steps 1 and 2 in the following procedure.
If outbound traffic protection is enabled (the default setting), the Red Hat Operator catalogs are disabled on ROKS. complete the following steps to enable the default catalog source on ROKS.
Disable outbound protection: Ensure that the cluster has outbound internet access to pull required images from sources such as
registry.redhat.ioandquay.io. You can disable outbound protection by using the following command:ibmcloud oc vpc outbound-traffic-protection disable -c <cluster-name>Enable default catalogSource: Make sure the default
catalogSourceis enabled. Run the following commands:Get cluster config:
ibmcloud ks cluster config --admin -c <cluster-name>Enable default
catalogSource:oc patch operatorhub cluster --type json -p '[{"op": "add", "path": "/spec/disableAllDefaultSources", "value": false}]'check
catalogSourcestatus:oc -n openshift-marketplace get catalogsource
check whether the required operator is available:
oc get packagemanifests -n openshift-marketplace | grep kubevirt
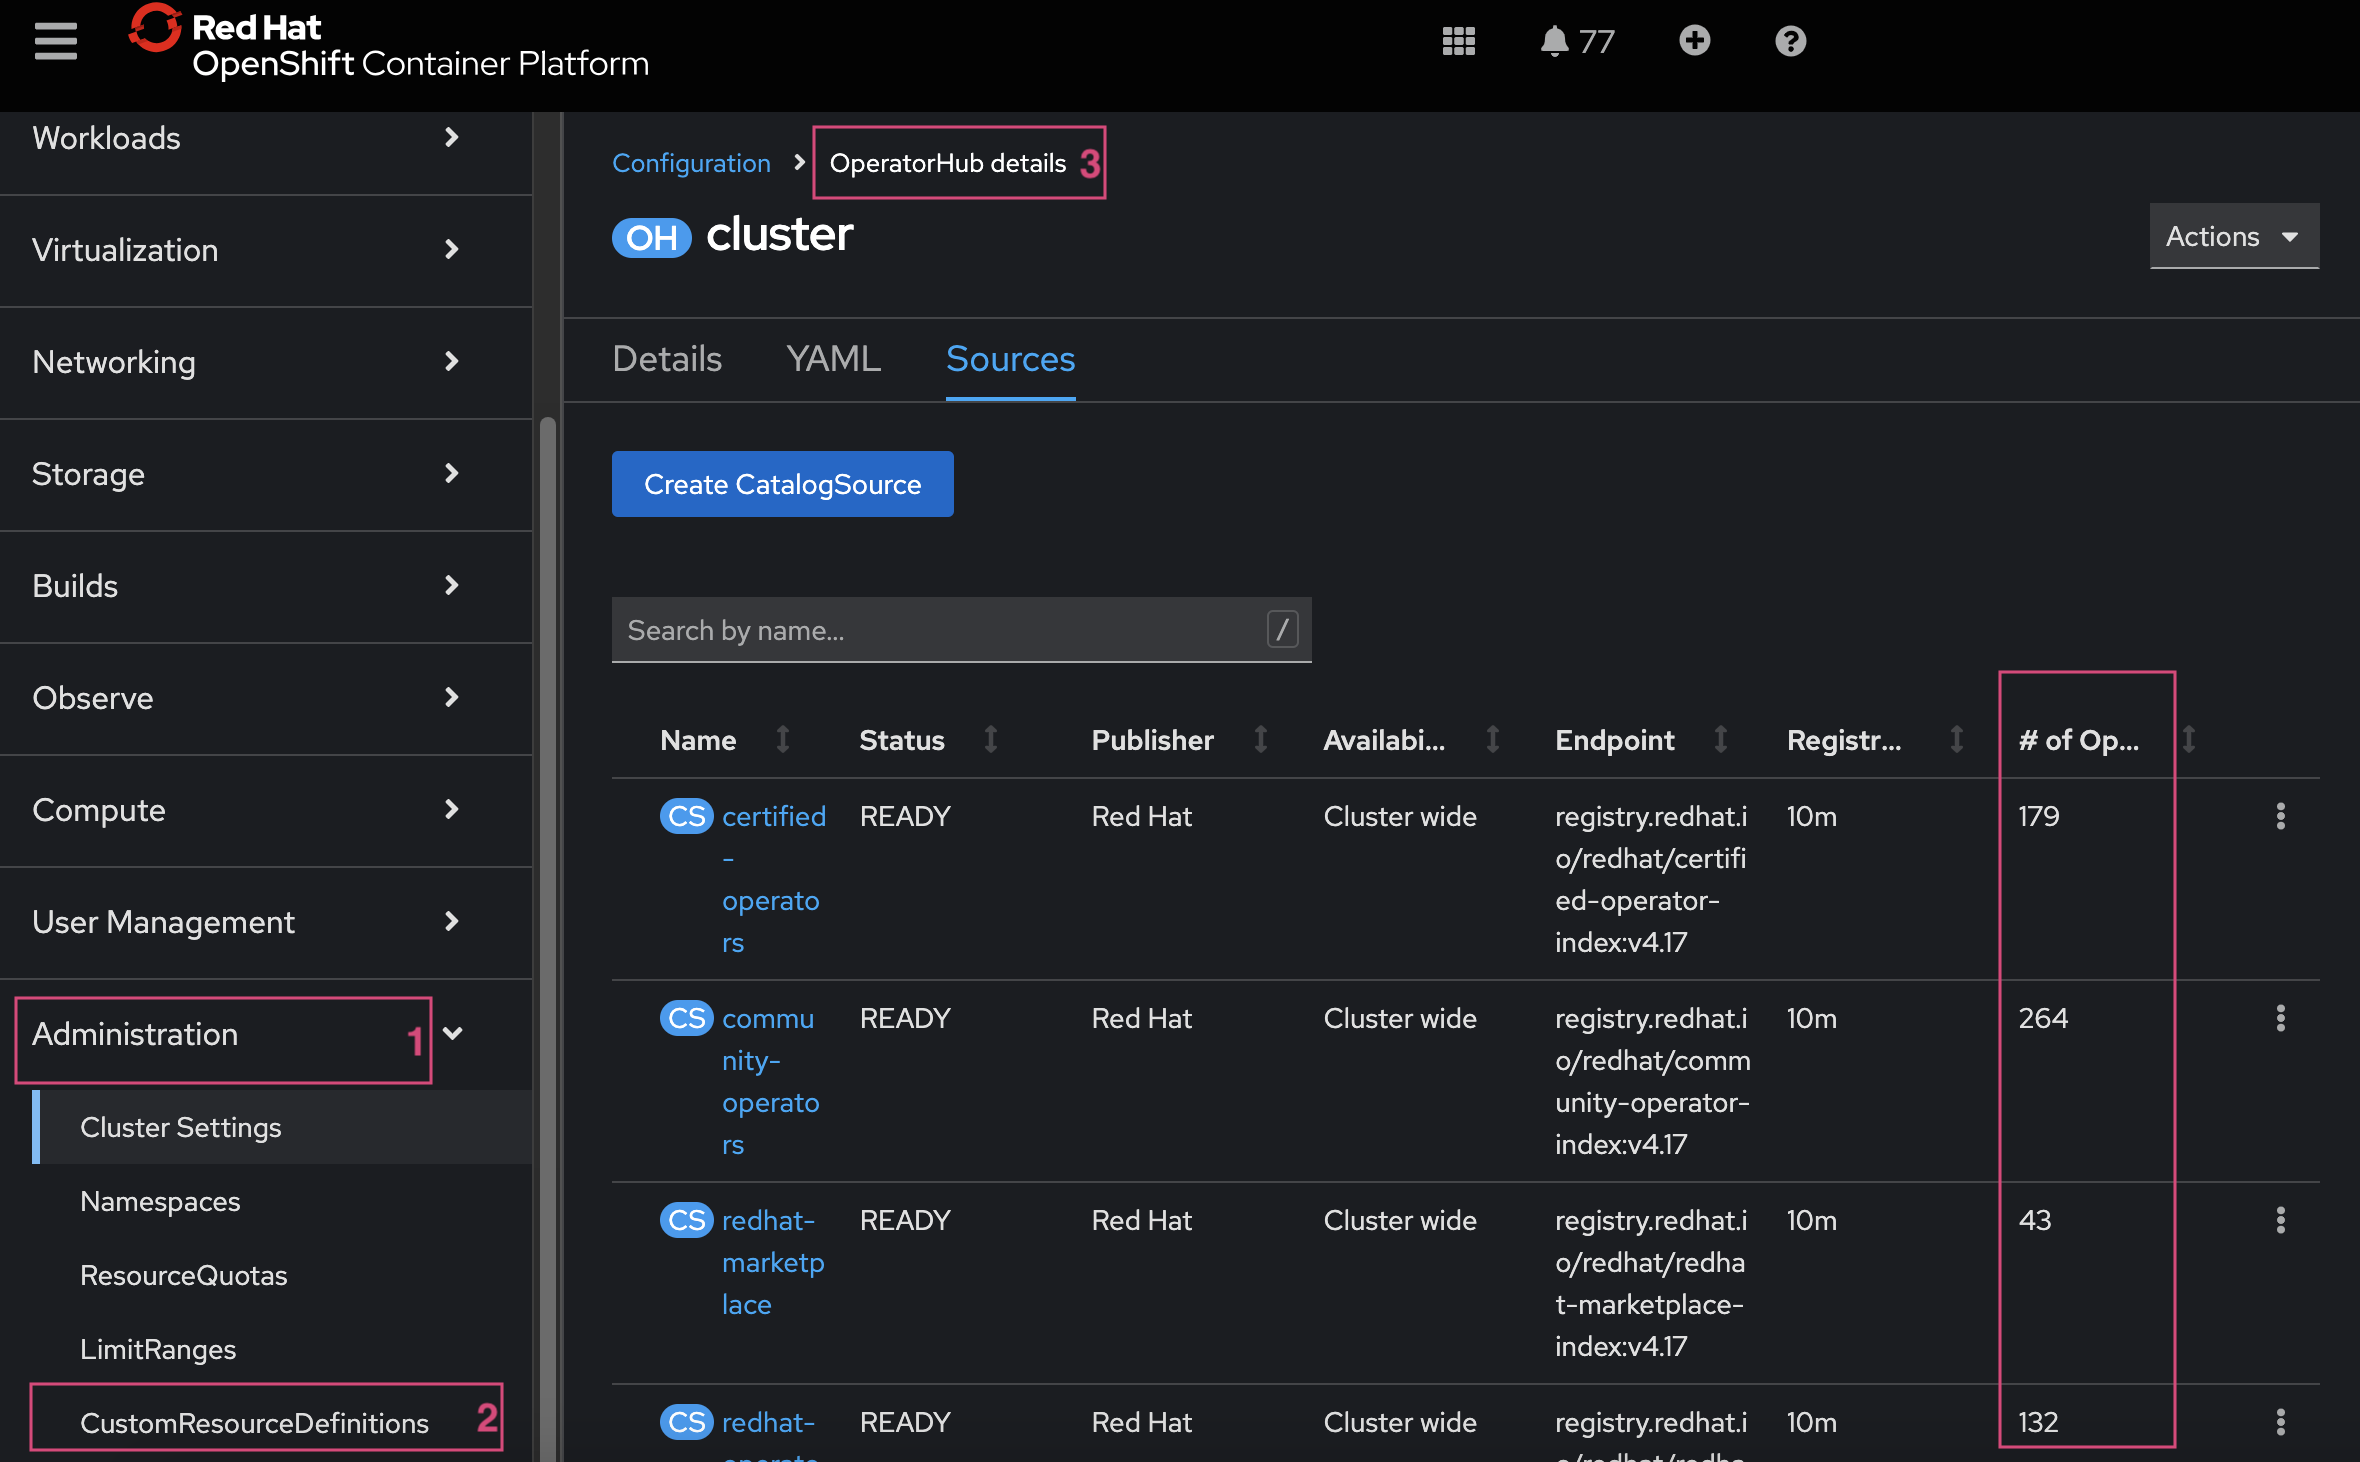
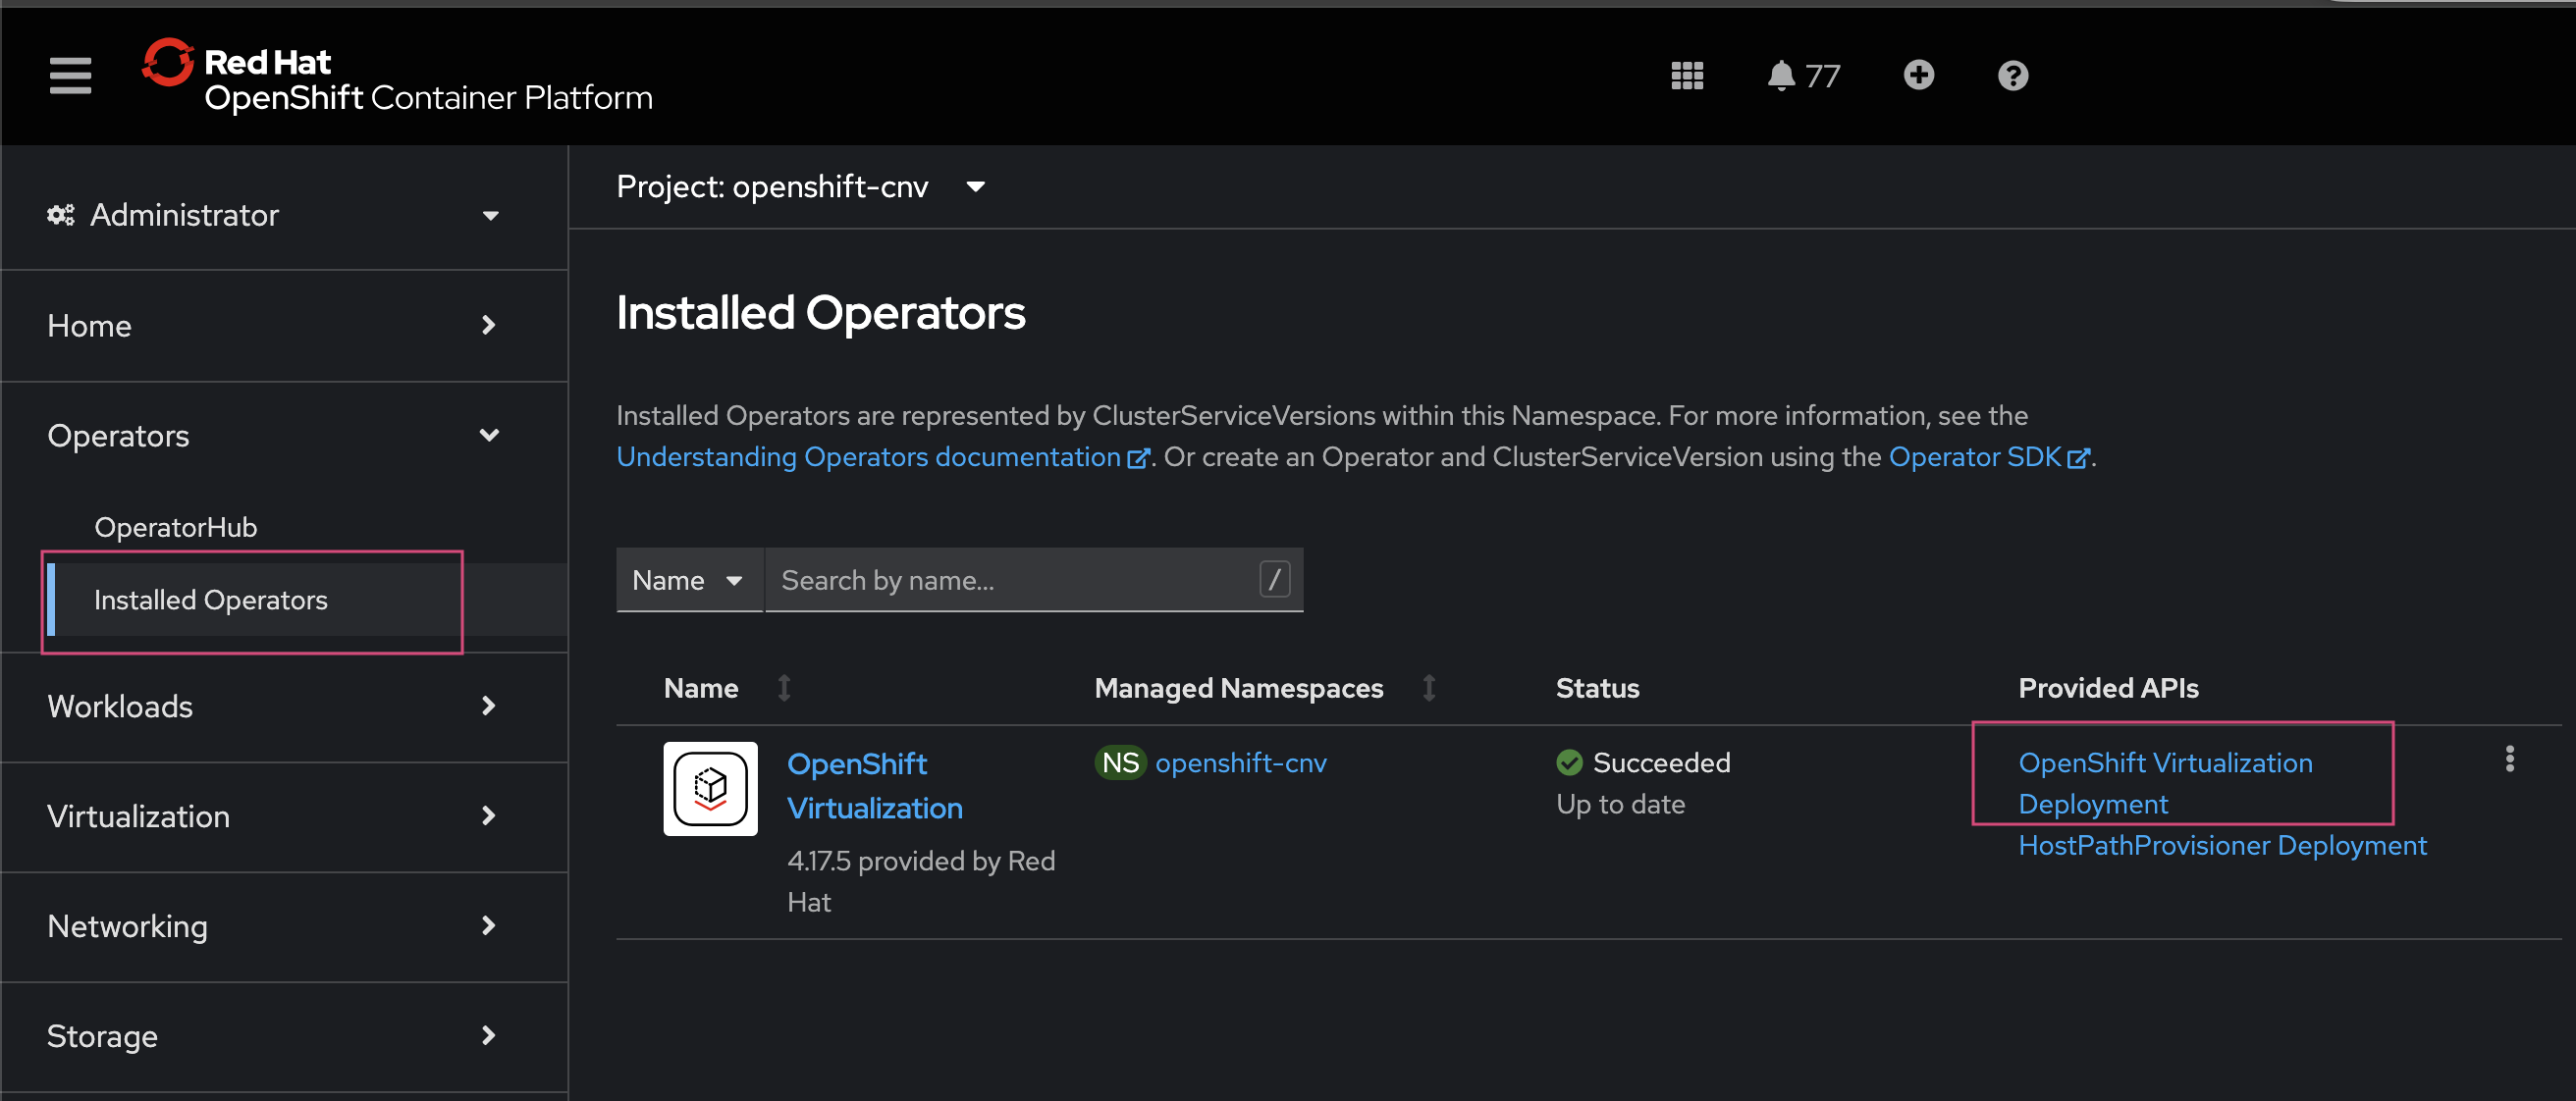
You can view the list of operators in each catalogSource from the Red Hat OpenShift console by navigating to Administration > customResourceDefinitions > OperatorHub details.
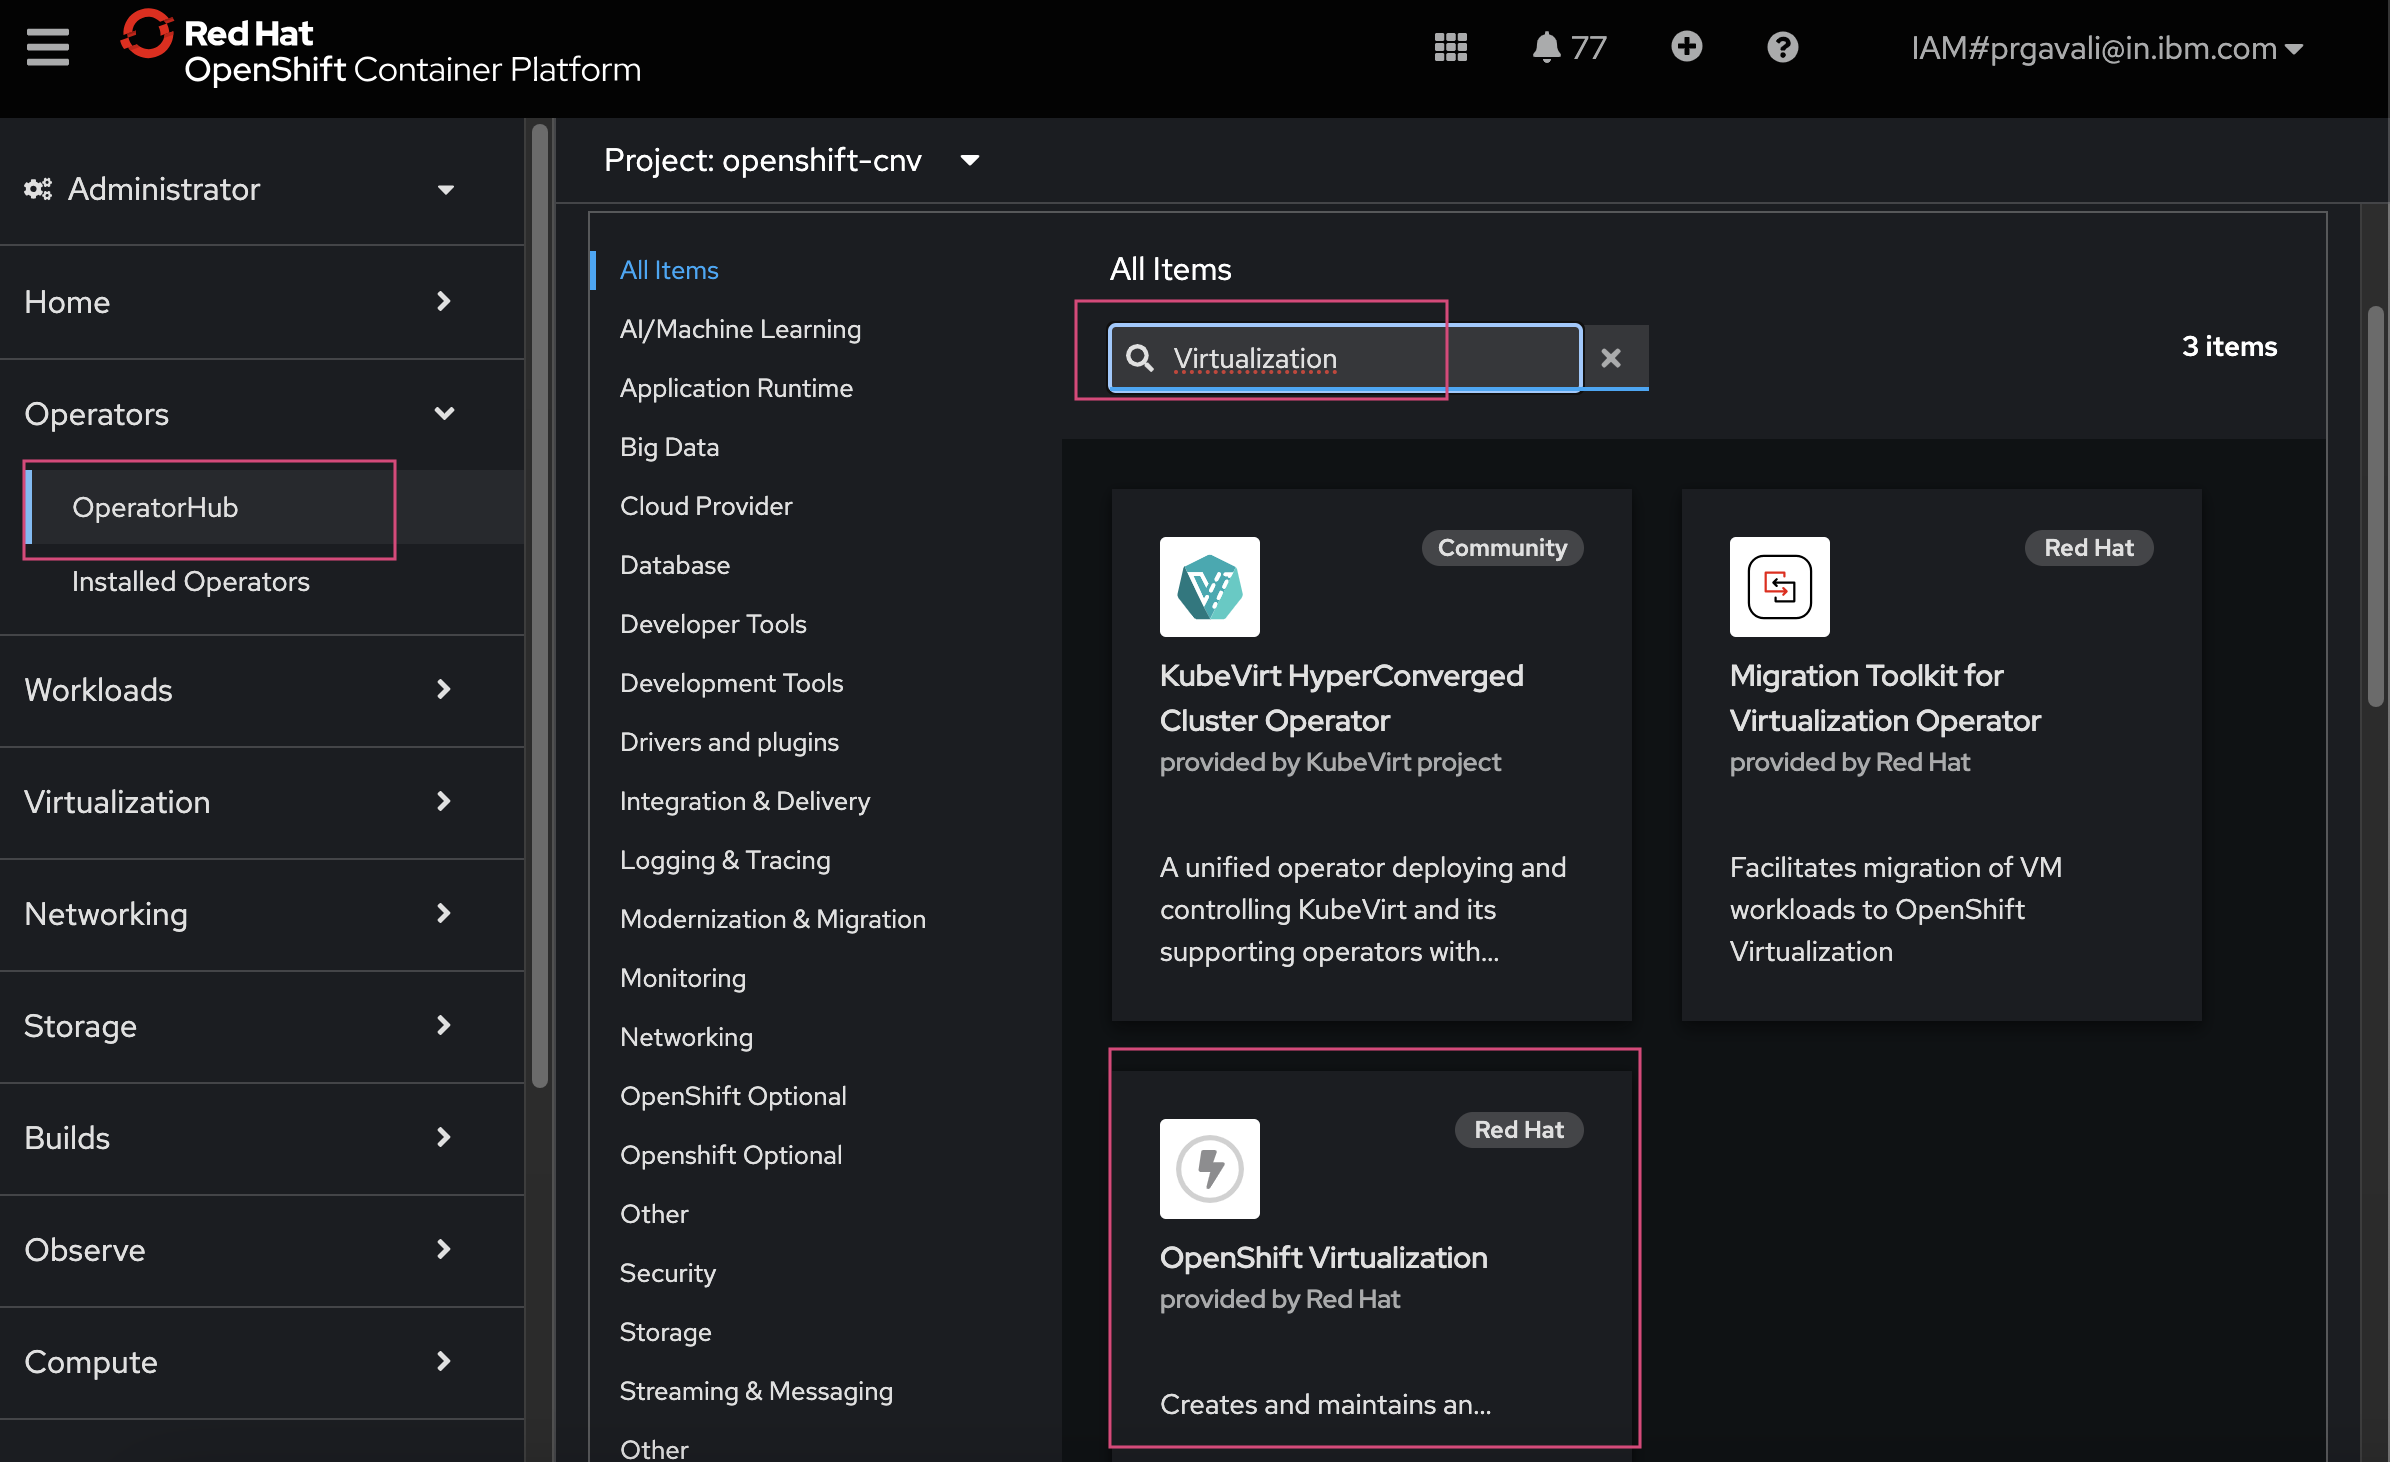
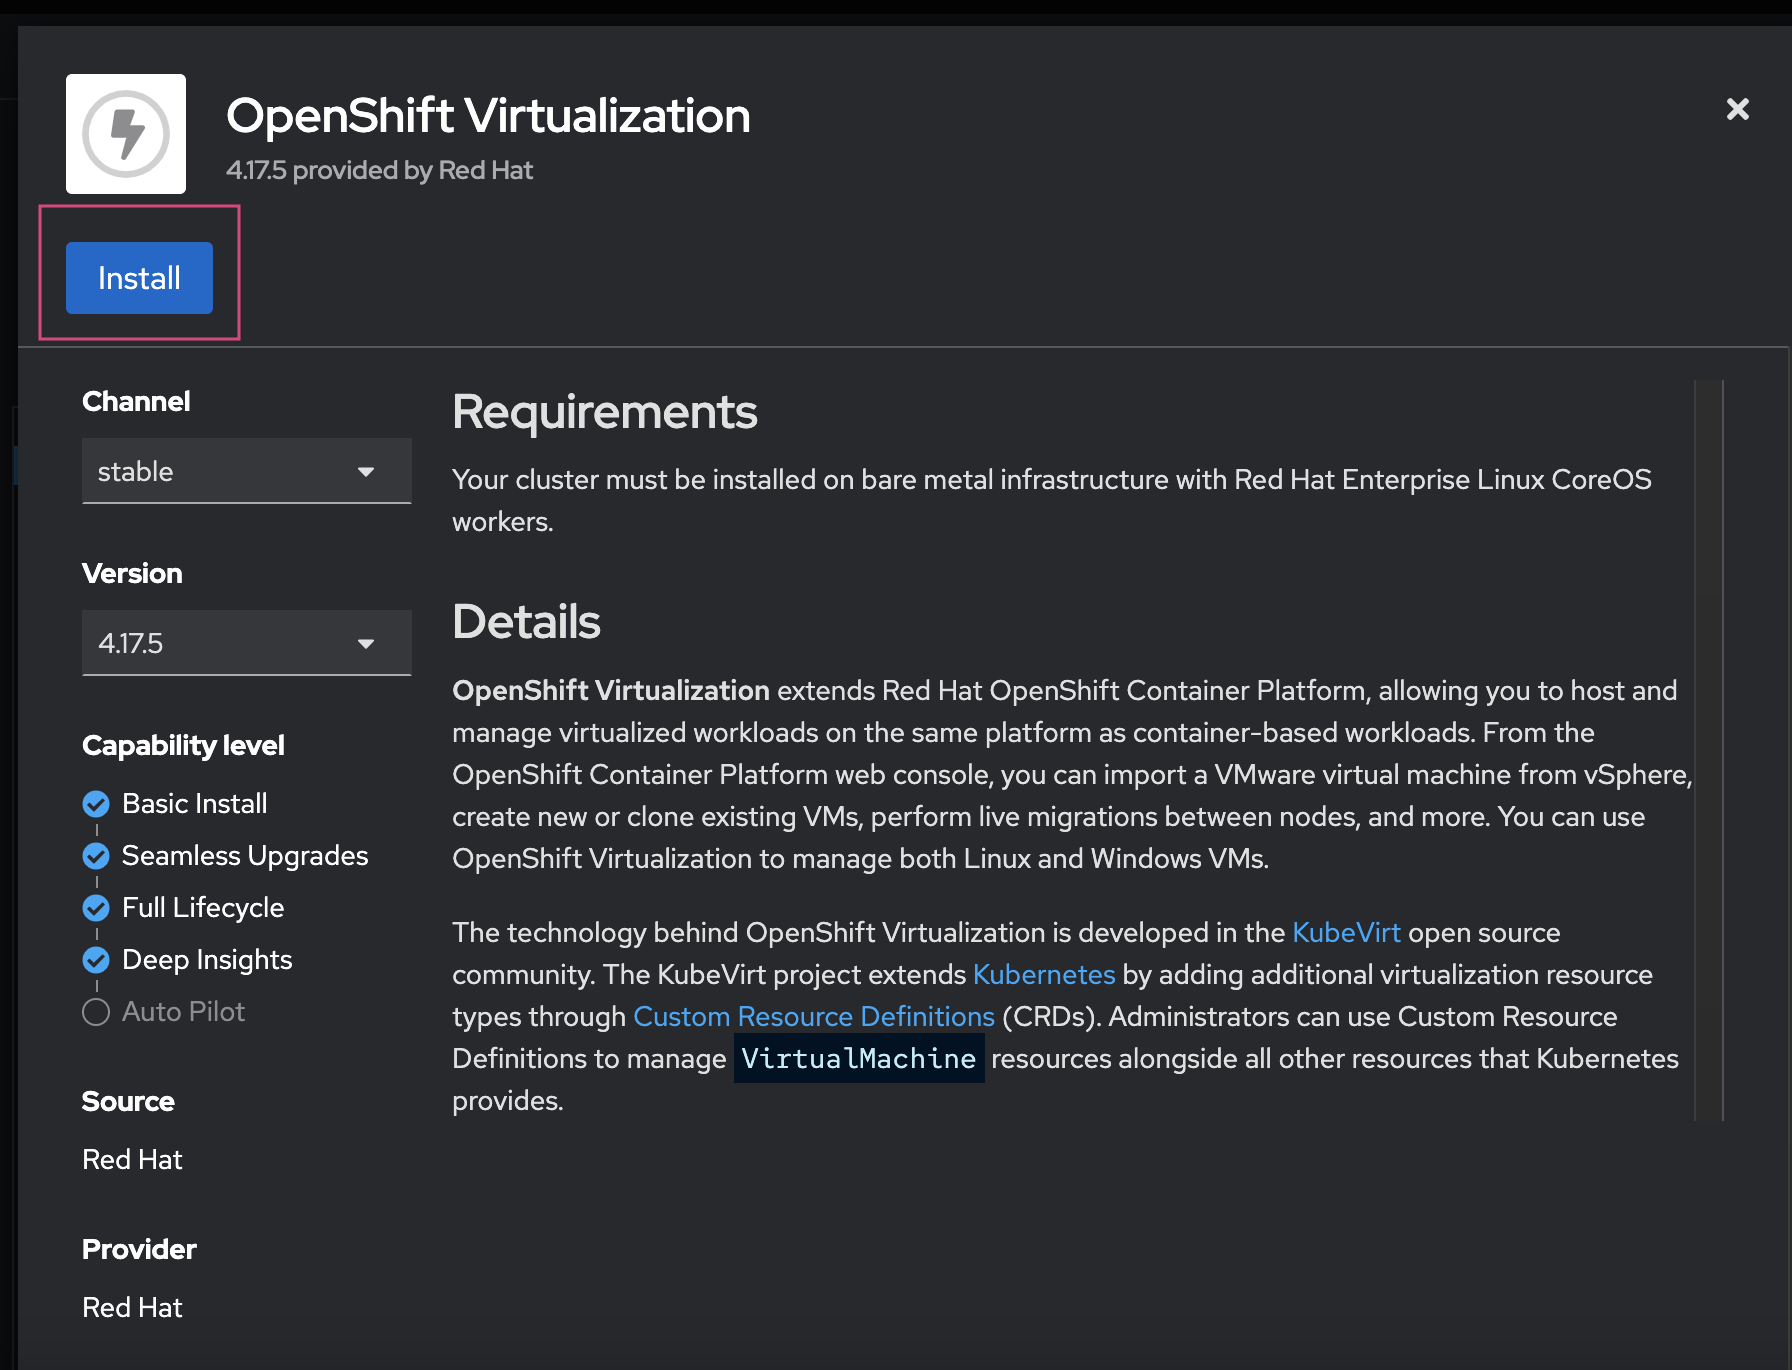
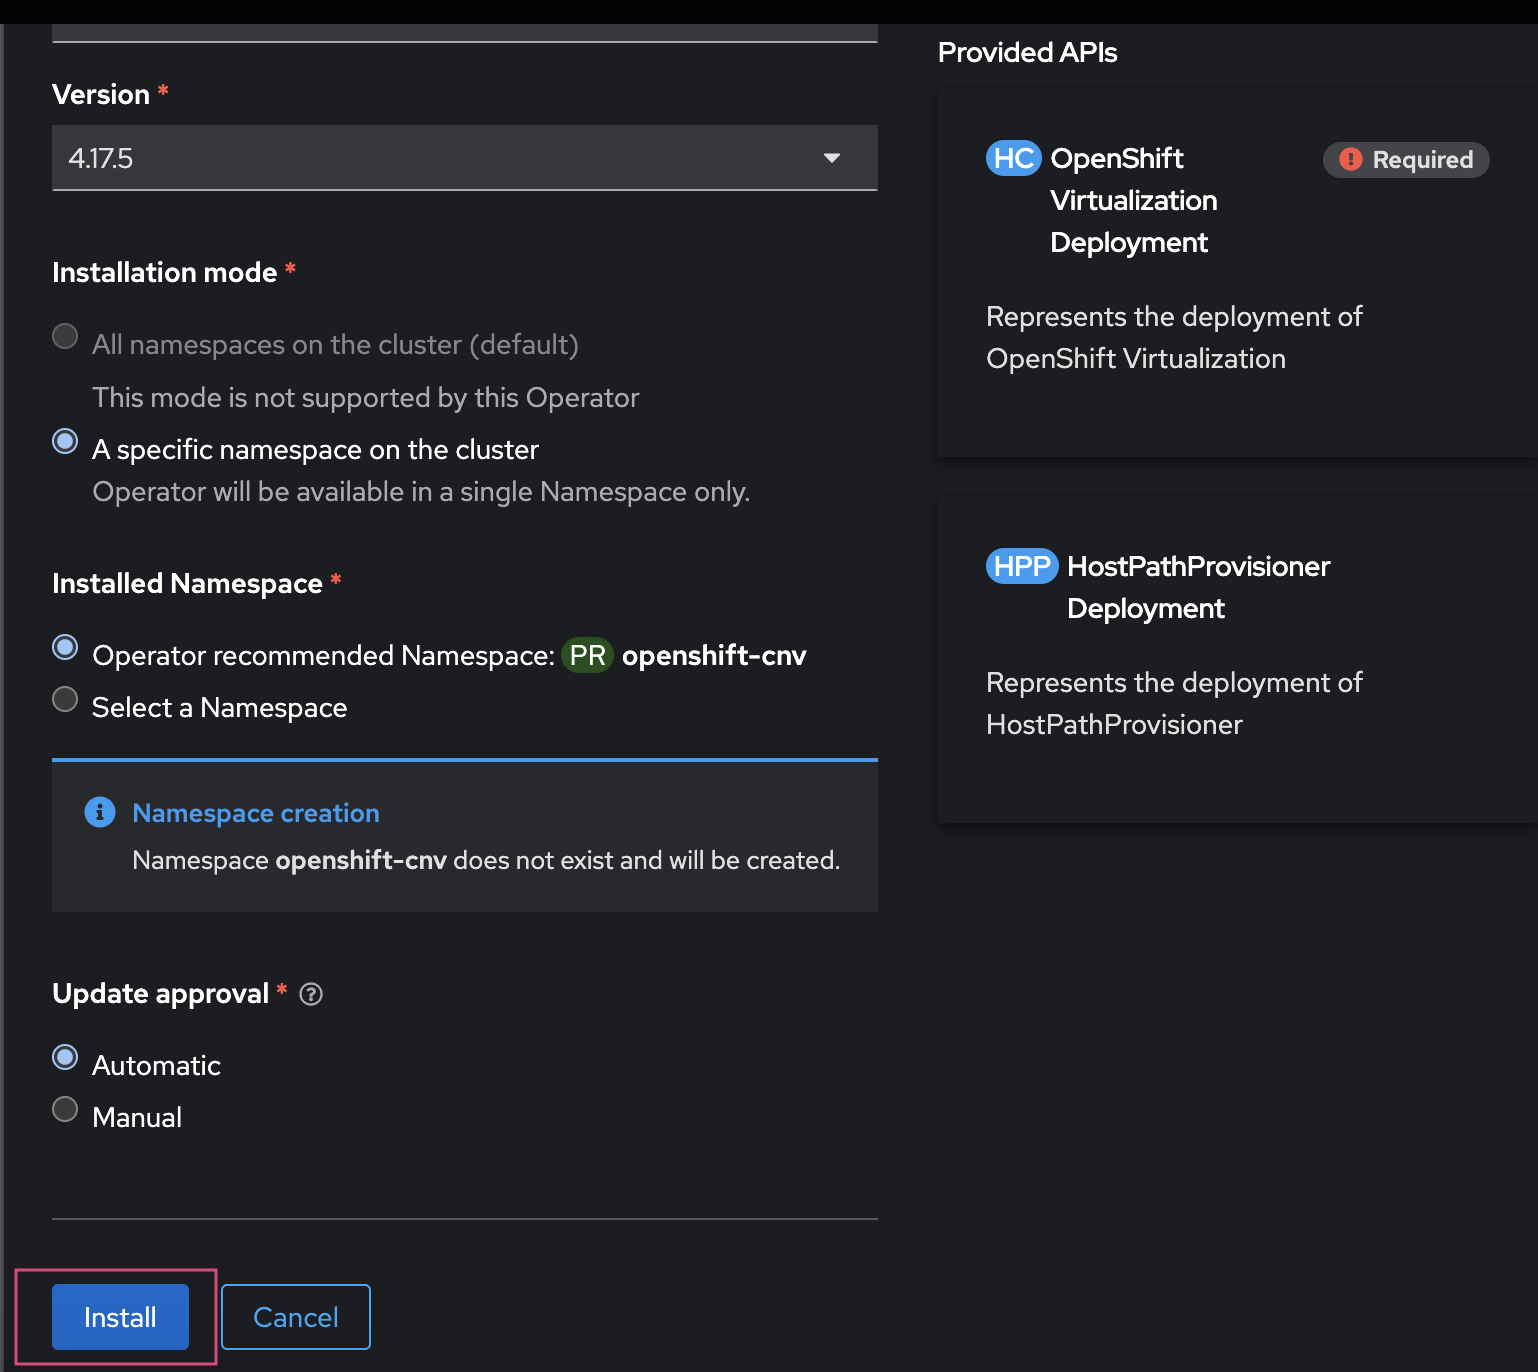
Install Red Hat OpenShift Virtualization Operator: Log in to the Red Hat OpenShift console, go to OperatorHub, search for Red Hat OpenShift Virtualization, and install the operator.
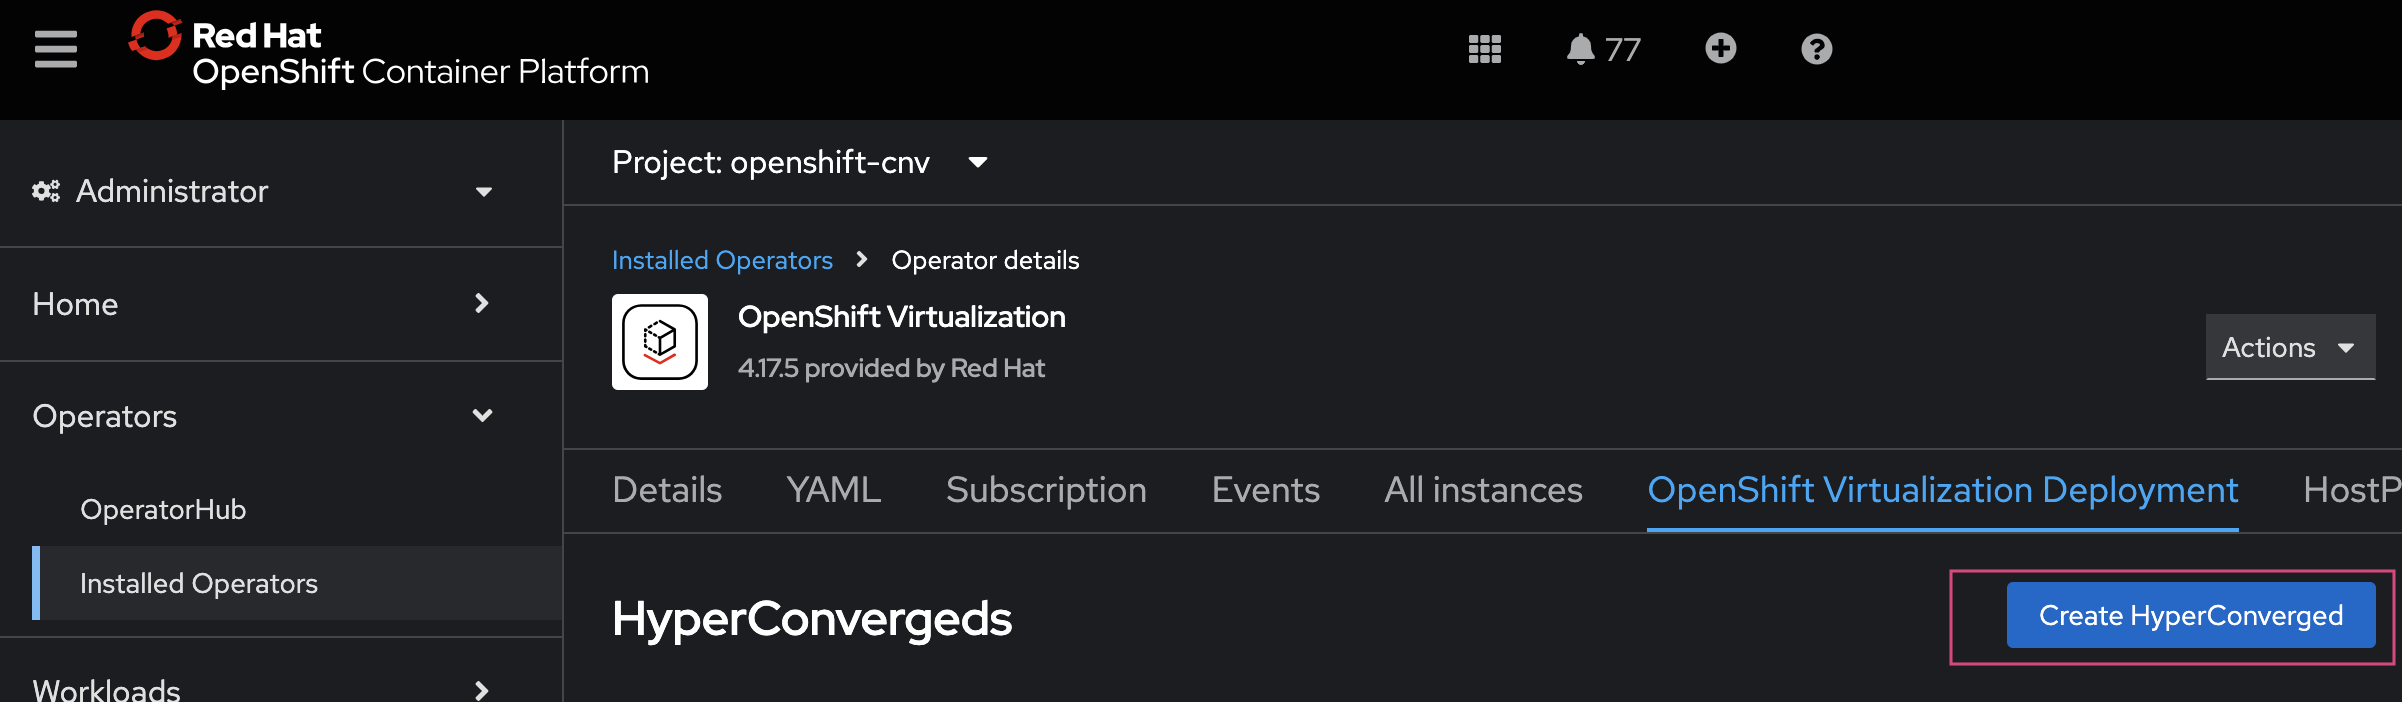
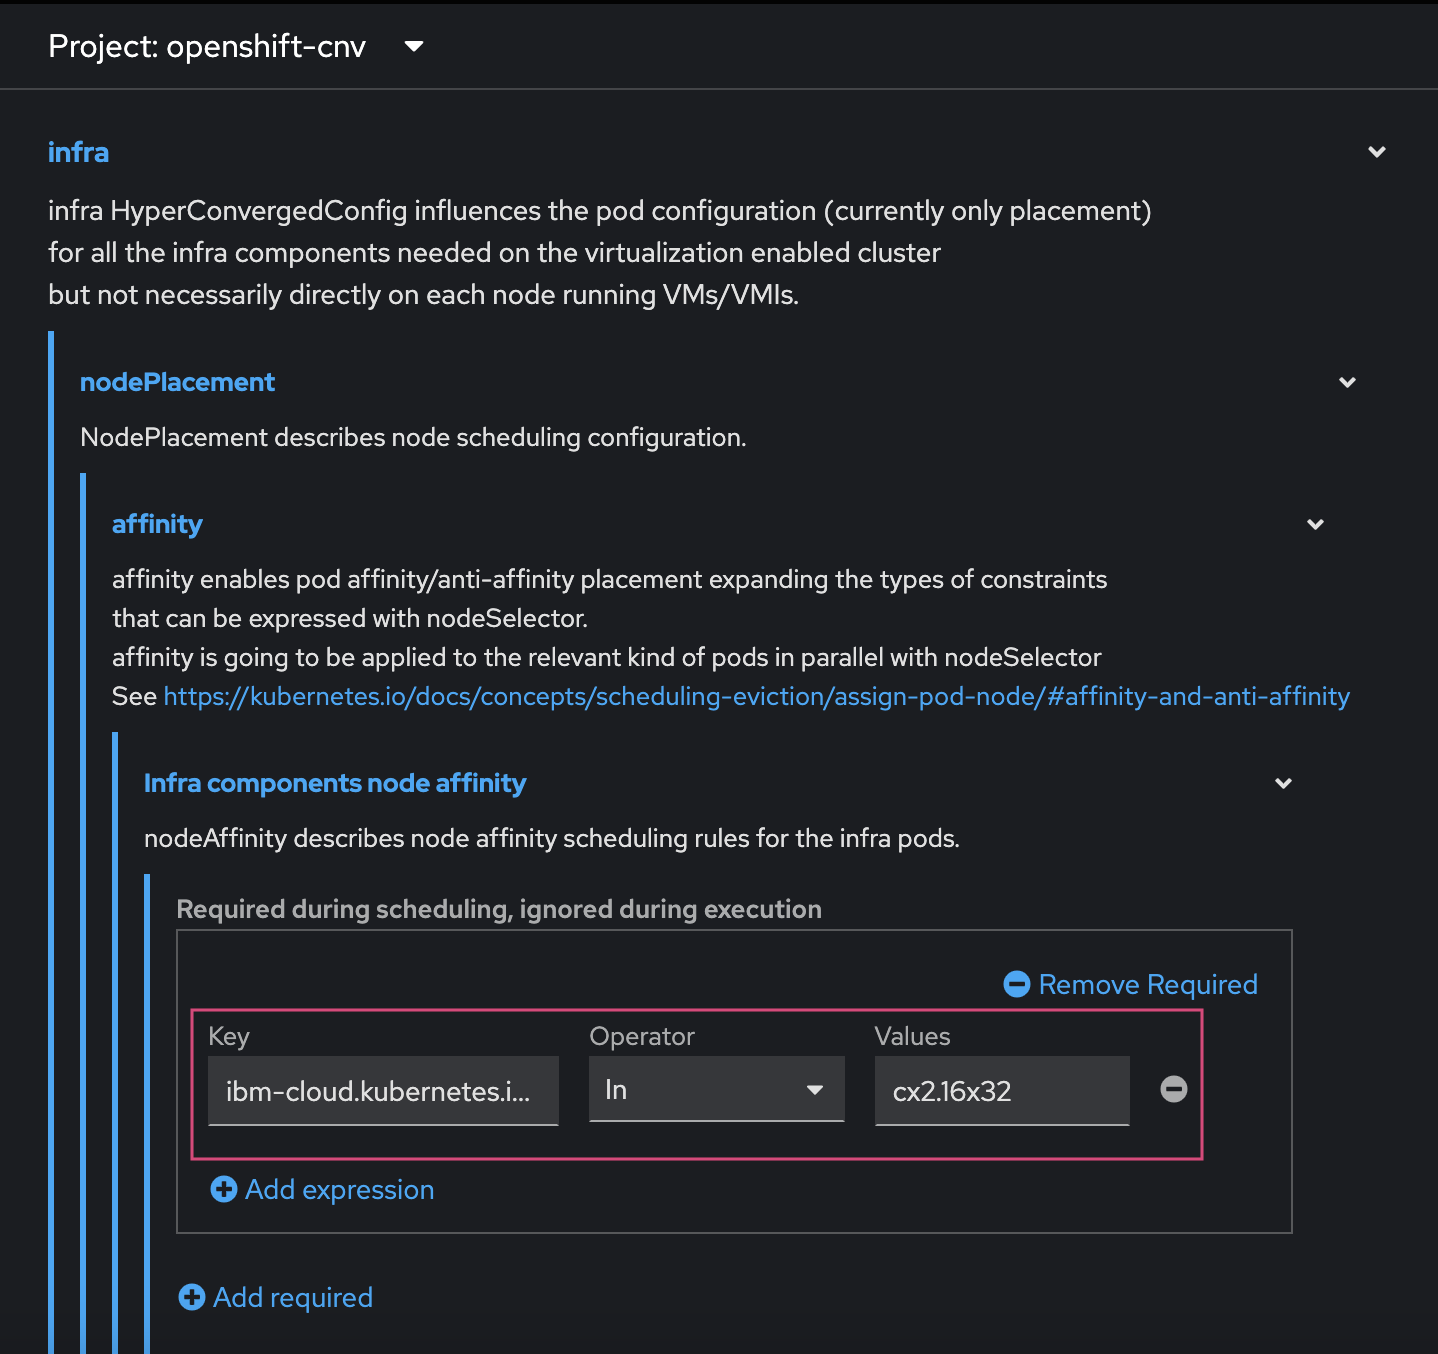
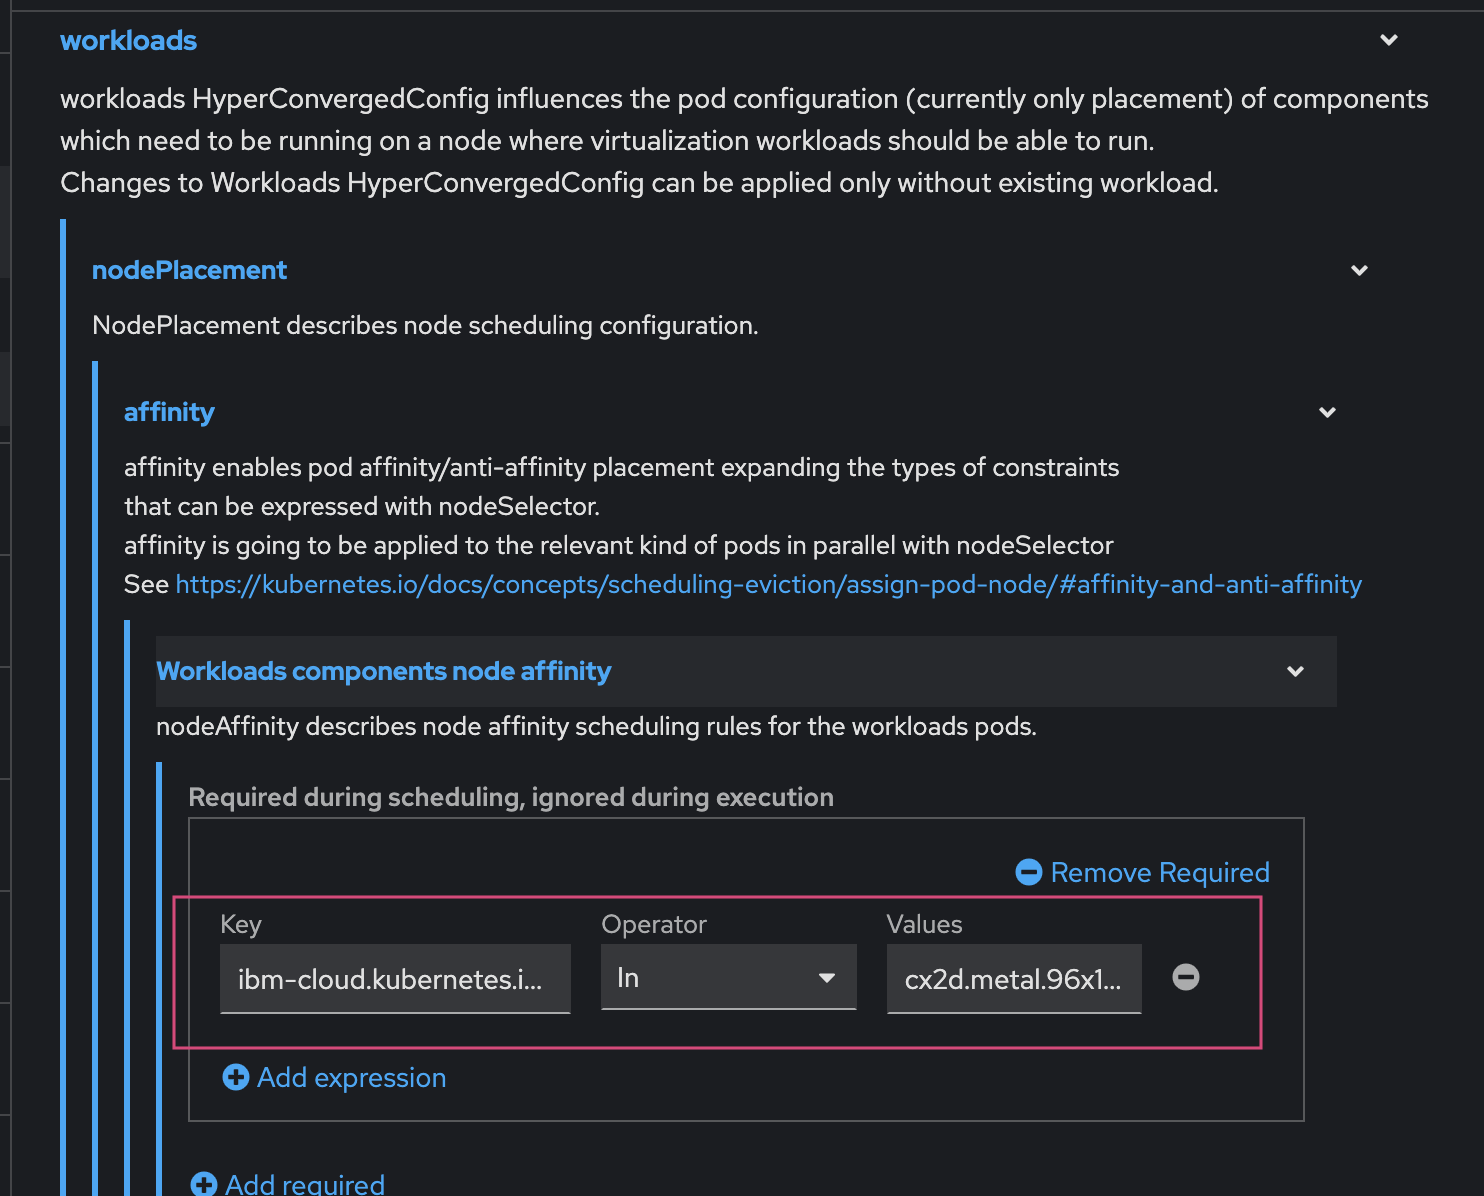
create the Hyperconverged custom Resource (cR): The Hyperconverged cR defines the configuration for Red Hat OpenShift Virtualization. If you have a bare-metal only cluster and no special requirements, you can create a default cR without customization. To meet more advanced requirements, you can configure node placement rules for:
Running virtual machines only on nodes meant for virtualization (VPc bare-metal only; nested virtualization is not supported).
Placing operator components and KubeVirt infrastructure on infrastructure nodes (use VSIs for cost optimization).
Keeping workloads separated for security—use two worker pools: one with Bare Metal nodes and another with VSIs.
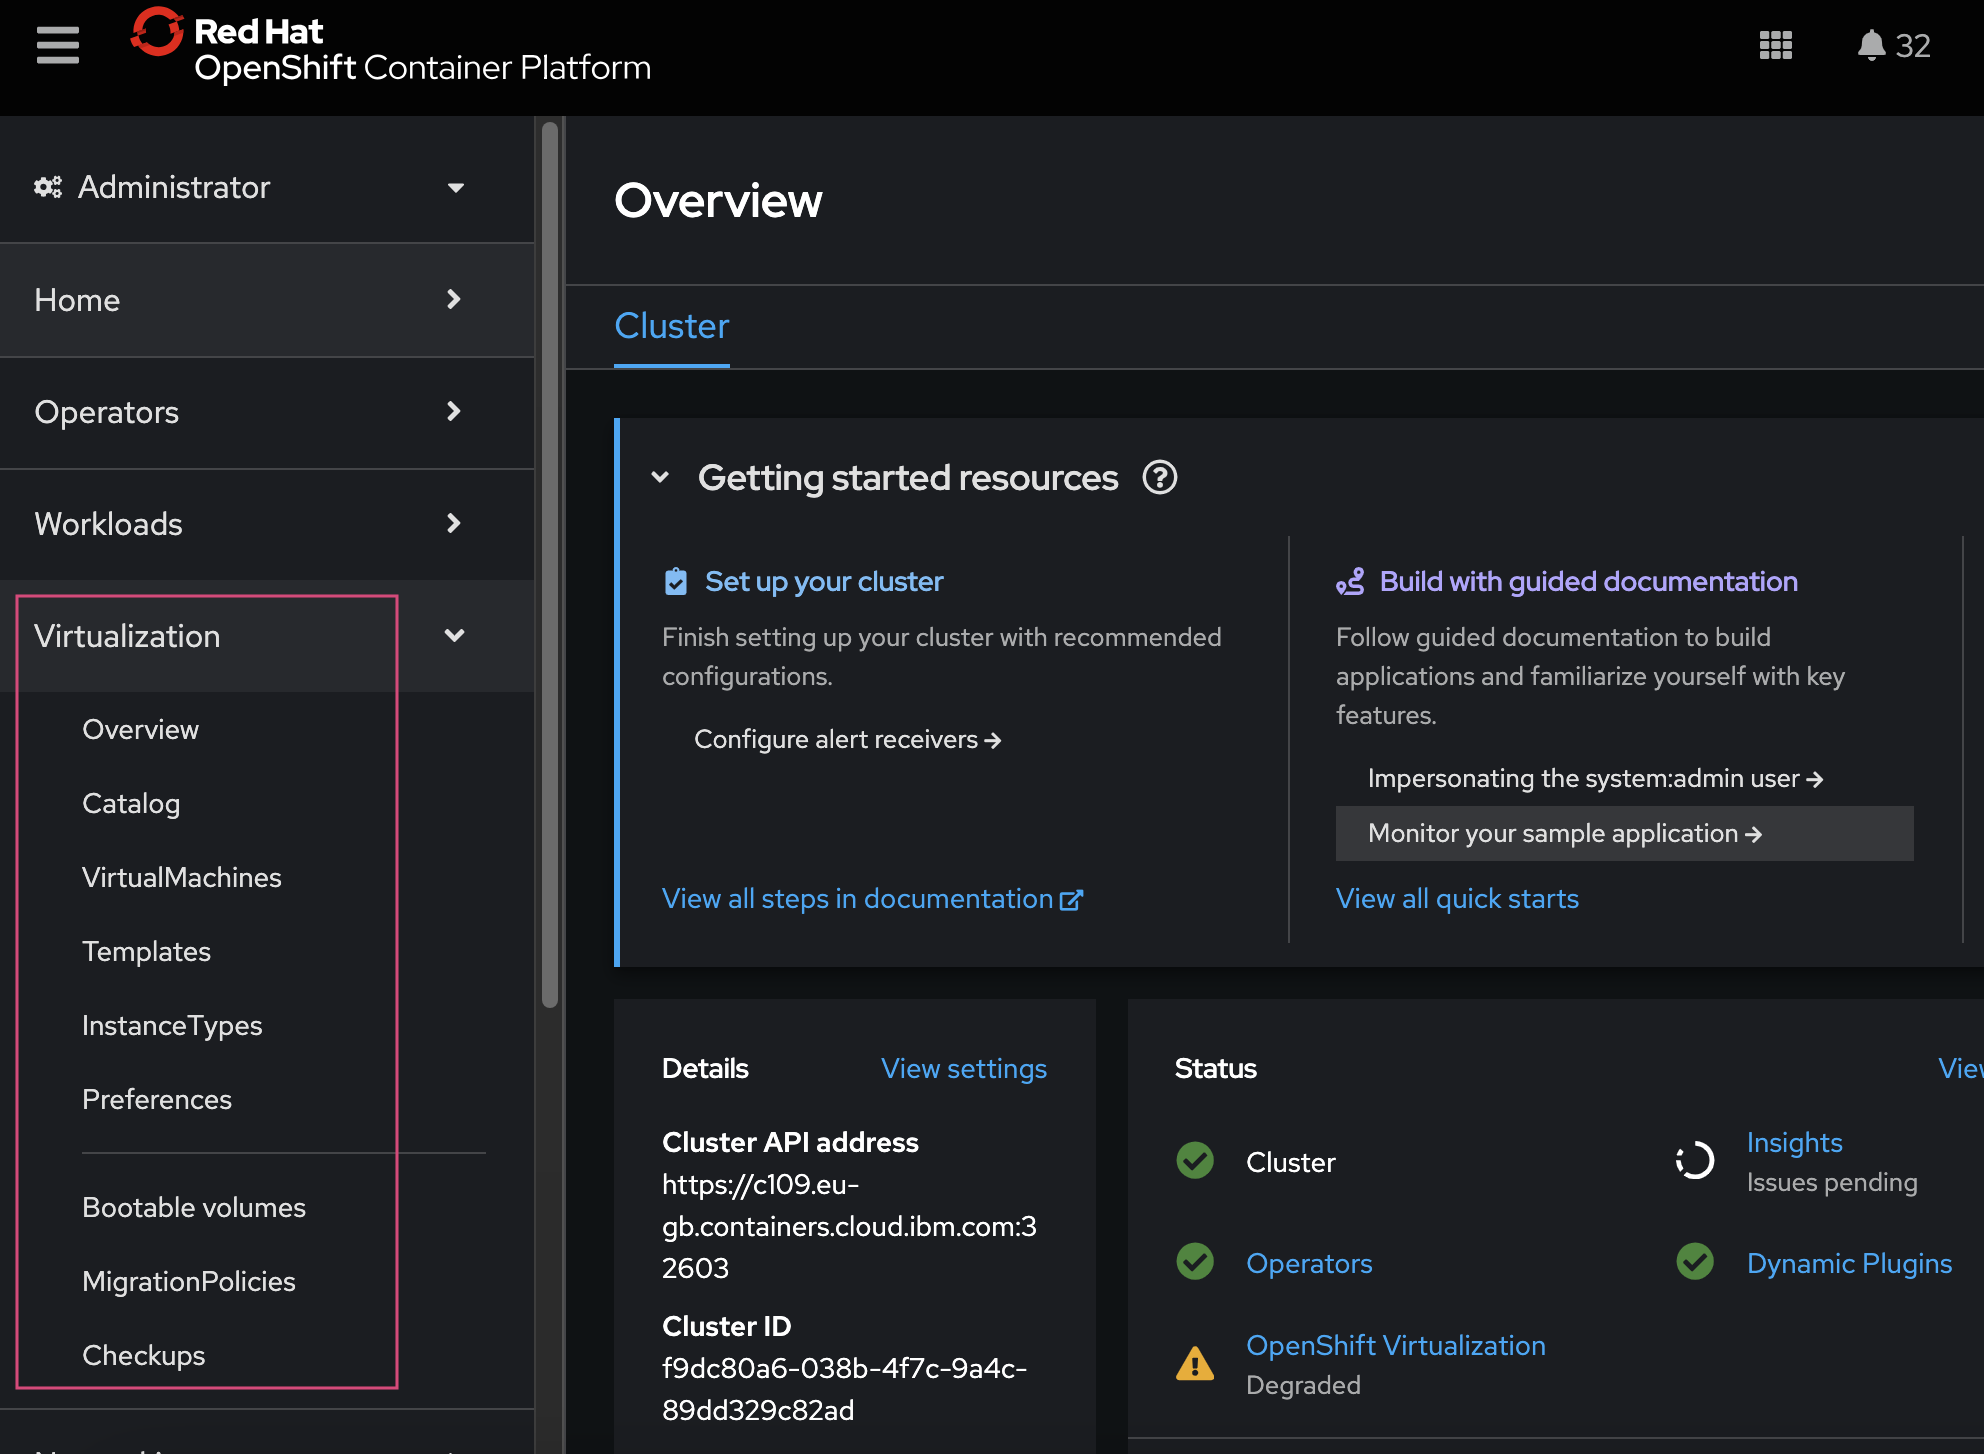
create Hyperconverged cR from the Red Hat OpenShift console: Use the Red Hat OpenShift web console to create the Hyperconverged custom resource. Follow the navigation steps shown in the screenshot to begin the setup.
The equivalent YAML configuration follows:
apiVersion: hco.kubevirt.io/v1beta1
kind: Hyperconverged
metadata:
  annotations:
    deployOVS: 'false'
  name: kubevirt-hyperconverged-test
  namespace: openshift-cnv
spec:
  virtualMachineOptions:
    disableFreePageReporting: false
    disableSerialconsoleLog: true
  higherWorkloadDensity:
    memoryOvercommitPercentage: 100
  liveMigrationconfig:
    allowAutoconverge: false
    allowPostcopy: false
    completionTimeoutPerGiB: 800
    parallelMigrationsPercluster: 5
    parallelOutboundMigrationsPerNode: 2
    progressTimeout: 150
  infra:
    nodePlacement:
      affinity:
        nodeAffinity:
          requiredDuringSchedulingIgnoredDuringExecution:
            nodeSelectorTerms:
              - matchExpressions:
                  - key: ibm-cloud.kubernetes.io/machine-type
                    operator: In
                    values:
                      - cx2.16x32
  workloadUpdateStrategy:
    batchEvictionInterval: 1m0s
    batchEvictionSize: 10
    workloadUpdateMethods:
      - LiveMigrate
  uninstallStrategy: BlockUninstallIfWorkloadsExist
  workloads:
    nodePlacement:
      affinity:
        nodeAffinity:
          requiredDuringSchedulingIgnoredDuringExecution:
            nodeSelectorTerms:
              - matchExpressions:
                  - key: ibm-cloud.kubernetes.io/machine-type
                    operator: In
                    values:
                      - cx2d.metal.96x192
After the reconciliation completes, the Virtualization menu will appear in the Red Hat OpenShift console.
What’s coming next for Red Hat OpenShift Virtualization on IBM cloud
Red Hat OpenShift Virtualization is evolving with new features:
Portworx support: A new Software-Defined Storage (SDS) option for managing virtualization workloads.
Multi-NIc support: Allows multiple network interfaces on cluster nodes for advanced networking needs.
OVN as cNI plug-in: Adds more flexible networking options in future ROKS releases.
Summary
This tutorial covered the basics of Red Hat OpenShift Virtualization and how to install it on IBM cloud. You learned how to:
create a ROKS cluster with the right configuration.
choose the appropriate storage solution.
Set up ODF, IBM VPc file cSI, and hostpath provisioner for best performance.