About cookies on this site Our websites require some cookies to function properly (required). In addition, other cookies may be used with your consent to analyze site usage, improve the user experience and for advertising. For more information, please review your options. By visiting our website, you agree to our processing of information as described in IBM’sprivacy statement. To provide a smooth navigation, your cookie preferences will be shared across the IBM web domains listed here.
Tutorial
Get an IBM MQ queue for development running on Azure
Configure your queue for app connections
In this tutorial, you will be guided through creating and configuring a queue manager (server) on Azure Kubernetes Service (AKS).
You can download, install, and run IBM MQ queue manager (server) in a variety of ways:
- In a container or Red Hat OpenShift Container Platform.
- In the IBM Cloud, AWS (or AWS using Ansible or AWS using Terraform), Microsoft Azure (this tutorial), or Google Cloud.
- On various operating systems: Linux/Ubuntu or Windows. For macOS, use MQ on Containers.
After completing this tutorial, you will be able to send messages to, and retrieve messages from, an IBM MQ queue running on a queue manager deployed on AKS.
This tutorial was created using a Free Tier Azure account. Provided all resources and services are removed immediately after completion, the total cost should fall below your annual free tier allowance.
It is recommended that you set a budget alert to warn you when your Azure usage approaches your annual free tier allowance.
In this tutorial, we will deploy an IBM MQ queue manager on AKS. This tutorial uses the Azure command line to deploy the queue manager, and the Microsoft Azure Portal to explore what has been created. We will then access the MQ Console and fire a couple of REST calls to demonstrate that the queue manager on Azure is operational.
Learning objectives
By completing this tutorial, you will learn how to :
- Deploy an IBM MQ queue manager onto AKS
- Access the queue manager pod
- Access the IBM MQ console
- Post and Get messages to/from a queue in the queue manager
Prerequisites
- An Azure account
- Helm version 3
- Kubectl
- The Azure command line
- Git
- An IDE eg. VSCode
Steps
Step 1. Azure Kubernetes Service on Azure portal
We will be using the Azure command line to deploy an IBM MQ queue manager onto AKS, and will be using the Azure portal to inspect the artifacts created.
Navigate to the Azure home page and click Sign in. A dashboard of services and resources will open.
All AKS components created in this tutorial will belong to a single cluster under two resource groups, allowing all the components to be removed by removal of the cluster and resource groups. To access Azure Kubernetes Services (AKS), click on the Kubernetes services icon.

If you do not see the Kubernetes services icon on the dashboard, click in the search bar located at the top of the screen and search for "Kubernetes services" and select it from the search results.
Step 2. Obtain the helm charts
We will be using Helm to define, install and configure the components that will make up the queue manager Kubernetes deployment. Sample helm charts are available in the IBM MQ Sample Helm Chart GitHub repository, which we will clone.
Open a new terminal or command prompt. Within this terminal create and navigate to a new directory.
Clone the repository by running the command:
git clone https://github.com/ibm-messaging/mq-helm.git
Step 3. Create an Azure Kubernetes Service cluster
AKS (Azure Kubernetes Service) allows us to deploy, manage, and scale containerized applications. The service incorporates the mechanisms provided by Kubernetes to interact with your clusters.
The shell scripts that we will be running make use of the Azure and Kubernetes command line to interact with AKS.
Log into the Azure through the command line, by running the following from your terminal or command line:
az login
This will open a new browser window showing the Microsoft login page where you can select your Microsoft Azure account.
After you log in, you should see something similar to the following in your terminal window.
Change directories to the samples/AzureAKSFreeTier/deploy directory.
cd mq-helm/samples/AzureAKSFreeTier/deploy
If you run a ls or dir command, you should see output similar to this:

The script that we will use to create the cluster has the following defaults:
- Resource group to “myMQResourceGroup”
- Cluster name to “myMQCluster”
- Region to “eastus”
To use the defaults, run the following command:
./createAKSCluster.sh
With this command you override the defaults for these items:
- Resource group set to “mq-aks-rg”
- Cluster name set to “mq-cluster”
- Region to set “westus”
Then, run this command:
./createAKSCluster.sh mq-aks-rg mq-cluster westus
The output will look like this:

This output displays the details of your cluster. After a few moments, a cluster should appear in your Azure Kubernetes Service dashboard (in your browser window) like the one shown in the following figure.

Wait until the Running status in the terminal (or command window) clears.

When the Running status has cleared, all the required AKS resources will have been generated.
Step 4. Create and start a queue manager in Azure
Now that we have created our Kubernetes cluster, we will deploy the following resources for IBM MQ:
- Config map: Defines the MQ resources such as queues and channels to pre-configure the queue manager on startup
- Secret: A public and private key to be used by the queue manager to secure the communication
- Secret: The non trivual IBM MQ Admin and App user passwords
- LoadBalancerService: Exposes the MQ web console and data ports on the Internet allowing access
- IBM MQ helm chart: Deploys an IBM MQ queue manager into a Kubernetes environment
To specify the Admin and App user passwords edit the file secureapp.yaml.
Add the lines:
credentials:
    enable: true

This will allow you to specify the admin and user credentials.
Save your changes.
The install.sh script takes care of deploying these resources for us. Edit the file install.sh. Add the line:
kubectl create secret generic mq-credentials --from-literal=mqAdminPassword=YOUR_ADMIN_PASSWORD --from-literal=mqAppPassword=YOUR-APP-PASSWORD
Remember to substitute YOUR_ADMIN_PASSWORD and YOUR-APP-PASSWORD with strong non-trivual passwords for your MQ admin and app accounts.

Save your changes.
Back in the terminal, run one of these commands:
Windows:
bash install.sh
Mac/Linux:
./install.sh
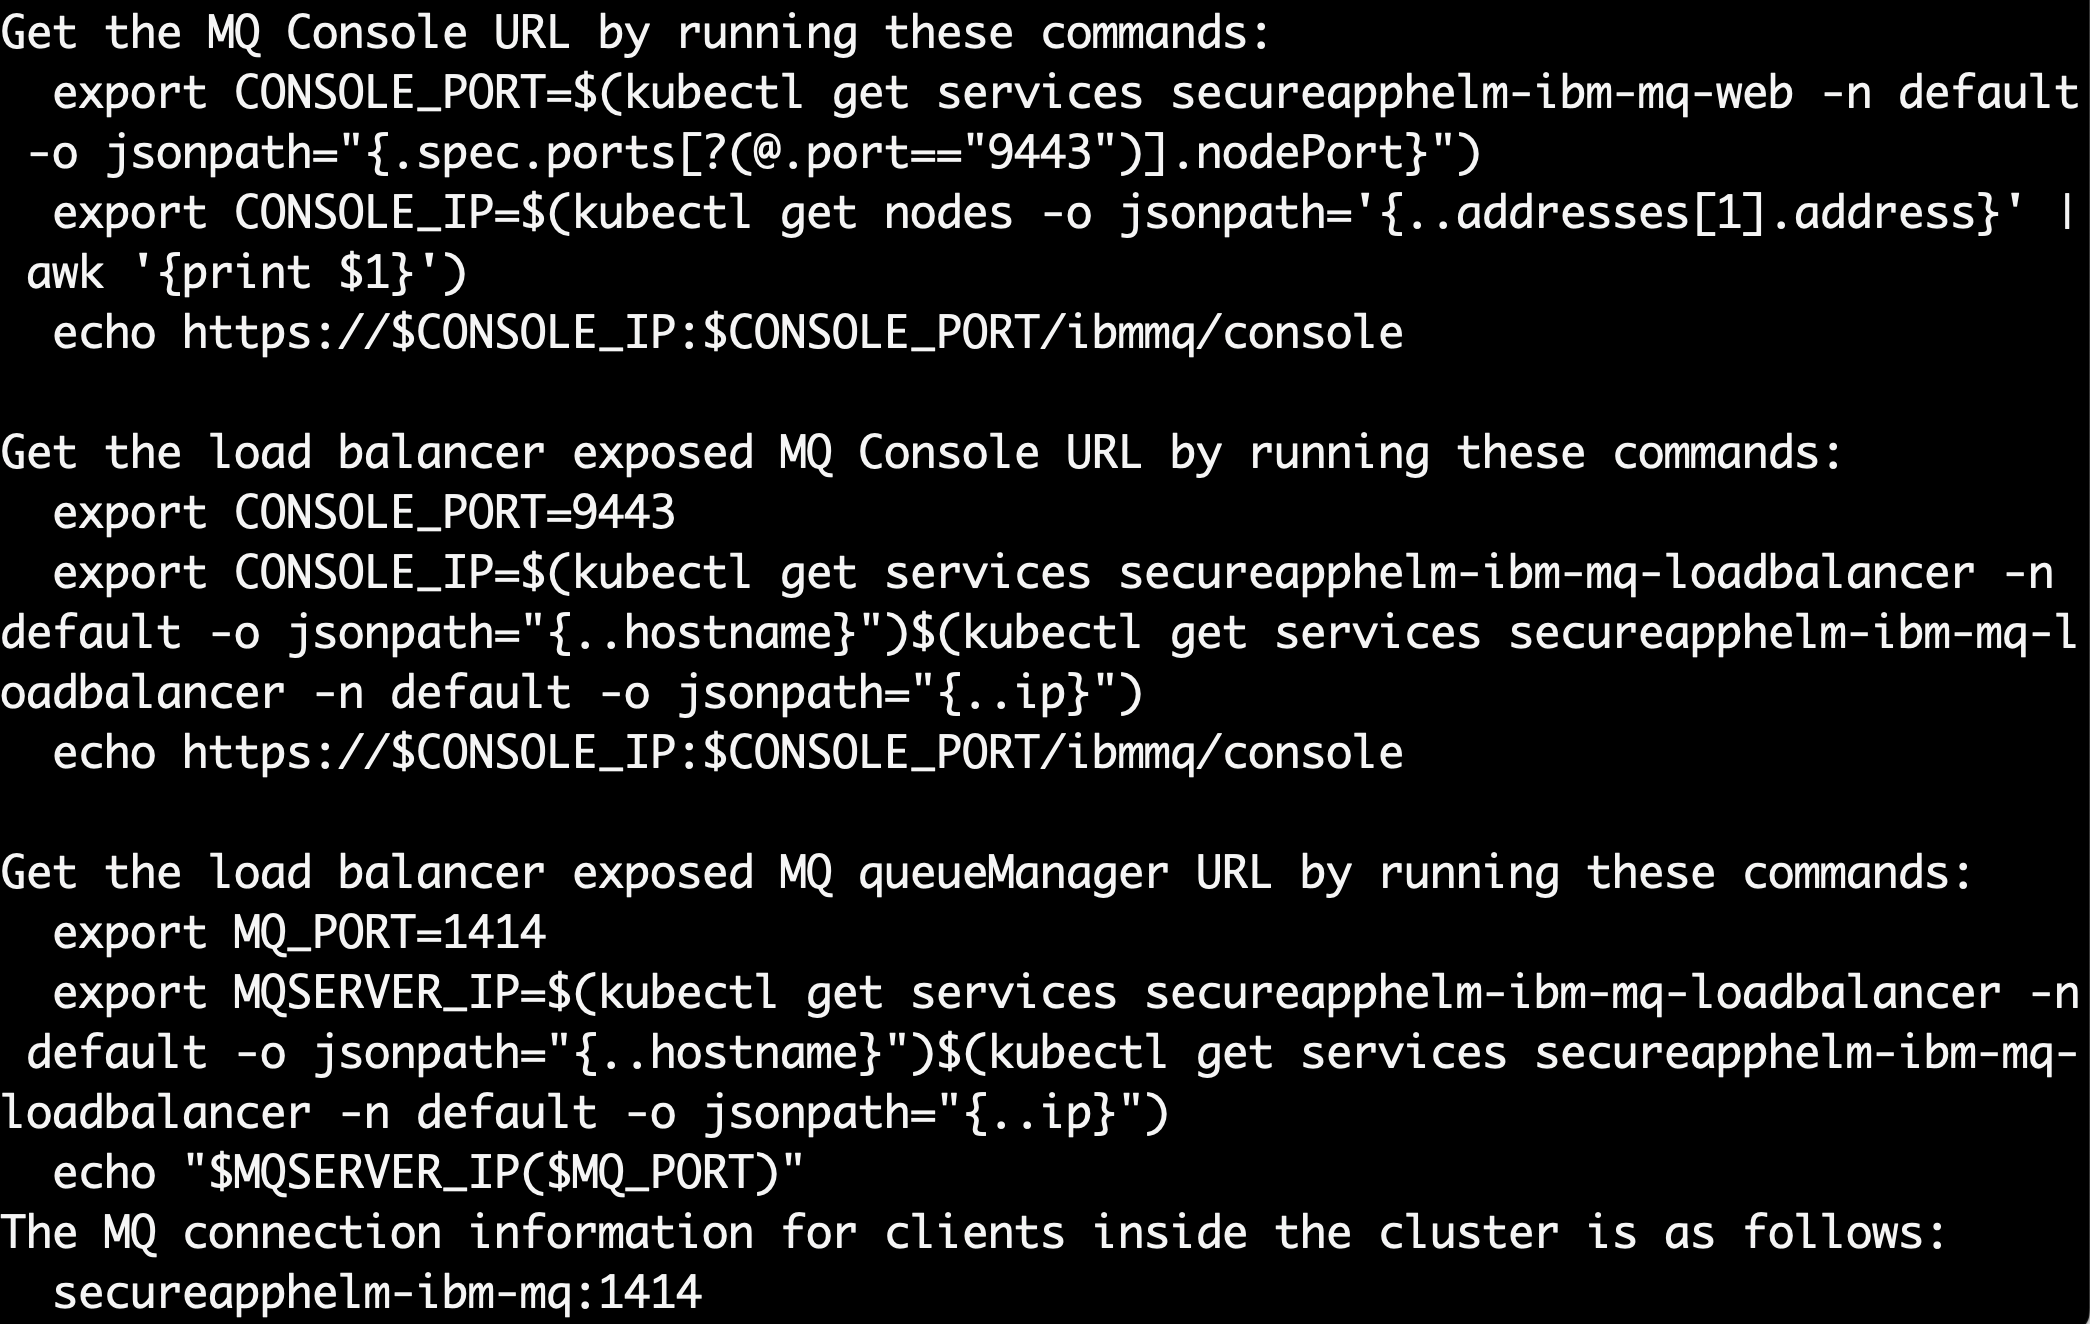
In the terminal you will see instructions for determining the URLs for the MQ Console URL and the load balancer.
Let’s check if our queue manager is running. You can exec into your pod secureapphelm-ibm-mq-0 by typing the following command onto our terminal:
kubectl exec -it secureapphelm-ibm-mq-0 -- /bin/bash
When you see bash-4.4$ appear, type in the following:
dspmq
If you see this output, that means your queue manager is successfully running!

Don’t worry if you see "Running elsewhere" this means one of the other two containers is the active instance. If there was an issue with the queue manager, Kubernetes would automatically restart the containers.
If you see the status "Starting", wait a few minutes and rerun the "dspmq" command.
Exit from the shell.
Step 5. Use REST to put messages
Next, we will use the MQ Messaging REST API to put a message. You will need the LoadBalancer’s IP address.
To retrieve our LoadBalancer’s IP address, type the following on your terminal:
kubectl get services
You should see output similar to this:

Make a note of the External IP of the LoadBalancer. In our test, in the diagram above the IP is 172.184.138.199. Using your LoadBalancer's IP run the following curl command to put a message on a queue.
curl -X POST -k --header 'Content-Type: application/json; charset=utf-8' --header 'ibm-mq-rest-csrf-token: abc' -u app:<your app password> -d 'Test message from curl command' 'https://<your loadbalancer ip>:9443/ibmmq/rest/v1/messaging/qmgr/secureapphelm/queue/DEV.QUEUE.1/message'
Remember to use the app password you specified in install.sh and the IP address for your loadbalancer. The -k option has been added as the queue manager will have been deployed using self signed certificates.
In the curl command the:
- queue manager is
secureapphelm - queue is
DEV.QUEUE.1 - ibm-mq-rest-csrf-token, can be any unique value
A blank response indicates a success code of 201 that the message was posted successfully.
Step 6. Use the MQ console
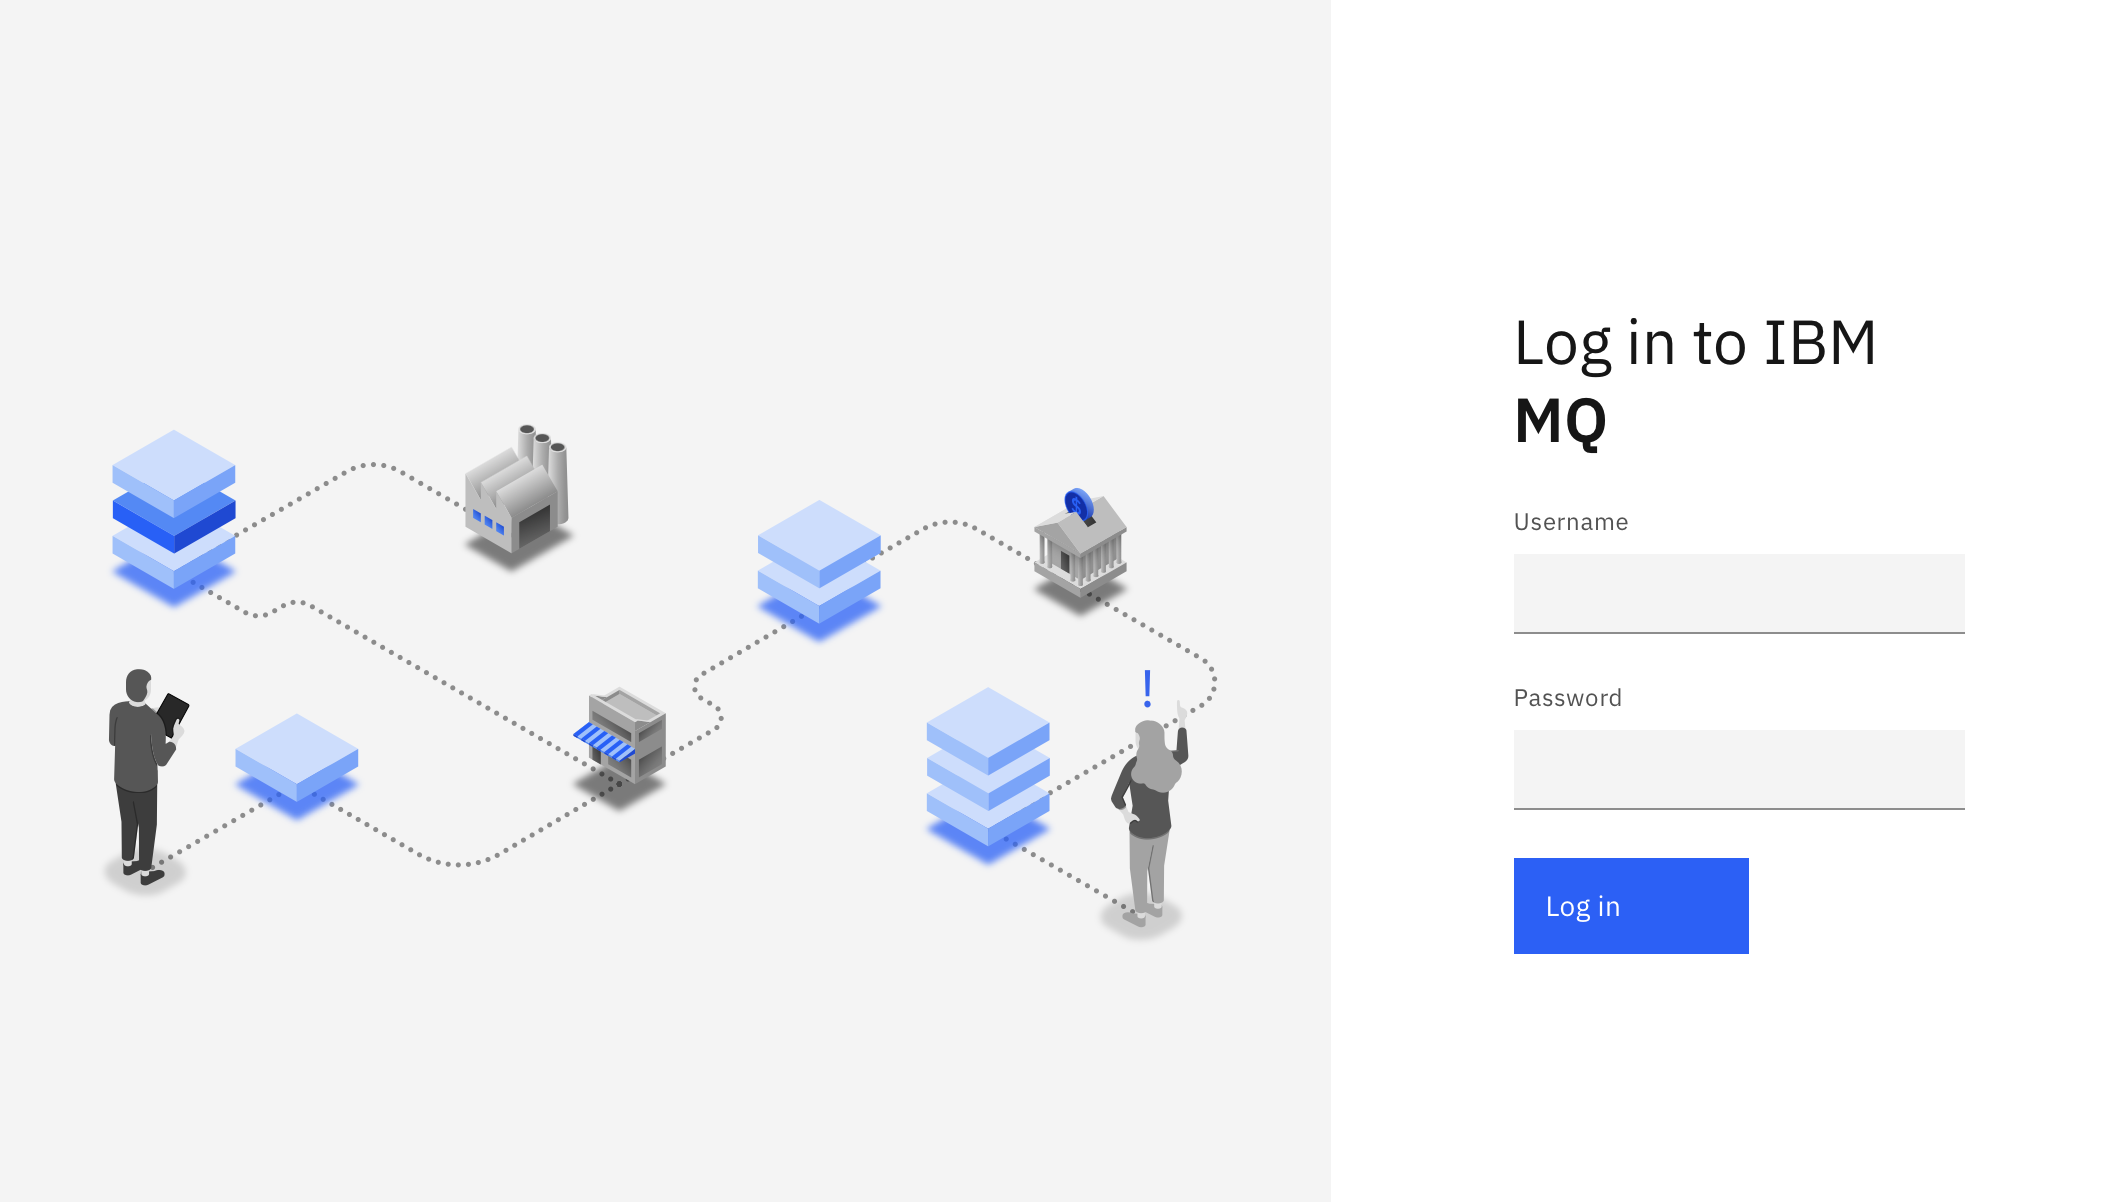
You can now use the IBM MQ console to interact with your queue manager deployed on your AKS cluster. To do this, open a browser and go to this URL, https://{IP_address}:9443, where IP address corresponds to your load balancer IP address, which we looked up in the previous step.
A "This connection is not private" warning will display as self signed certificates have been use. Click through this warning and you will be redirected to the login screen of MQ console, congratulations! You should see an output similar to the one below.
You can now use the IBM MQ console to interact with your queue manager deployed on your AKS cluster.
Using the MQ admin credentials you specified in install.sh, log in to the console. Inside the console, you can view and edit all of your MQ objects, as well as create others. You can also set permissions for different users and objects. A full MQ Console tour is available in this IBM Docs article, but we'll go over some basic actions here.
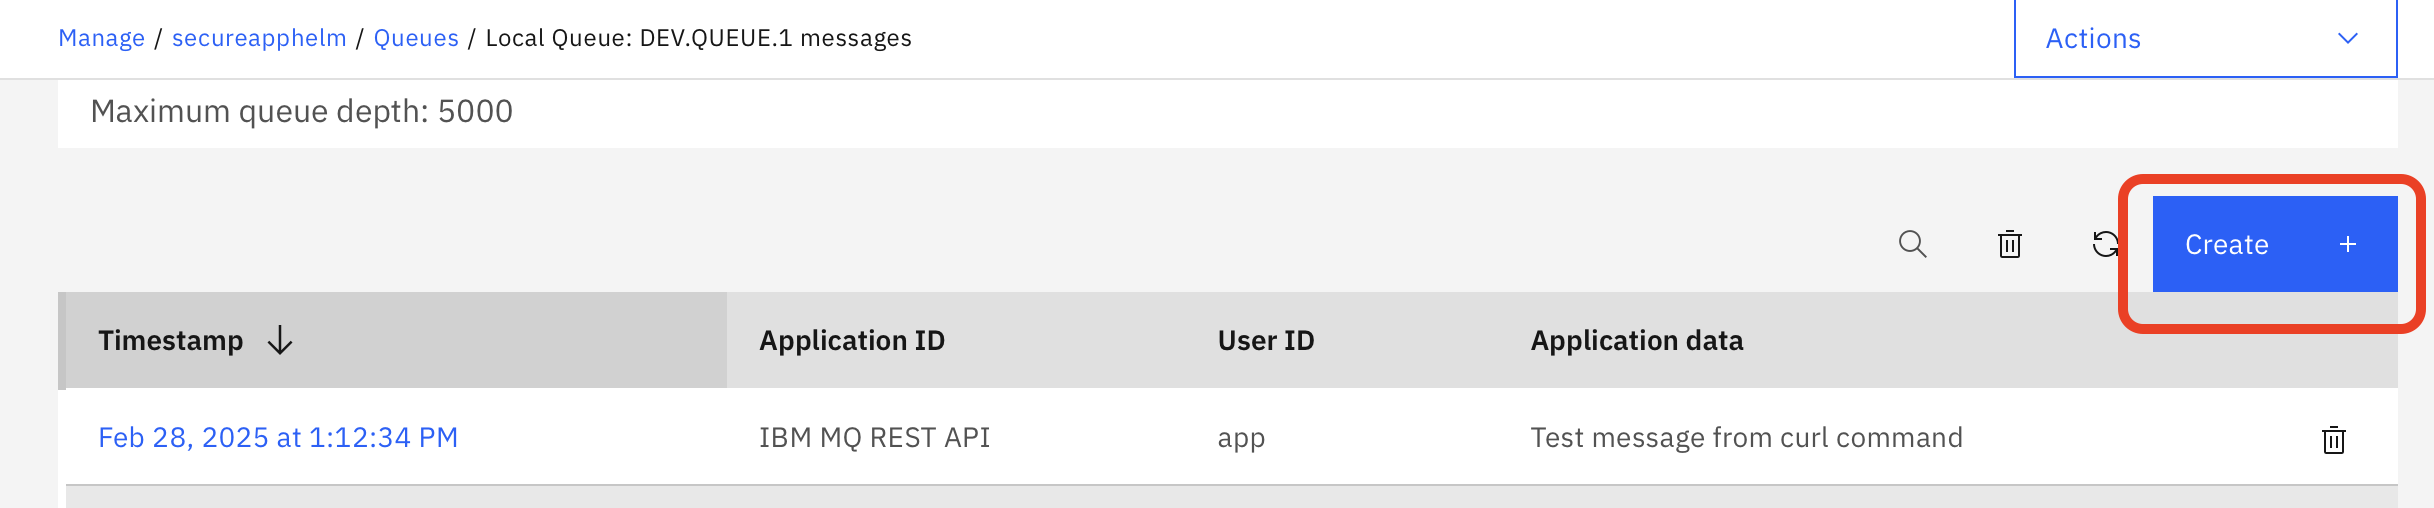
Select Manage to open a list of queue managers, then select queues.

You can create or manage queues from here. Select DEV.QUEUE.1
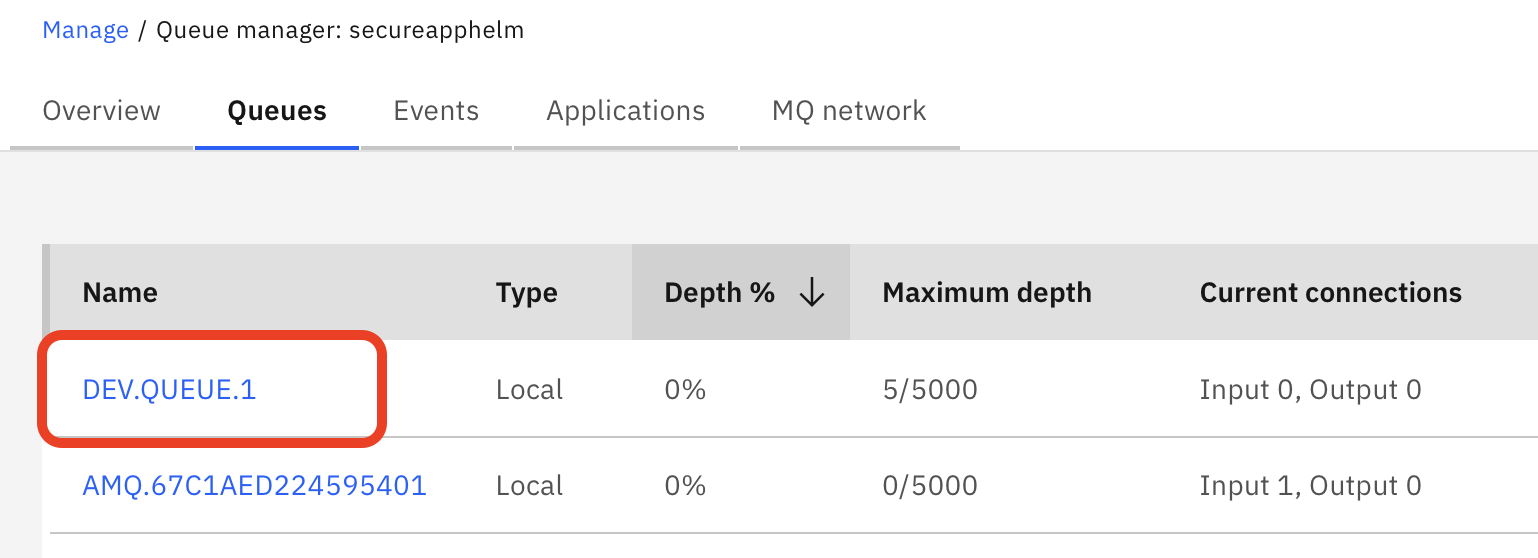
to see the message(s) you posted onto the queue.

You can put a message onto this queue clicking Create on this page, which here means "create a new message". The Application data field contains the message contents. Clicking Create puts your message onto the queue.
Now, we've set up the MQ Console, which will help us to manage and visualize our messaging system.
Step 7. Use REST to get messages
Now, We will use the MQ Messaging REST API to get a message. You will need the LoadBalancer’s IP address, obtained and used in the previous steps.
Run the following curl command to get a message from a queue.
curl -X DELETE -k --header 'Accept: text/plain' --header 'ibm-mq-rest-csrf-token: abc' -u app:<your app password> 'https://<your loadbalancer ip>:9443/ibmmq/rest/v1/messaging/qmgr/secureapphelm/queue/DEV.QUEUE.1/message'
Remember to use the app password you specified in install.sh and the IP address for your loadbalancer. The -k option has been added as the queue manager will have been deployed using self signed certificates.
In the curl command the:
- queue manager is
secureapphelm - queue is
DEV.QUEUE.1 - ibm-mq-rest-csrf-token, can be any unique value
A return of the message you posted earlier indicates a HTTP response code of 200 and signifies that the message was retrieved successfully. An empty response indicates a HTTP response of 204 and that there were no messages found.
Step 8. Cleanup
To avoid unnecessary cost you should shut down all Azure services once you are done with them.
To clean up and remove all Azure services and resources created in the tutorial you can delete the kubernetes cluster and Azure regions in the Azure portal.
Here we will show how to accomplish the cleanup from the command line.
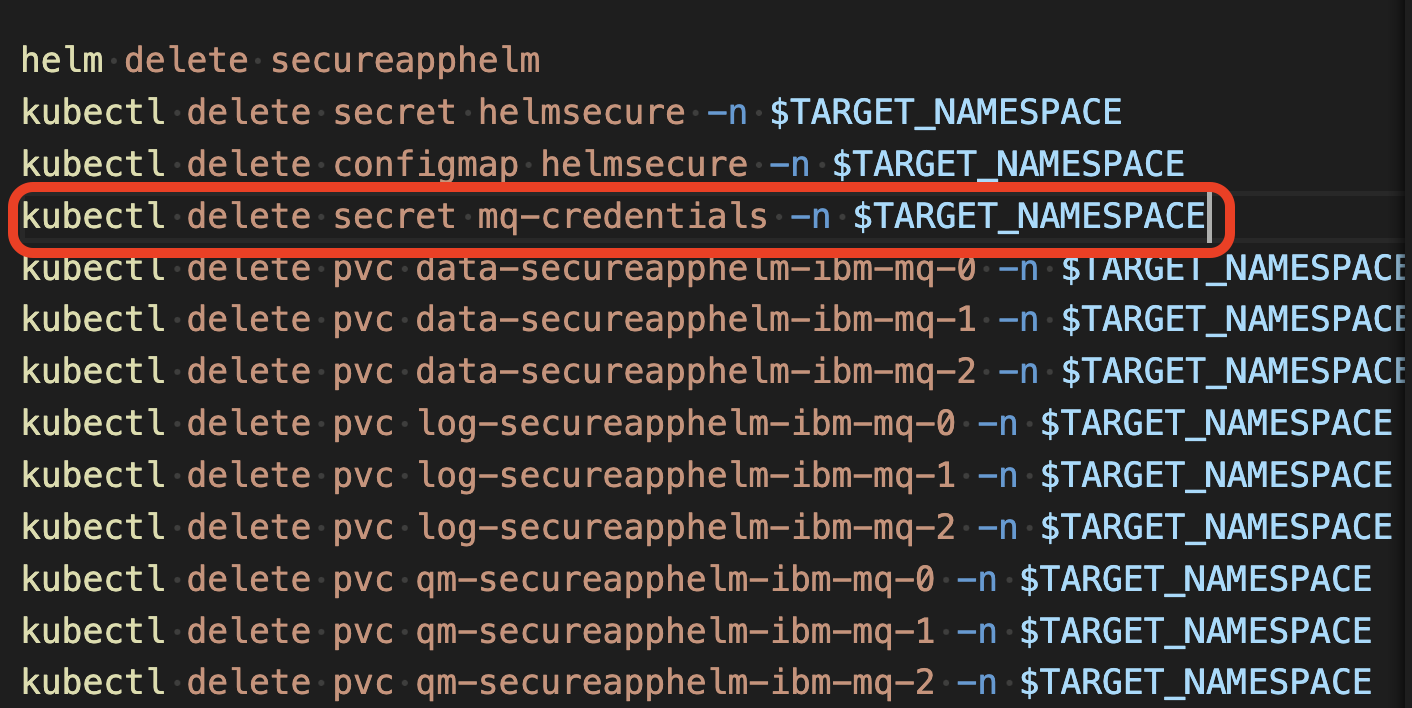
To clean up all the kubernetes resources edit the file cleanup.sh and add the line
kubectl delete secret mq-credentials -n $TARGET_NAMESPACE
From your command line run the command:
./cleanup.sh
To remove the AKS cluster and resource groups run the following command remebering to specify the resouce group, Kubernetes cluster name and Azure region if you had not used the default values.
./deleteAKSCluster.sh <resource group name> <cluster name> <region>
eg.
./deleteAKSCluster.sh mq-aks-rg mq-cluster westus
Summary and next steps
Congratulations! In this tutorial, you learned how to deploy IBM MQ queue manager on Azure Cloud using the Azure Kubernetes Service. To do this, you first created an Azure Kubernetes Service, and then deployed the resources for the IBM MQ queue manager.
You were able to access the MQ console to demonstrate your queue manager working on Azure. Finally, you used the MQ REST API to send and receive messages.
You should now understand how you can deploy IBM MQ queue manager on the Azure Kubernetes Service.
When you start developing your own client applications to connect to the queue manager, you'll follow these steps:
- Configure the connection to the queue manager.
- Open a queue.
- Put or Get a message on/from the queue.
- Close the connection to the queue manager.
This process demonstrates the point-to-point style of messaging. Applications that put messages act as producers. Applications that get messages act as consumers.
In IBM MQ, the queue manager is effectively the server part of the system, and applications that connect to it are clients.
Usually it is the administrators that look after the MQ server where all the MQ objects are defined and the routing of messages happens. Client applications are created by developers and IBM MQ provides client libraries that developers must include in their applications. These libraries, also called MQ clients, address and use the MQ objects that admins have set up on the MQ server side. In more complex scenarios, the MQ libraries do most of the heavy messaging work for you, so you just have to learn how to use them.
Configuration is needed on both the server and the client sides for the messaging to work.
When you first start developing MQ client applications, it helps to have access to your own queue manager and a queue, for testing your client application against. Installing IBM MQ in the cloud gives you access to a queue manager and many options for configuring MQ objects as you begin developing your client application.