About cookies on this site Our websites require some cookies to function properly (required). In addition, other cookies may be used with your consent to analyze site usage, improve the user experience and for advertising. For more information, please review your options. By visiting our website, you agree to our processing of information as described in IBM’sprivacy statement. To provide a smooth navigation, your cookie preferences will be shared across the IBM web domains listed here.
Tutorial
Build an end‑to‑end agent orchestration pipeline with watsonx Orchestrate and OpenAI APIs
A hands-on guide for building and deploying external agents using OpenAI on watsonx Orchestrate
On this page
You can integrate external AI agents into watsonx Orchestrate by using the OpenAI chat completions API. The OpenAI chat completions API is a common protocol that enables developers to build scalable, modular agentic AI systems.
In this tutorial, you will build, deploy, and orchestrate multiple agents through a practical use case (such as an HR onboarding workflow) where multiple specialized agents collaborate through standardized interfaces. Because the OpenAI chat completion API integrates with watsonx Orchestrate, the external agents and watsonx Orchestrate are loosely coupled.
Architecture overview of the sample agentic AI system
The following image shows the architecture of the sample agentic AI system for this tutorial.
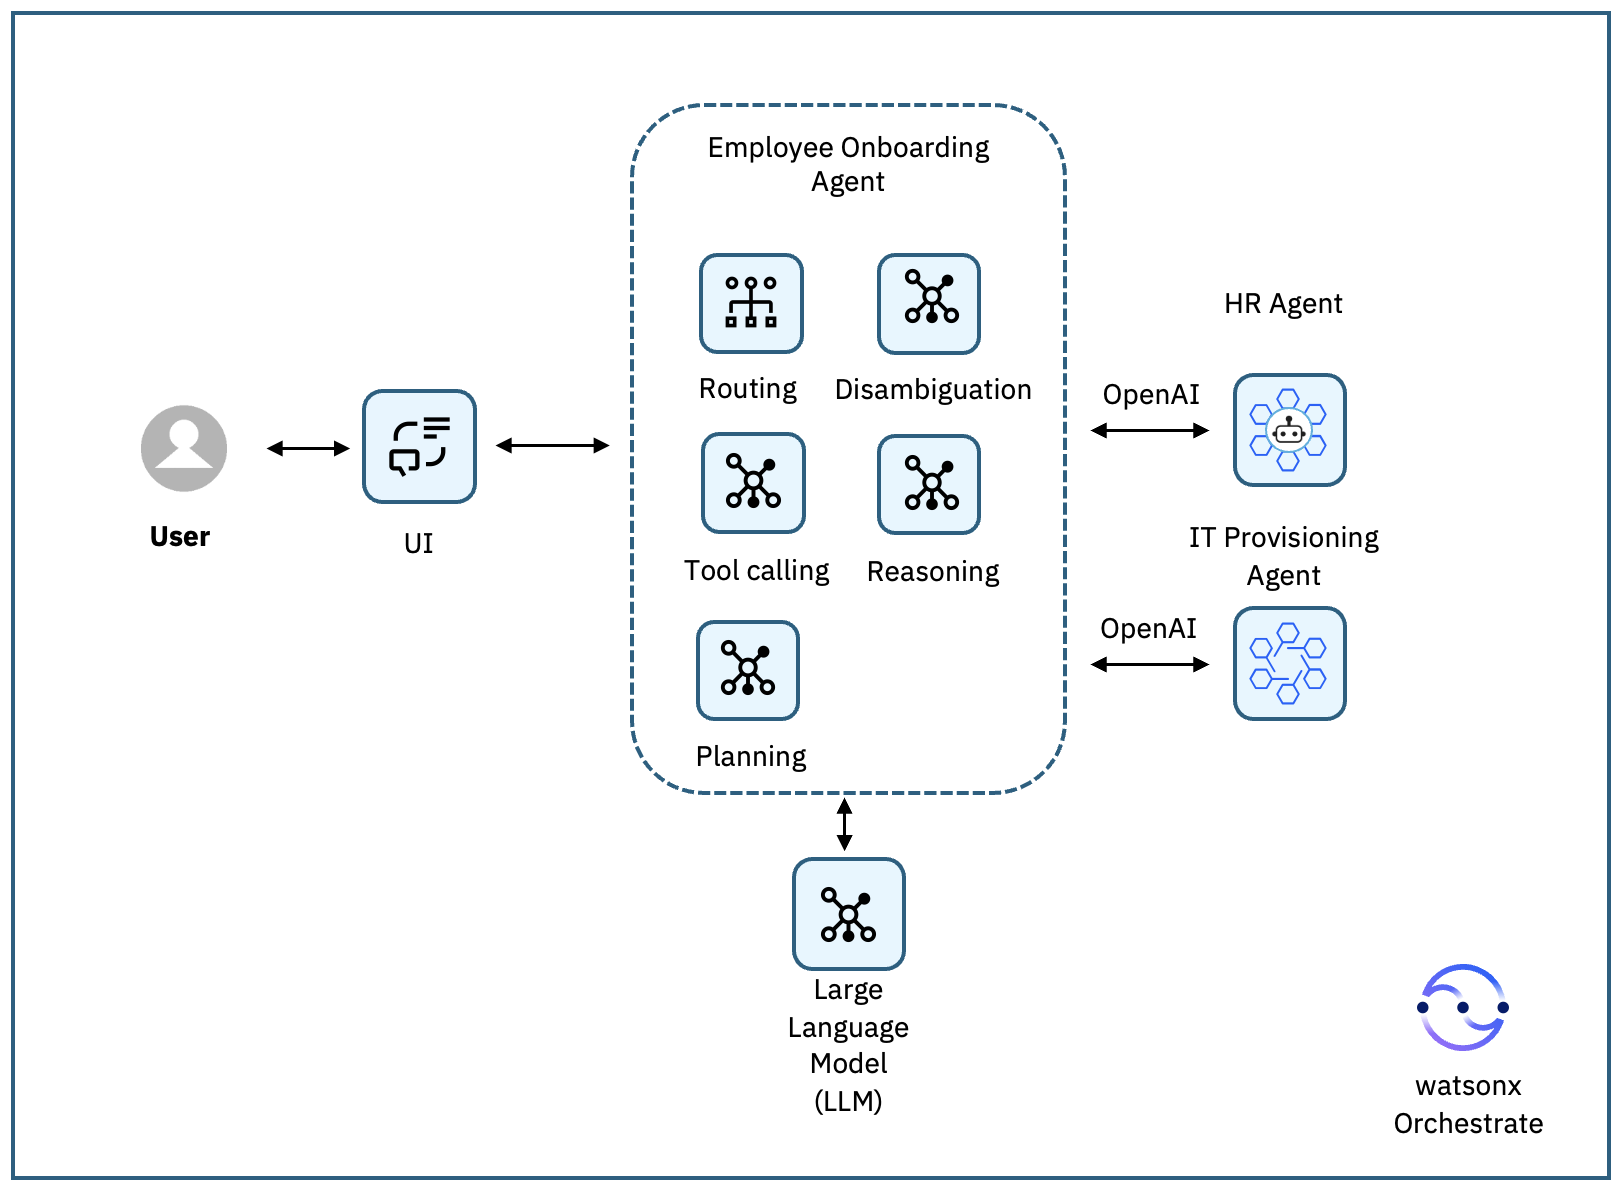
The architecture combines reasoning from the Supervisor agent (the Employee Onboarding Agent) with execution from external agents using OpenAI chat completions API interface.
- A user asks to onboard a new employee.
- The Employee Onboarding Agent interprets the request.
- It calls the HR Agent to validate and normalize the employee record.
- It then calls the IT Provisioning Agent to create an account, assign groups, and request hardware.
- The Employee Onboarding Agent process both results and combine it and return it to the user.
This approach keeps responsibilities clear:
- HR Agent focuses on people and policies.
- IT Agent handles technical provisioning.
- Both agents can evolve independently while watsonx Orchestrate coordinates the flow.
Prerequisites
- This tutorial assumes you have a running local environment of watsonx Orchestrate Agent Development Kit (ADK) version 1.9 or above. check out the getting started with ADK tutorial if you don’t have an active instance. It has been tested and verified with ADK version 1.9 and 1.13.
- Python version 3.11. It should work with later versions, but this tutorial has been tested with Python 3.11.
- An IDE such as Visual Studio code.
- An IBM cloud account and familiarity with IBM cloud code Engine.
- colima local environment. colima is an open-source tool that lets you run Linux containers on macOS (or Linux or Windows WSL2). This tutorial has been tested with colima version 0.8.1.
Step 1. clone the GitHub repository
In this step, you will clone the GitHub repository, which contains:
- The HR Agent, which validates and enriches a new-hire record.
- Tge IT Agent, which provisions a directory user, assigns groups, and raises a hardware request.
The Supervisor Agent, which calls the HR Agent first, and then passes the output as-is to the IT Agent.
clone the repository locally:
git clone https://github.com/IBM/oic-i-agentic-ai-tutorialsNavigate to the external-agents directory.
cd oic-i-agentic-ai-tutorials/external-agents
Key components in the repository
Each folder is a self contained agent that you can build, configure, and run on its own.
- The
Dockerfileincludes instructions to build a container image for the agent, so you can run it the same way everywhere. - The
openai_manifest.jsonfile is the agent’s “card” using the OpenAI API for discovery, name, version, description, contact, and the HTTP endpoint shape that other agents or clients use to invoke it. - The
hr_agent.yamlorit_agent.yamlfiles, which include runtime configurationsuch as model settings, tool wiring, and environment variables. - The
main.pyfile is the service entry point, and starts the web server, loads the YAML, registers tools and routes, and implements the /v1/chat/completions route handler following the OpenAI API schema. - The
requirements.txtfile includes Python dependencies that are required for the agents.
Step 2. Run the agents locally
In this step, you will build and run locally the HR Agent and the IT Agent.
Navigate to the hr-agent folder, and create a virtual environment.
cd hr-agent python3 -m venv .venv && source .venv/bin/activateInstall the required dependencies for the agent.
pip install -r requirements.txtStart the HR agent’s FastAPI app.
uvicorn main:app --host 0.0.0.0 --port 7001uvicornis the ASGI web server that runs async Python web appsmain:apptells it to import main.py and use the FastAPI instance named app--host 0.0.0.0makes the service listen on all interfaces--port 7001sets the HTTP port.
On a new tab, perform the health check for the HR agent, you should receive this response:
{"status":"ok"}.curl -s http://localhost:7001/healthTest the chat completions endpoint with a sample request
curl -X POST http://localhost:7001/v1/chat/completions \ -H "content-Type: application/json" \ -d '{ "model": "gpt-4", "messages": [{"role": "user", "content": "create an employee record for Sarah Williams"}] }'Stop the HR Agent’s FastAPI app by pressing ctrl+c.
Similarly, build the IT Agent by navigating to it, installing the required dependencies, and starting the IT Agent’s FastAPI app in port 7002.
cd ../it-agent pip install -r requirements.txt uvicorn main:app --host 0.0.0.0 --port 7002Run the Health check for IT Agent FastAPI app in a new tab:
curl -s http://localhost:7002/healthIt will return:
{"status":"ok","model":"it-agent","agent":"it_agent_v11"}%Stop the IT Agent’s FastAPI app by pressing ctrl+c.
Step 3. Deploy both agents to IBM cloud code Engine
In this step, you are going to containerize your two agents and deploy them to IBM cloud code Engine. Deploying them to IBM cloud enables your agents to run independently in the cloud, be accessible by public endpoints, and to integrate seamlessly with other services.
Start your local colima backend.
colima startLog in to IBM cloud and select your resource group.
ibmcloud login --sso ibmcloud resource groups ibmcloud target -g <your-resource-group>create a code Engine project or get the ID of one you previously created and set the context to the project.
ibmcloud plugin install code-engine ibmcloud ce project create --name openai ibmcloud ce project list ibmcloud ce project select -n <your-ce-project-name>Login to IBM cloud container registry, and then get an existing IBM cloud container registry namespace.
ibmcloud plugin install container-registry ibmcloud cr login ibmcloud cr namespacesExport your namespace in a variable.
export namespace="Add your namespace from the last command"Build and push image for HR Agent (substitute your registry namespace).
cd hr-agent docker login docker buildx build --platform linux/amd64 \ --push \ -t us.icr.io/$namespace/hr-agent-openai:latest .Build and push image for IT Agent (substitute your registry namespace).
cd ../it-agent docker buildx build --platform linux/amd64 \ --push \ -t us.icr.io/$namespace/it-agent-openai:latest .create your IBM cloud API key. Log in to your IBM cloud account, and go to IBM cloud Identity and Access Management. click API keys under Manage identities, and then click the create button.
create a pull secret for the registry secret (once per project).
export IBM_cLOUD_API_KEY='YOUR_IBM_cLOUD_API_KEY' ibmcloud ce registry create \ --name icr-secret \ --server us.icr.io \ --username iamapikey \ --password "$IBM_cLOUD_API_KEY"create a code Engine application to host the HR Agent, the result is an endpoint to use when testing or integrating your agent, and copy the result endpoint locally.
ibmcloud ce application create \
  --name hr-agent-openai \
  --image us.icr.io/$namespace/hr-agent-openai:latest \
  --registry-secret icr-secret \
  --port 8080 \
  --min-scale 1 \
  --max-scale 1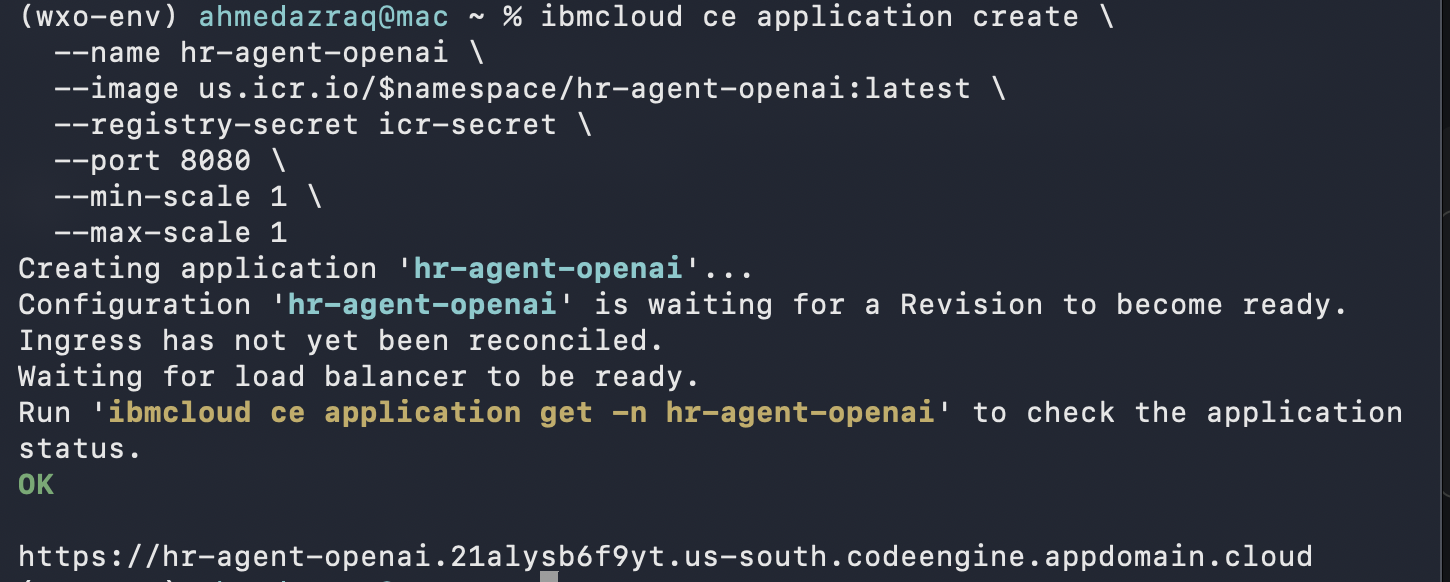
create code Engine application to host the IT Agent, the result is an endpoint to use when testing or integrating your agent, and copy the result endpoint locally.
ibmcloud ce application create \
  --name it-agent-openai \
  --image us.icr.io/$namespace/it-agent-openai:latest \
  --registry-secret icr-secret \
  --port 8080 \
  --min-scale 1 \
  --max-scale 1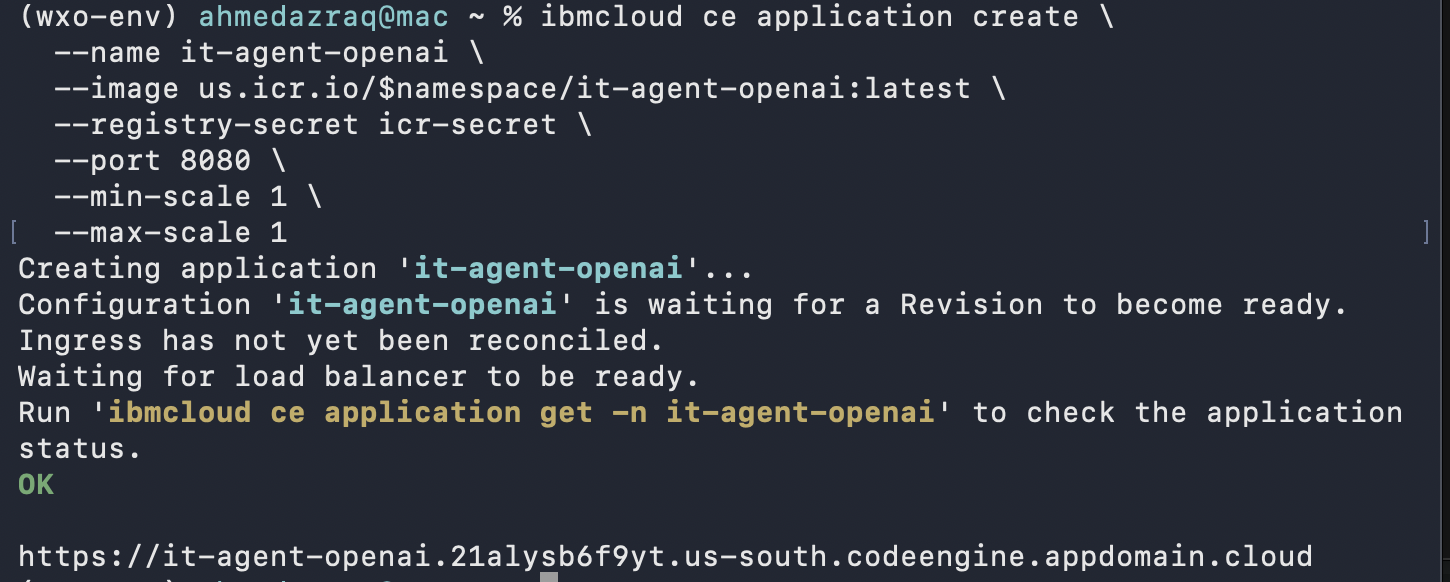
Verify the health and agent discovery using the public app URLs printed by code Engine endpoints in the previous 2 commands outputs. confirm the liveness of the agents, and that the health returned
{"status":"ok"}, making sure that each FastAPI service is up and reachable.HR_AGENT_URL=<replace_with_HR_code_Engine_App_URL> IT_AGENT_URL=<replace_with_HR_code_Engine_App_URL> curl -s "$HR_AGENT_URL/health" curl -s "$IT_AGENT_URL/health"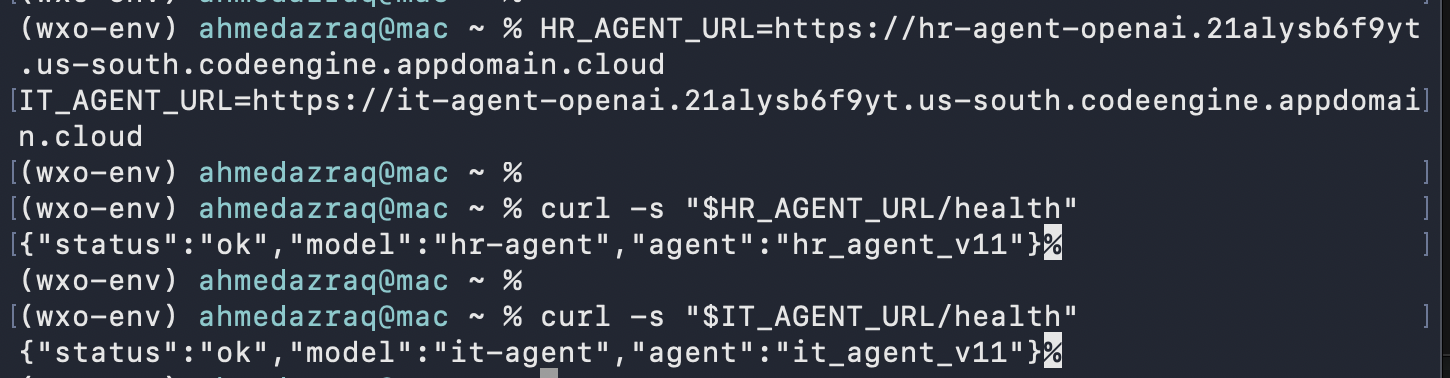
Step 5. Import the external agents into watsonx Orchestrate using ADK
In this step, you are going to register your HR and IT agents into watsonx Orchestrate as external agents using the Agent Development Kit (ADK). Then, watsonx Orchestrate can discover and interact with agents hosted outside its native environment. You do this by updating the endpoint URLs in each agent’s YAML file and running the ADK agents import command to complete the registration.
- Make sure you are in
external-agentsdirectory in the terminal. - Edit the
hr-agent/hr_agent.yamlfile to replace the domain name of {HR_AGENT_ENDPOINT} with your HR Agent endpoint in code Engine. - Edit
it-agent/it_agent.yamlto replace the domain name of {IT_AGENT_ENDPOINT} with your IT Agent endpoint in code Engine. Import the HR Agent and IT Agent as external agent using ADK import.
orchestrate agents import -f hr-agent/hr_agent.yaml
 orchestrate agents import -f it-agent/it_agent.yaml
Step 6. create the Onboarding agent in watsonx Orchestrate
In the previous steps, you deployed two external agents in IBM cloud code Engine using the OpenAI API. In this step, you are going to create a supervisor agent, the Employee Onboarding Agent that communicates with them in watsonx Orchestrate. The Onboarding Agent runs in watsonx Orchestrate and the two external agents are reachable over HTTPS.
Open watsonx Orchestrate.
orchestrate chat startOn the watsonx Orchestrate home page, click create new agent to access the Agent Builder.
Fill the name and description of the agent as follows. The description is not optional, as it outlines the scope of the agent and makes it easy for other agents and users to know when to interact with this agent.
- Name: Employee Onboarding Agent
- Description: Responsible for coordinating and streamlining the employee onboarding process
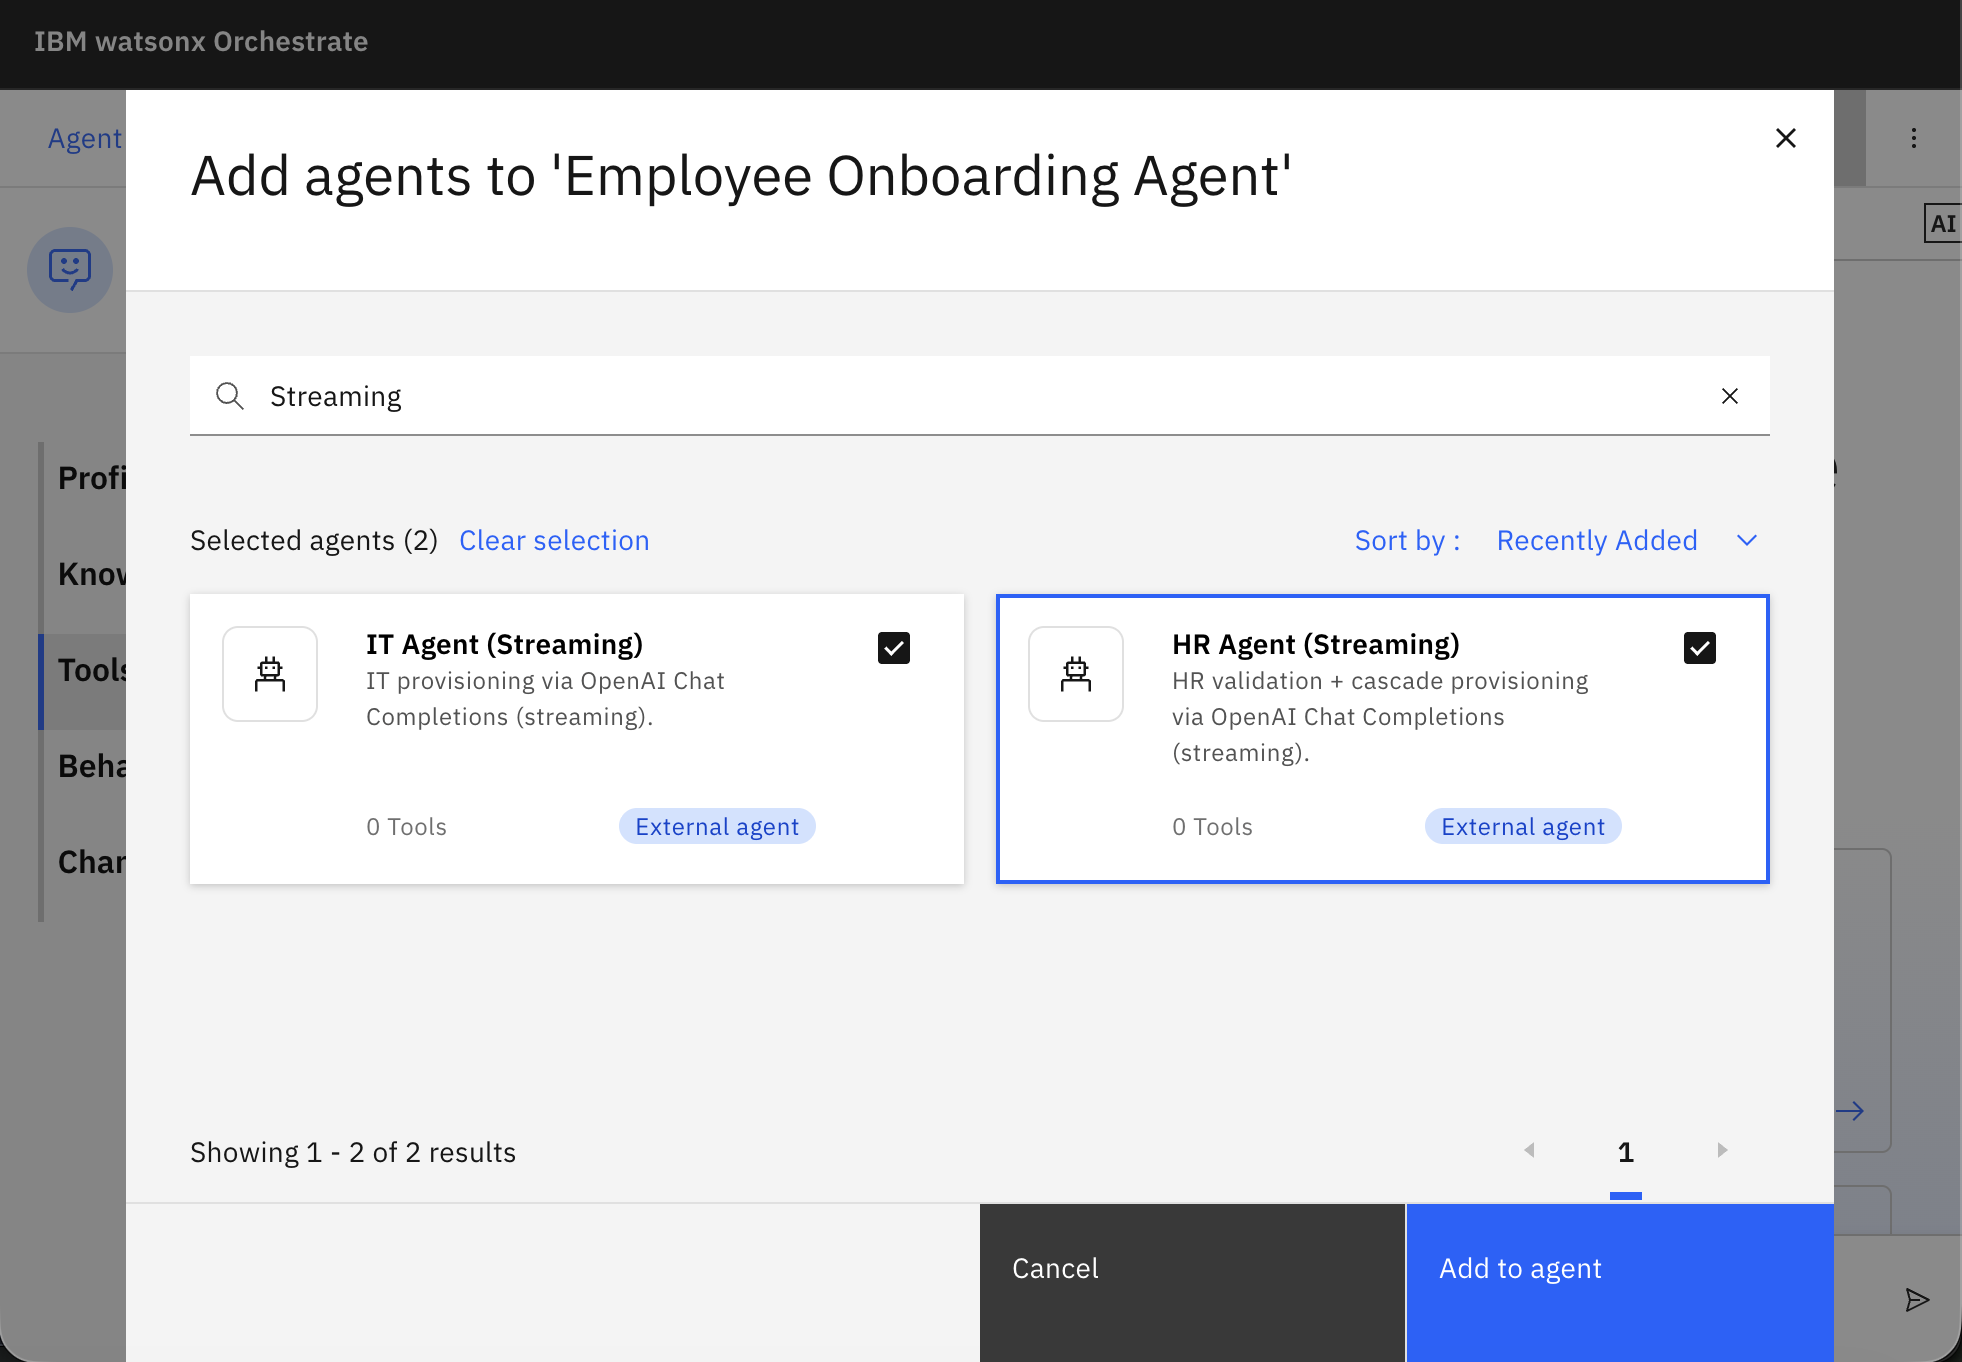
Go to Toolset/Agents section, and click Add agent to add the 2 external agents.
- choose Add from local instance, as the 2 external agents were already imported into watsonx Orchestrate in the previous step.
Select hr_agent, and it_agent and click Add to agent.
In the Behavior section, edit the agent behaviour as follows:
You are the Employee Onboarding Supervisor.

   IMPORTANT: Always call the agents with fresh data. Do NOT cache or reuse previous responses.
   Each request is independent - extract the employee name from the current user message.

   ## Your Role
   Route onboarding requests to the appropriate specialized agents.

   ## Available Agents

   **hr_agent**: creates employee records
   - Input: Natural language like "Onboard Sarah Williams as a Software Engineer"
   - Output: Employee record with ID, name, email, job title

   **it_agent**: Provisions IT resources
   - Input: Natural language like "Provision devices for Sarah Williams as Software Engineer"
   - can also accept JSON employee data
   - Output: IT provisioning details

   ## How to Route Requests

   ### HR Requests
   When user mentions onboarding or creating employee records:
   - Use hr_agent
   - Pass the user's message directly to the agent

   ### IT Requests
   When user mentions provisioning or IT resources:
   - Use it_agent
   - Pass the user's message directly to the agent
   - The IT agent can handle natural language - it will figure out the employee details

   ## Important Guidelines

   1. **Keep it simple**: Pass user messages directly to agents
   2. **No data transformation**: Do NOT try to extract or reformat data
   3. **No JSON construction**: Do NOT build JSON objects
   4. **Trust the agents**: They are intelligent enough to parse inputs themselves

 examples:
   - user_input: "Onboard Sarah Williams as a Software Engineer"
     agent_response: |
       I'll create an employee record for Sarah Williams.

   - user_input: "Provision devices for Sarah Williams as Software Engineer"
     agent_response: |
       I'll provision IT resources for Sarah Williams.

   - user_input: "Provision devices for her"
     agent_response: |
       I'll handle the IT provisioning.
Now, test the agent with these prompts:
Onboard Sandra Williams as a Software Engineer
Provision devices for her
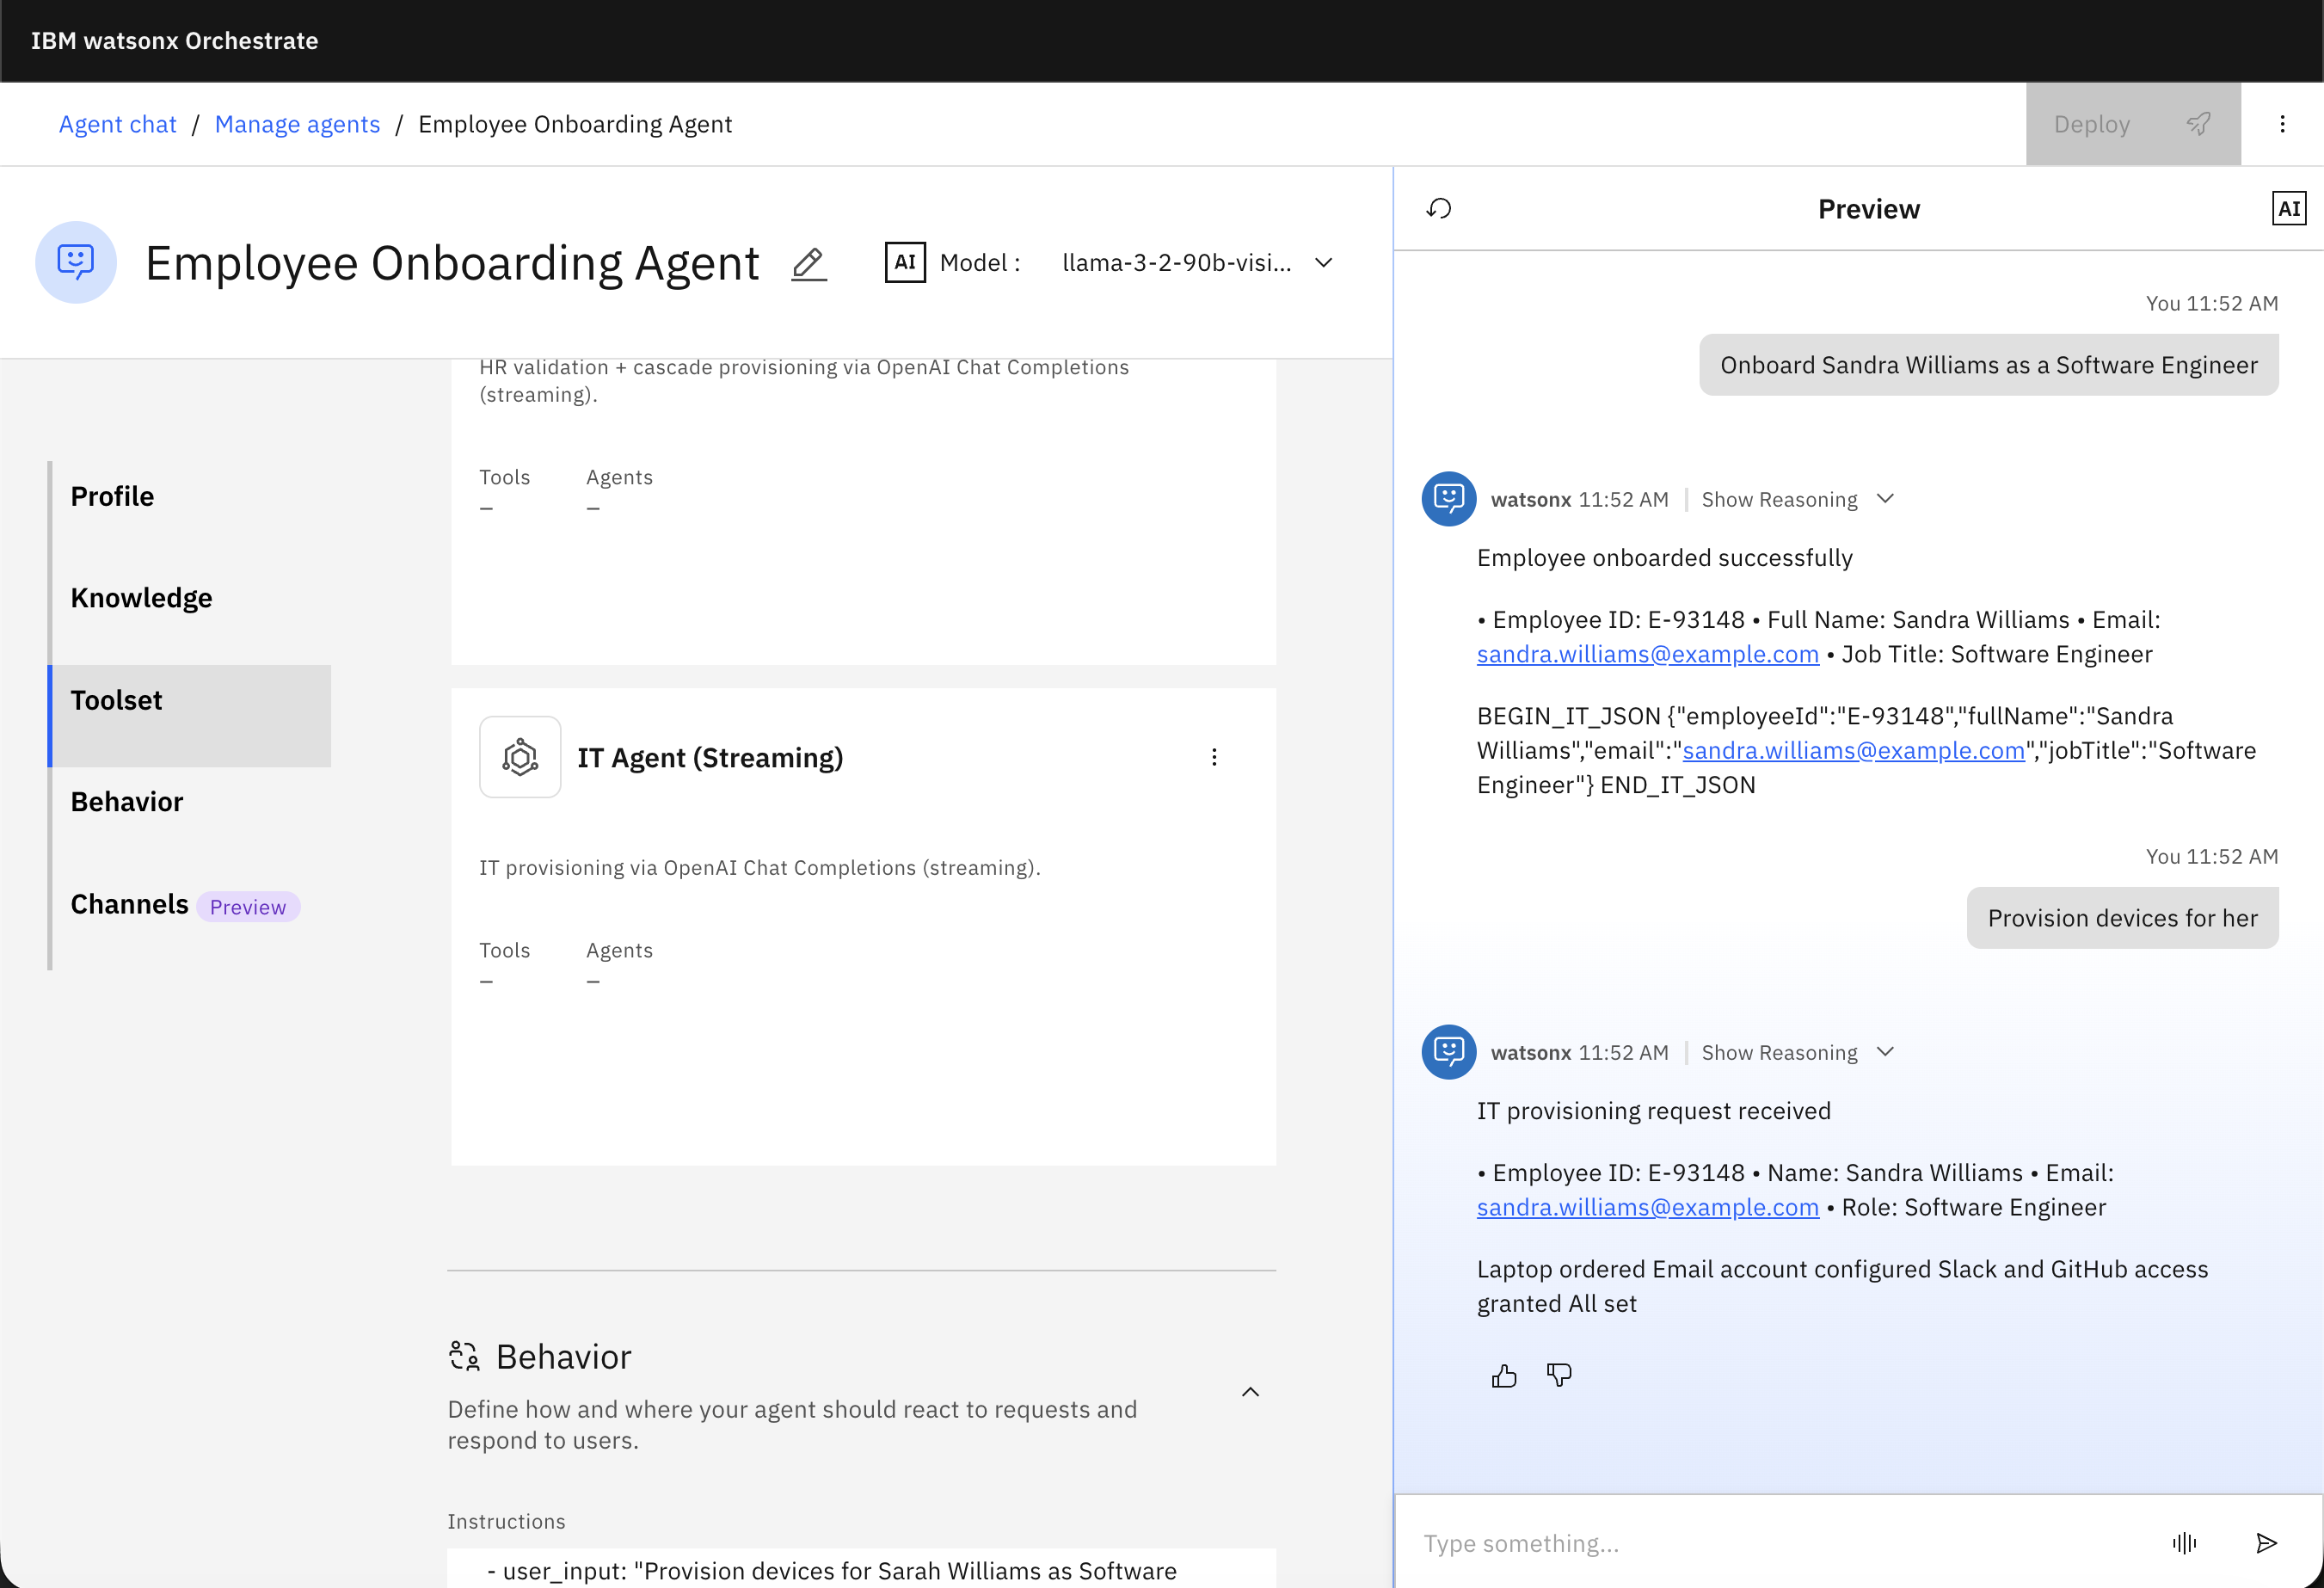
The previous image demonstrates a fully functional external agent orchestration using watsonx Orchestrate, and agents available through OpenAI API, where reasoning, data exchange, and task execution flow across independent agents. The user experiences a simple conversational interaction, while watsonx Orchestrate manages the coordination, state, and interoperability behind the scenes.
Summary
This tutorial explored how IBM watsonx Orchestrate collaborates seamlessly with external agents. Through a practical example, you built and deployed two external agents and connected them to a supervisor agent in watsonx Orchestrate. Together, they automated an onboarding scenario: the HR Agent validated new-hire details, the IT Agent provisioned the necessary resources, and the Onboarding Agent unified the results into a single response for the user.
As a natural next step, you could replace the mock logic with real enterprise integrations such as Active Directory or ServiceNow.
Acknowledgments
This tutorial was produced as part of the IBM Open Innovation community initiative: Agentic AI (AI for Developers and Ecosystem).
The authors deeply appreciate the support of Michelle corbin for reviewing and contributing to this tutorial.