About cookies on this site Our websites require some cookies to function properly (required). In addition, other cookies may be used with your consent to analyze site usage, improve the user experience and for advertising. For more information, please review your options. By visiting our website, you agree to our processing of information as described in IBM’sprivacy statement. To provide a smooth navigation, your cookie preferences will be shared across the IBM web domains listed here.
Tutorial
Build a custom RAG pipeline with Langflow and watsonx Orchestrate
A hands-on guide for designing, deploying, and integrating a visual RAG workflow to build scalable, document‑aware AI agents
Langflow is a visual interface that helps users build LangChain pipelines without writing code. watsonx Orchestrate manages AI agents and supports intelligent automation. When used together, these two tools create a strong foundation for building custom retrieval augmented generation (RAG) systems that work as enterprise conversational AI solutions.
In this step-by-step tutorial, you will learn how to build a custom RAG system by using the Langflow visual interface and connecting it to watsonx Orchestrate for agent orchestration. This tutorial explains each stage of the process, from environment setup to deployment of a production-ready conversational AI agent. After completing the tutorial, you will have the skills to create and deploy RAG pipelines that answer questions based on your organization’s documents.
In this tutorial, you will build:
- A visual RAG pipeline in Langflow: Design a document‑retrieval pipeline without writing code.
- A Model Context Protocol (MCP) wrapper: Expose your pipeline as a standardized tool.
- A watsonx Orchestrate agent: Deploy an intelligent agent that uses your custom RAG tool.
Architecture of a custom RAG system
The solution architecture contains four main components that work together to create a custom RAG system:
| Component | Description | Role in the flow |
|---|---|---|
| watsonx Orchestrate Agent | IBM agent orchestration platform with reasoning capabilities. | Receives the user question, performs reasoning, and sends a request to the MCP tool. |
| MCP Tool Wrapper | Python server that exposes the Langflow pipeline as a standardized tool. | Provides a consistent interface for the watsonx Orchestrate agent to call the RAG pipeline. |
| Langflow RAG Pipeline | Visual interface that uses drag-and-drop components to build LangChain pipelines. | Performs search, retrieval, and prompt creation in the RAG process. |
| pgvector Database | PostgreSQL extension that supports vector similarity search. | Stores document chunks and vector embeddings used during retrieval. |
The following figure shows this architecture:

- The user question is sent to the watsonx Orchestrate agent.
- The agent determines that document retrieval is required and calls the MCP Tool Wrapper.
- The MCP Tool Wrapper sends the query to the Langflow RAG pipeline.
- The Langflow RAG Pipeline sends a search request to the pgvector Database to find relevant document chunks.
- The Langflow RAG Pipeline creates an answer by using the retrieved context and an LLM.
- The agent returns the answer to the user.
When to use a custom RAG system
watsonx Orchestrate includes a built‑in Knowledge feature that supports standard RAG tasks. Use the custom approach in this tutorial when you need:
- Visual pipeline design: Build and change RAG pipelines without code by using the Langflow drag‑and‑drop interface.
- Custom retrieval strategies: Add hybrid search, reranking, or metadata filters.
- Your own vector database: Use pgvector, Pinecone, Weaviate, or other vector stores.
- Cross‑platform tools: Reuse the same pipeline across different frameworks by using MCP.
For simple document question‑and‑answer tasks that require minimal setup, use the built‑in Knowledge feature.
Prerequisites
Before you begin, make sure that you have the following software and resources installed and active:
- Docker Desktop running on your system.
- Python version 3.11, or later.
- Node.js version 18, or later.
- A running local environment of the watsonx Agent Development Kit (ADK). If you do not have an active ADK instance, review the getting started with ADK tutorial. This tutorial has been tested and validated with ADK version 1.11.0.
- A watsonx.ai API key and Project ID from IBM Cloud. For instructions, see Implementing IBM watsonx.ai (on-premises).
- An OpenAI API key from the OpenAI platform.
- Clone the code base from our GitHub repo. Open the code in VSCode or an editor of your choice and then navigate to the /
rag-langFlow-mcpdirectory. Set therag-langFlow-mcpdirectory as your current working directory.
Step 1. Set up your environment
Create an isolated Python virtual environment and install the required dependencies for the tutorial. This environment keeps your tutorial dependencies separate from other Python projects on your machine.
python3 -m venv .venv source .venv/bin/activateOn Windows, run:
.venv\Scripts\activateYour terminal prompt should show
(venv)or(.venv), which means the virtual environment is active.Install the required Python packages from the requirements.txt file.
pip install -r requirements.txtExpected output example:
Successfully installed langchain-0.1.0 pypdf-3.17.0 pgvector-0.2.4 fastmcp-0.2.0 ...The
requirements.txtfile includes packages for:- Document processing: pypdf, langchain
- Vector database support: pgvector, psycopg2
- LLM providers: openai, langchain-ibm
- MCP server: fastmcp, requests
Start the pgvector database with Docker. The docker-compose.yml file starts a PostgreSQL database with the pgvector extension enabled. This database provides vector similarity search for your RAG pipeline.
Start the pgvector database.
docker-compose up -dCheck that the container is running:
docker ps | grep pgvectorThe
rag-pgvectorcontainer should be running on port 5432.
Copy the example environment file and create your own
.envfile:cp .env.example .envOpen the
.envfile and enter the correct values for your chosen LLM provider.# Choose your LLM provider provider=openai # Change to "watsonx" if you want to use IBM watsonx.ai # If you use watsonx.ai: WATSONX_API_KEY=your_api_key_here WATSONX_PROJECT_ID=your_project_id_here # If you use OpenAI: OPENAI_API_KEY=sk-proj-your_key_here # Database connection PGVECTOR_URL=postgresql://postgres:postgres@localhost:5432/ragdbImportant: Update only the environment variables that match the provider you selected (OpenAI or watsonx). Use the same provider for the entire tutorial.
Step 2. Load sample documents
Load documents into the pgvector database. The provided script manages document loading, chunking, embedding creation, and storage.
Place your PDF or TXT files in the /data directory.
A sample document named EPA-SOER-2024-Chapter-07-Nature.pdf is available for testing. You can download it from the sample dataset directory. You may use this sample file or any other document in PDF, text, or markdown format. You can add multiple documents. All files in the
/datadirectory will be processed.Run the document loading script from the
scriptsdirectory:python scripts/load-documents.pyWhat the script does:
- Reads all documents from the
/datadirectory - Splits text into chunks (500 characters with 50 characters overlap)
- Creates embeddings by using the provider you configured (watsonx.ai or OpenAI)
Stores document chunks and vector embeddings in the pgvector database
The script uses the provider value in your
.envfile to select the correct embedding model. This keeps document loading and retrieval consistent.Expected output
✅ Loaded 1 document(s)
✅ Created 42 chunks
✅ Using watsonx.ai embeddings
✅ Documents loaded successfully!

- Reads all documents from the
Step 3: Build your RAG pipeline in Langflow
In this step, you will use the Langflow visual interface to build a complete RAG pipeline. Langflow provides a drag‑and‑drop canvas for creating LangChain workflows without writing code.
Start the Langflow server with Docker.
docker run -it -p 7860:7860 langflowai/langflow:latestWhat this command does:
docker runstarts a new container-itruns the container in interactive mode and shows logs in the terminal-p 7860:7860maps port 7860 in the container to port 7860 on your machinelangflowai/langflow:latestpulls and runs the official Langflow image
Expected output
INFO:     Started server process
INFO:     Uvicorn running on http://0.0.0.0:7860
When you see this message, Langflow is running.
Why use Docker for Langflow?
- Avoids Python dependency conflicts
- Provides a clean installation
- Easy to start and stop
- Works the same on all operating systems
Open your browser and go to:
http://localhost:7860
Create a flow.
- In the Langflow home page, click Create first flow. If you already created flows, New Flow is displayed in the sidebar.
- Langflow opens a blank canvas where you can start building your RAG pipeline.
Click the title at the top of the page to rename your flow.

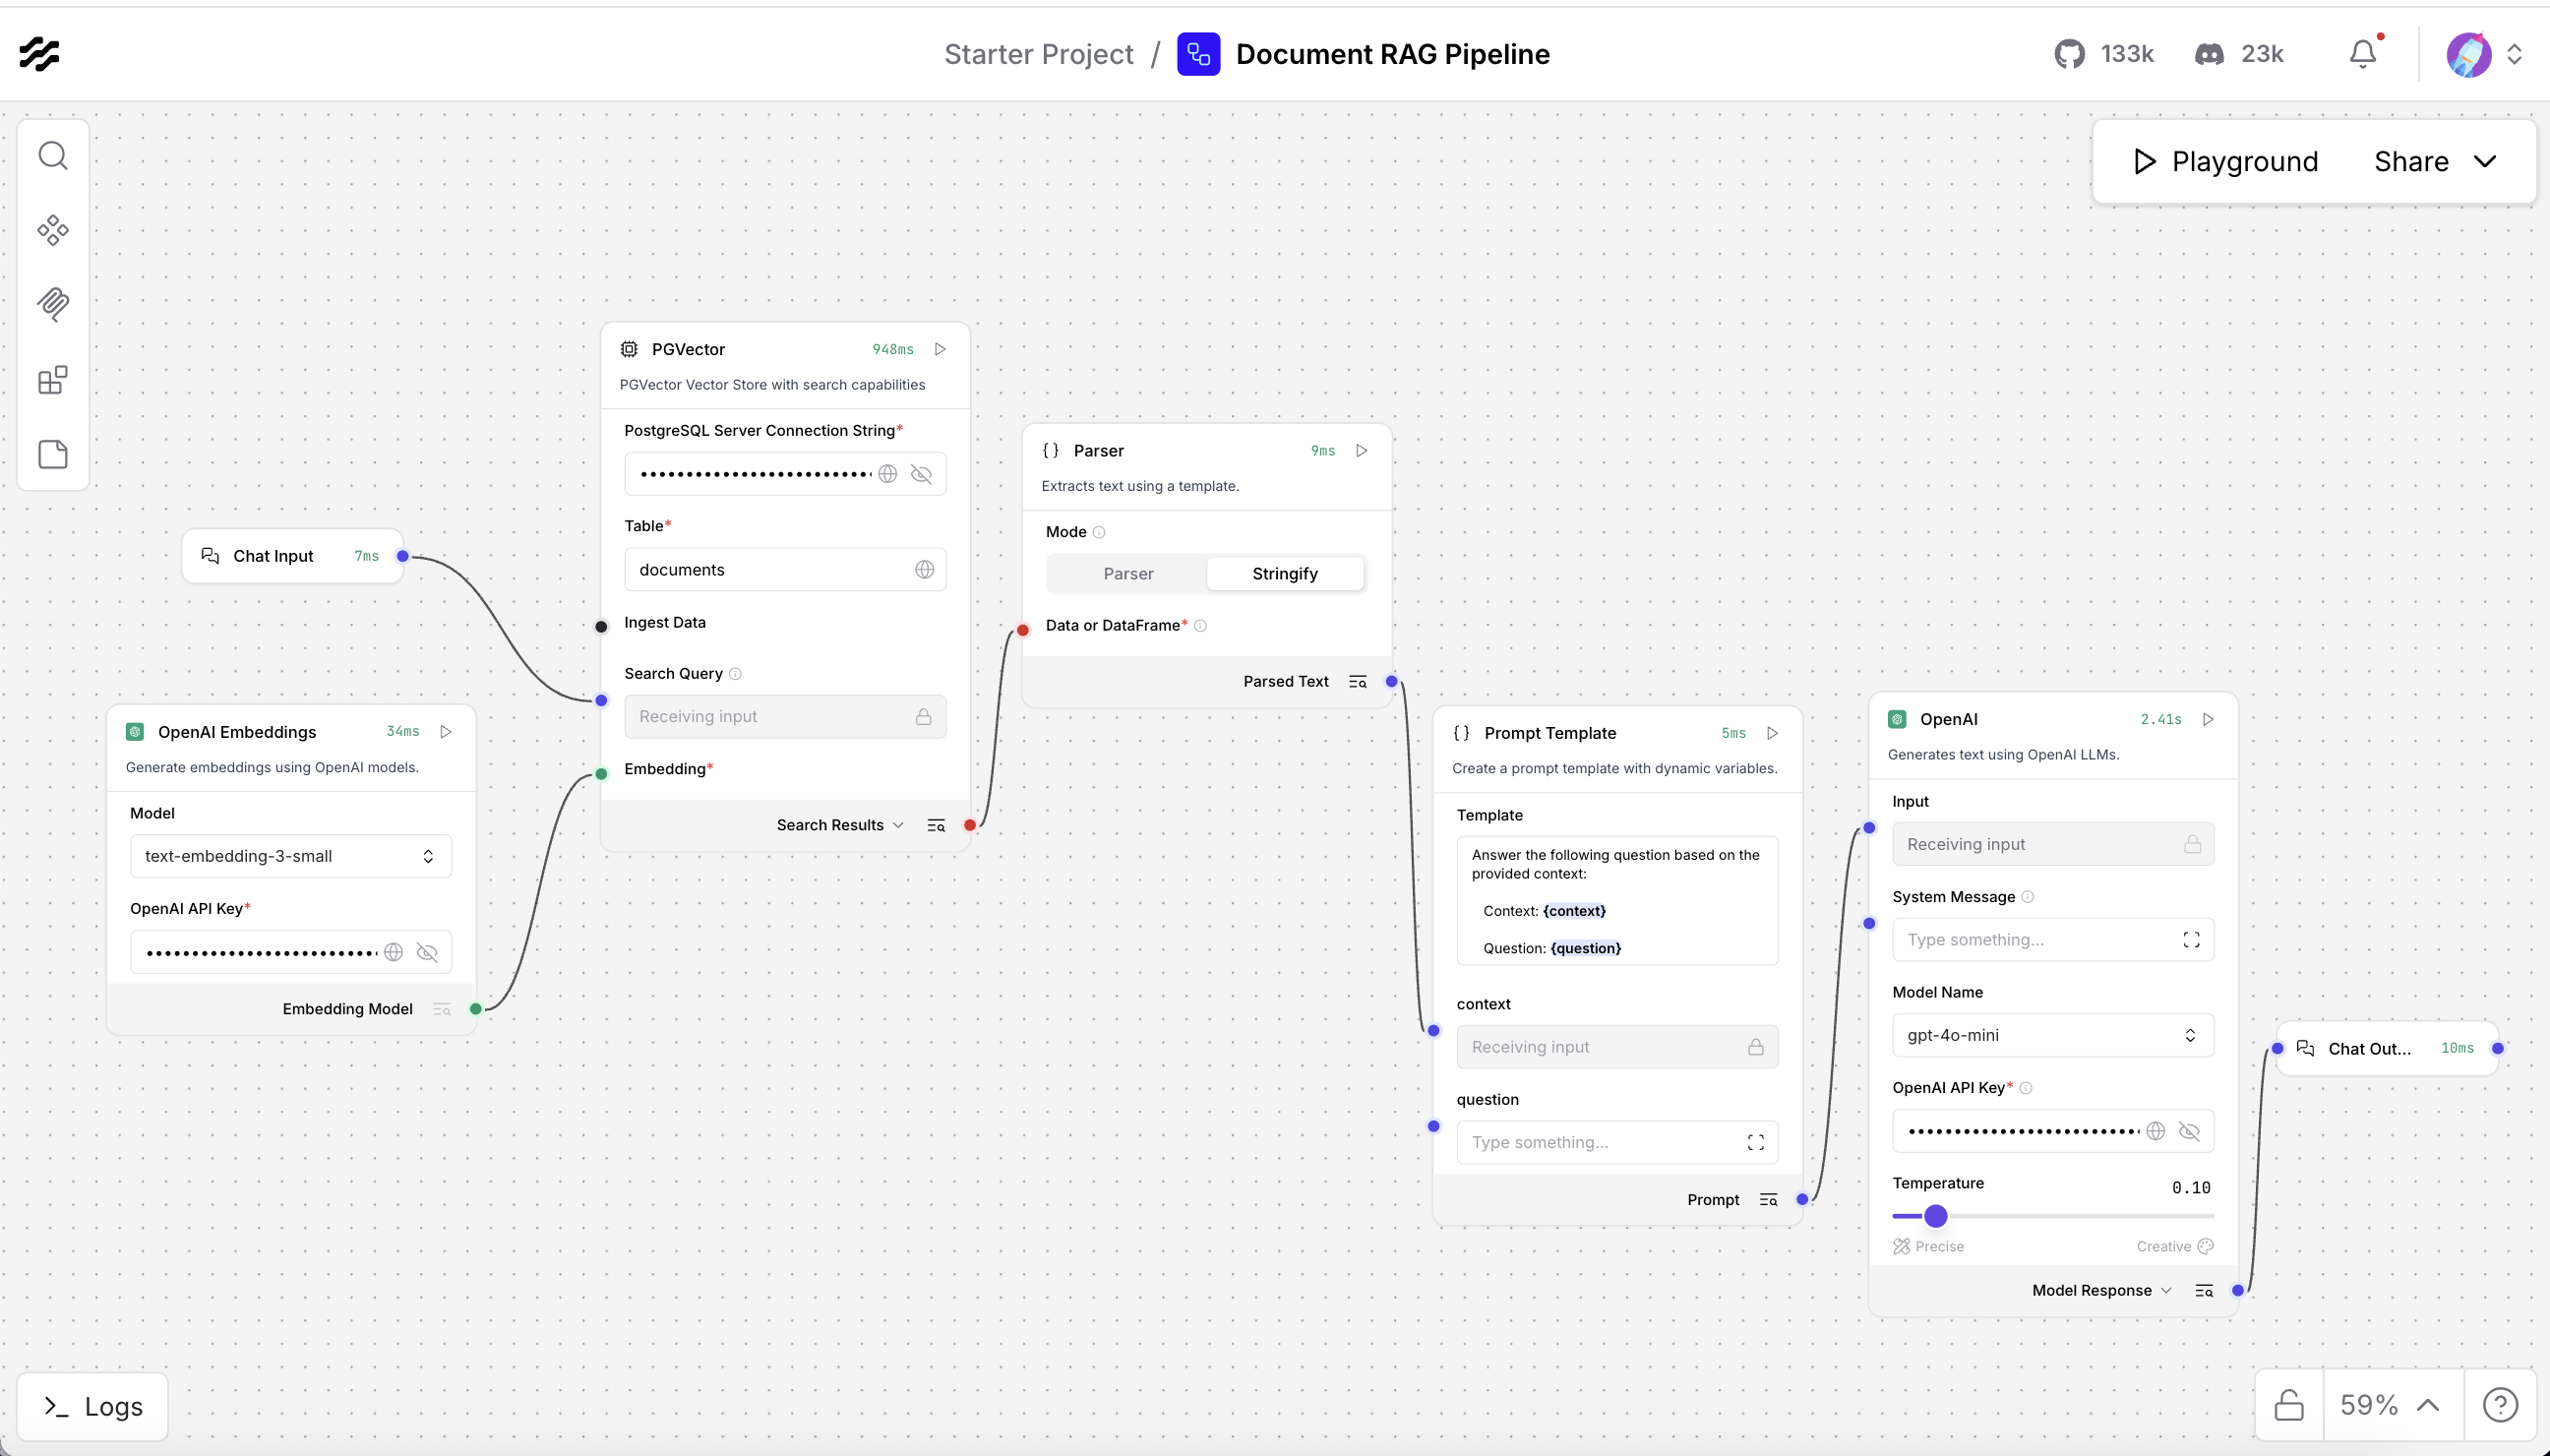
Build the RAG pipeline by adding each required component to the Langflow canvas. The pipeline follows this component sequence:
- User question (Chat input)
- Search in database (PGVector and Embeddings)
- Retrieved documents
- Format documents (Parser or Join)
- Create prompt (Prompt Template)
- Generate answer (LLM)
- Display answer (Chat Output)
Add and configure each component as follows:
Add embeddings by using the same provider that you selected in your
.envfile when you ran scripts/load-documents.py.If you set
provider=openaiin your.envfile:- Search for “OpenAI Embeddings” in the left sidebar.
- Drag OpenAI Embeddings onto the canvas.
- Configure the component:
- OpenAI API Key: your OpenAI key from the
.envfile - Model:
text-embedding-3-small
- OpenAI API Key: your OpenAI key from the
If you set
provider=watsonxin your.envfile:- Search for “watsonx embeddings”.
- Drag Watsonx Embeddings onto the canvas.
- Configure the component:
- API Key: your watsonx API key
- Project ID: your watsonx project ID
- Model:
ibm/slate-125m-english-rtrvr
Important: Use the same embedding model that you used in the document loading script. This keeps all vectors compatible.

Add the vector database and connect it to the embeddings.
- Search for “pgvector” in the left sidebar.
- Drag the PGVector component onto the canvas.
Enter the required fields, including the PostgreSQL Server Connection String.

Add a Prompt Template to format the retrieved context and the user question. Use a simple template such as:
Answer the following question based on the provided context: Context: {context} Question: {question} Answer:Use the chat output component to display the final answer from the LLM.
- Search for “chat output” in the left sidebar.
Drag the Chat Output component onto the canvas.

Now connect all components to create the full RAG pipeline. Langflow uses colored connection ports to link components.
Connection 1: Embeddings to PGVector
Connect the Embeddings output port (green dot on the right) to the PGVector Embedding input port (green dot on the left).
Connection 2: Chat Input to PGVector
Connect the Chat Input output port to the Search Query input port on PGVector. This sends the user question to the database for retrieval.
Connection 3: PGVector to Parser or Join Component
Connect the Search Results output port on PGVector to the input port on your Parser or Join component. This sends the retrieved document list to be combined into a single text block.
Connection 4: Parser or Join Component to Prompt
Connect the output port of the Parser or Join component to the context input on the Prompt component. This sends the combined document text to the prompt as a single context string.
Note: If you see the error 'ValueError: List of Data objects is not supported', set the Parser to Stringify mode, or use a Join or Combine component instead.
Connection 5: Chat Input to Prompt
Connect the Chat Input output port to the question input on the Prompt component. This sends the user question directly into the prompt template.
Connection 6: Prompt to LLM
Connect the Prompt output port to the input port on your LLM component (OpenAI or watsonx). This sends the formatted prompt, which includes both the question and the context, to the LLM for answer generation.
Connection 7: LLM to Chat Output
Connect the output port of the LLM component to the input port on the Chat Output component. This sends the LLM answer to the Chat Output so it can be shown to the user.
Test the pipeline to make sure it works correctly.
- Click Play in the Langflow interface.
- Enter a test question: What is Nature?
You should see an answer that uses the content from your documents

Note: If errors occur, check the following:
- All components are connected correctly.
- API keys are correct.
- The database is reachable through
host.docker.internal
Step 4: Export the flow and get the flow ID
Export your Langflow configuration and get the Flow ID. You will use this ID when connecting to your pipeline through the API.
Export your pipeline configuration for backup or version control.
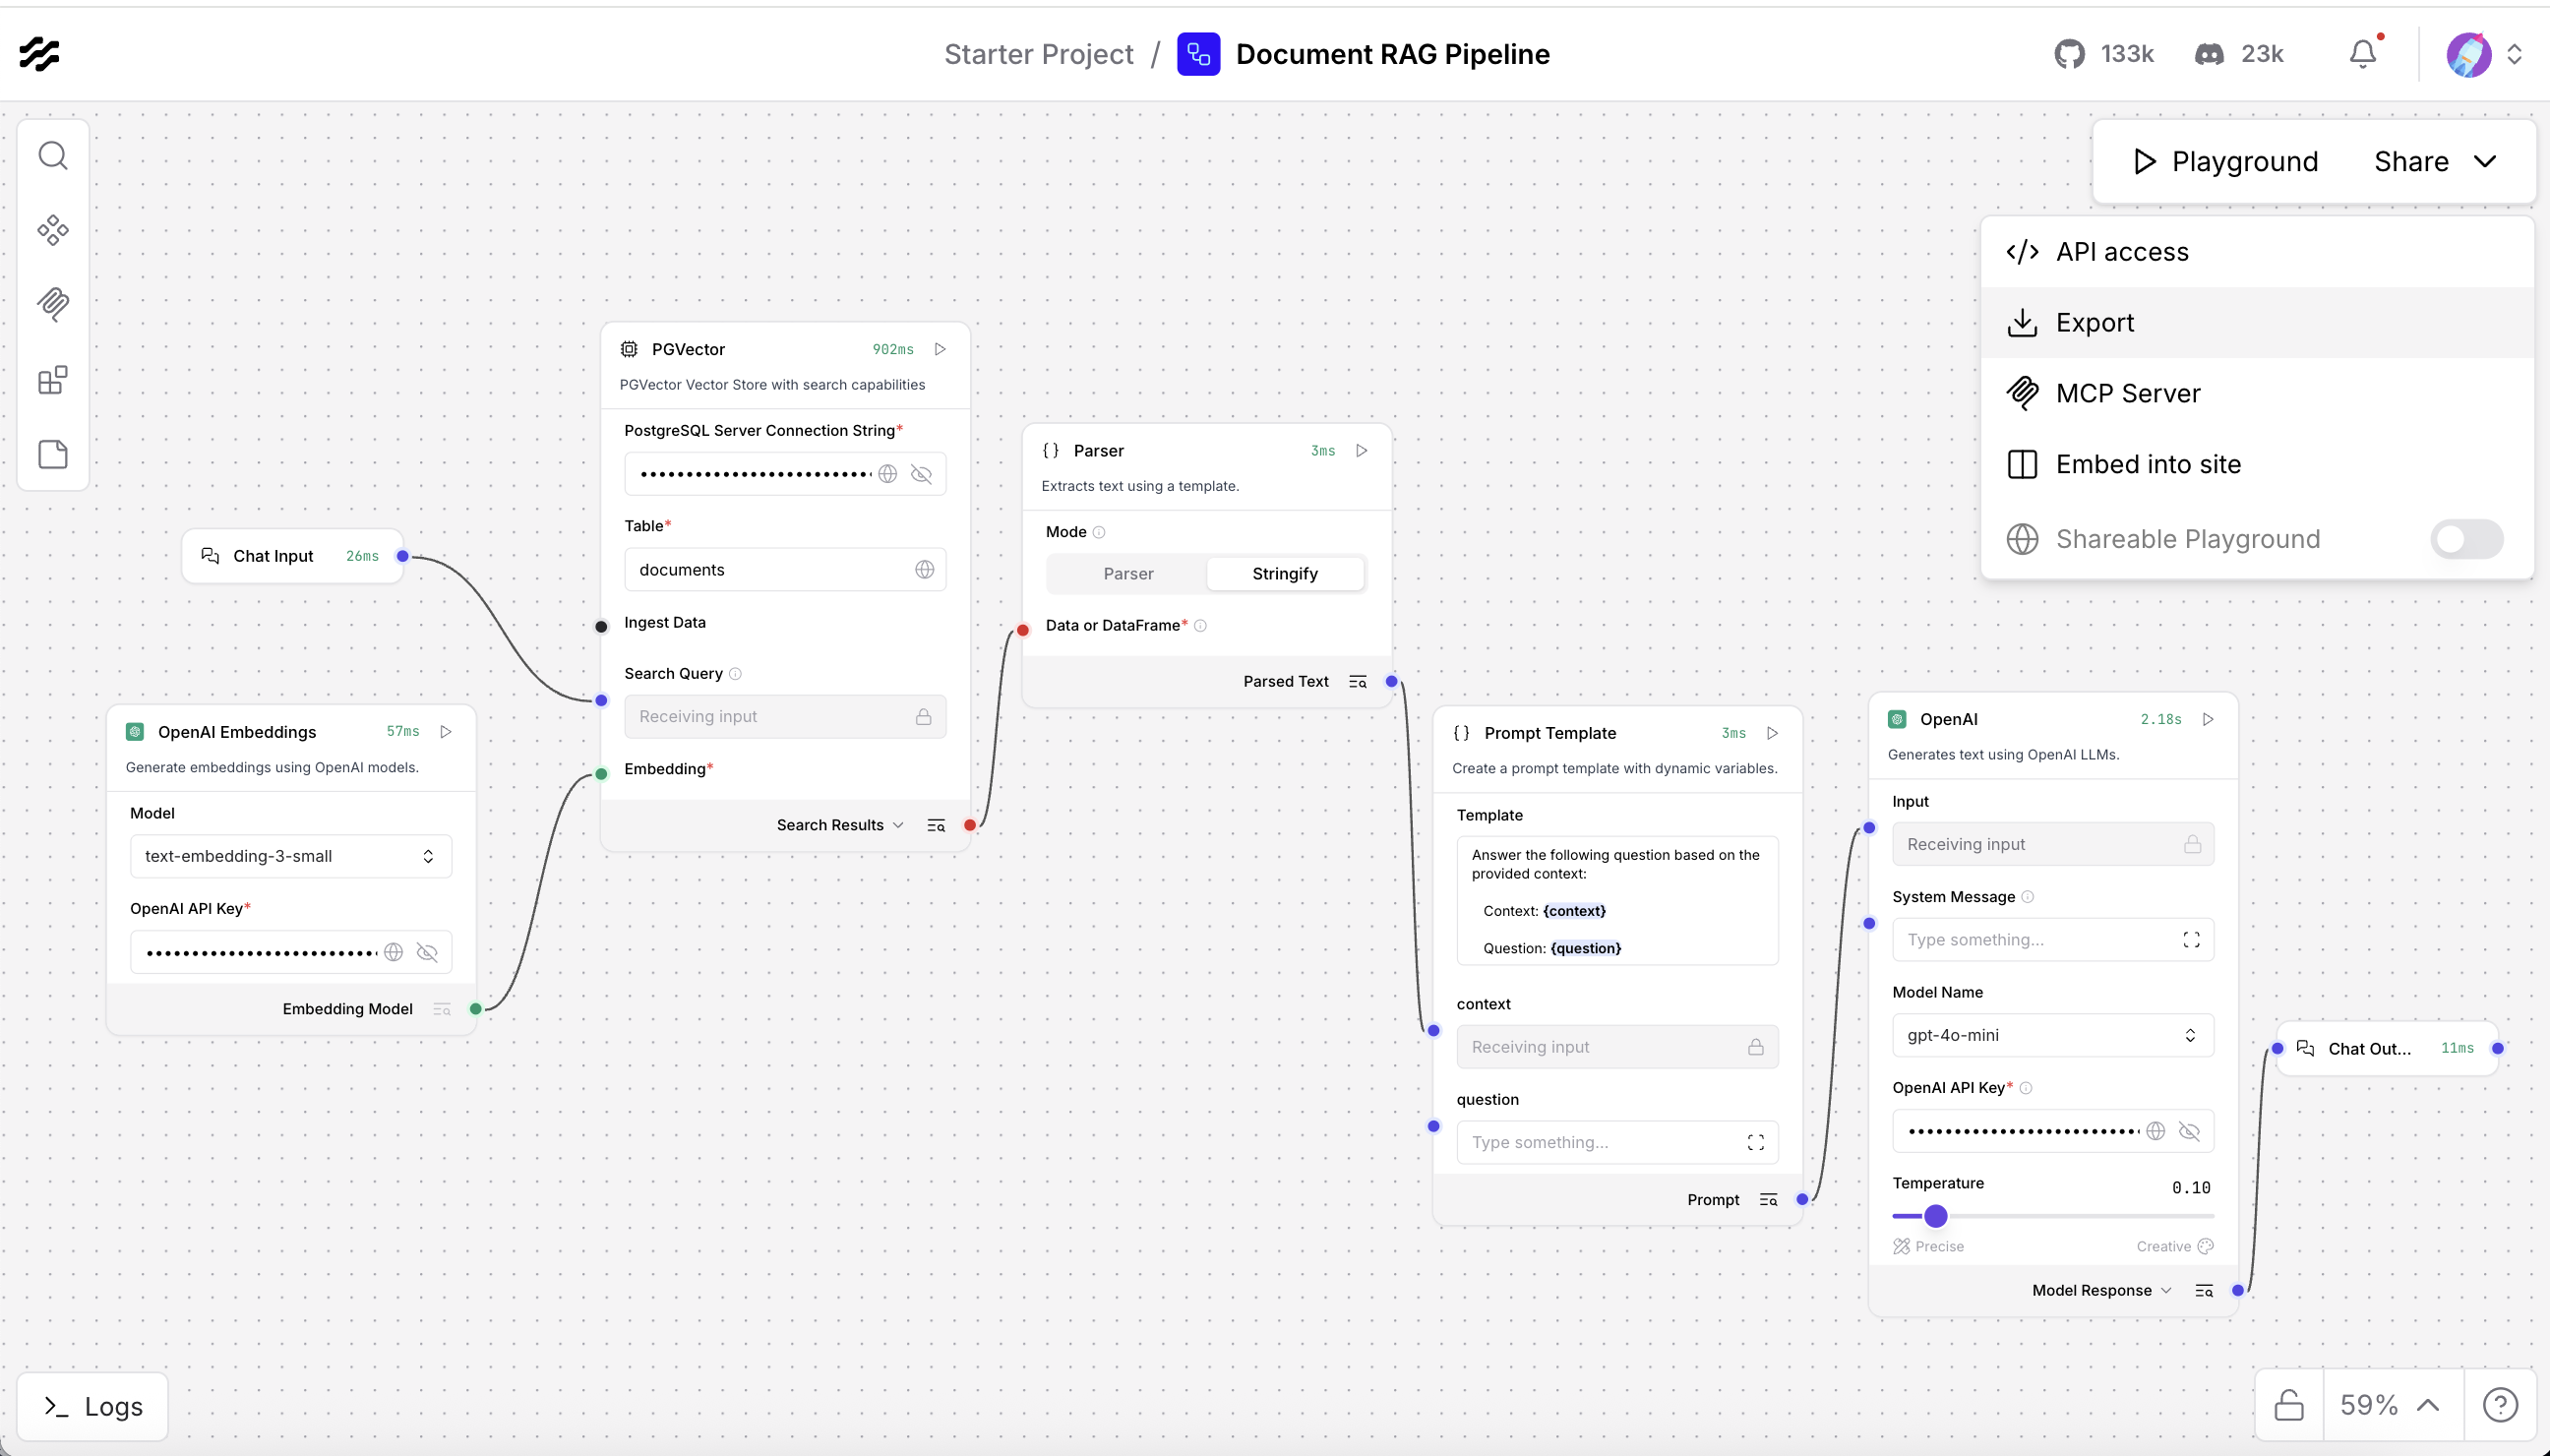
- Click Export in the upper-right of the Langflow interface.
Save the file as langflow-export.json.
This JSON file stores your complete pipeline configuration. You can import it later or share it with other users.
Get the flow ID to call your Langflow pipeline through the API.
- Click Deploy in the Langflow interface.
- Copy the Flow ID (format similar to:
abc123-def456-...). Open your
.envfile and add the flow ID.LANGFLOW_FLOW_ID=yourflowid_hereSave the
.envfile. The MCP server will use this flow ID to connect to your RAG pipeline.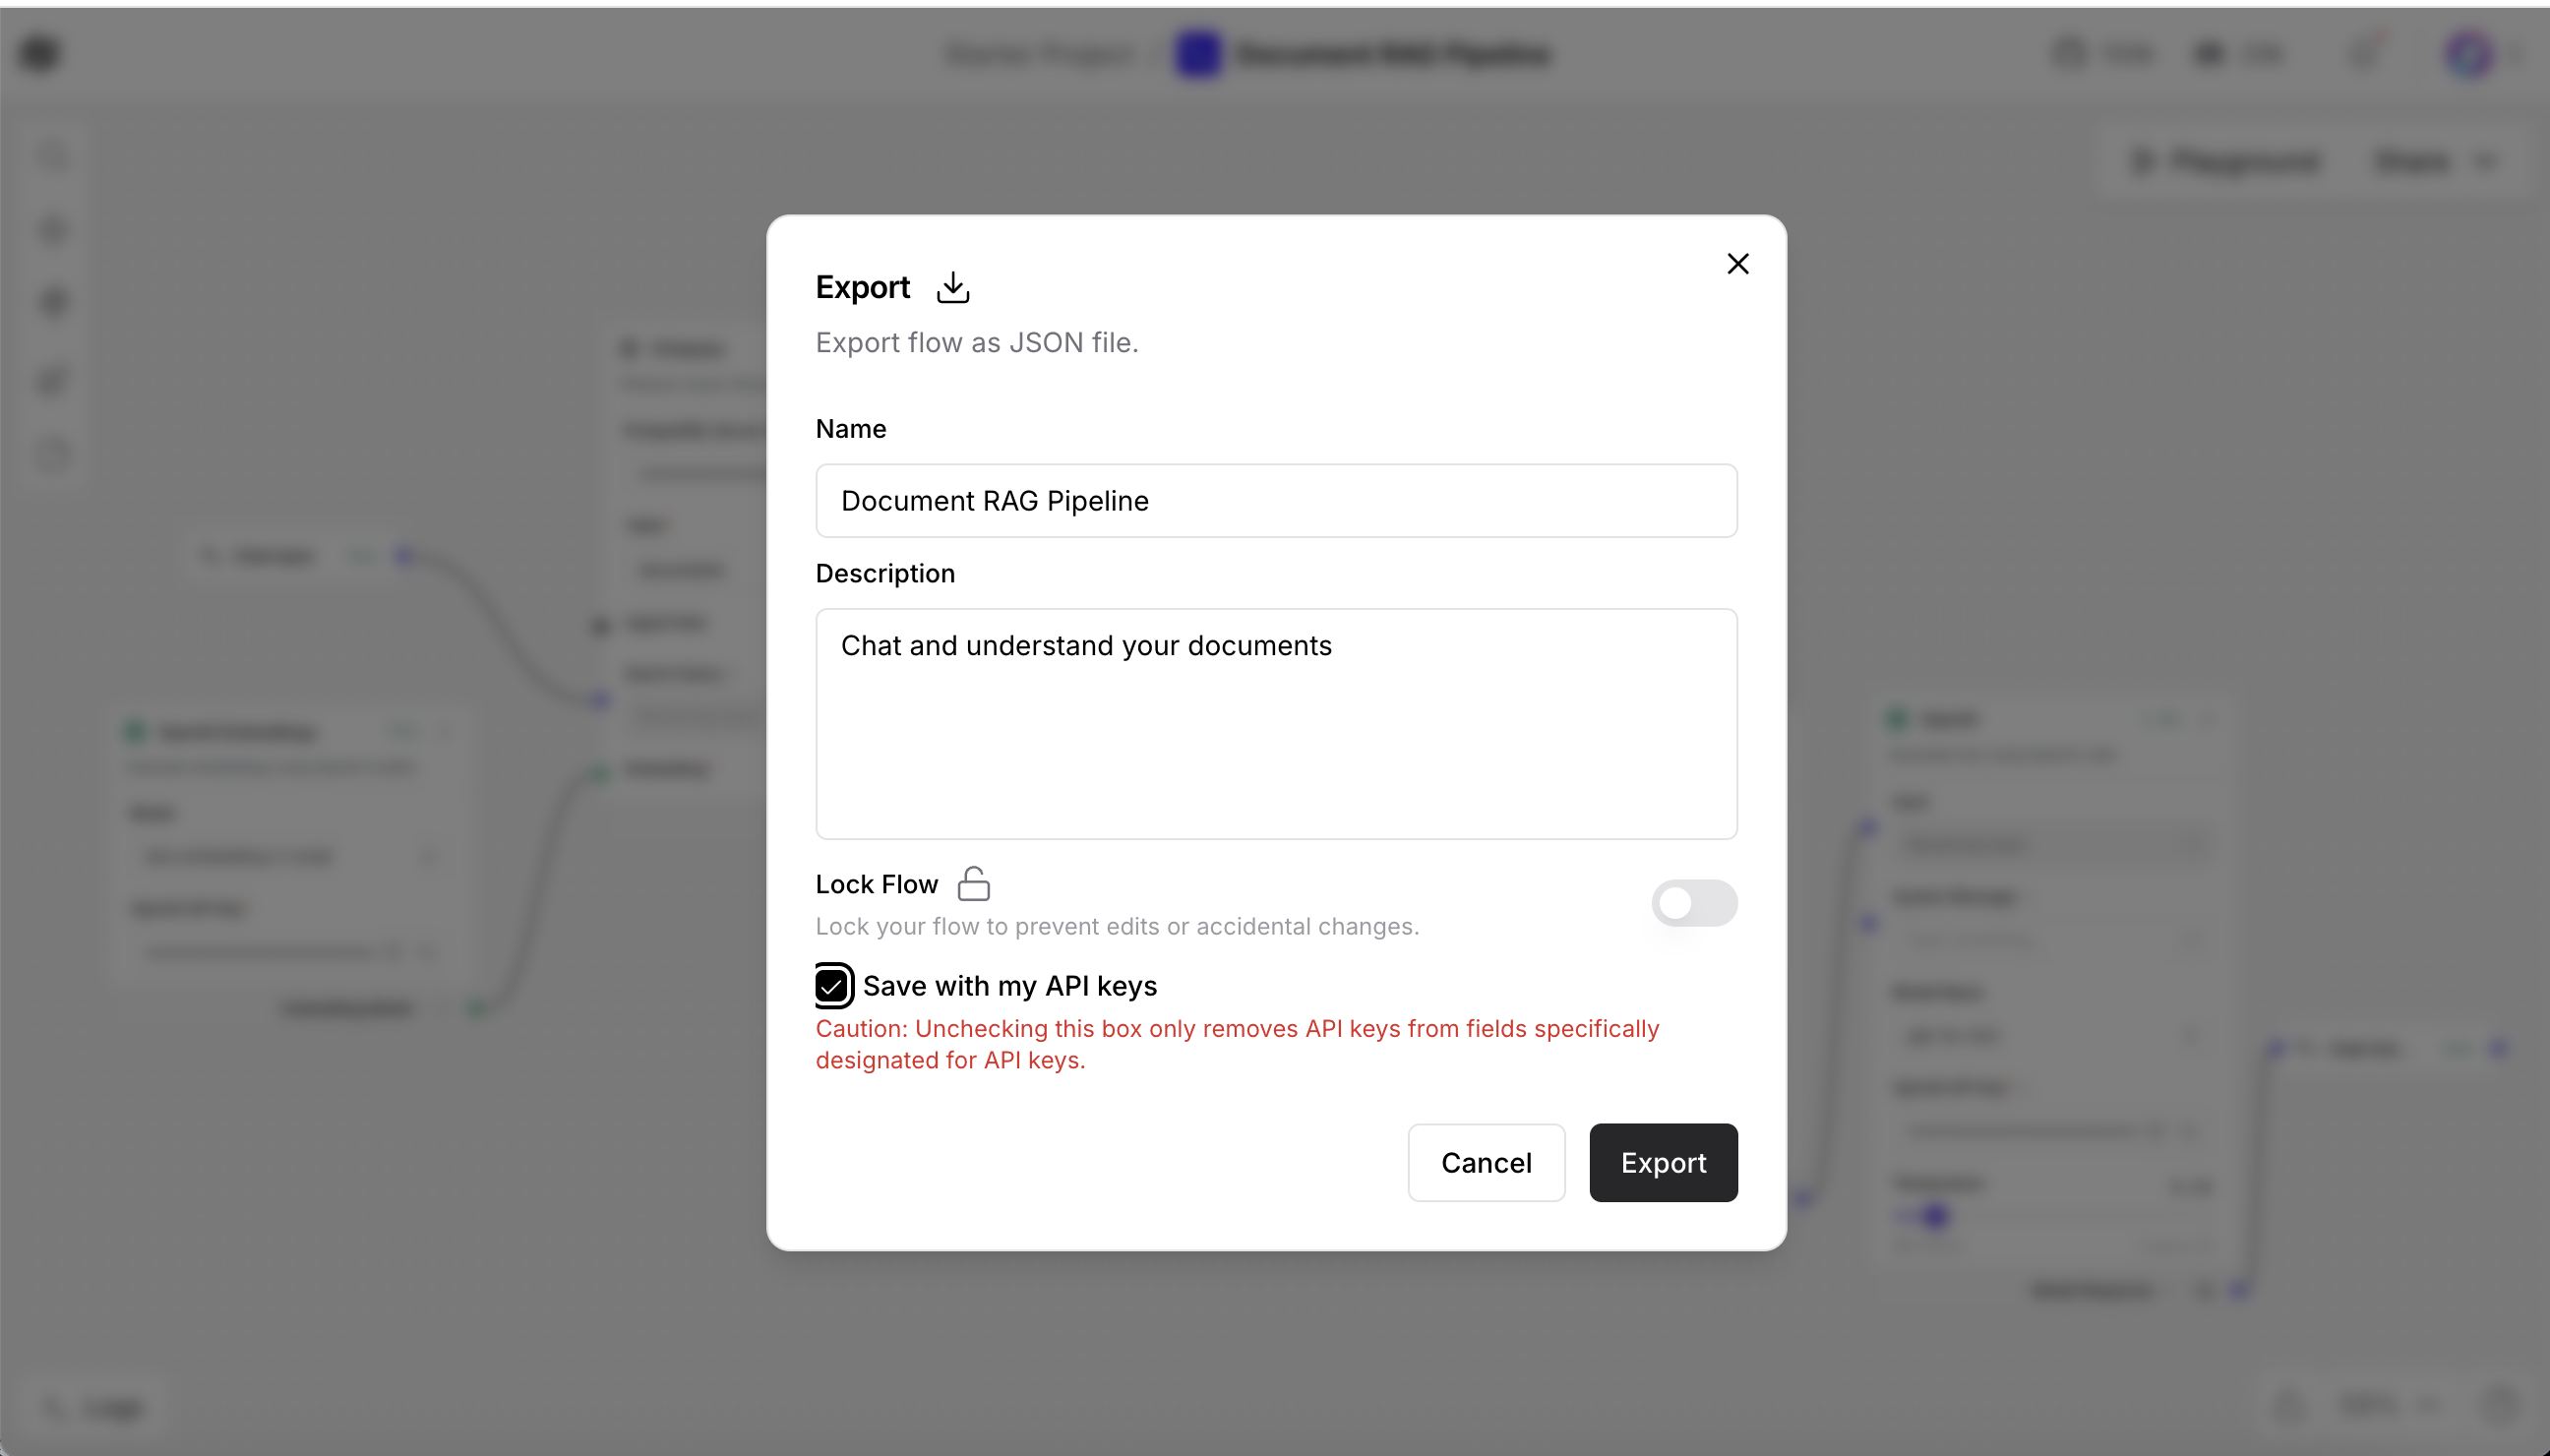
Step 5. Create the MCP tool wrapper
The MCP server exposes your Langflow pipeline as a standard tool. This tool can be used by watsonx Orchestrate or other agent frameworks.
Understand the code.
The MCP server code in mcp-server/main.py contains the following key parts:
from mcp.server.fastmcp import FastMCP import requests mcp = FastMCP("rag-tool") @mcp.tool("query_documents") async def query_documents(question: str) -> str: """Query documents using RAG pipeline""" response = requests.post( f"{LANGFLOW_URL}/run/{FLOW_ID}", json={"input_value": question} ) return response.json()["outputs"][0]["text"]This code does the following:
- Creates an MCP server named rag-tool.
- Registers a tool named query_documents.
- Sends the user question to your Langflow pipeline through an HTTP POST request.
- Returns the answer generated by your Langflow RAG pipeline.
Test the MCP server on your local machine before deploying it to watsonx Orchestrate.
Start the MCP server.
cd mcp-server python main.pyOpen another terminal and start the MCP Inspector.
npx @modelcontextprotocol/inspectorIn the Inspector interface:
- Connect to the running MCP server.
- Select the query_documents tool.
- Enter a sample question.
Confirm that you receive a response from your Langflow pipeline.

Import your custom MCP tool into watsonx Orchestrate by using the CLI or the web UI.
watsonx Orchestrate CLI (local setup)
Use the following command if your MCP server is running locally on port 8000.
orchestrate tools import --url http://localhost:8000/mcp/v1/openapi.jsonThis command imports the MCP tool definition from your running server.
watsonx Orchestrate web UI (recommended for cloud users)
Package your MCP server.
cd mcp-server zip -r ../langflow-rag-mcp.zip . cd ..Open your watsonx Orchestrate instance in a browser.
- Go to Skills → Import Toolkit.
- Choose MCP Server.
Upload your file.
- File:
langflow-rag-mcp.zip - Name:
langflow-rag - Description:
Custom RAG tool using Langflow and pgvector - Entry point:
python3 main.py
- File:
Configure the environment variables in the UI.
LANGFLOW_API_URLLANGFLOW_FLOW_IDOPENAI_API_KEYorWATSONX_API_KEY

CLI for local Orchestrate instances
If you use a local Orchestrate environment, run the following commands.
# Start local environment orchestrate env activate local# Import the toolkit orchestrate toolkits import \ --kind mcp \ --name langflow-rag \ --description "Custom RAG tool using Langflow and pgvector" \ --package-root ./mcp-server \ --command '["python3", "main.py"]'# Verify orchestrate toolkits list
Step 7. Build your agent
Create a watsonx Orchestrate agent that uses your custom RAG tool to answer questions.
Start the watsonx Orchestrate development server.
orchestrate chat startOpen the interface in your browser.
http://localhost:3000Create a new agent in the watsonx Orchestrate interface. For detailed instructions, see Develop agents with no code using watsonx Orchestrate.
- Click Create Agent.
Configure the agent with the following details:
- Name: Document Assistant
Description: Answers questions by using a custom RAG pipeline

Connect your custom RAG tool to the Document Assistant agent.
- Open the Tools tab in the agent configuration.
- Select langflow-rag from the list of available toolkits.
Enable the query_documents tool.

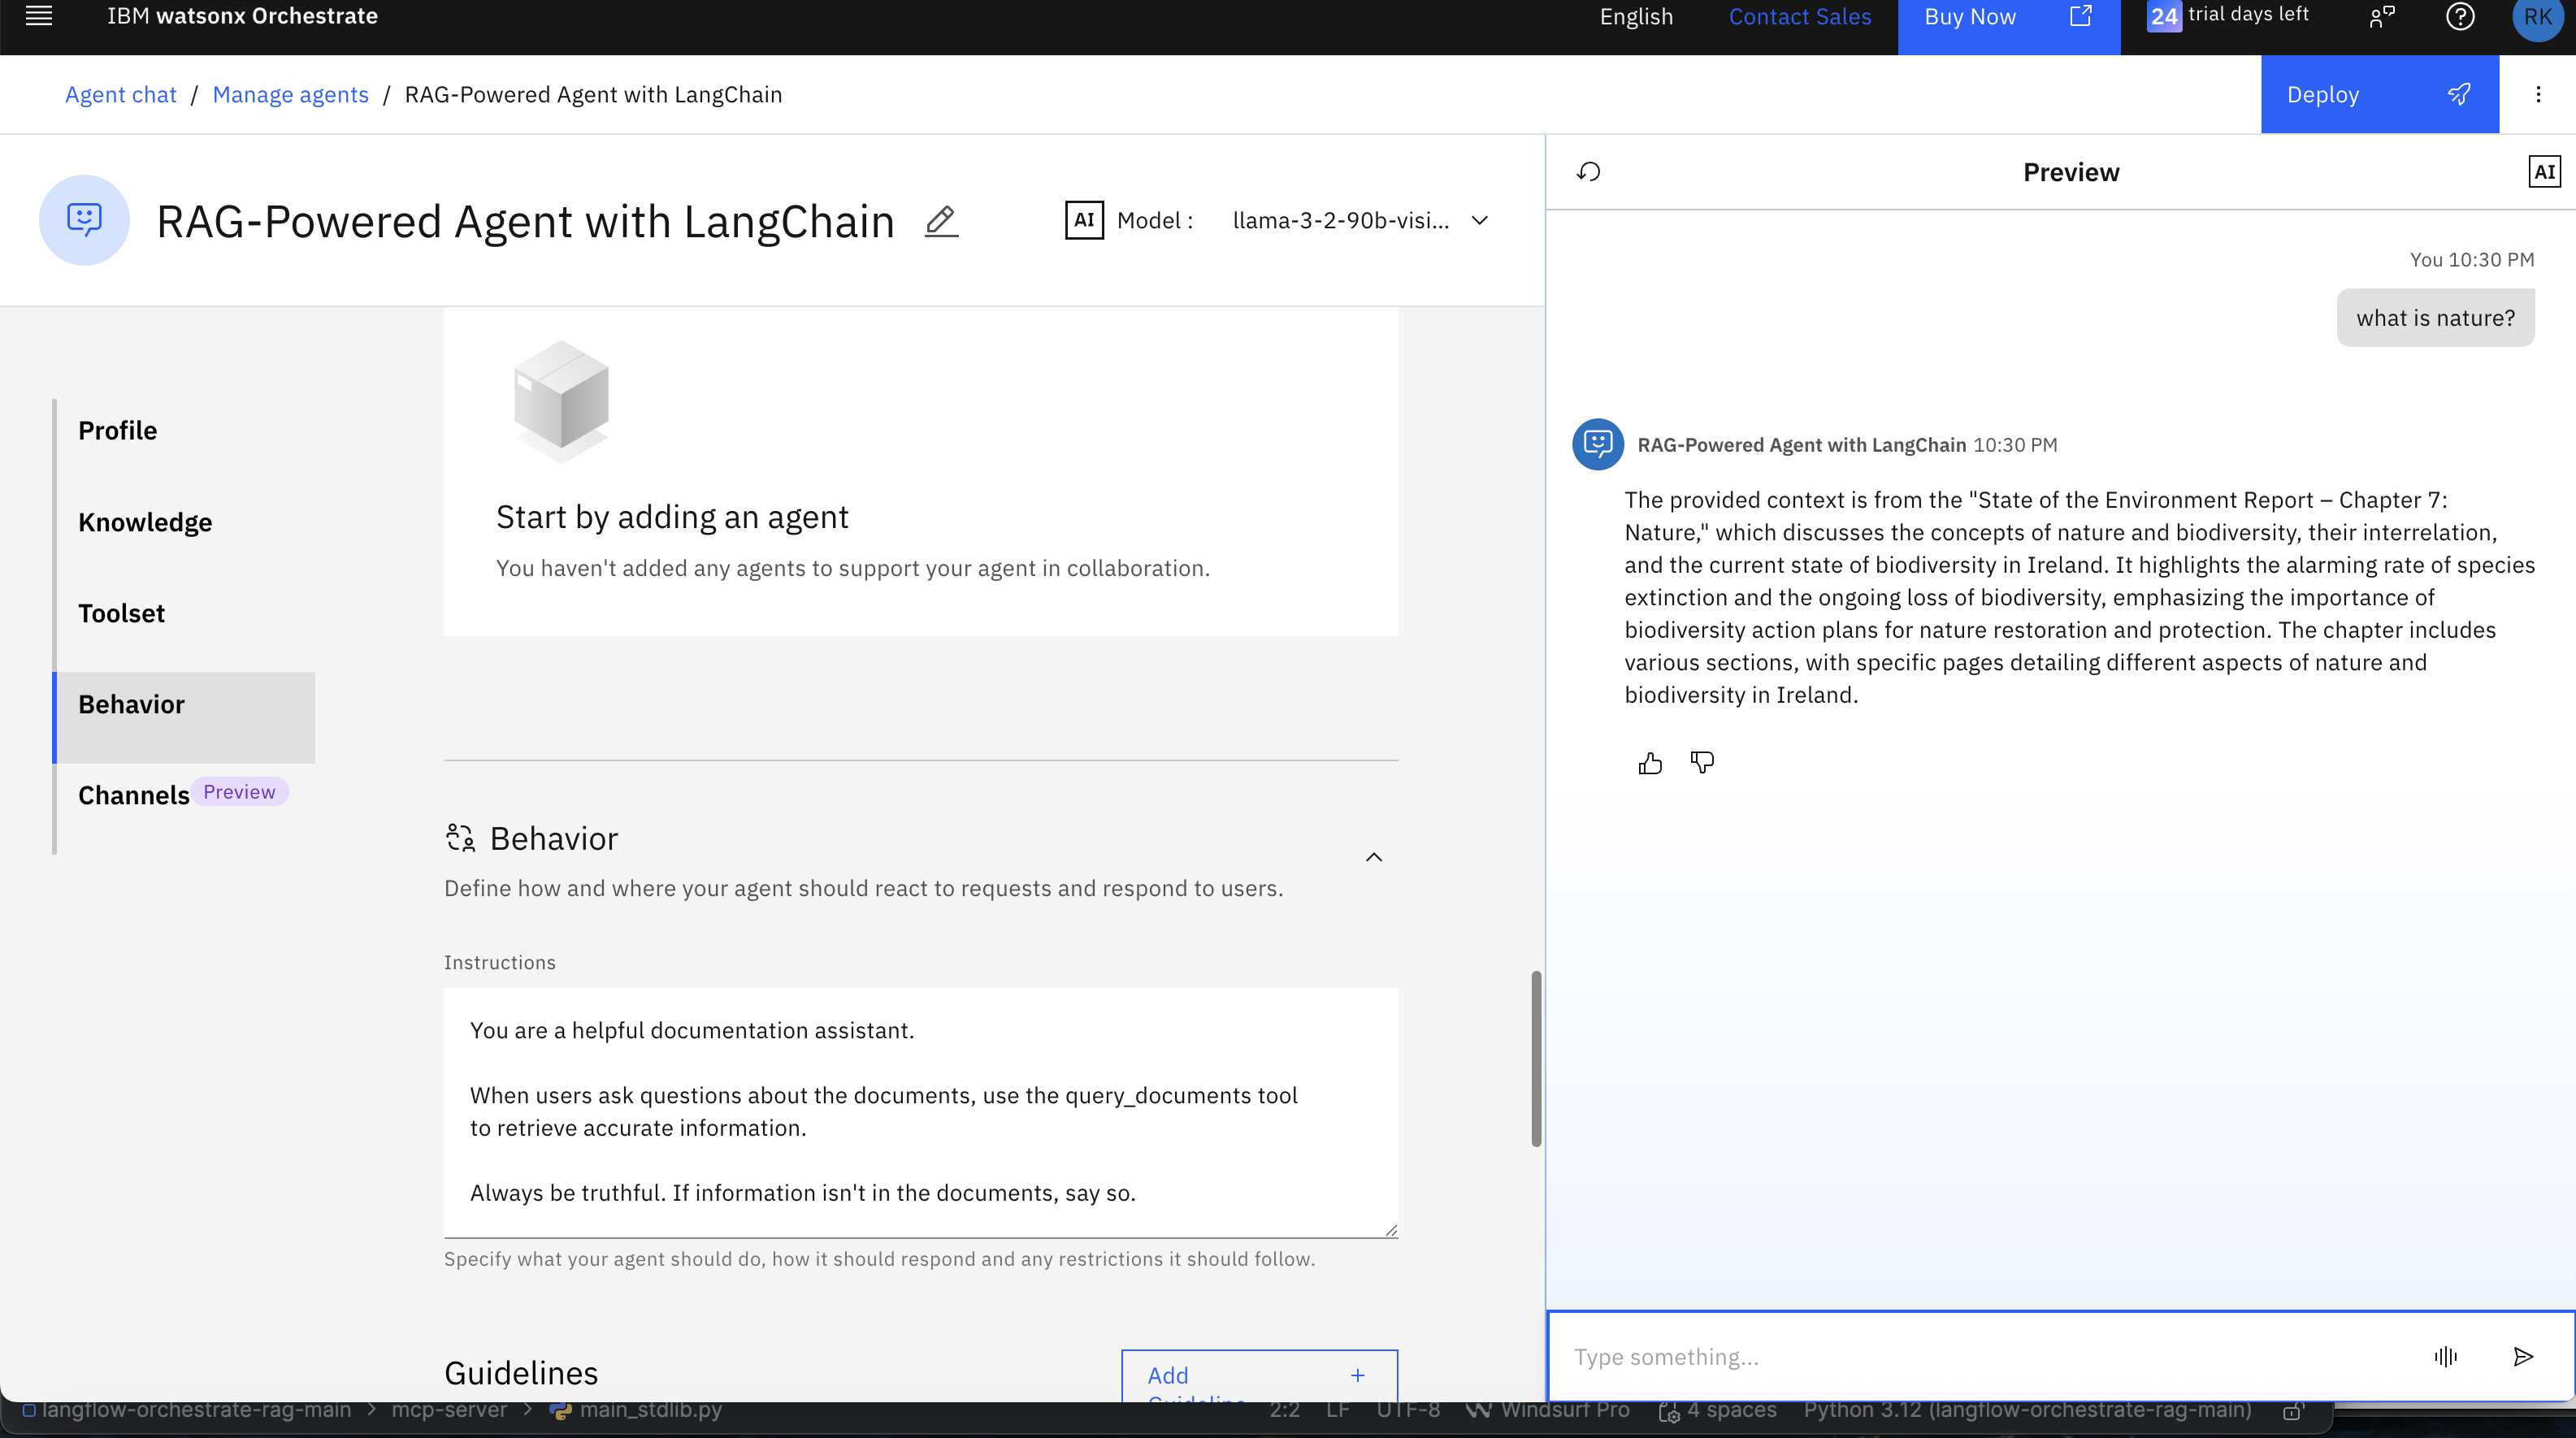
Add clear instructions to guide the agent’s behavior. Use direct and simple language:
You are a helpful documentation assistant. When users ask questions about the documents, use the query_documents tool to retrieve accurate information. Always be truthful. If the information is not in the documents, say so.These instructions tell the agent when to use the RAG tool and how to respond to users.
Step 8. Test your agent
Test your complete RAG system to confirm that everything works correctly.
Try asking questions in the watsonx Orchestrate chat interface. Use queries related to the document you loaded into the RAG pipeline.
You can also test the agent from the command line:
orchestrate agents test "RAG Agent" "What is Nature?"
The agent should decide to use the rag-tool.query_documents tool.
The agent will call your MCP server, and the MCP server will call your Langflow pipeline to generate the answer.
Note:
You can try the following enhancements to improve your RAG system and test the results with the agent you created:
- Add more documents of different types (Excel, CSV, PowerPoint, and other formats) to the
/datafolder and reload the agent. - Try different embedding models to improve retrieval quality.
- Adjust retrieval settings such as k, chunk size, and overlap to improve performance.
- Test hybrid search by using both vector search and keyword search.
- Add a reranking model to increase the relevance and accuracy of the results.
These experiments will help you build a deeper understanding of RAG techniques for creating your next agent.
Summary and next steps
In this tutorial, you built a complete RAG system. You set up the development environment, created embeddings, stored document vectors, and deployed an agent that can answer questions by using your custom RAG pipeline.
You learned how:
- Langflow provides a visual and modular way to build RAG pipelines.
- The MCP protocol allows tools to work across different agent frameworks.
- watsonx Orchestrate adds reasoning and connects tools into a working agent.
- pgvector enables fast and efficient similarity search for document retrieval.
These parts work together to show how modular AI systems can combine reasoning, retrieval, and orchestration to create strong, flexible, and production‑ready solutions.
Acknowledgments
This tutorial was produced as part of the IBM Open Innovation Community initiative: Agentic AI (AI for Developers and Ecosystem).
The authors deeply appreciate the support of Ela Dixit and Bindu Umesh for reviewing and contributing to this tutorial.