About cookies on this site Our websites require some cookies to function properly (required). In addition, other cookies may be used with your consent to analyze site usage, improve the user experience and for advertising. For more information, please review your options. By visiting our website, you agree to our processing of information as described in IBM’sprivacy statement. To provide a smooth navigation, your cookie preferences will be shared across the IBM web domains listed here.
Tutorial
Building AI applications with Model Context Protocol (MCP)
Learn how to build context-aware AI applications using MCP with Granite models
On this page
Large language models (LLMs) have transformed how developers build applications, but they face a fundamental limitation: they operate in isolation from the data and tools that make applications truly useful. Whether it's accessing your company's database, reading files from your filesystem, or connecting to APIs, LLMs need a standardized way to interact with external systems.
The Model Context Protocol (MCP) addresses these limitations by providing a standardization layer for AI agents to be context-aware while integrating with the data and tools. Learn more about what MCP is, its client-server architecture components, and its real-world benefits in this “What is MCP?” article or in the MCP docs.
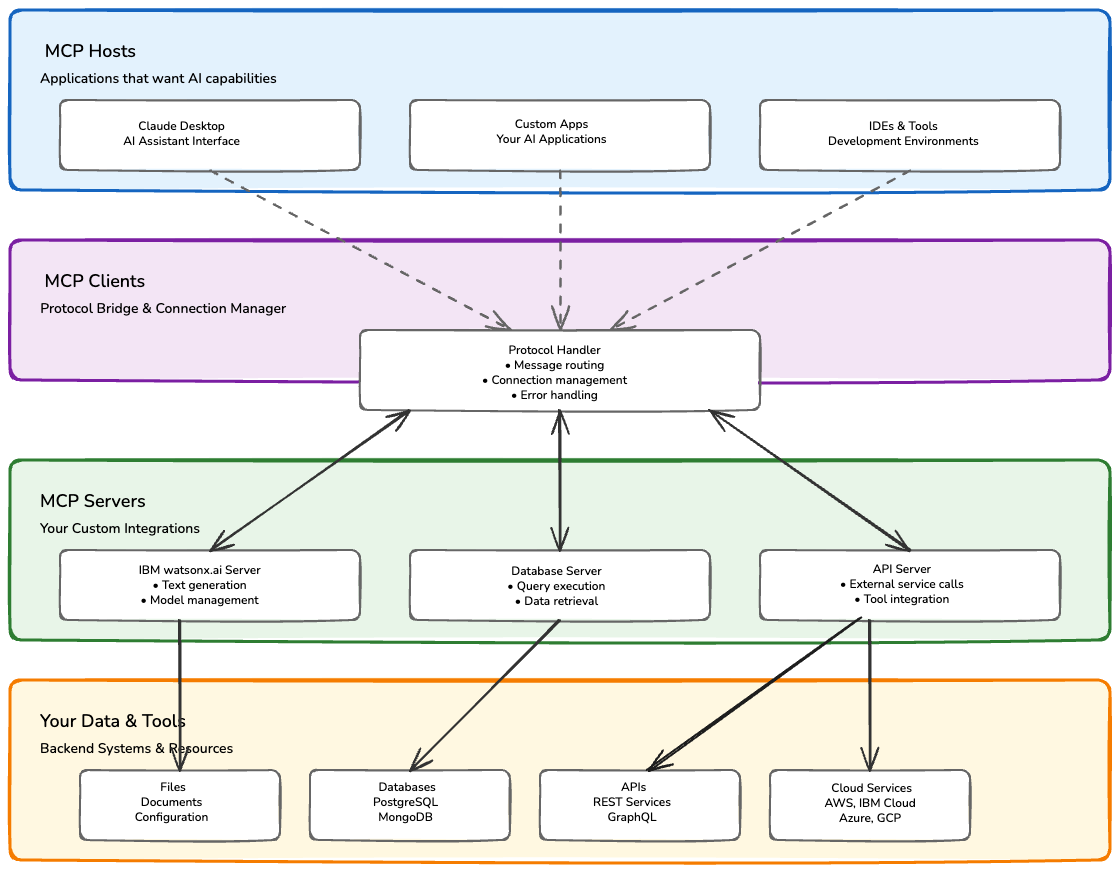
The following figure shows the typical MCP architecture, with MCP hosts, MCP clients, MCP servers, and your own data and tools.
In this comprehensive tutorial, we'll explore MCP and learn how to build a production-ready integration with IBM watsonx.ai, demonstrating how to create AI applications that can seamlessly connect to enterprise data and services.
Prerequisites
Before we begin, ensure you have:
- IBM Cloud account with watsonx.ai access. Register for a free trial of watsonx.ai.
- Python 3.8+ installed
- IBM Cloud API key, which you create from the IAM dashboard (create one here)
- A watsonx.ai project ID, which you can find it in your project settings
- Claude Desktop
You can find the code used in this tutorial in our GitHub repo.
Steps
Step 1. Set up your environment
Let’s create a directory for this experiment and install the essential packages.
# Create project directory
mkdir ibm-watsonx-mcp-tutorial
cd ibm-watsonx-mcp-tutorial

# Create Python virtual environment
python -m venv venv
source venv/bin/activate  # On Windows: venv\Scripts\activate

# Install required packages
pip install ibm-watsonx-ai==1.3.23
pip install mcp
pip install python-dotenv
Step 2. Configure credentials for watsonx.ai
Create a .env file with your IBM watsonx.ai credentials.
# .env - IBM watsonx.ai Configuration
WATSONX_APIKEY=your-ibm-cloud-api-key
WATSONX_URL=https://us-south.ml.cloud.ibm.com
WATSONX_PROJECT_ID=your-project-id-from-watsonx-studio
Add this .env file to .gitignore to avoid an unnecessary upload of it to the GitHub repo.
echo ".env" >> .gitignore
echo "venv/" >> .gitignore
echo "__pycache__/" >> .gitignore
Step 3. Implement the MCP server using watsonx.ai
We are going to build an MCP Server using watsonx.ai, which provides MCP integration with IBM's enterprise foundation models, like Granite. We will use the Anthropic MCP specification and the watsonx.ai Python SDK.
First, create ibm_watsonx_mcp_server.py. We will step you through the code in this file, but you can review this entire sample file in our GitHub repo.
This script starts with importing the necessary modules and creating a logging mechanism.
"""
"""
Importing the modules and creating a logging mechanism

import json
import logging
import os
from typing import Dict, Any
from dotenv import load_dotenv

# MCP imports - using FastMCP for simplified development
from mcp.server.fastmcp import FastMCP

# IBM watsonx.ai imports
from ibm_watsonx_ai import APIClient, Credentials
from ibm_watsonx_ai.foundation_models import ModelInference
from ibm_watsonx_ai.foundation_models.utils.enums import ModelTypes
from ibm_watsonx_ai.metanames import GenTextParamsMetaNames as GenParams

# Configure logging
logging.basicConfig(level=logging.INFO)
logger = logging.getLogger(__name__)

# Load environment variables
load_dotenv()
Then, the script reads the keys from the environment variables and configures an instance of watsonx.ai.
# IBM watsonx.ai configuration
WATSONX_APIKEY = os.getenv("WATSONX_APIKEY")
WATSONX_URL = os.getenv("WATSONX_URL")
WATSONX_PROJECT_ID = os.getenv("WATSONX_PROJECT_ID")

def validate_credentials():
    """Validate IBM watsonx.ai credentials"""
    required_vars = [
        ("WATSONX_APIKEY", WATSONX_APIKEY),
        ("WATSONX_URL", WATSONX_URL),
        ("WATSONX_PROJECT_ID", WATSONX_PROJECT_ID)
    ]

    missing_vars = [name for name, value in required_vars if not value]
    if missing_vars:
        raise ValueError(
            f"Missing required IBM credentials: {', '.join(missing_vars)}\n"
            "Please set these in your .env file"
        )

    logger.info("IBM credentials validated successfully")

# Validate credentials on startup
validate_credentials()

# Initialize IBM API client
credentials = Credentials(api_key=WATSONX_APIKEY, url=WATSONX_URL)
api_client = APIClient(credentials)
Next, we define the large language model (LLM) that we want to use in this application, which can be any one from watsonx.ai.
# Available IBM models
AVAILABLE_MODELS = {
    "granite-13b-instruct": ModelTypes.GRANITE_13B_INSTRUCT_V2,
    "granite-13b-chat": ModelTypes.GRANITE_13B_CHAT_V2,
    "llama-3-8b-instruct": ModelTypes.LLAMA_3_8B_INSTRUCT,
    "mistral-large": ModelTypes.MISTRAL_LARGE_2407_INSTRUCT
}
Now, the most important step is to create the MCP server and define the tools and resources.
# Create the FastMCP server
mcp = FastMCP("IBM watsonx.ai MCP Server")

logger.info("IBM watsonx.ai MCP Server initialized successfully")

# === MCP TOOLS ===
# Tools allow LLMs to perform actions through our server

@mcp.tool()
def generate_text(
    prompt: str,
    model_name: str = "granite-13b-instruct",
    max_tokens: int = 200,
    temperature: float = 0.7
) -> Dict[str, Any]:
    """
    Generate text using IBM watsonx.ai foundation models

    This tool demonstrates how MCP enables LLMs to call external services.
    The LLM can request text generation, and our server handles the
    IBM watsonx.ai API integration.

    Args:
        prompt: Text prompt for generation
        model_name: IBM model to use (granite-13b-instruct, etc.)
        max_tokens: Maximum tokens to generate (1-4000)
        temperature: Sampling temperature (0.0-2.0)

    Returns:
        Dictionary with generated text and metadata
    """
    try:
        # Get model ID
        model_id = AVAILABLE_MODELS.get(model_name, ModelTypes.GRANITE_13B_INSTRUCT_V2)

        # Configure generation parameters
        generation_params = {
            GenParams.MAX_NEW_TOKENS: max_tokens,
            GenParams.TEMPERATURE: temperature,
            GenParams.TOP_P: 0.9,
            GenParams.TOP_K: 50
        }

        # Initialize IBM model inference
        model = ModelInference(
            model_id=model_id,
            params=generation_params,
            credentials=credentials,
            project_id=WATSONX_PROJECT_ID
        )

        # Generate response using IBM watsonx.ai
        response = model.generate_text(prompt=prompt)

        return {
            "generated_text": response,
            "model_used": model_name,
            "model_id": model_id,
            "prompt_tokens": len(prompt.split()),
            "completion_tokens": len(response.split()) if response else 0,
            "status": "success"
        }

    except Exception as e:
        logger.error(f"❌ IBM watsonx.ai generation error: {e}")
        return {
            "error": str(e),
            "model_used": model_name,
            "status": "error"
        }

@mcp.tool()
def analyze_sentiment(text: str) -> Dict[str, Any]:
    """
    Analyze sentiment using IBM Granite models

    This demonstrates chaining MCP tools - this tool uses the generate_text
    tool internally with a specialized prompt for sentiment analysis.
    """
    prompt = f"""
Analyze the sentiment of the following text:

Text: "{text}"

Provide:
1. Overall sentiment (positive, negative, neutral)
2. Confidence score (0-1)
3. Key phrases that influenced the sentiment
4. Brief explanation

Format as structured analysis.
"""

    result = generate_text(
        prompt=prompt,
        model_name="granite-13b-instruct",
        max_tokens=300,
        temperature=0.3
    )

    if result["status"] == "success":
        return {
            "text_analyzed": text,
            "sentiment_analysis": result["generated_text"],
            "model_used": "IBM Granite 13B Instruct",
            "status": "success"
        }
    else:
        return result

# === MCP RESOURCES ===
# Resources provide data that can be included in LLM context

@mcp.resource("ibm://models/available")
def get_available_models() -> str:
    """
    Resource: List of available IBM watsonx.ai models

    This resource allows LLMs to discover what models are available
    in our IBM watsonx.ai environment.
    """
    try:
        model_info = {}
        for model_name, model_type in AVAILABLE_MODELS.items():
            try:
                specs = api_client.foundation_models.get_model_specs(model_type)
                model_info[model_name] = {
                    "model_id": model_type,
                    "description": specs.get("short_description", "IBM Foundation Model"),
                    "supported_tasks": specs.get("supported_tasks", []),
                    "provider": "IBM"
                }
            except Exception as e:
                logger.warning(f"Could not get specs for {model_name}: {e}")
                model_info[model_name] = {
                    "model_id": model_type,
                    "description": "IBM Foundation Model",
                    "status": "available",
                    "provider": "IBM"
                }

        return json.dumps(model_info, indent=2)

    except Exception as e:
        logger.error(f" Error fetching model information: {e}")
        return json.dumps({"error": f"Failed to fetch model info: {str(e)}"}, indent=2)

@mcp.resource("ibm://config/server-info")
def get_server_info() -> str:
    """
    Resource: Server configuration and status

    Provides information about our MCP server configuration
    for debugging and monitoring.
    """
    config_info = {
        "server_name": "IBM watsonx.ai MCP Server",
        "version": "1.0.0",
        "watsonx_url": WATSONX_URL,
        "project_id": WATSONX_PROJECT_ID[:8] + "..." if WATSONX_PROJECT_ID else "Not set",
        "available_models": list(AVAILABLE_MODELS.keys()),
        "default_model": "granite-13b-instruct",
        "total_models": len(AVAILABLE_MODELS),
        "provider": "IBM watsonx.ai",
        "status": "operational",
        "mcp_version": "1.0",
        "features": [
            "Text Generation",
            "Sentiment Analysis",
            "Model Information"
        ]
    }
    return json.dumps(config_info, indent=2)
Finally, you run the MCP server with the mcp.run command.
# Run the server
if __name__ == "__main__":
    logger.info("Starting IBM watsonx.ai MCP Server...")
    mcp.run()
Step 4. Test your MCP server
First, verify your server starts correctly: python ibm_watsonx_mcp_server.py
You should see these success messages:
IBM credentials validated successfully
IBM watsonx.ai MCP Server initialized successfully
Starting IBM watsonx.ai MCP Server...
Optionally, you can use the MCP Inspector, which is a visual debugging tool provided by Anthropic. The MCP Inspector provides a web interface where you can:
- View available tools and resources
- Test tool calls interactively
- Debug MCP protocol messages
- Validate server responses
# Install MCP Inspector
npm install -g @anthropic/mcp-inspector

# Test your server
npx @anthropic/mcp-inspector python ibm_watsonx_mcp_server.py
Lastly, for automated testing of your MCP server, you can create a Python script, such as test_server.py. You can review the sample test script in our GitHub repo.
"""
Test script for IBM watsonx.ai MCP Server
"""

import asyncio
import json
from mcp import ClientSession, StdioServerParameters
from mcp.client.stdio import stdio_client

async def test_mcp_server():
    """Test MCP server functionality"""

    server_params = StdioServerParameters(
        command="python",
        args=["ibm_watsonx_mcp_server.py"]
    )

    async with stdio_client(server_params) as (read, write):
        async with ClientSession(read, write) as session:

            # Initialize connection
            print(" Connecting to IBM watsonx.ai MCP server...")
            await session.initialize()
            print(" Connected successfully!\n")

            # Test resources
            print(" Testing Resources:")
            resources = await session.list_resources()
            for resource in resources.resources:
                print(f"  - {resource.name}: {resource.description}")

            # Test tools
            print("\n Testing Tools:")
            tools = await session.list_tools()
            for tool in tools.tools:
                print(f"  - {tool.name}: {tool.description}")

            # Test text generation
            print("\n Testing Text Generation:")
            result = await session.call_tool("generate_text", {
                "prompt": "Explain the benefits of AI in enterprise applications",
                "model_name": "granite-13b-instruct",
                "max_tokens": 100
            })

            response = json.loads(result.content[0].text)
            if response["status"] == "success":
                print(" Text generation successful!")
                print(f"Generated: {response['generated_text'][:100]}...")
            else:
                print(f"❌ Error: {response.get('error')}")

if __name__ == "__main__":
    asyncio.run(test_mcp_server())
Integrating your MCP server with Claude Desktop
When you make a request through Claude Desktop, here's what happens:
- The Claude Desktop (MCP Host) receives your prompt.
- Claude analyzes the prompt and determines it needs external capabilities.
- The MCP Client (Claude Desktop) connects to your watsonx.ai MCP server.
- Your MCP Server receives the tool call (for example, generate_text)
- Server calls the watsonx.ai API with the specified parameters.
- Watsonx.ai returns the generated text.
- Your MCP Server formats the response according to the MCP protocol.
- Claude receives the response and incorporates it into the conversation.
This standardized flow means your MCP server can work with any MCP-compatible client, not just Claude Desktop. But, here’s how you can integrate your MCP server with Claude Desktop.
First, create or update Claude Desktop's configuration file: claude_desktop_config.json.
{
  "mcpServers": {
      "ibm-watsonx": {
        "command": "python",
        "args": ["/absolute/path/to/your/ibm_watsonx_mcp_server.py"],
        "env": {
            "WATSONX_APIKEY": "your-api-key",
            "WATSONX_URL": "https://us-south.ml.cloud.ibm.com",
            "WATSONX_PROJECT_ID": "your-project-id"
        }
      }
  }
}
Then, restart Claude Desktop and verify that the MCP connections are active. Then, test the setup with prompts such as these:
- "Use IBM Granite to explain quantum computing in simple terms"
- "Analyze the sentiment of this text: 'Our AI project is exceeding expectations!'"
- "What IBM models are available through the MCP server?"
Best Practices for MCP Development
Based on this sample implementation of MCP, we see these best practices for MCP development:
Server Design
- Single Responsibility: Each server should focus on one domain
- Error Handling: Always provide meaningful error messages
- Documentation: Use clear docstrings for tools and resources
- Validation: Validate inputs and provide helpful parameter descriptions
Tool Implementation
- Idempotent Operations: Tools should be safe to retry
- Clear Names: Use descriptive tool names and parameters
- Structured Responses: Return consistent, well-formatted data
- Resource Efficiency: Implement appropriate timeouts and limits
Resource Management
- Caching: Cache expensive operations when appropriate
- Pagination: Handle large datasets efficiently
- Fresh Data: Ensure resources provide current information
- Access Patterns: Design resources for common LLM use cases
Data Security
- Credentials stored in environment variables
- Data never leaves your infrastructure
- IBM Cloud's enterprise security controls apply
- Audit logging for compliance
Access Control
- API keys with minimal required permissions
- Project-level access control in IBM watsonx.ai
- Network security (VPC, firewalls) for production deployments
Monitoring
- Log all MCP interactions for audit trails
- Monitor IBM watsonx.ai usage and costs
- Track performance metrics
Summary
Model Context Protocol represents a fundamental shift in how we build AI applications. By providing a standardized way to connect LLMs with external data and tools, MCP enables:
- Faster development: Reusable integrations across projects
- Better collaboration: Shared infrastructure across teams
- Enterprise-grade security: Data stays within your infrastructure
- Future-proof architecture: Works with any MCP-compatible LLM
The integration with IBM watsonx.ai demonstrates how MCP can leverage enterprise-grade foundation models while maintaining the flexibility to work with other providers. As the MCP ecosystem grows, you'll be able to:
- Switch LLM providers without changing your integration code
- Share MCP servers across different AI applications
- Leverage community servers for common use cases
- Build complex workflows combining multiple data sources and tools
Whether you're building internal AI tools, customer-facing applications, or research prototypes, MCP provides the foundation for creating truly intelligent, context-aware AI systems.
The protocol is still evolving, with Anthropic actively developing new features and the community contributing servers for various use cases. By adopting MCP now, you're positioning yourself at the forefront of AI application development.
Next steps
To explore more ways to use MCP in your AI applications, check out this tutorial, “Handle remote tool calling with Model Context Protocol.”
Also, explore the MCP tools provided by IBM, which include reusable components and reference implementations that you can adapt for your own projects.