About cookies on this site Our websites require some cookies to function properly (required). In addition, other cookies may be used with your consent to analyze site usage, improve the user experience and for advertising. For more information, please review your options. By visiting our website, you agree to our processing of information as described in IBM’sprivacy statement. To provide a smooth navigation, your cookie preferences will be shared across the IBM web domains listed here.
Tutorial
Integrate your ESG Data into Envizi using Integration Hub
Learn how to integrate and automate ESG data into Envizi using the Integration Hub, a solution accelerator for Envizi
On this page
Integration Hub is a solution accelerator designed to facilitate the integration of ESG data from various sources into the IBM Envizi ESG Suite. The Hub provides configurable hooks to connect with any ESG data source, enabling seamless data transformation and integration.
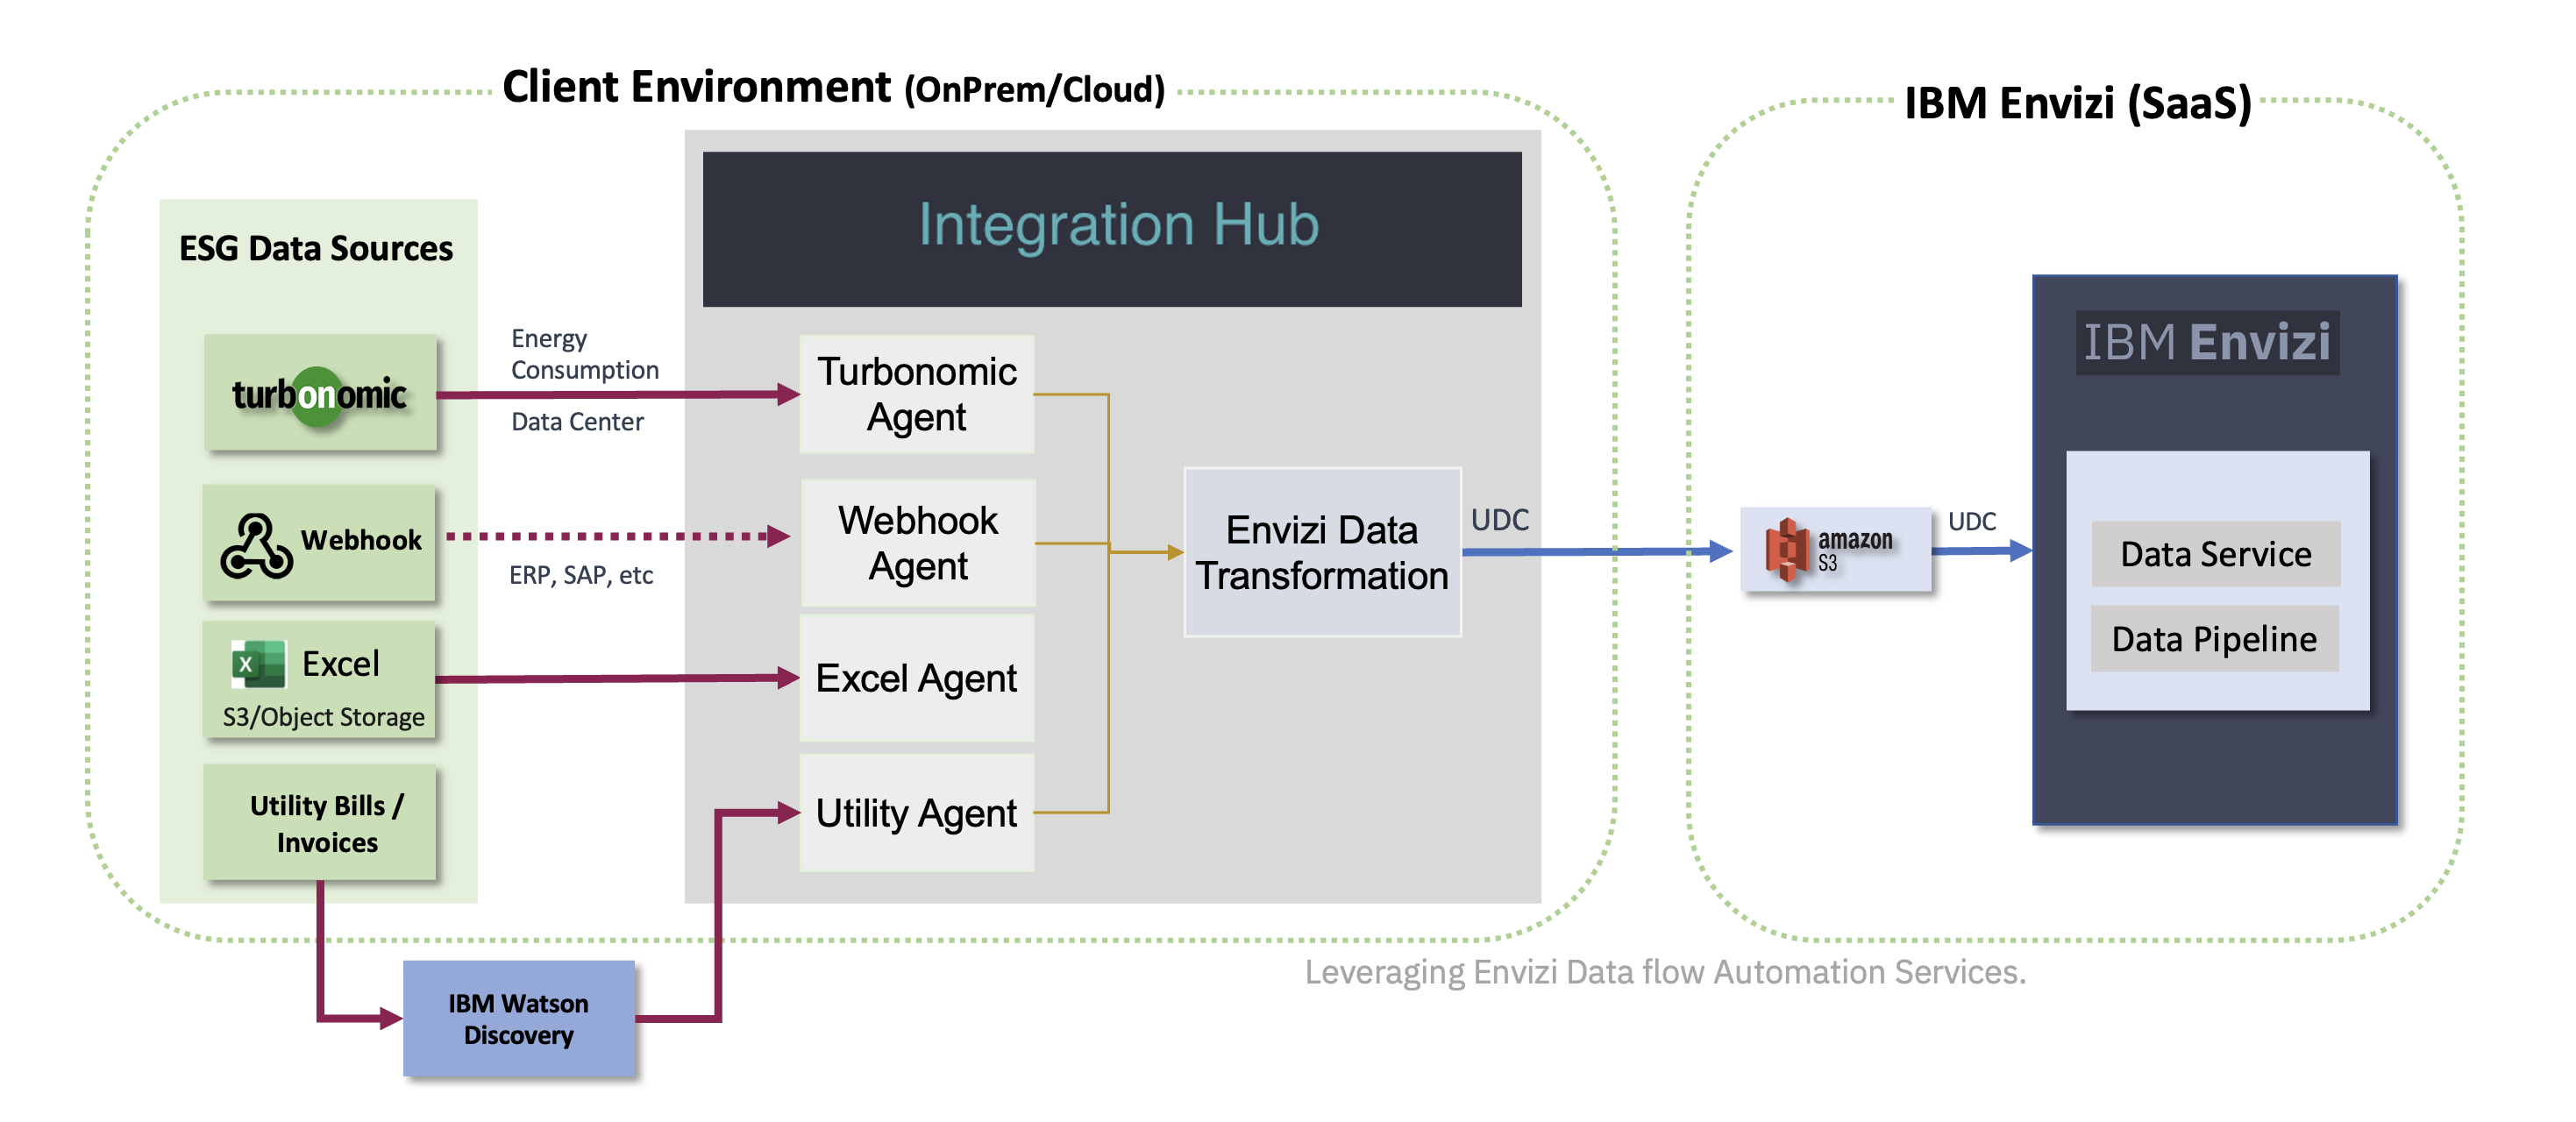
Figure. Architecture of the Integration Hub
Watch the following overview video about the Integration Hub:

Video will open in new tab or window
Key features
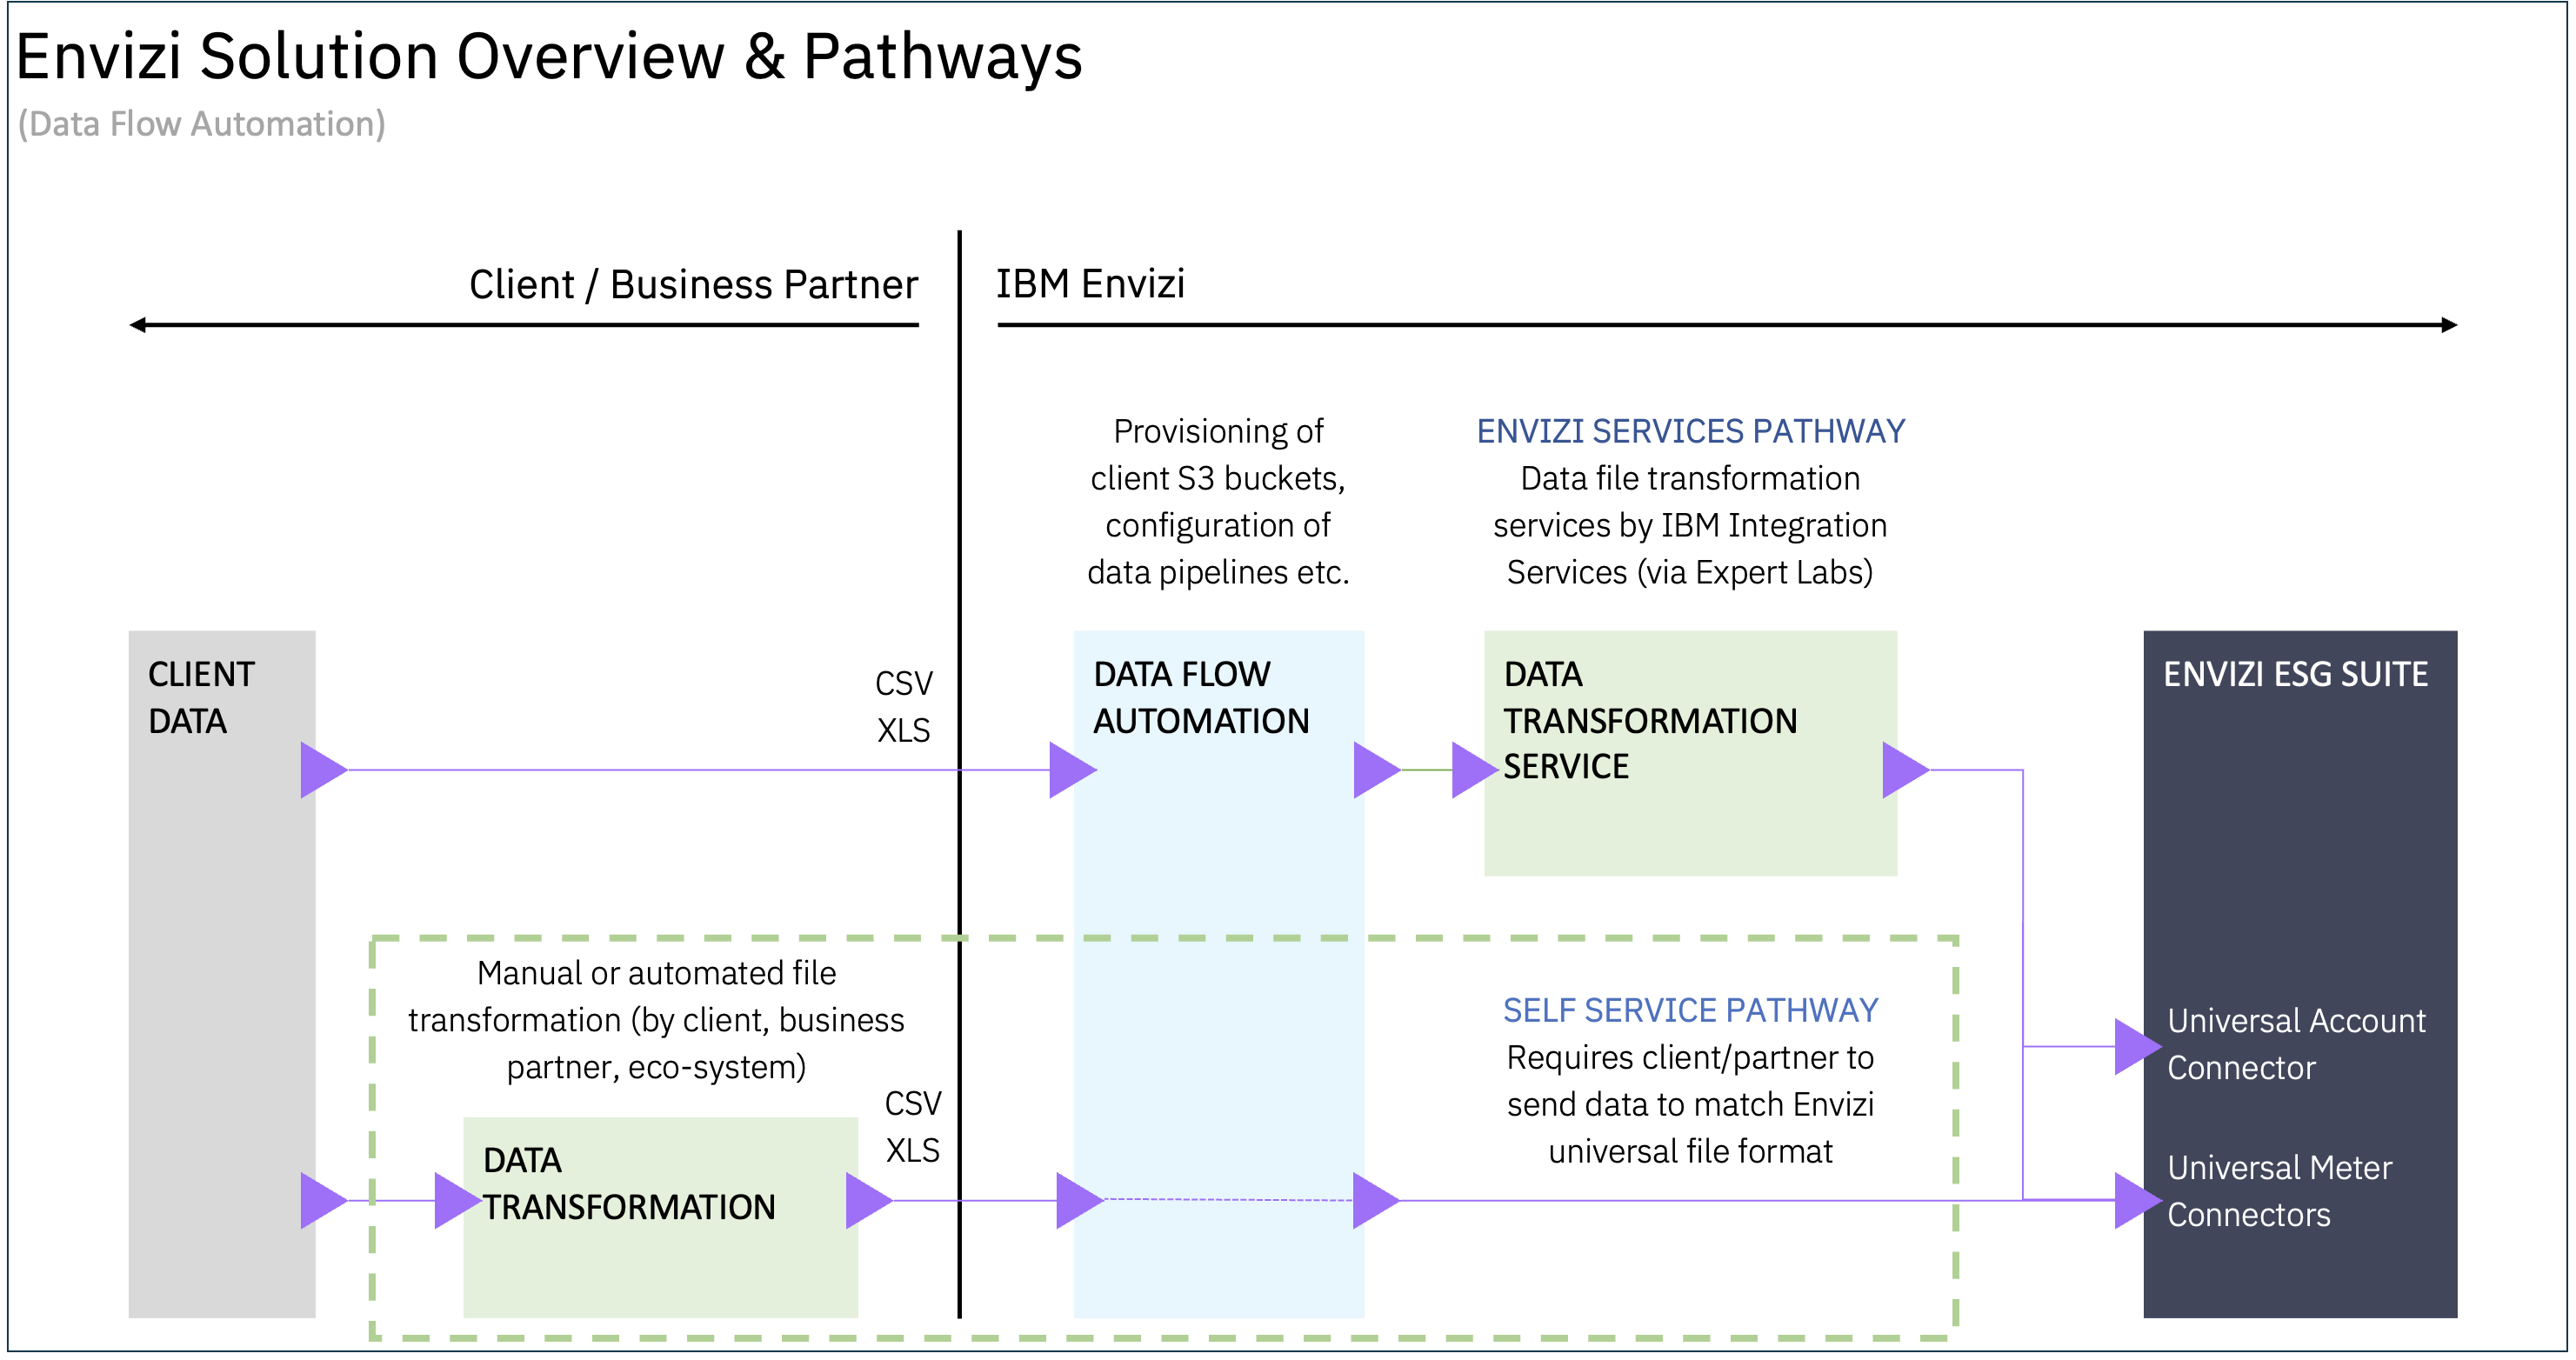
The Integration Hub leverages Envizi’s data flow automation capabilities and aligns with data templates. There are two pathways for ingesting data into Envizi:
- Envizi Services Pathway: Managed by Expert Labs, available as a paid service.
- Self-Service Pathway: Allows clients or partners to take complete ownership of data transformation and integration.
The Integration Hub supports the Self-Service Pathway by providing a development toolkit for integration specialists, practitioners, developers, or managed services teams to quickly build integration showcases.
Available integrations
The following integrations are currently available in the Integration Hub:
- Excel Integrations
- Webhook Integrations (e.g., SAP, ERP Systems)
- Invoice Processing
- Utility Bill Processing
- Turbonomic Integration
The Integration Hub can be extended to support integration with various external systems that need to interface with the IBM Envizi ESG Suite. It connects to external systems such as Turbonomic, Webhook API, Watson Discovery, etc., retrieves emissions data, converts it into the Universal Account Setup and Data Loading (UDC) format, and dispatches it to an S3 bucket configured within the IBM Envizi ESG Suite.
Additional resources
The entire source code and detailed documentation for this application are available in the Github repository. You can find more detailed information in the following sections about each integration, including how to deploy, run, and extend the application based on your needs.
Prerequisites
Access to an Envizi instance.
Integrations
Let's explore the various integrations available in the Integration Hub.
1. Excel integrations
Excel files can be seamlessly integrated into Envizi using the Integration Hub.
Watch the following demo video about Excel integration:
Video will open in new tab or window
Excel mappings
Customer data in different Excel file formats can be mapped to POC, Account Setup, and Data Load PM&C templates. The following Excel mappings are available:
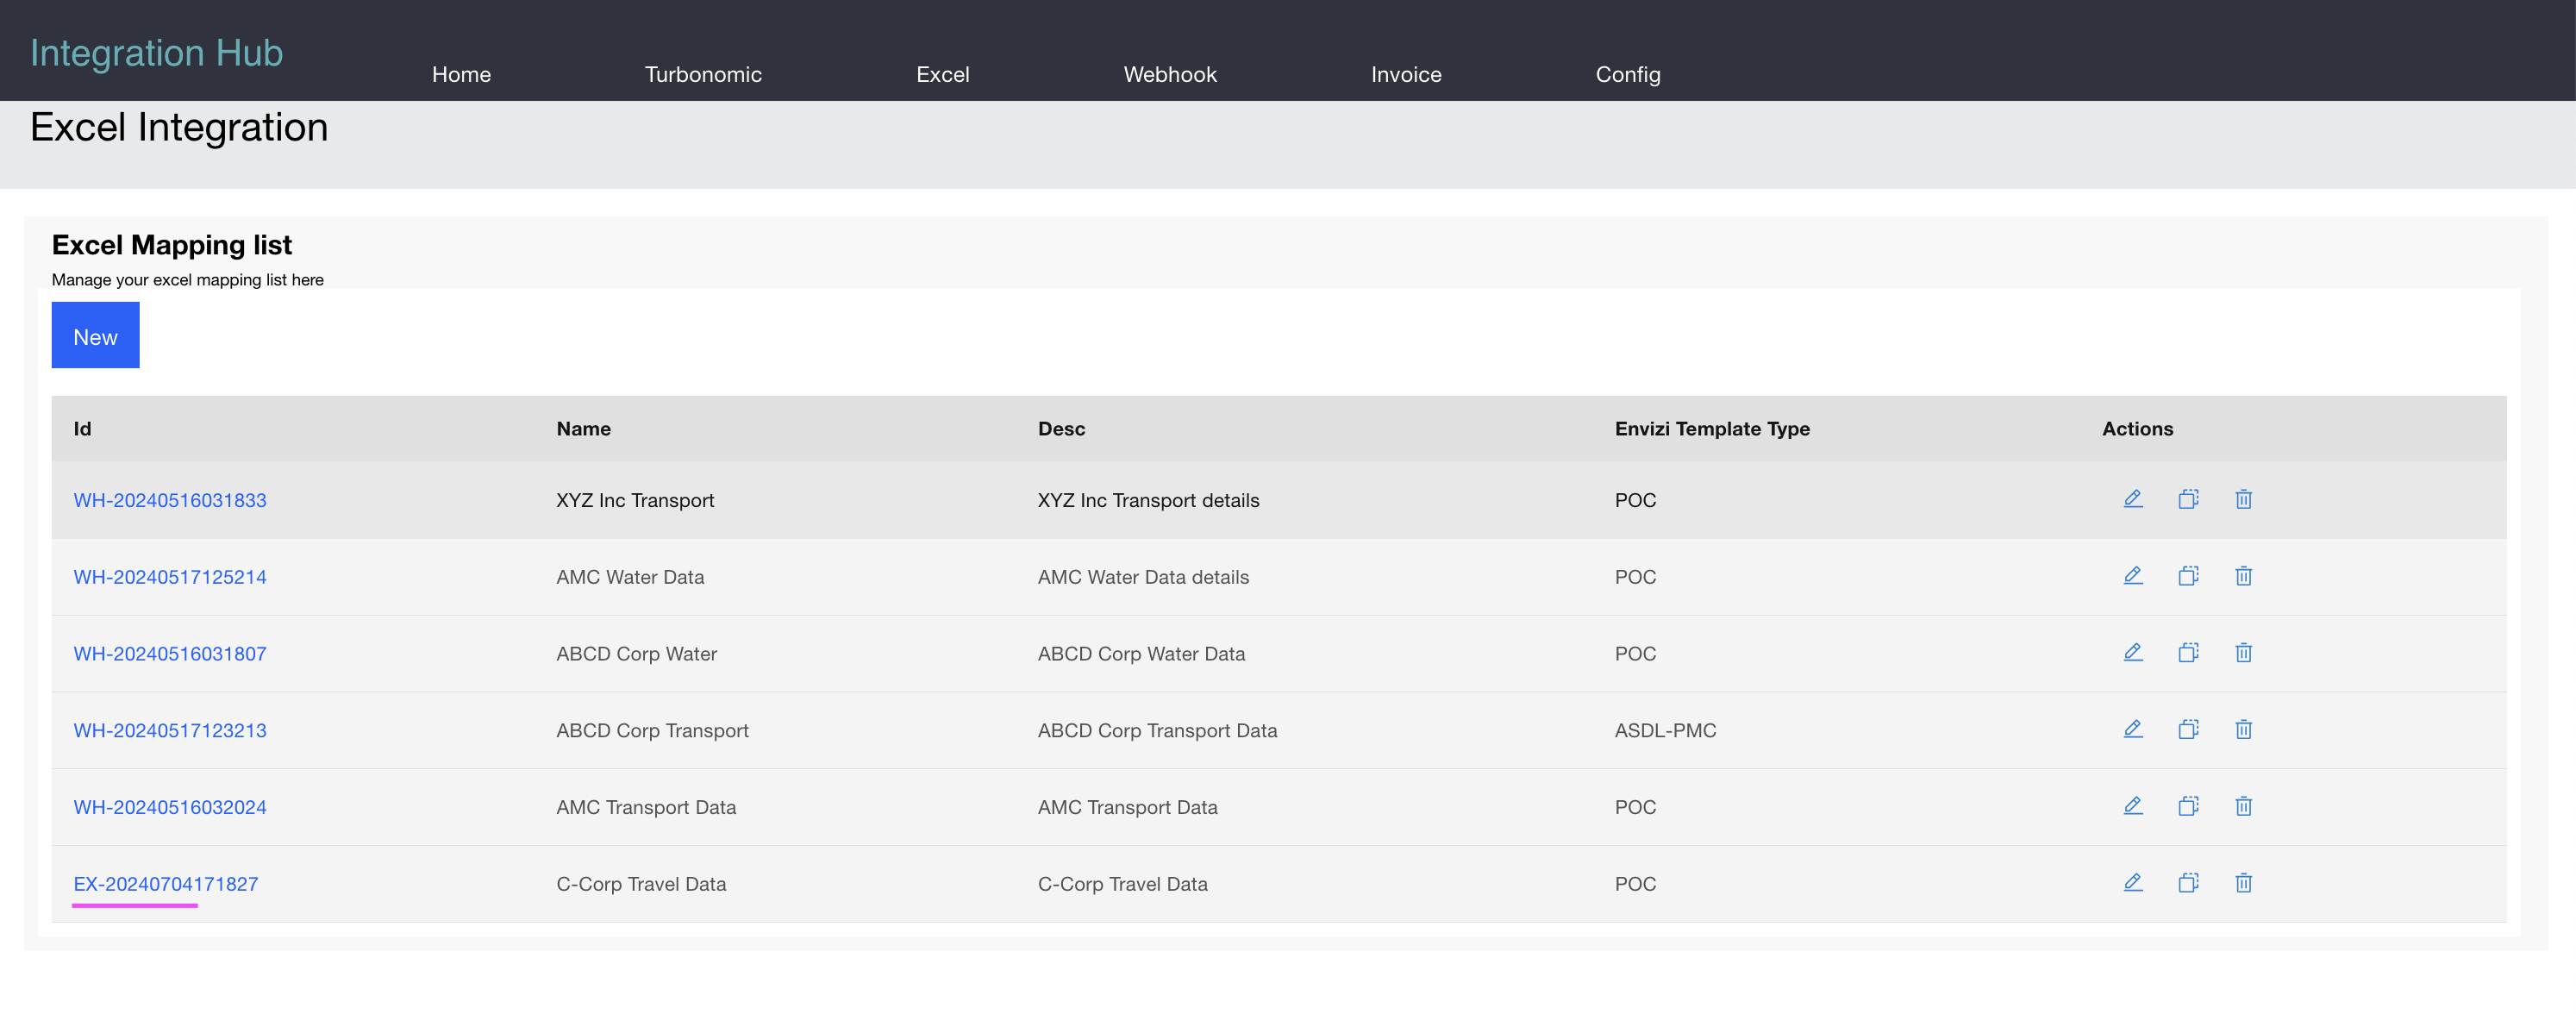
For example, the C-Corp Travel Data mapping from the list corresponds to the Excel file shown below:

Let's review the details of this mapping.
Excel mapping details
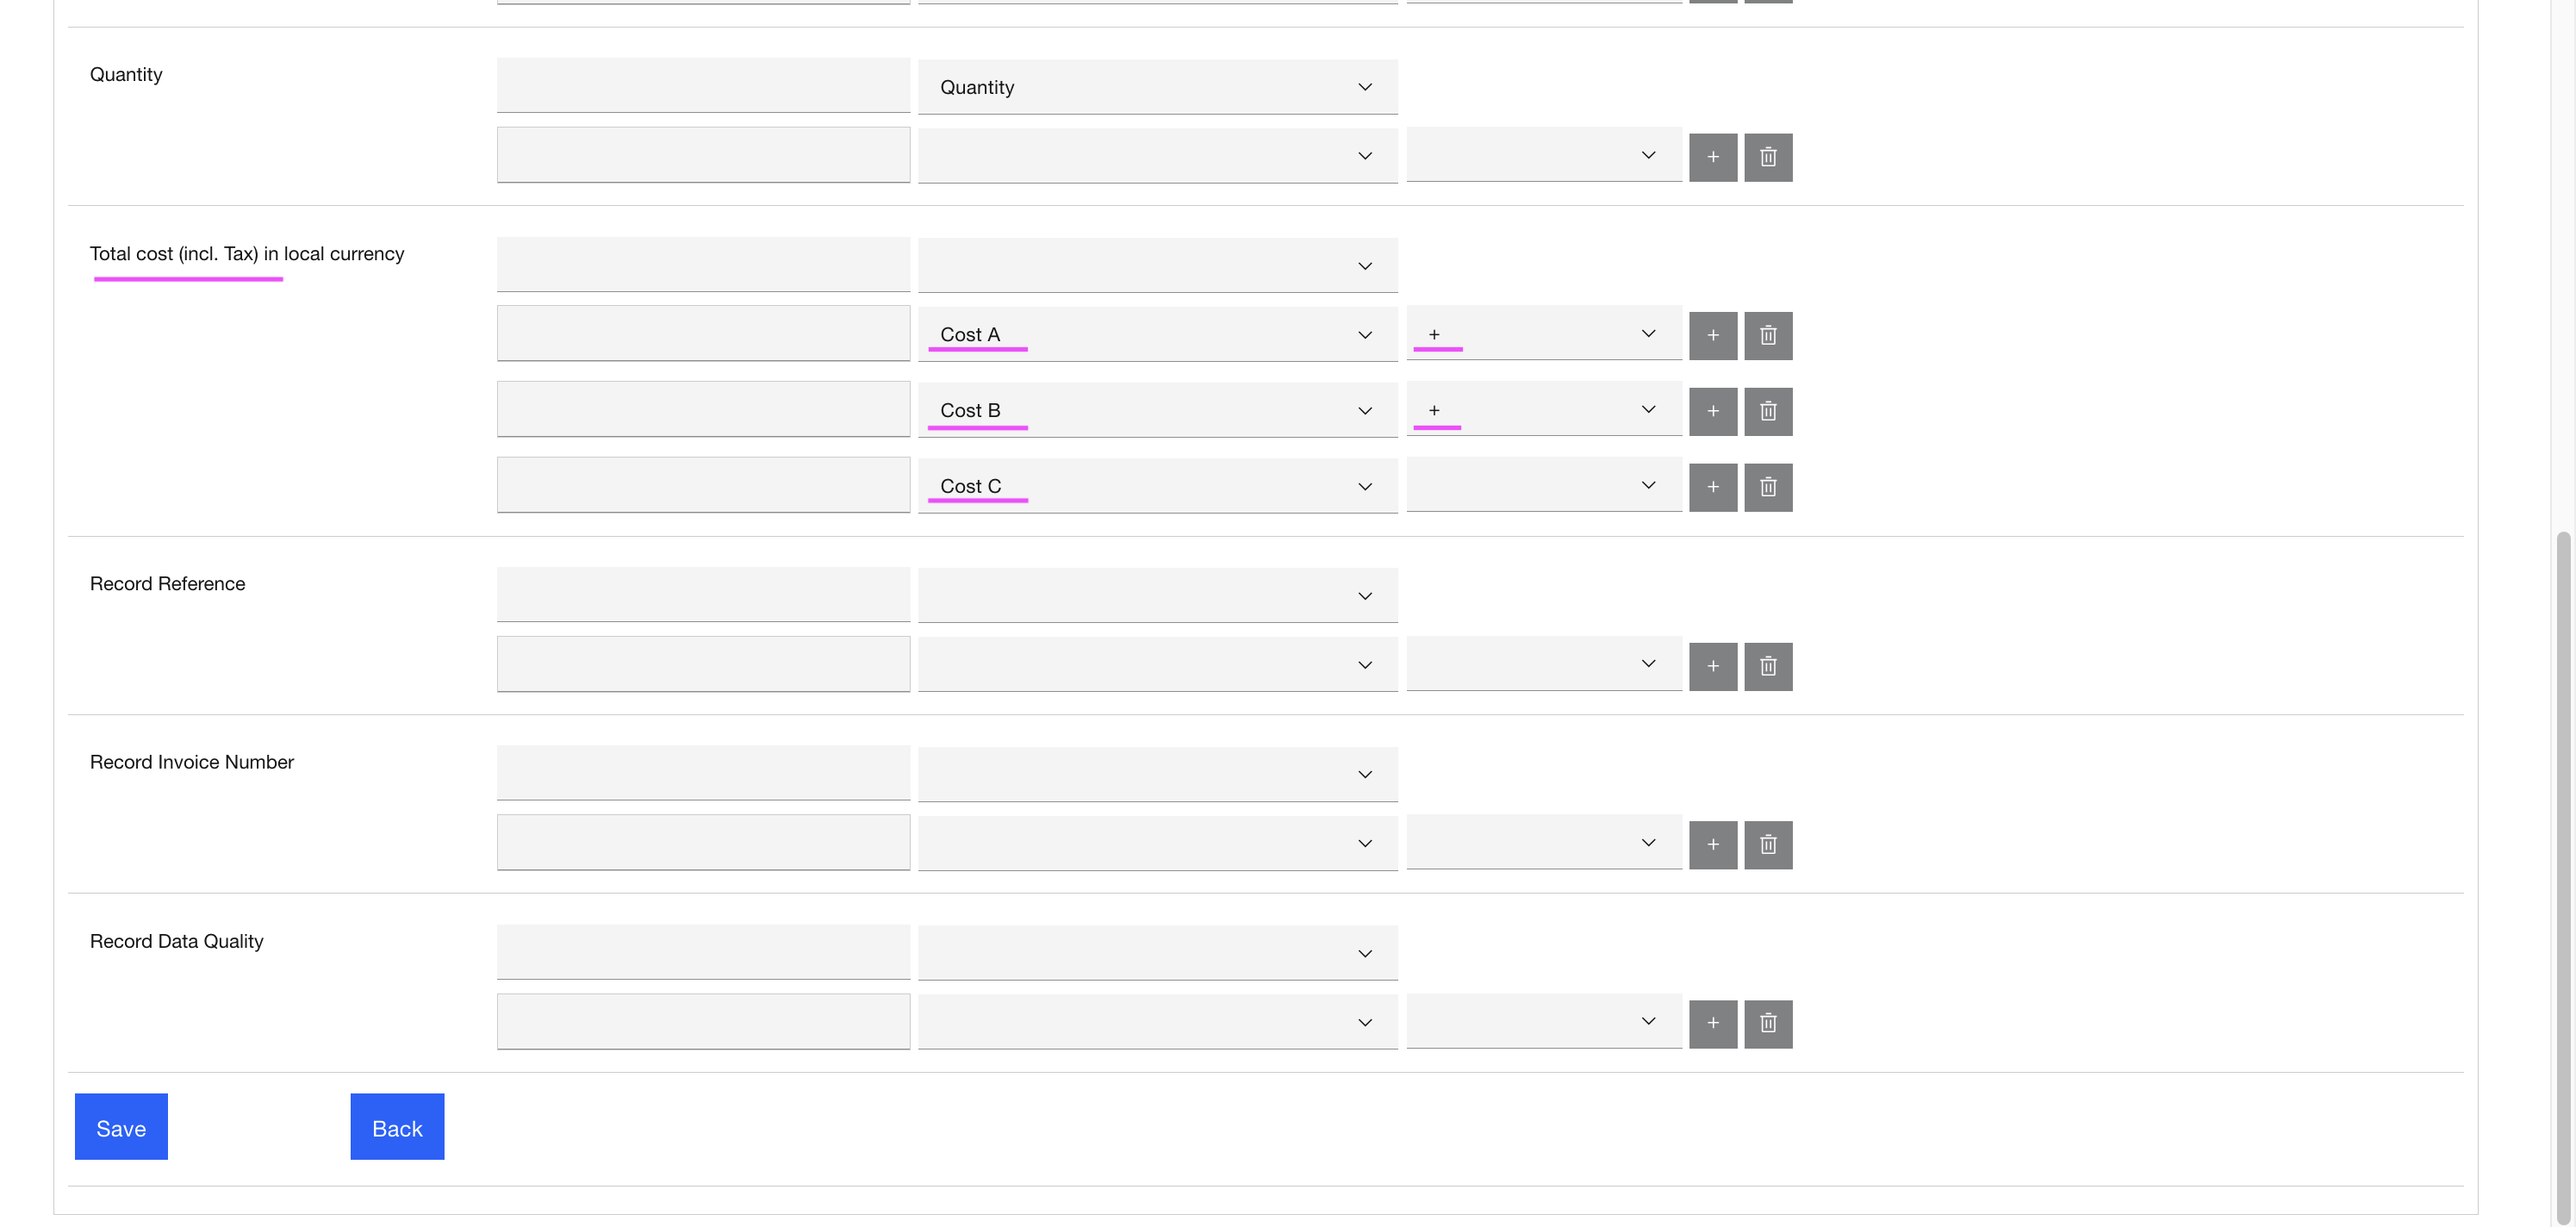
The following details outline the mapping configuration for the example Excel file:
- Organization: This column is hard-coded with "IBM APAC."
- Location: Mapped to the "Places" column in the Excel file.
- Account number: Mapped to the "Subject Name" column in the Excel file.
- Total cost (incl. Tax) in local currency: Mapped to the sum of "Cost A + Cost B + Cost C" columns in the Excel file.
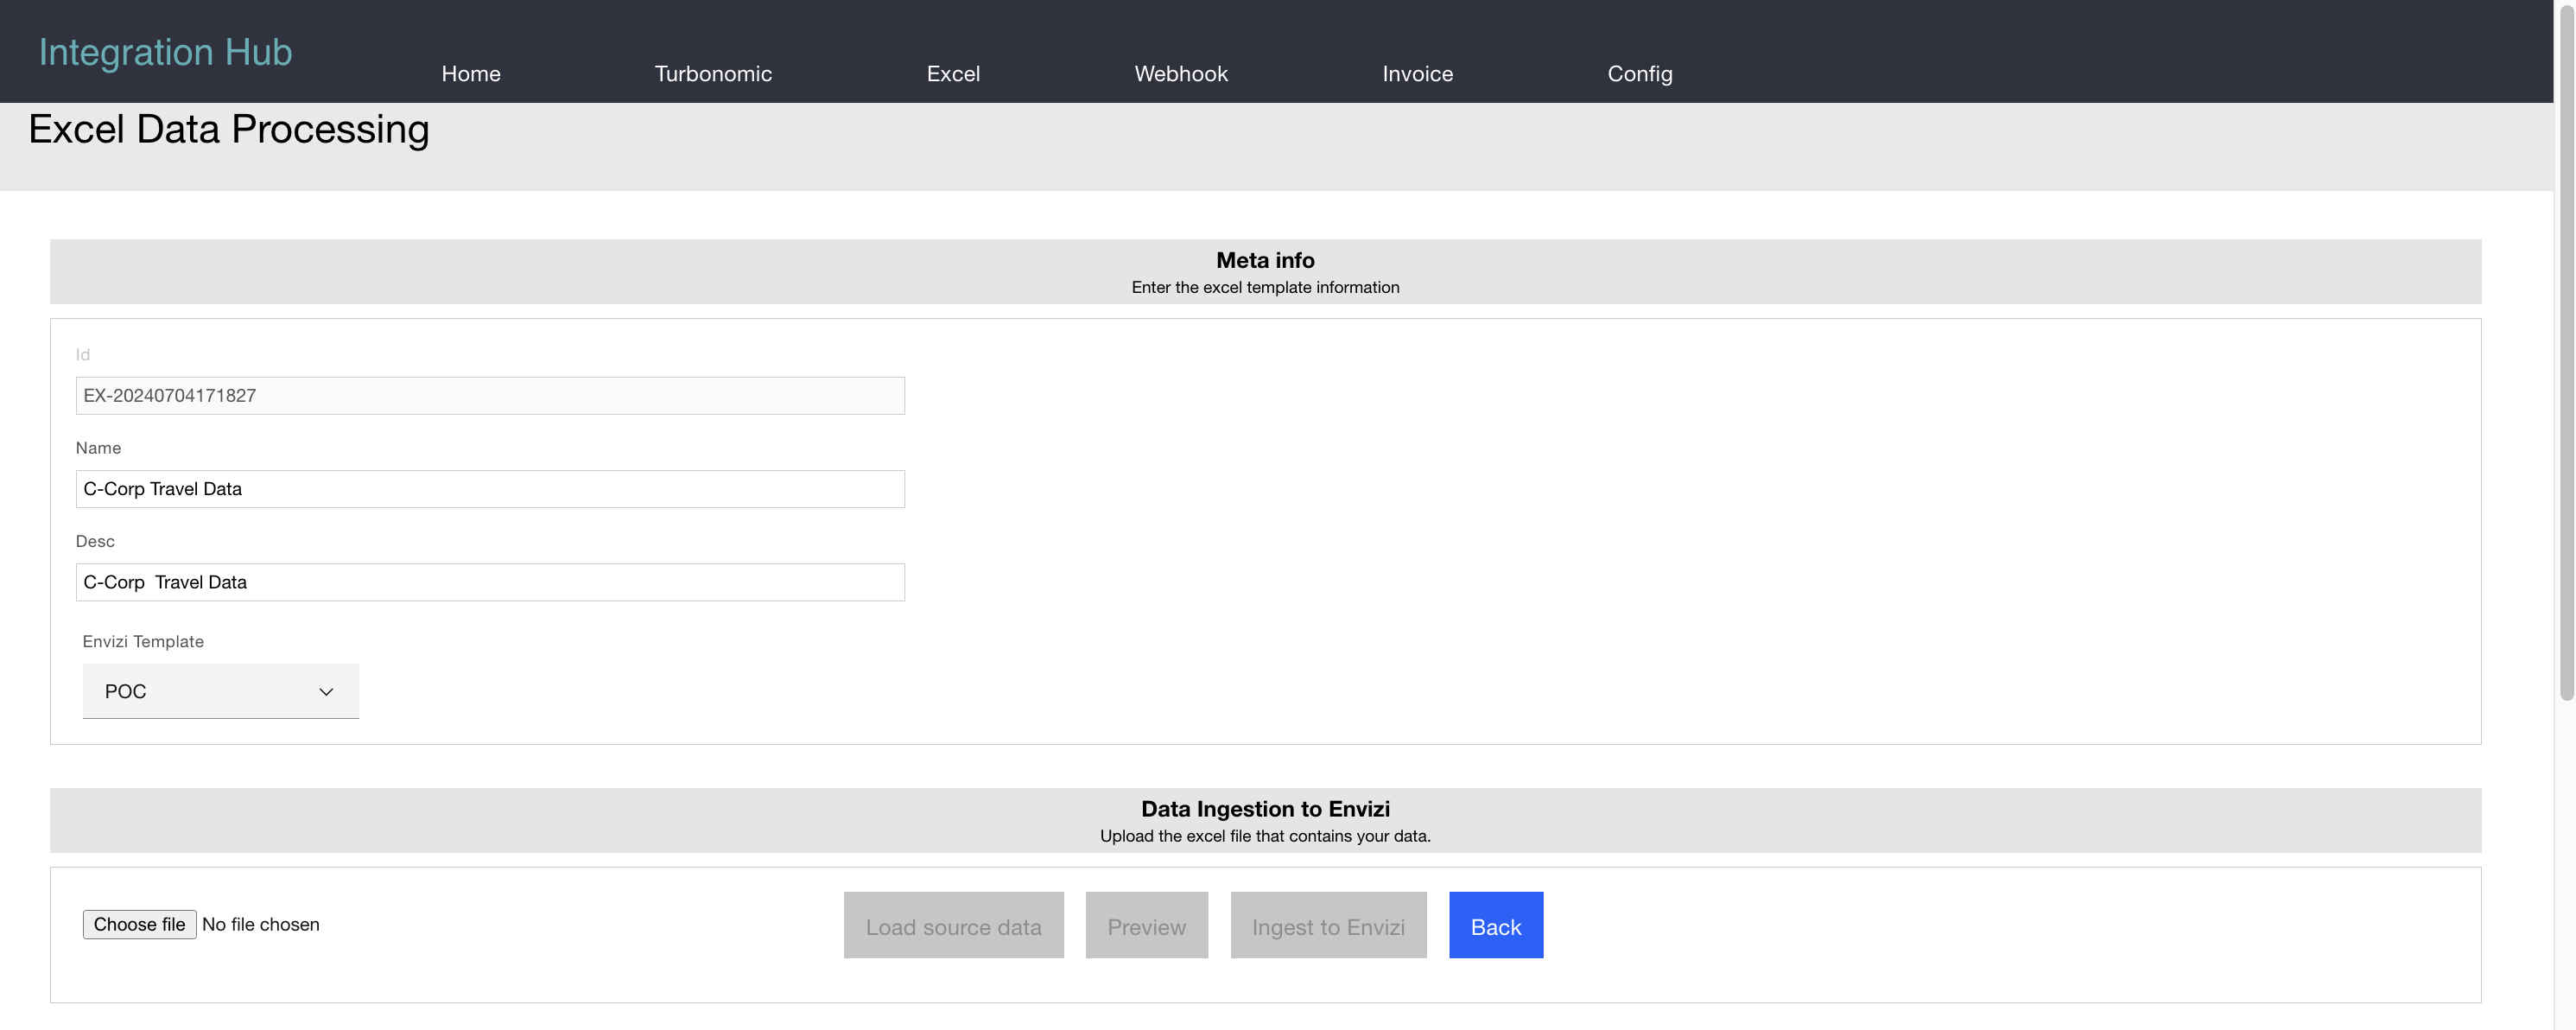

Uploading excel files
You can upload your data file and click on Load Source Data.

Preview data
To preview the data conversion into the Envizi format, click on Preview.

The converted data will be displayed as shown below:
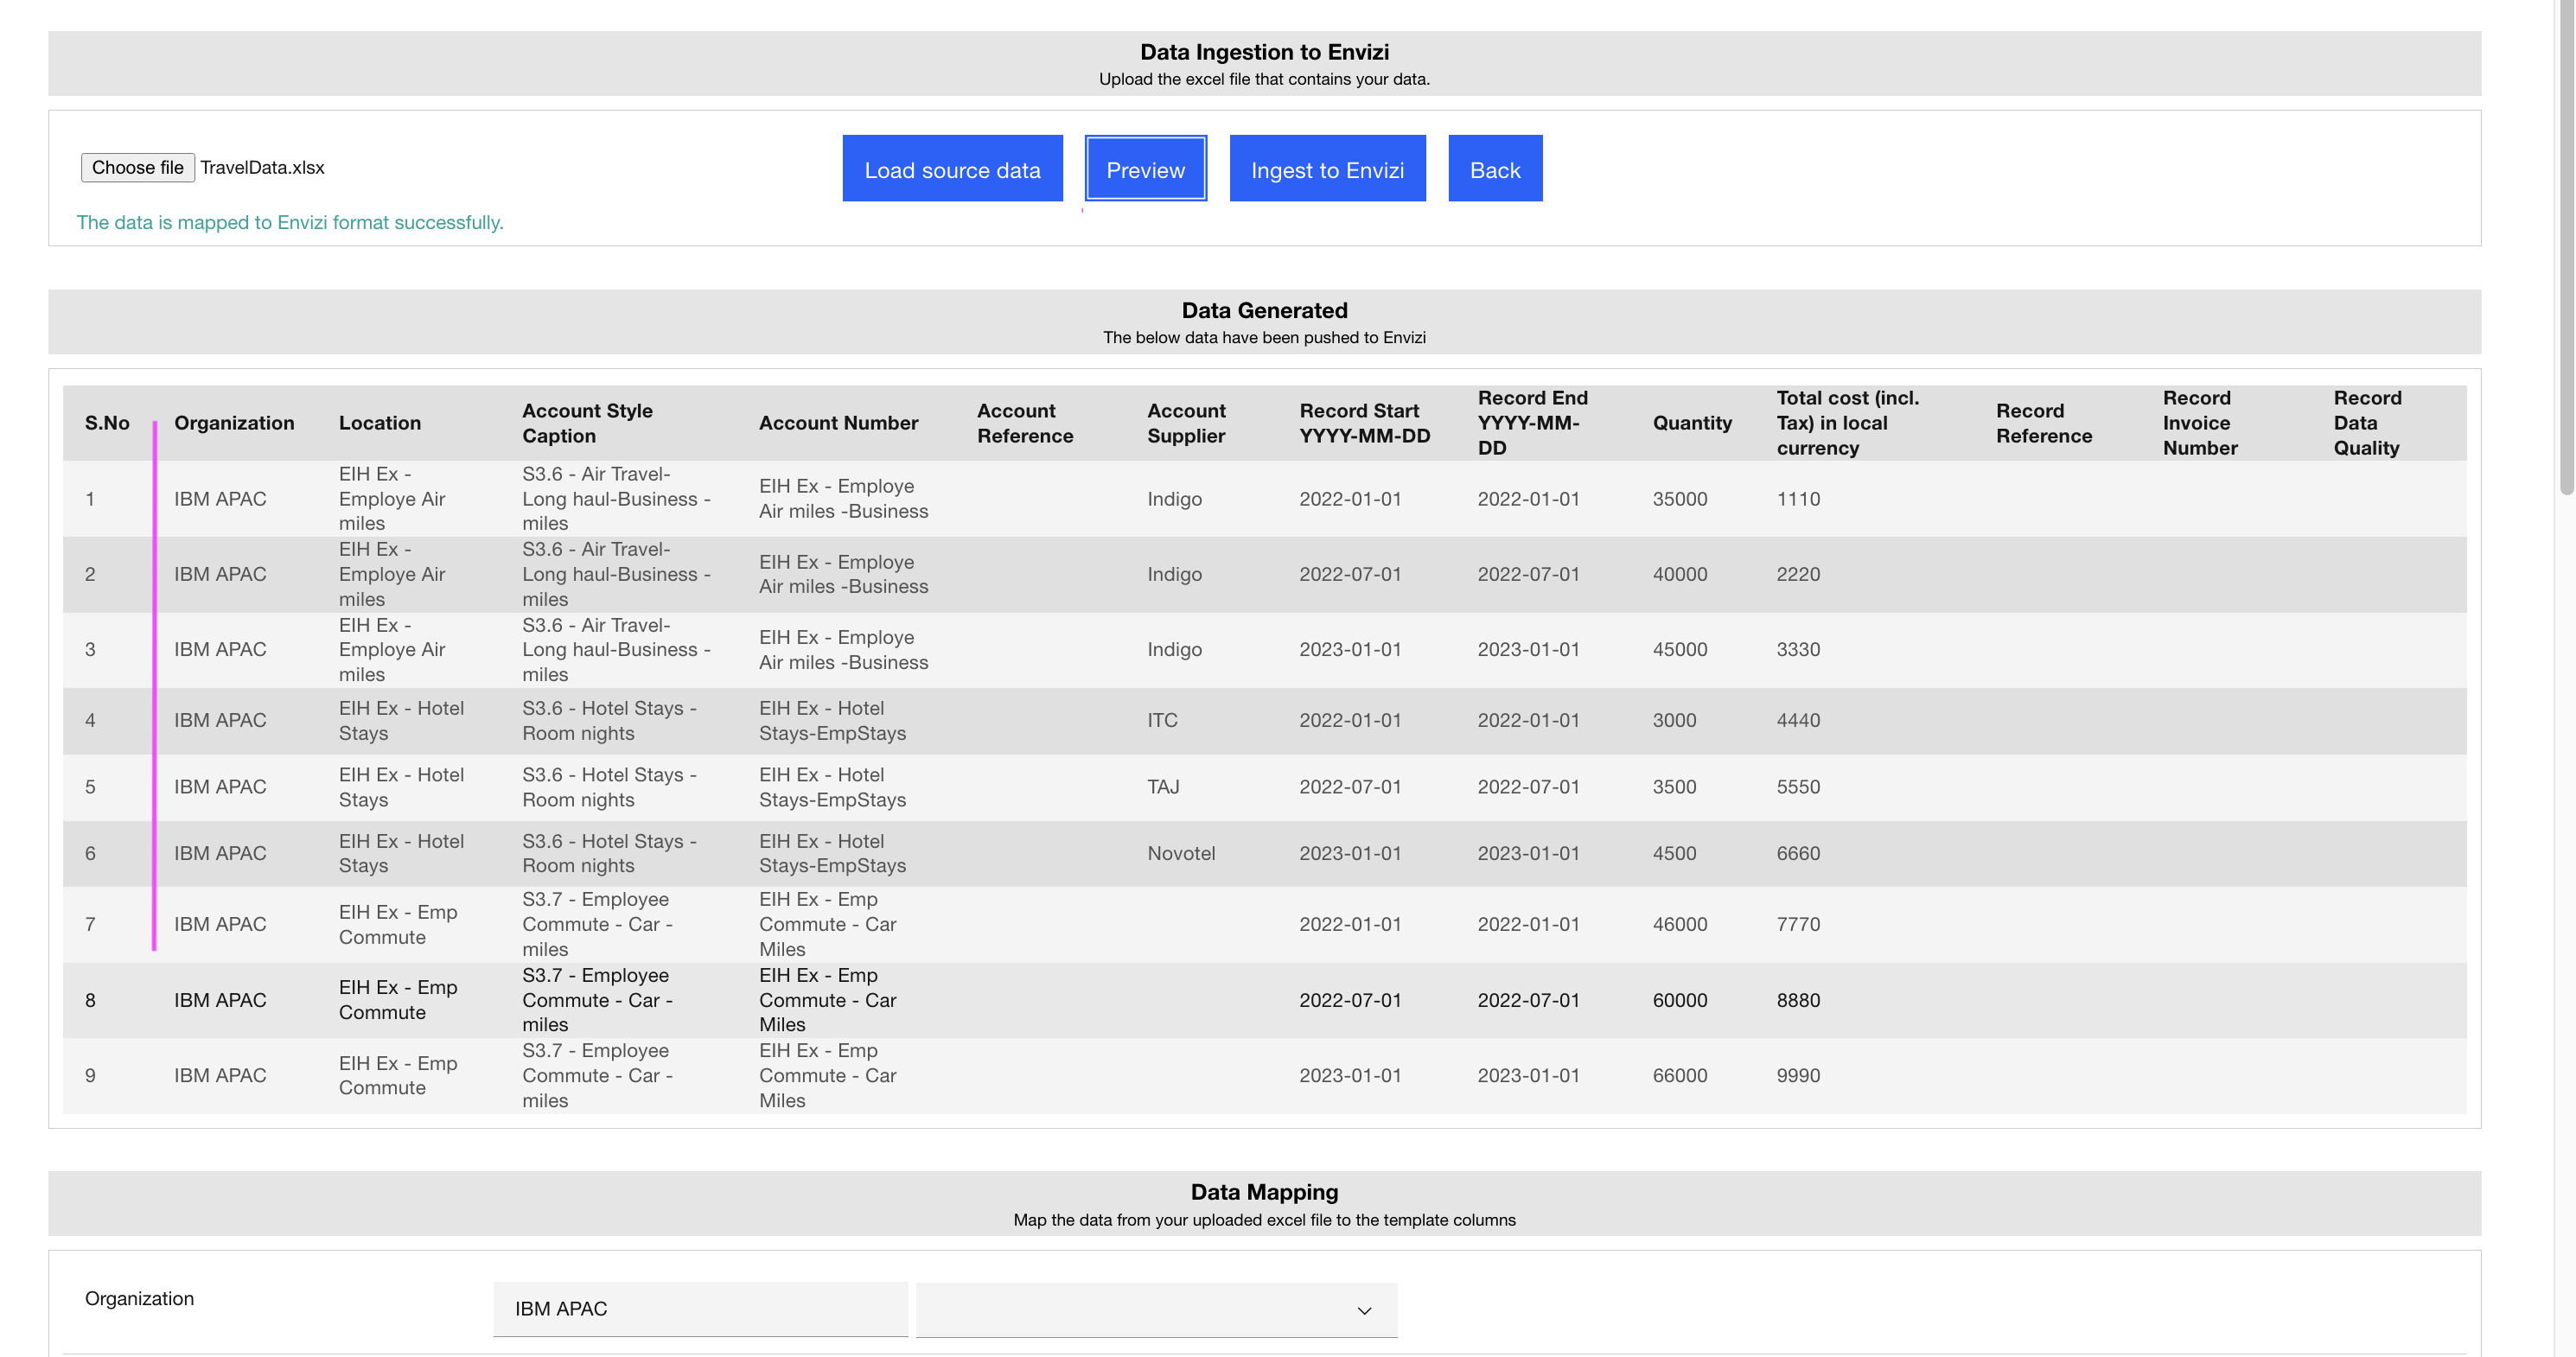
Ingest data to Envizi
You can then push the converted data to Envizi.

2. Webhook integrations
The Integration Hub supports integration with any ERP system or application that exposes an API. It can connect to these APIs, pull the data, transform it into the Envizi format based on the provided mapping, and then push the data into Envizi.
Watch the following demo video about Webhook integration:
Video will open in new tab or window
Webhook mappings
Each Webhook response can be mapped to POC, Account Setup, and Data Load PM&C templates. The following Webhook mappings are available:
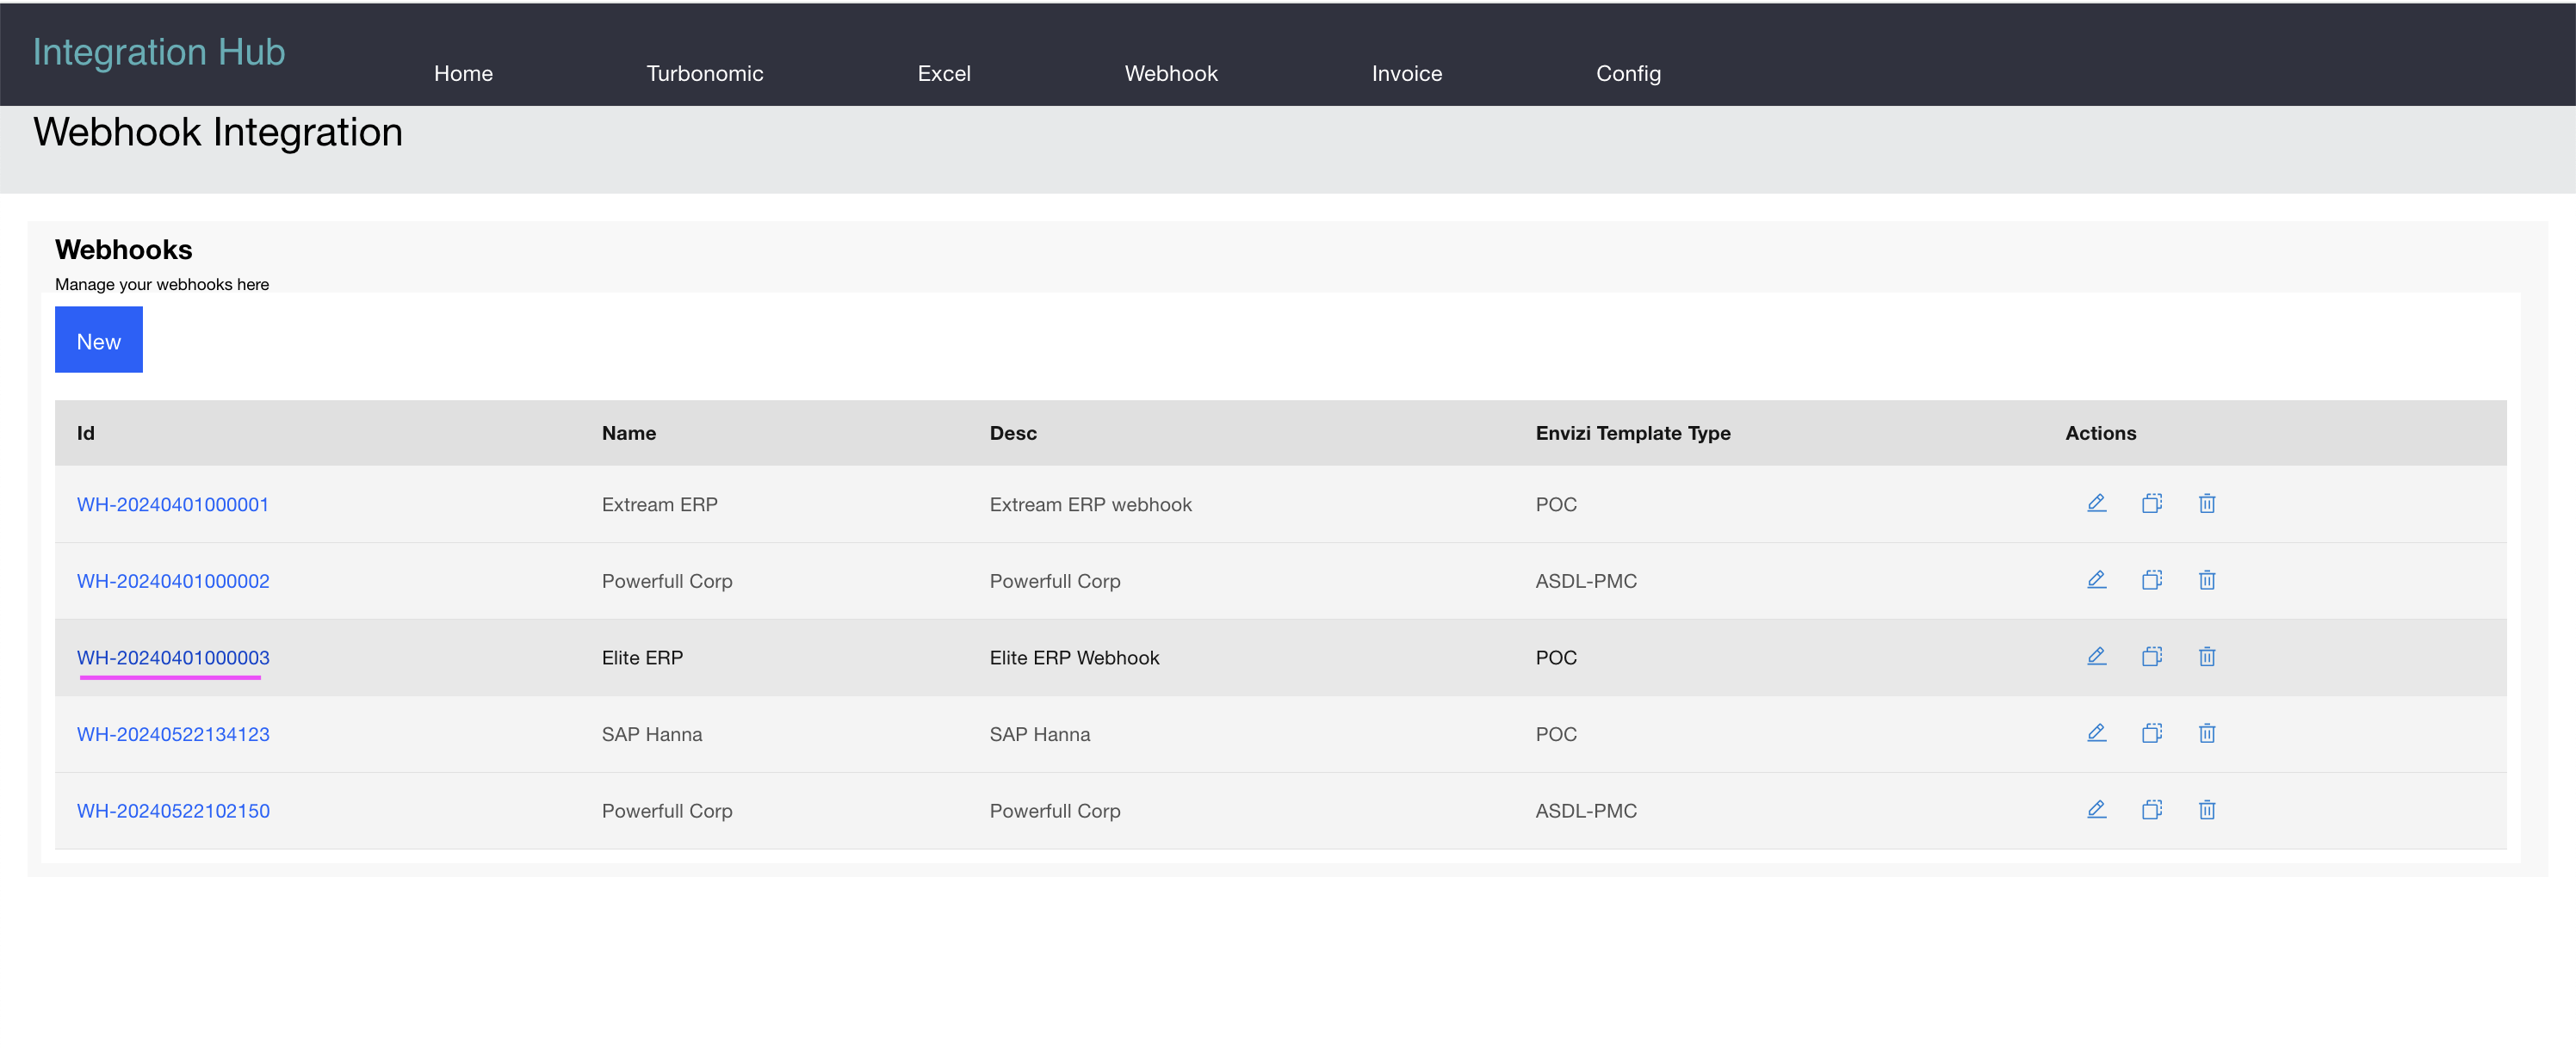
For example, the mapping for Elite ERP from the list is detailed below:
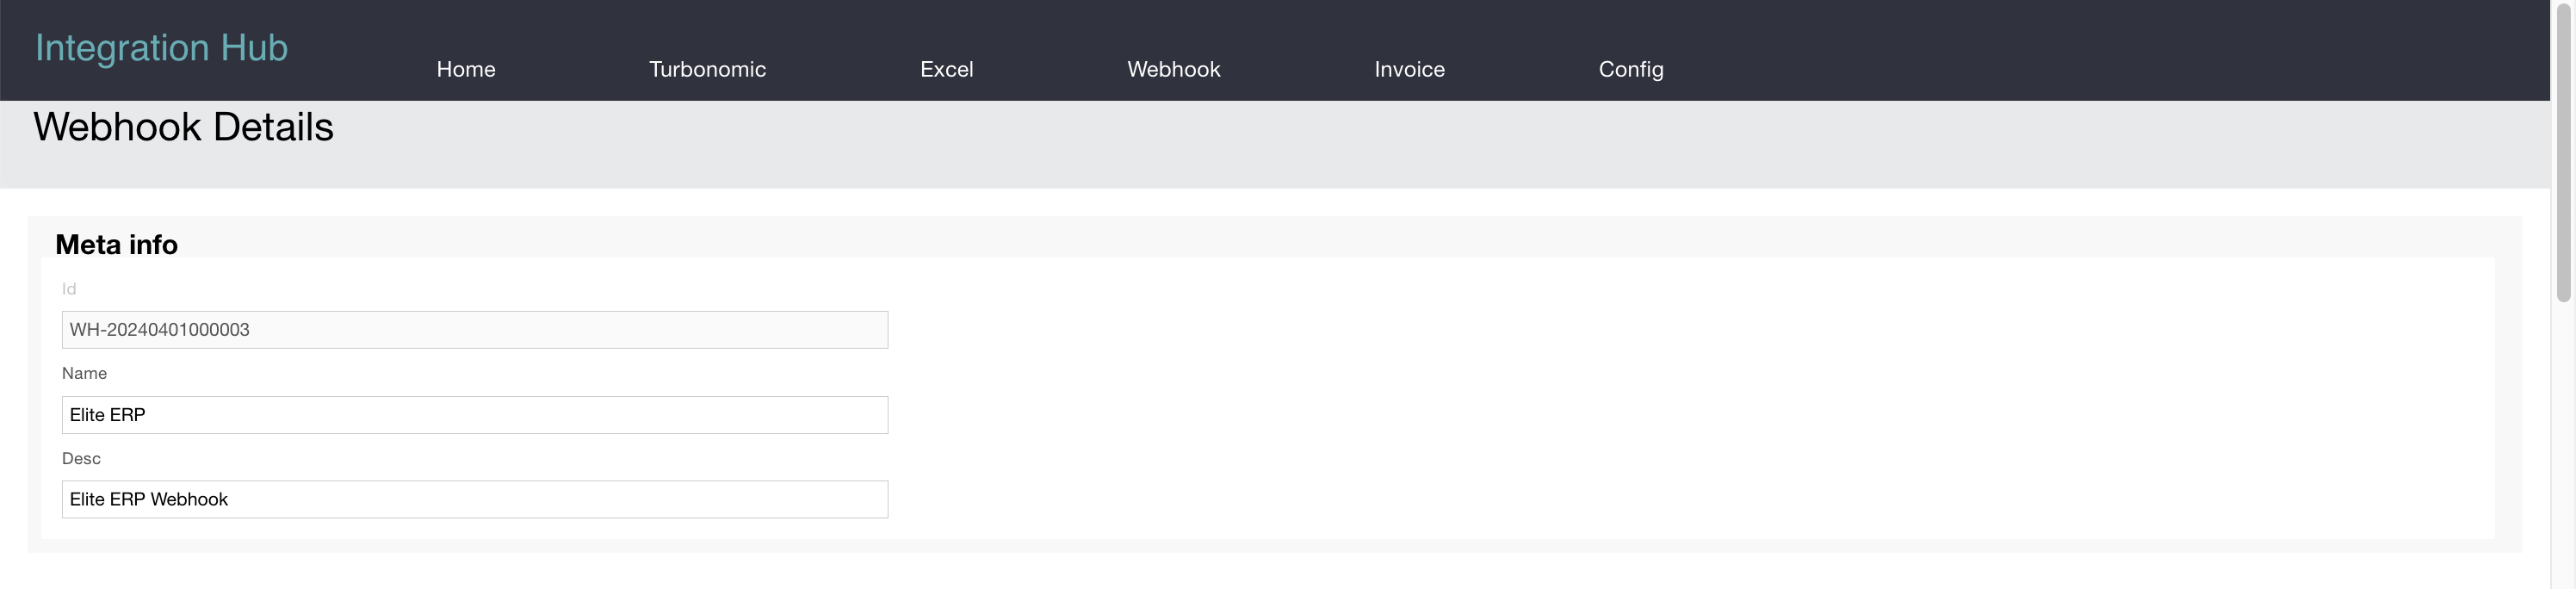
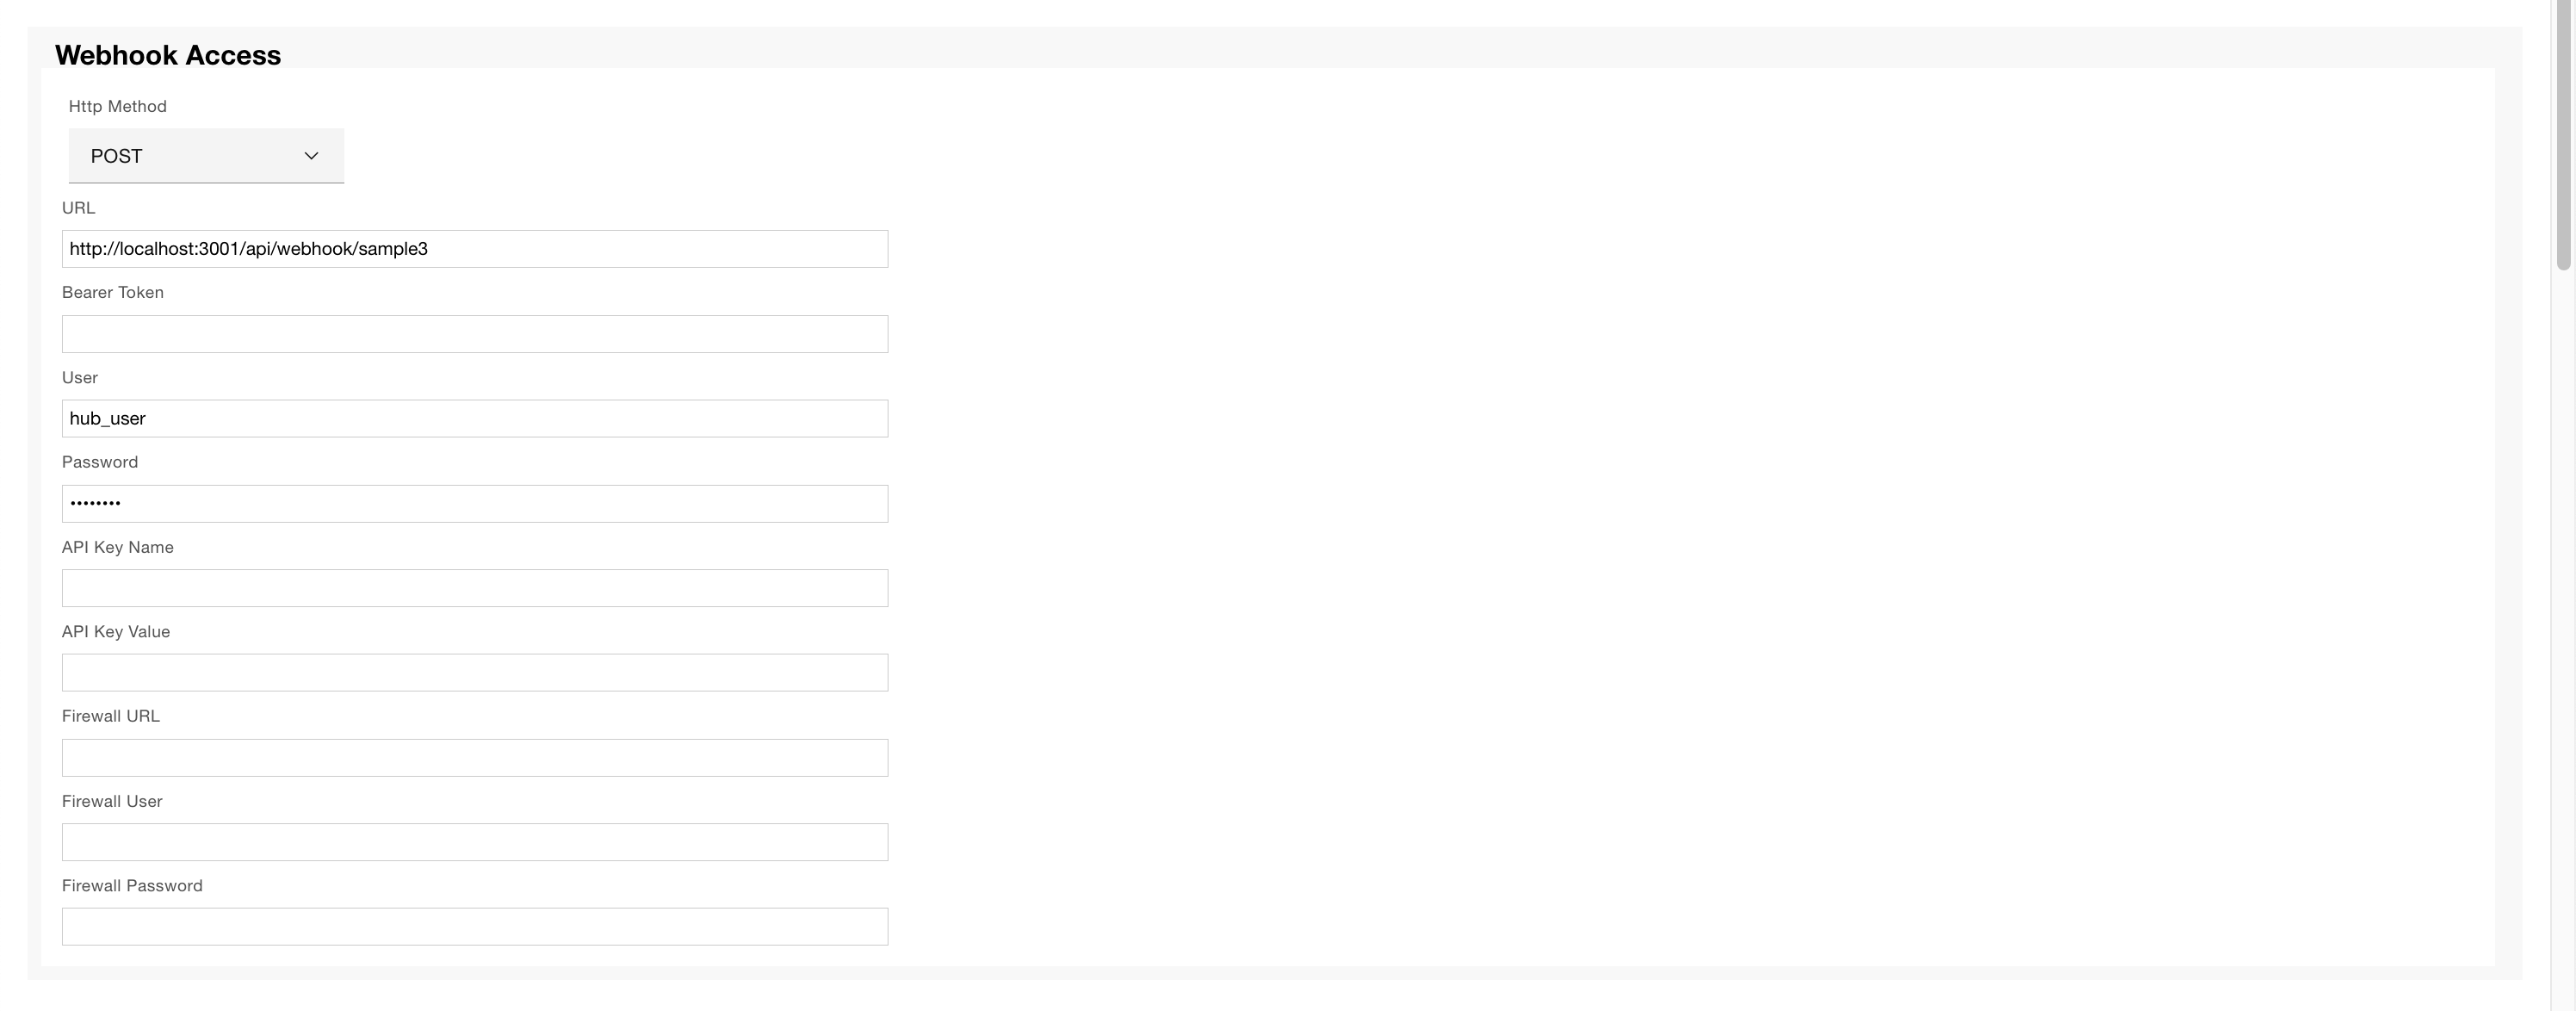
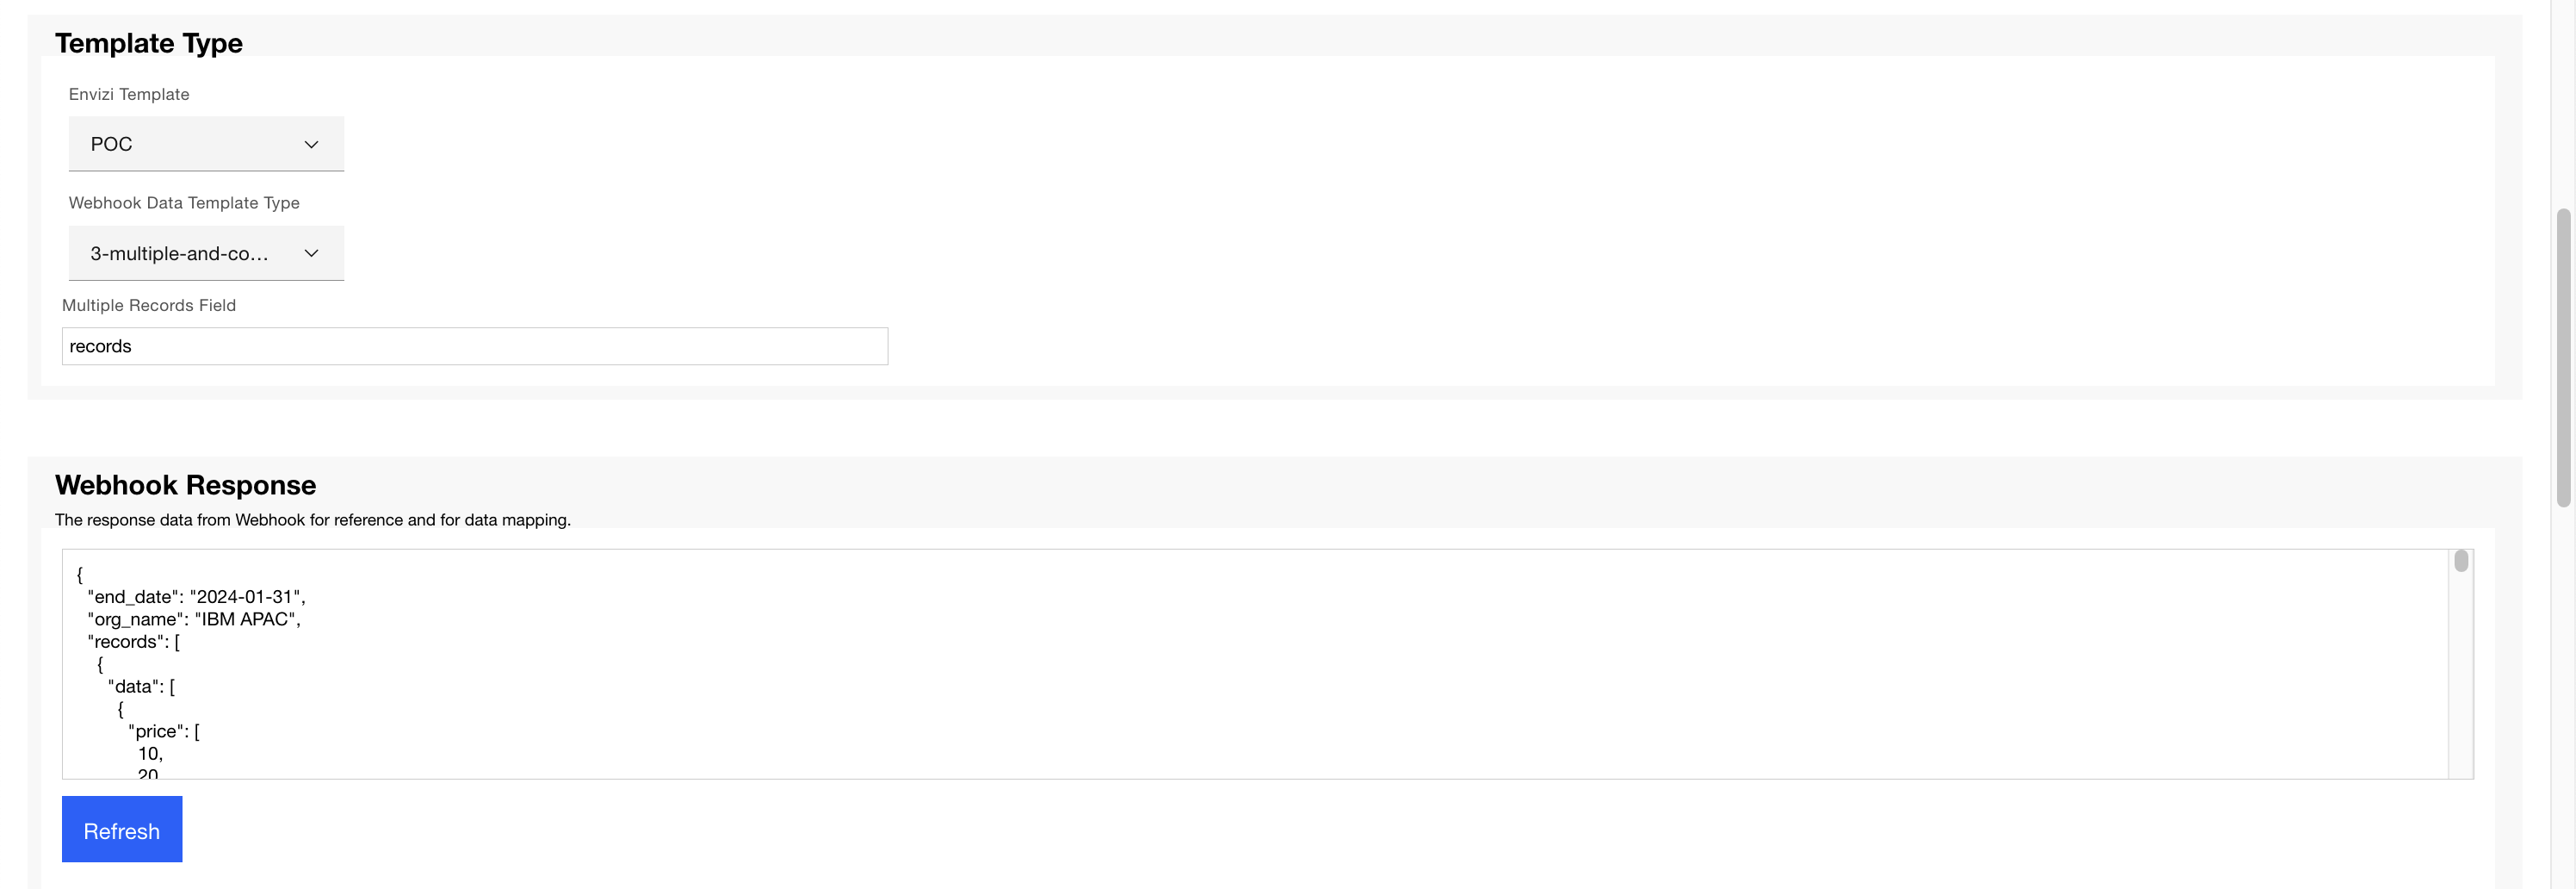
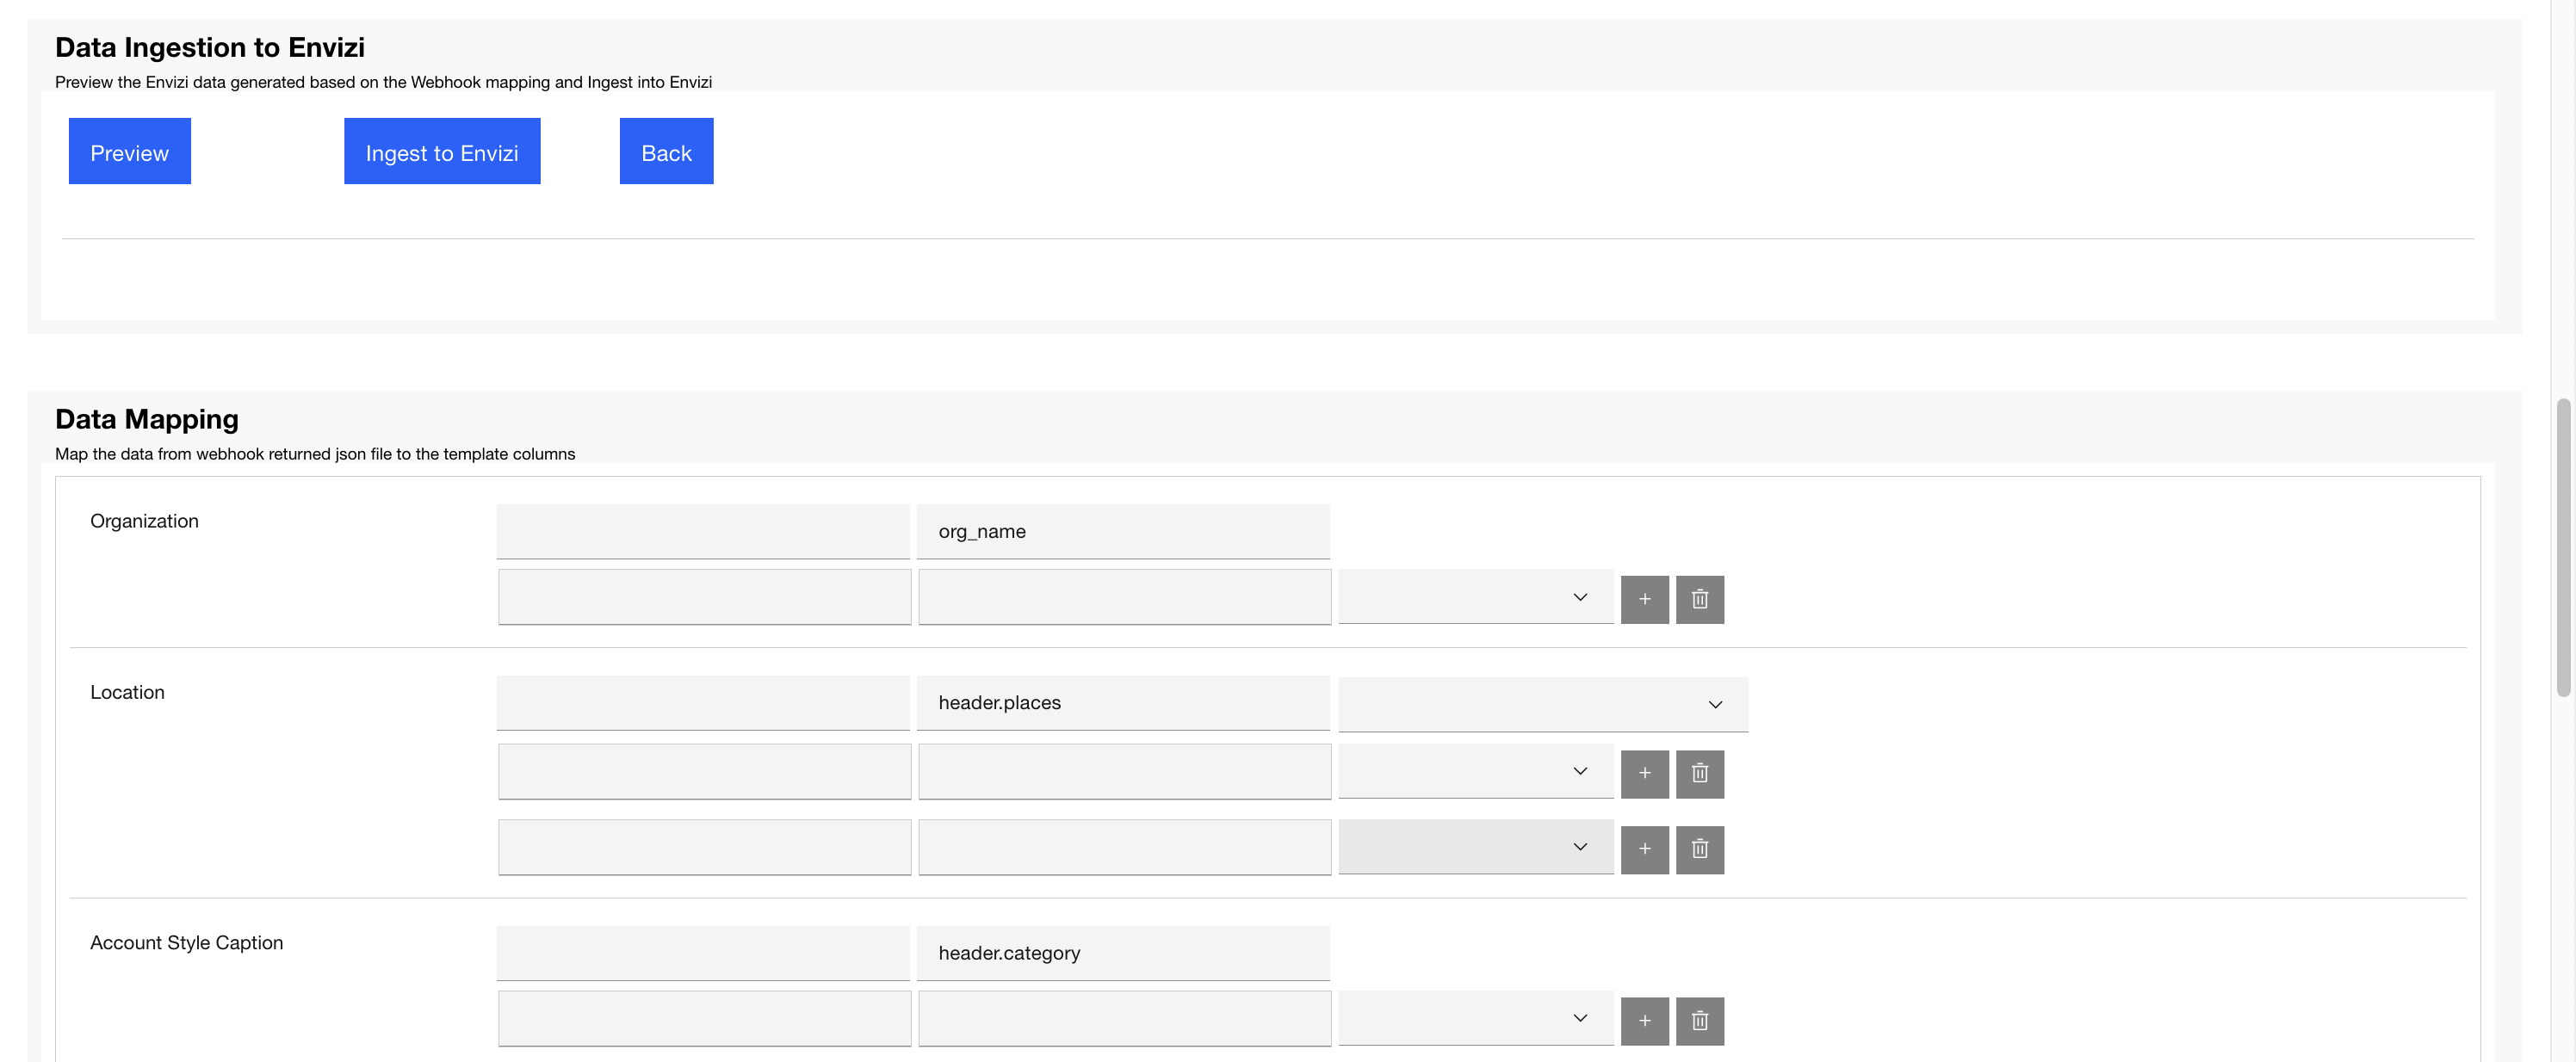
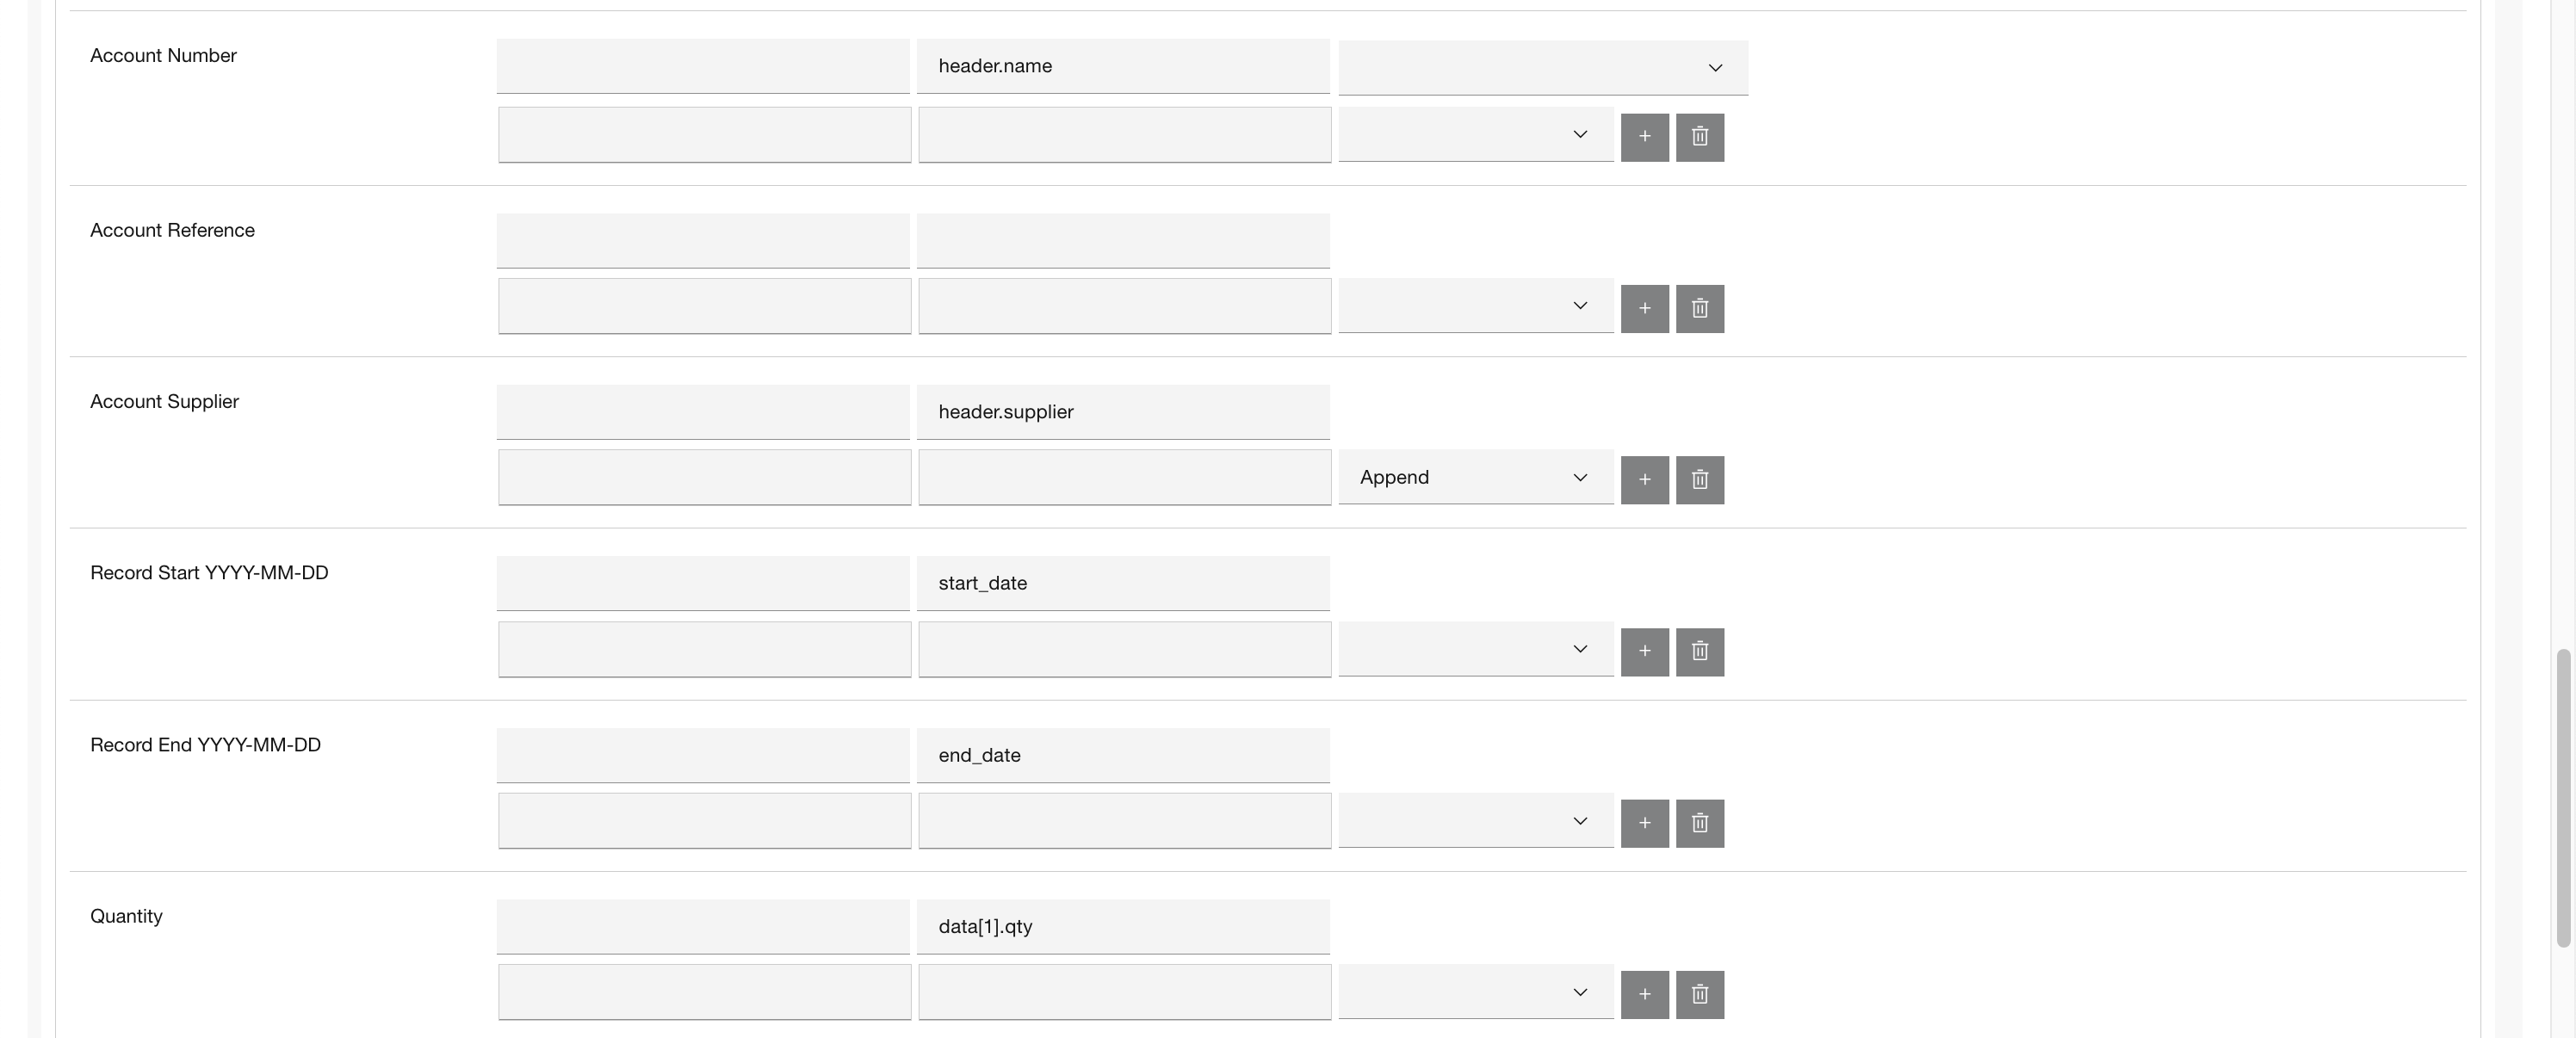
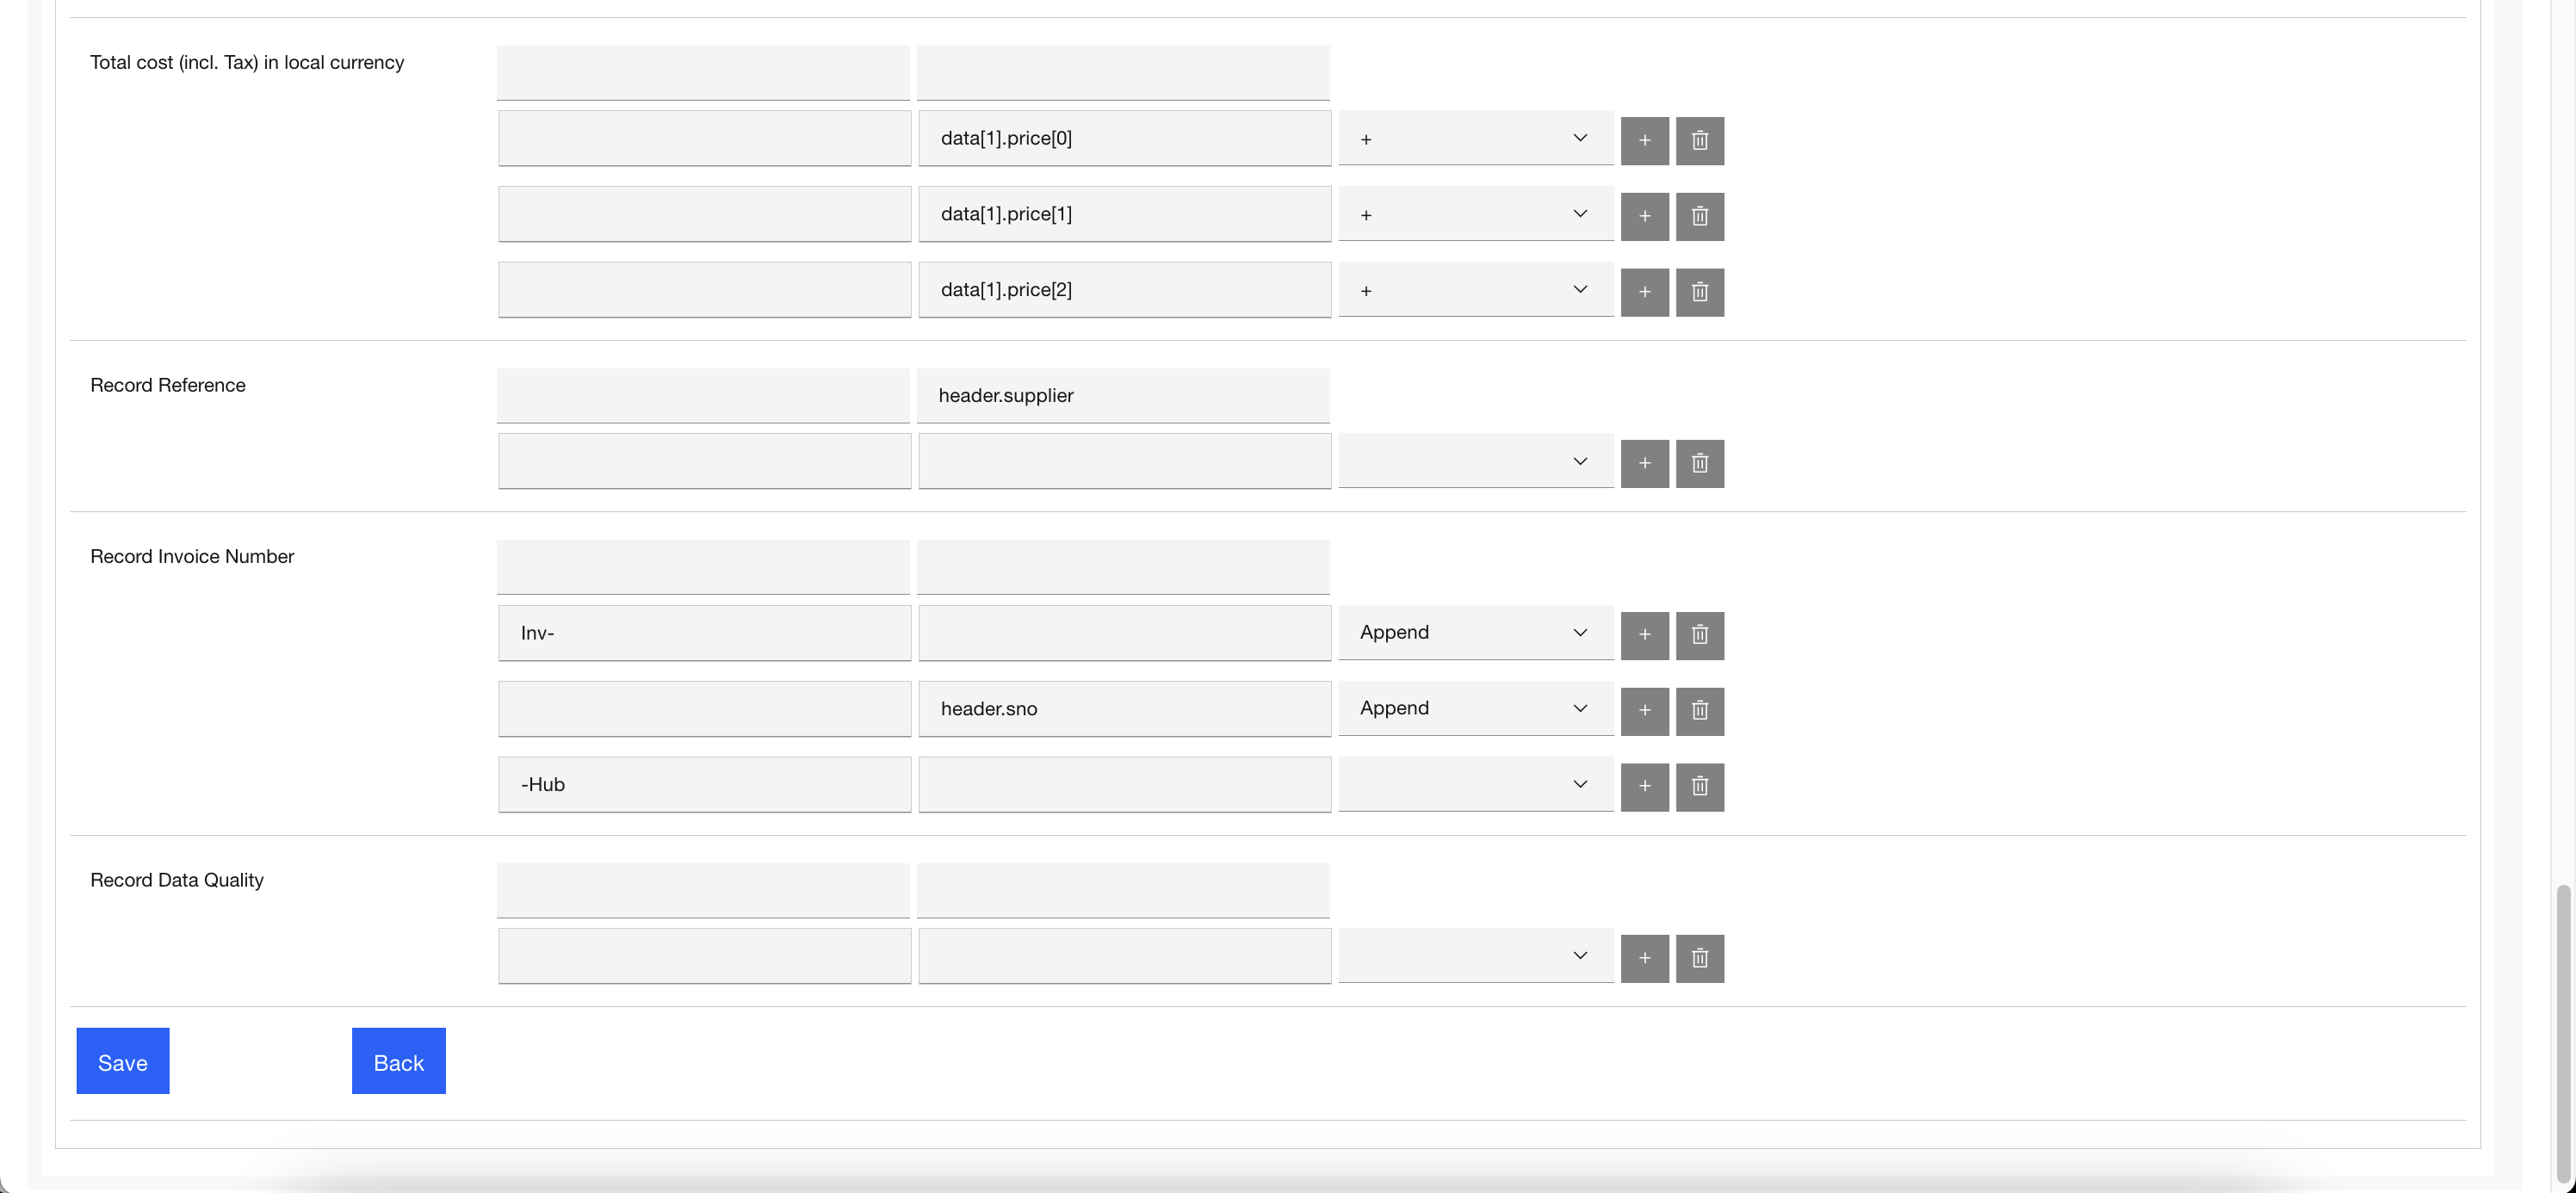
Webhook mapping details
The following images show the details of the "Elite ERP" mapping configuration:
Preview data
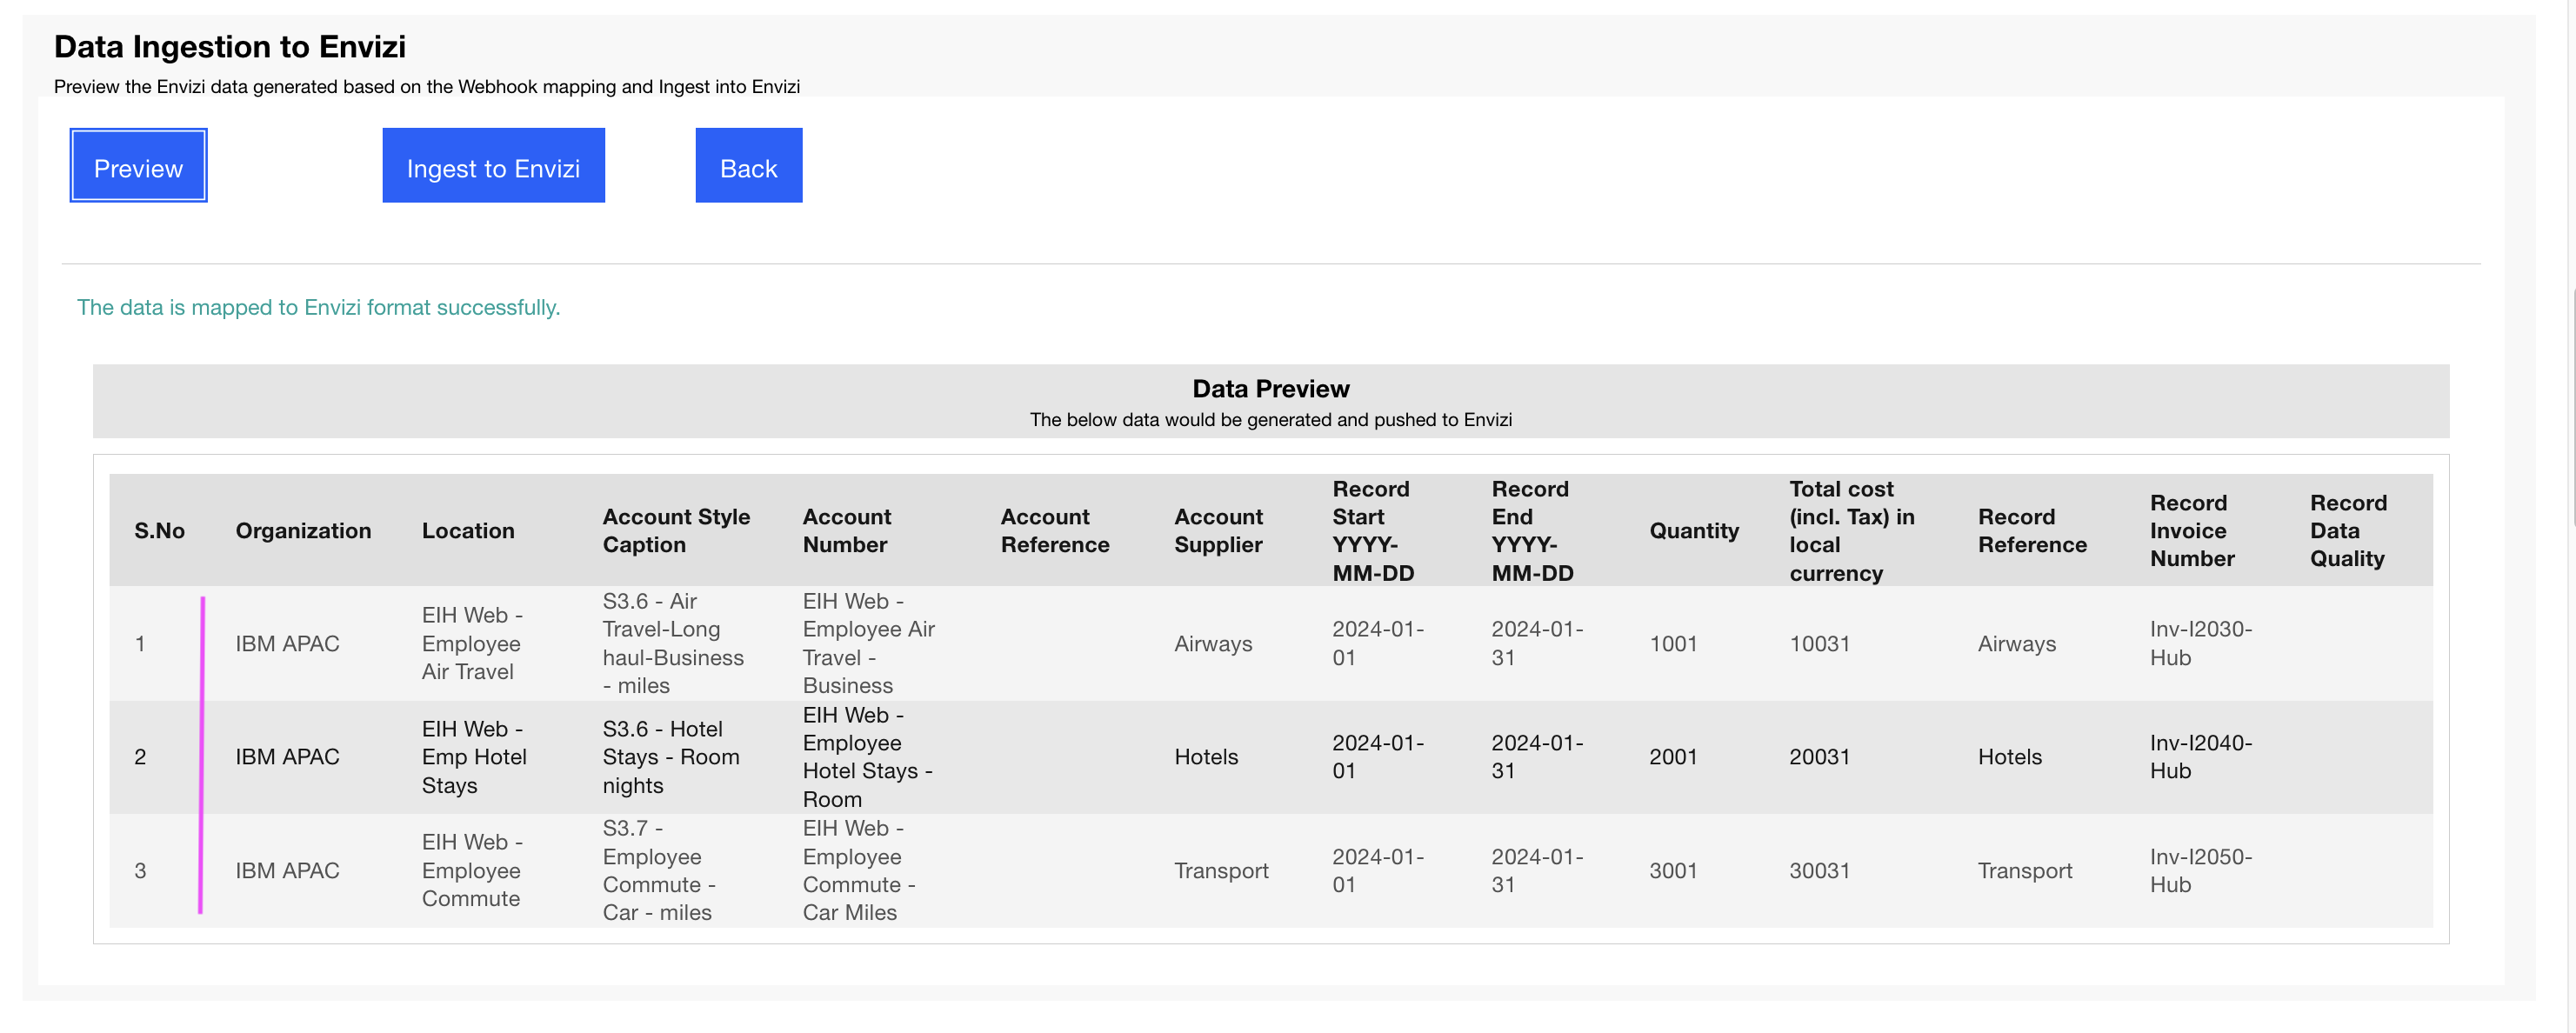
To preview the data conversion into the Envizi format, click on Preview.

The converted data will be displayed as shown below:
Ingest data to Envizi
You can then push the converted data to Envizi.

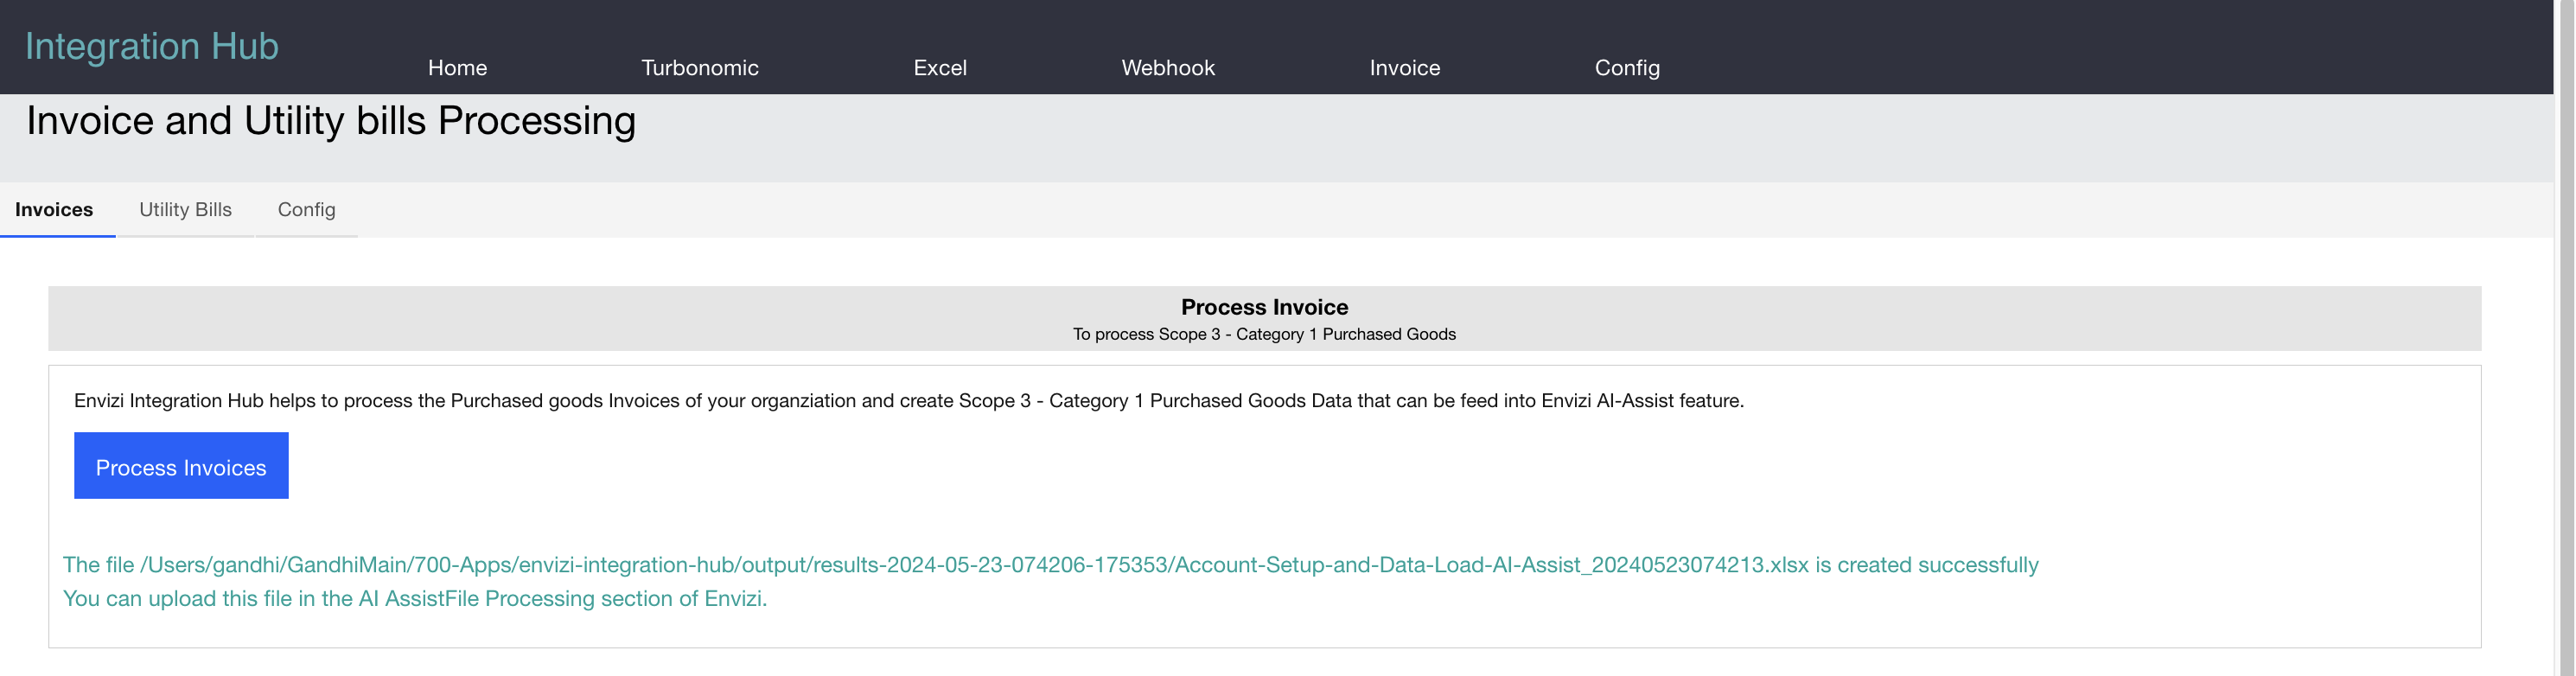
3. Invoice integrations
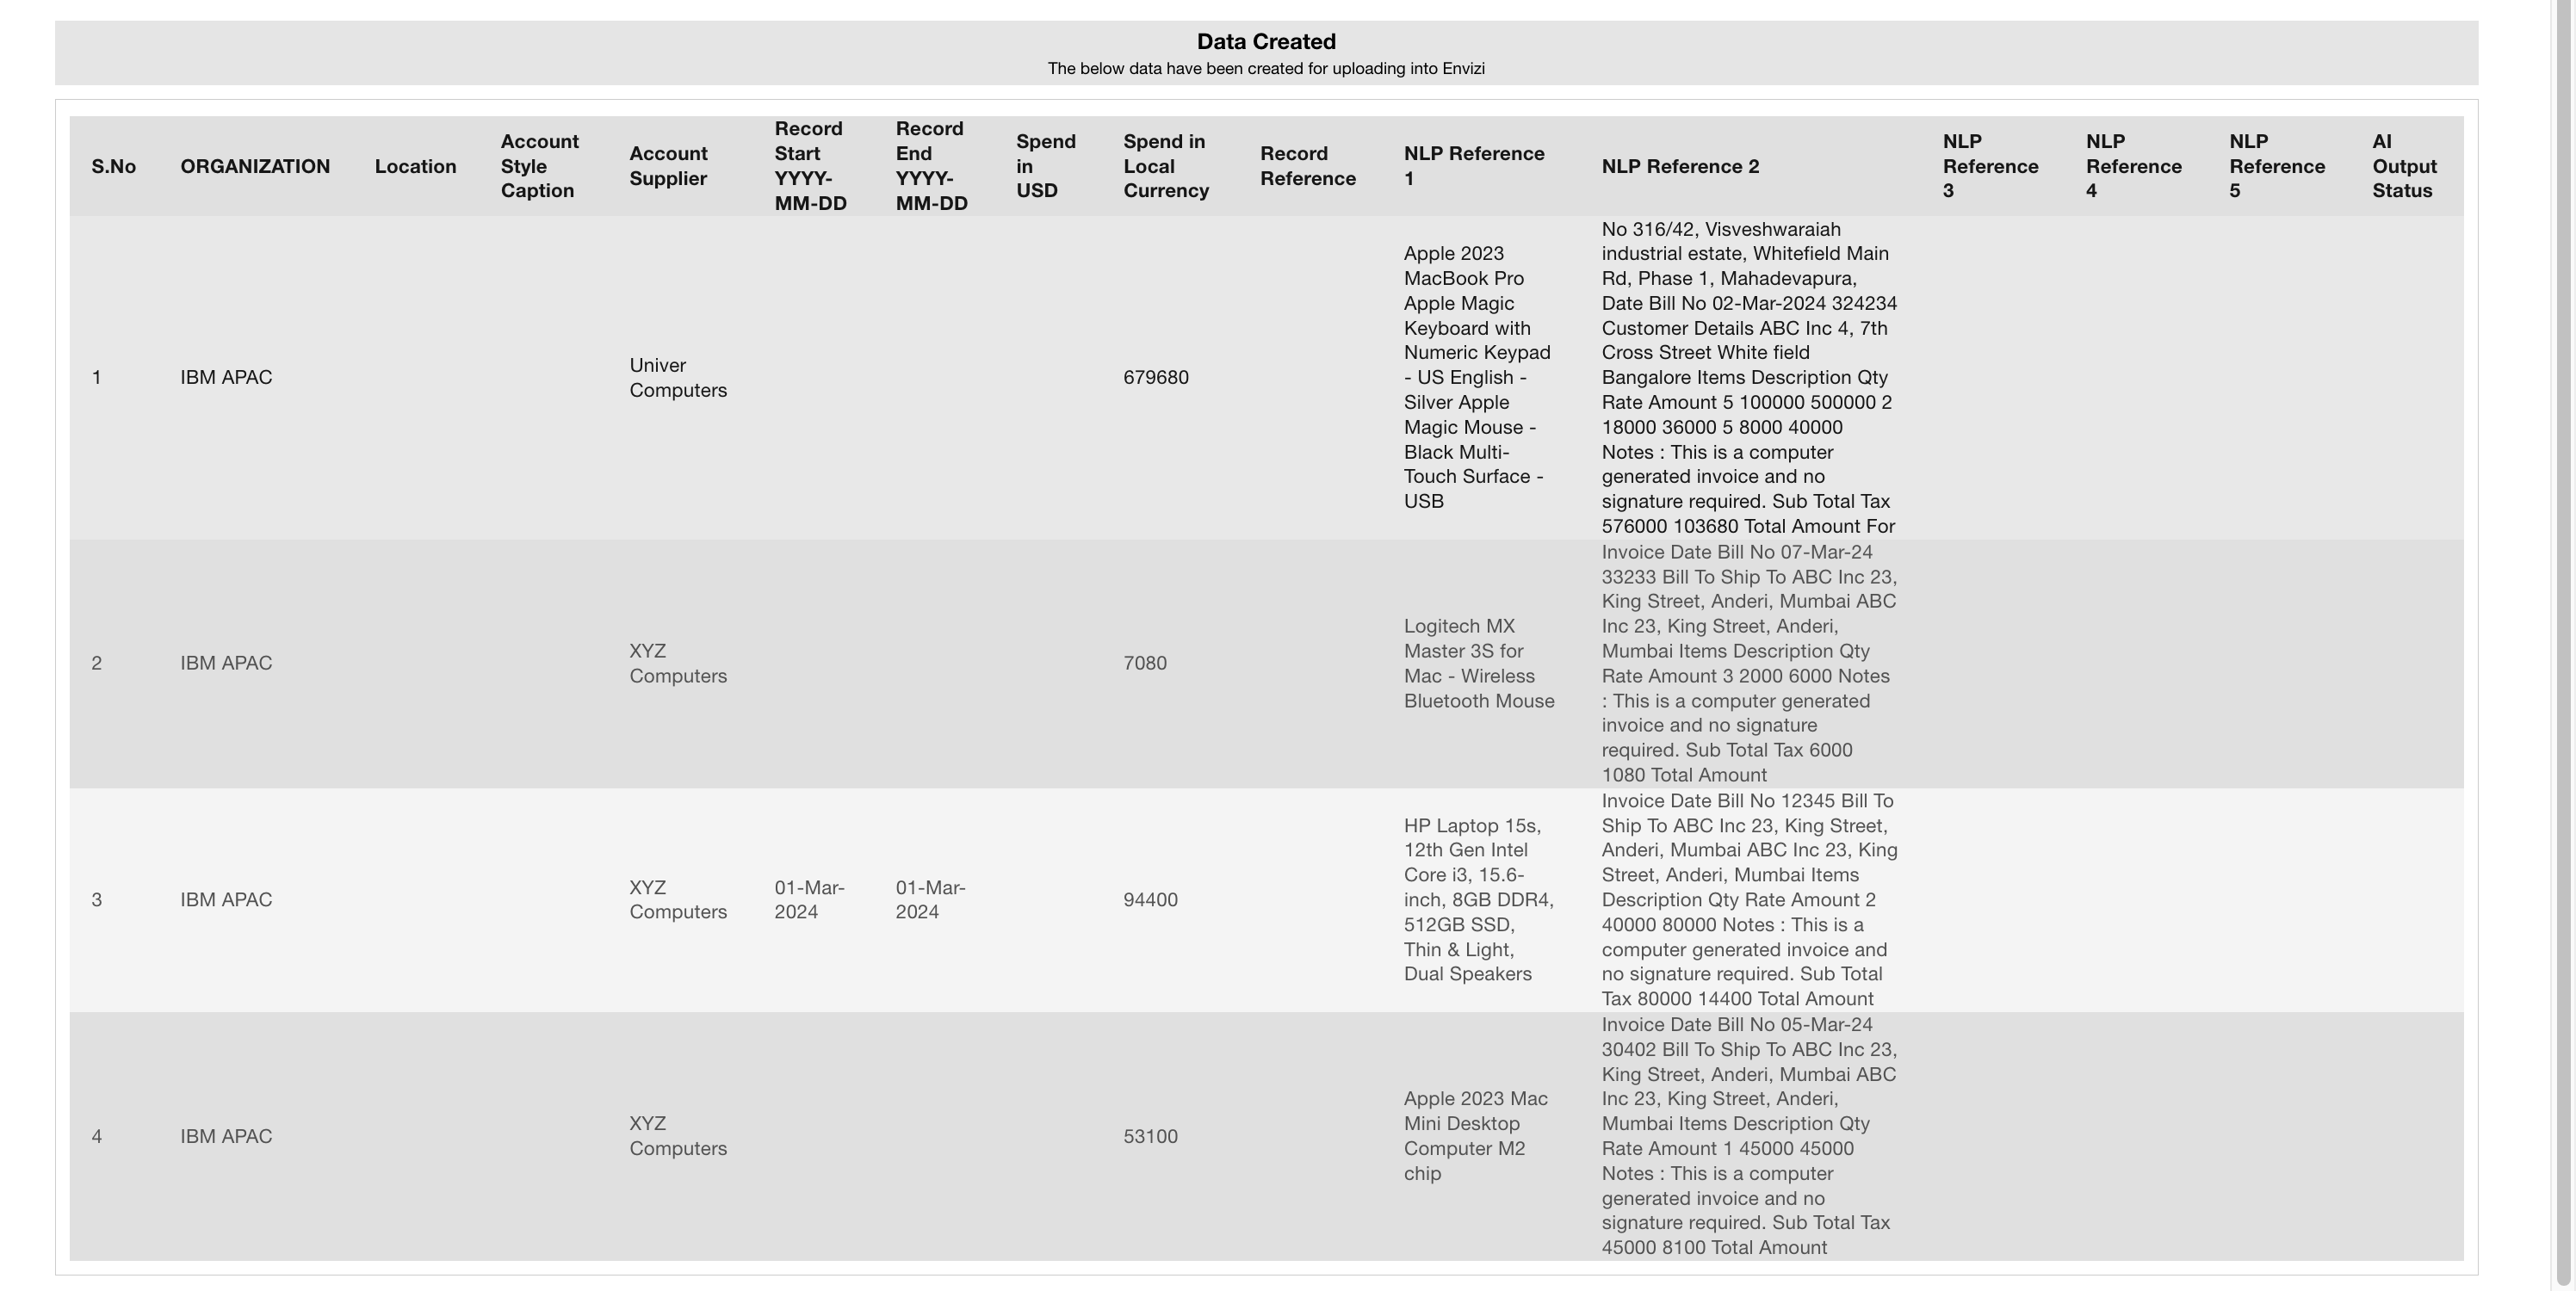
The Integration Hub enables the processing of PDF invoices using IBM Watson Discovery. It reads the invoices and generates Envizi Scope-3 Category-1 AI Assist Template files, which are then used to push utility data into Envizi.
Invoices are stored in IBM Watson Discovery as collections. Using Smart Document Understanding (SDU), IBM Watson Discovery is trained to extract custom fields from these invoices. The Integration Hub pulls data from Watson Discovery, converts it into the Envizi format, and prepares it for integration.
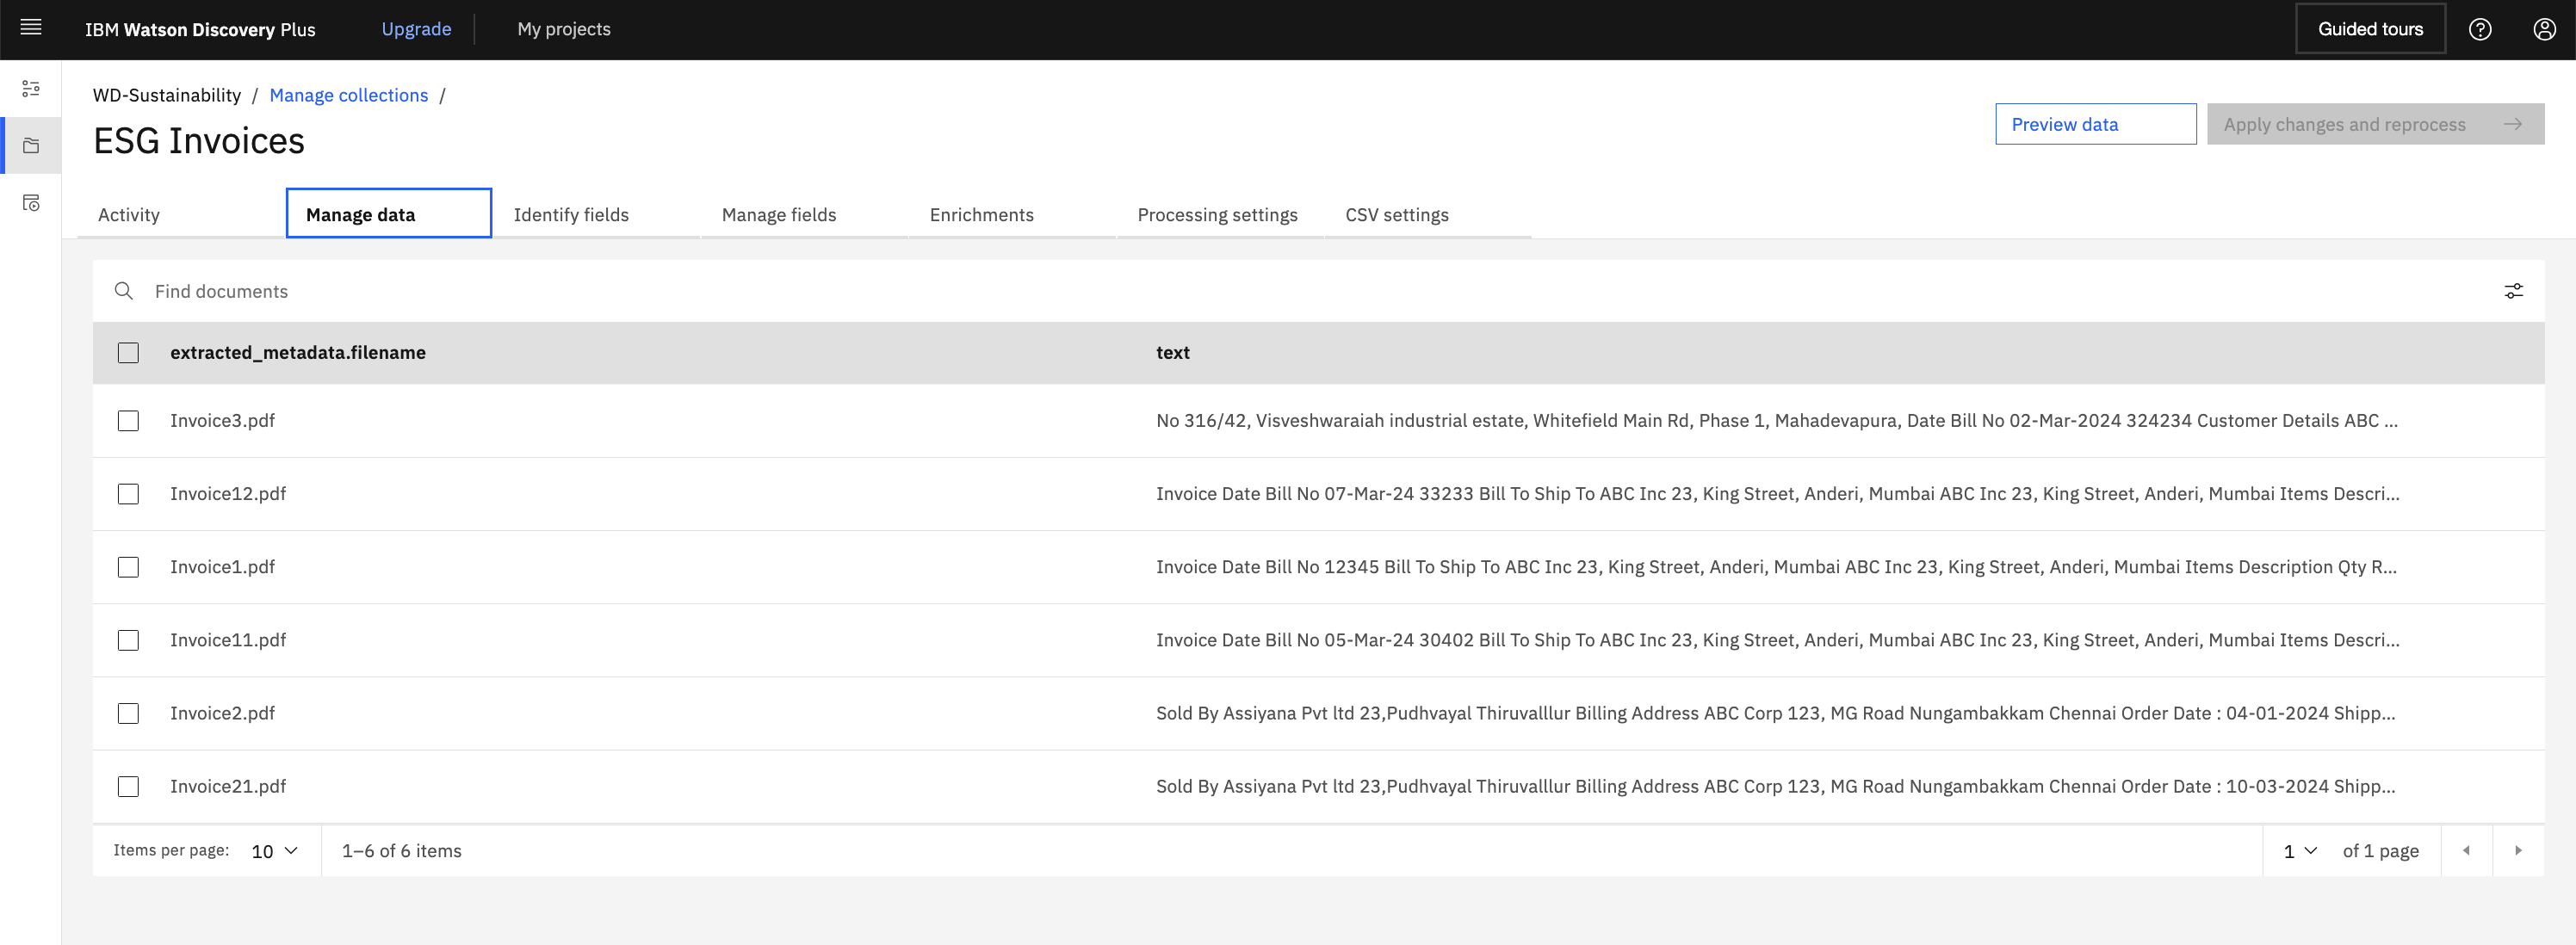
Invoices in Watson Discovery
Invoices are managed within Watson Discovery, as shown below:
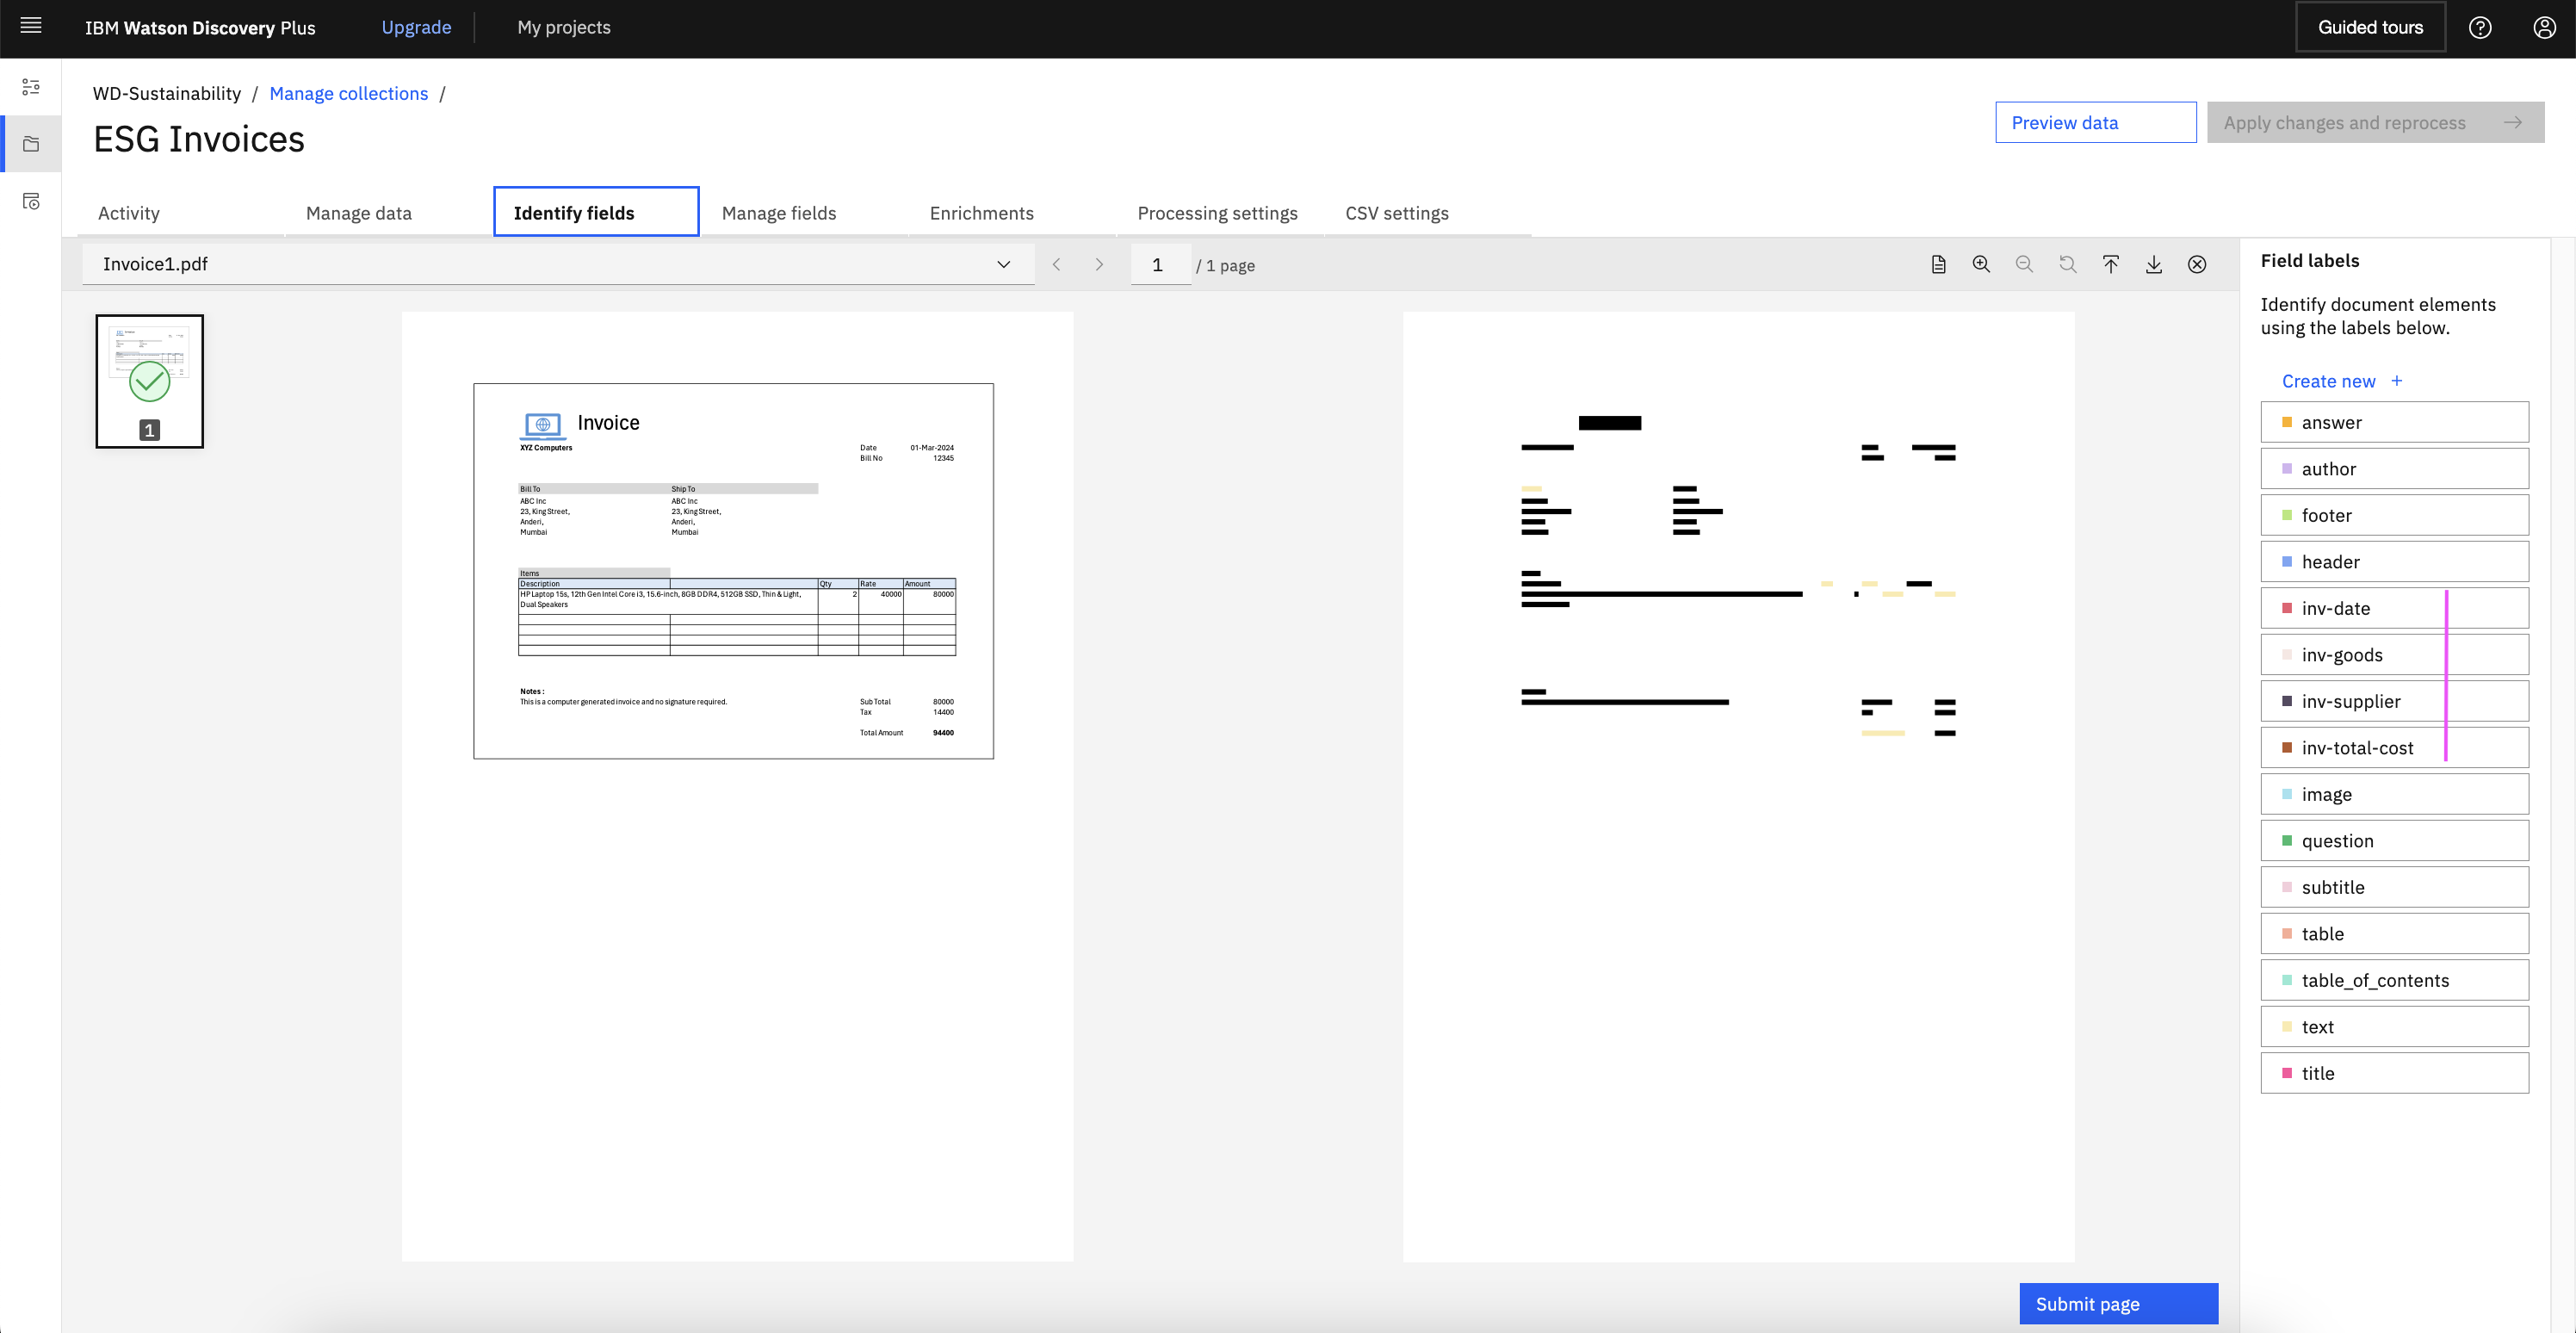
Smart Document Understanding (SDU) is used to extract custom fields from these invoices:
The following are examples of invoices processed:
- Invoice1-94400.pdf
- Invoice2.pdf
- Invoice3-UniverComputers.pdf
- Invoice11-53100.pdf
- Invoice12-7080.pdf
- Invoice21.pdf
Integration of invoices into Envizi
This process involves communication with Watson Discovery to pull invoice data, convert it into the Envizi format, and push it to a configured S3 bucket.
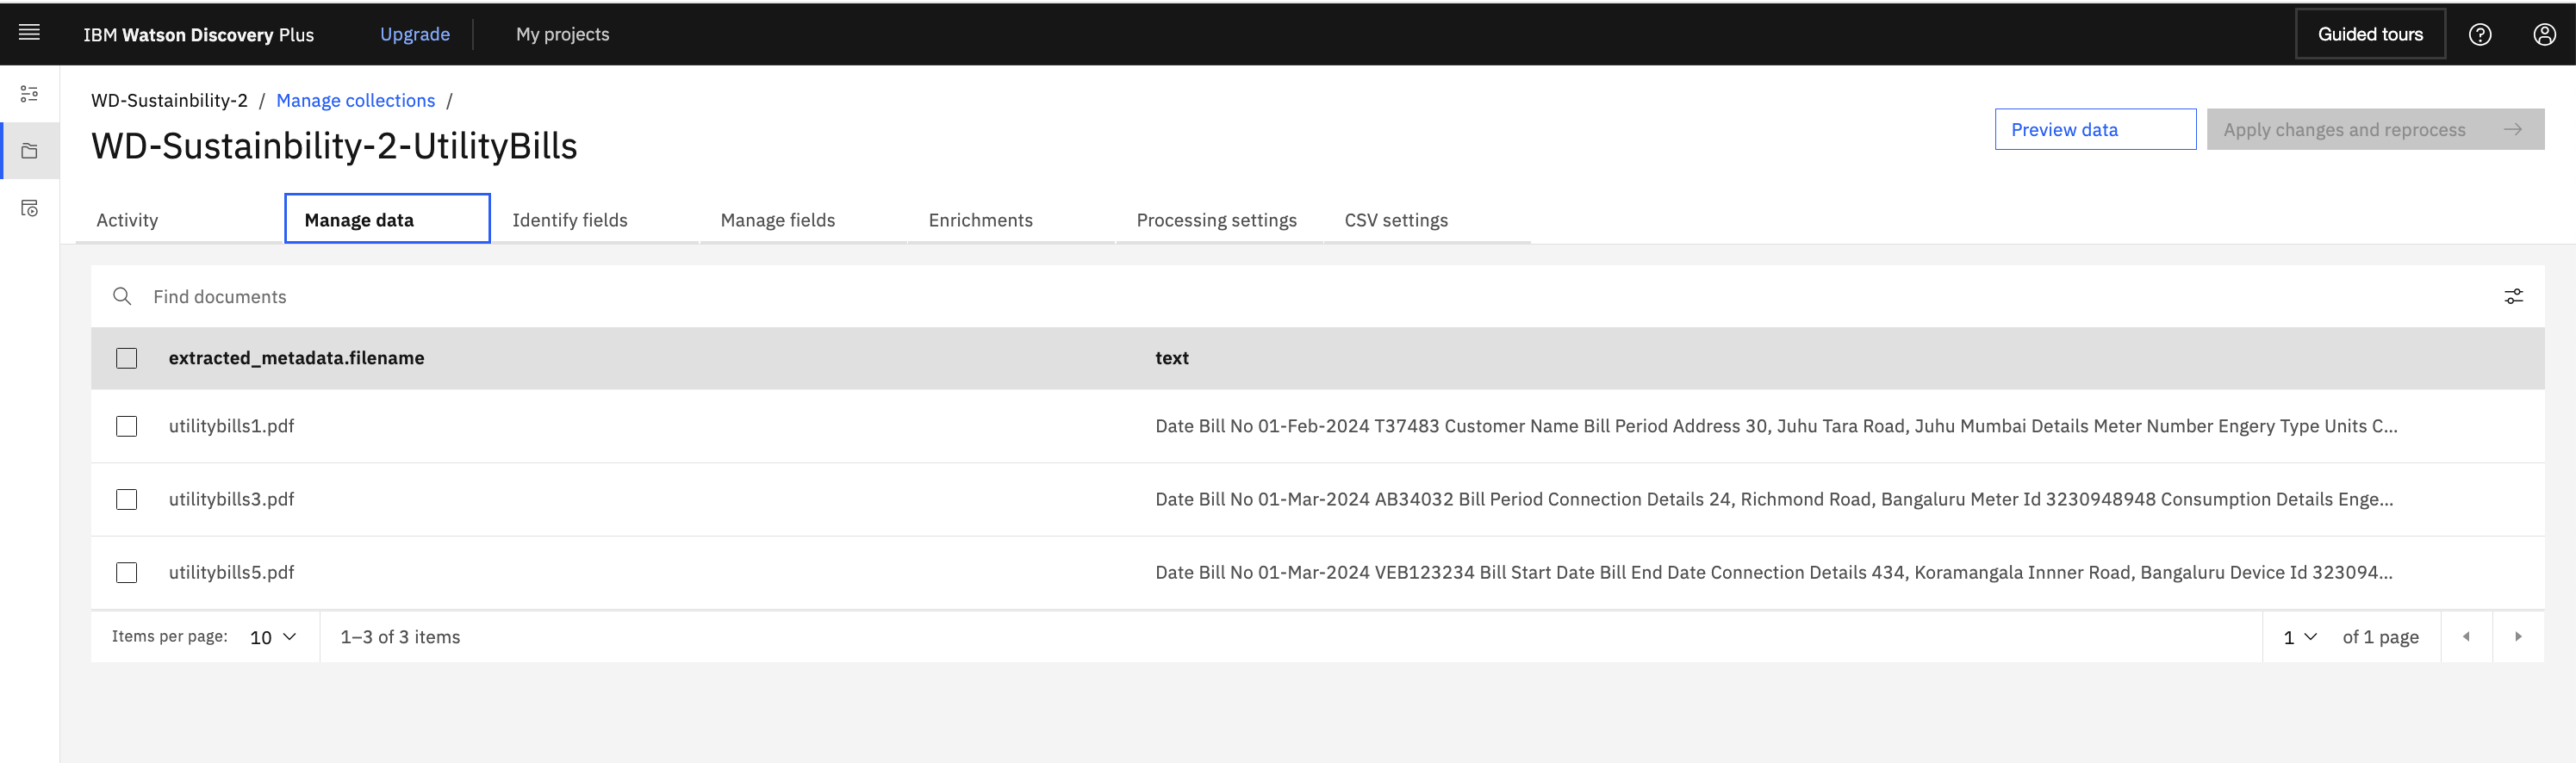
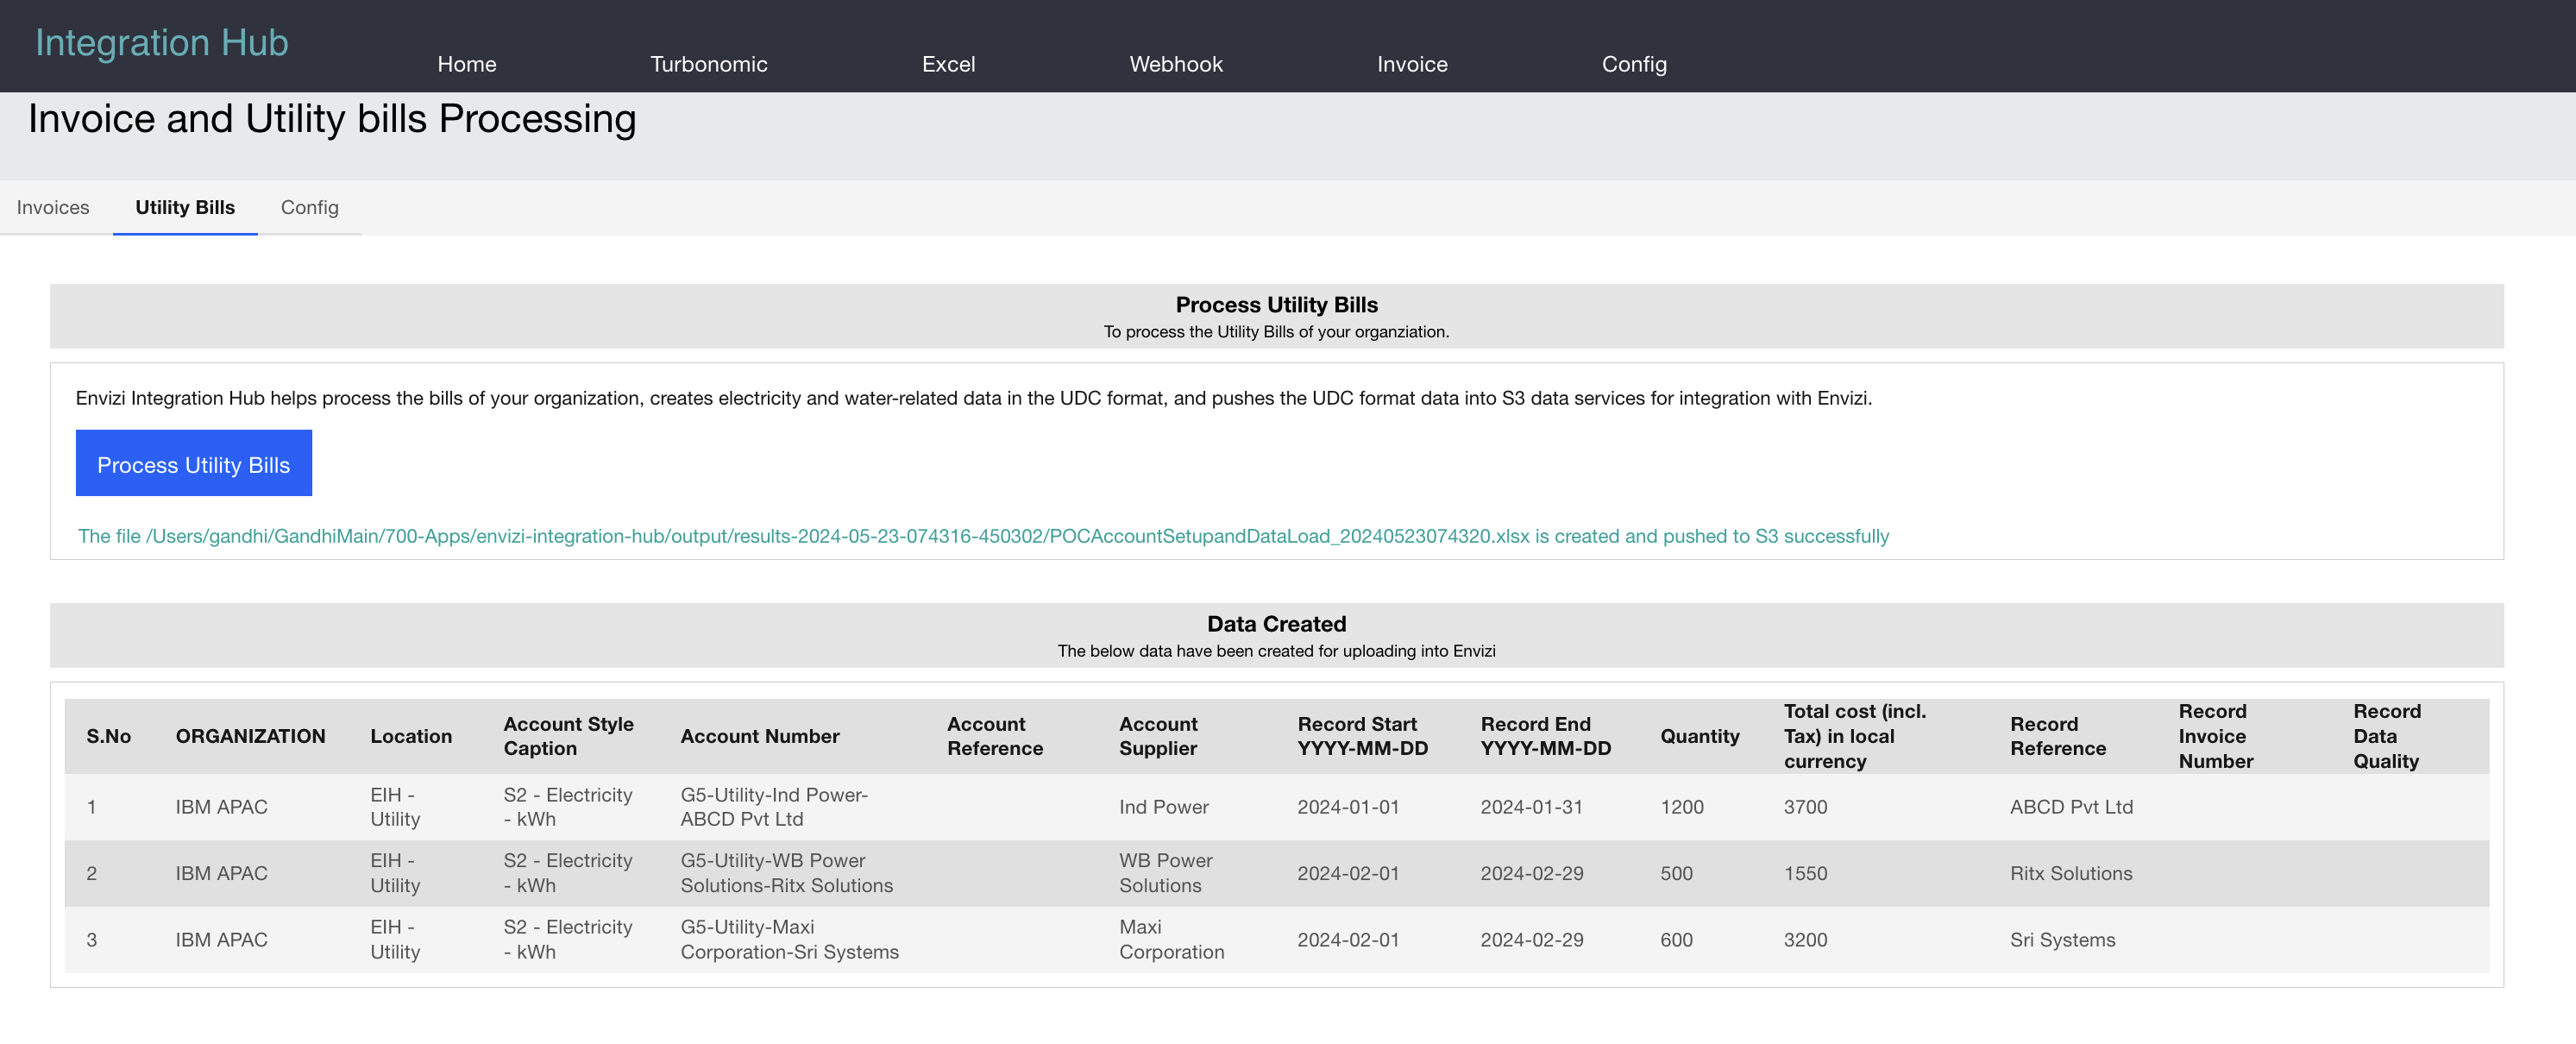
4. Utility bill integrations
The Integration Hub supports the integration of utility bills in PDF format using IBM Watson Discovery. It processes these bills to create Envizi UDC (Universal Data Conversion) template files, which are then used to push utility bill data into Envizi.
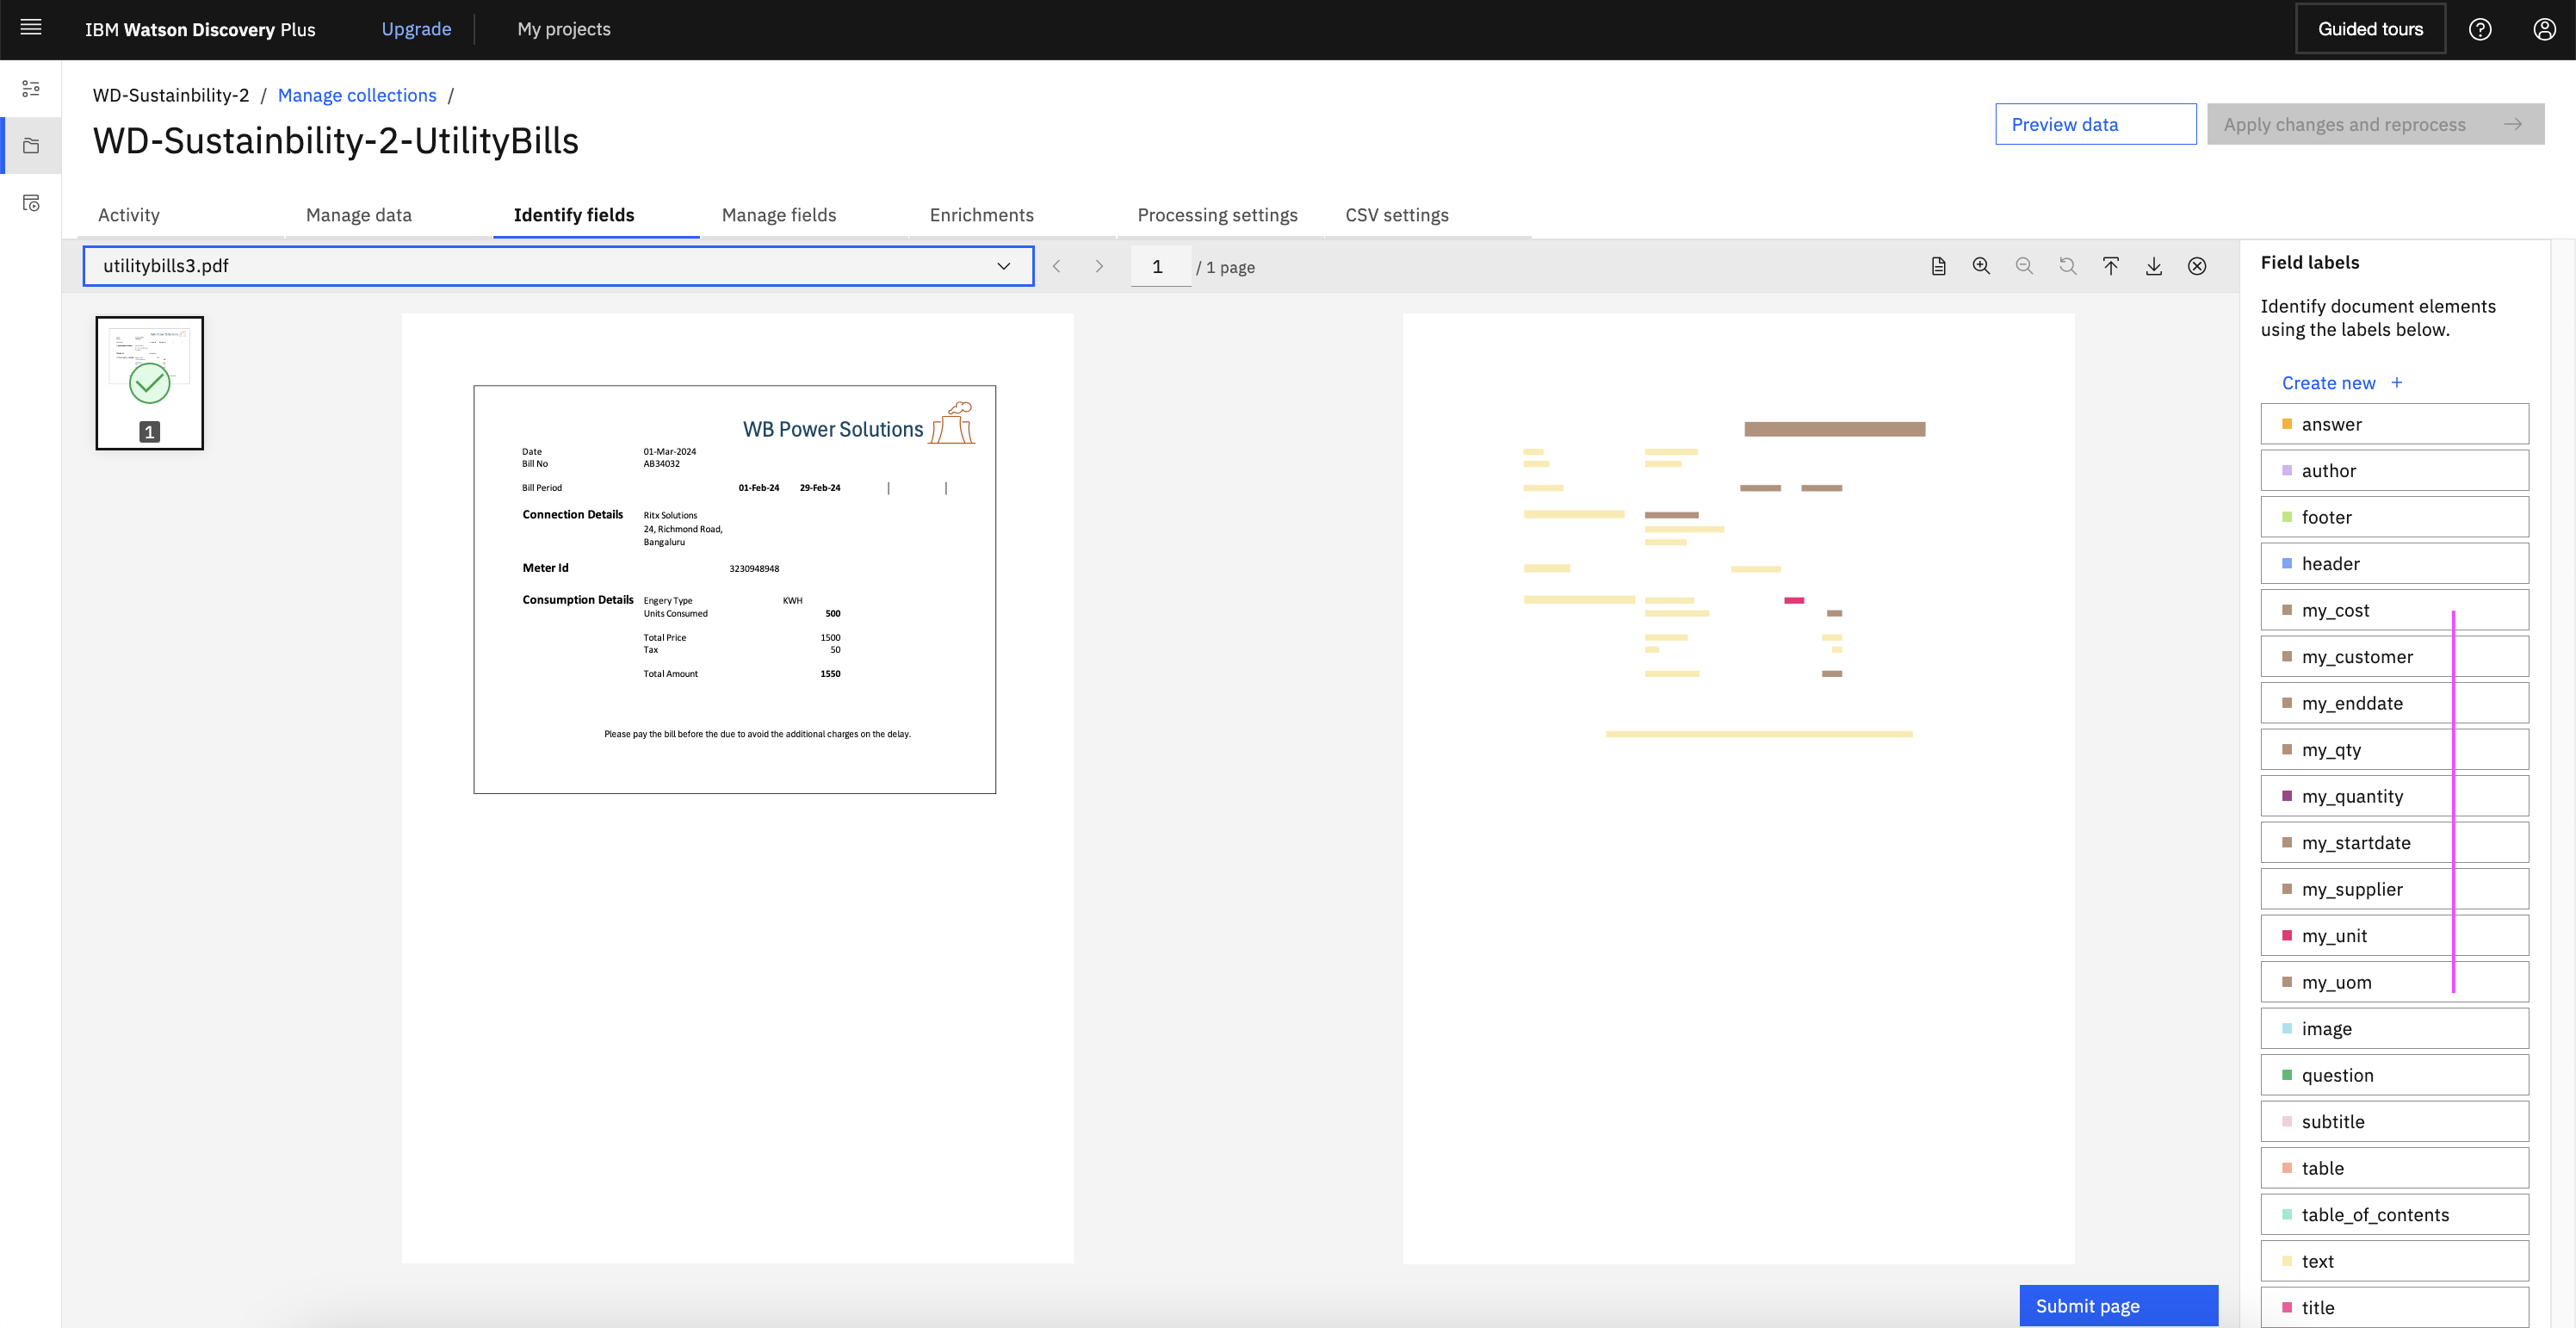
Utility bills are stored as collections within IBM Watson Discovery. Using Smart Document Understanding (SDU), IBM Watson Discovery is trained to extract custom fields from the utility bills. The Integration Hub pulls this data, converts it into the Envizi format, and prepares it for integration.
Utility bills in Watson Discovery
Utility bills are managed within Watson Discovery, as shown below:
Smart Document Understanding (SDU) is used to extract custom fields from these utility bills:
Sample utility bills
The following are examples of utility bills processed:
Integration of utility bills into Envizi
This process involves communication with Watson Discovery to retrieve utility bill data, convert it into the Envizi format, and push it to a configured S3 bucket.
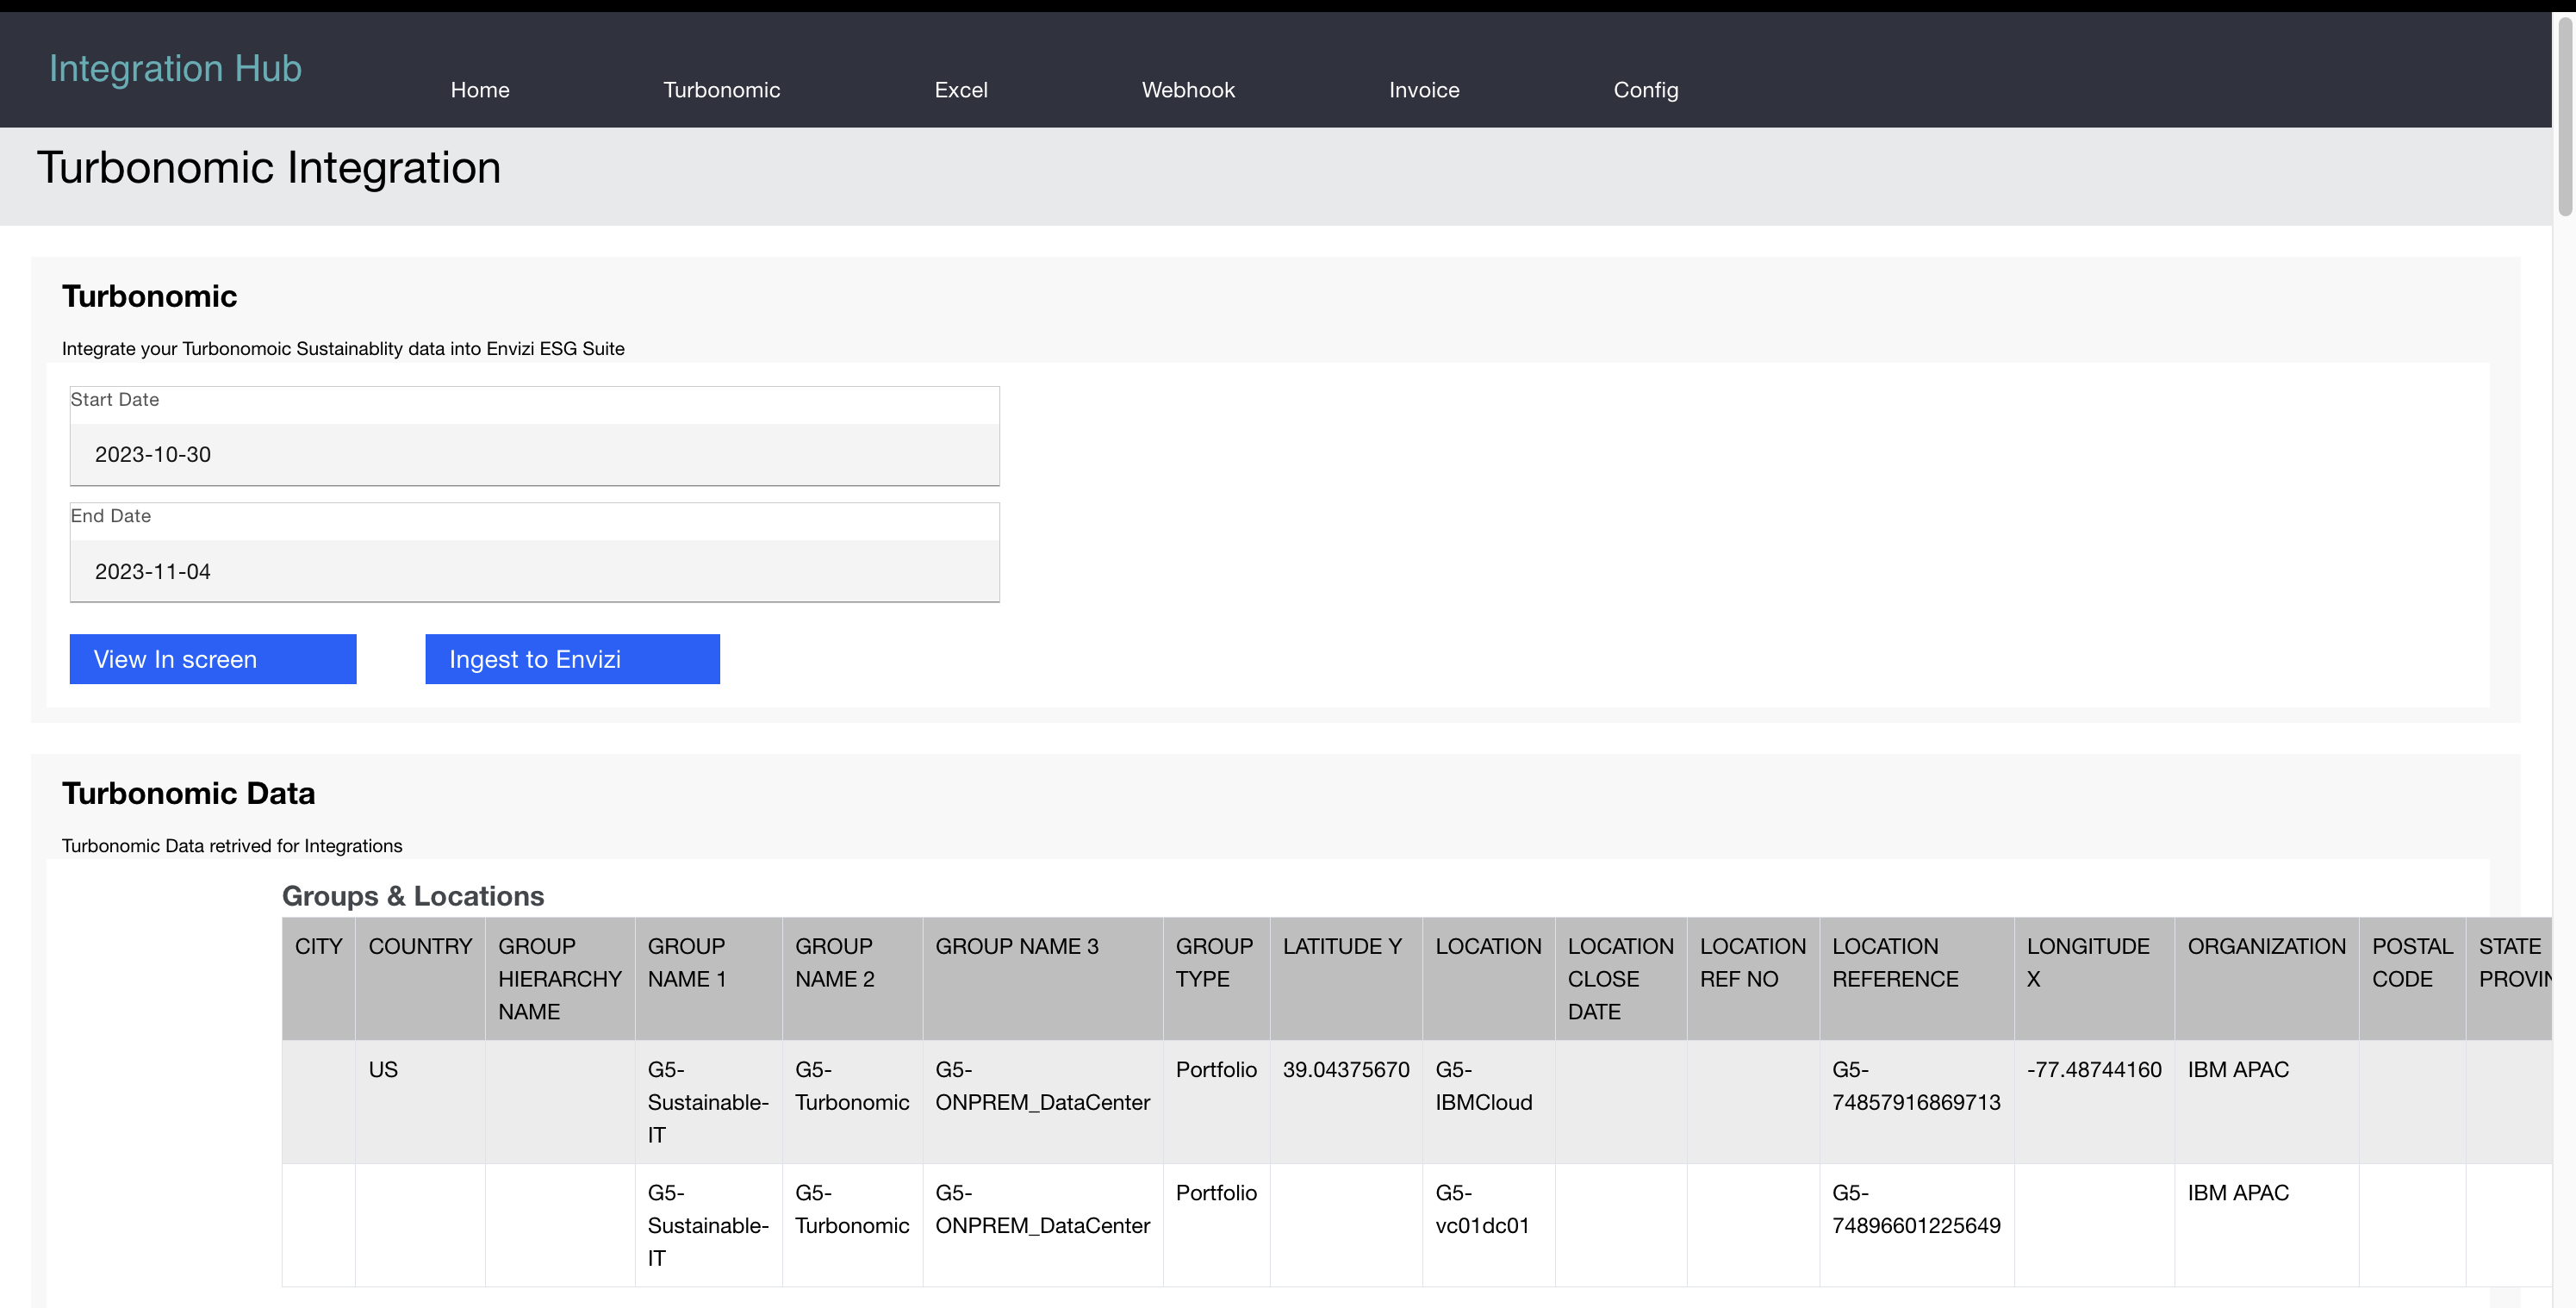
5. Turbonomic integrations
The Integration Hub can connect to IBM Turbonomic to retrieve energy consumption data for data centers. This integration pulls various data from Turbonomic into Envizi, transforming it into the required format.
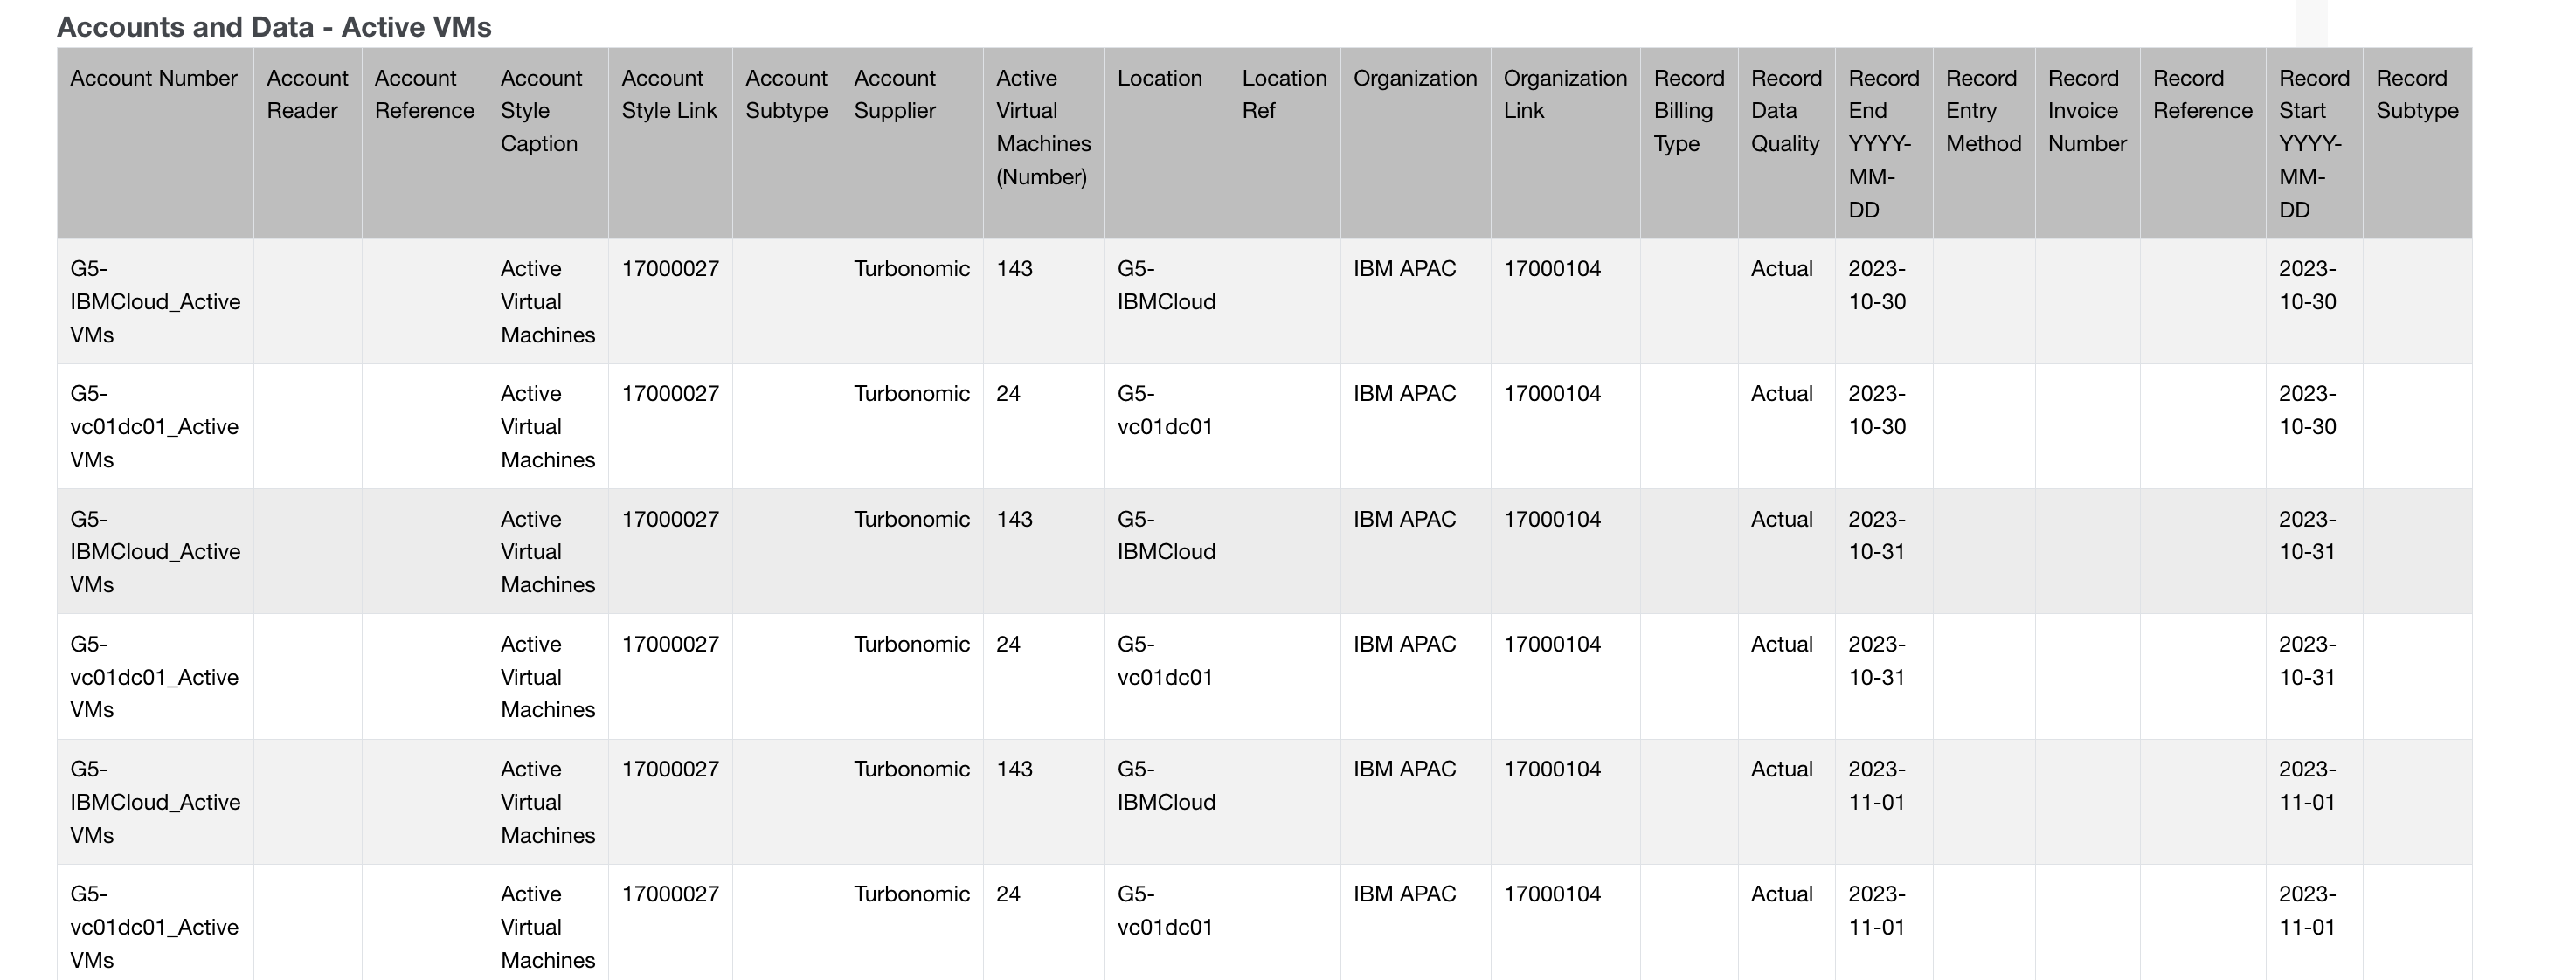
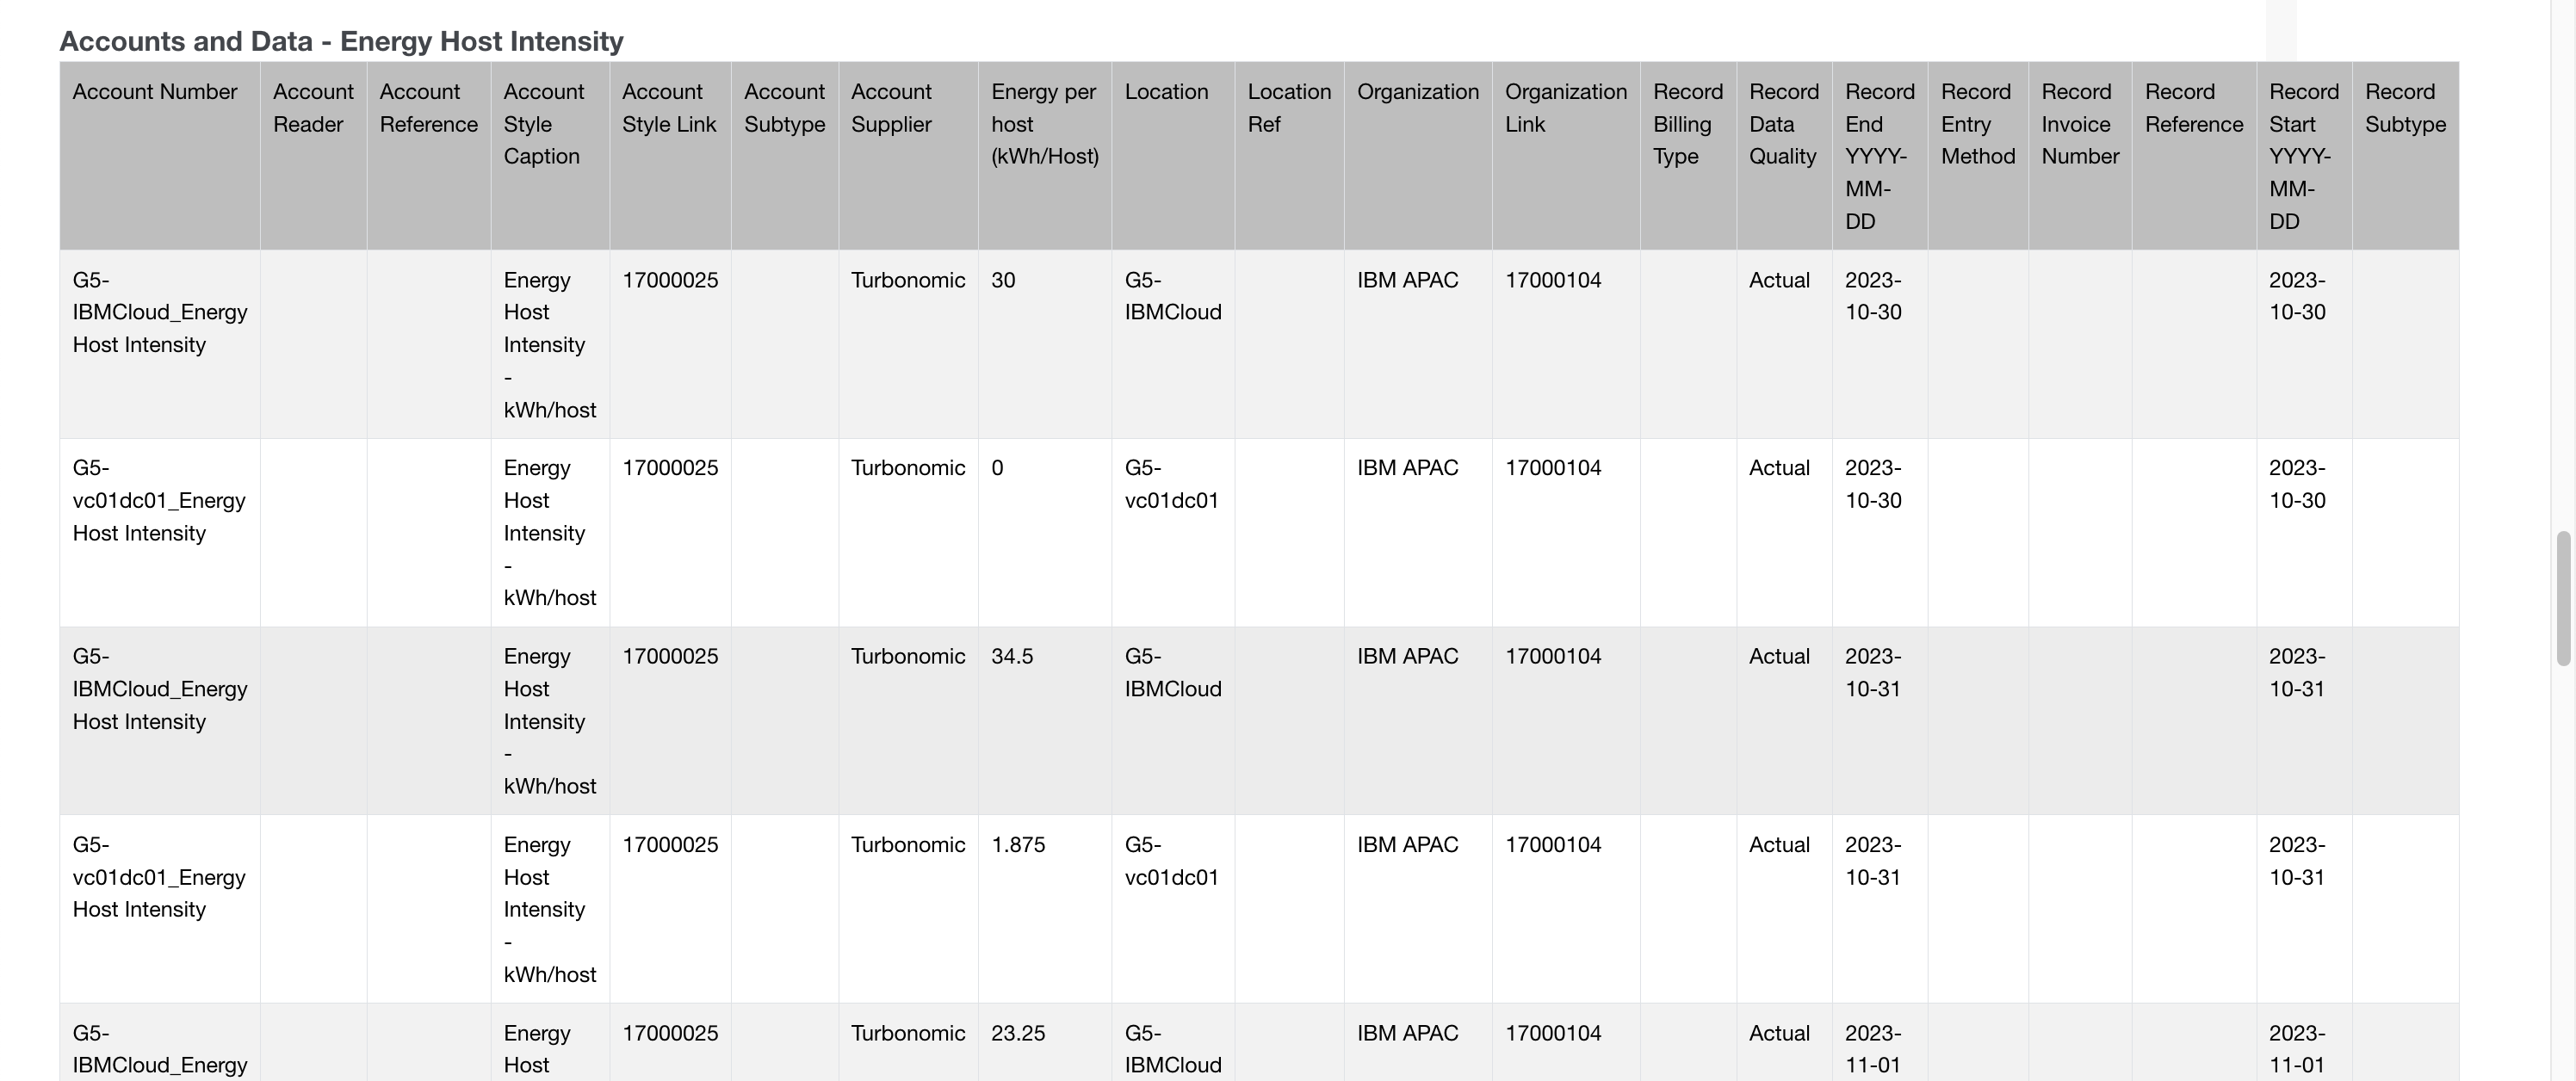
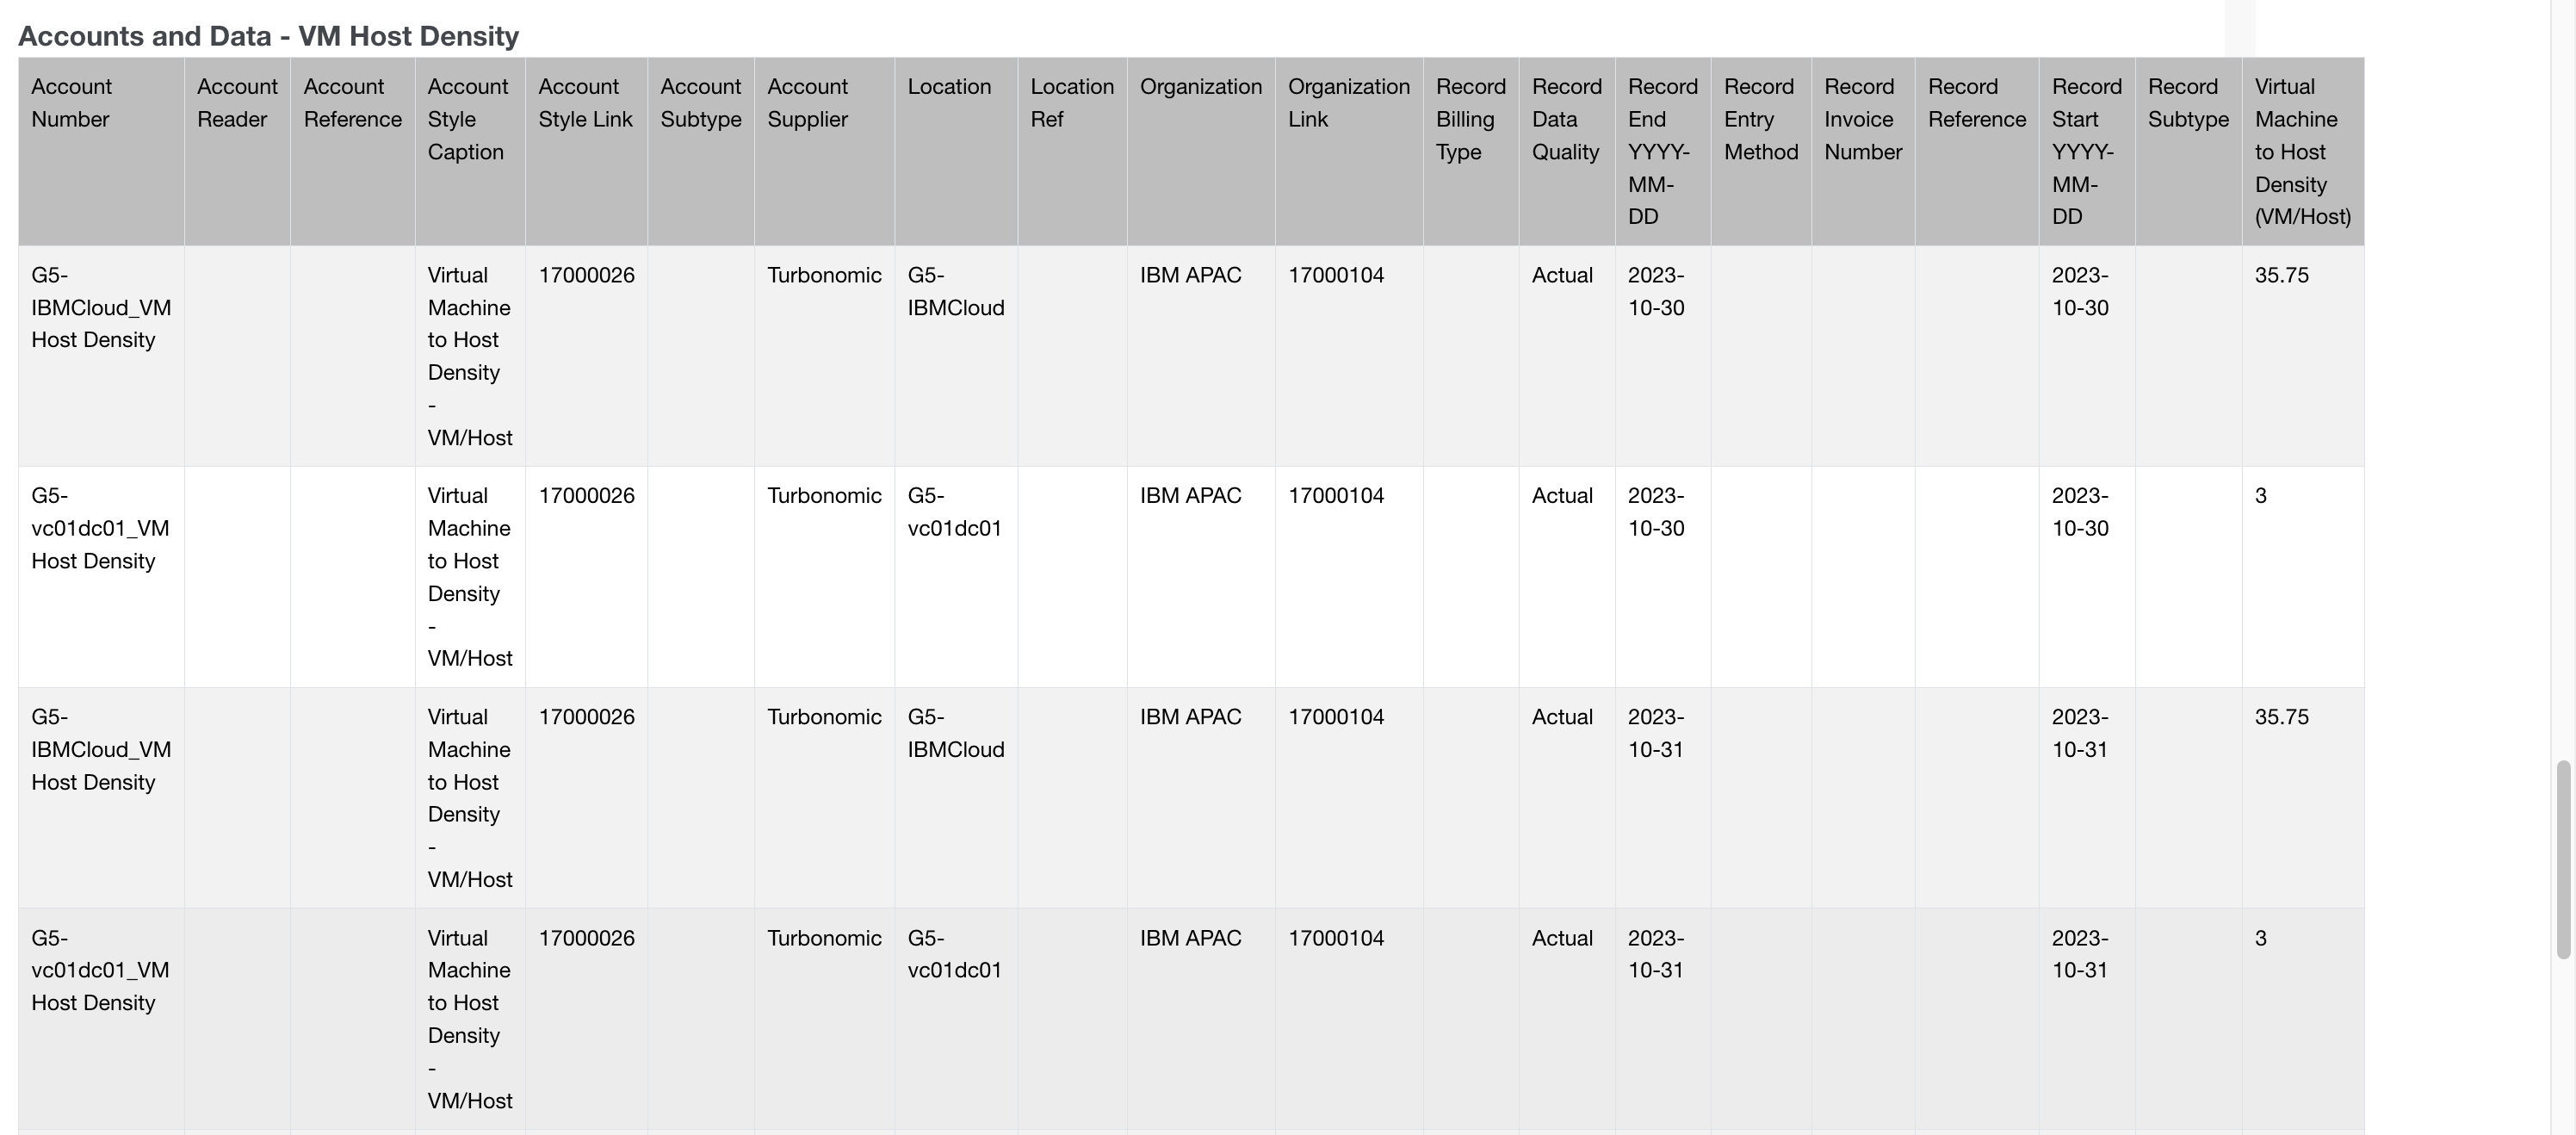
Below are examples of data retrieved from Turbonomic and converted for use in Envizi.
This image shows how the Groups and Locations data is retrieved from Turbonomic and formatted for Envizi.
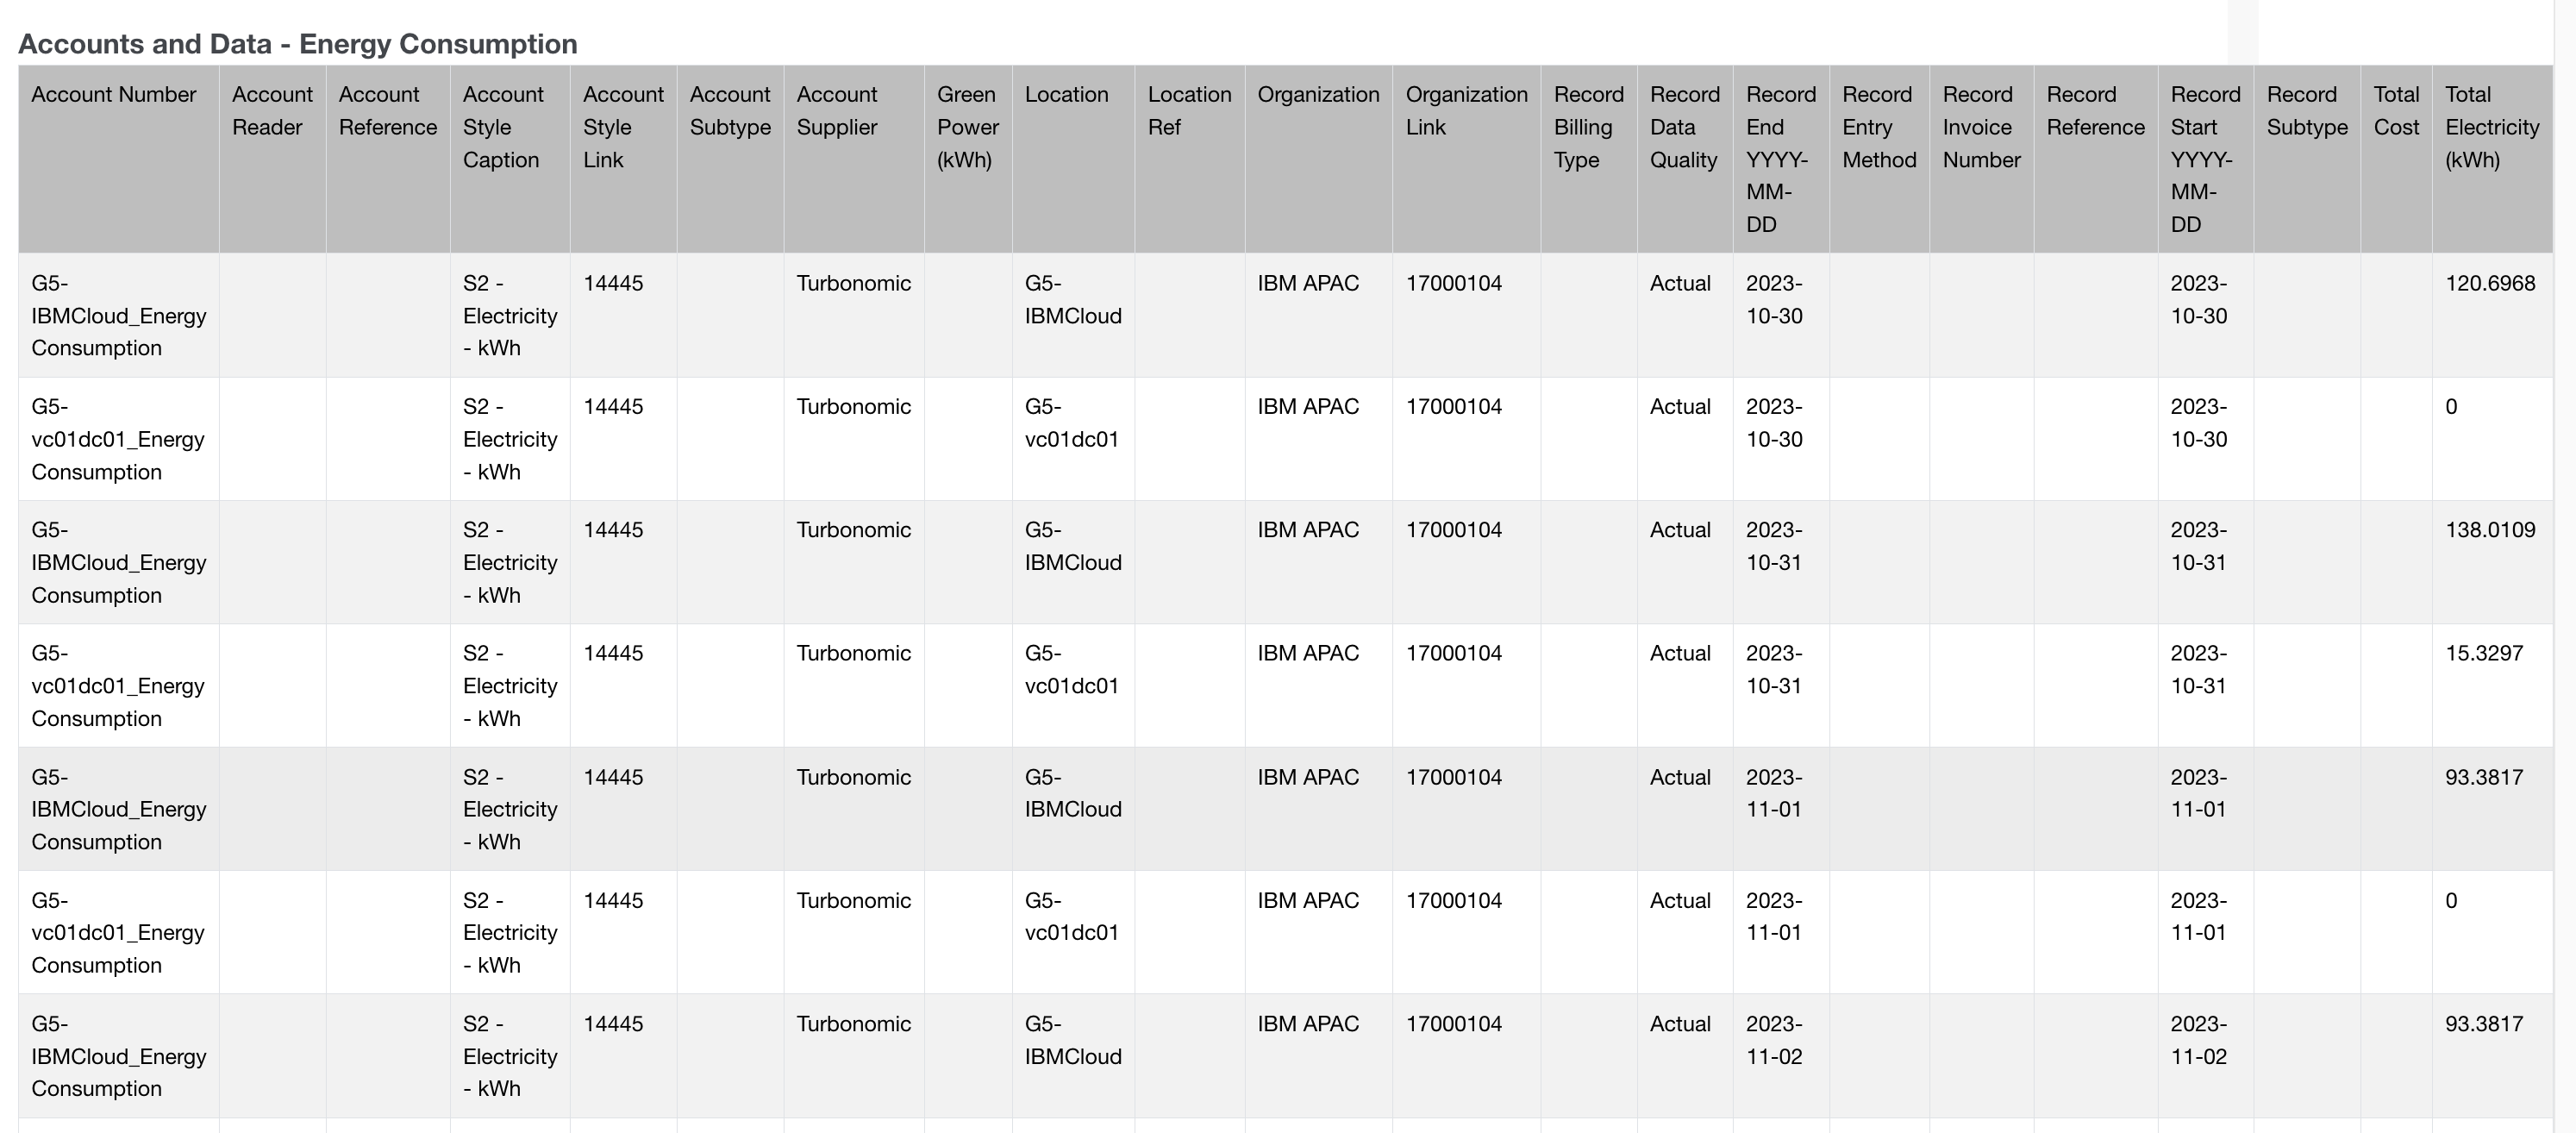
This image displays Accounts and Data containing details of Energy Consumption.
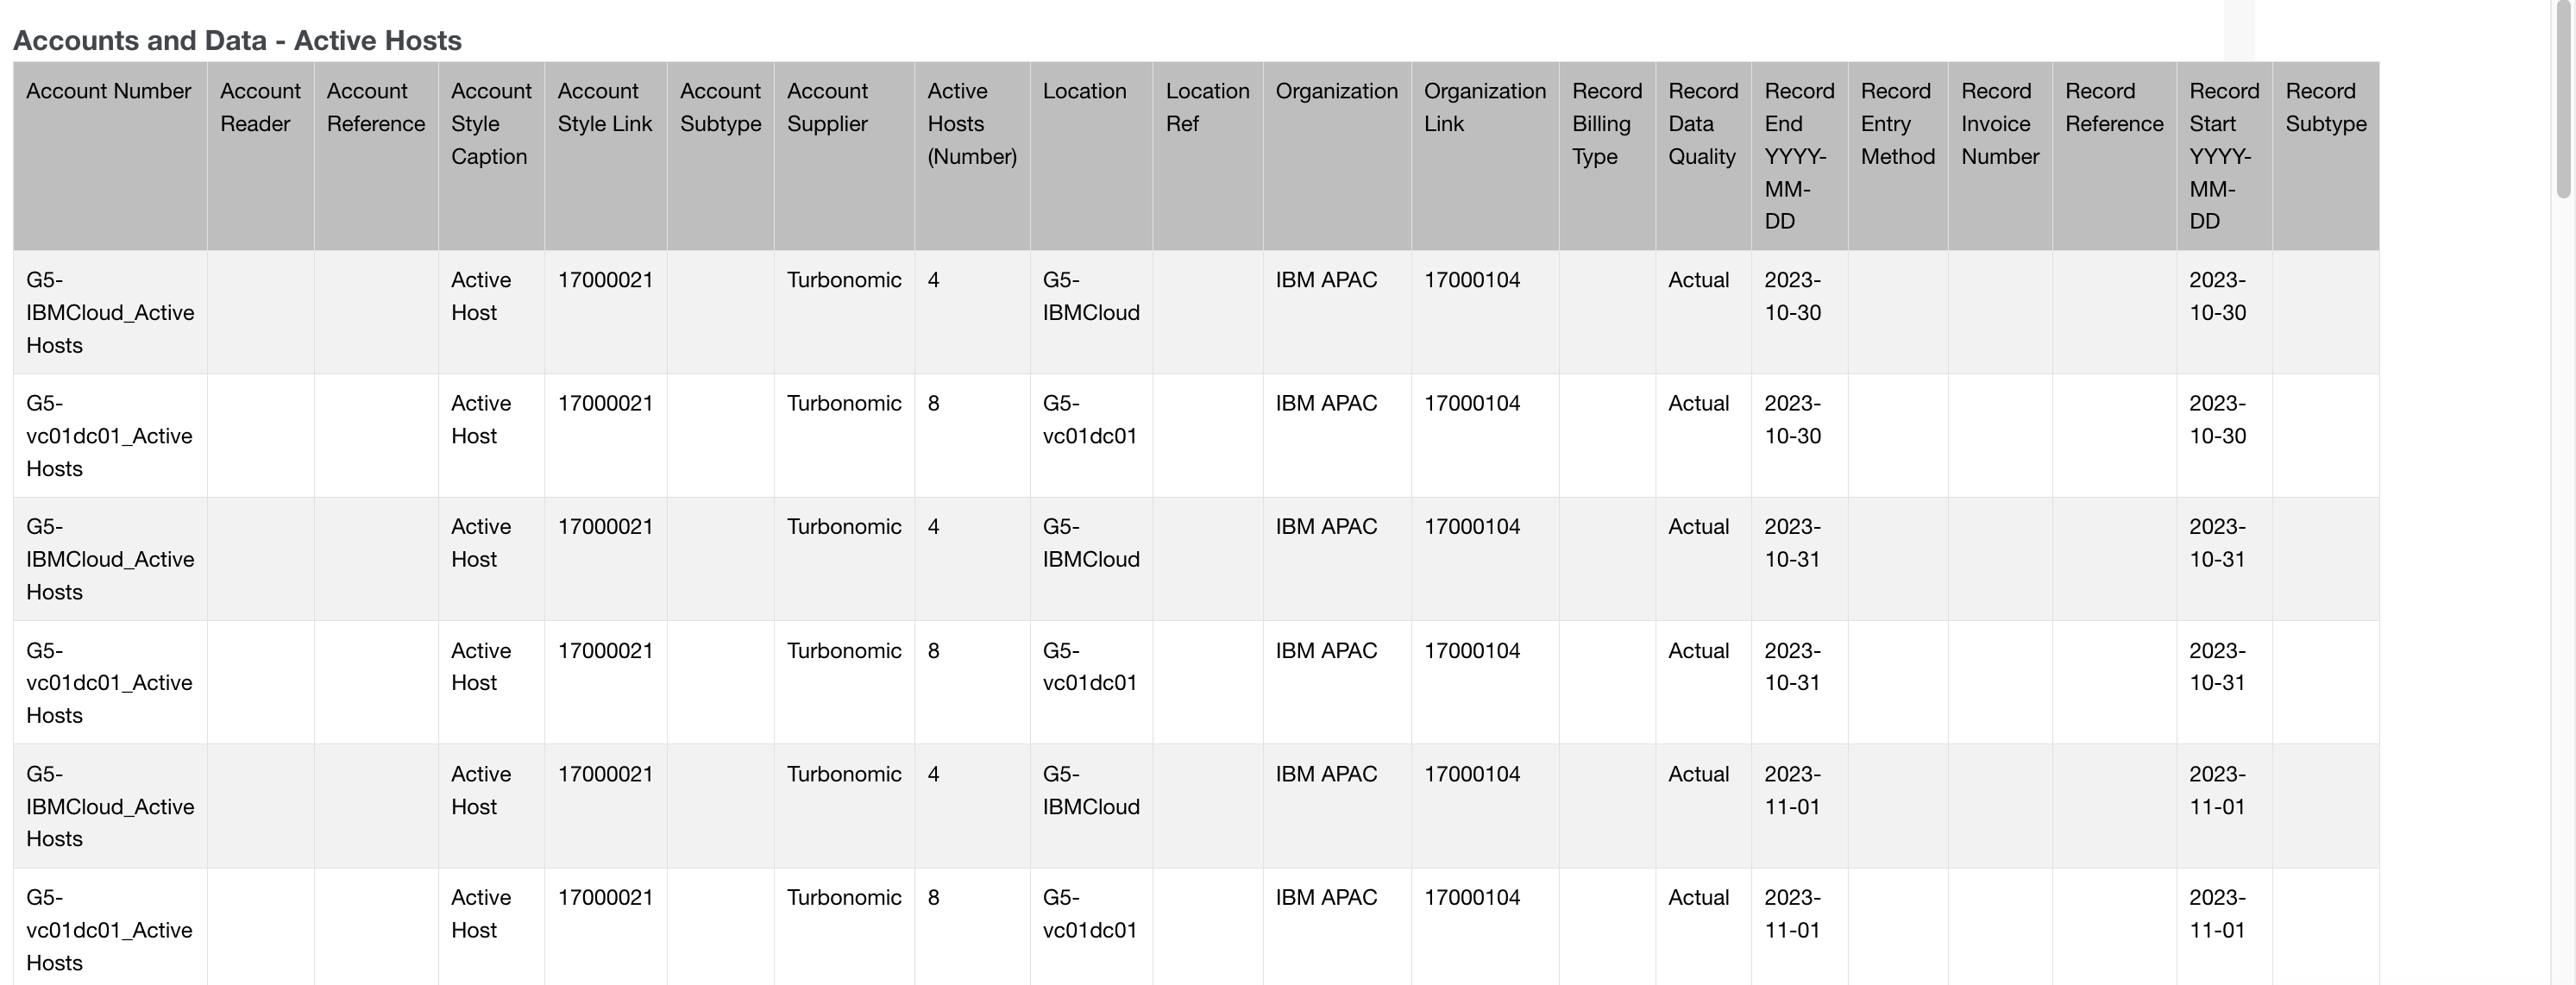
This image presents Accounts and Data with details on Active Hosts.
This image shows Accounts and Data containing information on active virtual machines (VMs).
This image shows Accounts and Data related to the energy intensity of hosts.
This image displays Accounts and Data that includes details on VM host density.
Running the application
You can find the source code for this application on GitHub. Download the repository to follow the steps outlined below.
Running locally
Follow these instructions to run the Integration Hub locally using the source code. You will need to start two applications: the API app and the UI app.
Starting the API app (Python)
Download the repository from GitHub.
Prepare the configuration file,
envizi-config.json, by following the steps outlined in the repository.Save the
envizi-config.jsonfile in a folder. For example, assume the file is located at:/Users/xyz/envizi-integration-hub-app/api/config/envizi-config.jsonRun the following command to create a virtual environment (only needed for the first time):
python -m venv myvenv source myvenv/bin/activate python -m pip install -r requirements.txtReplace
/Users/xyz/envizi-integration-hub-appwith your folder structure in the commands below.Start the app by running the following commands:
export WRITE_INTERIM_FILES=FALSE export LOGLEVEL=INFO export ENVIZI_CONFIG_FILE="/Users/xyz/envizi-integration-hub-app/api/config/envizi-config.json" export DATA_FOLDER="/Users/xyz/envizi-integration-hub-app/api/data" export DATA_STORE_FOLDER="/Users/xyz/envizi-integration-hub-app/api/data-store" export OUTPUT_FOLDER="/Users/xyz/envizi-integration-hub-app/output" cd /Users/xyz/envizi-integration-hub-app/api python src/main.pyOpen your browser and navigate to http://localhost:3001/hello to check if the API app is running.
Note: If you are running this on a virtual machine (VM), replace
localhostwith the IP address of your VM.
Starting the web app (React.js)
Create a
.envfile with the following content in thewebfolder:NEXT_PUBLIC_API_URL=http://localhost:3001Note: If running on a VM, replace
localhostwith the VM's IP address.Run the following command to build the app (only needed for the first time):
yarn buildStart the app with the following command:
yarn run devOpen your browser and navigate to http://localhost:3000/.
Note: If running on a VM, use the VM's IP address instead of
localhost.
Running as a Container
This section explains how to start the Integration Hub using Docker or Podman.
You will need to run two Docker images: one for the API app and another for the UI app.
Starting the API app
To start the API app on a Linux VM:
Place the
envizi-config.jsonconfiguration file in a directory, for example,/tmp/envizi-config.json.Run the following command to start the app. The file name mentioned above is specified in the
-vparameter and suffixed with:/app/envizi-config.json.docker run -d -p 3001:3001 --name my-e-int2-hub \ --env LOGLEVEL=DEBUG \ --env DATA_FOLDER="/app/data" \ --env DATA_STORE_FOLDER="/app/data" \ --env OUTPUT_FOLDER="/app/output" \ -v "/tmp/envizi-config.json:/app/envizi-config.json" \ gandigit/e-int-hub2-linux:latestNotes:
- If you're running this on a Mac, replace
e-int-hub2-linuxwithe-int-hub2-macin the command above. - To use Podman instead of Docker, replace
dockerwithpodmanin the command.
- If you're running this on a Mac, replace
Open the URL
http://<IP_ADDRESS_OF_VM>:3001/helloin your browser to verify if it is working.
Starting the UI app
To start the UI app on a Linux VM:
Replace
##IP_ADDRESS_OF_VM##with the actual IP address of the VM where the API app is running.Run the following command to start the UI app:
podman run -d -p 3000:3000 --name my-e-int-hub2-ui --env NEXT_PUBLIC_API_URL="http://##IP_ADDRESS_OF_VM##:3001" gandigit/e-int-hub2-ui-linux:latestNote:
- If you are running this on a Mac, replace
e-int-hub2-ui-linuxwithe-int-hub2-ui-macin the command. - To use Podman instead of Docker, replace
dockerwithpodmanin the command.
- If you are running this on a Mac, replace
Open the URL
http://<IP_ADDRESS_OF_VM>:3000/helloin your browser to verify if it is working.
How to extend this application
The repository Integration Hub for Envizi App is available as open source. You are free to download, modify, and use it to suit your needs.
Summary and next steps
IBM Envizi ESG Suite provides a comprehensive solution for creating custom PowerReports with the Monthly data set of your organization.
To get more information about IBM Envizi or to try it out yourself, start your 14-day IBM Envizi ESG Suite trial. You can also request a personalized IBM Envizi demo.