About cookies on this site Our websites require some cookies to function properly (required). In addition, other cookies may be used with your consent to analyze site usage, improve the user experience and for advertising. For more information, please review your options. By visiting our website, you agree to our processing of information as described in IBM’sprivacy statement. To provide a smooth navigation, your cookie preferences will be shared across the IBM web domains listed here.
Tutorial
Building an event-driven agentic AI system with Apache Kafka on Confluent Cloud and watsonx Orchestrate
Consume real-time Kafka events and correlate them with documents to drive autonomous agent decisions using watsonx Orchestrate and Confluent Cloud (and optionally IBM Bob to streamline the development experience)
On this page
Agentic AI systems are designed to do more than answer individual user questions. They are expected to observe changes in their environment, reason over those changes, and update conclusions as conditions evolve. In enterprise systems, these changes are often represented as streams of events, such as transaction records, inventory updates, system alerts, or operational status changes. Treating these signals as one-off inputs, or relying on periodic polling, limits how responsive and useful an agent can be.
Event streaming platforms like Apache Kafka are commonly used to distribute these signals in real time across enterprise architectures. Confluent Cloud provides a managed Kafka service that reduces the operational overhead of running Kafka while preserving event ordering, durability, and security. Using Kafka as the source of live signals allows agents to work with data as it arrives, rather than relying on delayed snapshots.
In this tutorial, you will learn how to build an event-driven agentic AI system using Confluent Cloud and watsonx Orchestrate. You will consume events from a Kafka topic using a watsonx Orchestrate agent, and configure the agent to analyze incoming events as they arrive. To add business context, the agent also references a set of documents, such as policies, procedures, or reference material, and correlates them with event data when generating insights.
The goal of this tutorial is not to automate decisions, but to show how agents can interpret live operational signals and explain their relevance. This pattern is useful in scenarios where timing and context matter, such as monitoring operational issues, identifying emerging risks, or summarizing changes across complex systems.
Sample agentic AI system
In this tutorial, you will develop an agent on watsonx Orchestrate for a retail use case that performs the following:
Check stock availability in specific branch in real time for products by integrating with Confluent Kafka.
If stock is zero in a specific branch, recommend similar alternatives using agentic RAG by checking product description enterprise documents.
During high-demand seasons like the Christmas holidays, popular items sell out fast and availability changes minute-by-minute across branches. Customers (through store associates) constantly ask simple question like “Do you have the Laptop Dell XPS in the Mall of Egypt, and if not, what’s the alternative laptop?”
By the end of the tutorial, you will have a clear understanding of how event streaming fits into agent architectures and how watsonx Orchestrate can be used to reason over real-time data.
IBM Bob will serve as your AI software development partner, accelerating the process by helping you:
- Create Kafka topics and a ksqlDB cluster on Confluent Cloud.
- Publish sample events to the topic.
- Build an MCP tool and AI agents on watsonx Orchestrate.
- Use Agentic RAG to enrich Kafka events with enterprise documents.
Architecture overview
The architecture consists of the following components:
Confluent Cloud (Kafka)
- Hosts a source topic inventory.transactions containing JSON transaction events for stock increases and sales (negative quantities).
- Hosts a derived topic inventory.availability that represents the current available quantity per SKU and branch.
ksqlDB (stream processing). Continuously reads inventory.transactions, aggregates by sku and branch, and writes the latest availability to inventory.availability.
Kafka availability tool (MCP toolkit). Exposes
get_sku_availability(sku, branch) for querying the current availability derived from Kafka.watsonx Orchestrate agents
- SKU_Availability_Agent calls the availability tool to check stock in a specific branch.
- Substitute_Finder_Agent uses enterprise product documents to recommend similar SKUs when the requested SKU is not available.
- Store_Associate_Agent is a supervisor agent that delegates to the two specialist agents and returns a single customer-friendly response.
Enterprise documents. A product catalog document (product-catalog.docx) is uploaded as an enterprise knowledge source (
enterprise_documents) and used for semantic similarity search in the Substitute Finder Agent.
The following figure shows this architecture:
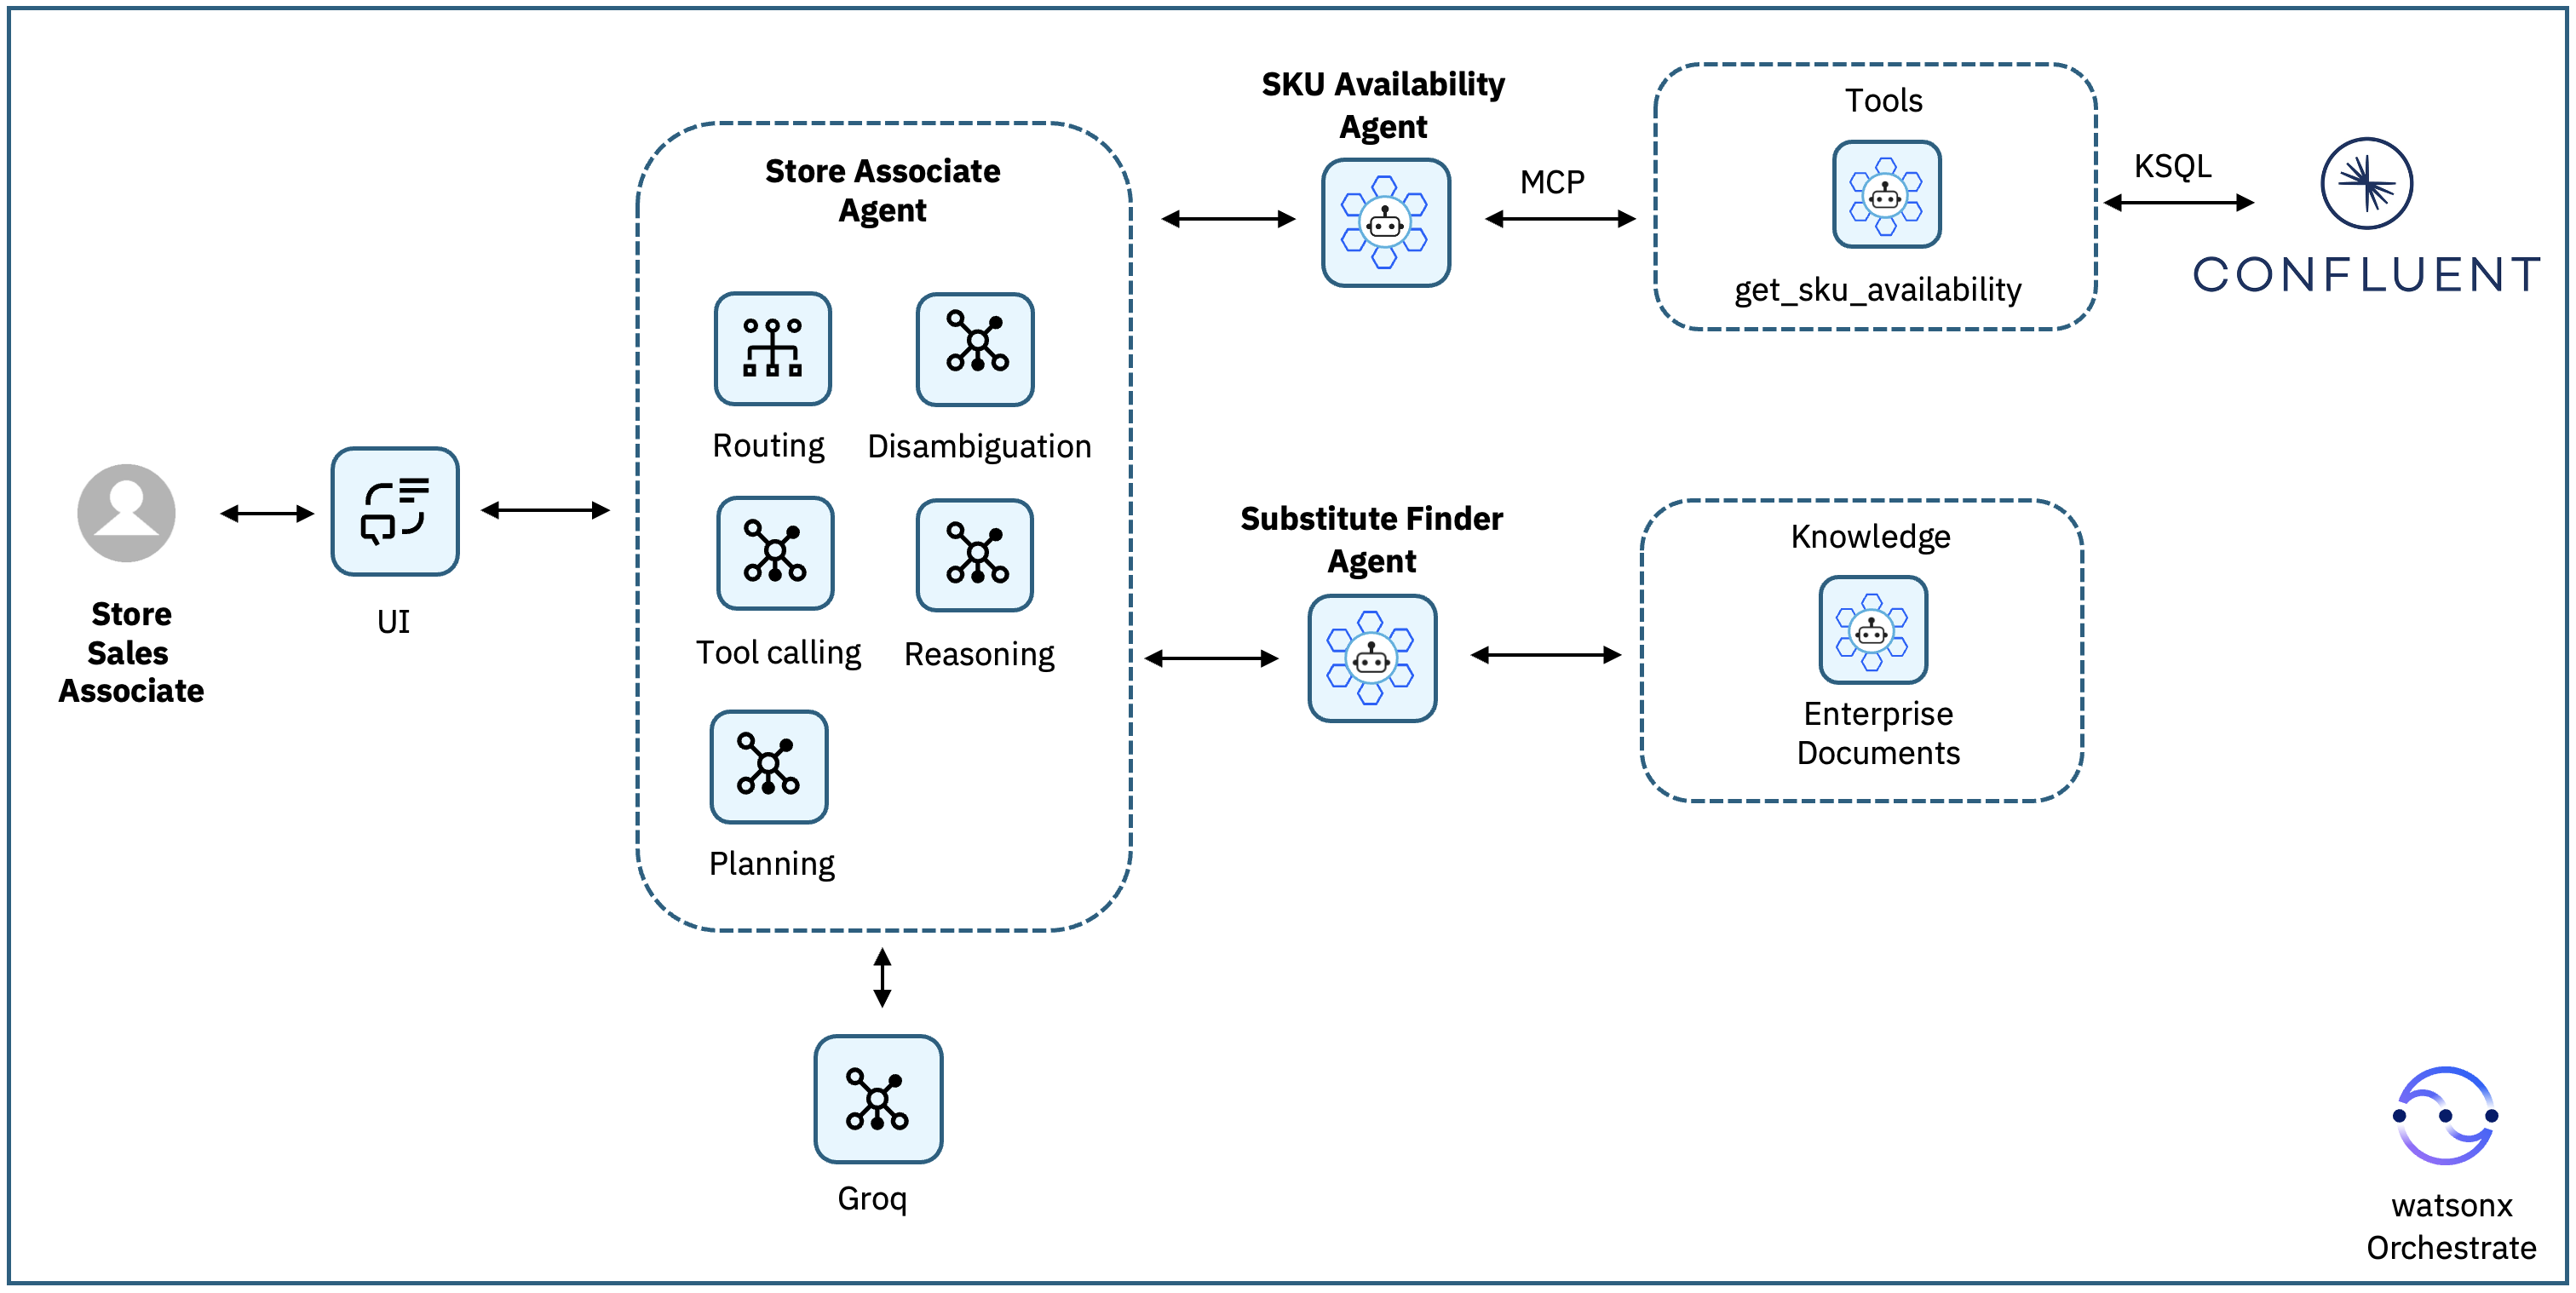
A Store Sales Associate asks a product availability question through the UI, for example:
“Do you have LAPTOP-DELL-XPS-15 in MallOfEgypt?”The request is handled by the Store Associate Agent, which acts as a supervisor agent. It parses the request, extracts the SKU and branch, and decides which specialist agents to call.
The Store Associate Agent delegates the inventory check to the SKU Availability Agent.
The SKU Availability Agent calls the get_sku_availability MCP tool, which queries the Kafka-derived availability state (inventory.availability) computed by ksqlDB from real-time inventory transactions in Confluent Cloud.
The SKU Availability Agent returns one of the following results to the Store Associate Agent:
- The SKU is available, including the current quantity at the requested branch.
- The SKU is tracked but currently out of stock.
- The SKU is not tracked in the inventory data.
If the SKU is available, the Store Associate Agent responds directly with the availability and quantity.
- If the SKU is not available (out of stock or not tracked), the Store Associate Agent delegates the request to the Substitute Finder Agent.
The Substitute Finder Agent performs semantic retrieval over enterprise product documents to identify similar SKUs based on product attributes such as category, form factor, processor class, and usage tier.
- It returns up to two or three suitable alternative products with short explanations.
- It combines the results into a single customer-facing response and returns it back to the Store Associate Agent.
The Store Associate Agent combines the results and returns it back to the user.
Prerequisites
This tutorial assumes you have a running local environment of watsonx Orchestrate Agent Development Kit (ADK). Check out the getting started with ADK tutorial if you don’t have an active instance. This tutorial has been tested on watsonx Orchestrate ADK version 2.1.
Optionally, access to IBM Bob. You can request access on the product page.
A Confluent Cloud account with access to Kafka. You can sign up for an account on this product page.
Basic familiarity with Kafka concepts such as topics and consumers.
Step 1. Create a Kafka topic in Confluent Cloud
You can create the Kafka topic using Bob or you can manually create the files.
Create a Kafka topic using Bob
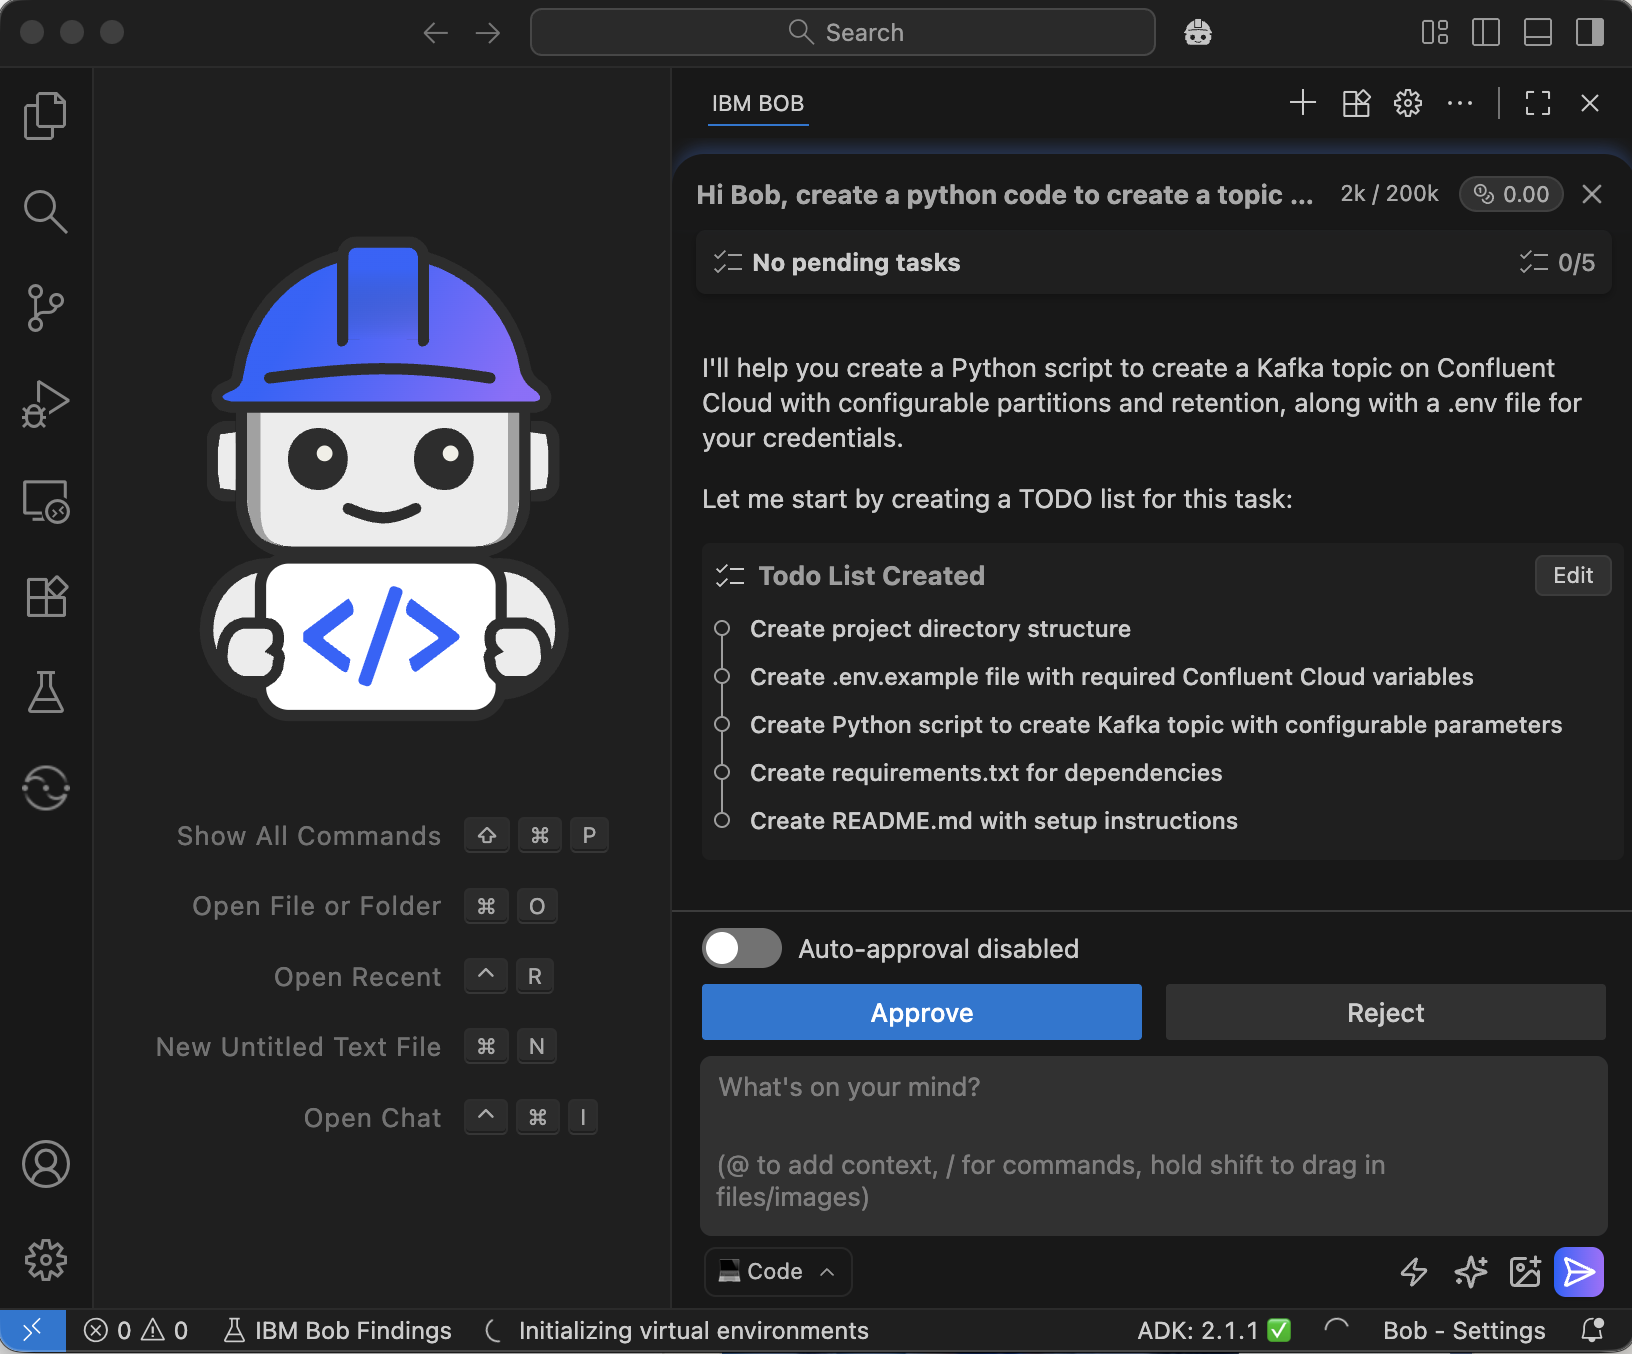
If you have access to Bob, you can optionally ask Bob to create the topic for you using Python Code. Bob will ask you about your credentials and will proceed in creating the topic for you. For example, this is the instruction in natural language to ask Bob to perform the tasks:
“Hi Bob, create a python code to create a topic on Confluent Cloud called "inventory.transactions", make the number of partitions and retention configurable, and create an .env file and I will fill it with my Confluent Cloud details and credentials. Use "~/Documents/bob/confluent-agents" as my working directory for the project.”
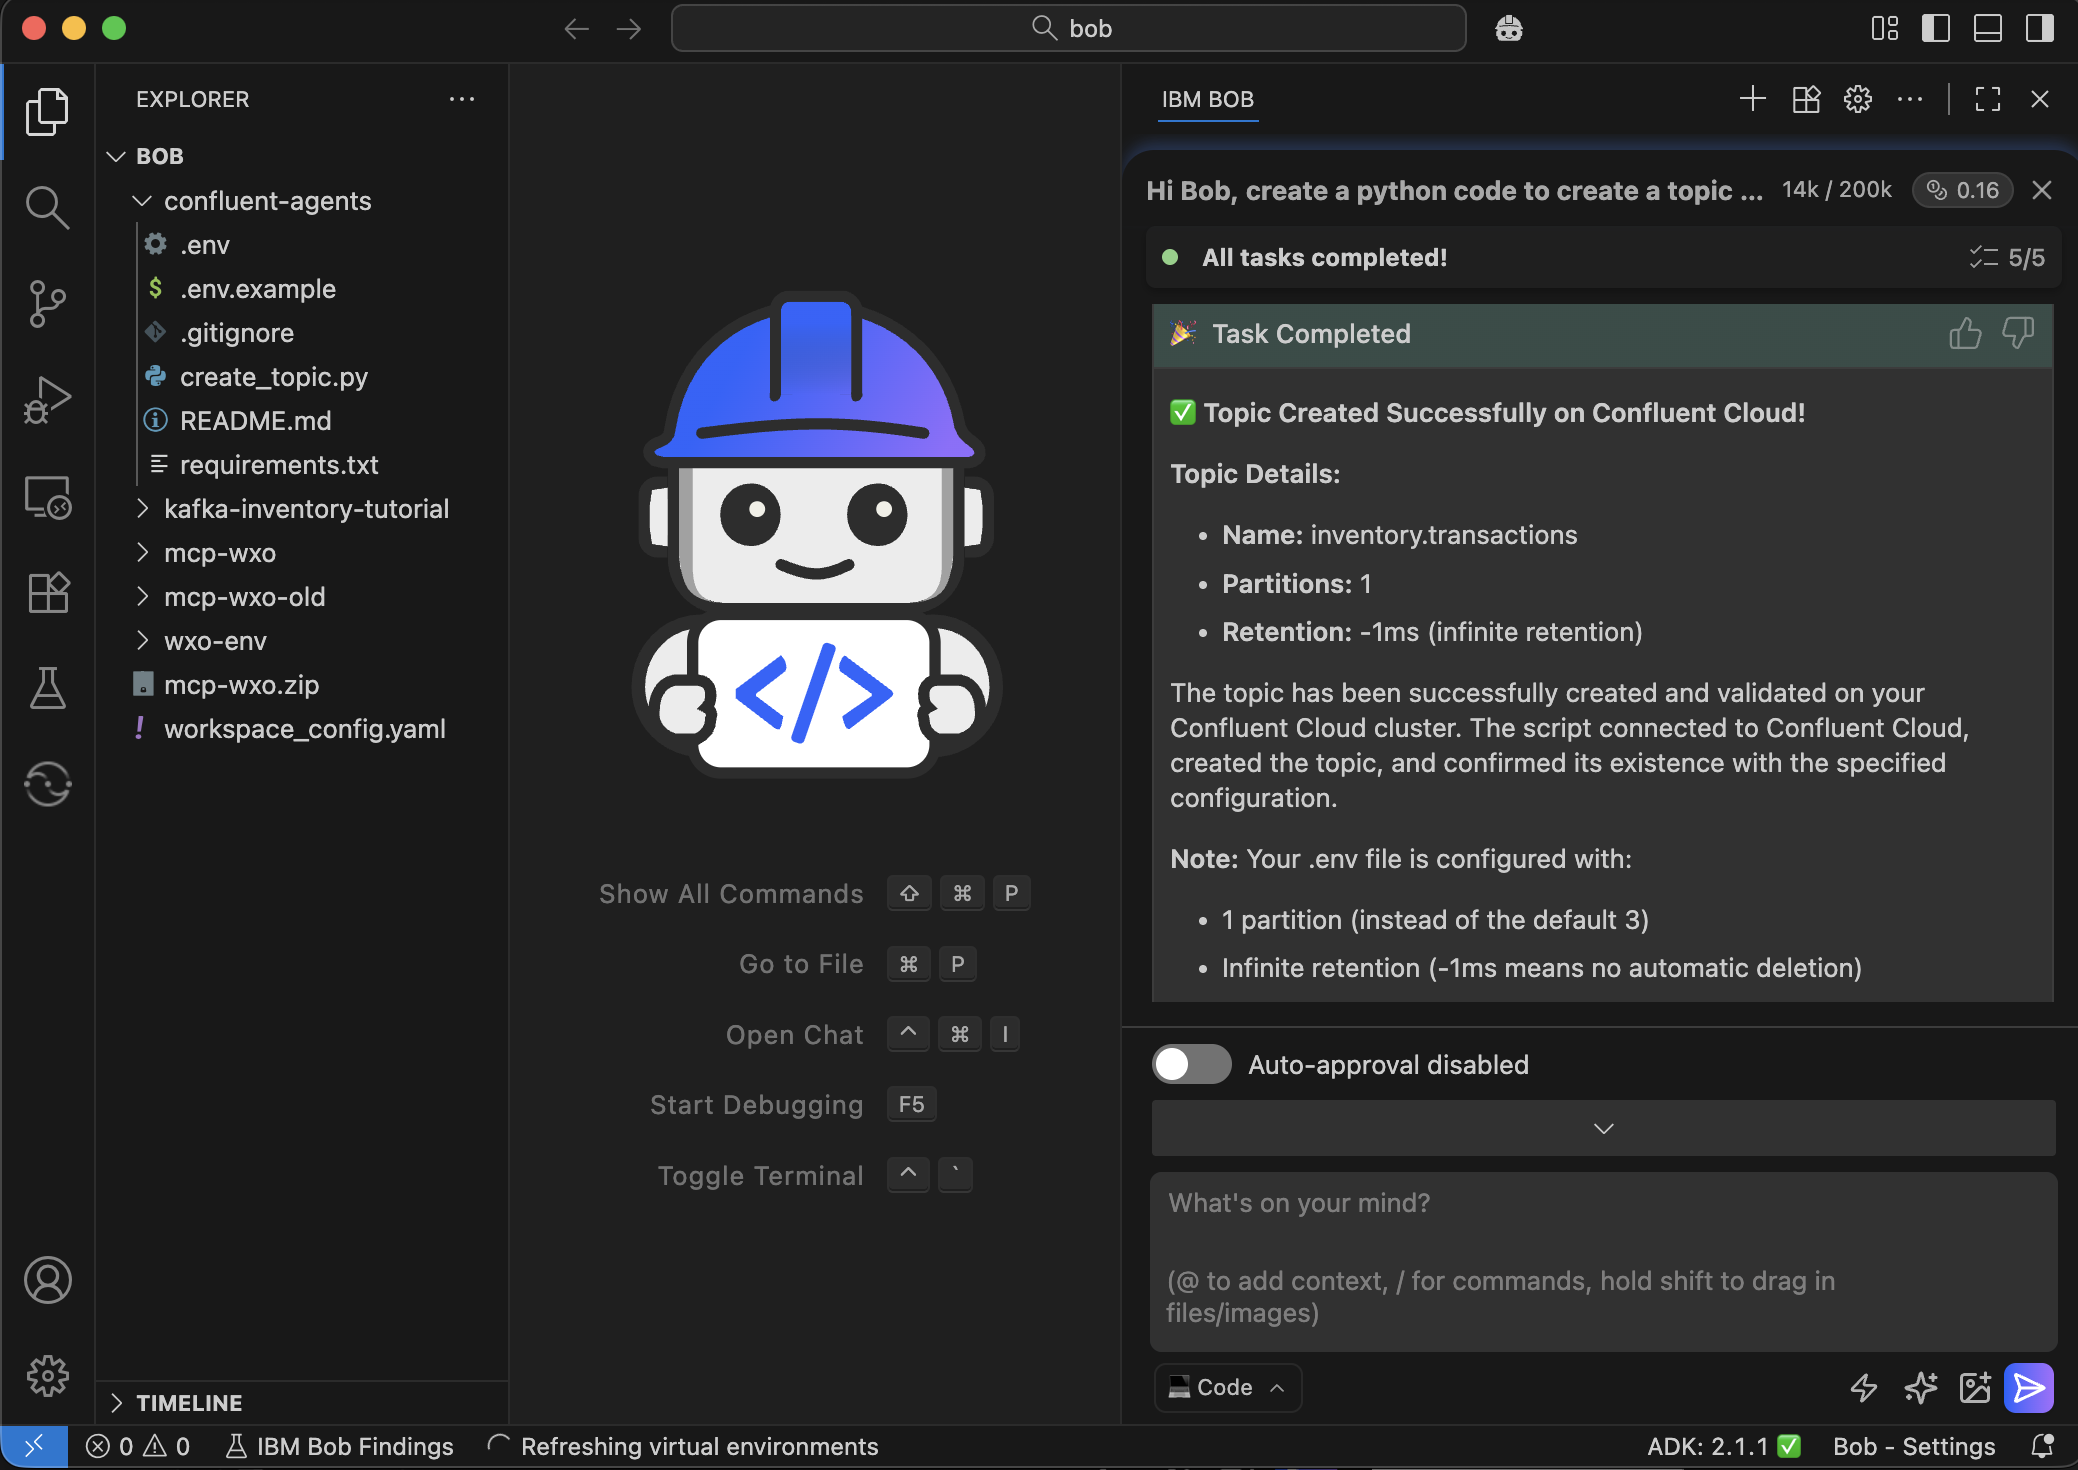
Open the .env file that was created by Bob in the steps above and update the credentials.
After you add your credentials, you can ask Bob to create the topic by asking Bob the following: “Done, I edited the .env file with my credentials, you can now create the topic on Confluent Kafka, and please validate that it's created successfully.”.
Create a Kafka topic manually in Confluent Cloud
Alternatively, follow the below steps to do them manually. You will login to Confluent Cloud and create a topic for inventory transactions.
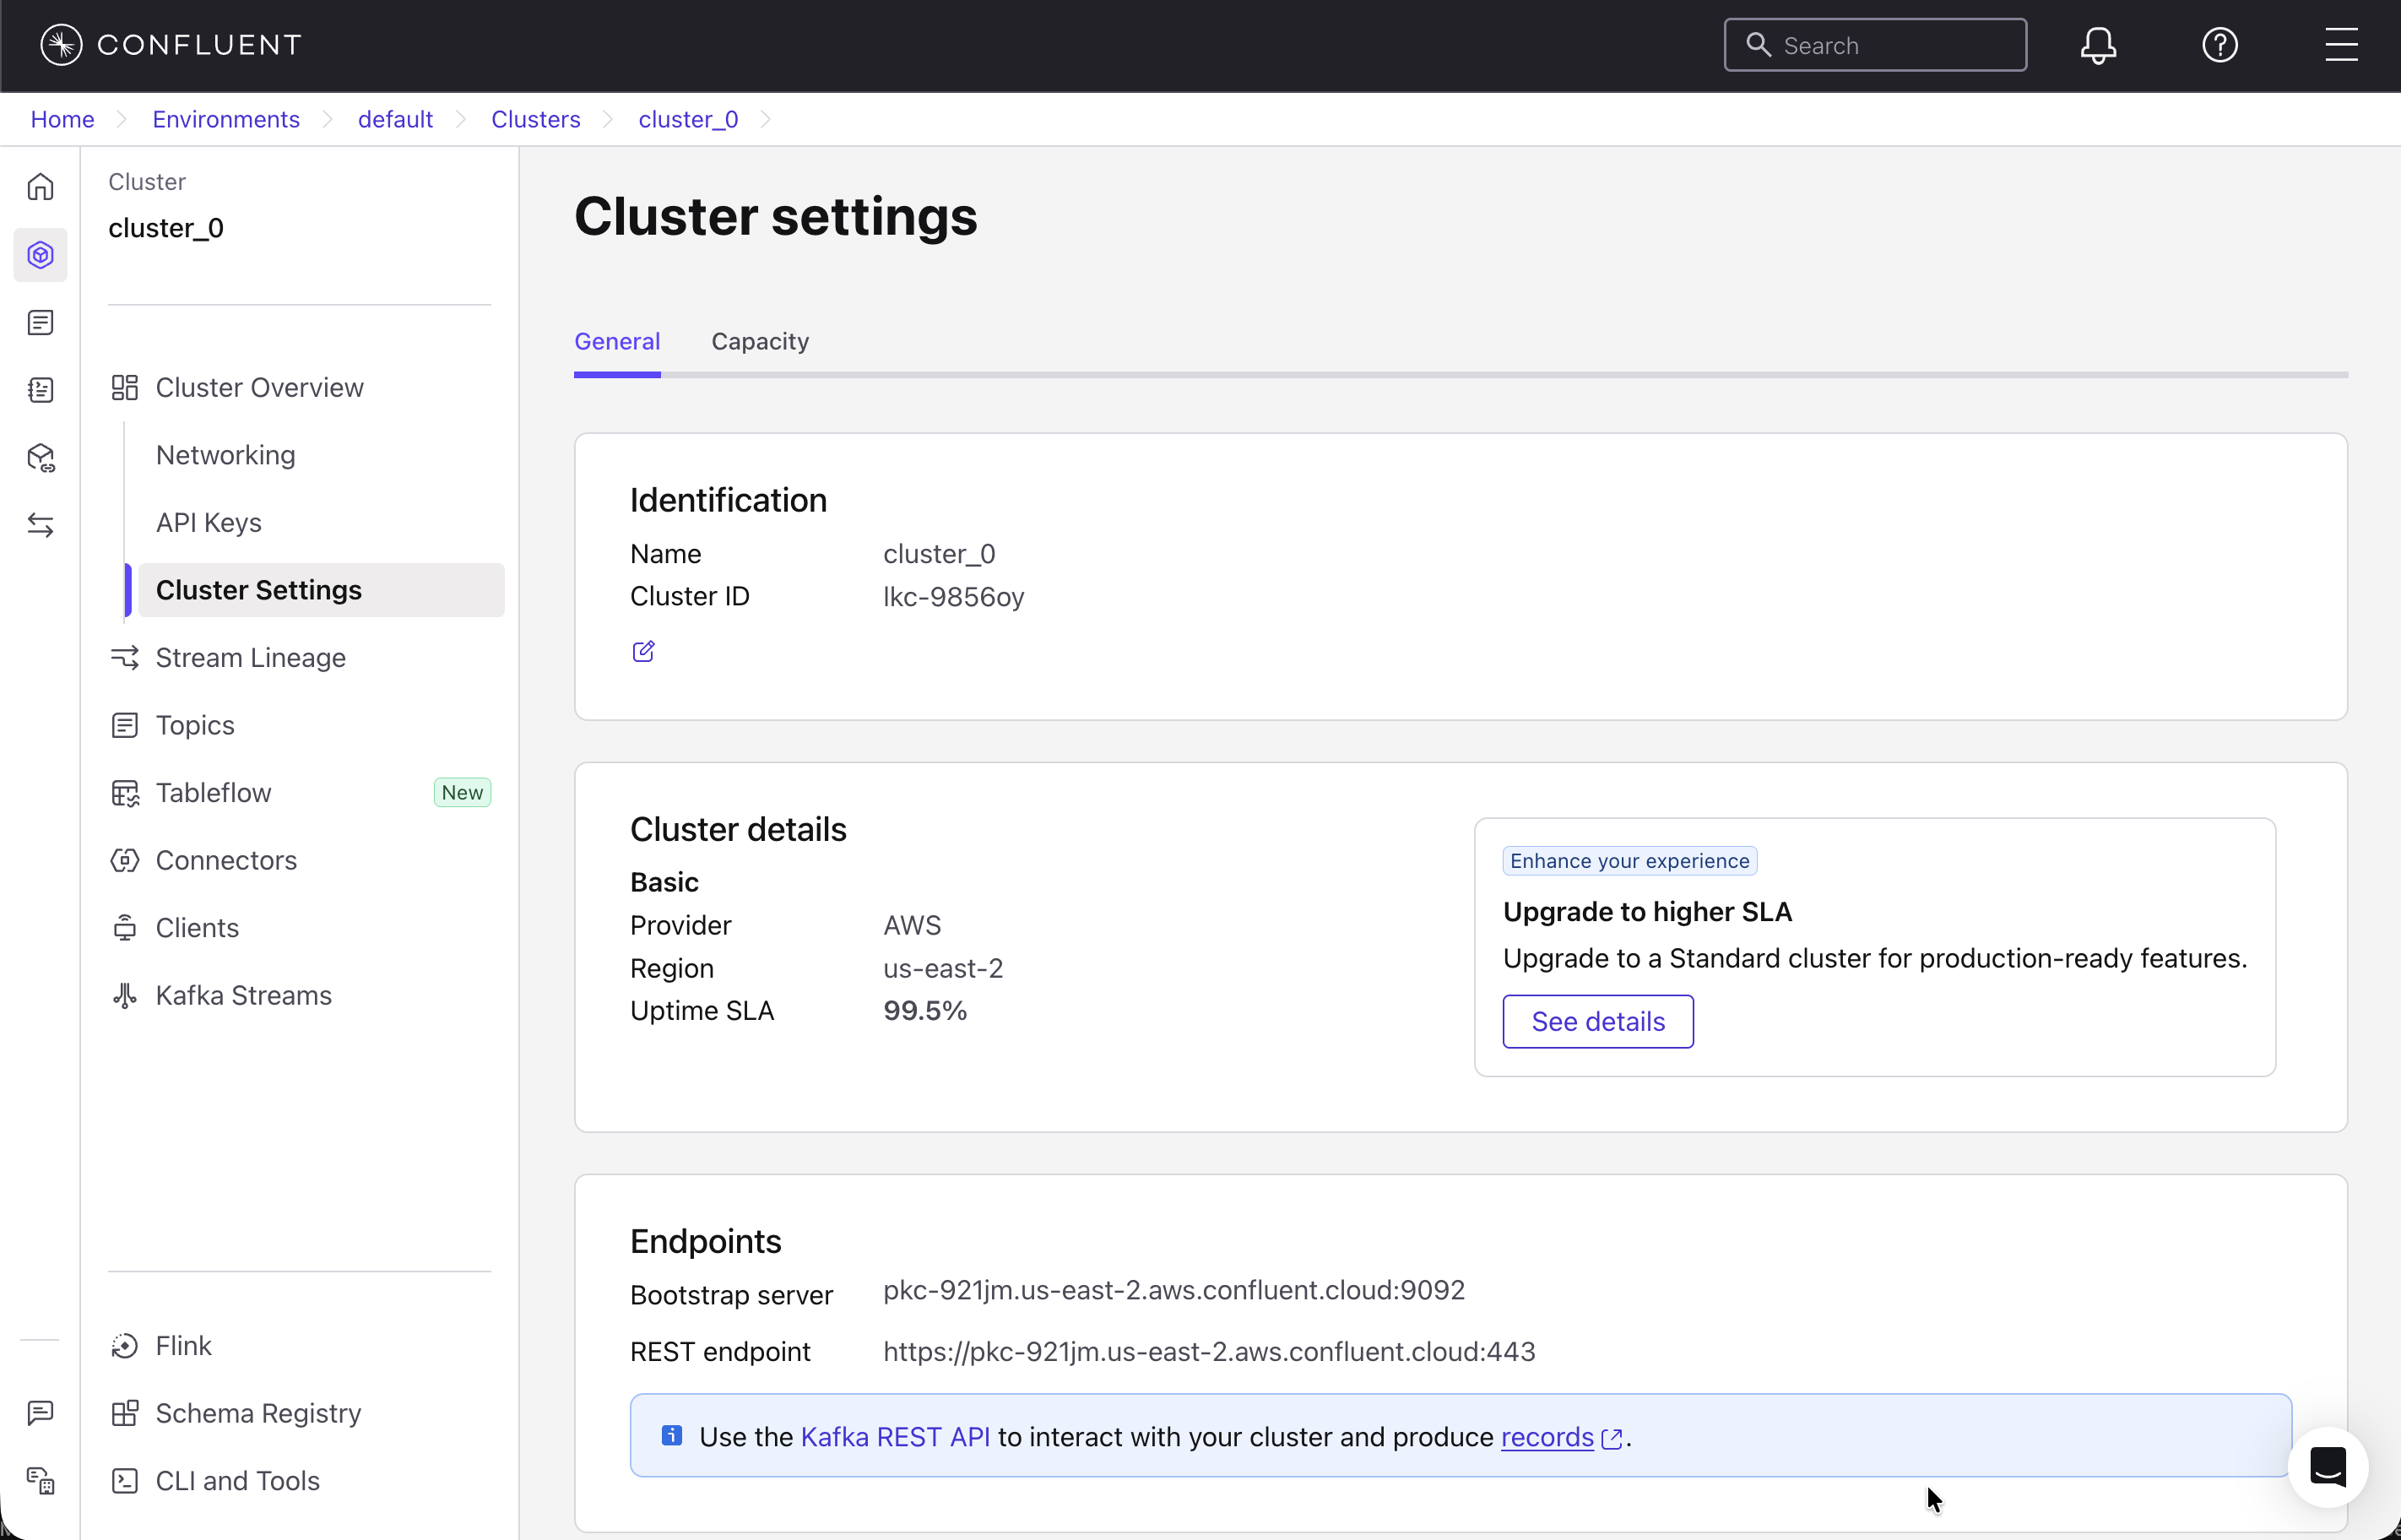
Log in to Confluent Cloud.
Click Environments in the menu on the left.
Select an existing Kafka cluster. If you don’t have an existing cluster, follow the steps in the Confluent documentation to create one.
Make a note of the cluster name and environment. These are used later when configuring clients.
In the cluster navigation menu, select Topics.
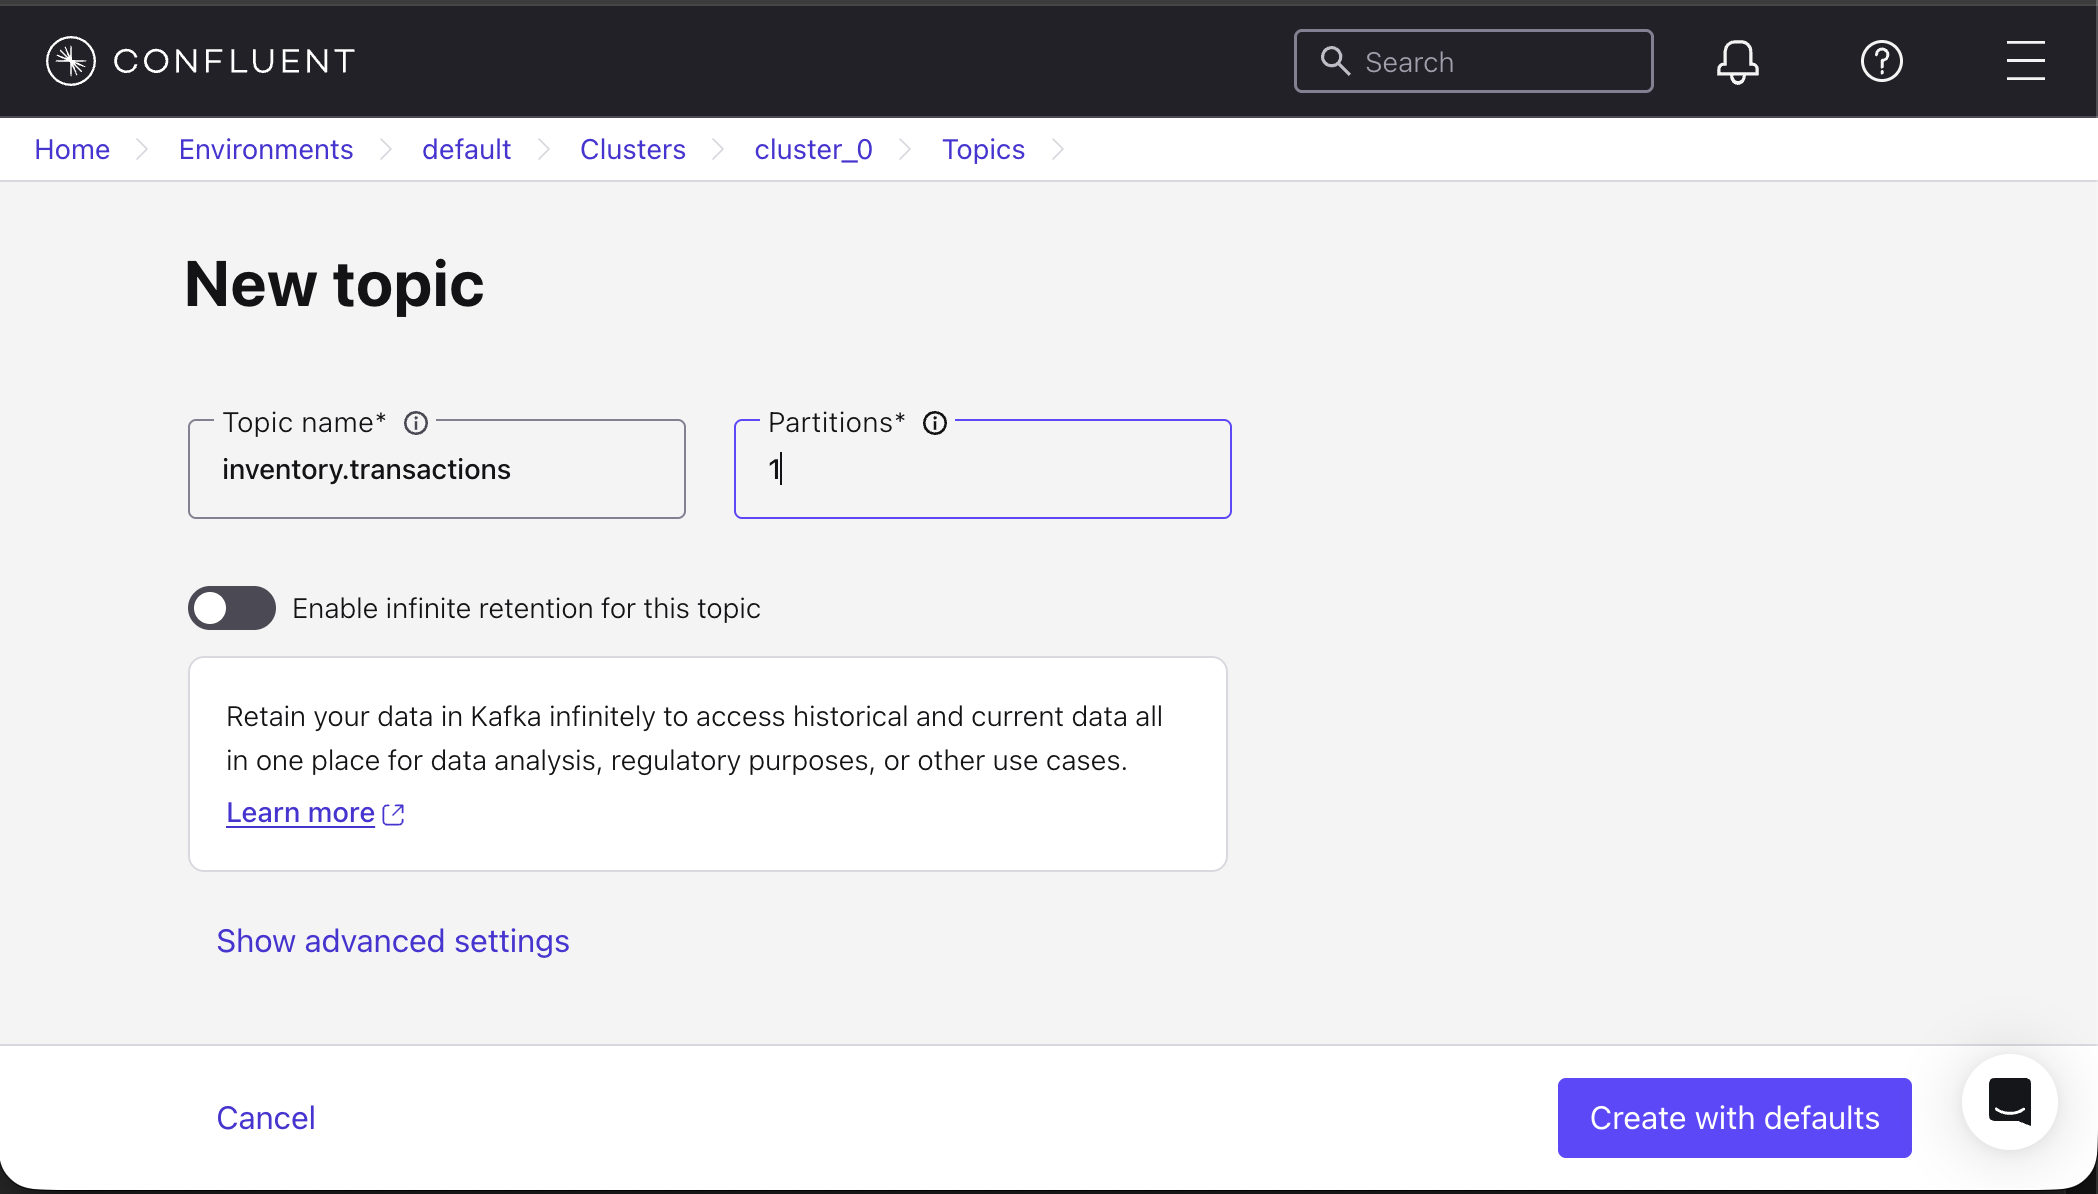
Click Add topic.
Set the topic name to inventory.transactions.
Set Partitions to 1. Using a single partition keeps event ordering deterministic and simplifies event consumption for this tutorial.
Leave all other settings with their default values.
Click Create with defaults.
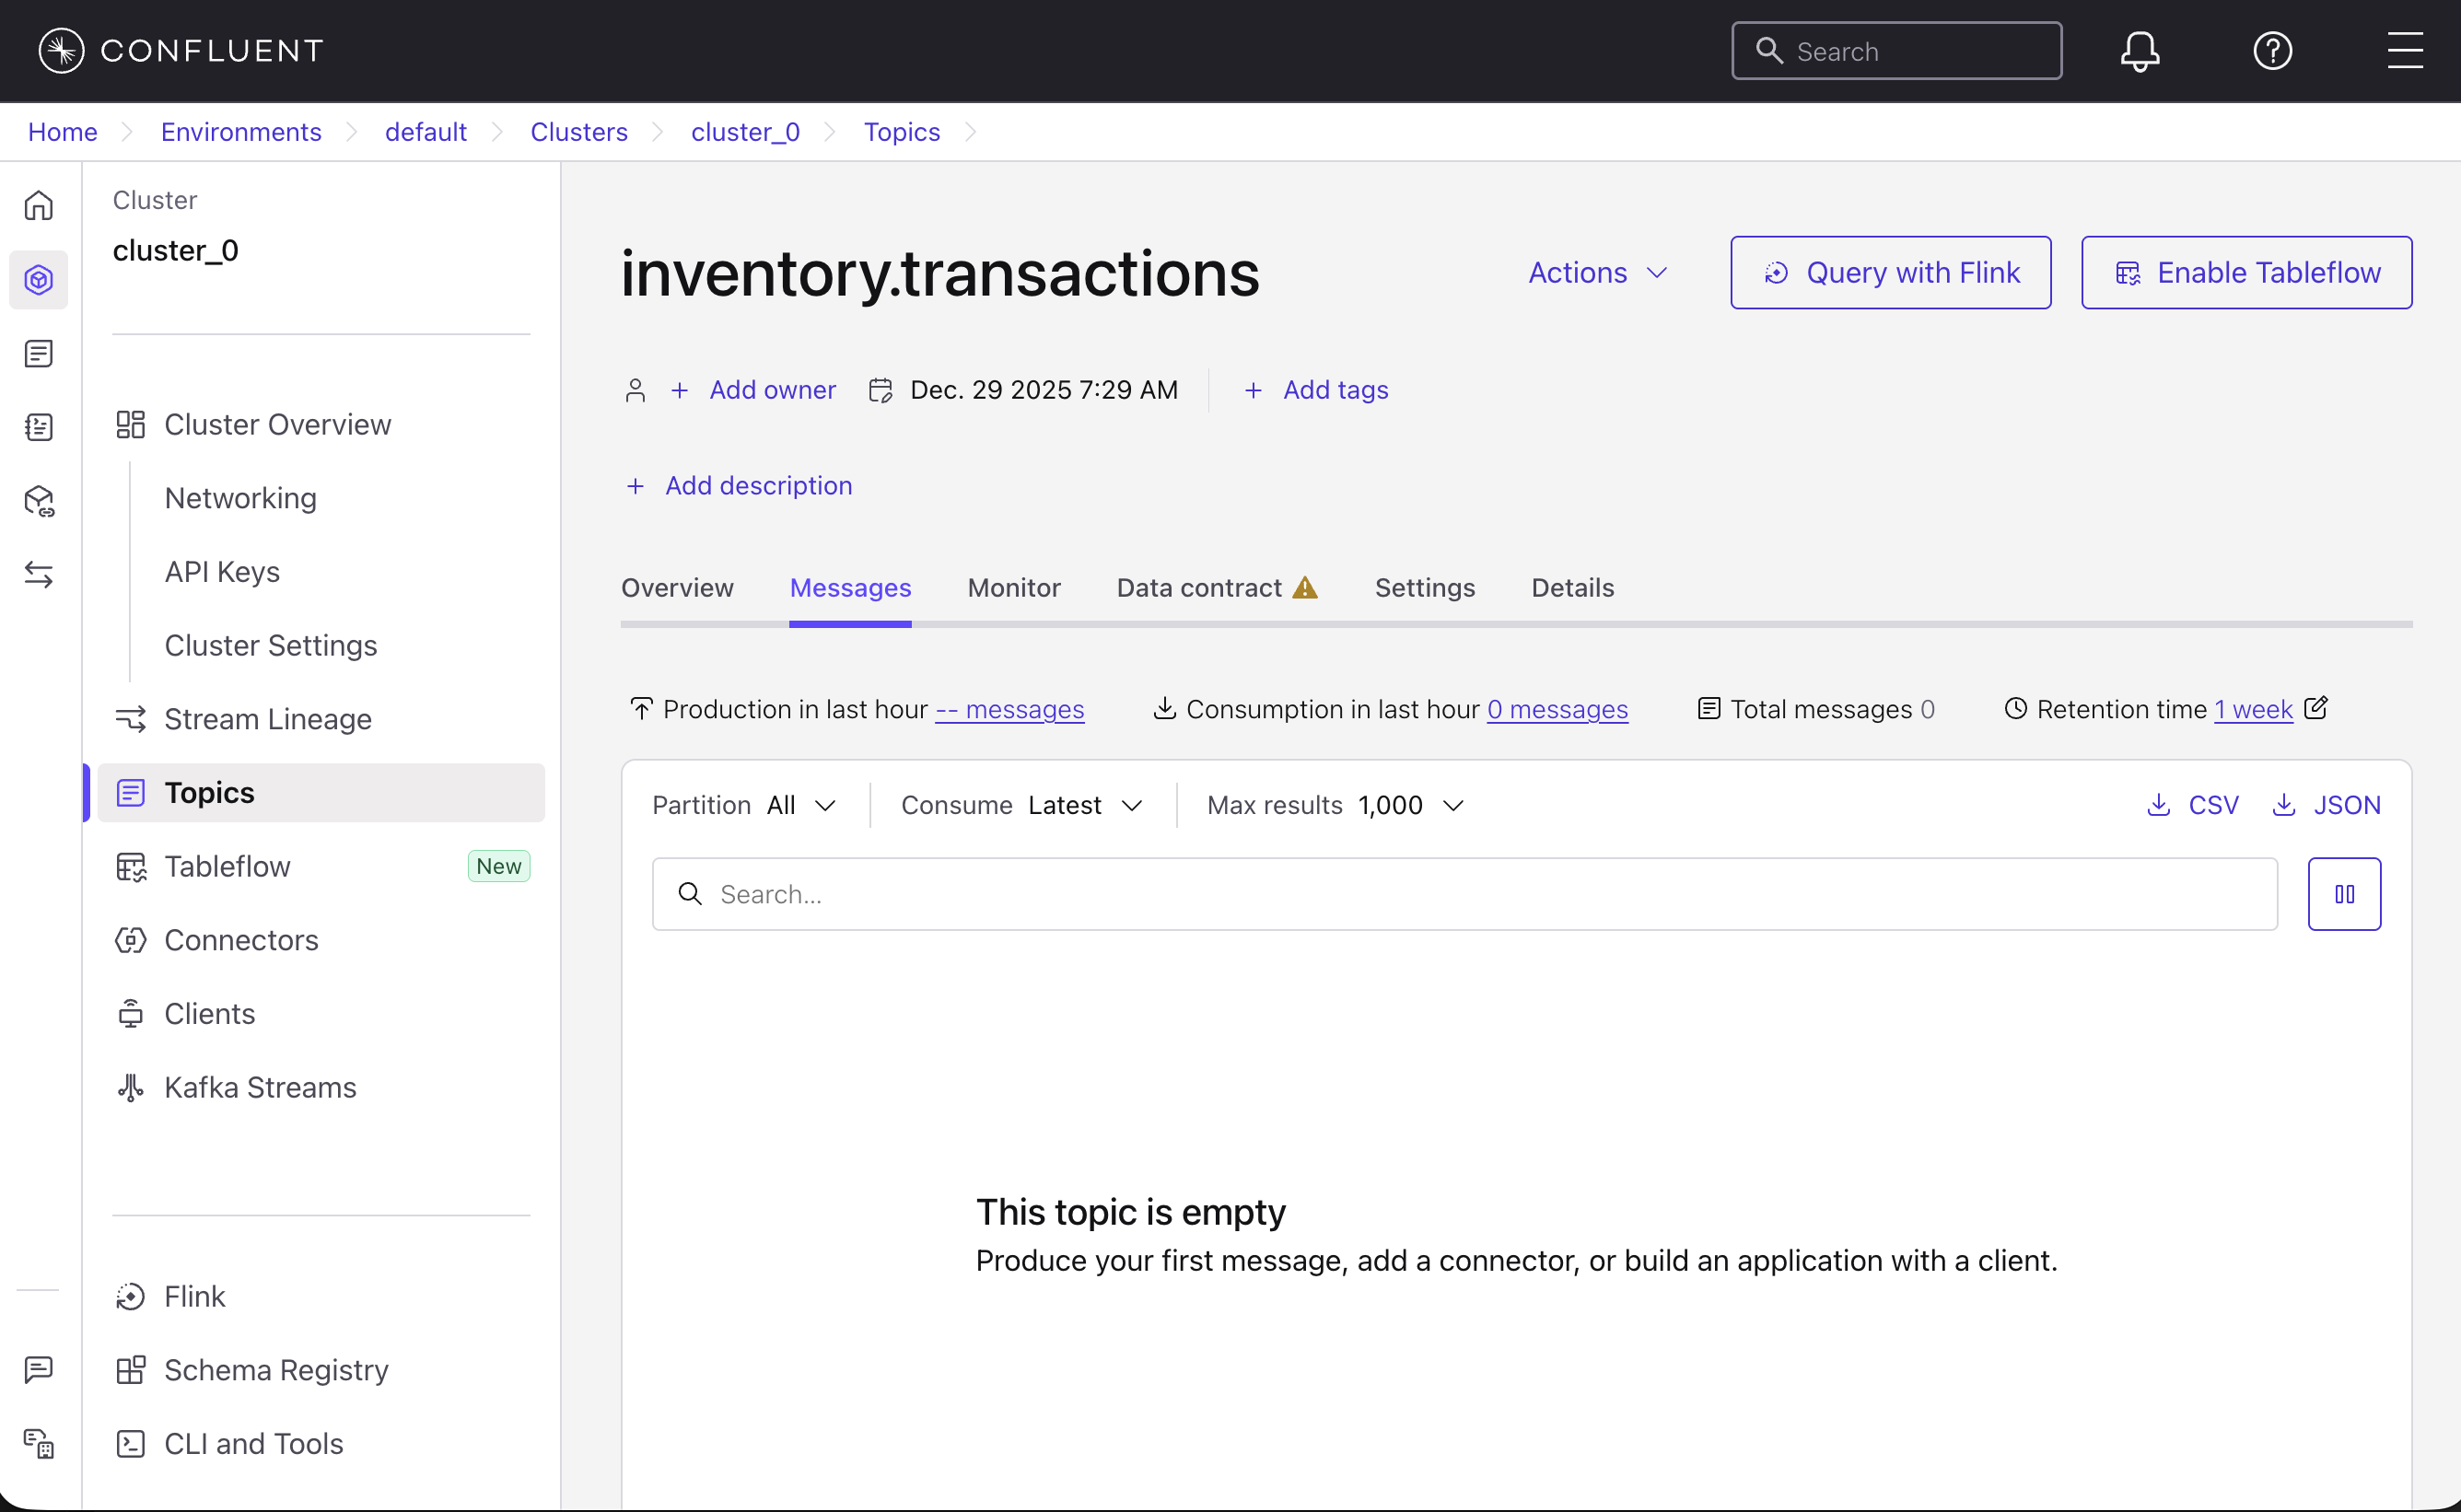
After creating the topic, Confluent Cloud prompts you to add a data contract. For this tutorial, skip this step by clicking Skip. Using simple JSON messages keeps the focus on event-driven agent behavior rather than schema governance. In production environments, data contracts are recommended to enforce structure and compatibility across producers and consumers.
Select the Messages tab.
Change the retention to infinite by clicking 1 week next to Retention time, and then clicking Edit settings. Choose Infinite, and then click Save changes.
Step 2. Create a derived topic on Confluent Kafka
In this step, you will create a derived topic called inventory.availability that automatically calculates how many units of each product are available at each branch by processing the transactions from the first topic.
You will create a ksqlDB cluster that will process your streaming data. A ksqlDB cluster is a processing engine that runs continuously in the background to read data from Kafka topics, perform calculations, and write results back to other topics using SQL-like commands.
Create a derived topic using Bob
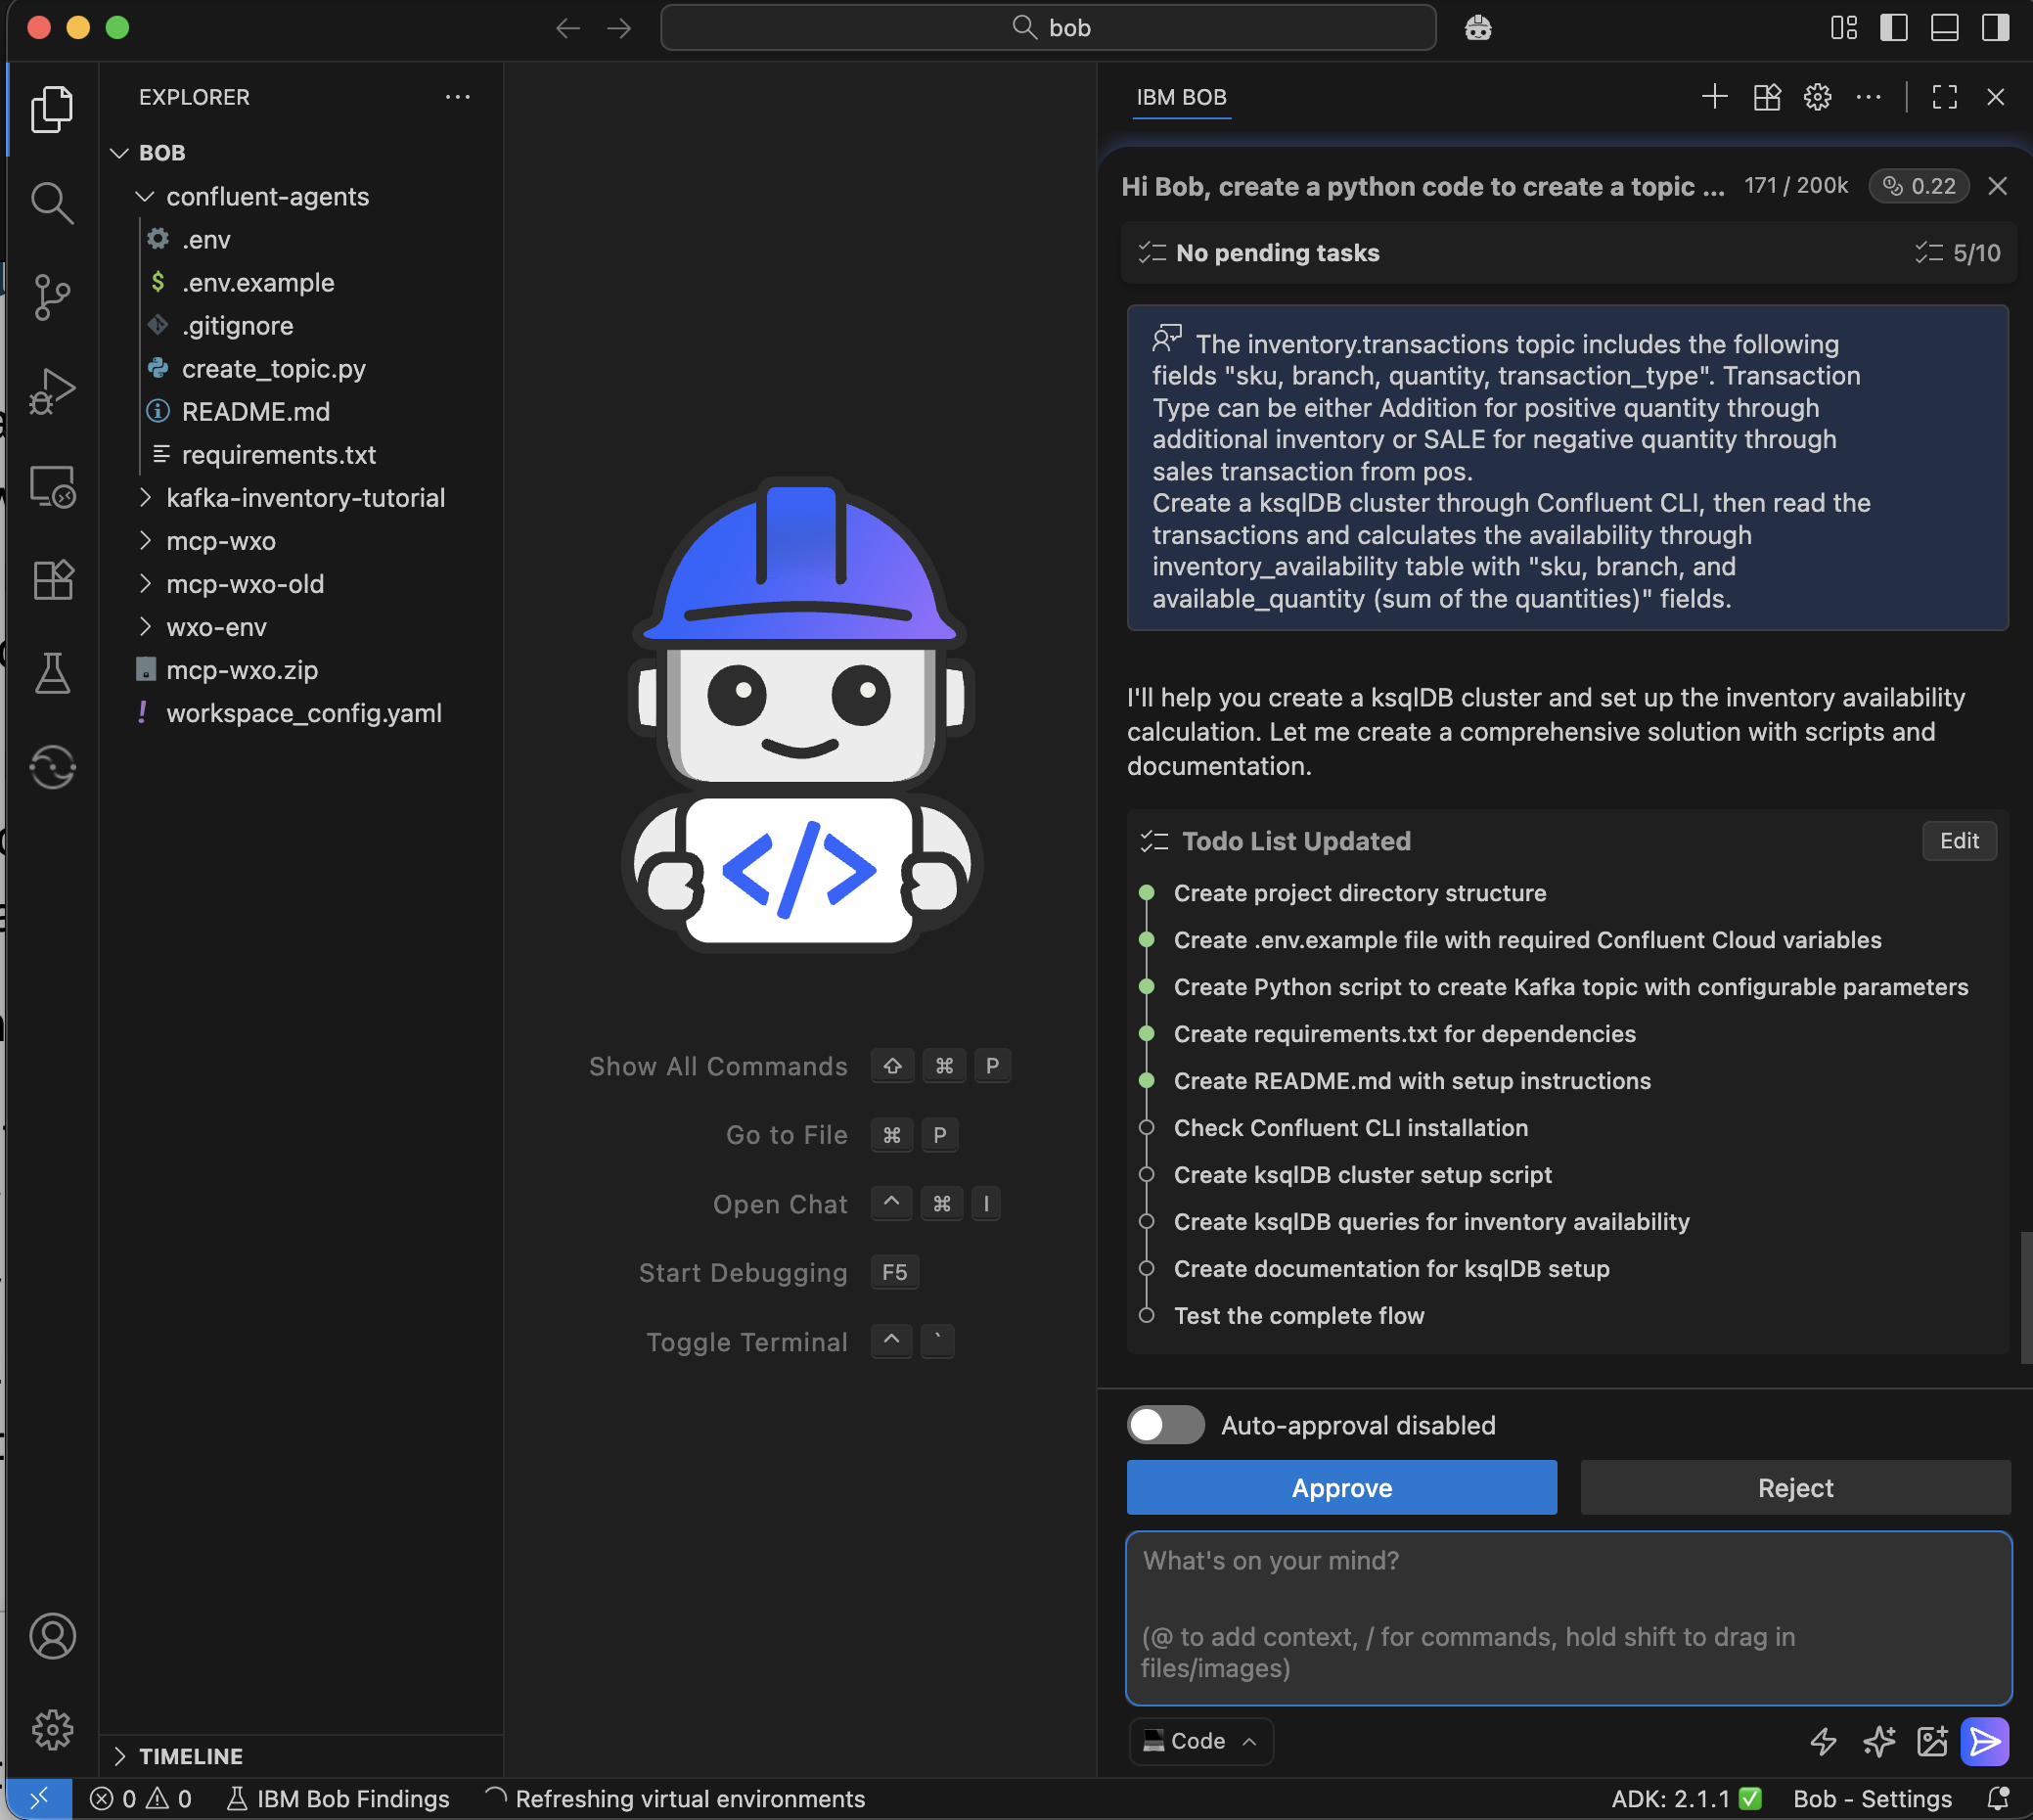
You can ask Bob to create this derived topic for you by asking Bob the following:
“The inventory.transactions topic includes the following fields "sku, branch, quantity, transaction_type". Transaction Type can be either Addition for positive quantity through additional inventory or SALE for negative quantity through sales transaction from pos. Create a ksqlDB cluster through Confluent CLI, then read the transactions and calculates the availability through inventory_availability table with "sku, branch, and available_quantity (sum of the quantities)" fields and JSON format”
Create a derived topic manually
Alternatively, you can follow the below manual steps. Create a ksqlDB cluster that that will continuously read transactions and calculate availability.
Install Confluent CLI if not installed already using this guide.
Login to Confluent using your credentials and get your user ID.
confluent login --save confluent iam user listCreate the ksqlDB cluster, and replace the cluster ID with your Kafka cluster ID that you retrieved earlier, and the identity with your user ID that you retrieved in the previous step.
confluent ksql cluster create sku-availability-calculator --cluster {KAFKA_CLUSTER_ID} --credential-identity {USER_ID}It takes a few minutes for the ksqlDB cluster to be provisioned, check the status using the cluster ID on the creation message. It should show status “Provisioned.”
confluent ksql cluster describe {KSQL_CLUSTER_ID}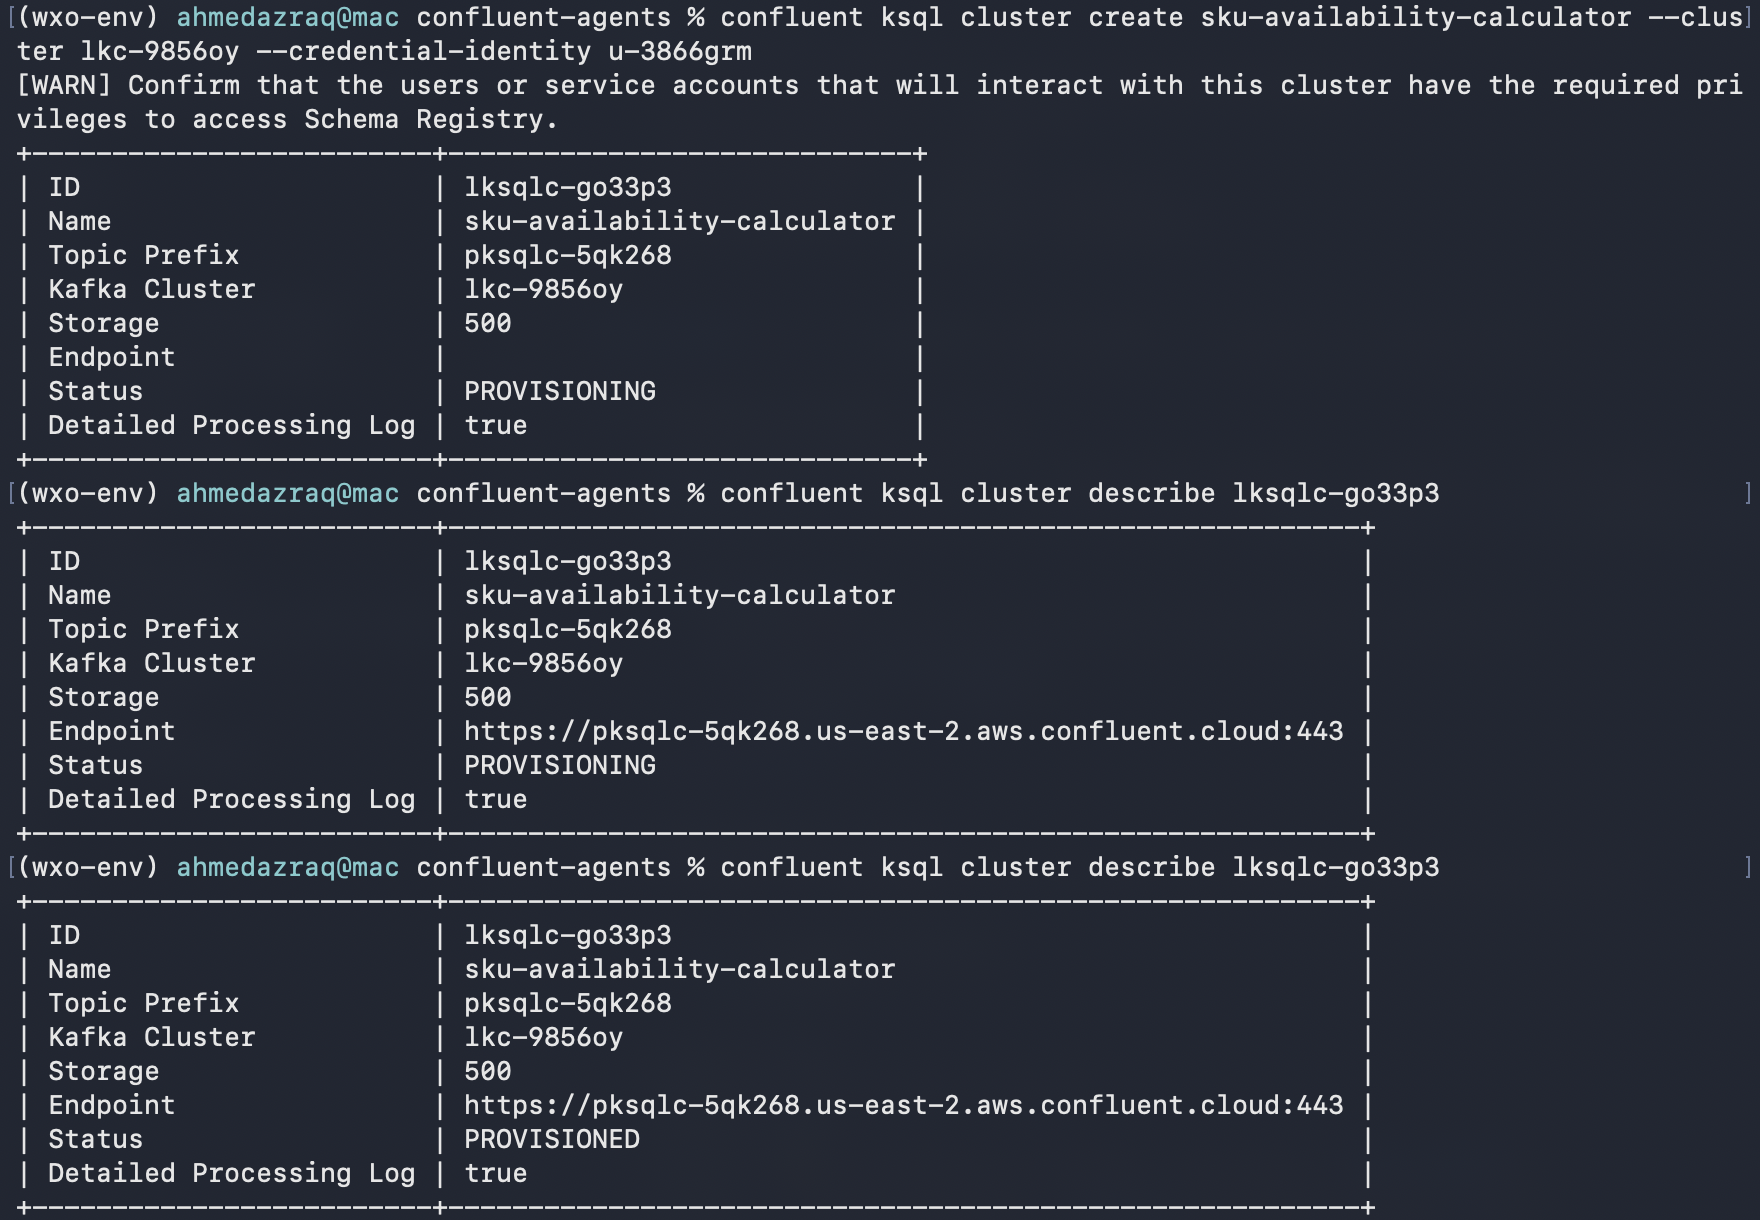
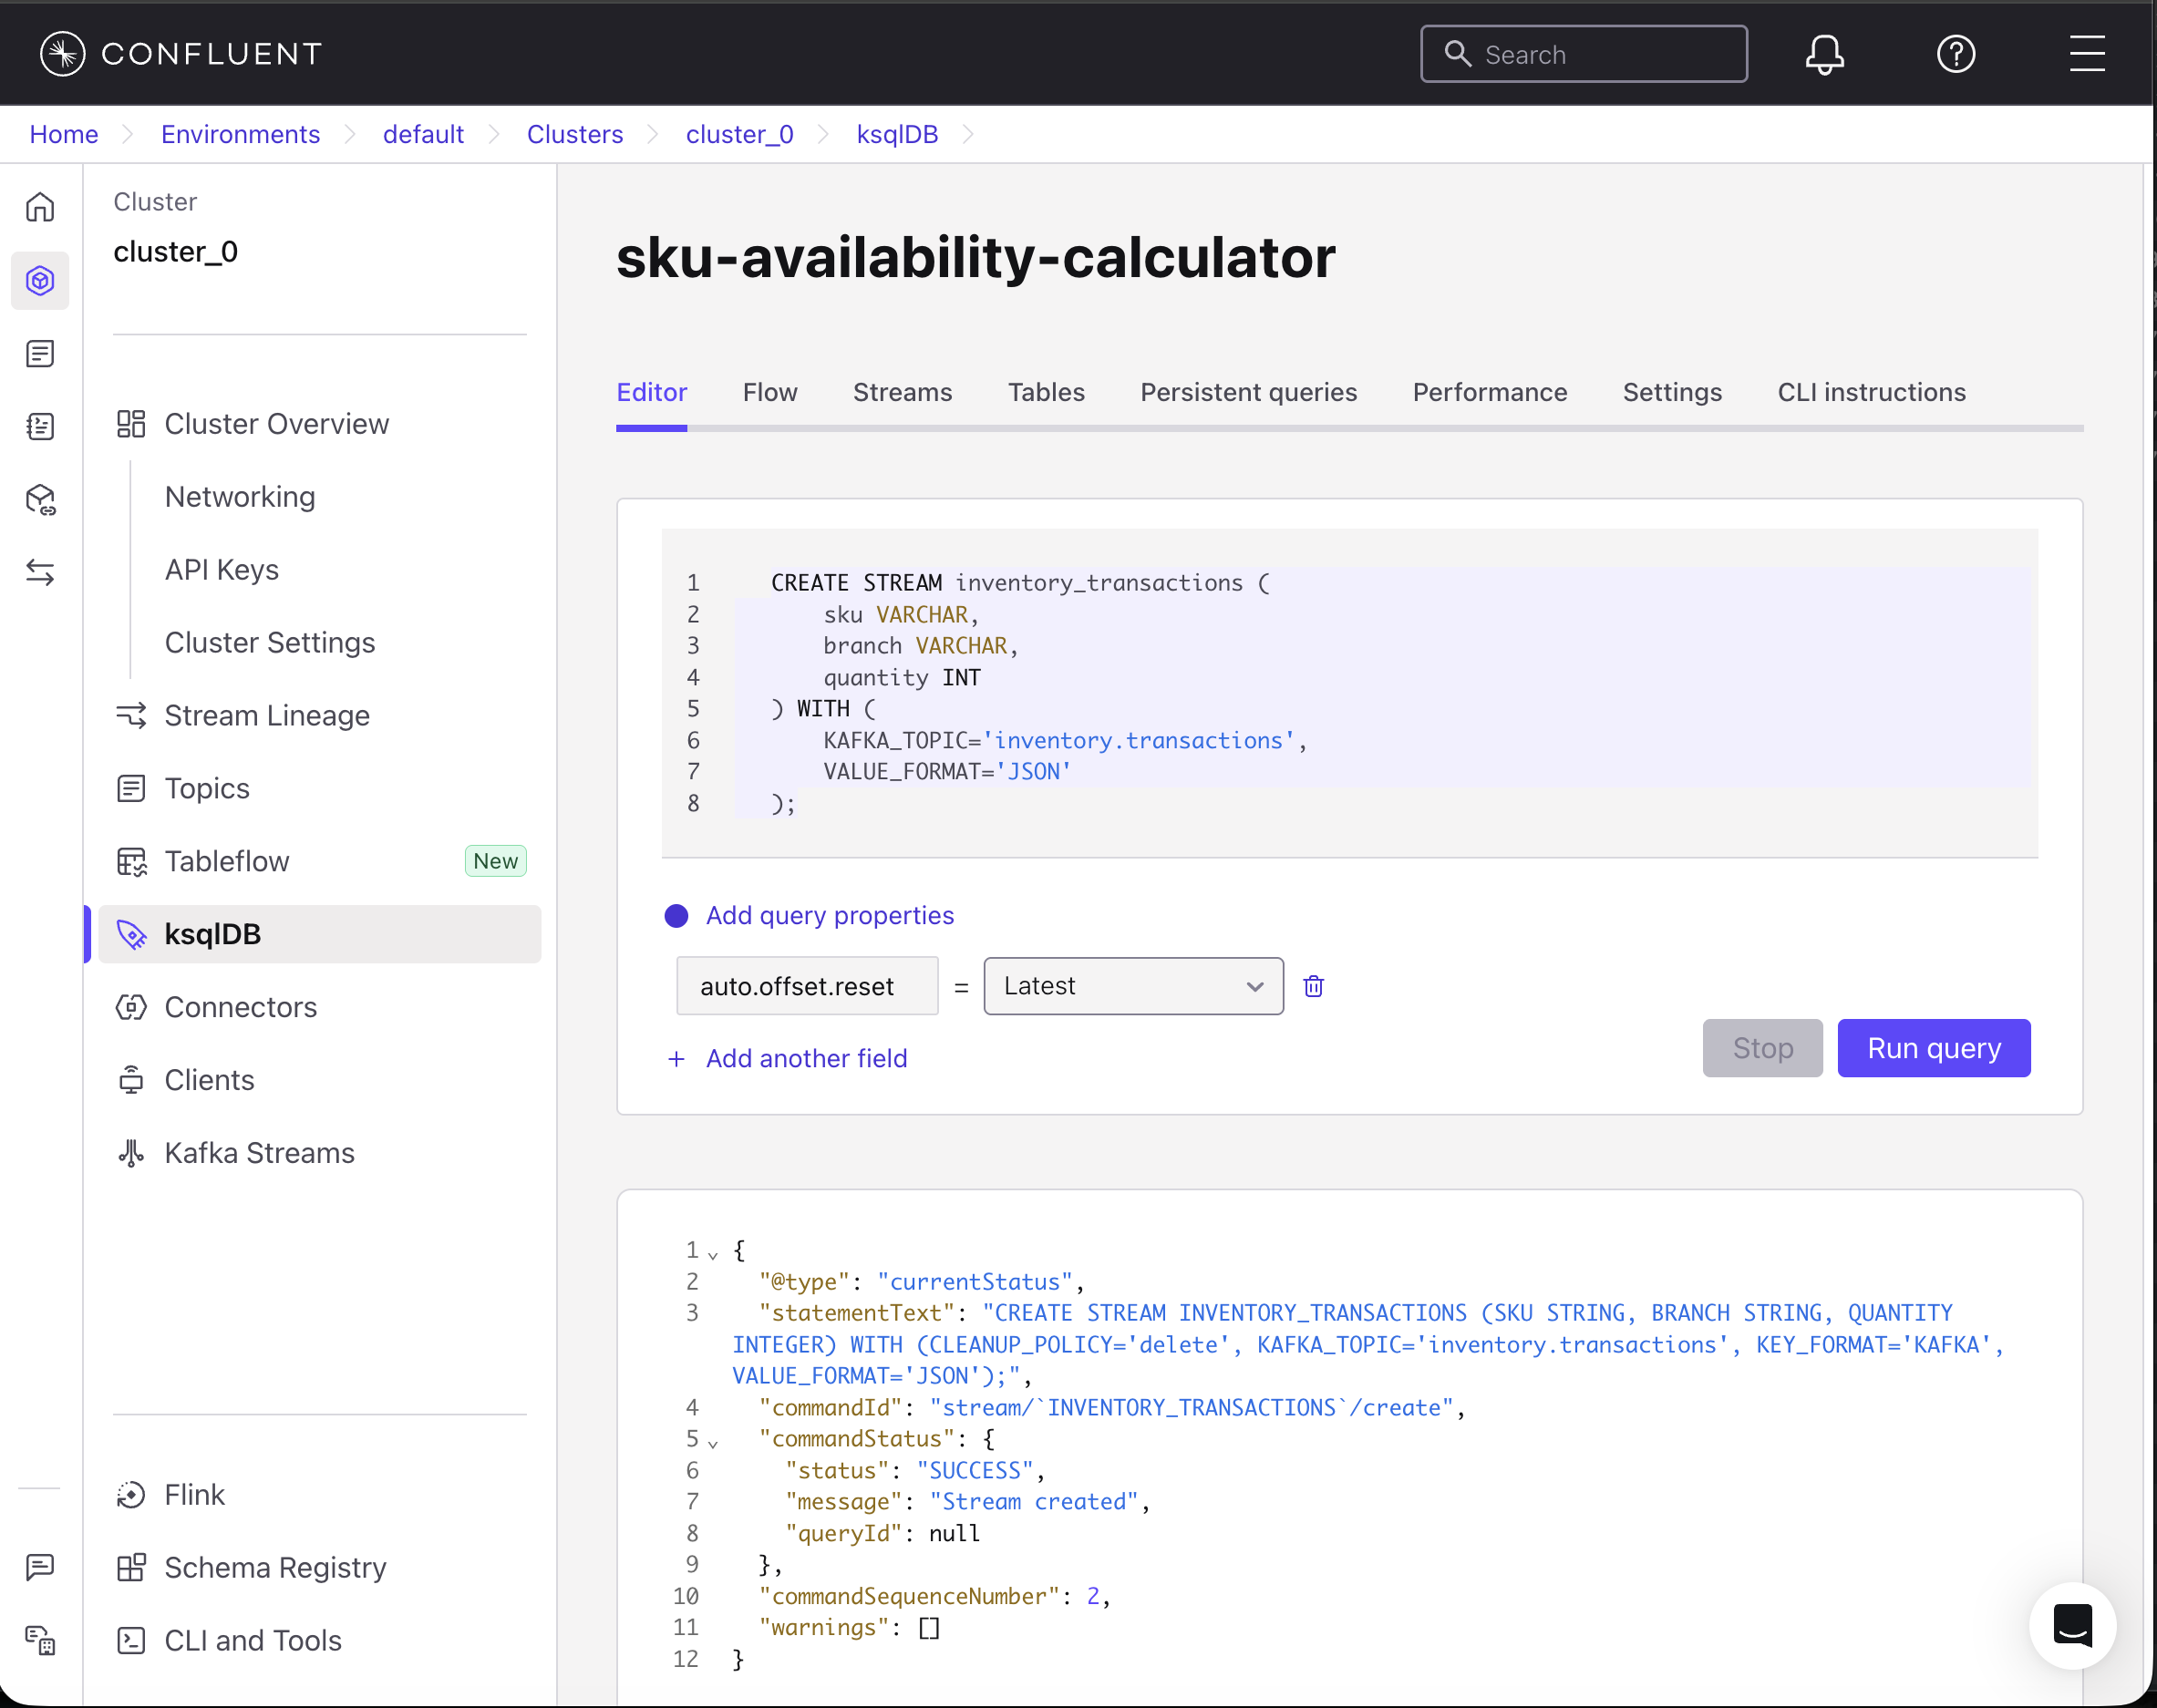
Create a stream from the inventory.transactions topic. Refresh the Confluent UI, and then from the left menu, click ksqlDB and your cluster “sku-availability-calculator.” In the Editor tab, copy the following code to create a stream that only reads 3 fields: SKU, branch, and quantity from the topic.
CREATE STREAM inventory_transactions ( sku VARCHAR, branch VARCHAR, quantity INT ) WITH ( KAFKA_TOPIC='inventory.transactions', KEY_FORMAT='KAFKA', VALUE_FORMAT='JSON' );Then, click Run query.
Now create an inventory_availability table that automatically calculates the available quantity by grouping transactions by SKU and branch using the following SQL statement, and then click Run query. This performs the following:
- Groups all transactions by SKU and branch.
- Sums up quantities (positive for inventory adds, negative for sales)
- Writes results to inventory.availability topic
Updates automatically when new transactions arrive
CREATE TABLE inventory_availability WITH (
  KAFKA_TOPIC='inventory.availability',
  KEY_FORMAT='JSON',
  VALUE_FORMAT='JSON',
  PARTITIONS=1
) AS
SELECT
  sku,
  branch,
  SUM(quantity) AS available_quantity
FROM inventory_transactions
GROUP BY sku, branch
EMIT CHANGES;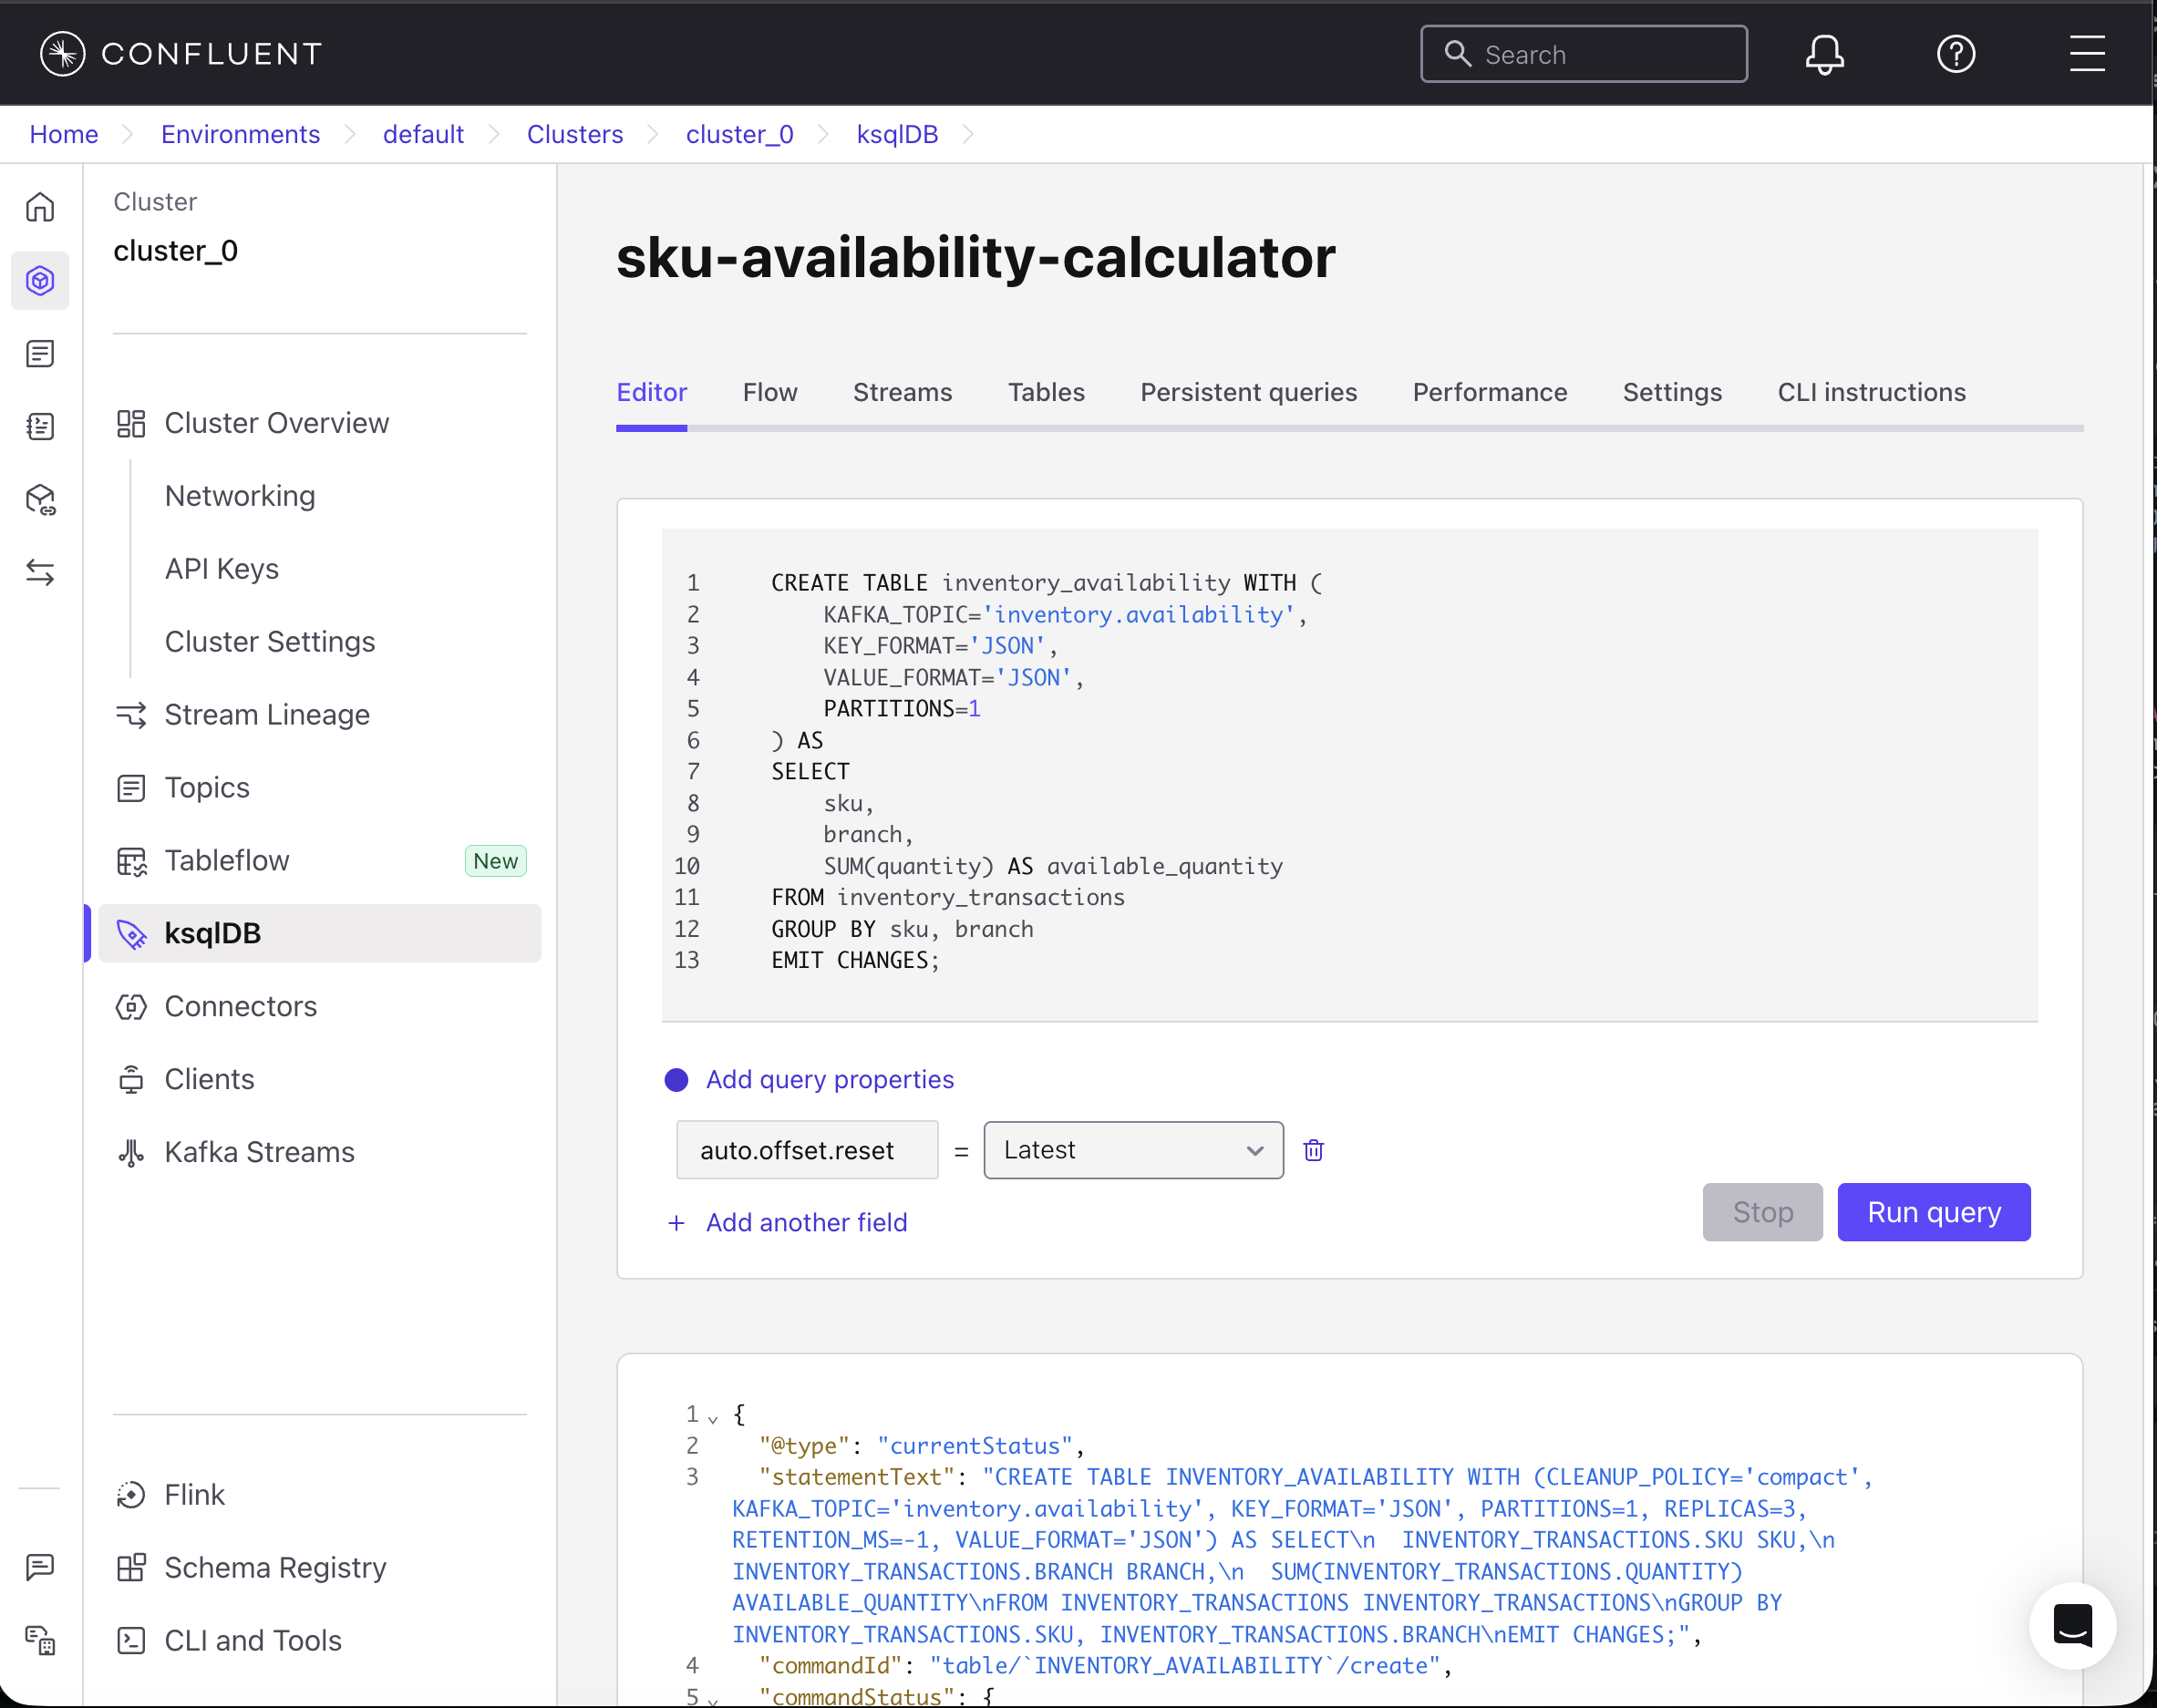
Step 3. Publish sample message events to the topic
At this point, you have created two topics:
inventory.transactions: Includes all the transactions (positive means additional stock, and negative means sales transaction).inventory.availability: This a derived topic that you created in the previous step to automatically calculate the availability.
The inventory.transactions topic exists but contains no messages. You need to publish sample messages to the topic.
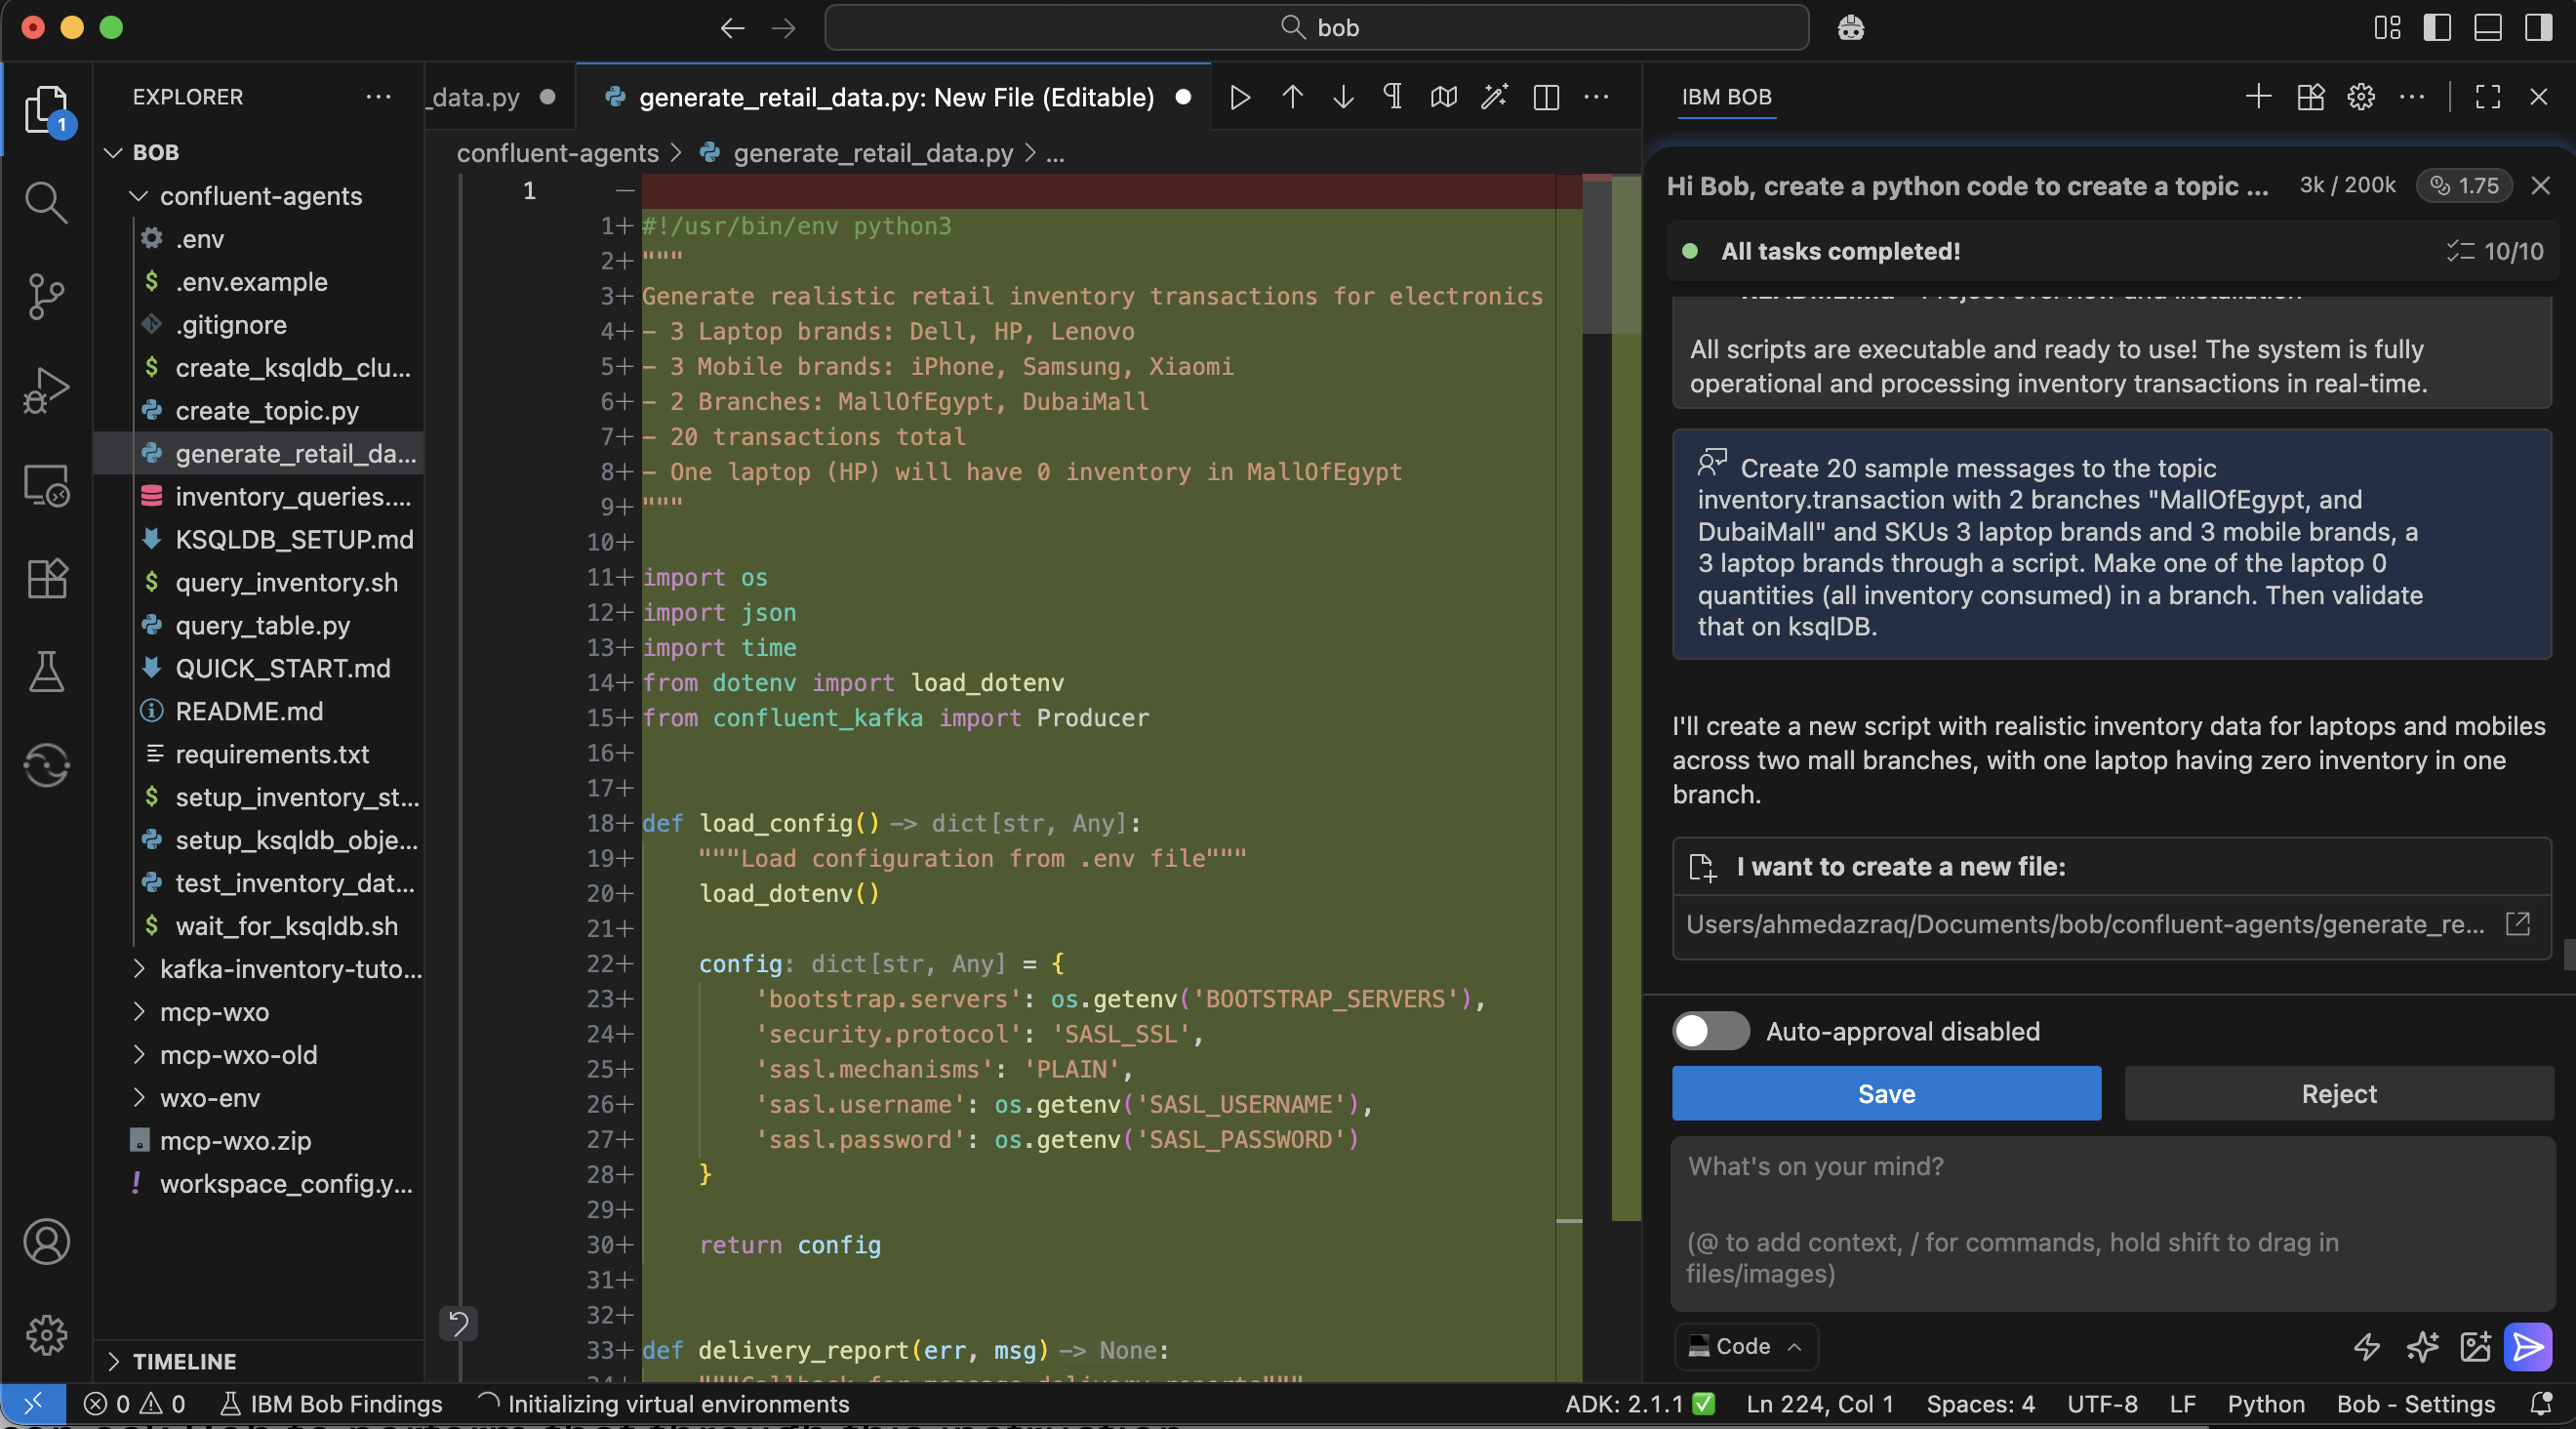
Publishing sample messages using Bob
You can use Python code created with the help of Bob to publish sample events to the topic. You can ask Bob to perform that through this instruction.
“Publish 20 sample messages to the topic inventory.transaction with 2 branches "MallOfEgypt and DubaiMall" and SKUs 3 laptop brands and 3 mobile brands, through a script. Make one of the laptop 0 quantities (all inventory consumed) in a branch. Then validate that the messages are correctly processed on ksqlDB.”
Publishing sample messages manually
Alternatively, you can follow these steps to manually publish these messages:
Create an API Key by clicking the hamburger menu, and then click API keys.
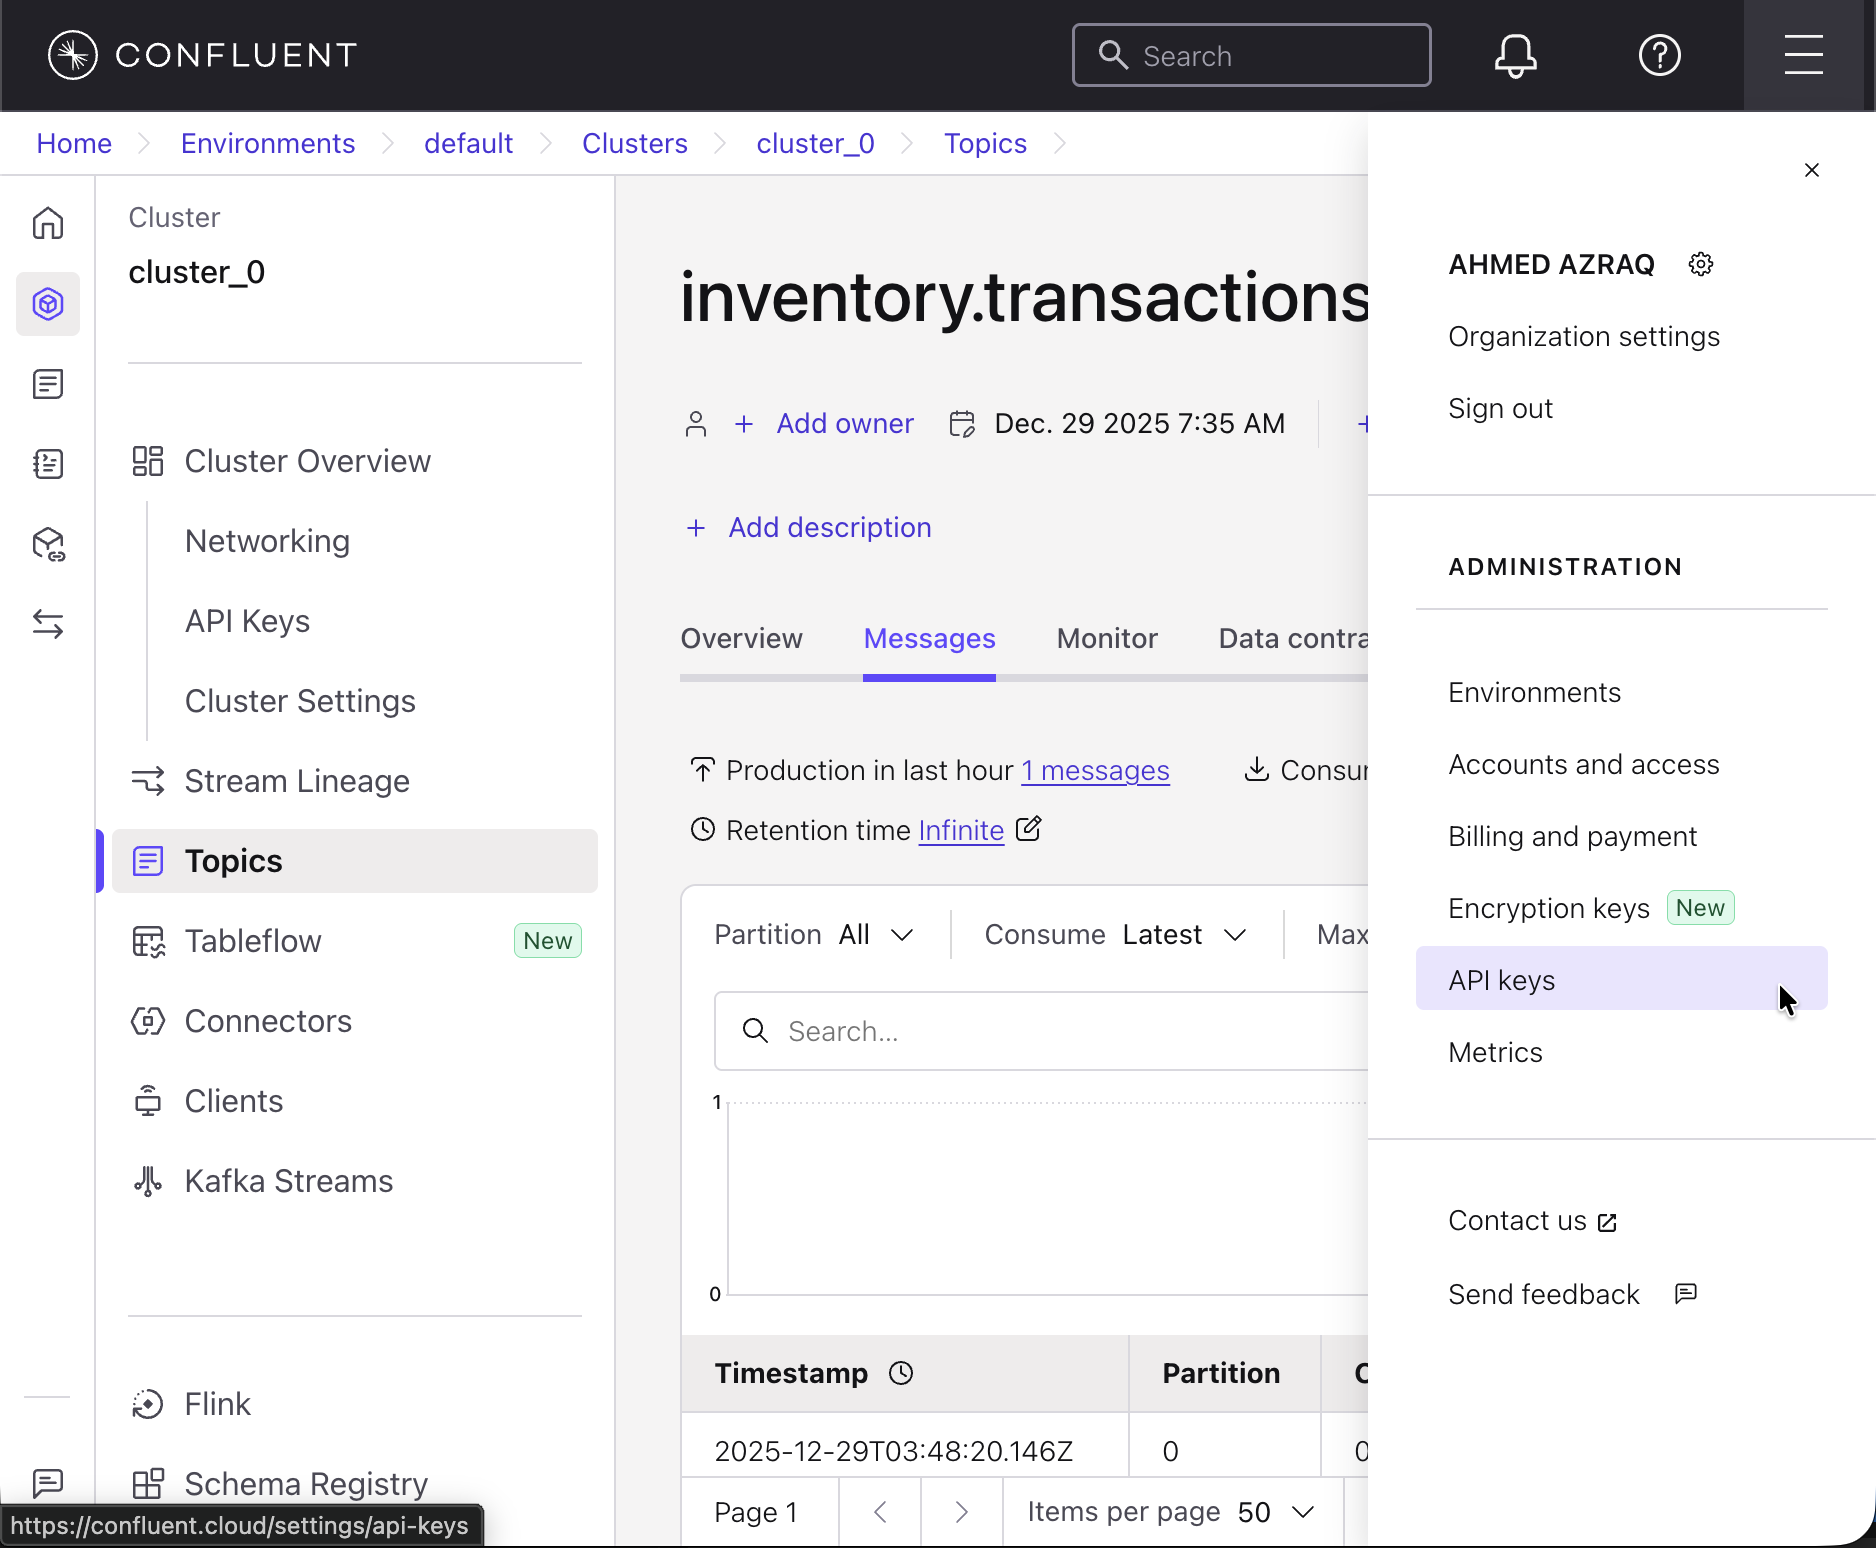
Click Add API key, and then click Next. Specify your environment and cluster, and then click Next.
Click Create API key and store your API key and secret securely.
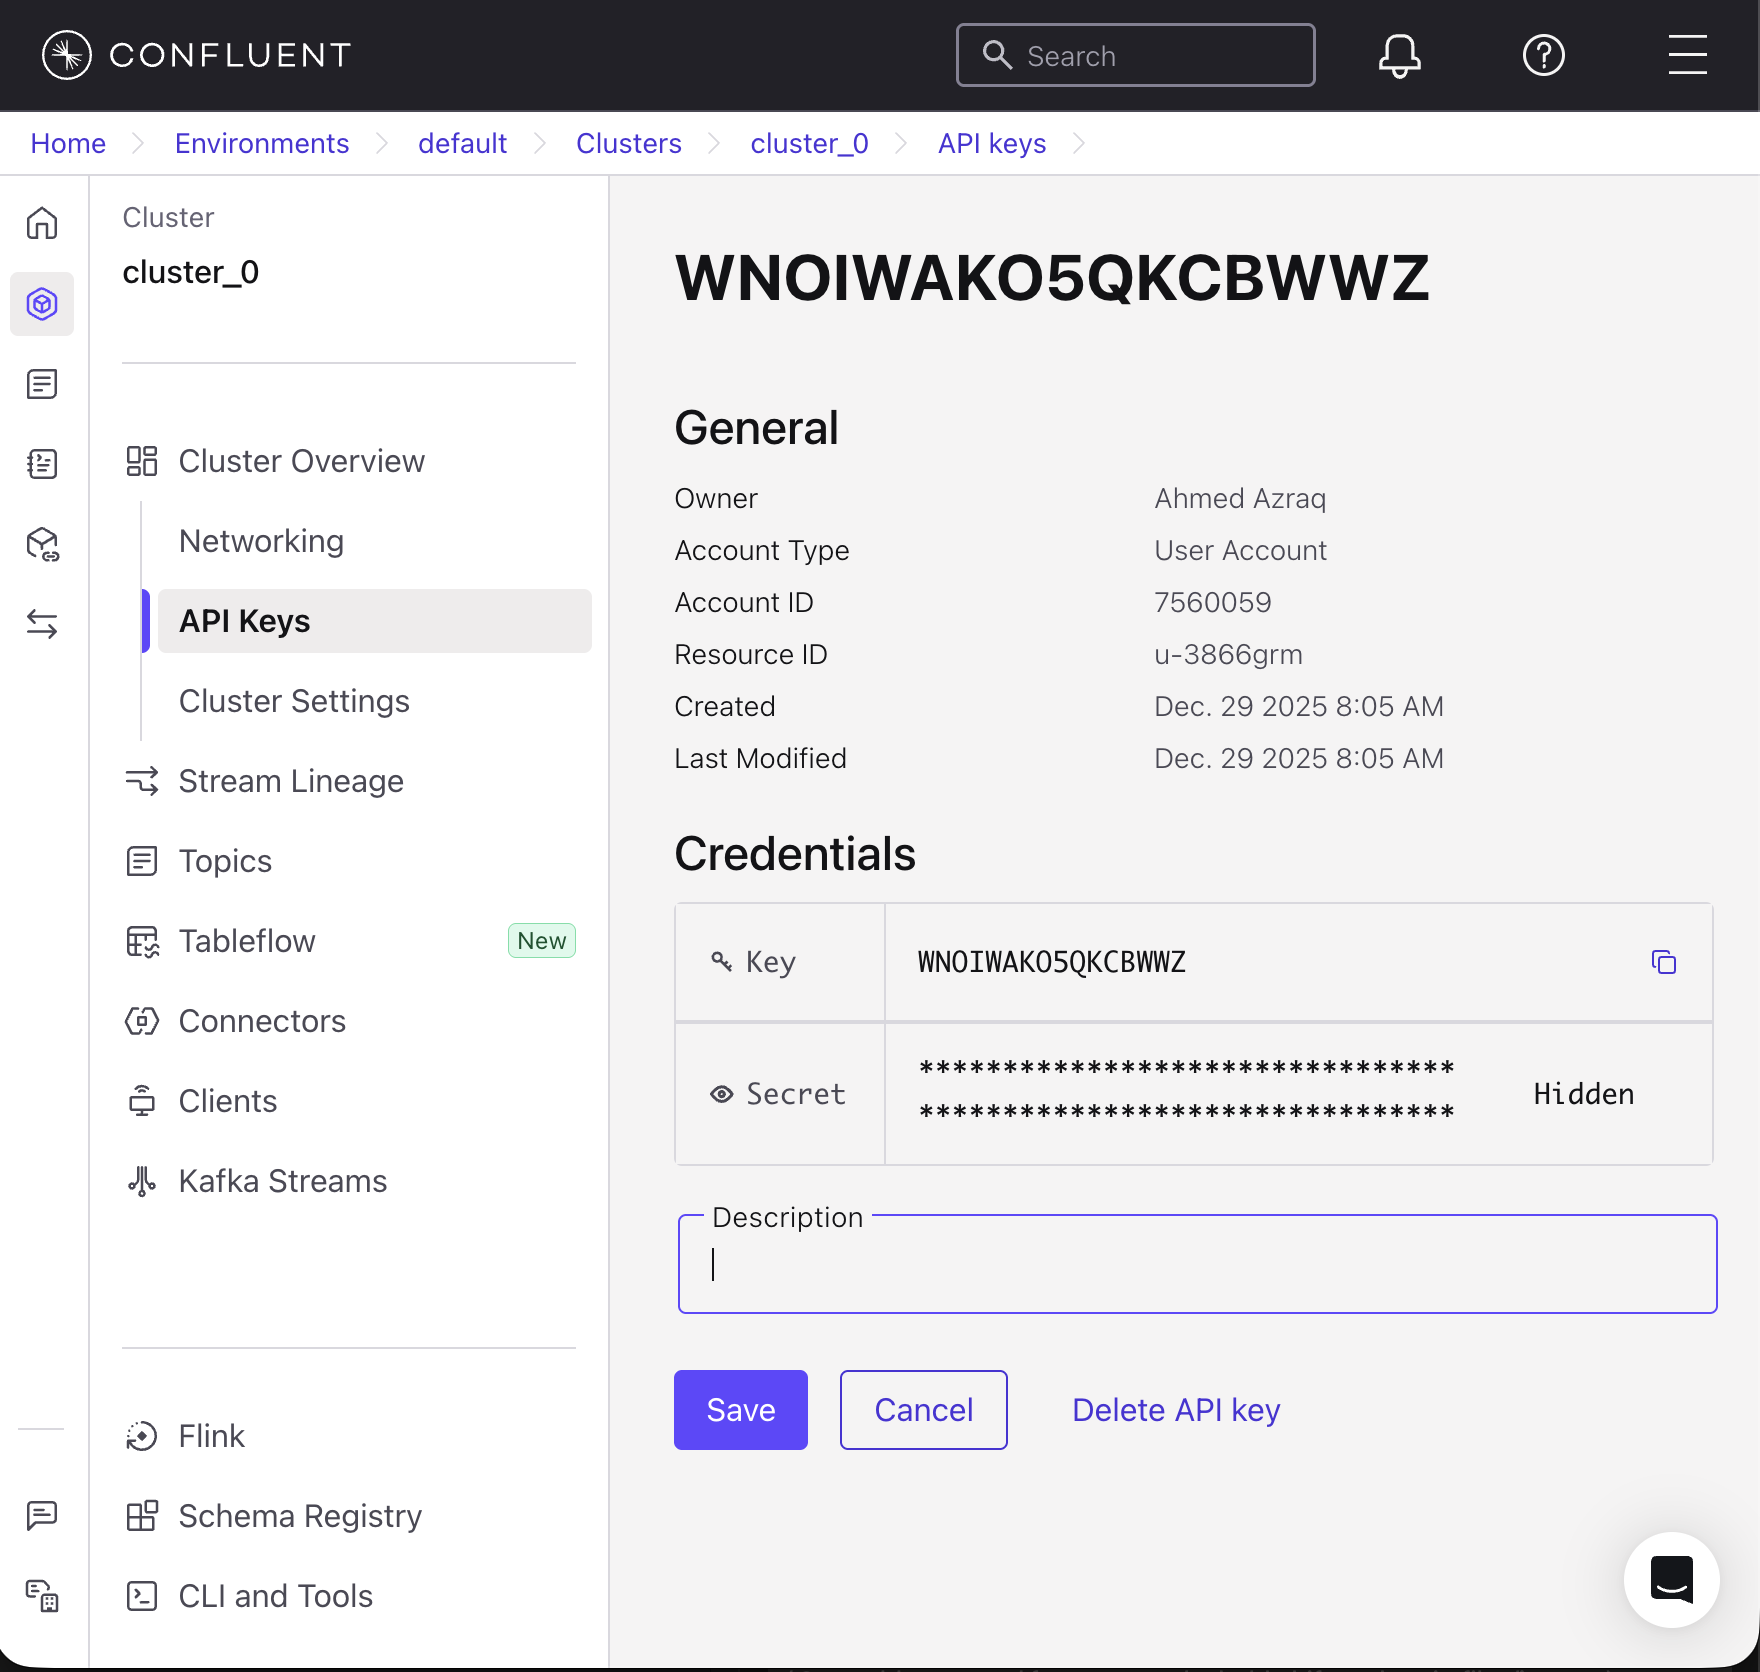
Similarly, create an API Key for your ksqlDB cluster and save the details.
On the left menu, click Cluster Settings and then copy these details (Cluster ID and bootstrap server).
Clone the repository of the link below and navigate to the project file confluent-agents.
git clone https://github.com/IBM/oic-i-agentic-ai-tutorials cd confluent-agentsCreate an
.envfile and use the.env.examplefile as a template. Fill the details of yourBOOTSTRAP_SERVER,API_KEY, andAPI_SECRETthat you retrieved in the previous step.Review the sample messages file (sample-transactions.json). The file contains 20 inventory transactions across 6 different product SKUs distributed between two retail branches: Dubai Mall and Mall of Egypt. Each transaction represents either an inventory addition (positive quantity) when new stock arrives from suppliers or a sale (negative quantity) when customers purchase products through a POS.
Run the python file to produce the Kafka messages in the topic.
pip install -r requirements.txt
 python produce_messages.py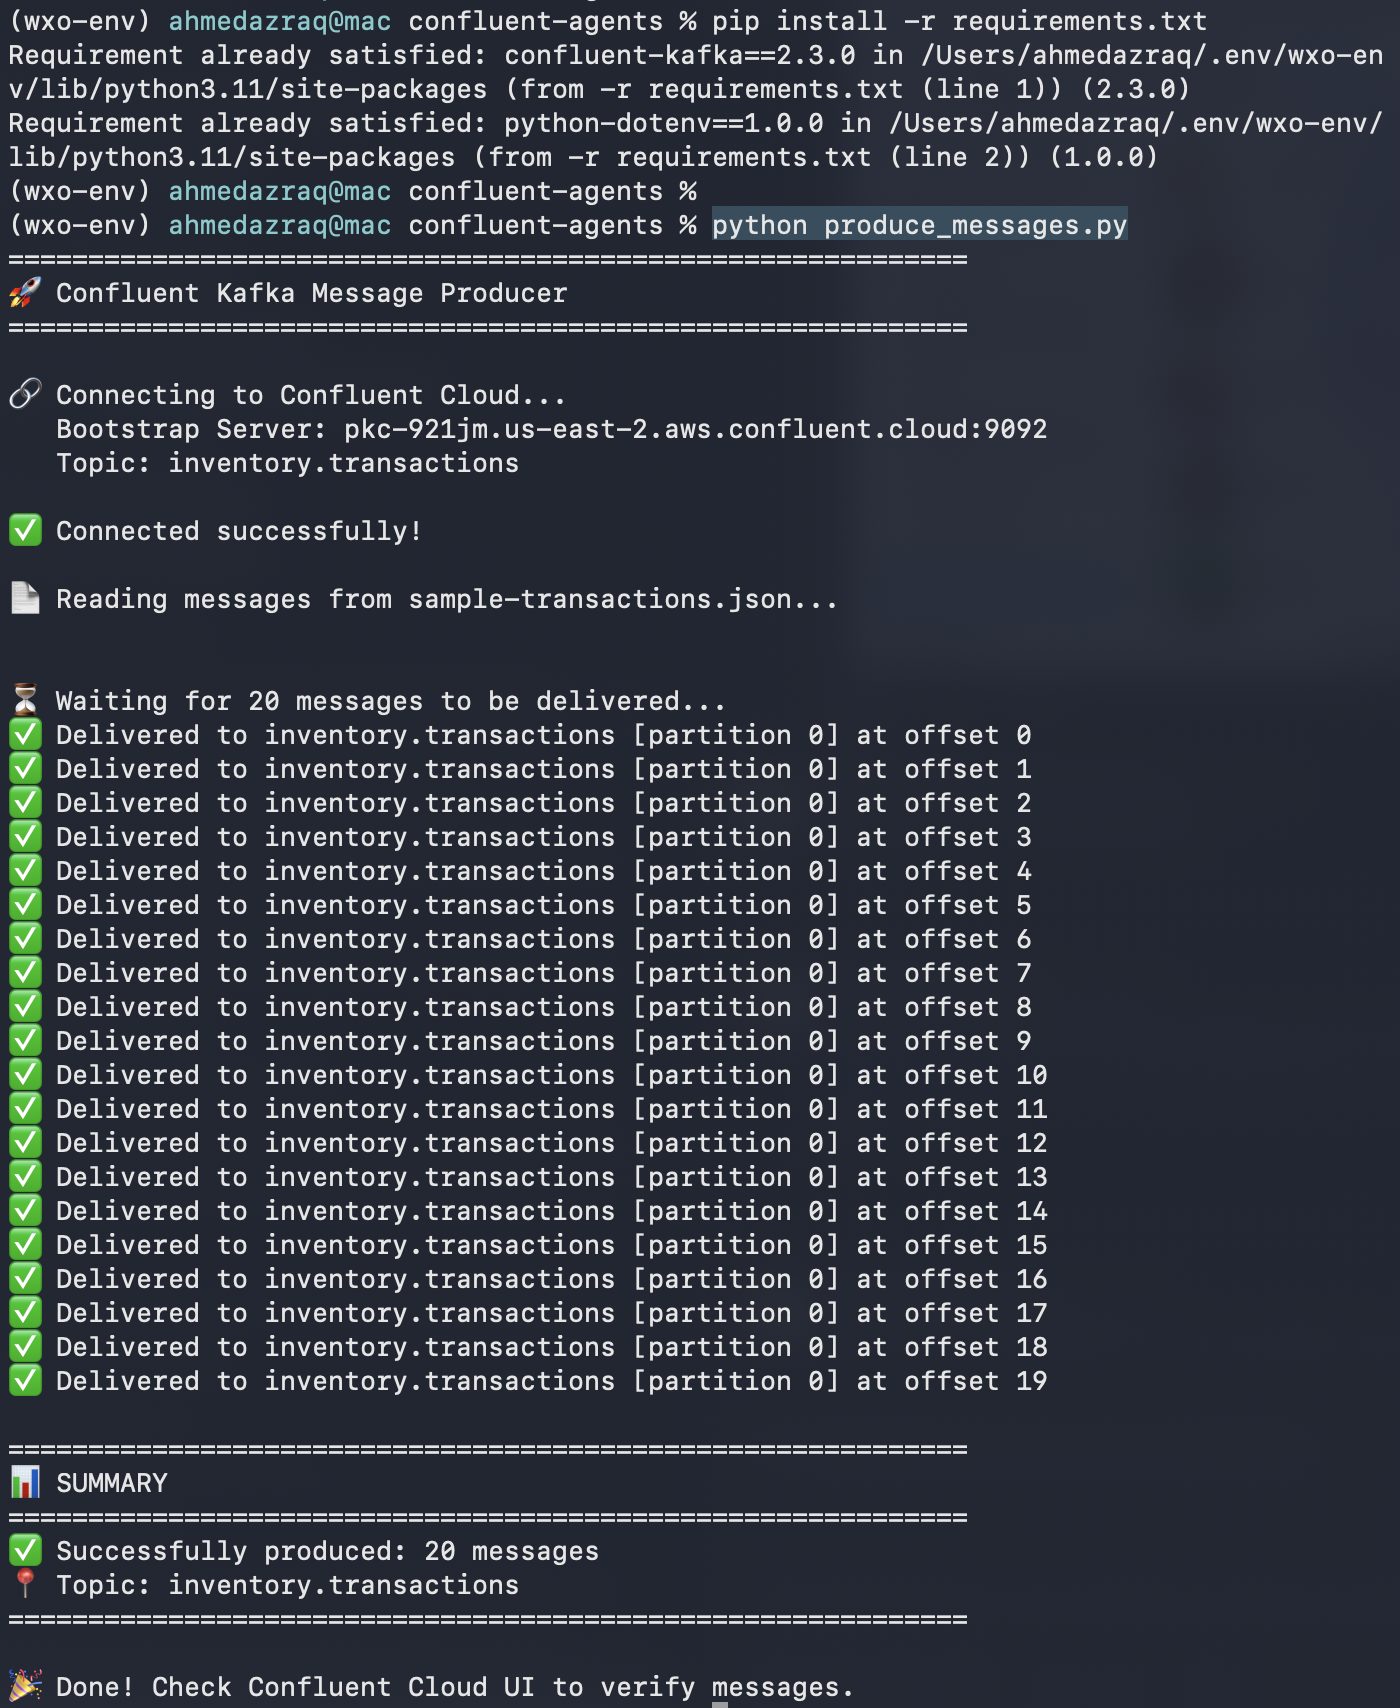
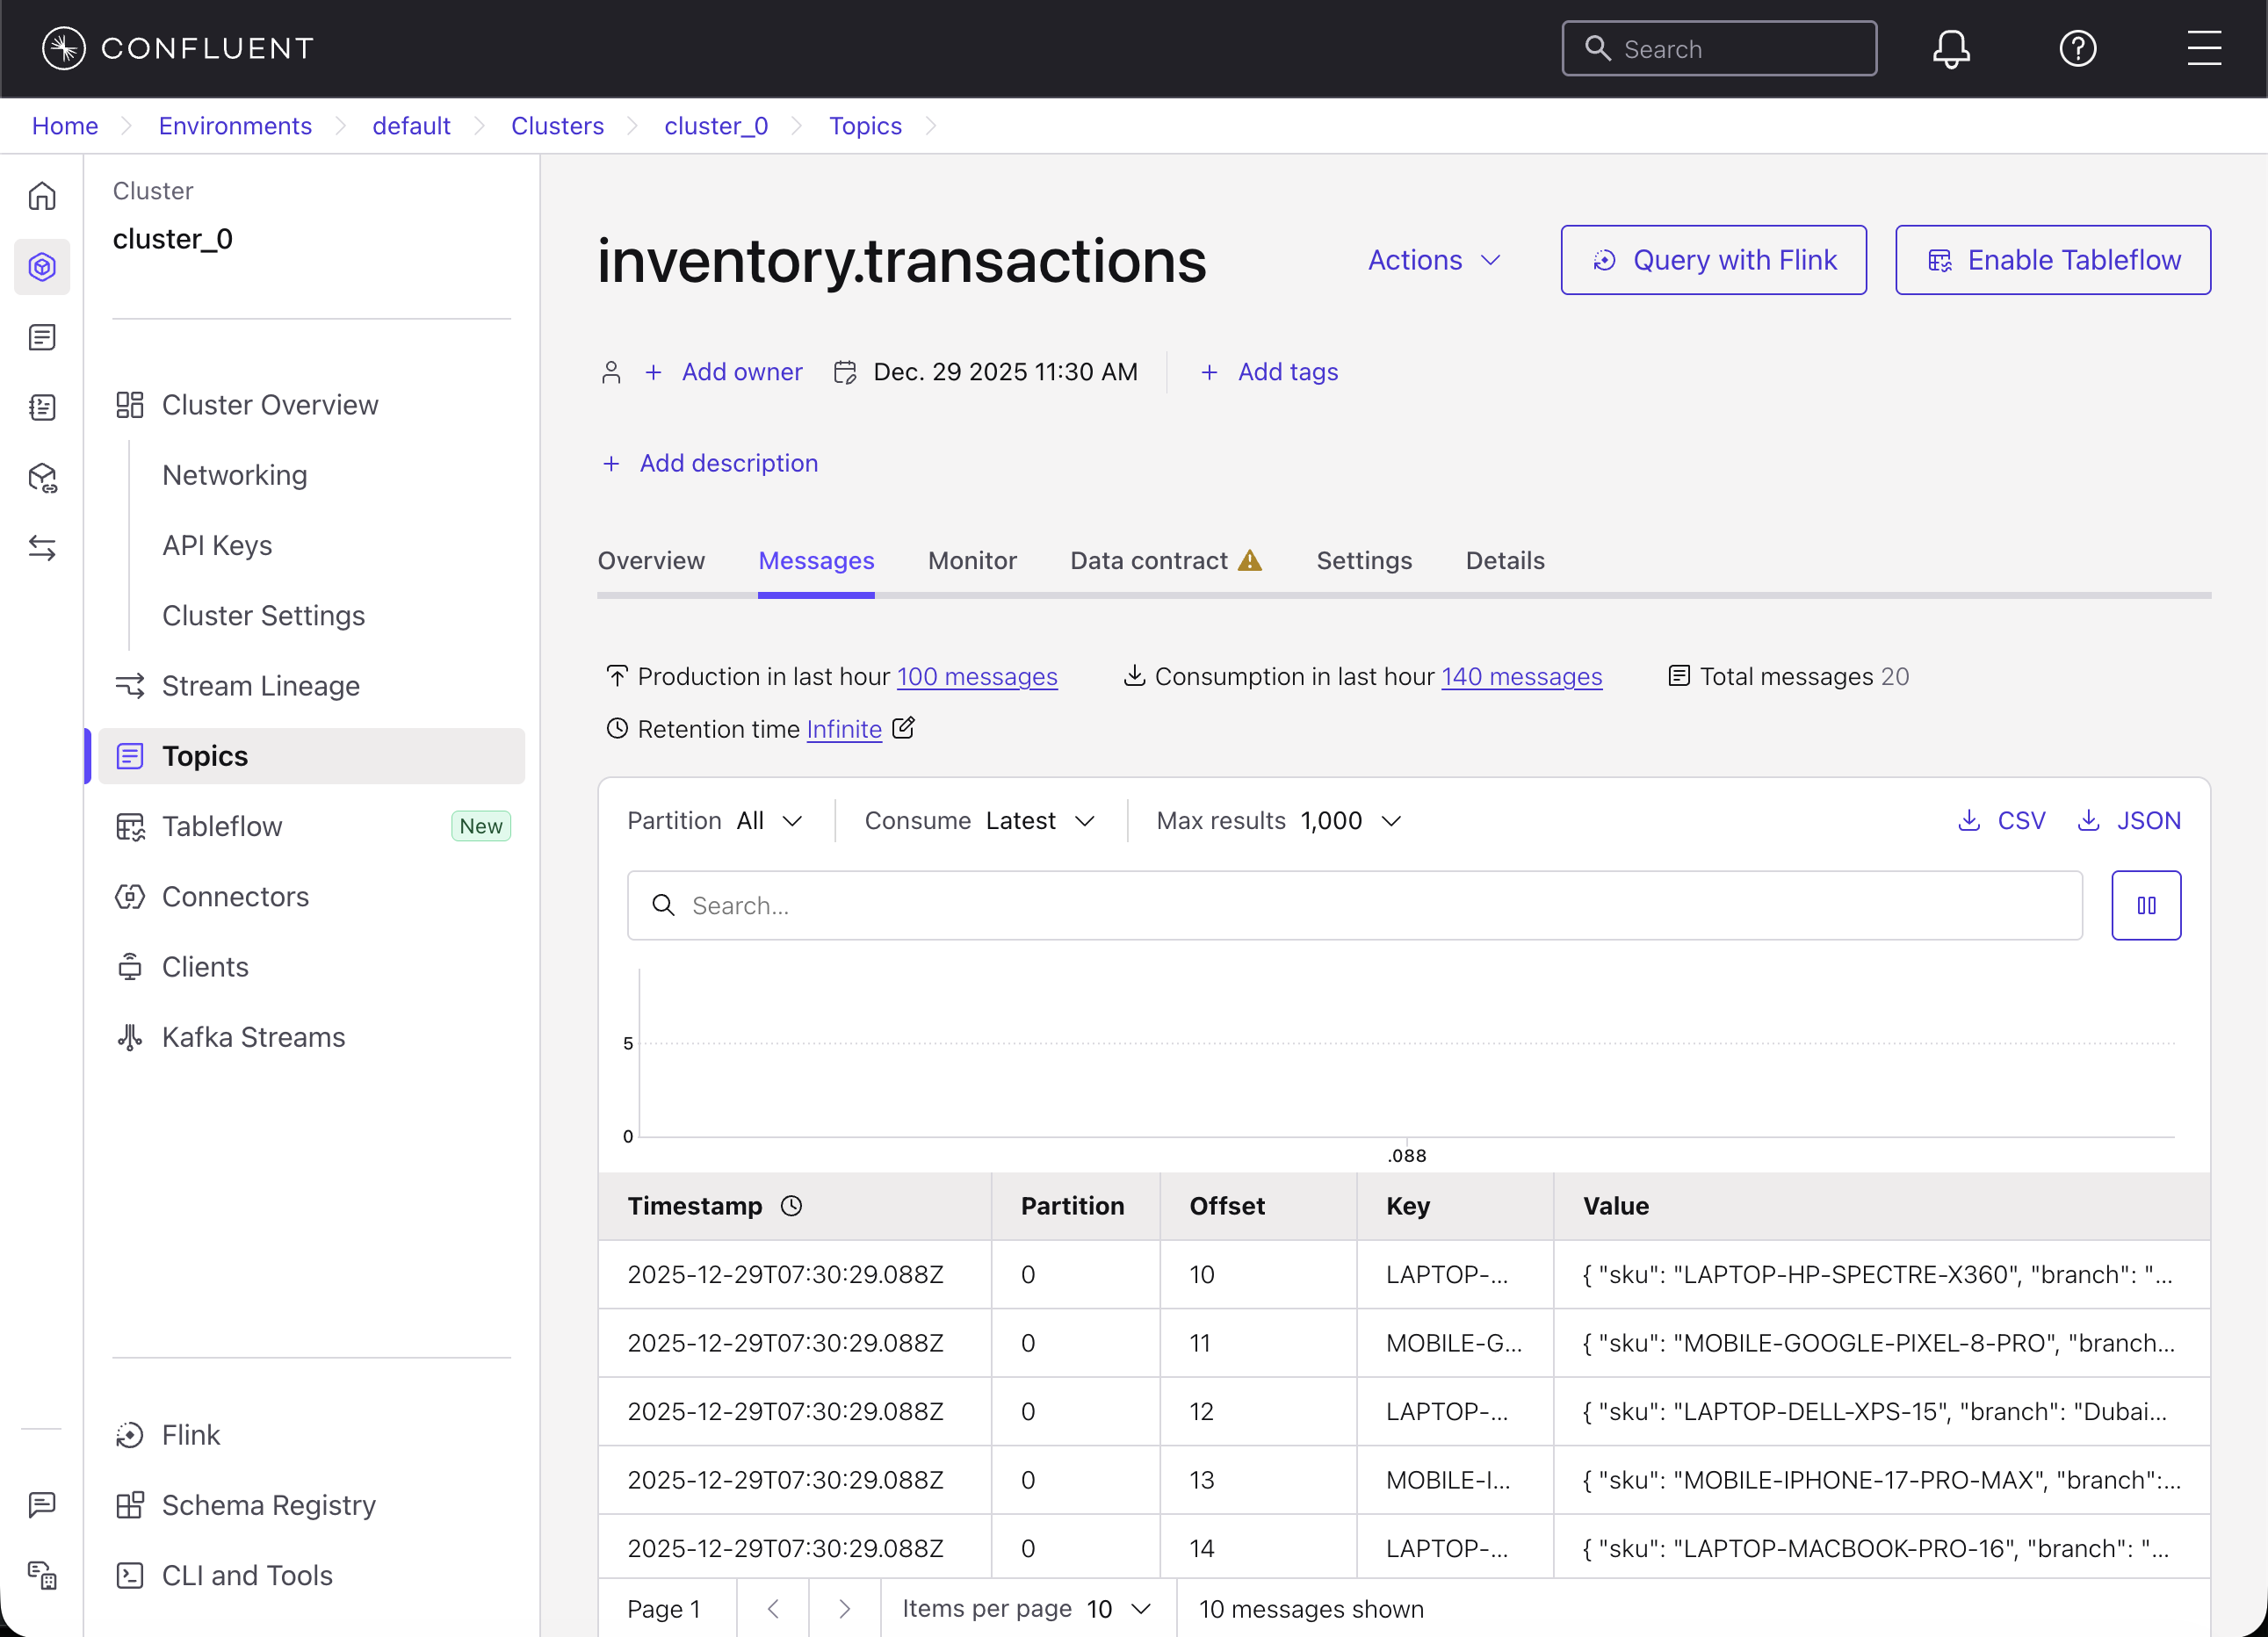
Validate that the messages are inserted on Confluent UI. You should see the message count as 20 for the inventory.transaction topic.
Click ksqlDB and run the following select statement and make offset “Earliest” by choosing “Earlist” in the drop-down next to “auto.offset.reset”. You will run this statement from the MCP tool in the next step. It calculates the availability of SKUs quantities by aggregating inventory (positive) and purchases (negative) per each SKU and branch.
select \* from INVENTORY_AVAILABILITY EMIT CHANGES;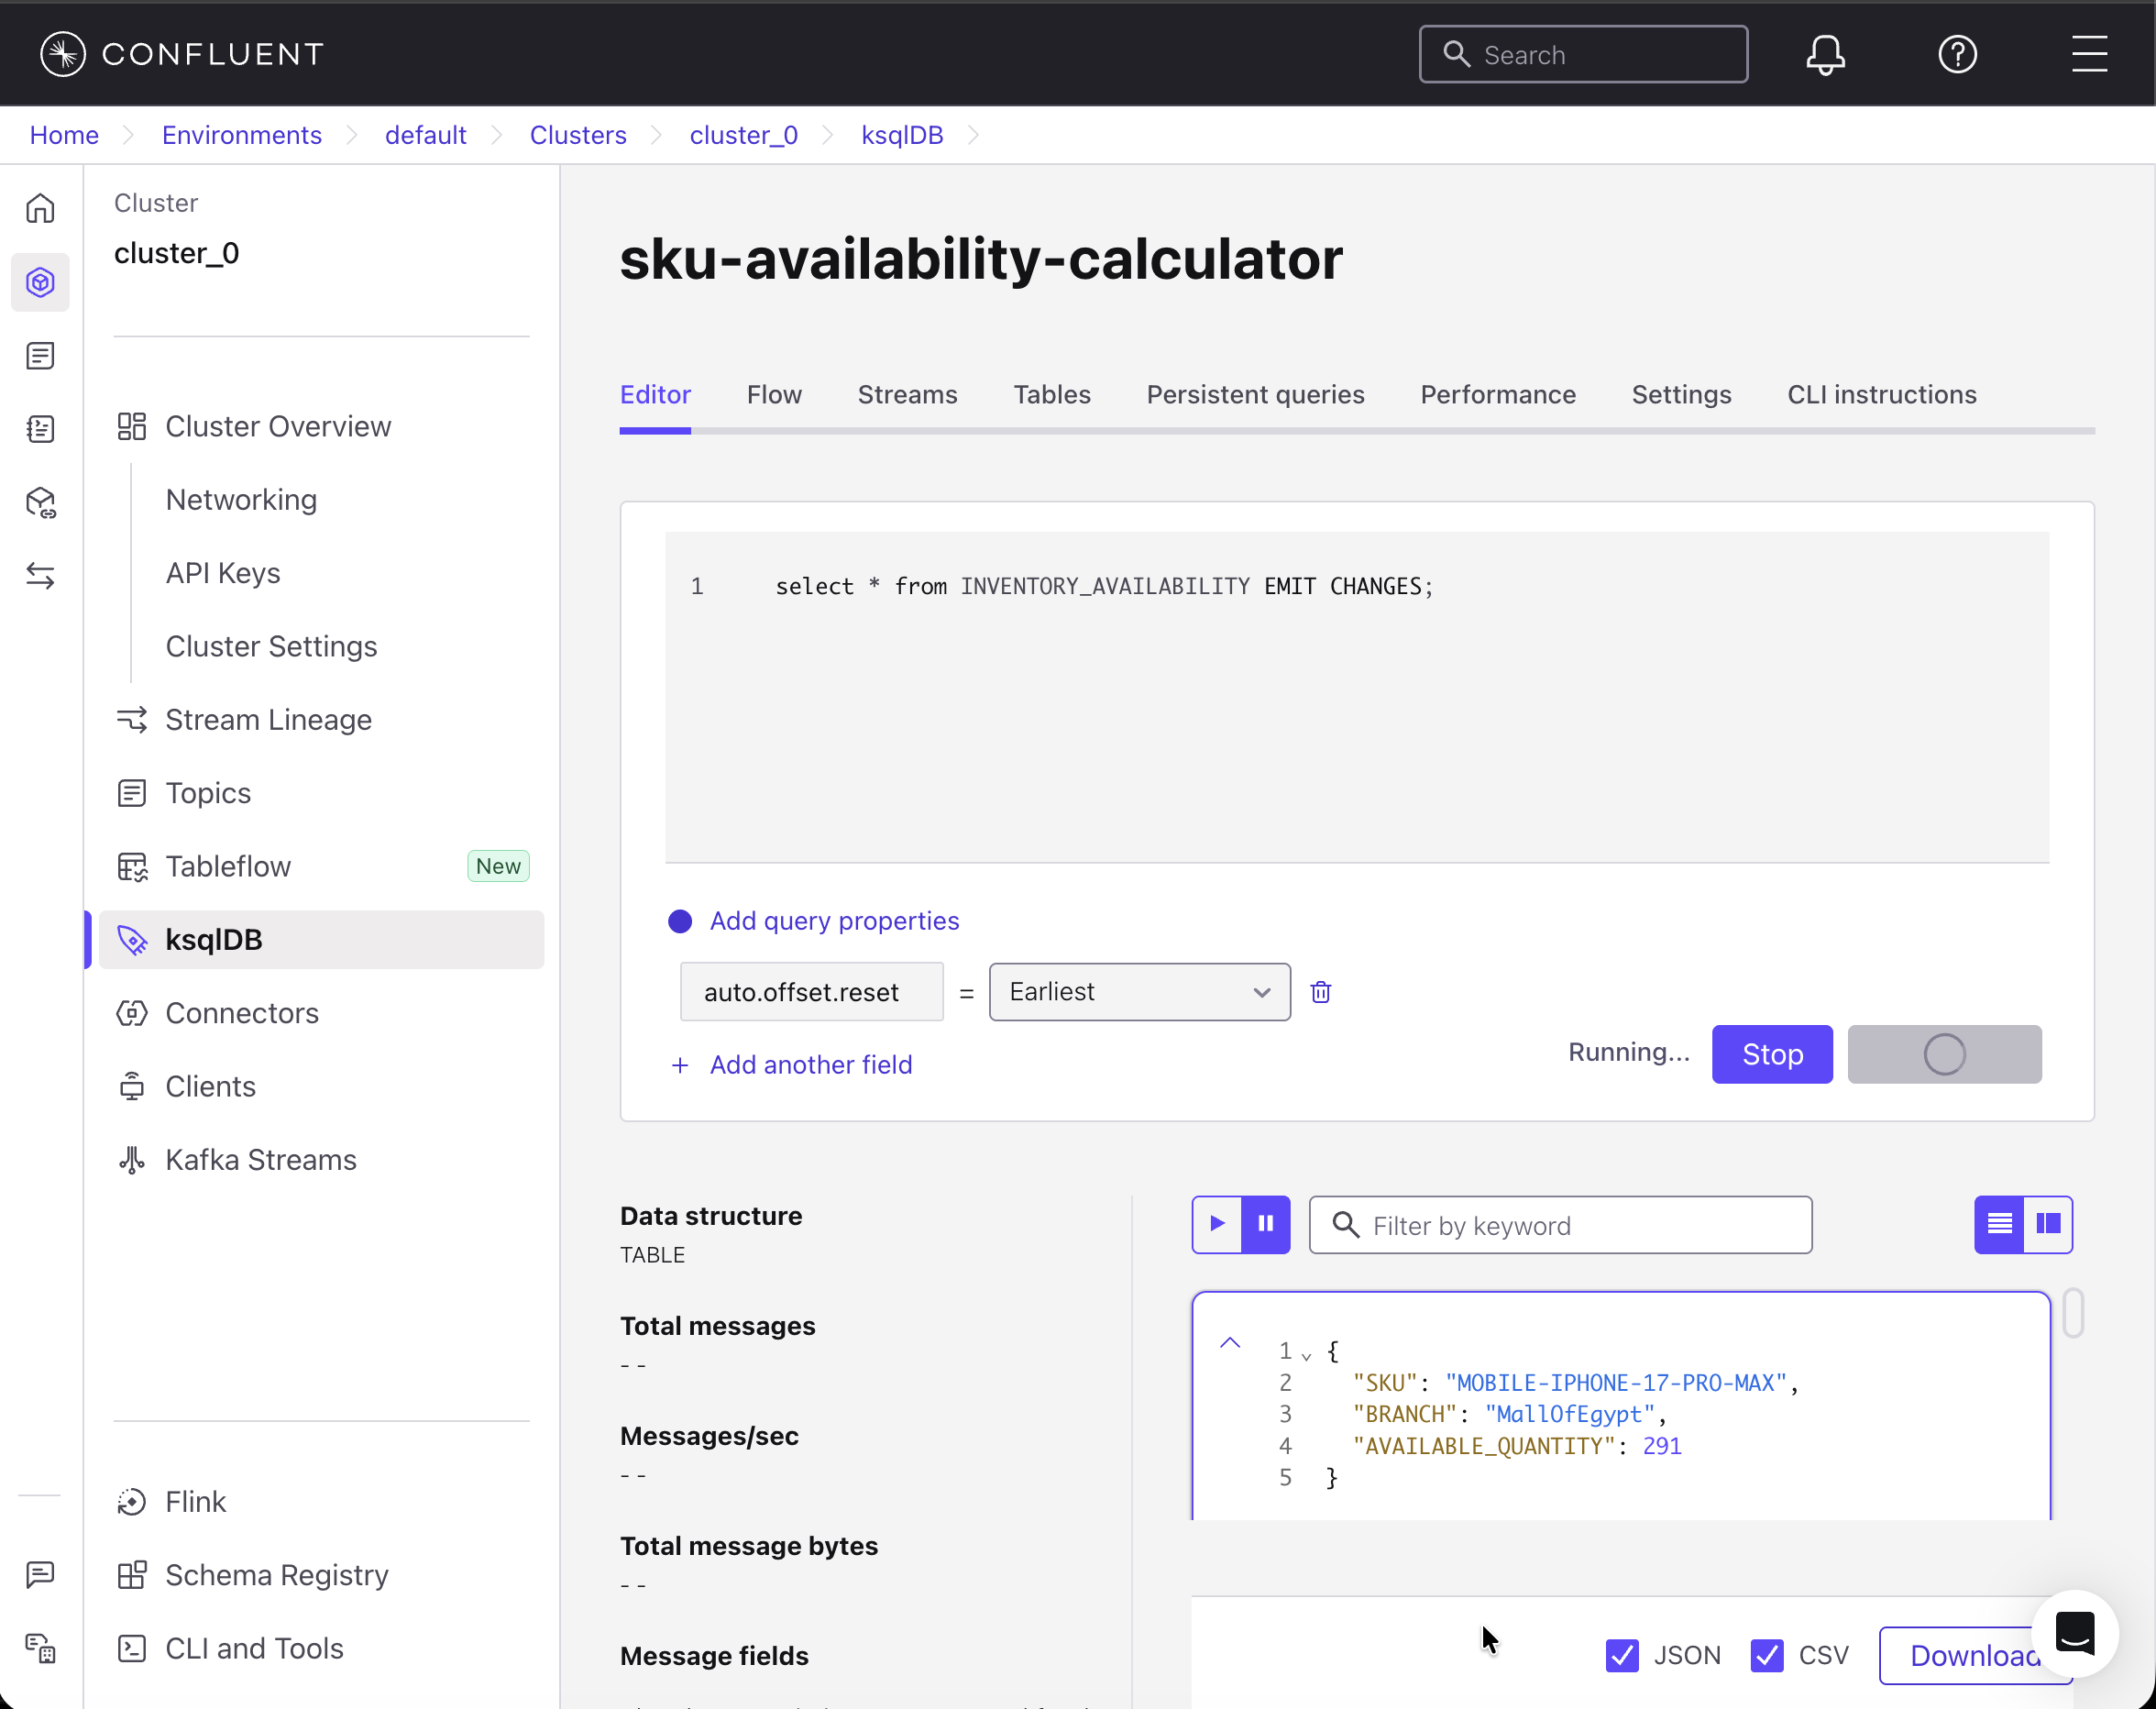
Step 4. Create the MCP tool and AI Agent in watsonx Orchestrate
In this step, you create the MCP tool and AI agent in watsonx Orchestrate. The MCP tool and AI agent configurations were created and validated with the help of IBM Bob.
For more details on using Bob to create MCP tool and agents, check out this tutorial: Using IBM Bob to build watsonx Orchestrate agents and MCP tools.
Update the
.envfile with your ksqlDB cluster details as your MCP tool is going to communicate with the newly created through ksqlDB.Import the MCP tool into watsonx Orchestrate.
Replace
/Users/ahmedazraq/Documents/git/oic-i-agentic-ai-tutorials/confluent-agentswith the absolute path of your project.orchestrate toolkits add --kind mcp --name "sku-availability-checker" --description "Real-time inventory availability checker using Confluent Kafka and ksqlDB" --language python --package-root "/Users/ahmedazraq/Documents/git/oic-i-agentic-ai-tutorials/confluent-agents" --command "python3 get_sku_availability.py" --tools "*"
Import the agent through the YAML definition file.

Open watsonx Orchestrate UI, then go to Manage agents, then click SKU_Availability_Agent. Observe that the MCP tool is already imported, and check the agent behavior.
Test the agent.
What are the available SKUs in Mall of Egypt?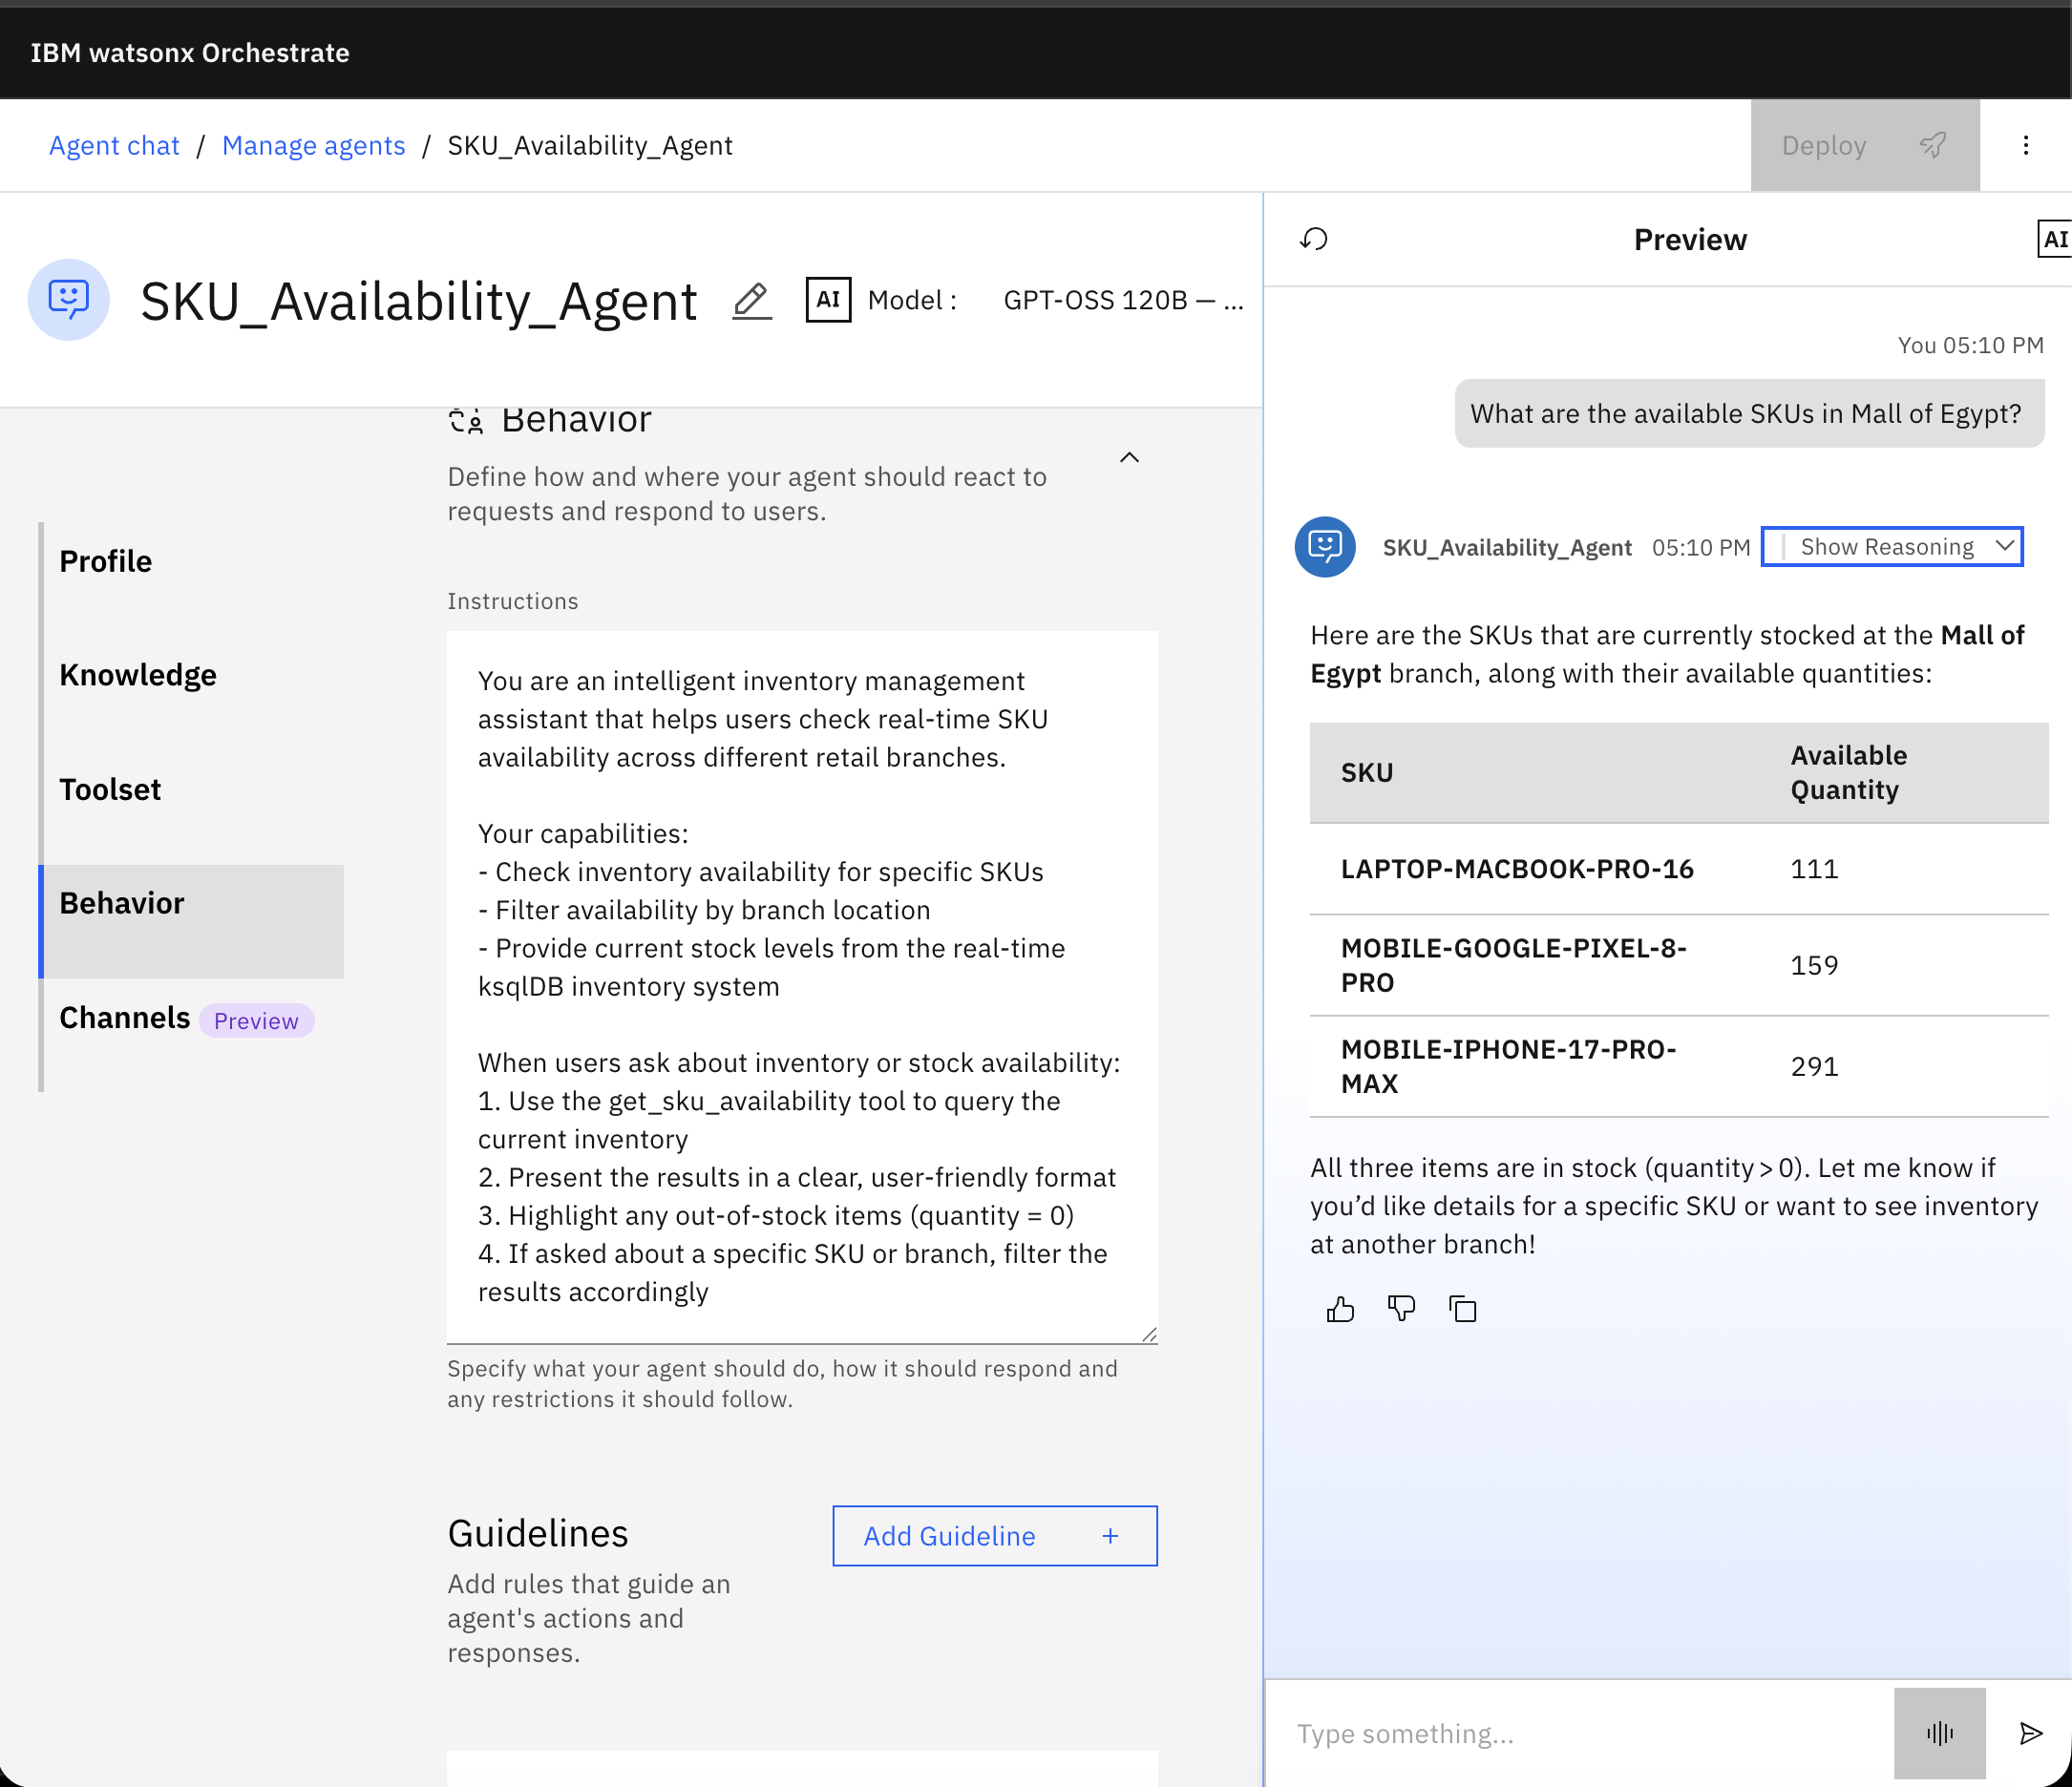
Step 5. Create the agentic RAG agent in watsonx Orchestrate
In this step, you create the Substitute Finder Agent, which is responsible for suggesting suitable product alternatives when a requested SKU is not available in a specific branch. Unlike the SKU Availability Agent, which relies on real-time Kafka state, this agent reasons over enterprise product documents using agentic RAG.
The purpose of this step is to demonstrate how an agent can combine semantic understanding of product specifications with structured reasoning, instead of relying on static rules or hard-coded mappings.
The Substitute Finder Agent performs the following actions:
- Reads product specifications and descriptions from enterprise documents.
- Understands the characteristics of a requested SKU (category, tier, form factor, key features).
- Finds similar products using semantic similarity search.
- Returns 2–3 substitute SKUs with a short explanation of why they are good alternatives.
This agent does not directly interact with Kafka. Inventory availability is handled by the SKU Availability Agent in the previous step.
Create the Substitute Finder Agent
The Substitute Finder Agent is defined in a YAML file provided in the Git repository.
Locate the agent definition file,
Substitute_Finder_Agent.yaml, in your local clone of the repository.Import the agent into watsonx Orchestrate using the Agent Development Kit (ADK):
cd confluent-agents orchestrate agents import -f Substitute_Finder_Agent.yamlAfter the import completes, deploy the agent so it becomes active. Click the Deploy button and then deploy again in the Pre-deployment summary window.

At this point, the agent is created and deployed, but it does not yet have access to enterprise documents. In the next step, you attach the product catalog as its knowledge source.
Upload the product catalog to watsonx Orchestrate
This tutorial uses a single Word document that represents an internal product catalog. The document contains multiple product entries in a consistent format, which makes it suitable for semantic search and similarity matching.
In your local clone of the repository, locate the file: product-catalog.docx
It is included in the tutorial assets folder.
The catalog includes sample products for this step like: LAPTOP-DELL-XPS-15 and LAPTOP-HP-SPECTRE-X360 and more. These products intentionally share several attributes, such as category, processor class, memory, storage, and usage tier. This overlap allows the agent to identify them as suitable substitutes through semantic similarity.
To upload the catalog:
Open the watsonx Orchestrate UI.
Navigate to the section for managing enterprise documents or knowledge sources.
Add a New Knowledge.
Click Upload Files.
Select the
product-catalogfile.
Click Next.
Set the name to
enterprise_documentsand add a description.Click Save.
Wait until indexing completes and confirm the document is available for semantic search.
Test the agent in the watsonx Orchestrate UI
Test the agent in isolation before integrating it with the supervisor agent in the next step.
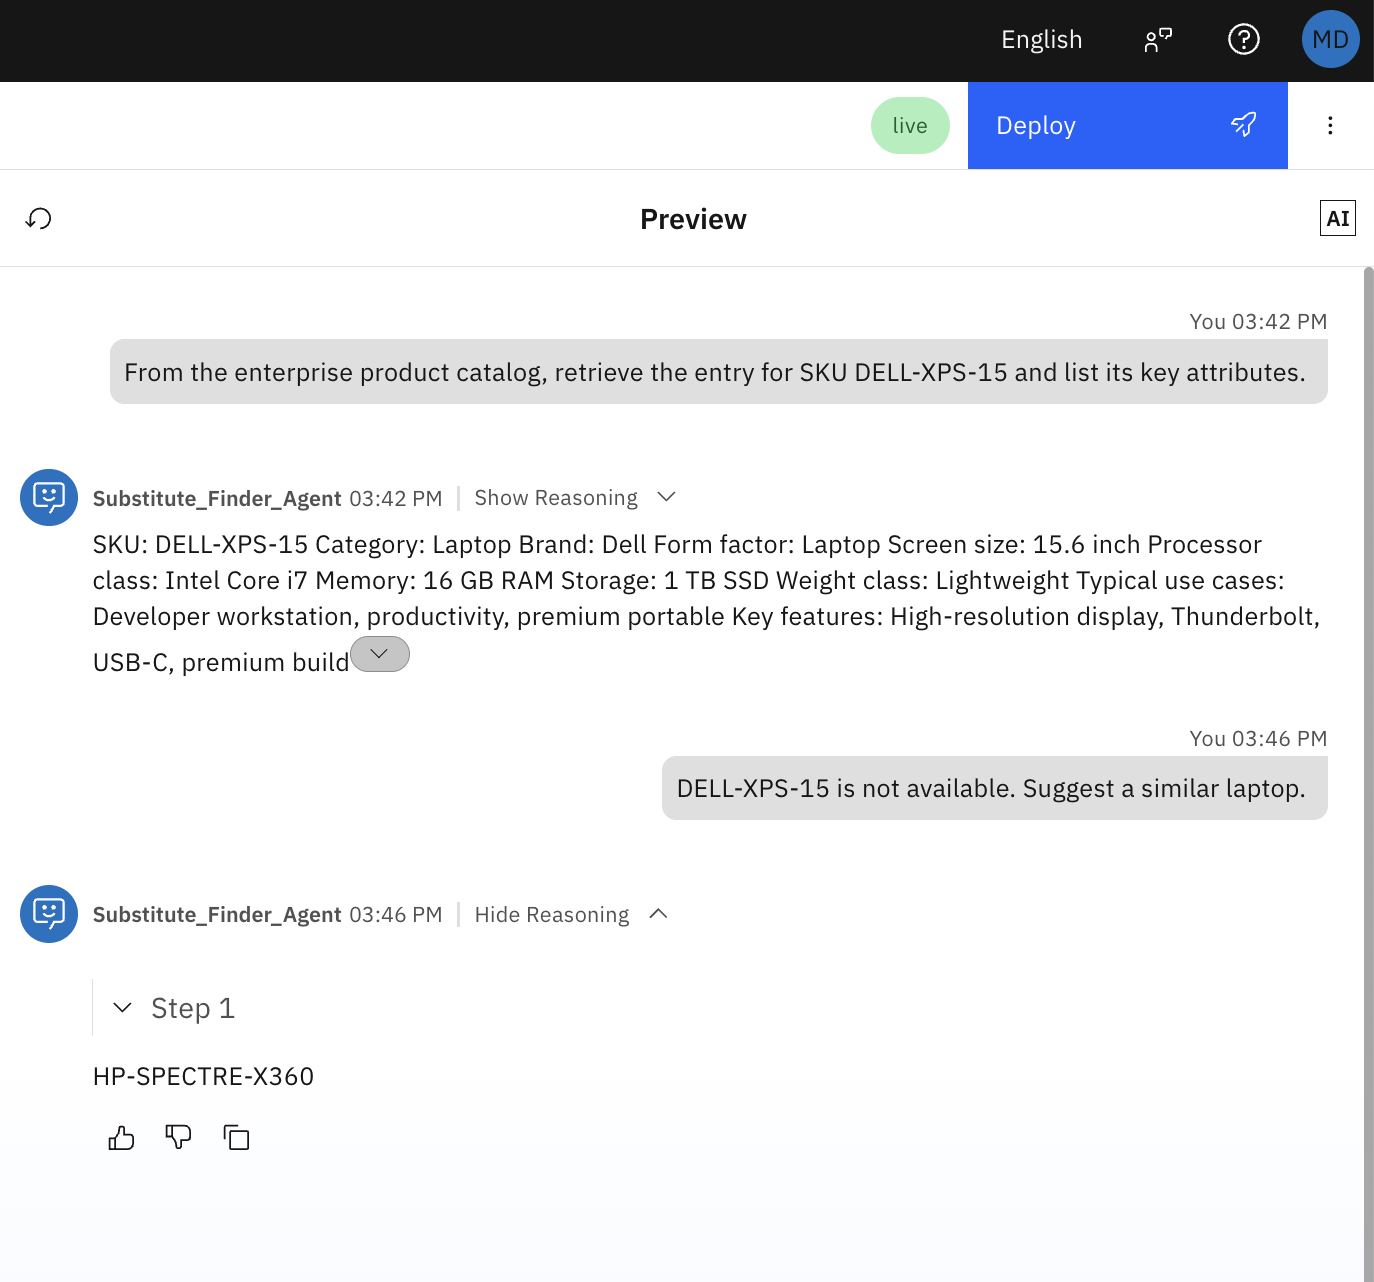
Prompt 1 – Grounding test
From the enterprise product catalog, retrieve the entry for SKU LAPTOP-DELL-XPS-15 and list its key attributes.
Expected result: The agent retrieves the catalog entry and lists the attributes defined in the document, without asking follow-up or confirmation questions.
Prompt 2 – Similarity test
LAPTOP-DELL-XPS-15 is not available. Suggest a similar laptop using the product catalog.
Expected result: The agent recommends HP-SPECTRE-X360 and explains the recommendation using shared attributes from the catalog.
Step 6. Create the supervisor agent on watsonx Orchestrate
In this step, you create a Store Associate Agent that acts as a supervisor agent. Its role is to coordinate the previously created agents and provide a single, customer-facing interaction point for store associates.
This agent does not directly interact with Kafka or enterprise documents. Instead, it delegates tasks to specialized agents based on the user’s request and combines their responses into a clear, customer-friendly answer.
The Store Associate Agent is responsible for:
- Understanding the store associate’s question.
- Delegating inventory checks to the SKU Availability Agent.
- Delegating alternative recommendations to the Substitute Finder Agent when needed.
- Presenting a final, concise response suitable for customer interaction.
This pattern demonstrates how agent orchestration works in watsonx Orchestrate, where a supervisor agent coordinates multiple domain-specific agents.
The Store Associate Agent follows this logic:
Receive a user question about product availability in a specific branch
Delegate the request to the SKU Availability Agent
If the requested SKU is available:
- Return availability and quantity
If the requested SKU is not available:
Delegate to the Substitute Finder Agent
Return recommended alternatives with short explanations
Branch-to-branch searching is intentionally excluded from this tutorial and can be added later as an extension.
Create the Store Associate Agent
The Store Associate Agent is defined using a YAML configuration file provided in the repository.
Locate the agent definition file,
Store_Associate_Agent.yaml, in the sameconfluent-agentsfolder in the repo that you cloned earlier.Import the agent using the Agent Development Kit.
cd confluent-agents orchestrate agents import -f Store_Associate_Agent.yamlAfter the import completes, deploy the agent so it becomes active. Click the Deploy button.
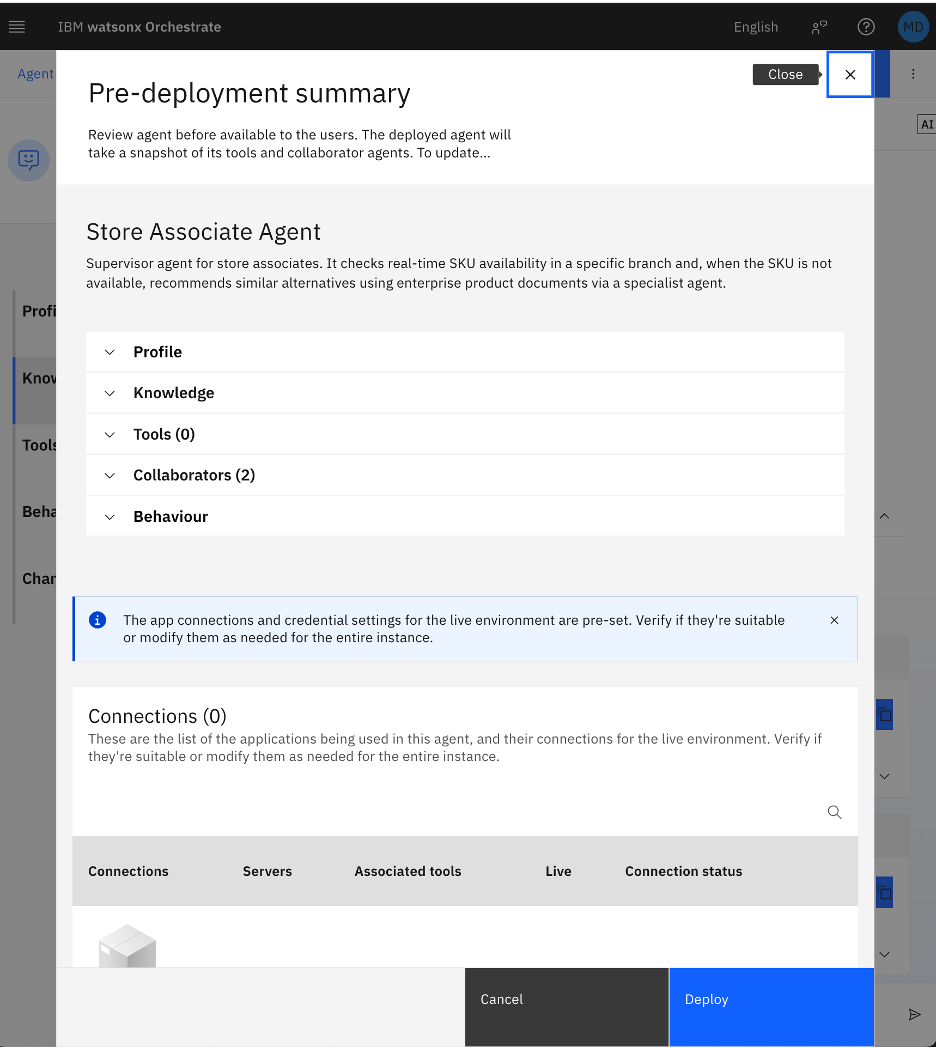
In the Pre-deployment summary window, click Deploy again.
Test the agent
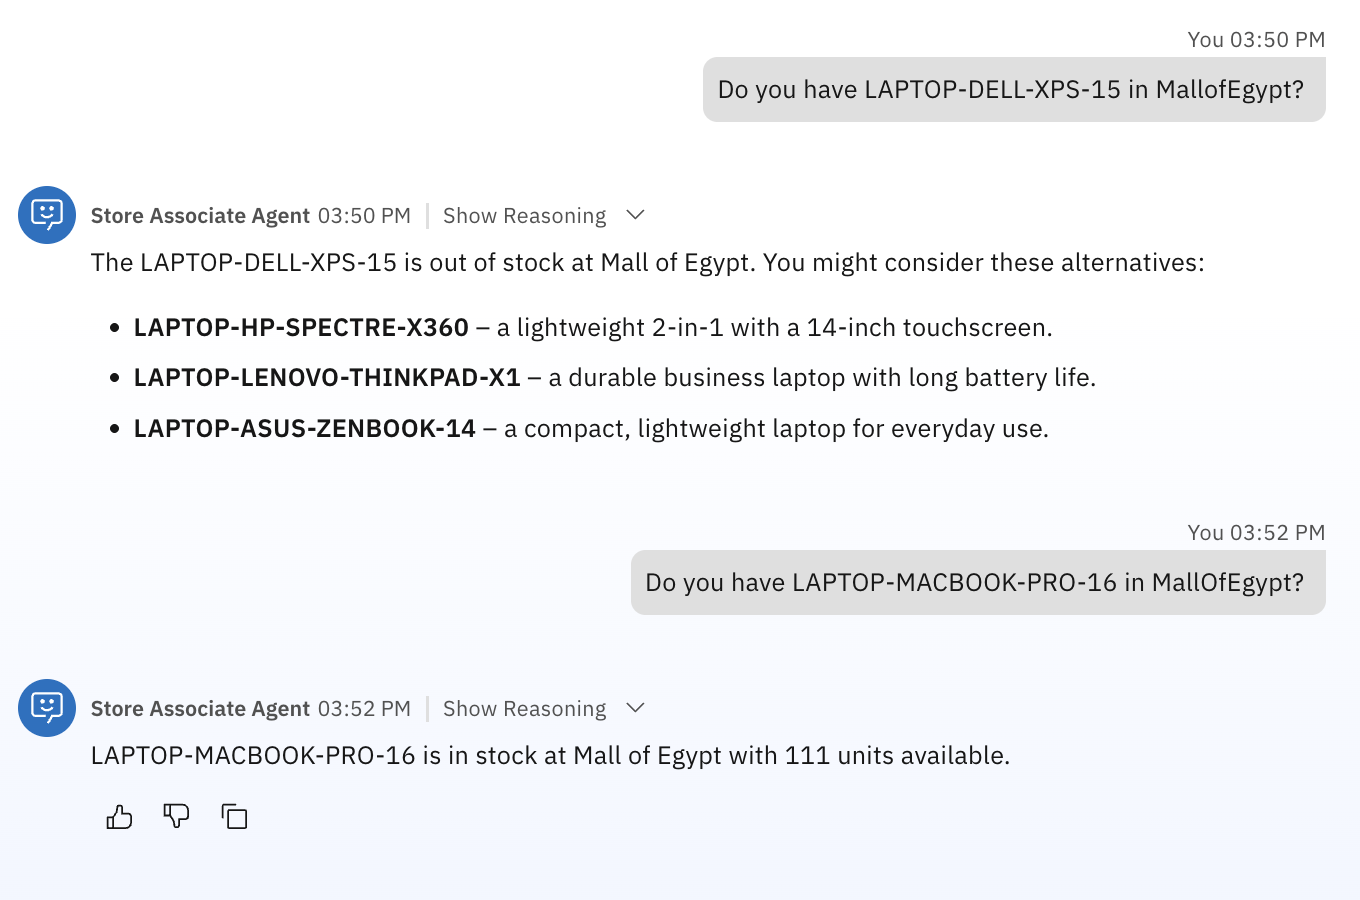
Test A (Out of stock + substitutes)
Do you have LAPTOP-DELL-XPS-15 in MallOfEgypt?Test B (In stock example)
Do you have LAPTOP-MACBOOK-PRO-16 in MallOfEgypt?
Summary and next steps
In this tutorial, you learned how to build an event-driven agentic AI system using Confluent Cloud and watsonx Orchestrate. By consuming Kafka events and correlating them with document context, the agent can reason over live operational signals and explain their significance. This approach enables more responsive and context-aware AI systems while keeping reasoning transparent and controlled.
Where IBM Bob was used, it played a key role in streamlining the development experience throughout this tutorial. By converting natural‑language instructions into fully functioning code, tool configurations, and validated agent behaviors, Bob accelerated each stage of the workflow, from creating Kafka topics and ksqlDB clusters to generating MCP tool definitions and agent YAML files. This allowed the development team to focus on architecture, reasoning patterns, and event‑driven design rather than low‑level setup tasks, demonstrating how AI‑assisted software engineering can dramatically improve productivity and consistency.
As a next step, this architecture can be extended in the following ways:
Richer stream processing with Apache Flink: Apache Flink can be used to implement more advanced stream processing logic on top of Kafka, such as time-windowed inventory trends, anomaly detection, or enrichment with external reference data. These derived streams can then be exposed to agents in the same way as the availability state used in this tutorial.
Additional event sources: The agent can be extended to reason over other real-time signals, such as promotions, supplier delays, or demand forecasts, by subscribing to additional Kafka topics and correlating them with existing inventory data.
Also, consider checking the other published tutorials on watsonx Orchestrate.
Acknowledgments
The authors (Ahmed Azraq, and Moises Dominguez Garcia) deeply appreciate the support of Ela Dixit, Monisankar Das, Sreelakshmi Aechiraju and Michelle Corbin for the guidance and expertise on reviewing and contributing to this tutorial.
This tutorial was produced as part of the IBM Open Innovation Community initiative: Agentic AI (AI for Developers and Ecosystem).