Tutorial
Building secure Hyper Protect Virtual Servers workloads with attestation and signature
Learn how to use attestation and contract signatures to ensure workload integrity in Hyper Protect Virtual Servers
On this page
This tutorial provides a hands-on walkthrough of Hyper Protect Virtual Servers (HPVS) anti-tamper and attestation features. You’ll learn how contract signing and attestation work together to ensure that only trusted workloads are deployed, even in a zero trust environment. By simulating a tampered contract and observing HPVS behavior, you'll gain a clearer understanding of how these mechanisms protect against unauthorized changes and maintain workload integrity.
Prerequisites
A working HPVS contract that deploys a workload.
The contract should be encrypted, as described in the official documentation
Attestation in HPVS
You can find detailed documentation on attestation for on-prem servers at IBM Documentation: Attestation.
In HPVS, attestation is a process used to verify the integrity of your application stack. It allows you to view and confirm the SHA256 checksums of key components, including:
The original base image
The root partition at first boot
The root partition at build time
Cloud initialization options
Here's a diagram that shows the attestation flow:
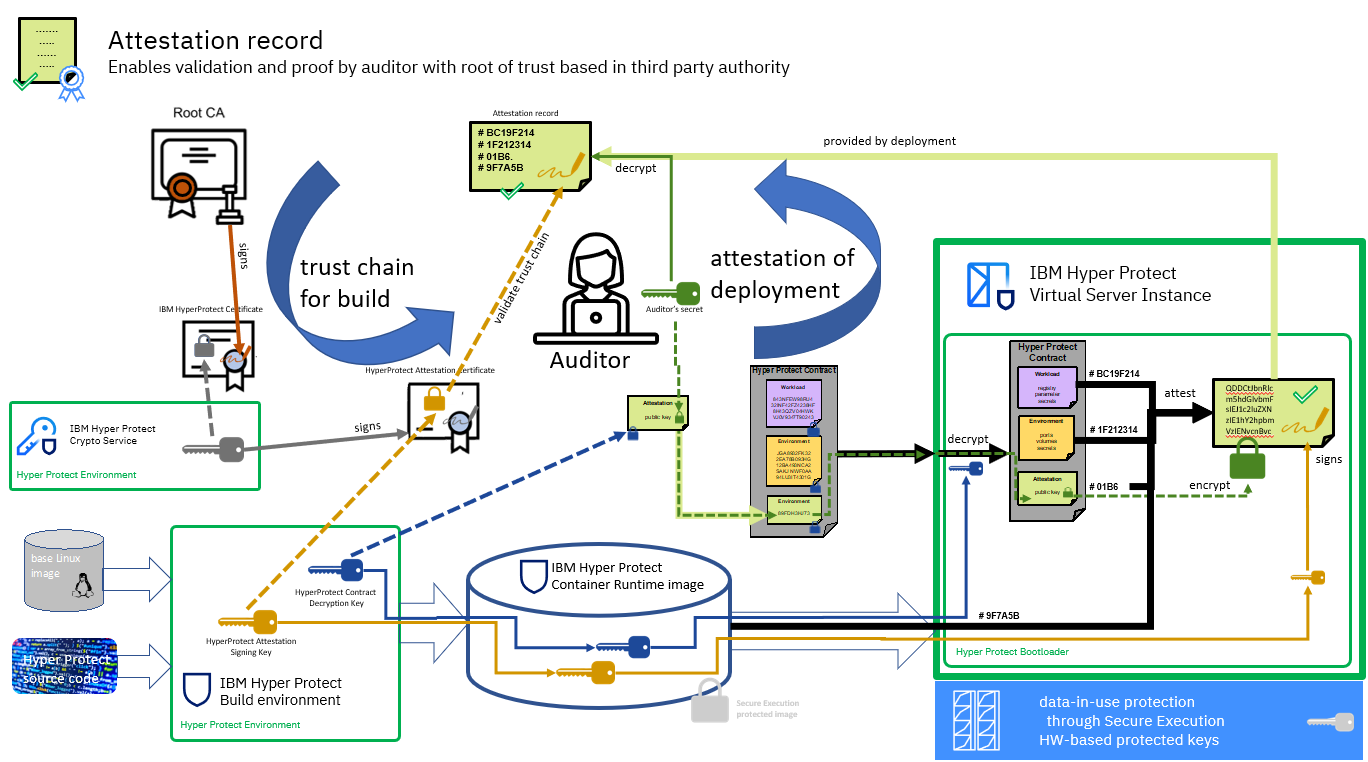
In a zero trust system, only the AUDITOR should have access to the private and public key pair used to encrypt and decrypt attestation data. This makes the AUDITOR the only trusted role for verifying integrity.
While an admin deploying the workload can see the contract and figure out the correct SHA256 checksums (for workload, env, etc.), they cannot see the attestation data, because:
The contract is encrypted and only HPCR can decrypt it.
The attestationPublicKey in the contract is used by HPCR to encrypt the attestation data.
Without the corresponding private key, the admin cannot tamper with or fake the attestation.
If the attestation section were missing or unencrypted, a malicious admin could potentially fake the contract and make it look legitimate. Encrypting this section prevents that.
Setting up attestation in the contract
To enable attestation, mount the internal attestation directory in your contract like this:
volumeMounts:
  - name: attestation
    readOnly: true
    mountPath: /var/hyperprotect:Z,U

volumes:
  - name: attestation
    hostPath:
      path: /var/hyperprotect
      type: Directory
We’ll use a contract template from the Deploying Vault securely in a confidential environment IBM Developer tutorial. You can view it in the workload.yaml file.
Accessing attestation data
Your workload must expose the attestation data—either through a web server/API or by writing it to the logs at boot time.
In this example, since the workload doesn’t include a web server, we chose to dump the data into the logs. The following line was added to the script that runs the workload:
cat /var/hyperprotect/se-checksums.txt
You can view the full script at vault-script.sh
Encrypting the contract and verifying attestation checksums
Attestation checksums are SHA256 hashes of specific parts of the contract. For example, the workload checksum is generated by hashing the following string (without any newline characters):
echo "hyper-protect-basic.${ENCRYPTED_PASSWORD}.${ENCRYPTED_WORKLOAD}" | tr -d "\n\r" | sha256sum
To make this easier, we used the encrypt_contract.sh script to automatically generate and save these checksums. This allowed us to compare them against the values provided by the system during boot.
The locally generated se-checksums.txt looked like this:
680e49fa9deae730d16eb0ba067ec2a66b18540ffc735665e54535450a9e5fc8  - contract:workload
ef192311e1c19512774498ef5d6c1afd0709da7d4675de65e67d87014c57616f  - contract:env
Log output at boot
When the workload starts, you can see matching entries in the logs:
24.11.0
Machine Type/Plant/Serial: 3931/02/8A3B8
Image age: 123 days since creation.
ad65a3820d4a233c84e6d201ce537b8020435ccefe26682809da5ef9b176b8ae root.tar.gz
080f817231fe4bc40021d24e20af9f1135a36711047212f9374664b86ab406ac baseimage
b69ddd6fa0a4474a097d1fbb3a8e61158e00d3036a246964792bdfb4bdc72096 /dev/disk/by-label/cidata
c7337f60d493b4b146c27ad1213b4b6fd35bb88c9905869002b47fbae16f4e52 cidata/meta-data
ac6f89514970d644aa306cbee0ff51a5a38a64858faf1362544ac3d382511a1f cidata/user-data
13891bfb004315f8fd84d1b3d06833fe251f7749010e1c14833522bd57a950c4 cidata/vendor-data
680e49fa9deae730d16eb0ba067ec2a66b18540ffc735665e54535450a9e5fc8 contract:workload
ef192311e1c19512774498ef5d6c1afd0709da7d4675de65e67d87014c57616f contract:env
These matching values confirm that the contract running on the system is the same one we originally encrypted.
Encrypting the attestation records
As mentioned earlier, open attestation records can be faked. To prevent this, we take on the role of the auditor and encrypt the attestation records.
Since we’re now using encrypted records, we need to update the workload script to output the encrypted file se-checksums.txt.enc to the logs. To make it easier to spot in the logs, we add the following tags around the encrypted content:
***BEGIN se-checksums.txt.enc CAT DUMP***
<encrypted content>
***END se-checksums.txt.enc CAT DUMP***
Steps
Use the following commands to generate the RSA key pair used for encryption (change password zcatattestation to a password of your choice):
# Generate the private key with a passphrase openssl genrsa -aes128 -passout pass:zcatattestation -out private_attestation.pem 4096 # Extract the public key from the private key openssl rsa -in private_attestation.pem -passin pass:zcatattestation -pubout -out public_attestation.pemNext, update the contract encryption script to include the attestation public key. Rename the modified script as
encrypt_contract_att.sh(click to view). This change ensures that the attestation key becomes part of the contract and is included in the checksum calculations.The resulting
se-checksums.txtlooks like this:8b58c2a43d62f44b4362a88a37729bf8fbe32f890b8bad84113f98cd01c2861d - contract:workload dca72747c131d42f308c591c367a72b9613aa9d7f6988d04cb9f2bf661fe67e7 - contract:env f49b94c7fd898b74e2efda21b06cd8054926ebfe24a4f714b5fc1ef9b6136c74 - contract:attestationPublicKeyEncrypted output in logs
Once the workload is deployed, the encrypted attestation checksum appears in the logs like this:
***BEGIN se-checksums.txt.enc CAT DUMP*** <encrypted data> ***END se-checksums.txt.enc CAT DUMP***`This confirms that the attestation data was encrypted with the auditor’s public key and logged securely by the workload.
Decrypting the attestation data
To verify the attestation data, follow these steps:
Copy the encrypted string (starting with
hyper-protect-basic.MJ2R...) into a file named:se-checksums.txt.encUse the provided decrypt-attestation.sh script to decrypt the attestation file using your private key.
Note: This script will overwrite the
se-checksums.txtfile generated byencrypt_contract.sh. To avoid this, change the output filename in either script../decrypt-attestation.sh private_attestation.pem se-checksums.txt.enc Enter pass phrase for private_attestation.pem:After decryption, the contents of
se-checksums.txtshould look like this:# cat se-checksums.txt 24.11.0 Machine Type/Plant/Serial: 3931/02/8A3B8 Image age: 124 days since creation. ad65a3820d4a233c84e6d201ce537b8020435ccefe26682809da5ef9b176b8ae root.tar.gz 080f817231fe4bc40021d24e20af9f1135a36711047212f9374664b86ab406ac baseimage 8014fee239f8ece9fa197b0b83028e1de9397f4ab2e6be1fb721ad9f18c80145 /dev/disk/by-label/cidata c7337f60d493b4b146c27ad1213b4b6fd35bb88c9905869002b47fbae16f4e52 cidata/meta-data c98bb06ed4be07064d704918f5e220d0032805824d538fc061c2754686986660 cidata/user-data 13891bfb004315f8fd84d1b3d06833fe251f7749010e1c14833522bd57a950c4 cidata/vendor-data dca72747c131d42f308c591c367a72b9613aa9d7f6988d04cb9f2bf661fe67e7 contract:env f49b94c7fd898b74e2efda21b06cd8054926ebfe24a4f714b5fc1ef9b6136c74 contract:attestationPublicKey 8b58c2a43d62f44b4362a88a37729bf8fbe32f890b8bad84113f98cd01c2861d contract:workloadThe attestation records match! This confirms the contract has not been tampered with.
Separation of duties is important
To ensure security and trust, the attestation process must follow separation of duties:
Part 1: Key generation
The AUDITOR is responsible for generating the RSA key pair. This step must not be handled by anyone else.
Part 2: Encryption workflow (done in separate roles)
Each party handles their own section and shares outputs appropriately:
Workload owner
Encrypts the workload section.
Shares the encrypted value with the ADMIN:
"hyper-protect-basic.tc/xVkDUY9bzvjsBlRok/o9ZbJEXuX9ZdqXwHe5tXKOWRzl0nnZWw3jOeAQSXCvdeN1bfWD8A1QeNJf+SqiRsWNatk3c1BoGjqK5mqrf+BkUARtvH4JkDTrr59STCOXnWlr4O6/61bA1DUgKjFHh9..."Provides the checksum to the AUDITOR:
8b58c2a43d62f44b4362a88a37729bf8fbe32f890b8bad84113f98cd01c2861d - contract:workload
Env owner (ADMIN)
Encrypts the environment section.
Shares the checksum with the AUDITOR:
dca72747c131d42f308c591c367a72b9613aa9d7f6988d04cb9f2bf661fe67e7 - contract:env
Auditor
Encrypts the attestation public key.
Gives the encrypted value to the ADMIN to be added under
contract:attestationPublicKey:"hyper-protect-basic.GAmsw4oFY1LizjqcwvzrK4gzy1GbnUd+EU1w+S2..."
Adding a contract signature
A contract signature is an optional but powerful anti-tampering mechanism. It ensures that only a trusted source, usually the workload owner, can approve and validate the contract. For more information, see Contract signature.
The contract is signed using a private key or certificate, and the matching public key is included in the contract’s environment section as signingKey:. This allows the platform to verify that the contract hasn’t been tampered with.
It is recommended that the workload owner signs the contract. This ensures that only the intended workload can be deployed.
Unless a malicious actor has access to the private key, they won’t be able to create a valid signature. HPCR will reject any contract with an invalid or missing signature.
Signing process
The contract signer (typically the workload owner) generates a key or certificate pair.
The signer gives the public key (or certificate) to the ADMIN to include in the contract's
envsection assigningKey:.The ADMIN shares the encrypted
envsection with the signer. The signer combines it with the encryptedworkloadsection to formcontract.txt. The signer uses their private key to sign the file.The signer provides the signature back to the ADMIN, who uses it to deploy the contract.
Note: If you use certificates instead of keys, you can also enable contract expiry based on certificate validity. For simplicity, we’ll use keys in this example, but certificate usage is fully documented in the official guide.
We’ll now build on the contract we've created earlier (with attestation) and add this signature step for a complete, secure solution.
Steps
Run the following commands to generate an RSA key pair for signing (change password zcatsigner to a password of your choice):
# Generate a 4096-bit RSA private key, encrypted with a passphrase openssl genrsa -aes128 -passout pass:zcatsigner -out private_signer.pem 4096 # Extract the public key from the private key openssl rsa -in private_signer.pem -passin pass:zcatsigner -pubout -out public_signer.pemConvert the public key to a base64 string so it can be added to the contract (in the
signingKey:field under theenvsection):cat public_signer.pem | base64 -w 0This outputs a single-line base64 string, which becomes your
signingKeyvalue.Add the base64-encoded public key under the
signingKeyfield in the contract'senvsection:type: env logging: *** Redacted *** volumes: test: seed: "testing" signingKey: LS0tLS1CRUdJTiBQVUJMSUMgS0VZLS0tLS0K... (truncated for readability)Use the modified script encrypt_contract_att_sign.sh to encrypt and sign the contract. This generates a signed checksum file (
gen-se-checksums.txt) at creation time. The signature includes both the encryptedworkloadandenvsections using the private key.Log output should show:
***BEGIN se-checksums.txt.enc CAT DUMP*** ... <encrypted and signed data> ... ***END se-checksums.txt.enc CAT DUMP***To verify the attestation:
./decrypt-attestation.sh private_attestation.pem se-checksums.txt.enc`Then compare
se-checksums.txt(decrypted from attestation) withgen-se-checksums.txt(generated at signing):cat se-checksums.txt cat gen-se-checksums.txt`Example checksum entries:
contract:workload - dcc2ca7f... contract:env - 4bd9da27... contract:attestationPublicKey - 5b958723... contract:envWorkloadSignature - e2367910...If all values match, the attestation is valid.
testing with an invalid signature:
To simulate a tampered contract, modify a character in the
signingKeywithin theenvsection. This mimics someone trying to deploy a workload with an incorrect signature.When the machine boots, it fails with the following logs:
VSI has failed to start! HPL10000E: One or more services failed -> systemd triggered hpl-catch-failed serviceFrom the detailed logs:
Contract file is invalid. Validation of Contract failed. HPL05001E: Unable to validate the contract semantically. jsonschema: '/envWorkloadSignature' ... does not match expected patternThis confirms that Hyper Protect Virtual Servers (HPVS) will reject any workload that doesn’t match the expected signature, protecting the environment from tampering.
Conclusion
We now have a better understanding of HPVS anti-tamper mechanisms:
Attestation: Lets an auditor verify that all components are as expected. It's important to keep both public and private keys secure, especially the public keys used for verification.
Contract signature: Allows the workload owner to sign the contract. If the signature doesn’t match, HPVS will block the deployment, assuming the contract was tampered with.
Note: These checks won’t stop a compromised image if it already exists in the registry with the same SHA256 checksum. To prevent this, use a secure build pipeline and digitally sign your images.