About cookies on this site Our websites require some cookies to function properly (required). In addition, other cookies may be used with your consent to analyze site usage, improve the user experience and for advertising. For more information, please review your options. By visiting our website, you agree to our processing of information as described in IBM’sprivacy statement. To provide a smooth navigation, your cookie preferences will be shared across the IBM web domains listed here.
Tutorial
Get an IBM MQ queue for development running on Red Hat OpenShift
Configure your queue for app connections
On this page
To see how IBM MQ works, you will be guided through creating and configuring a queue manager (server). Then, you will connect an application (client) to it.
After completing the tutorial, you will be able to send messages to and retrieve messages from an IBM MQ queue.
You can download, install, and run IBM MQ queue manager (server) in a variety of ways:
- In a container or Red Hat OpenShift Container Platform (this tutorial).
- In the IBM Cloud, AWS (or AWS using Ansible or AWS using Terraform), Microsoft Azure, or Google Cloud.
- On various operating systems: Linux/Ubuntu or Windows. For macOS, use MQ on Containers (this tutorial).
Learning objectives
After completing this tutorial, you will understand these concepts:
- IBM MQ queue managers
- IBM MQ queues
- Point-to-point messaging
Prerequisites
- A Red Hat OpenShift Container Platform (OCP) cluster, including preparing it for the IBM MQ Operator by completing the first four steps of this task in the IBM MQ docs.
- OpenShift CLI
- OpenSSL
- Maven
Estimated time
This tutorial should take about 30 minutes.
Steps
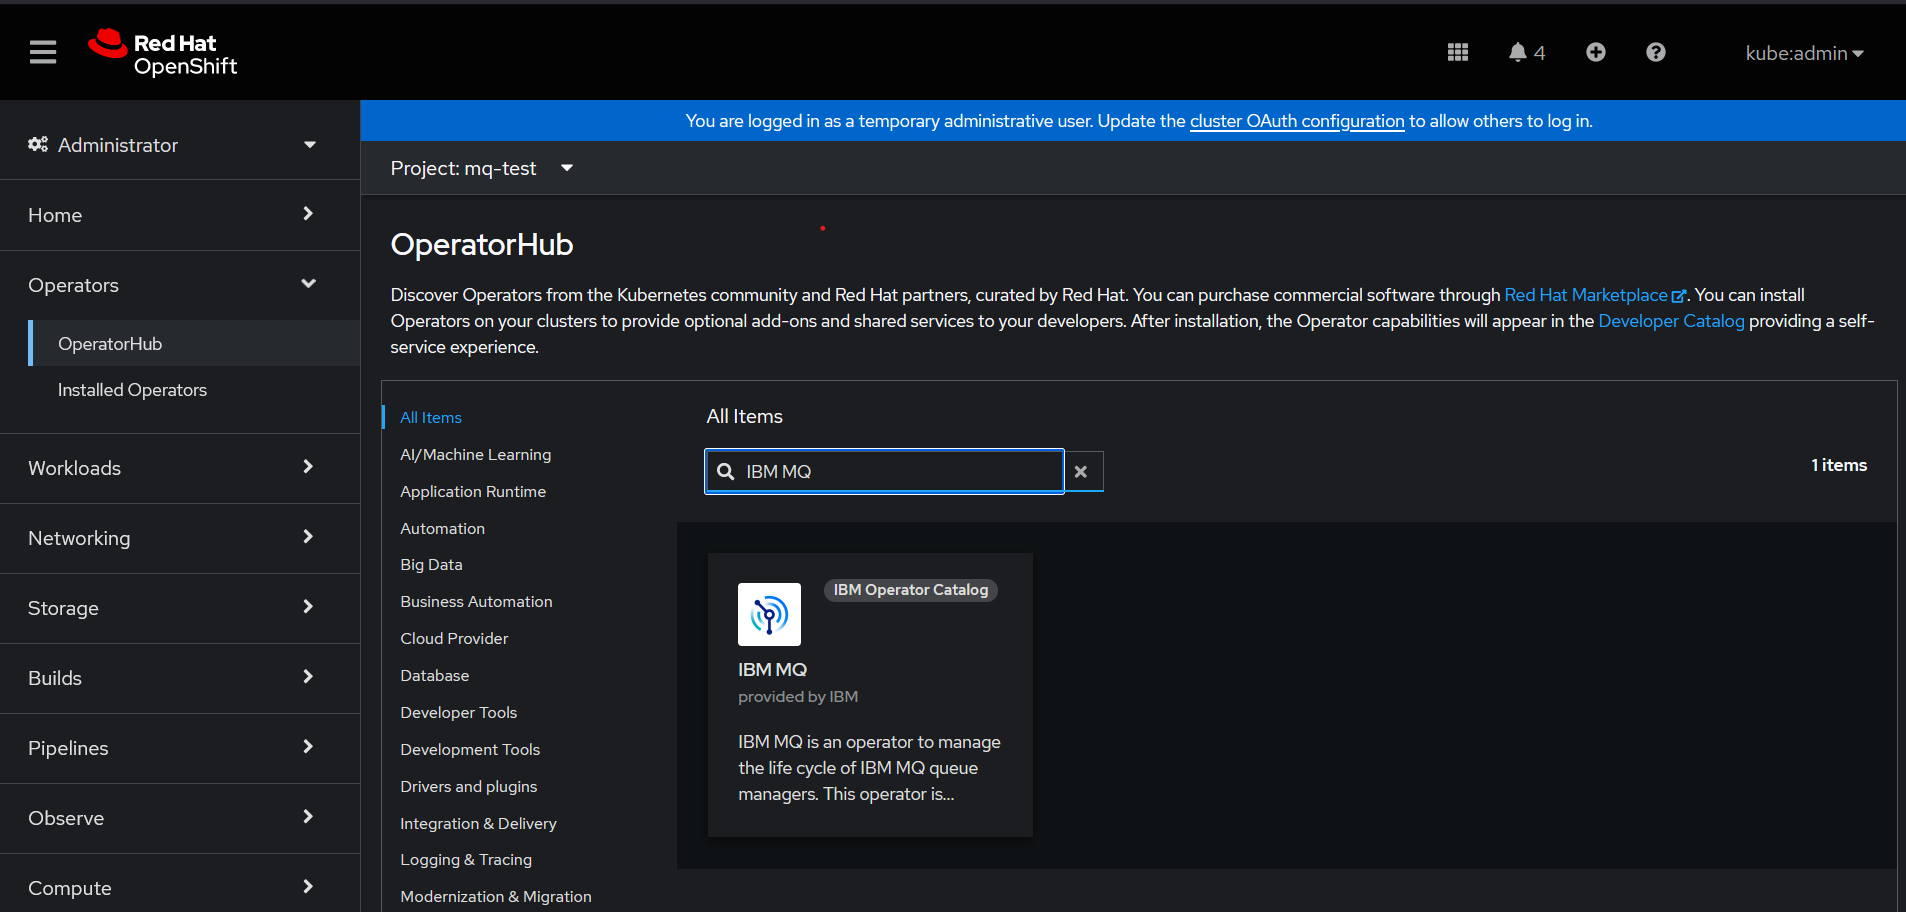
Step 1. Get the IBM MQ operator
Log in to the Red Hat OpenShift console. In the side bar, select Operators > OperatorHub. Search for IBM MQ. Select the IBM MQ operator, and then click install and choose the update channel version. We are installing the latest version.
If you want to have the IBM MQ operator available only in a single OpenShift namespace, you can choose Installation mode as - A specific namespace on the cluster. Click Install, and accept the default configurations. This installation typically takes a few seconds.
Step 2. Configure OpenShift to enable TLS
Because you need to connect client applications from outside the cluster which requires Server Name Indication (SNI), you must enable TLS on our queue manager and client application because SNI is only available in the TLS 1.2 or higher protocol. To enable TLS on our queue manager we will create an OpenShift secret with TLS objects and provide them in our queue manager YAML file during deployment.
Use the OpenShift CLI to log in to your OCP cluster. You can find the login command from your profile drop down at the top right corner of the OpenShift console.
oc login --token=<YOUR_TOKEN> --server=<YOUR_SERVER_URL>
Let’s now set up TLS by using OpenSSL to create the TLS objects that are needed. OpenSSL is installed by default on most machines. Check if you have OpenSSL installed by entering this command in your terminal:
openssl version
If you need OpenSSL, you can download it from here.
Create a new directory on your machine and navigate to it in your terminal.
Now we can create the server key and certificate with this command:
openssl req -newkey rsa:2048 -nodes -keyout tls.key -x509 -days 365 -out tls.crt
You will be prompted to enter some information. Put whatever you like, as it is a self-signed certificate and is meant for your eyes only.
You have now created a server key and certificate, which you will need to provide to the queue manager as an OpenShift secret. Type the following command to create an OpenShift secret:
oc create secret tls mq-tls-secret --key="tls.key" --cert="tls.crt"
This will create a secret named mq-tls-secret with key and certificate you created.
For our messaging client to talk to IBM MQ using TLS, you will need to create a client keystore and add the server certificate to the keystore. In our example, we will be securing some Java code written for JMS. We will use keytool (a Java security tool), which is included with Java JREs and SDKs. To create a .jks client keystore and import our sever certificate into it, enter this command:
keytool -keystore clientkey.jks -storetype jks -importcert -file tls.crt -alias server-certificate
You will be prompted to create a password. Be sure to make a note of the path to your keystore and the remember the password that you set as you'll need this information in when you run the sample application later.
If you’re using MQI, such as C, Python, Node.js, or Golang, you can use this article to create an appropriate client keystore and learn more about TLS.
Step 3. Deploy a queue manager instance
You can create a queue manager instance either using the OpenShift console or using the CLI commands. Follow these steps for deploying a queue manager using the console.
In the OpenShift console, select Operators > Installed operators in the side bar.Then, select IBM MQ.
In the Provided APIs of the IBM MQ operator, you should see Queue Manager. Click on Create instance, and then select Configure via YAML view.
Copy paste the following YAML in to the editor, and then click Create. It will take a few minutes to get the queue manager instance up and running.
apiVersion: mq.ibm.com/v1beta1
kind: QueueManager
metadata:
  name: qm-dev
spec:
  license:
    accept: true
    license: L-AXAF-JLZ53A
    use: Development
  web:
    enabled: true
  template:
    pod:
      containers:
        - env:
            - name: MQ_DEV
              value: "true"
            - name: MQ_CONNAUTH_USE_HTP
              value: "true"
            - name: MQ_ADMIN_PASSWORD
              value: "passw0rd"
            - name: MQ_APP_PASSWORD
              value: "passw0rd"
          name: qmgr
  queueManager:
    storage:
      queueManager:
        type: persistent-claim
    name: QM1
  version: 9.3.5.1-r1
  pki:
    keys:
      - name: mqtls
        secret:
          secretName: mq-tls-secret
          items:
          - tls.key
          - tls.crt
This queue manager configuration accepts the licence for IBM MQ Advanced for Developers container image. The queue manager QM1 is created with default configurations and objects and runs in a Kubernetes pod.
Note that you are providing the TLS objects created in Step 2 using the mq-tls-secret.
For creating the queue manager with CLI commands, create the above YAML file in your current directory and run the following command:
oc apply -f <filename>.yaml -n <namespace>
Confirm that queue manager is running. You may have to wait for few minutes for queue manager to go into running state.
oc get qmgr qm-dev
You will get the output like this:

You now have a queue manager up and running on Red Hat OpenShift. We can now create an application to exchange messages on queues and topics hosted by the deployed queue manager. However, first you need to understand the networking in an OCP cluster so that we can connect to it.
Networking in an OCP cluster
The following image illustrates the networking in an OpenShift cluster.

By default, OpenShift allocates an internal IP address to each pod, which allows the application to exchange data on a network between pods. However, clients outside the Kubernetes cluster do not have access to this networking layer. OpenShift will need a route to connect an application outside of OpenShift to an IBM MQ queue manager running inside a OpenShift cluster.
The OpenShift Container Platform Router uses server name indication (SNI) for routing network requests to cluster members such as an IBM MQ queue manager. Therefore, the configuration of the route depends on the SNI of your client application.
IBM MQ supports two different SNI header settings depending on the configuration and client type. IBM MQ’s SNI header is typically set to the IBM MQ channel name or alternatively set to the host name of the IBM MQ queue manager. This configuration is controlled by setting the OutboundSNI attribute in the IBM MQ client application.
If OutboundSNI is set to HOSTNAME, one route is used per queue manager, whereas when OutboundSNI is set to CHANNEL, one route is required per channel name and IBM MQ channel names must be unique across the entire OCP cluster (and additionally encoded to follow DNS rules).
In this example tutorial, we will set OutboundSNI to HOSTNAME and use the default route that the MQ operator creates for us when a queue manager is deployed. If you want to use OutboundSNI as CHANNEL (which is the default value) you will need to create a new route following the IBM MQ documentation.
To configure our messaging client, first we need to get the host name for our queue manager running in OpenShift using the following command:
oc get route qm-dev-ibm-mq-qm -n <namespace of your MQ deployment> -o jsonpath="{.spec.host}" && echo
You should see the host name, which you can use for connecting your applications.

Step 4. Put and get messages to and from a queue
Now, let’s connect a JMS application to the deployed queue manager. You can use your own client application or get samples from the mq-dev-pattern repo.
Clone the repository:
git clone https://github.com/ibm-messaging/mq-dev-patterns.git
You can test with a sample in an API or language of your choice. In this tutorial, we show this using a JMS sample.
Go to the cloned directory, and edit the env.json file with following MQ endpoint configuration:
{
  "MQ_ENDPOINTS": [{
    "HOST": <HOSTNAME_OF_YOUR_QM>,
    "PORT": "443",
    "CHANNEL": "DEV.APP.SVRCONN",
    "QMGR": "QM1",
    "APP_USER": "app",
    "APP_PASSWORD": "passw0rd",
    "QUEUE_NAME": "DEV.QUEUE.1",
    "BACKOUT_QUEUE": "DEV.QUEUE.2",
    "MODEL_QUEUE_NAME": "DEV.APP.MODEL.QUEUE",
    "DYNAMIC_QUEUE_PREFIX": "APP.REPLIES.*",
    "TOPIC_NAME": "dev/",
    "CIPHER": "TLS_RSA_WITH_AES_128_CBC_SHA256",
    "CIPHER_SUITE": "TLS_RSA_WITH_AES_128_CBC_SHA256"
  }]
}
Use the host name that you got from the above command.
Go to the JMS directory and build the samples with maven using following command:
mvn clean package
Now, let’s use JmsPut, to put a message to DEV.QUEUE.1 that comes with the default developer configuration. Make sure you have the client keystore mentioned above in the current JMS directory.
Copy the following command to run JmsPut:
java -Djavax.net.ssl.trustStoreType=jks -Dcom.ibm.mq.cfg.SSL.outboundSNI=HOSTNAME -Djavax.net.ssl.trustStore=./clientkey.jks -Djavax.net.ssl.keyStore=./clientkey.jks -Djavax.net.ssl.trustStorePassword=<YOUR_KEYSTORE_PASSWORD> -Djavax.net.ssl.keyStorePassword=<YOUR_KEYSTORE_PASSWORD> -Djavax.net.ssl.keyStoreType=jks -Dcom.ibm.mq.cfg.useIBMCipherMappings=false -cp target/mq-dev-patterns-0.1.0.jar com.ibm.mq.samples.jms.JmsPut
Notice that we are setting OutboundSNI to HOSTNAME using
-Dcom.ibm.mq.cfg.SSL.outboundSNI=HOSTNAME, which allows us to use the default route. If you set it to CHANNEL, or if you do not specify this property, you will need to create an OpenShift route for your channel following the IBM MQ documentation.
You can also set this property in your JMS application using the following command.
System.setProperty("[com.ibm.mq](http://com.ibm.mq/).cfg.SSL.OutboundSNI","HOSTNAME");
You can similarly get the message from DEV.QUEUE.1 using the JmsGet.
Copy the following command to run JmsGet:
java -Djavax.net.ssl.trustStoreType=jks -Dcom.ibm.mq.cfg.SSL.outboundSNI=HOSTNAME -Djavax.net.ssl.trustStore=./clientkey.jks -Djavax.net.ssl.keyStore=./clientkey.jks -Djavax.net.ssl.trustStorePassword=<YOUR_KEYSTORE_PASSWORD> -Djavax.net.ssl.keyStorePassword=<YOUR_KEYSTORE_PASSWORD> -Djavax.net.ssl.keyStoreType=jks -Dcom.ibm.mq.cfg.useIBMCipherMappings=false -cp target/mq-dev-patterns-0.1.0.jar com.ibm.mq.samples.jms.JmsGet
If you’re using MQI, such as C, Python, Node.js, or Golang, you can specify the OutboundSNI in the MQ client configuration file (mqclient.ini), which allows you to configure your clients by using attributes in a text file. Here is a sample mqclient.ini file which sets OutboundSNI to HOSTNAME.
#*******************************************************************#
#* Module Name: mqclient.ini                                       *#
#* Type      : IBM MQ MQI client configuration file                *#
#* Function  : Define the configuration of a client                *#
#*                                                                 *#
#*******************************************************************#
#* Notes      :                                                    *#
#* 1) This file defines the configuration of a client              *#
#*                                                                 *#
#*******************************************************************#

SSL:
    OutboundSNI = HOSTNAME
Copy this file to the directory that has your application source code. You should now be able to connect to the queue manager using MQI.
Step 5. Access the IBM MQ Console
Now let’s access the IBM MQ console to interact with your queue manager that is deployed on OpenShift.
In the side menu of the OpenShift web console, choose Networking and click Routes. You should see two routes that were created when a queue manager instance was deployed. These routes are used to connect applications with the queue manager and the MQ console. To access the console, click the location URL of the qm-dev-ibm-mq-web queue manager.

You can log in to the console using admin as the user name and passw0rd as the password, which we provided in the queue manager YAML file using the MQ_ADMIN_PASSWORD environment variable.
To learn more about how to set up the IBM MQ Console, view and edit MQ objects using it, use this tutorial.
Use the url highlighted in the above image to access the console.
Summary
In this tutorial, you deployed queue manager on a Red Hat Openshift Container Platform cluster and configured it to accept incoming client connections using TLS. You also learned how to connect your applications from outside the cluster to the queue manager. You can similarly connect any application written in any language if you are using the correct route depending on defining the route and have enabled TLS.
In IBM MQ, the queue manager is effectively the server part of the system, and applications that connect to it are clients.
Usually, it is the administrators that look after the MQ server where all the MQ objects are defined and the routing of messages happens. Client applications are created by developers and IBM MQ provides client libraries that developers must include in their applications. These libraries, also called MQ clients, address and use the MQ objects that admins have set up on the MQ server side.
When you first start developing MQ client applications, it helps to have access to your own queue manager and a queue, for testing your client application against. Deploying IBM MQ on your OpenShift gives you access to a queue manager and many options for configuring MQ objects as you begin developing your client application.