About cookies on this site Our websites require some cookies to function properly (required). In addition, other cookies may be used with your consent to analyze site usage, improve the user experience and for advertising. For more information, please review your options. By visiting our website, you agree to our processing of information as described in IBM’sprivacy statement. To provide a smooth navigation, your cookie preferences will be shared across the IBM web domains listed here.
Article
Effective cloud-native Java app development with Liberty in IntelliJ IDEA
Use Liberty Tools for IntelliJ IDEA to enable rapid, easy, and efficient development of cloud-native Java applications with Open Liberty and WebSphere Liberty
On this page
When it comes to integrated development environments, within the Java community, IntelliJ IDEA is the most popular IDE amongst professional developers. It is the preferred IDE of choice by >80% of Java developers, making up the biggest majority of IDE users in this community, according to JRebel’s 2025 Java Developer Productivity Report.
This well-established and highly popular IDE provides a fantastic and highly efficient environment in which to develop effective cloud-native Java applications, significantly improving the development experience. However, in order to truly unlock this improved development experience and enhanced productivity, we must ensure that we have the most appropriate and useful plugins.
In this article, we’ll explore the Liberty Tools plugin for IntelliJ IDEA and how this plugin can help enable fast, easy, and efficient development of cloud-native Java applications with both Open Liberty and WebSphere Liberty.
The open source Liberty Tools for IntelliJ IDEA, is a useful plugin when developing your application with Liberty. The Liberty Tools are a set of intuitive developer tools that provide a simplified yet powerful development experience and support popular IDEs, including IntelliJ IDEA, Eclipse IDE, and Visual Studio Code.
The Liberty Tools for IntelliJ IDEA plugin can help with all stages of the extended development lifecycle that is now expected from cloud-native development teams, including helping you in developing, building, testing, deploying, and managing your applications – all within your favorite IDE, IntelliJ!

Key Capabilities of Liberty Tools
These tools introduce capabilities that really empower you to develop, test, debug, and manage applications without having to leave your IDE, including:
- Easily view and access all detected Liberty projects in your IDE in the Liberty tool window
- Rapid, iterative development with Liberty dev mode
- Effective testing and debugging all within the IDE
- Editing assistance for you to easily make changes to your Liberty configuration files
- Coding assistance for you to write applications that use Jakarta EE (9.x and later) and MicroProfile (3.x and later) APIs, including validations, quick fixes, and completions
In this article, we’ll dive further into these capabilities. If you want to view a deep dive tutorial on this tool, then watch the Developer Deep Dive of Liberty Tools for IntelliJ IDEA video. Clips of this video are used in this article to showcase these capabilities.
View and access all detected Liberty projects in your IDE in the Liberty tool window
Liberty Tools automatically detects Liberty Maven or Gradle projects. These projects are added to a special Liberty tool window in the IntelliJ IDEA. This can be accessed through the Liberty tab available in the menu on the very right-hand side of the IDE. From this window, you can access a command menu to manage your Liberty projects. Now, you don’t have to spend time creating and managing Liberty instances, which frees up your time to focus on the code itself and enabling greater developer productivity in your teams.

Rapid, iterative development with Liberty dev mode
Liberty’s hot reload functionality, named “dev mode”, enables automatic detection, recompilation, and deployment of code changes whenever you save a new change. Liberty dev mode enables rapid, iterative development in a manner that aligns with agile development practices that are recommended for cloud-native applications. It can also run unit and integration tests automatically after changes and can attach a debugger to the running server to step through your code at any time. Liberty Tools brings these dev mode features directly into the command menu for the Liberty projects in your editor. With just a few clicks, you can start and stop your Liberty application, run tests, and view test reports.
See how you can get started with dev mode using Liberty Tools in the following video. To try this for yourself, follow the steps in the Liberty Tools user guide to run your application on Liberty using dev mode.

Video will open in new tab or window.
You can also run your application in dev mode in a container through the ‘Start in container’ action. When dev mode runs with container support, it builds a container image and runs the container. For more information on dev mode for containers, check out the Liberty Maven devc goal or, alternatively, see the Liberty Gradle libertyDevc task.
Effective testing and debugging within the IDE
When your application is running on Liberty using dev mode, you can easily run the tests provided by your application. To do this, select the ‘Run tests’ command in the Liberty tool window, or alternatively, you can simply press enter in the terminal running Liberty in dev mode. Additionally, you can also configure Liberty to automatically re-run tests after you’ve made changes by setting “hottests” parameter to “true”. After the application tests finish running, you can access the test reports that were generated. The reports will vary depending on what build tool you have used.
You can follow the steps in the Liberty Tools user guide to run your application’s tests and view your application’s test results. Or, check out the following video to see for yourself just how easy this can be with Liberty Tools.
Video will open in new tab or window.
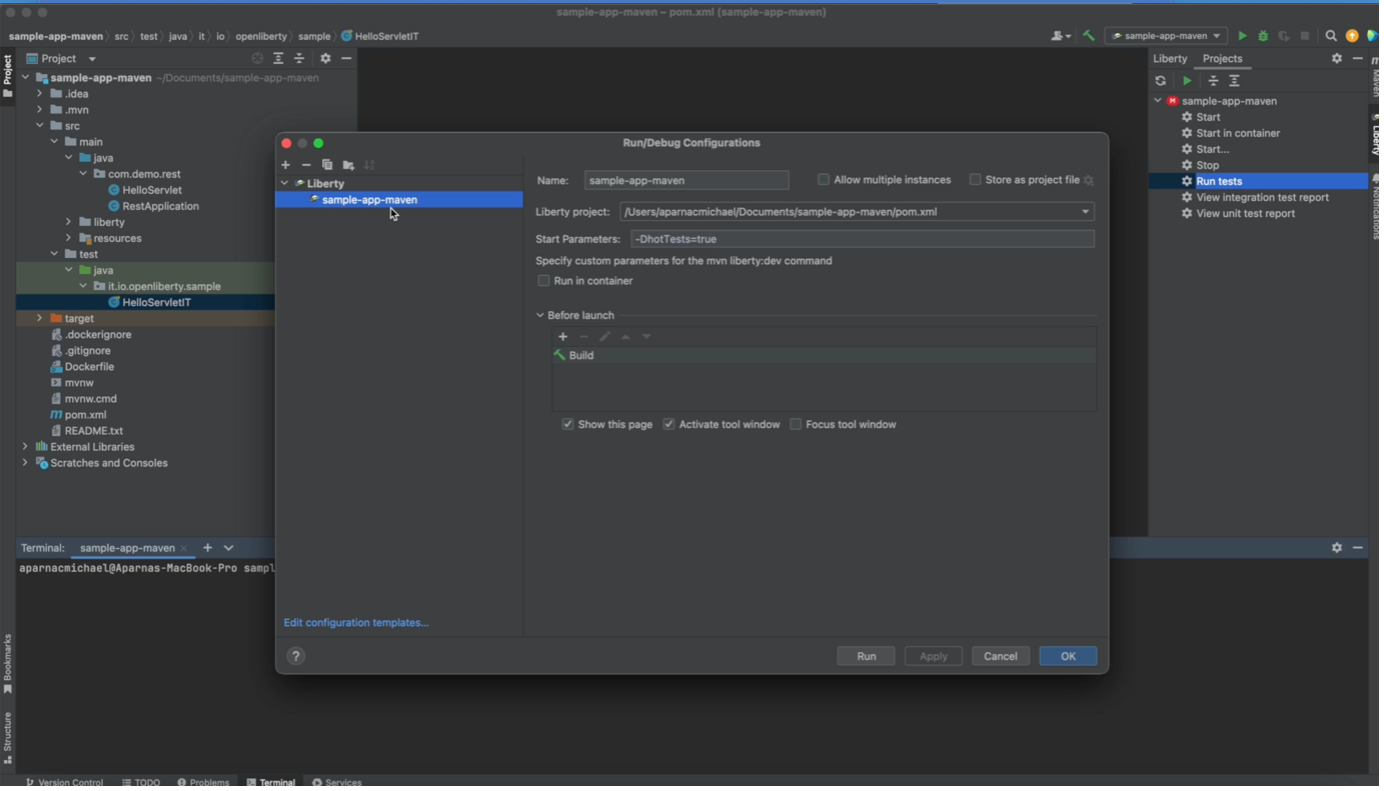
You can use the Liberty run/debug configuration to customize the parameters for the dev mode start command and to start dev mode with the debugger automatically attached to the Liberty server JVM that runs your application. To do this, you’ll first need to create or select a Liberty Run/Debug Configuration through the IntelliJ Run/Debug Configuration menu, and then select the Debug action in the IDE menu. If you’re unsure of how to create a new Liberty run/debug config, you can access detailed instructions on how to achieve this in the Liberty Tools for IntelliJ IDEA User Guide.
The following video also demonstrates how attaching a debugger can be achieved in just a few clicks with Liberty Tools in IntelliJ IDEA. For more on this, you can see the steps required in the Liberty Tools user guide section: debug your application.
Video will open in new tab or window.
Editing assistance for configuration files
You can also use Liberty Tools to get Liberty configuration editing assistance through the Liberty Config Language Server, such as code completion, diagnostics, and quick-fixes, in Liberty server.xml, server.env, and bootstrap.properties files.
To use Liberty-specific code completion, press Ctrl + Space or Cmd + Space and a drop-down list of completion suggestions will appear. In addition to this, by hovering over existing features defined within the server.xml, a description for each of these will also appear, helping developers to know exactly what they’re using in their applications. This hover-over support is also enabled for other xml elements too. All of this saves developers time and additionally means that they don’t have to go and find the correct documentation to find this information – promoting further productivity gains. To see an example of what this editing assistance is like, check out the following video, or try following the steps in the Liberty Tools user guide for configuring a Liberty server with configuration assistance.
Video will open in new tab or window.
Coding assistance for Jakarta EE and MicroProfile APIs
Another feature offered by the Liberty Tools plugin is coding assistance. This provides helpful language-support features such as code completion, diagnostics, and quick-fixes in configuration and application files for Jakarta EE and MicroProfile APIs. Just as with the editing assistance, this can also be accessed by pressing Ctrl + Space or Cmd + Space and a drop-down list of code snippet suggestions appears. This can range from creating an entire REST class, to adding POST, GET, DELETE methods, and more.
The Jakarta EE API coding assistance is offered through Eclipse LSP4Jakarta and the MicroProfile API coding assistance is offered through Eclipse LSP4MP, the Language Servers for Jakarta EE and MicroProfile.
You can see this coding assistance in action with Liberty Tools for IntelliJ IDEA in the following videos, showcasing how this can be used for both Jakarta EE and MicroProfile.
Jakarta EE:
Video will open in new tab or window.
MicroProfile:
Video will open in new tab or window.
If you’d like further resources for this, you can explore the Liberty Tools user guide and follow the steps laid out in this to develop with Jakarta EE and MicroProfile APIs with coding assistance.
Start using Liberty Tools in IntelliJ IDEA
Before you can use Liberty Tools in IntelliJ IDEA, you must satisfy these requirements:
- Java 17 (or later) is needed to run the extension (but you can choose a different version of Java to run your application)
- IntelliJ IDEA 2023.1 or later (IntelliJ IDEA 2023.1 and above come bundled with Java 17, so no extra set up is required)
- Install the Liberty Tools for IntelliJ IDEA plugin either from the JetBrains marketplace or directly from the IDE
- Liberty Maven plugin or Liberty Gradle plugin configured in the pom.xml or build.gradle file for your app. Use the most recent version of the plugin to get important bug fixes.
Comprehensive instructions for how to install and use this plugin are available on GitHub.
When installed, the Liberty tool window and corresponding Liberty actions are available in the Liberty tab on the right-hand side of the IDE. The Liberty tool window is automatically populated with detected projects that are already properly configured to run on Liberty and use Liberty dev mode.

If you do not have any apps in your current workspace, you can create a starter application and import. Once you import an app, refresh the Liberty tool window tab by clicking the refresh icon in the upper right pane in the IDE.
Summary and next steps
With the Liberty Tools for IntelliJ IDEA, you can efficiently develop, deploy, debug, test, and manage your cloud-native Java applications.
Now that you have Liberty Tools set up in your IDE, why not try using it with some of the Open Liberty guides or tutorials?
Additional Tools
Or, if you want to find out more about other extensions available in IntelliJ IDEA that could help you even further, then check out our additional, complementary extensions in the JetBrains marketplace:
IBM Application Modernization Accelerator Developer Tools (AMA Dev Tools)
AMA Dev Tools simplify and accelerate developer efforts to modernize legacy enterprise Java application code, including WebSphere Application Server traditional applications, to adopt current Java technologies and run on Open Liberty or WebSphere Liberty.