About cookies on this site Our websites require some cookies to function properly (required). In addition, other cookies may be used with your consent to analyze site usage, improve the user experience and for advertising. For more information, please review your options. By visiting our website, you agree to our processing of information as described in IBM’sprivacy statement. To provide a smooth navigation, your cookie preferences will be shared across the IBM web domains listed here.
Tutorial
Generate Java records from COBOL with IBM Developer J2C tools
Harness J2C tools in IBM Developer for z/OS to create Java classes for use in an IBM CICS OSGi Java application
On this page
When developing a Java program to link to a CICS program with a COMMAREA or to access a VSAM file, you typically need to map the underlying record structure from a high-level language copybook to Java data types. This tutorial describes how you can use Java data bindings in IBM Developer for z/OS to create Java classes from COBOL data structures. You can then use the classes as input or output types in a CICS Java program that interacts with record-based language structures.
J2C Java data bindings
The Java EE Connector (J2C) tooling in IBM Developer for z/OS is provided through a set of wizards called the CICS and IMS Java data bindings. They support the importing of data structures from COBOL, PL/I, and C source code to generate Java classes with setter and getter methods for accessing the fields within the records. As part of the generation process, you can specify the encoding of character and numeric data types to correctly convert data when passing data from Java to the EBCDIC runtime in CICS.
Note: As an alternative solution to J2C, you can use the IBM Record Generator for Java, which supports COBOL and Assembler and is described further in the tutorial Build Java records from COBOL with IBM Record Generator.
Prerequisites
- IBM Developer for z/OS v15
- Eclipse development environment with the CICS Explorer SDK plug-in
- A CICS OSGi JVM server if you want to deploy the example into CICS. This tutorial uses CICS TS v5.6.
Estimated time
It should take you about 1 hour to complete this tutorial.
Steps
In this tutorial, we show you how to perform the following steps:
- Install IBM Developer for z/OS on your workstation. In this tutorial, we use IBM Developer for z/OS v15.0.2.0.
- Run the J2C record importer to generate a Java data binding class from a COBOL copybook.
- Develop a simple CICS Java program to use the generated data binding class when linking to a CICS COBOL program and deploy this into a CICS OSGi JVM server.
1. Install IBM Developer for z/OS
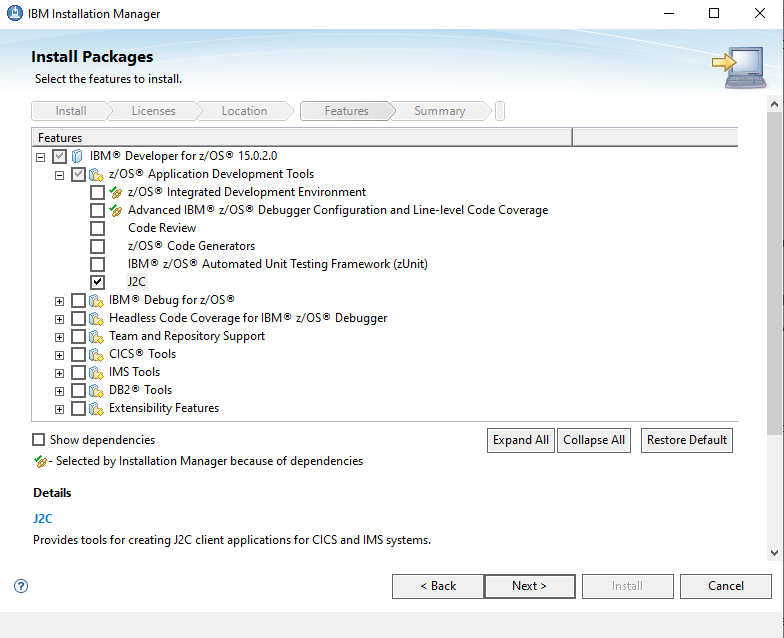
First, you should install IBM Developer for z/OS using the IBM Installation Manager. Ensure that you install the J2C feature during the installation process because it's not selected by default. It can be found under the z/OS Application Development Tools -> J2C install option as shown below.
2. Run the J2C record importer
The first step in generating the record bean is to transfer the COBOL programs from IBM z/OS to your workstation. You should use the sample copybook EDUCPY and corresponding program EDUPGM, which you can download from this CICSDev Git repository. The copybook EDUCPY provides the following DFHCOMMAREA structure, which includes the most common types of COBOL data elements:
01   DFHCOMMAREA.
           03  DATA-PAYLOAD.
              05 BINARY-DIGIT            PIC 9(4)       COMP.
              05 CHARACTER-STRING        PIC X(30).
              05 NUMERIC-STRING          PIC 9(18).
              05 PACKED-DIGIT            PIC 9(15)      COMP-3.
              05 PACKED-DIGIT-WITH-COMMA PIC 9(12)V9(3) COMP-3.
              05 SIGNED-PACKED           PIC S9(12)     COMP-3.
              05 BOOL                    PIC X.
                 88 BOOL-FALSE           value X'00'.
                 88 BOOL-TRUE            value X'01' through X'FF'.
              05 RESULT.
                 09 RESULT-CODE          PIC S9(5)      VALUE +0.
                 09 RESULT-TEXT          PIC X(25).
Note: The J2C COBOL importer requires that the imported structure be a fully formatted structure, so it must start with a COBOL 01 level item.
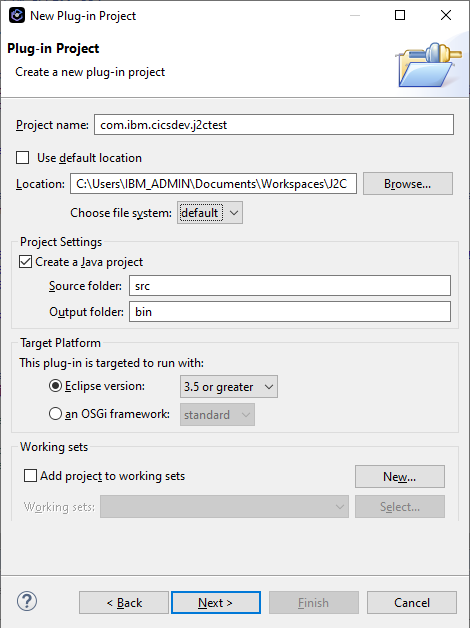
2.1 Create a project
You will be using an OSGi development environment, so before you generate any code you first need to create a new OSGi Plug-in project in Eclipse using the wizard File -> New -> Plug-in Development -> Plug-in Project, as shown:
As you go through the wizard, follow these steps:
- On the first panel of the Plug-in Project wizard, select the standard OSGi framework option because you do not need any extra Eclipse or Equinox extensions.
- On the second panel, make sure that the version is set to 1.0.0 without a qualifier because the OSGi JVM server does not support the use of qualifiers. Also, ensure that the selected Java execution environment is supported by your JVM server. You are not required to select the option to generate an activator.
- On the third panel, uncheck the box to create a plug-in using a template. You will add your own application code to the project.
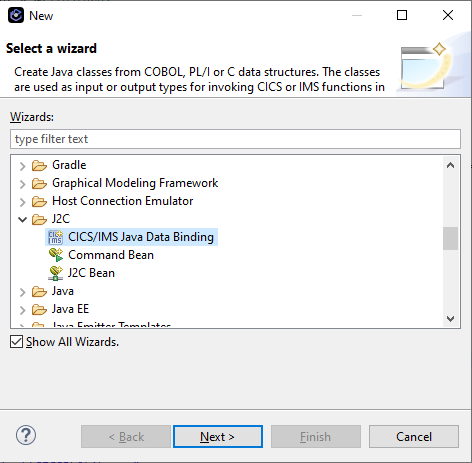
2.2 Generate the J2C data binding
Upon transferring the copybook to the workstation, you can now use it to create a J2C data binding class using the wizard J2C -> CICS/IMS Java Data Binding, as shown below:
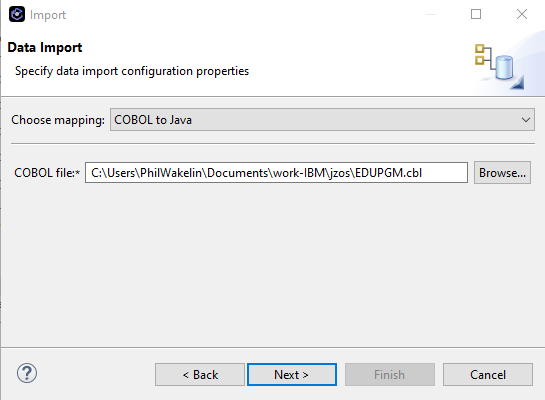
Click Next and then select COBOL to Java, which provides the mapping you need.
Note: Other mapping types including C or PL/I to Java are also supported.
Next, use the Browse dialog to navigate to the folder where you stored the COBOL source code on the workstation, and select the program EDUPGM, which includes the desired copybook. Then click Next.
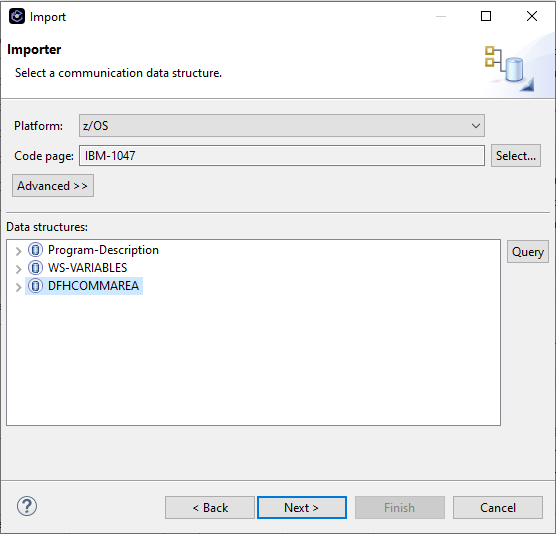
Select the platform and code page that the COBOL application will use. This is used by the J2C data bindings at runtime when accessing the fields in the data bindings, so it must correctly reflect the encoding of the data used in the COBOL application. In this example, you select z/OS and the EBCDIC codepage of IBM-1047, which is the local CCSID that the CICS system will be using. In the Data structures section, select the 01 level COBOL data structure. In this example, it is the DFHCOMMAREA as defined in your copybook EDUCPY:
Click Next and then select the name of the Java project, package, and class for the generated code. This example uses the following convention:
- Project -- com.ibm.cicsdev.j2ctest
- Package -- com.ibm.cicsdev.bean
- Class -- J2CCommareaWrapper
2.3 Resolve package imports
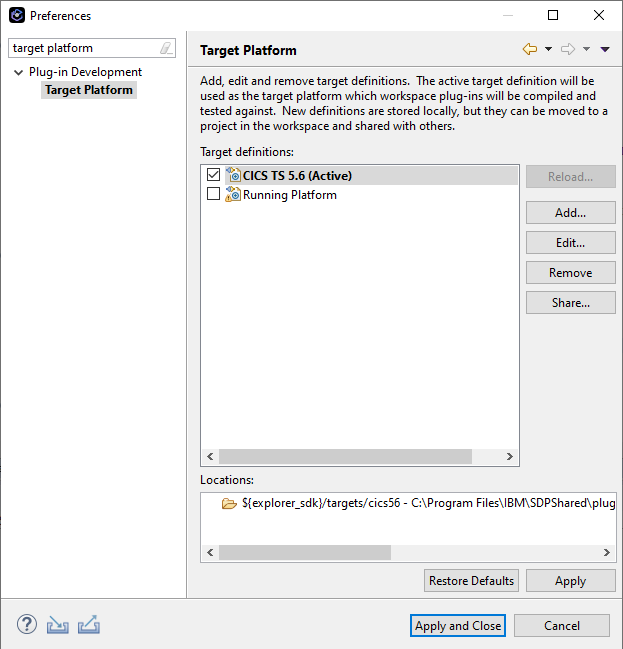
In an OSGi development environment, target platform definitions specify the plug-ins that applications in the workspace will be built against. The CICS Explorer software development kit (SDK) offers a set of sample target platforms that provide the JCICS application programming interfaces (APIs) for different CICS TS versions. Set the target platform using the Eclipse menu Windows -> Preferences -> Plug-in Development -> Target Platform. Click Add, and then, from the supplied templates, select the CICS TS release for your runtime environment. Click Apply and Close. You can then select the new target platform and apply it to your workspace.
Having created the CICS target platform, you may notice that your J2C-generated code does not have all the required interfaces available and will therefore not compile in Eclipse. So you need to add the J2C libraries to your workspace to augment the target platform.
The Java Archives (JARs) that you need to add to your target platform are marshall.jar from IBM Developer for z/OS and connector.jar from the Java SDK on z/OS.
2.3.1 Add marshall.jar
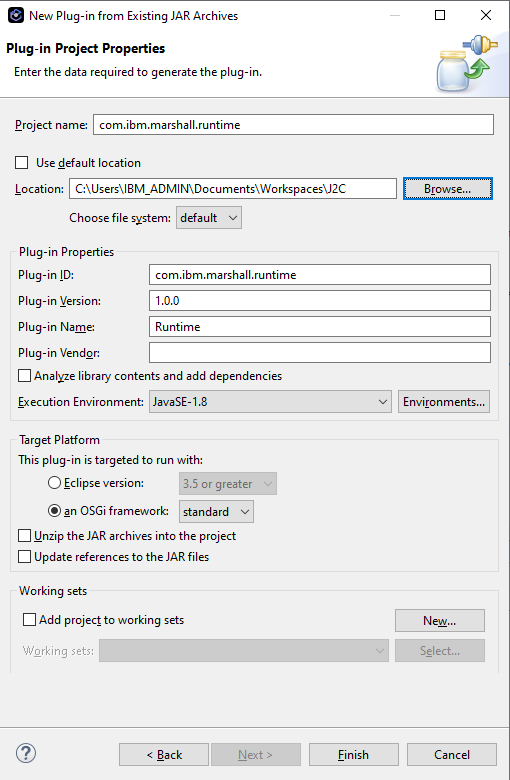
First, locate the redistributable marshall.jar from your IBM Developer for z/OS . This is usually located in the SDPShared\plugins\com.ibm.ccl.commonj.connector.metadata_nnn\runtime folder. Import it into Eclipse using the wizard New -> Plug-in from Existing JAR Archives wizard, as shown below. Make sure to uncheck the Unzip the JAR archives into the project because you do not need to unpack the JAR; it only contains compiled classes. Select the standard OSGi framework option and make sure that the selected Java execution environment is supported on your target CICS environment. Last, click Finish and the wizard will create the wrapper bundle.
Validate the bundle manifest for the wrapper bundle to ensure that the required packages -- com.ibm.etools.marshall.util and com.ibm.etools.marshall -- are exported. You can find the manifest at META-INF/MANIFEST, which should be similar to this example:
Manifest-Version: 1.0
    Bundle-ManifestVersion: 2
    Bundle-Name: j2c
    Bundle-SymbolicName: com.ibm.etools.marshall.runtime
    Bundle-Version: 1.0.0
    Bundle-ClassPath: marshall.jar
    Export-Package: com.ibm.etools.marshall,
     com.ibm.etools.marshall.util,
     com.ibm.etools.marshall.util.bidi
    Bundle-RequiredExecutionEnvironment: JavaSE-1.7
2.3.2 Add connector.jar
Next, locate the connector.jar from your Java Runtime Environment on z/OS. This contains the javax.resource interfaces and can be found in the JAVA_HOME/standard/jca directory on z/OS. Use FTP to transfer this to the workstation in binary mode, and create another wrapper project using the same technique as in Step 2.3.1.
Validate the bundle manifest for the wrapper bundle to ensure that the required package, javax.resource.cci, is exported. The manifest should be similar to this example:
Manifest-Version: 1.0
    Bundle-ManifestVersion: 2
    Bundle-Name: Resource
    Bundle-SymbolicName: javax.resource
    Bundle-Version: 1.0.0
    Bundle-ClassPath: connector.jar
    Export-Package: javax.resource,
     javax.resource.cci,
     javax.resource.spi,
     javax.resource.spi.security
    Bundle-RequiredExecutionEnvironment: JavaSE-1.7
2.3.3 Define OSGi Import-Package statements
The next step is to resolve the package imports in your generated data binding class using the wrapper bundles that you just created. The package imports for the J2C components can be resolved by adding the following OSGi Import-Package statements to the OSGi bundle manifest in the com.ibm.cicsdev.j2ctest plug-in project:
Import-Package: com.ibm.etools.marshall,
     com.ibm.etools.marshall.util,
     javax.resource.cci
3. Create a CICS Java application
Create a new Java package, com.ibm.cicsdev.j2ctest, in the plug-in project and add a new class, J2Cprog. Copy and paste in the code shown below, which makes a JCICS Program.link() call to your EDUPGM CICS COBOL program. Alternatively, you can download the full sample code at the CICSDev GitHub.
public class J2Cprog {

    public final static String proglink = "EDUPGM"; // Linked to COBOL program

    public static void main(String[] args) {

        // Get details about our current CICS task
        Task task = Task.getTask();
        task.out.println(" - Starting J2Cprog");

        // Wrapper objects for input and output commareas
        J2CCommareaWrapper cwIn = null;
        J2CCommareaWrapper cwOut = null;

        // Set the input data fields
        Short binarydigit = 1;
        String charstring = "hello";
        Short numericstring = 1234;
        Integer packeddigit = 123456789;
        Integer signedpackeddigit = -100;
        String bool = "1";

        cwIn = new J2CCommareaWrapper();
        cwIn.setBinary__digit(binarydigit);
        cwIn.setCharacter__string(charstring);
        cwIn.setNumeric__string(numericstring);
        cwIn.setPacked__digit(packeddigit);
        cwIn.setSigned__packed(signedpackeddigit);
        cwIn.setBool(bool);

        // Create a reference to the CICS program
        Program prog = new Program();
        prog.setName(proglink);

        // Create byte array for input commarea from wrapper
        byte[] commarea = cwIn.getBytes();

        try {

            // Link to target CICS program
            prog.link(commarea);

            // Build output record from updated commarea
            cwOut = new J2CCommareaWrapper();
            cwOut.setBytes(commarea);

            // Catch any exception and force a rollback of CICS UOW
        } catch (Exception e) {
            String msg = "ERROR: Exception on link to {0} with msg({1})";
            task.out.println(MessageFormat.format(msg, proglink, e.getMessage()));
            // Rollback the CICS Task
            try {
                task.rollback();
            } catch (InvalidRequestException e1) {
                // If this fails, then throw Runtime Exception
                throw new RuntimeException(e1);
            }
        }

        String msg = "Returned from {0} with rc({1}) {2}";
        task.out.println(MessageFormat.format(msg, proglink, cwOut.getResult__code(), cwOut.getResult__text()));

    }

}
This sample uses the setter methods from the generated J2CCommareaWrapper to access the individual fields in the record. Each field in the COBOL record can be written to using methods such as setBinary__digit() and setCharacter__string(), and also read using the corresponding getters. The entire byte array representing a record can be passed into a link call using a Java byte[] array returned with the getBytes() method.
3.1 Add OSGi package import statements
Next, you need to resolve the JCICS package imports, so you should add an Import-Package statement to the bundle manifest for JCICS in addition to the imports you previously added for J2C. Specify the version range of the JCICS import to define the OSGi semantic version referring to the supported JCICS API. For instance, com.ibm.cics.server;version="[1.300.0,2.0.0)" allows the application to use JCICS APIs from CICS TS v4.2 onward. For more details on JCICS package versioning, see the Knowledge Center topic, Guidance for using OSGi. Your resulting manifest should now contain the following lines:
Import-Package: com.ibm.cics.server;version="[1.300.0,2.0.0)",
     com.ibm.etools.marshall,
     com.ibm.etools.marshall.util,
     javax.resource.cci
Finally, add a CICS-MainClass: definition to the bundle manifest to register a MainClass service for the com.ibm.cicsdev.j2ctest.J2Cprog class. This will allow the Java class to be linked to using a CICS program definition. Your manifest should now look similar to this:
Manifest-Version: 1.0
    Bundle-ManifestVersion: 2
    Bundle-Name: J2ctest
    Bundle-SymbolicName: com.ibm.cicsdev.j2ctest
    Bundle-Version: 1.0.0
    Bundle-Vendor: IBM
    Bundle-RequiredExecutionEnvironment: JavaSE-1.7
    Import-Package: com.ibm.cics.server;version="[1.300.0,2.0.0)",
     com.ibm.etools.marshall,
     com.ibm.etools.marshall.util,
     javax.resource.cci
    CICS-MainClass: com.ibm.cicsdev.j2ctest.J2Cprog
3.2 Deploy the application
Before the application can be deployed, you need to create a middleware bundle that contains the J2C components from the IBM Developer for z/OS environment, which you can then deploy into CICS. You do this by creating a wrapper OSGi bundle from the relevant JAR.
The required J2C components are found in marshall.jar, and you have already created a plug-in project to wrapper this. The next step is to export this marshall.jar project as an OSGi bundle and deploy it to the CICS OSGi JVM server environment as a middleware bundle. To export the project, select the File -> Export -> Deployable plug-ins and fragments wizard, select the com.ibm.etools.marshall.runtime plug-in project previously created, and then export to an archive file as a JAR. Transfer this to z/OS in binary mode and deploy into the OSGi JVM server as a middleware bundle using the OSGI_BUNDLES JVM server property.
The OSGI_BUNDLES property is a CICS JVM server profile option that's used for adding bundles to the OSGi framework in order to implement shared system functions. The following is an example definition that assumes the exported OSGi bundle was named com.ibm.etools.marshall.runtime_1.0.0.jar:
OSGI_BUNDLES=/u/cics1/deploy/com.ibm.etools.marshall.runtime_1.0.0.jar
Note: The Streamable and Record interfaces from the javax.resource.cci package that are also required by J2C are exported from the OSGi system bundle within the CICS JVM server environment, and therefore do not need to be added in the same manner as used here for marshall.jar.
The application is now ready to be deployed in a CICS OSGi JVM server. To do this, you need to do the following:
- Create a CICS bundle project in Eclipse and add the OSGi bundle project using the menu, New -> OSGi Bundle Project Include.
- Deploy to zFS using the menu, Export Bundle Project to z/OS UNIX File System.
- Create a
CICS BUNDLEdefinition that references this zFS location and install it. - Create a
CICS PROGRAMdefinition with the classcom.ibm.cicsdev.j2ctest.J2Cprogin the JVMClass attribute and install it. - Create a
TRANSACTIONdefinition that references thePROGRAMif this is to be run from a 3270 terminal.
When invoked, the Java class J2Cprog will link to the COBOL EDUPGM using the CommareaWrapper classes to marshal the input to the required COBOL record formats. It should return the following messages, if successful, indicating the input and output CommareaWrapper records have been successfully used to marshal the data in the COMMAREA:
Starting J2Cprog
Returned from EDUPGM with rc(0) PARAMETERS ARE ALL OK
Summary
This tutorial has demonstrated how to use the J2C tooling in IBM Developer for z/OS to create Java data binding classes from a COBOL copybook to simplify the mapping of record-based data to Java data types. After completing this tutorial, you should be able to go on to customize this process for your own COBOL source code and integrate it into your IBM z/OS-based Java applications.
For more details on the technologies covered in this tutorial, see the Resources links in the upper right-hand column.