About cookies on this site Our websites require some cookies to function properly (required). In addition, other cookies may be used with your consent to analyze site usage, improve the user experience and for advertising. For more information, please review your options. By visiting our website, you agree to our processing of information as described in IBM’sprivacy statement. To provide a smooth navigation, your cookie preferences will be shared across the IBM web domains listed here.
Tutorial
Create your first Node.js application
Build a shopping list application using Node, SQLite, and RESTful services
If you are following along this learning path, you've installed Node, learned basic Node.js concepts, and taken a deep dive into the Node event loop. Now it's time to put that knowledge to use on a real-world project.
Get the code
The code you need to follow along with the examples in this tutorial is in my GitHub repo:
The project
Imagine the company that you work for called a meeting and invited you to participate. When you arrive, the project manager explains that a major retailer hired the company to write an application suite.
As a proof-of-concept, the retailer requested a shopping list application. Your company started the project to write a minimally viable product (MVP) for the shopping list, but the Node developer who was working on it suddenly left the company. The project must be finished, or the customer will take its business elsewhere.
Your role is to finish the JavaScript code started by the previous Node developer and ensure that the code meets the functional specs. Are you up to the task?
User stories
The Shopping List MVP consists of 10 user stories. This section contains the stories that you need to complete before the MVP can be shown to the customer. Because of the incredibly short timeframe, these stories act as functional specs for the Shopping List MVP.
Each story has a brief description, along with a list of high-level requirements that must be met before the story will be considered accepted.
The stories are implemented in the following order:
Items: Find by ID
Each item in the database has a unique ID, and a user needs to be able to find a specific item in the database by its ID.
Given an ID, the system will return a single item from the database that matches the specified ID.
Items: Search by partial description
Each item in the database has a description, and a user needs to be able to find one or more items in the database using a partial description (such as "cough medicine," "banana flavored," or "free range").
Given a string of text (the partial description), the system will return 0 or more matches to items in the database that contain the specified text.
Items: Find by UPC
Each item in the database has a unique universal product code (UPC), and a user needs to be able to find a specific item in the database by its UPC.
Given a UPC, the system will return a single item from the database that matches that UPC.
Lists: Create shopping list
A user needs to be able to create a new shopping list. The system will provide a way to create a new shopping list in the database with the following attribute:
- Description
Lists: Find shopping list by ID, return shopping list only
Once a shopping list has been created, it is assigned a unique ID. A user needs to be able to find the shopping list in the database using that ID.
Given an ID, the system will return a single shopping list that matches the specified ID.
Lists: Add item to shopping list
A user needs to be able to add an item to a shopping list in the database. Given an item ID, the system must be able to add that item to the shopping list, along with the following attribute:
- Quantity
Lists: Find shopping list by ID, return all items in the list
Once a shopping list is created, it's assigned a unique ID. A user needs to be able to find the shopping list in the database using that ID.
Given an ID, the system will return a single shopping list that matches the specified ID, along with all items in that list.
Lists: Update shopping list
A user needs to be able to modify the shopping list attribute:
Description
Given an ID, and values for the updated attribute, the system will provide a way to update the shopping list in the database.
Lists: Update item in shopping list
A user needs to be able to update the following attributes about an item in a shopping list:
- Quantity
Picked up (whether or not the item has been picked up)
Given a shopping list ID and an item ID, the system will provide a way to update the item's attributes in the database.
Lists: Remove item from shopping list
A user needs to be able to remove an item from a shopping list.
Given a shopping list ID and an item ID, the system will provide a way to remove the item (shopping list attribute) from the database.
Together, these 10 stories define the system's behavior.
Functional testing
The behavior-driven approach requires a test suite that mirrors the user stories assigned to the MVP project. To save time, the functional tests are run in the same order as the stories. Once all the tests pass, you're done.
Here's what you'll do:
- Run the functional test suite.
- If any step in a story (that is, any test function in the suite) fails:
- Write code to implement the functionality in the corresponding story.
- Go back to Step 1.
- If all the steps succeed:
- You're done.
Running the functional test
First, I'm going to explain to you how to run the functional test. You don't need to do this right now, but I want to explain how it works and what it will look like, so that when you run it later in the tutorial, you understand how it's supposed to work.
To run the functional test, pull the source code from GitHub.
Run:
npm test
When the output looks like this, you're done:
$ npm test

> shopping-list@1.0.0 test /Users/sperry/home/development/projects/IBM-Code/Node.js/Course/Unit-6
> node ./test/functional-test

1531086599944:INFO: testItemFindbyId(): TEST PASSED
1531086599982:INFO: testItemFindbyDescription(): TEST PASSED
1531086599985:INFO: testListsCreate(): TEST PASSED
1531086599987:INFO: testListsAddItem(): TEST PASSED
1531086599988:INFO: testListsFindbyIdWithAllItems(): TEST PASSED
1531086599989:INFO: testListsUpdate(): TEST PASSED
1531086599989:INFO: testListsUpdateItem(): TEST PASSED
1531086599989:INFO: testListsRemoveItem(): TEST PASSED
1531086599990:INFO: testListsFindbyId(): TEST PASSED
1531086599990:INFO: testItemFindbyUpc(): TEST PASSED
If a test fails, it looks something like this:
$ npm test

> shopping-list@1.0.0 test /private/tmp/IBM-Code/Node.js/Course/Unit-6
> node ./test/functional-test

1531087259727:ERROR: testItemFindbyId(): TEST FAILED. Try again.
1531087259728:ERROR: testItemFindbyId(): ERROR MESSAGE: Unexpected token N in JSON at position 0.
.
.
In that case, you need to write code to fix the failing test and run the functional test again.
You are finished when all of the functional tests pass.
The data
The data for the Shopping List MVP is from the Open Grocery Database Project and is free to use.
The data from the Open Grocery Database Project is in the form of two MS Excel spreadsheets:
- Grocery_Brands_Database.xlsx contains information related to the brands in the database.
- Grocery_UPC_Database.xlsx contains information for each item (by UPC) in the database.
Each item has a unique UPC. In addition, each item is associated with only one brand.
Both of the Excel spreadsheets have been converted to CSV files. The files have been placed with the CSV files in the GitHub repo.
The data will be loaded into an SQLite database for now. The code to create and access the database was written before you joined the project, so you just need to be aware of it in case you run into issues.
The data model
The data model consists of the following tables:
- item is used to store item data.
- brand is used to store brand data.
- shopping_list is used to store shopping list data.
- shopping_list_item is used to store information about an item that has been added to a shopping list.
Each of these tables has a definition in a corresponding source file in ./scripts, which I cover during the code walkthrough later in this tutorial.
The code to access the database is located in the GitHub repo. This code was written by the previous Node developer, but you should study it in case you run into issues:
items-dao-sqlite3.jsis code to access the database in support of the items-related stories.lists-dao-sqlite3.jsis code to access the database in support of the lists-related stories.
To insulate the application from the underlying data source, a data access object (DAO) layer has been started, but it was never completed:
items-dao.jsis the insulation layer in support of items-related stories.lists-dao.jsis the insulation layer in support of lists-related stories.
To finish the stories assigned to you, you need to complete the insulation layer. Comments in the code will guide you.
The application framework
The application architecture has a few constraints that you should know about:
- The application cannot modify
itemorbranddata. - You can only use "vanilla" Node.js, meaning just the Node.js APIs and no other packages from the npm registry. The one exception is the
node-sqlite3module, which will be installed when you runnpm install. - You must implement the backend using RESTful services.
RESTful services
There is one RESTful service for each user story and one DAO function for each RESTful service. These are summarized in the following table:
| User story | HTTP method | RESTful path | DAO function |
|---|---|---|---|
| Items: Find by Id | GET |
/items?id=123 |
itemsDao.findbyId() |
| Items: Search by partial description | GET |
/items?description=free range |
itemsDao.findbyDescription() |
| Items: Find by upc | GET |
/items?upc=123456789012 |
itemsDao.findbyUpc() |
| Lists: Create shopping list | POST |
/lists |
listsDao.create() |
| Lists: Find shopping list by Id, return shopping list only | GET |
/lists/123 |
listsDao.findbyId() |
| Lists: Add item to shopping list | POST |
/lists/123/items |
listsDao.addItem() |
| Lists: Find shopping list by Id, return all items in the list | GET |
/lists/123/items |
listsDao.findbyIdWithAllItems() |
| Lists: Update shopping list | PUT |
/lists/123 |
listsDao.update() |
| Lists: Update item in shopping list | PUT |
/lists/123/items/567 |
listsDao.updateItem() |
| Lists: Remove item from shopping list | DELETE |
/lists/123/items/567 |
listsDao.removeItem() |
Each RESTful path is handled by one of two classes:
- Items: Handled by
items-handler.js - Lists: Handled by
lists-handler.js
Code walkthrough
The project source directory contains the following files:
Figure 1. Files in the project source directory

You've already seen some of these in previous sections, and we'll walk through them here. You need to study each of these files so that you can write the code to complete your stories.
config
Configuration-related source code resides in the config directory:
app-settings.jscontains application settings in an object calledappSettings, which centralizes configuration.
controllers
Controller logic (which glues together the application logic and Node) resides in the controller directory:
items-handler.jscalls the DAO layer on behalf of the router (routes.js) for all item routes.lists-handler.jscalls the DAO layer on behalf of the router (router.js) for all list routes.routes.jscalls the route handler on behalf of the HTTP REST server (server.js).
You need to provide the missing implementation code for items-handler.js and lists-handler.js. Comments marked TODO will guide you.
data
Data files reside in the data directory:
- Grocery_Brands_Database.csv contains information related to brands.
- Grocery_UPC_Database.csv contains information related to items.
models
The DAOs reside in the models directory:
items-dao-sqlite3.jscalls the SQLite database to retrieve data for the application.items-dao.jsis the insulation layer between the application and the SQLite database.lists-dao-sqlite3.jscalls the SQLite database to retrieve data for the application.lists-dao.jsis the insulation layer between the application and the SQLite database.
You need to provide the missing implementation code for items-dao.js and lists-dao.js. Comments marked 'TODO' will guide you.
scripts
SQL scripts reside in the scripts directory:
brand.sqlis the SQL to create the brand table.item.sqlis the SQL to create the item table.shopping_list.sqlis the SQL to create the shopping_list table.shopping_list_item.sqlis the SQL to create the shopping_list_item table.
test
Test-related source files and other artifacts reside in the test directory:
functional-test.jsis the functional test suite created by the test lead, which you should run to validate your code.REST-Project-Unit6-soapui-project.xmlis a SoapUI project for testing the project (optional, included as a convenience).unit-test.jscontains all the unit tests for code in the project.
utils
Utilities reside in the utils directory. Utilities are modules that provide utility functionality:
load-db.jsis the module to load the database with data from the Open Grocery Database Project.logger.jsis the module to put a better interface onconsole.logwith log levels and so forth.utils.jscontains utilities that are too small for their own module, but are useful outside any particular module (such as URL parsing).
root
There are three files in the root directory:
package-lock.json: Don't worry about this file for now, we will get into it in detail in "Node.js dependency management".package.json: Project file for the application.server.js: HTTP server front-end for the application.
Now that you've had a code walkthrough, you should study the code more thoroughly on your own to get a feeling for how it fits together.
In the next section, you'll be off and running, writing code to get all the functional tests to pass.
Ready, set, and go
Now that you've studied the code thoroughly, it's time to write code to get all of your functional tests to pass. There are a few things you need to do first, however. We'll go through the steps together.
Step 1. Set up your environment
First, make sure you're using the correct versions of Node and npm, which should be 16 and 7, respectively:
node -v && npm -v
You should see output like this (the output you see may not be exactly like this, but the major versions should match):
$ node -v && npm -v
v16.13.0
v7.21.1
To set up your environment, navigate to the GitHub repo and run:
npm install
This creates a node_modules directory in the root directory. It contains the sqlite3 module and all of its dependencies. This is the one deviation from the required "vanilla" approach to Node.js.
Now that you've installed the sqlite3 module, you're ready to setup your local database.
Step 2. Load your local SQLite database
To set up your local database for testing, you need to load the Open Grocery Database Project data into your database. A Node module (load-db.js) was written for this purpose.
To run the database loading module, run npm run load-db, and you'll see output like this:
$ npm run load-db

> shopping-list@1.0.0 load-db /Users/sperry/home/development/projects/IBM-Code/Node.js/Course/Unit-6
> node ./utils/load-db

1531086312416:INFO: mainline(): Script start at: 7/8/2018, 4:45:12 PM
1531086312419:INFO: createdbFixtures(): Dropping all tables...
1531086312422:INFO: createdbFixtures(): Dropping all tables, done.
1531086312424:INFO: createdbFixtures(): Creating item table...
1531086312424:INFO: createdbFixtures(): Creating item table, done.
1531086312424:INFO: createdbFixtures(): Creating brand table...
1531086312424:INFO: createdbFixtures(): Creating brand table, done.
1531086312425:INFO: createdbFixtures(): Creating shopping_list table...
1531086312425:INFO: createdbFixtures(): Creating shopping_list table, done.
1531086312425:INFO: createdbFixtures(): Creating shopping_list_item table...
1531086312425:INFO: createdbFixtures(): Creating shopping_list_item table, done.
1531086312425:INFO: createdbFixtures(): DONE
1531086312425:INFO: mainline:createdbFixtures(resolved Promise): Loading data for brand...
1531086312426:INFO: loadData(): Loading data files...
1531086312427:INFO: loadData():readableStream.on(open): Opened file: ./data/Grocery_Brands_Database.csv
1531086320293:INFO: loadData():readableStream.on(close): Closed file: ./data/Grocery_Brands_Database.csv
1531086320293:INFO: mainline:createdbFixtures(resolved Promise): Loading brand data, done.
1531086320293:INFO: mainline:createdbFixtures(resolved Promise): Loading data for item...
1531086320293:INFO: loadData(): Loading data files...
1531086320293:INFO: loadData():readableStream.on(open): Opened file: ./data/Grocery_UPC_Database.csv
1531086433275:INFO: loadData():readableStream.on(close): Closed file: ./data/Grocery_UPC_Database.csv
1531086433275:INFO: mainline:createdbFixtures(resolved Promise): Loading item data, done.
1531086433275:INFO: mainline:createdbFixtures(resolvedPromise): Script finished at: 7/8/2018, 4:47:13 PM
Now the data is loaded into your local SQLite database, and you're ready to start coding and testing!
Step 3. Start Node (development mode)
Any time you need to test the application, you have to start the HTTP REST server, which is in server.js, and is associated with the npm start script.
That said, you will probably be making lots of code changes in a code-test-rinse-repeat cycle. So, run the npm run start-dev script once before you start testing. It uses nodemon to restart Node automatically whenever you make a code change:
$ npm run start-dev

> shopping-list@1.0.0 start-dev /Users/sperry/home/development/projects/IBM-Code/Node.js/Course/Unit-6
> nodemon server.js

[nodemon] 1.17.5
[nodemon] to restart at any time, enter `rs`
[nodemon] watching: *.*
[nodemon] starting `node server.js`
1531086509416:INFO: Database ./data/shopping-list.db is open for business!
Step 4. Run the functional test suite
Next, run your functional tests using the npm test command.
The functional test suite will fail at first. Your task is to write code until all of the tests pass.
Step 5. Write code
The previous developer left the project before completing the Shopping List MVP, so you must finish it by writing code in the following modules:
controllers/items-handler.jscontrollers/lists-handler.jsmodels/items-dao.jsmodels/lists-dao.js
You should only need to modify the modules listed above. All the other code in the application should work fine without any changes (but don't let that stop you from studying it).
If you get stuck, check the solution directory in each of these directories: controllers/solution and models/solution.
For me, the path to true understanding always involves time spent in the Land of Frustration. But with enough perseverance and effort, the lightbulb inevitably comes on. I encourage you to look in the solution directories only as a last resort. Reading the solution before you have worked to discover it for yourself robs you of an opportunity to learn and grow as a developer.
Using the VSCode debugger
One of the things I like about VSCode is that it's just easy to use. There's no complicated configuration to worry about; I just load up my code and go.
The same applies to debugging with VSCode. Once you have the Unit 6 project loaded into VSCode, you can easily debug it:
- Open
server.js. - Click on the Debug tab.
- Set a breakpoint (or two, or three).
- Click the Run button.
Figure 2. Starting the Shopping List MVP application in VSCOde
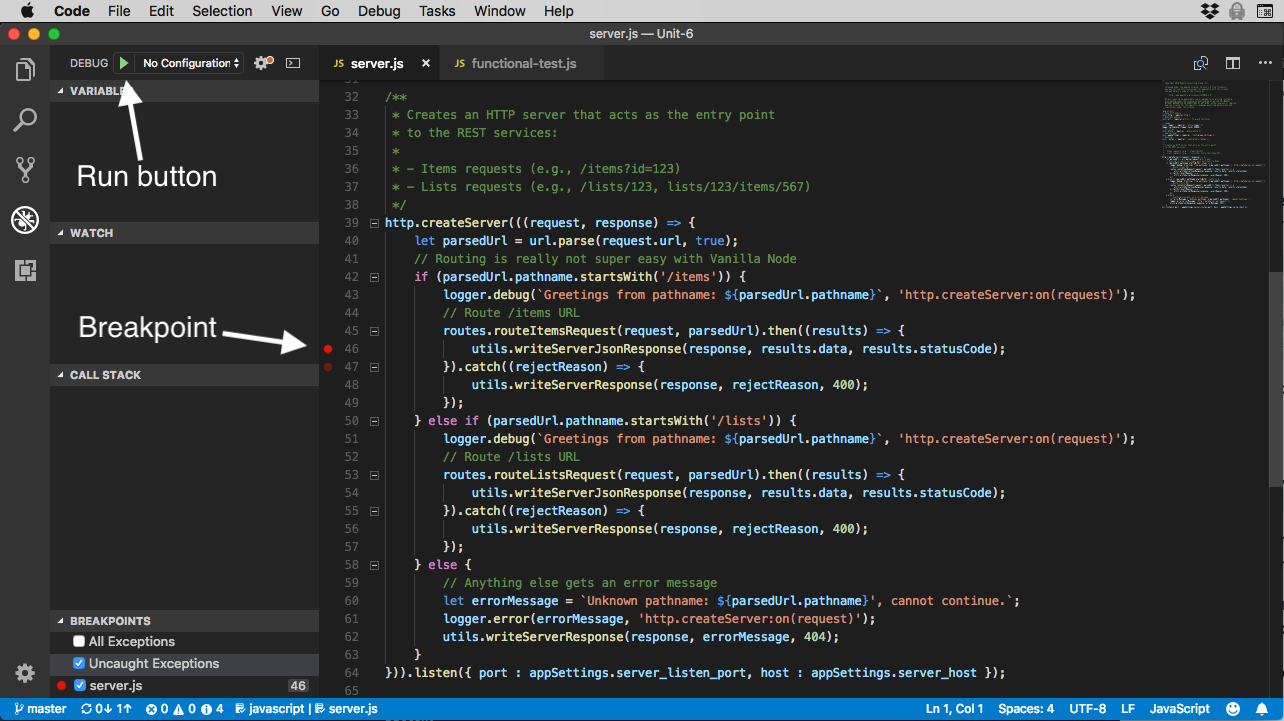
To set a breakpoint, click once just to the left of the line of code where you want the debugger to stop.
Test the code (for example, run the functional test script), and when the debugger encounters a line with a breakpoint set on it, it will stop, as you would expect. You then have all kinds of information at your fingertips.
Figure 3. The VSCode debugger
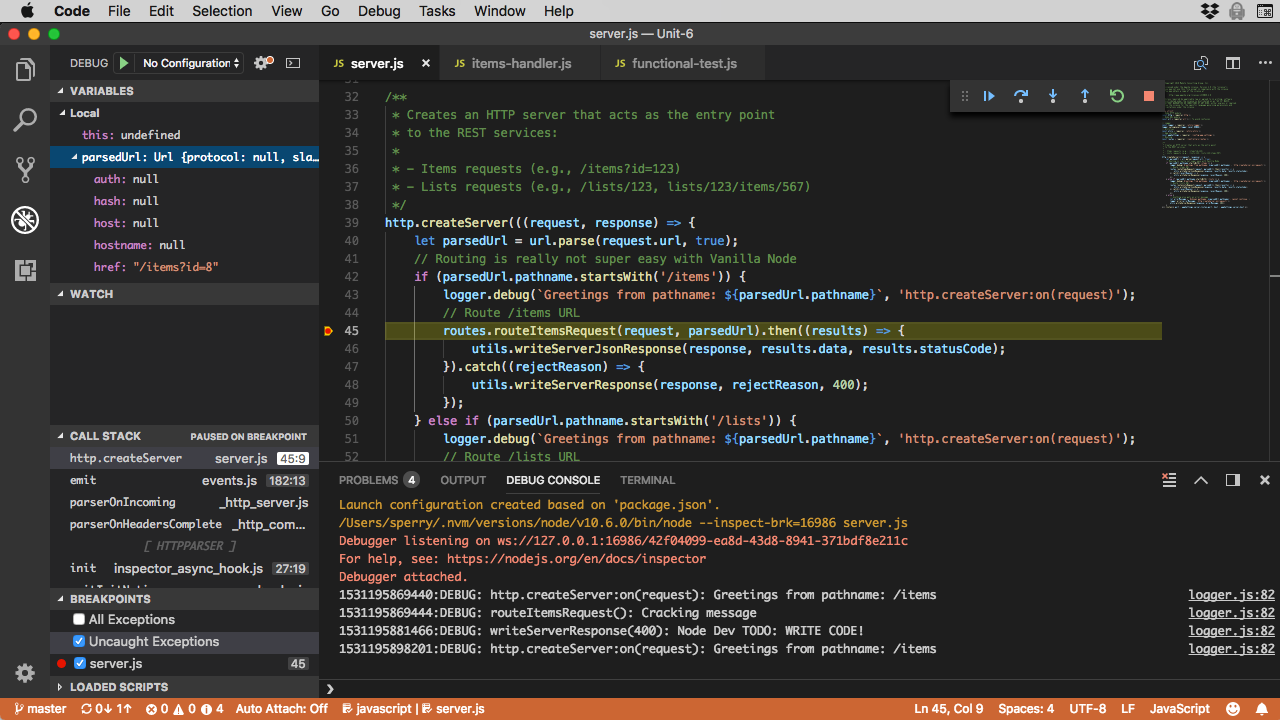
You can step through the code, look at variables, study the call stack, and lots more.
For more information about the VSCode debugger, check out the VSCode Debugging page.
Conclusion
In this tutorial, you worked on a real-world Node.js application. The tutorial simulates the conditions of many types of projects I've worked on in my career: being brought in after some work has been done, after the specifications have been done, and in a high-pressure situation (deliver something quickly or the customer walks).
You learned:
How to setup your environment to do Node development
How to load and work with the SQLite database
How to start Node and use
nodemonHow to work with the VSCode debugger.
In the next couple of tutorials, we step back from Node development and look at some of the surrounding ecosystem, including npm and the file that controls a Node project: package.json.
Video

Test your understanding
True or false
The HTTP
POSTmethod is used for all query-type REST services because you provide the server with an object payload that can be more easily parsed.Using Promises with asynchronous methods helps ensure that serial steps in a business process occur in the correct sequence.
A user story is a term used by support to capture customer sentiment on application experience surveys.
The
mainline()function of theload-dbmodule (located in/utils/load-db.js) registers anexithandler with theprocessobject to prevent memory leaks when the garbage collector exits.
Choose the best answer
The purpose of the DAO insulation layer (for example,
lists-dao.js) in the Shopping List application is to:A. Shield the developer from the complexity of the underlying database
B. Provide encapsulation of the underlying database, making it easier to switch to another database down the road
C. Creates more code, thus making the application more difficult to reverse engineer
D. A and B
E. B and C
F. None of the above
The
addItem()function of thelists-daomodule uses which HTTP method?A.
GETB.
POSTC.
PUTD.
PATCHE.
FUDGEWhen the route handler module (for example,
lists-handler) captures the HTTP request body, it does so:A. Using a Stream-based approach with the
dataandendeventsB. Reading the data directly from the body of the HTTP request as a file
C. Using the
bodyproperty of therequestobject passed to the anonymous callback inserver.jsD. None of the above
Fill in the blank
The
load-dbprogram (located in/util/load-db.js), in order to make sure that operations occur in the correct order, makes heavy use of JavaScript __.To update a resource using a REST service you should use the _ method (hint: look at
routeListsWithId()function of theroutes.jsmodule).When a
GETrequest is issued against a RESTful service that should return a single resource by Id, and that resource is not found, should return a __ status code.
Programming exercises
Write a JavaScript program to:
- Read a file called
foo.txt(assume the file is UTF-8 encoded). - Write its contents to a new file called
newfoo.txt. - Wrap all mainline logic in an IIFE called
mainline(). - Write a message to the console if the write I/O operation is successful.
- Read a file called
Write a module called
echowith a single method calledecho()that takes a single parameter, and writesecho+ the parameter to the console. Write another module calledecho-requesterthat usesechoand passes it a text parameter of your choice. Assume thatecho.jsandecho-requester.jsreside in the same directory.
Quiz answers
Answers for true or false questions
Answer: False. The
GETmethod is used for query (find) REST services.POSTis used to create new resources.Answer: True. When two or more steps must occur serially, and the underlying code works asynchronously, using a Promise guarantees the steps occur serially.
Answer: False. A user story is used to capture a distinct requirement of the software as a system behavior observable from the user's perspective, and is used to set the scope of a release (sprint).
Answer: False. The
process.on('exit')handler is used to make sure the database connection is closed before Node exits.
Answers for multiple choice questions
Answer: D (A and B). The DAO insulation layer has a double benefit: it shields the development from having to know exactly how to communicate with the database (simply by using the DAO interface), and it makes it easier (potentially seamless) to switch out databases as the application matures. In unit 12 you will use Mongodb with the Shopping List application and see if this proves to be true.
Answer: B -
POSTis used to create a new resource, which is exactly what happens. When the destination path is/lists/1/itemsthelists.daoaddItem()function is called, and under the hood, the sqlite3 module creates a new row in theshopping_list_itemtable to store the new resource.Answer: A. The code that does this is in
utils/utils.jsand reads the incoming request (which is an instance ofhttp.IncomingMessage, astream.ReadableStreamimplementation) by registeringdataandendhandlers to capture the complete request body as a String and returns it.
Answers for fill in the blank questions
Answer: Promises. Because the underlying database module (
sqlite3) functions asynchronously, it is critical to ensure proper sequencing (for example, you can't load data into a table that has not yet been created), and Promises are perfect for that.Answer:
PUTis used to update a resource in a RESTful application.Answer: 404. The HTTP 404 means "Not found". If the RESTful service contract for a specific path is to return a single object and the resource cannot be located, it should return a 404.