Tutorial
Use Spring Kafka to access an Event Streams service
Send and recieve messages to Event Streams
On this page
Built on open source Apache Kafka, IBM Event Streams is an event-streaming platform that helps you build smart applications that can react to events as they happen.
In this tutorial, learn how to use Spring Kafka to access an IBM Event Streams service on IBM Cloud. You will perform the following steps:
- Create an Event Streams instance on IBM Cloud
- Configure a Spring Boot application to communicate with the Event Streams instance
- Build a RESTful API to send and receive messages
Prerequisites
To follow along with this tutorial, you will need to following:
Estimated time
This tutorial will take approximately 30 mins to complete.
Create a Spring Boot application using the Spring Initializr
Using Spring Initializr, create a project with dependencies of
WebandKafka. For this example, we use groupcom.ibm.developerand artifactevent-streams-kafka.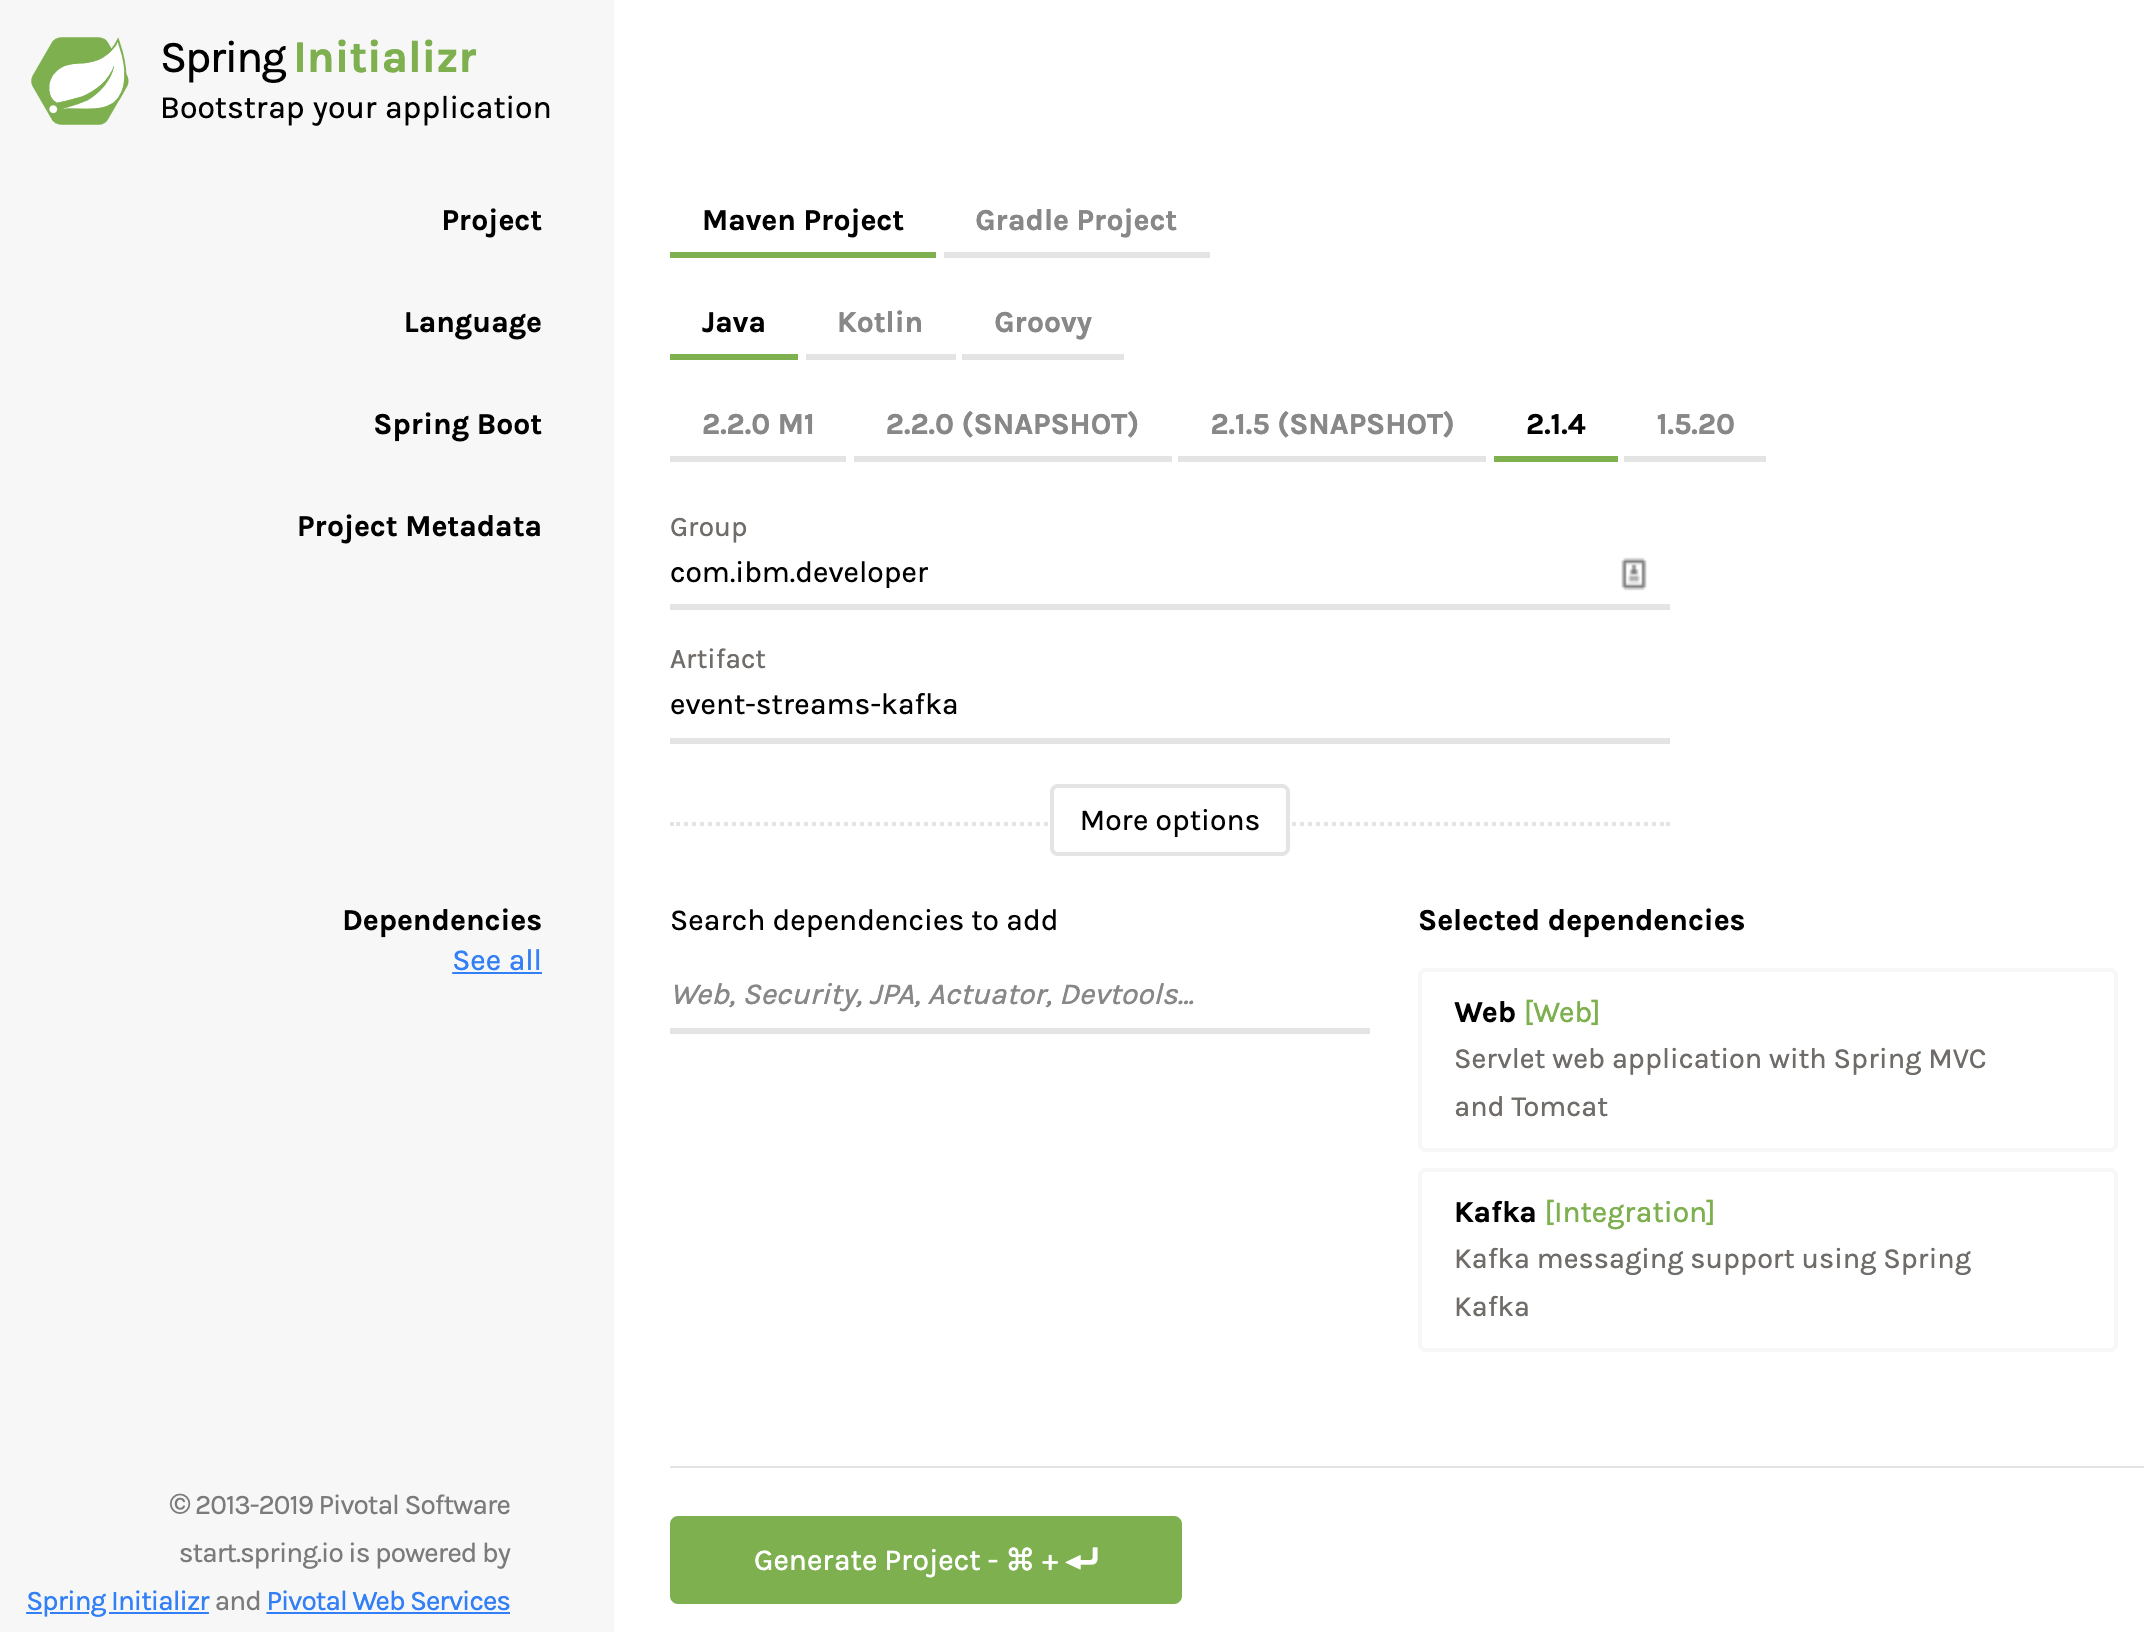
Download the project.
- Unzip the project.
- Open the project in your preferred IDE.
Create an Event Streams instance on IBM Cloud
- Navigate to the IBM Cloud Catalog.
- Select Event Streams.
- Click Create to create a service instance - for this tutorial the lite plan should suffice nicely. Detailed instructions on choosing a plan is located here.
- Click the + (Add) button to create a topic.
For this project, call the topic
spring, and accept the defaults.
Use the Service credentials tab on the left side of the screen to create a new set of credentials that your application will use to access the service. Once the credentials are created, note the values for the
userandpasswordfields, along with the servers listed in thekafka_brokers_saslsection.
Configure Spring Boot to talk to Event Streams
Configuring a Spring Boot application to talk to a Kafka service can usually be accomplished with Spring Boot properties in an application.properties or application.yml file. Let's walk through the properties needed to connect our Spring Boot application to an Event Stream instance on IBM Cloud. The properties used in this example are only a subset of the properties available.
In the project we created earlier, under /src/main/resources, open application.properties, and add the following properties, using the username and password you generated in the previous step:
#Connection
spring.kafka.jaas.enabled=true
spring.kafka.jaas.login-module=org.apache.kafka.common.security.plain.PlainLoginModule
spring.kafka.jaas.options.username=<your username>
spring.kafka.jaas.options.password=<your password>
spring.kafka.bootstrap-servers=<your sasl kafka brokers>
spring.kafka.properties.security.protocol=SASL_SSL
spring.kafka.properties.sasl.mechanism=PLAIN

#Producer
spring.kafka.template.default-topic=spring
spring.kafka.producer.client-id=event-streams-kafka
spring.kafka.producer.key-serializer=org.apache.kafka.common.serialization.StringSerializer
spring.kafka.producer.value-serializer=org.apache.kafka.common.serialization.StringSerializer

#Consumer
listener.topic=spring
spring.kafka.consumer.group-id=foo
spring.kafka.consumer.auto-offset-reset=earliest
spring.kafka.consumer.key-deserializer=org.apache.kafka.common.serialization.StringDeserializer
spring.kafka.consumer.value-deserializer=org.apache.kafka.common.serialization.StringDeserializer
In applicatiopn.properties, the configuration properties have been separated into three groups:
The first group, Connection, is properties dedicated to setting up the connection to the event stream instance. While, in this example, only one server is defined,
spring.kafka.bootstrap-serverscan take a comma-separated list of server URLs. Note that the server URL above is us-south, which may not be the correct region for your application.The second group, Producer, is properties defining the sending of messages to kafka.
spring.kafka.template.default-topicdefines the topic we will be writing to (in this case, the topic we created in the previous step --spring). Which topic to write to can also be defined progammatically, which will be shown in the next step.spring.kafka.producer.client-idis used for logging purposes, so a logical name can be provided beyond just port and IP address.spring.kafka.producer.key-serializerandspring.kafka.producer.value-serializerdefine the Java type and class for serializing the key and value of the message being sent to kafka stream.
The third and final group is Consumer, which defines the reading of messages from kafka.
listener.topicis not a Spring-defined property, but will be used in the next step.spring.kafka.consumer.group-iddefines the group our consumer will be a member of.spring.kafka.consumer.auto-offset-resettells the consumer at what offset to start reading messages from in the stream, if an offset isn't initially available.- Like with the producer, we will also need to define the type(s) for the key and value of the message, and how to deserialize them, which is done with the properties
spring.kafka.consumer.key-deserializerandspring.kafka.consumer.value-deserializer.
The above is a very basic example of how to connect to an Event Stream instance and configure a kafka producer and consumer. Be sure to check out the following guides for more advanced information on how to configure your application:
Note: Spring Kafka defaults to using String as the type for key and value when constructing a KafkaTemplate, which we will be using in the next step. Strictly speaking, we didn't need to define values like spring.kafka.consumer.key-deserializer or spring.kafka.producer.key-serializer in our application.properties. However, because String is often not sufficient, the properties were shown above as an example of how to define the type for key/value (de)serialization of kafka messages.
Define the controller
Under the package com.ibm.developer.eventstreamskafka, create a new class called EventStreamsController. We will use this controller to send messages to and read messages from the topic we created earlier from the comfort of our web browser! The finished class should look like this:
@RestController
public class EventStreamsController {
    private KafkaTemplate<String, String> template;
    private List<String> messages = new CopyOnWriteArrayList<>();

    public EventStreamsController(KafkaTemplate<String, String> template) {
        this.template = template;
    }

    @KafkaListener(topics = "${listener.topic}")
    public void listen(ConsumerRecord<String, String> cr) throws Exception {
        messages.add(cr.value());
    }

    @GetMapping(value = "send/{msg}")
    public void send(@PathVariable String msg) throws Exception {
        template.sendDefault(msg);
    }

    @GetMapping("received")
    public String recv() throws Exception {
        String result = messages.toString();
        messages.clear();
        return result;
    }
}
Let's step through what is happening in this class:
public EventStreamsController(KafkaTemplate<String, String> template) {
    this.template = template;
}
Spring Kafka client support is based around a KafkaTemplate<K,V>. Using the configuration from the previous step, a KafkaTemplate<String,String> has been added to the application context. Because EventStreamsController is a Spring-managed bean defined with a single consturctor, the Spring container will automatically supply the KafkaTemplate.
@KafkaListener(topics = "${listener.topic}")
public void listen(ConsumerRecord<String, String> cr) throws Exception {
    messages.add(cr.value());
}
Here we are setting up a KafkaListener (javadoc). A KafkaListener will check in and read messages that have been written to the topic it has been set to. ${listener.topic} references the property we defined in application.properties from the previous step, which is set to spring.
@GetMapping(value = "send/{msg}")
public void send(@PathVariable String msg) throws Exception {
    template.sendDefault(msg);
}
This method is defining the GET endpoint /send/{msg}, which is being used to send a message to kafka. In the body of the method we are calling template.sendDefault(msg), alternatively the topic the message is being sent to can be defined programmatically by calling template.send(String topic, T data), instead.
@GetMapping("received")
public String recv() throws Exception {
    String result = messages.toString();
    messages.clear();
    return result;
}
Finally, we are defining a second GET endpoint recieved to read the messages that the KafkaListener has read off the spring topic.
Build the app and invoke the REST endpoints
Build and run your app with the following command:
mvn spring-boot:run
Now you can invoke the REST endpoint for send, http://localhost:8080/send/Hello. This will send the message Hello using KafkaTemplate to Event Streams.
Having sent a message, you can invoke the REST endpoint for receive, http://localhost:8080/received. You should see the reply from the endpoint with the content of the message you sent.
Summary
Spring Kafka support makes it easy to send and recieve messages to Event Streams using Spring's KafkaTemplate and KafkaListener APIs, with Spring configuration.
The code used in this article can be found in GitHub.