About cookies on this site Our websites require some cookies to function properly (required). In addition, other cookies may be used with your consent to analyze site usage, improve the user experience and for advertising. For more information, please review your options. By visiting our website, you agree to our processing of information as described in IBM’sprivacy statement. To provide a smooth navigation, your cookie preferences will be shared across the IBM web domains listed here.
Tutorial
Serve a custom model on a Kubernetes or Red Hat OpenShift cluster
Learn how to take a Watson NLP model that you trained in IBM Watson Studio and serve it on a Kubernetes or Red Hat OpenShift cluster
On this page
Archived content
Archive date: 2025-03-12
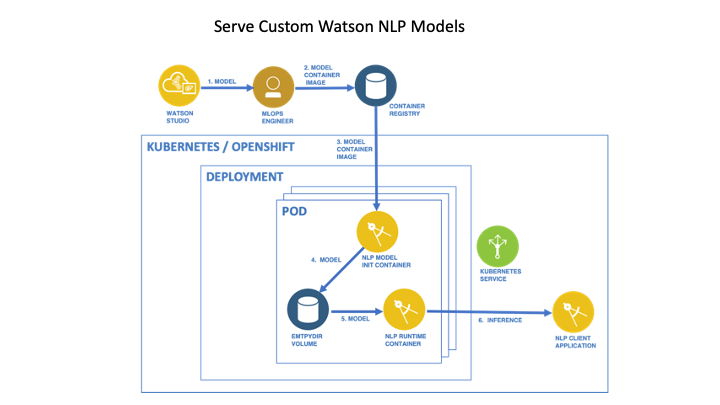
This content is no longer being updated or maintained. The content is provided “as is.” Given the rapid evolution of technology, some content, steps, or illustrations may have changed.With IBM Watson NLP, IBM introduced a common library for natural language processing, document understanding, translation, and trust. IBM Watson NLP brings everything under one umbrella for consistency and ease of development and deployment. In this tutorial, learn how to take a Watson NLP model that you trained in IBM Watson Studio and serve it on a Kubernetes or Red Hat OpenShift cluster. The model is packaged as a container image using the model builder. The container images can be used in the same way as the pretrained Watson NLP models, that is, specified as init containers of Watson NLP Runtime Pods.
Reference Architecture
Prerequisites
To complete this tutorial, you first must complete the Consumer Complaint Classification notebook, which includes steps on training a custom ensemble model and saving it to the IBM Cloud Object Storage bucket associated with the project.
You also need:
- Python 3.9 installed.
- Docker Desktop installed.
- Docker has access to the Watson NLP Runtime and pretrained models.
- You have a Kubernetes or Red Hat OpenShift cluster on which you can deploy an application.
- You have either the Kubernetes (
kubectl) or Red Hat OpenShift (oc) CLI installed and logged into your cluster. The current namespace should be set to the namespace in which you will deploy the model service. - Your Kubernetes or Red Hat OpenShift cluster namespace must have access to the Watson NLP Runtime and pretrained models.
- You have completed the Consumer Complaint Classification notebook, and saved the custom trained model named
ensemble_modelto the Cloud Object Storage bucket associated with the project.
Steps
Step 1. Save your model
- Export your Watson NLP model from Watson Studio on IBM Cloud.
In the IBM Cloud Pak for Data GUI, navigate to the page for your Consumer Complaints Classification project. Click the Assets tab. There, you should find a model named
ensemble_modelstored as a ZIP file.If the model is not there, go back to the notebook and ensure that you have followed the steps in the notebook.
- Insert a project token into the notebook.
- Run the cell that saves the model.
project.save_data('ensemble_model', data=ensemble_model.as_file_like_object(), overwrite=True)Download the model into the
modelsdirectory on your local machine. Use the vertical ellipsis to the right of the model name to open a menu with the download option.Create a directory to unzip the file into.
mkdir modelsmkdir models/ensemble_modelUnzip the file into the newly created directory. You might need to specify the path to the ZIP file if it is not in the current directory.
unzip ensemble_model -d models/ensemble_model
Step 2. Build the model image
Prepare your Python environment.
python3 -m venv client-envsource client-env/bin/activateInstall the model builder package.
pip install watson-embed-model-packagerRun the setup for the model builder package.
python -m watson_embed_model_packager setup \ --library-version watson_nlp:3.2.0 \ --local-model-dir /path/to/models \ --output-csv model-manifest.csvEnsure that you replace
/path/to/modelsin the previous command with the path to yourmodelsdirectory. This command generates the filemodel-manifest.csvthat is used during the build.Run the build command.
python -m watson_embed_model_packager build --config model-manifest.csvThis creates a Docker image with the name
watson-nlp_ensemble_model.Verify the existence of this image.
docker images
Step 3. Copy the model to a container registry
To deploy this image in a Kubernetes or Red Hat OpenShift cluster, you first must provision the image to a container repository.
- Tag your image with proper repository and namespace/project name.
Replace
<REGISTRY>and<NAMESPACE>in the following commands based on your configuration.docker tag watson-nlp_ensemble_model:v1 <REGISTRY>/<NAMESPACE>/watson-nlp_ensemble_model:v1Push the image to the registry.
docker push <REGISTRY>/<NAMESPACE>/watson-nlp_ensemble_model:v1
Step 4. Serve the models
Clone the GitHub repository containing sample code for this tutorial.
git clone https://github.com/ibm-build-labs/Watson-NLPGo to the directory for this tutorial.
cd Watson-NLP/MLOps/custom-model-k8sOpen the Kubernetes manifest for editing.
vim Runtime/deployment/deployment.yamlUpdate the
initcontainer line in the file to point to your custom model image.spec: initContainers: - name: ensemble-model image: <REGISTRY>/<NAMESPACE>/watson-nlp_ensemble_model:v1Create a secret in the namespace to give credentials to the registry used, and add this secret to the
imagePullSecretssection so that your Pod can pull the image from the registry.Deploy the model service.
If using Kubernetes:
kubectl apply -f deployment/deployment.yamlIf using Red Hat OpenShift:
oc apply -f deployment/deployment.yaml
The model service is now deployed.
Step 5. Test the service
Run a simple Python client program to test that the model is being served. Note that the client code is specific to the model. If you serve a different model you must update the client program.
Install the Python client library on your machine.
pip install watson_nlp_runtime_clientEnable port forwarding from your local machine.
If running the service in a Kubernetes cluster:
kubectl port-forward svc/watson-nlp-runtime-service 8085For Red Hat OpenShift:
oc port-forward svc/watson-nlp-runtime-service 8085Go to the directory with the client program and run it.
cd ClientRun the program with a single string argument.
python client.py "Watson NLP is awesome"
The program returns output similar to the following code.
###### Calling GRPC endpoint =  localhost:8085
###### Calling remote GRPC model =  ensemble_model
classes {
  class_name: "Credit reporting, credit repair services, or other personal consumer reports"
  confidence: 0.328219473
}
classes {
  class_name: "Debt collection"
  confidence: 0.262635
}
classes {
  class_name: "Credit card or prepaid card"
  confidence: 0.16425848
}
classes {
  class_name: "Checking or savings account"
  confidence: 0.102090739
}
classes {
  class_name: "Mortgage"
  confidence: 0.0733666793
}
producer_id {
  name: "Voting based Ensemble"
  version: "0.0.1"
}
Conclusion
In this tutorial, you learned how to take a Watson NLP model that you trained in IBM Watson Studio and serve it on a Kubernetes or Red Hat OpenShift cluster.