About cookies on this site Our websites require some cookies to function properly (required). In addition, other cookies may be used with your consent to analyze site usage, improve the user experience and for advertising. For more information, please review your options. By visiting our website, you agree to our processing of information as described in IBM’sprivacy statement. To provide a smooth navigation, your cookie preferences will be shared across the IBM web domains listed here.
Article
Optimizing GPU accelerated VMs with KubeVirt
Aligning GPUs with their corresponding NUMA nodes to improve performance in GPU-related tasks
On this page
Are you running GPU-intensive workloads on virtual machines? KubeVirt is a powerful tool that brings virtualization into a Kubernetes ecosystem. But sometimes, even KubeVirt-based virtual machines (VMs) miss out on performance, simply due to overlooked hardware topology.
In this article, we explain how GPU and NUMA (Non-Uniform Memory Access) node topology can impact performance in KubeVirt VMs. We’ll break down the problem, demonstrate its effect on the performance of GPU-related tasks, and propose a workaround. We’ll use the NVIDIA HGX A100 (8-GPUs) system as our reference scenario, supported by NVIDIA’s benchmark data.
This article goes beyond basic configuration, examining how libvirt-generated XML topology affects CPU-to-GPU data transfer through NUMA alignment. These details are often hidden by orchestration layers, and yet they’re critical for achieving near bare-metal performance in virtualized environments. This is where the true value of this article lies: by understanding these hidden details, we can work toward eliminating inefficiencies and delivering optimal performance.
The problem
As of today, KubeVirt virtualization does not support associating GPU devices with their corresponding NUMA nodes within the host cluster.
What does this look like in practice? Let’s take our scenario: a host with two NUMA nodes and eight GPU devices.
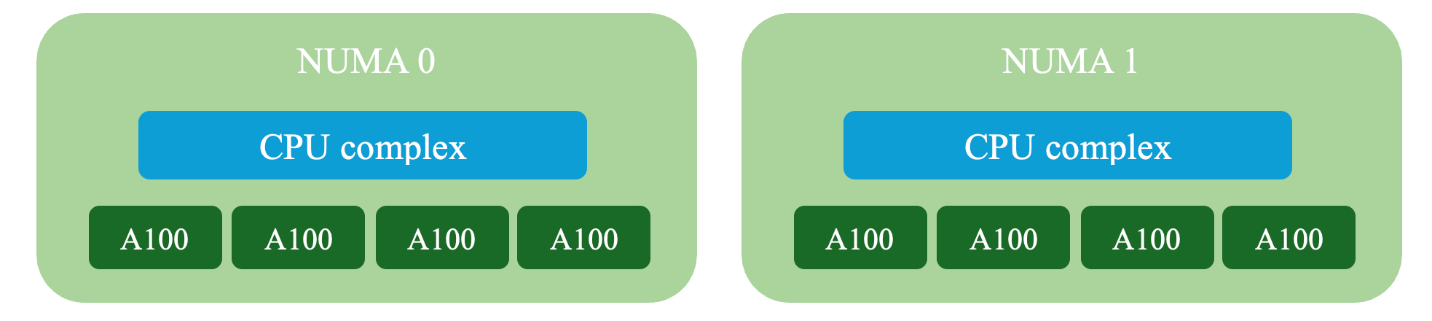
KubeVirt generates the following VM topology.
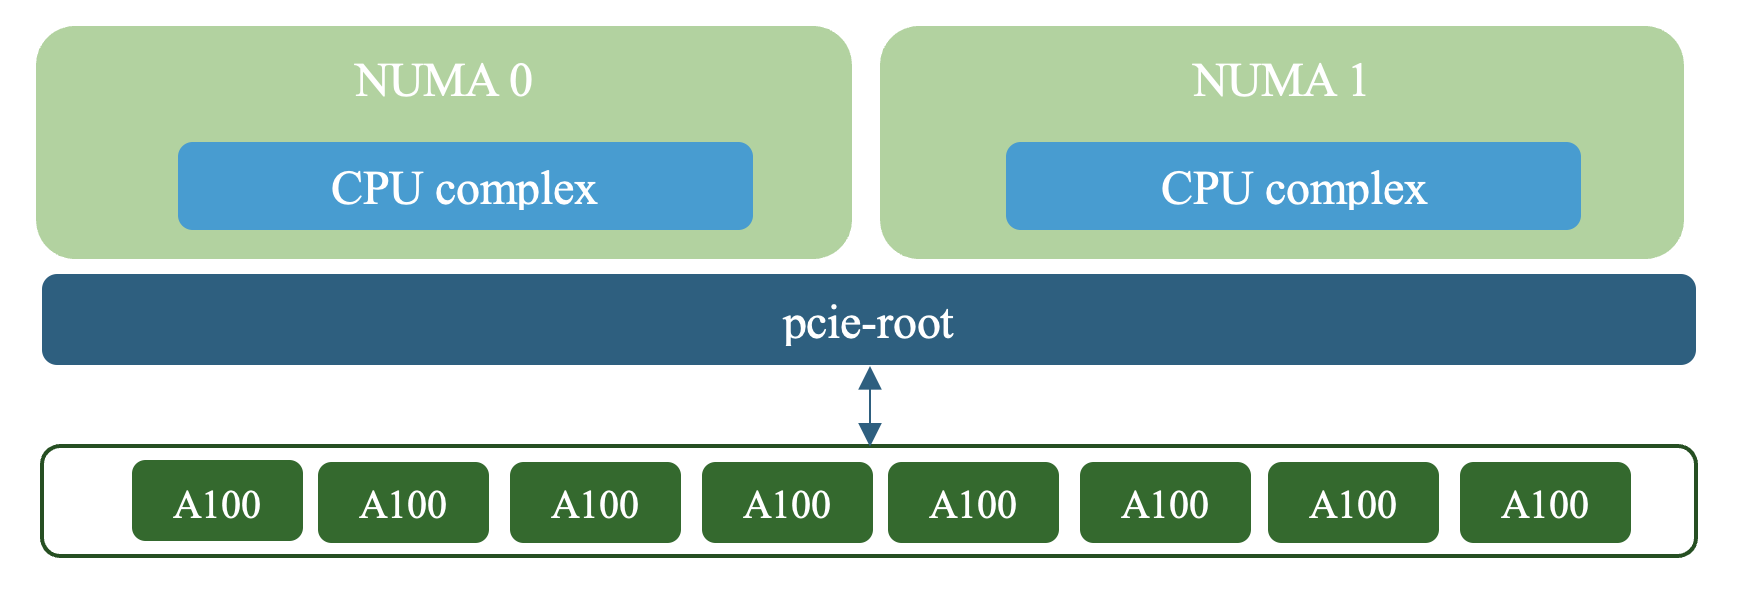
In the XML, the GPU is connected to the pcie-root controller via a pcie-root-port controller.
The VM’s topology is defined during the creation of the Virtual Machine XML, which is then passed to QEMU (Quick Emulator). The issue is that all GPU devices are attached directly to the PCIe root complex, which itself is not associated with any NUMA node. This missing hardware mapping is critical, as it affects how data is routed between the host and the GPUs, potentially leading to performance bottlenecks.
For optimal performance, data transfers should be prioritized to occur between a CPU and GPU within the same NUMA node whenever possible. In a NUMA environment, CPUs and memory are divided into separate domains or "nodes". When data is transferred from a CPU to a GPU on a different NUMA node, an extra step is introduced. The data must first travel across the interconnect between nodes before reaching the device. This added step increases latency and could potentially reduce overall throughput.
To demonstrate the issue, we’ll run NVIDIA’s micro-benchmark tool, nvbandwidth. Specifically, we’ll examine the test case that measures the host-to-device-memcpy bandwidth using the GPU copy engine.
The test results are as follows:
Running host_to_device_memcpy_ce.
memcpy CE CPU(row) -> GPU(column) bandwidth (GB/s)
           0         1         2         3         4         5         6         7
 0     12.61     12.52     15.46     15.53     15.59     15.62     12.66     12.55
Notice that four of the GPUs show significantly higher bandwidth than the others. To understand why, let’s look at a second run of the benchmark, this time with additional diagnostic logs:
Running host_to_device_memcpy_ce.
Thread of device 0 running on CPU: 199, NUMA node: 1
Thread of device 1 running on CPU: 153, NUMA node: 1
Thread of device 2 running on CPU: 152, NUMA node: 1
Thread of device 3 running on CPU: 152, NUMA node: 1
Thread of device 4 running on CPU: 152, NUMA node: 1
Thread of device 5 running on CPU: 125, NUMA node: 1
Thread of device 6 running on CPU: 153, NUMA node: 1
Thread of device 7 running on CPU: 153, NUMA node: 1
memcpy CE CPU(row) -> GPU(column) bandwidth (GB/s)
           0         1         2         3         4         5         6         7
 0     12.57     12.59     15.59     15.46     15.60     15.54     12.59     12.65
The logs are manually added and are not part of NVIDIA’s official benchmark.
Before we continue, it’s important to note that this benchmark is NUMA-aware. That means it considers the NUMA topology when executing memcpy. Specifically, it uses the NVIDIA Management Library (NVML) API to pin the host thread to a CPU core within the same NUMA node as the GPU device.
The added logs show the virtual core and its NUMA node where the process thread is running, right before the memcpy execution. This information is gathered using Linux’s getcpu(2) system call, immediately after the CPU affinity is set.
After mapping the device’s IDs to their corresponding NUMA nodes on the host, it becomes clear that the four higher-performing GPUs were accessed from CPU cores within the same NUMA node, while the lower-performing ones were accessed from the opposite node.
For workloads that use similar logic, the lack of NUMA awareness leads to two issues:
- There’s no reliable information available to assign optimal CPU affinity.
- Worse, the system might assign threads to the wrong NUMA node by default, resulting in a worst-case scenario for the affected device.
As a result, we observed a bandwidth drop of approximately 19% on devices with non-optimal affinity, as seen in the figure below.

This figure illustrates a comparison of the average bandwidth between four GPUs with optimal affinity (data transfer within the same NUMA node) and four GPUs with non-optimal affinity (cross-NUMA data transfer).
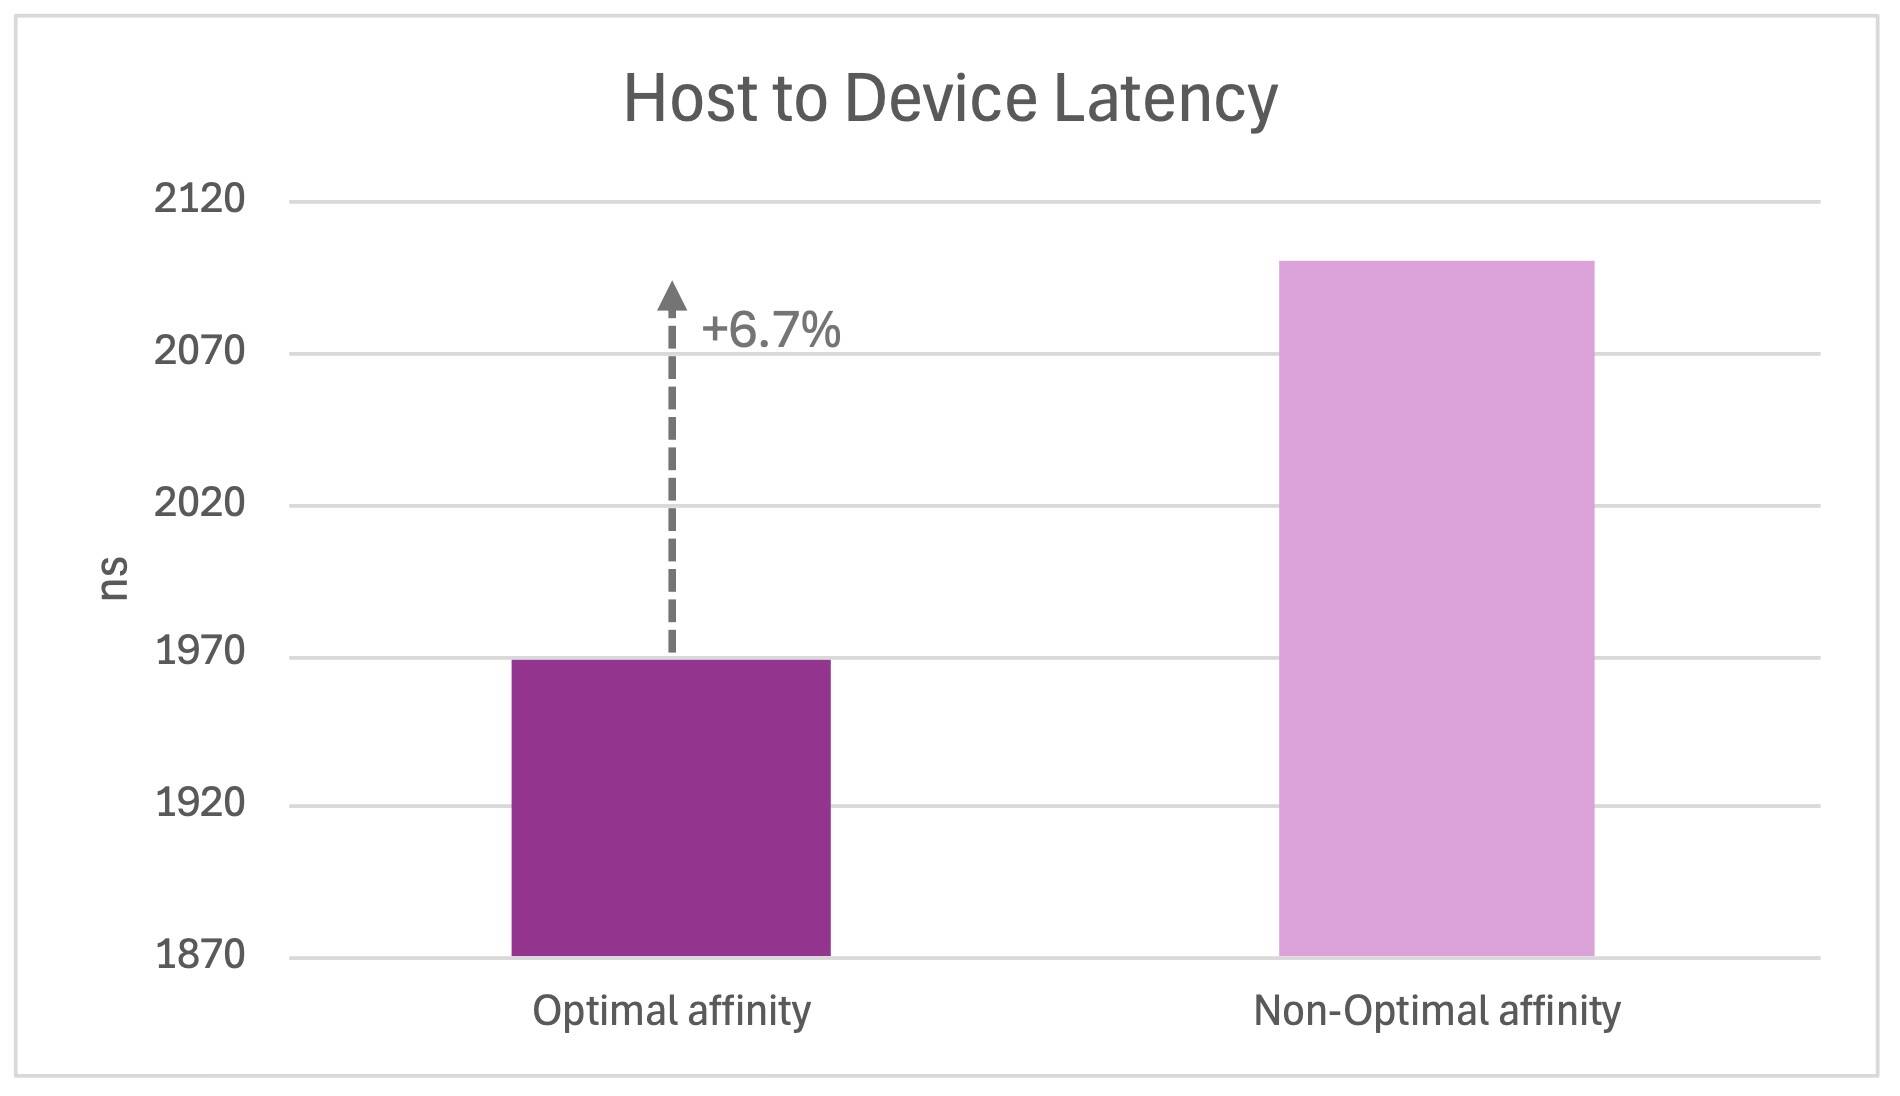
The same pattern appears in the host-to-device-latency benchmarks. The affected GPUs showed approximately a 6.7% increase in latency.
Our solution
To overcome this issue, we need to expose the NUMA node of each GPU device to the virtual machine. This requires customizing the XML configuration that KubeVirt generates.
Let’s return to the original VM topology. All passthrough GPU devices were attached directly to the PCIe root complex, which has no NUMA association. To fix this, we’ll insert an intermediary, a PCI controller using the pcie-expander-bus mode, which can be used with x86_64/q35 guests.
Unlike the PCIe root complex, the pcie-expander-bus can be associated with a NUMA node. With this addition, we can update KubeVirt’s generated XML to reflect the correct topology. You can retrieve the KubeVirt-generated VM’s XML using virsh dumpxml.
To do so, exec into the pod and follow these steps:
virsh list # get the vm’s name
virsh dumpxml <vm-name>
The following snippet shows this new XML element used in our configuration:
<controller type='pci' index='1' model='pcie-expander-bus'>
<model name='pxb-pcie'/>
<target busNr='252'>
    <node>0</node>
</target>
<alias name='pci.1'/>
<address type='pci' domain='0x0000' bus='0x00' slot='0x0a' function='0x0'/>
</controller>
The busNr attribute should be configured carefully, as it defines the bus number of the new expander bus. All bus numbers from the specified value up to 254 will be reserved for assignment to PCI/PCIe controllers within the hierarchy that begins at this expander bus. Bus numbers lower than the specified value will be available to the expander bus lower in the hierarchy. You can read more about it on the libvert site.
So, in our example, the next PCIe expander bus is defined as follows:
<controller type='pci' index='2' model='pcie-expander-bus'>
<model name='pxb-pcie'/>
<target busNr='248'>
     <node>0</node>
</target>
<alias name='pci.2'/>
<address type='pci' domain='0x0000' bus='0x00' slot='0x07' function='0x0'/>
</controller>
In the same way, we defined additional PCIe expander buses for the second NUMA node.
Within this setup, passthrough devices are routed through pcie-root-port controllers, which are attached to the pxb (PCIe expander bus). The pxb itself is then linked to the PCIe root complex.
In the XML, those components would be defined as follows:
</controller>
<controller type='pci' index='0' model='pcie-root'>
<alias name='pcie.0'/>
</controller>

<controller type='pci' index='1' model='pcie-expander-bus'>
<model name='pxb-pcie'/>
<target busNr='252'>
       <node>0</node>
</target>
<alias name='pci.1'/>
<!-- mapped to pcie-root (index 0) -->
<address type='pci' domain='0x0000' bus='0x00' slot='0x0a' function='0x0'/>
</controller>

<controller type='pci' index='5' model='pcie-root-port'>
<model name='pcie-root-port'/>
<target chassis='5' port='0x10'/>
<alias name='pci.5'/>
<!-- mapped to pxb at index 1-->
<address type='pci' domain='0x0000' bus='0x01' slot='0x00' function='0x0'/>
</controller>

<!-- NVIDIA Corporation GA100 [A100 SXM4 40GB] -->
<hostdev mode='subsystem' type='pci' managed='no'>
<driver name='vfio'/>
<source>
       <address domain='0x0000' bus='0x07' slot='0x00' function='0x0'/>
</source>
<alias name='ua-hostdevice-a1005'/>
<!-- mapped to pcie-root-port at index 5-->
<address type='pci' domain='0x0000' bus='0x05' slot='0x00' function='0x0'/>
</hostdev>
You can repeat the steps above to assign additional devices.
The following diagram shows the updated topology.
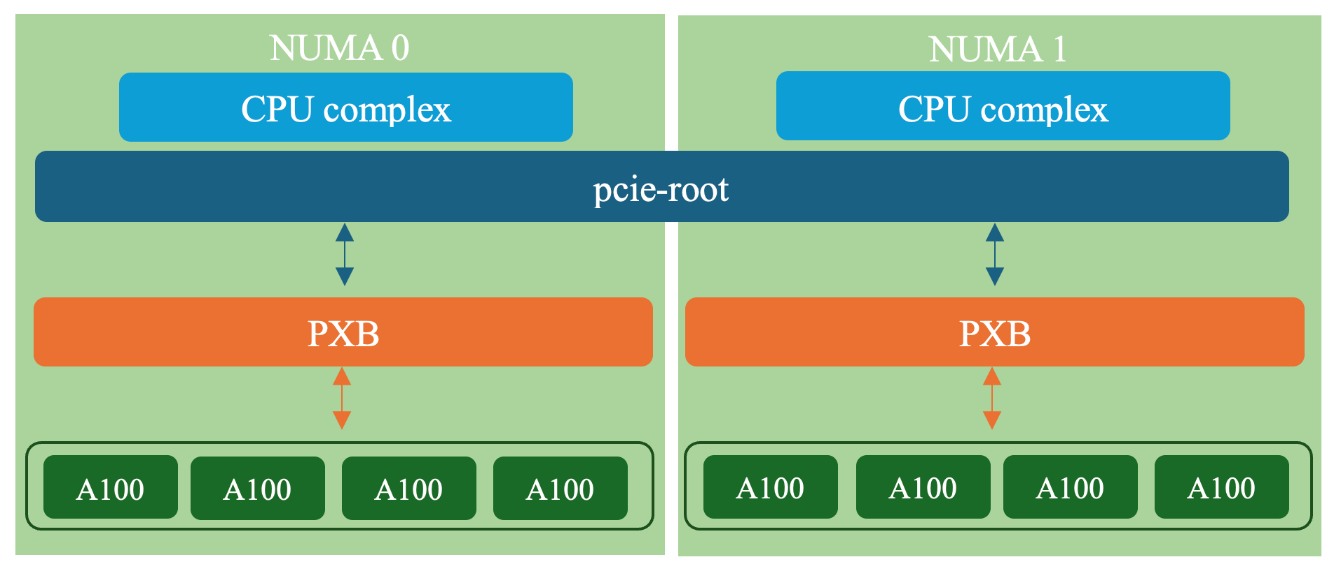
The GPUs are routed to the PXB via a pcie-root-port controller.
The next challenge is injecting our newly configured XML into libvirt, replacing the original one. One way to achieve this is by using a sidecar container.
A KubeVirt sidecar container is a secondary container that runs alongside the main application container within the same pod. It communicates with the main container over a socket using the gRPC protocol. KubeVirt includes an option for a sidecar hook, which is used to apply customizations before the VM is initialized. We can use this feature to our advantage to modify the XML before it is passed to QEMU.
KubeVirt provides good documentation on how to use a sidecar. As an additional illustration, we’ll briefly go through the process using our example scenario.
Before diving into the technical aspects of this step, let’s first get a general idea of how this feature works. The sidecar container is intended to intervene in libvirt’s VM launch process, giving users the opportunity to inject custom logic during the VM startup. KubeVirt enables this by providing hooks, including the onDefineDomain hook and a predefined container image called sidecar-shim-image. This image is used by default when no other image is specified.
The sidecar-shim-image contains a binary named sidecar-shim, which serves as the container’s entry point and is built using sidecar_shim.go. This binary searches the container’s $PATH for executables that match the specified hook name. If a match is found, it executes the corresponding executable with the required arguments, which depend on the hook and must be provided by the user.
In our case, we’ll use the onDefineDomain hook with a shell script.
Let’s see how it’s done.
First, activate the sidecarfeatureGate. Assuming you already have KubeVirt preinstalled, enable the sidecar featureGate in the KubeVirt resource as follows:
kubectl edit kubevirt kubevirt -n kubevirt

... spec:
configuration:
        developerConfiguration:
            featureGates:
                - Sidecar
Note that the name of the featureGate is case sensitive.
You can achieve the same result in other ways, as described in the KubeVirt user guide.
If you’re using the OpenShift Container Native Virtualization environment, the activation can be achieved by updating the HyperConverged CR (or in any case when your cluster is set up with this operator). The hyperconverged operator is a wrapper for multiple operators, including KubeVirt, and serves as a single-entry point for their configuration. This enables users to manage all included components through a single object. When using the hyperconverged operator, you cannot configure the CRs of the individual wrapped components directly. Instead, all configurations must be done through the HyperConverged resource.
So, if your cluster uses this setup, make sure to activate the feature appropriately.
kubectl annotate --overwrite -n openshift-cnv hco kubevirt-hyperconverged kubevirt.kubevirt.io/jsonpatch='[{"op": "add", "path": "/spec/configuration/developerConfiguration/featureGates/-", "value": "Sidecar"}]'
Next, create a ConfigMap using a shell script. The arguments of the onDefineDomain hook are the VMI information as a JSON string, and the current domain XML. It outputs the modified domain XML to the standard output.
Our script, then, will be simple: It will save the original domain XML (argument $4) in a temporary file and then output the modified domain XML to the standard output, after updating the VM’s UUID to match the current one.
Here’s a snippet of the ConfigMap with the script:
apiVersion: v1
kind: ConfigMap
metadata:
name: my-cm
data:
my_script.sh: |
#!/bin/sh

input_xml=`mktemp`
echo $4 > $input_xml

optimized_xml= `mktemp`

# Output the configured domain XML in tmp file
echo "<domain type='kvm' id='1'>

...

</domain>" > $optimized_xml

# Grep the lines containing the uuid and extract the uuid
old_uid=$(grep 'kubevirt-private' "$optimized_xml" | sed -n 's|.*kubevirt-private/\([^/]*\)/virt-[^"]*|\1|p' | head -n1)

# The inputted XML is given as one line, so we can simply retrieve the uuid
new_uid=`sed 's/.*kubevirt-private\/\(.*\)\/virt-serial0.*/\1/' $input_xml`

sed -i "s/$old_uid/$new_uid/g" $optimized_xml

cat $optimized_xml
Lastly, create a VM yaml containing the annotation hooks.kubevirt.io/hookSidecars and the ConfigMap information:
annotations:
        hooks.kubevirt.io/hookSidecars: '[{"args": ["--version", "v1alpha2"], "configMap":
          {"name": "my-cm","key": "my_script.sh", "hookPath": "/usr/bin/onDefineDomain"}}]'
You can now start your virtual machine as usual and enjoy the magic!
Now, let’s examine the benchmark results of our virtual machine with the updated XML.
We would expect to see all eight GPUs perform at their maximum capabilities, and this is exactly what happens:
Running host_to_device_memcpy_ce.
Thread of device 0 running on CPU: 199, NUMA node: 1
Thread of device 1 running on CPU: 199, NUMA node: 1
Thread of device 2 running on CPU: 199, NUMA node: 1
Thread of device 3 running on CPU: 199, NUMA node: 1
Thread of device 4 running on CPU: 1, NUMA node: 0
Thread of device 5 running on CPU: 1, NUMA node: 0
Thread of device 6 running on CPU: 1, NUMA node: 0
Thread of device 7 running on CPU: 1, NUMA node: 0
memcpy CE CPU(row) -> GPU(column) bandwidth (GB/s)
           0         1         2         3         4         5         6         7
 0     15.60     15.64     15.75     15.58     15.39     15.39     14.76     15.40
We also observe, with the help of the logs, that CPU affinity performs as expected. After mapping the device ID to the corresponding host device, the logs show that the thread runs on the same NUMA node where the device is located.
The same behavior repeats itself in the host-to-device latency test.
Summary
In this article, we demonstrated how aligning GPUs with their corresponding NUMA nodes can improve performance in GPU-related tasks. Through benchmarking, we explored the performance gap caused by mismatched topology.
To address this, we introduced a solution to enable NUMA-aware GPU assignment in KubeVirt by updating the virtual machine’s XML.
Beyond the solution discussed in this article, ongoing work in the KubeVirt project aims to include the pcie-expander-bus controller in the VM XML generation process itself. This is intended to enable native support for associating GPU devices with their corresponding NUMA nodes.
I hope you found this exploration helpful. Thanks for reading, until next time!
Acknowledgements
I would like to thank Andrey Oderenko, Effi Ofer, Ezra Silvera, Michal Malka, and Omer Paz for their time, expertise, ideas, and review of this work.