About cookies on this site Our websites require some cookies to function properly (required). In addition, other cookies may be used with your consent to analyze site usage, improve the user experience and for advertising. For more information, please review your options. By visiting our website, you agree to our processing of information as described in IBM’sprivacy statement. To provide a smooth navigation, your cookie preferences will be shared across the IBM web domains listed here.
Tutorial
Get started with IBM EASeJ
Learn how to build, deploy and run Java applications in the Cloud using IBM Enterprise Application Service for Java (EASeJ)
On this page
The goal of this tutorial is to quickly help you learn the core concepts of Enterprise Application Service for Java (EASeJ). This tutorial is designed to be used with a newly provisioned Trial instance of EASeJ, and should take no more than 30 minutes to complete.
What is Enterprise Application Service for Java?
Enterprise Application Service for Java (EASeJ, pronounced “easy jay”) is a fully managed application platform, available as a service on IBM Cloud and AWS. It provides everything that you need to build, deploy, and run Java applications. EASeJ removes the burden from enterprise teams of managing middleware and infrastructure. It includes tooling to automate key migration steps, which simplify moving to the cloud.
EASeJ uses the Liberty runtime to run applications. Liberty is a modern lightweight runtime that is designed to run monoliths and microservices, and also be the best target for modernizing traditional enterprise Java applications. For more information, watch this short video that highlights the benefits of Liberty.
How EASeJ works
EASeJ provides built-in build (CI) and deploy (CD) pipelines that are driven by changes to source and configuration repositories (currently GitHub repositories, but other types might be added in the future). The flow is illustrated in the following diagram.
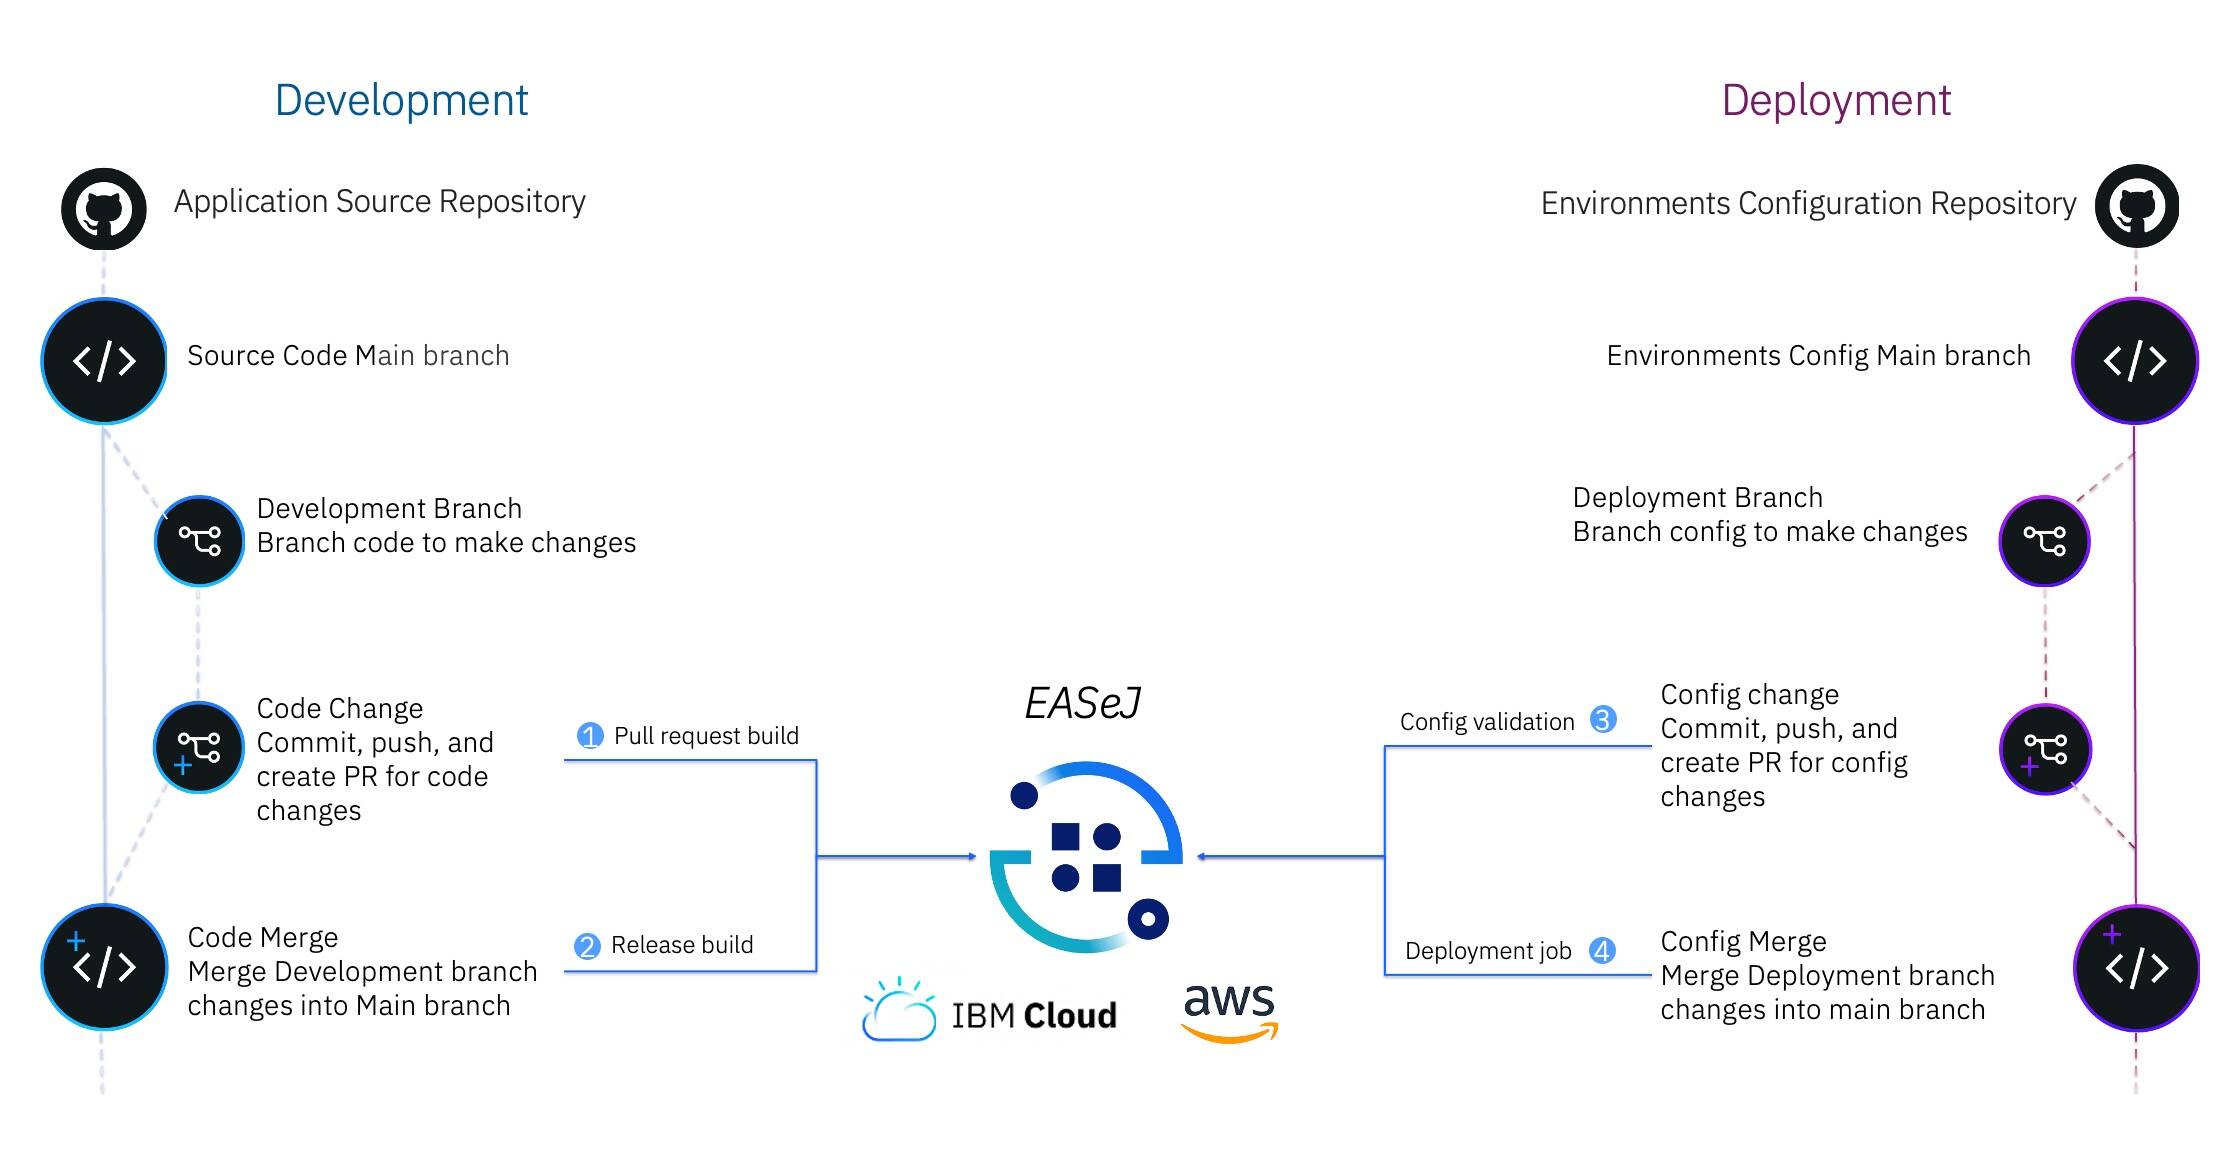
Development flow. The source repository contains the application source code. A developer makes changes to the code in a Git branch and tests them locally. When they’re happy with the changes they deliver them in a pull request, which causes EASeJ to run a pull request build (1). The purpose of this build is to validate that the changes also build and pass the tests in EASeJ. The developer then gets a team member to review the pull request and pull request build output. If they’re happy, they merge the pull request into the main branch, which causes EASeJ to run a Release build (2). The output of a successful release build is a release of the application that can be deployed and run.
Deployment flow. The configuration repository contains the application deployment configuration. A person responsible for deployments, such as an application SRE (Site Reliability Engineer), makes changes to the configuration in a Git branch and delivers them in a pull request, which causes EASeJ to run a Config Validation build (3). The purpose of this build is to validate that the configuration is correct (for example, it references a known good release build). A second team member would review the pull request and config validation build output. Then, if they’re happy, they would merge the pull request into the main branch, which causes EASeJ to run a Deployment job (4). The deployment job updates the deployment in either the Staging or the Production environment, depending on which configuration files were changed.
Getting a Trial EASeJ instance
The EASeJ Trial is available from the EASeJ AWS Marketplace listing. From there, you can choose the “Try for free” option to request and set up your free trial.
To use the trial, you need a public GitHub account, which you can sign up for one at no charge.
At the end of the setup for your trial, you should have an EASeJ service instance configured with source and configuration GitHub repositories that include source code for a sample application and some initial deployment configuration.
Steps
In this tutorial, you will deliver an update to the sample application that was provided in the trial setup. You will perform the four steps that are outlined in the “How EASeJ Works” section and includes:
- Making a code change and creating a pull request to run a pull request build that builds and tests the change in EASeJ
- Merging the pull-request to run a Release build that builds and tests the new code in the main branch and creates a new release.
- Making a configuration change to deploy the release to Staging, and creating a pull-request to run a Config validation build to validate the configuration change in EASeJ
- Merging the pull-request to run a Deployment job to deploy the new release to the Staging environment.
First, though, you should familiarize yourself with the intuitive, browser-based user interface, which helps you perform actions and monitor your application delivery and status. To familiarize yourself with the EASeJ UI, watch this short video:
Step 1: Make an application change and create a pull request
You will begin by updating the sample application.
Liberty, and therefore EASeJ, has a great developer experience that is based around the Liberty Tools and Dev Mode. These tools enable you to do rapid local development and testing before you commit code into GitHub for sharing with your team. However, to keep this tutorial short, you’re going to make changes directly in GitHub.
On your EASeJ trial instance Dashboard, locate the GitHub configuration, and click the link for the source repository.

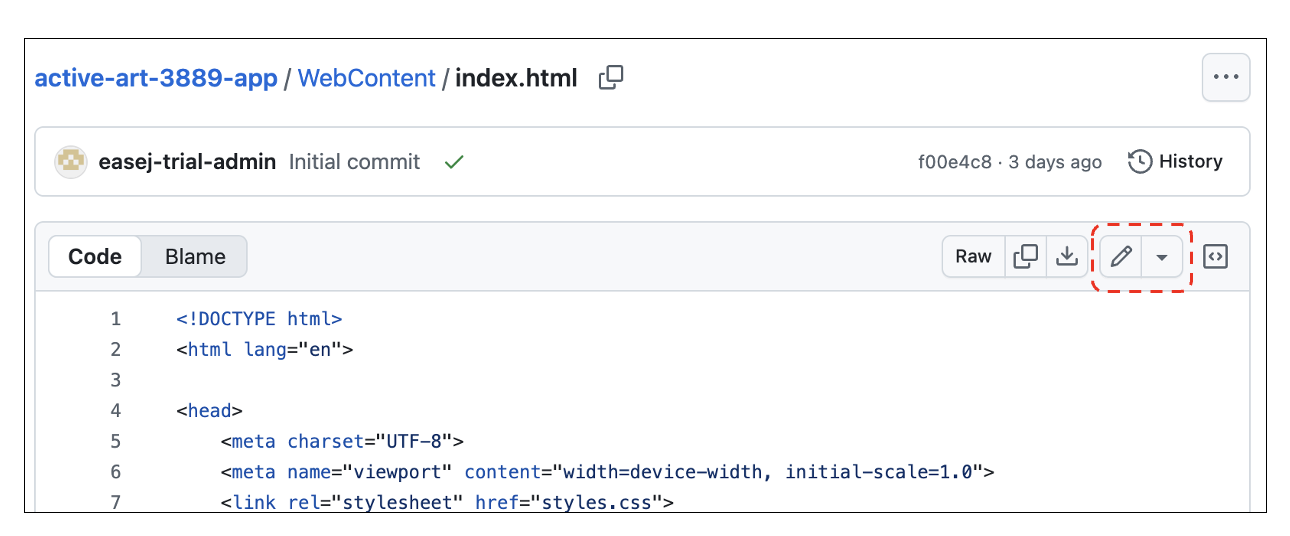
The GitHub UI opens in your browser. In the GitHub UI, click WebContent and then the index.html file.
Click the pencil icon to edit the index.html file.
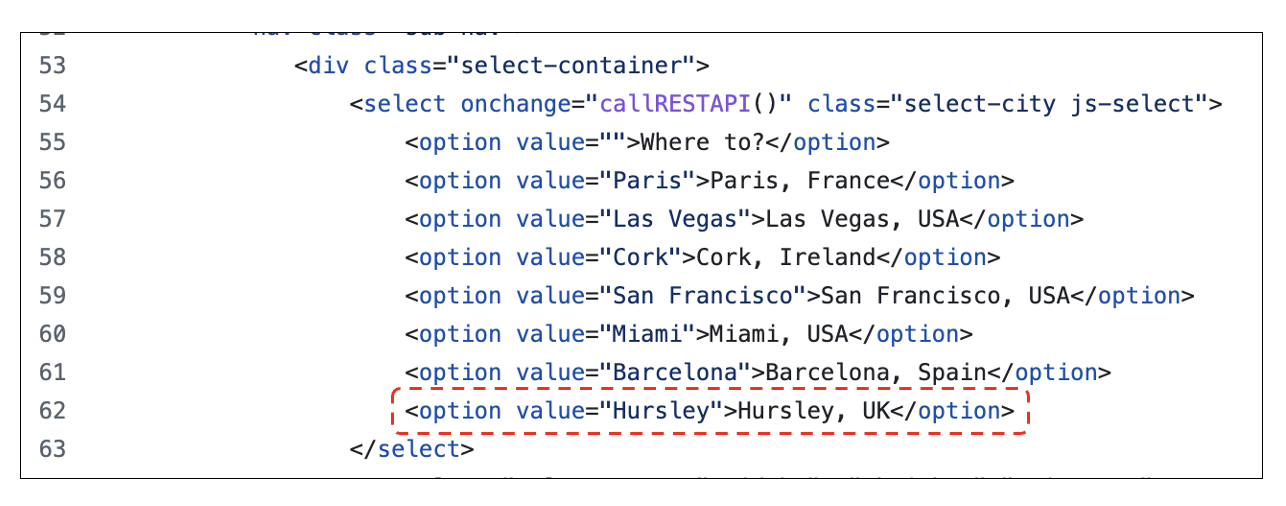
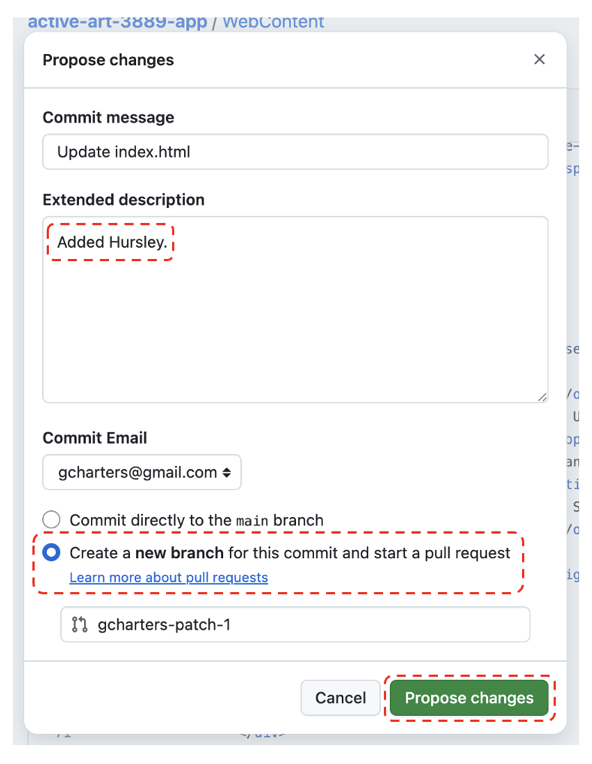
Locate the city selections in the file around line 60 and add a new destination, for example, “Hursley.”
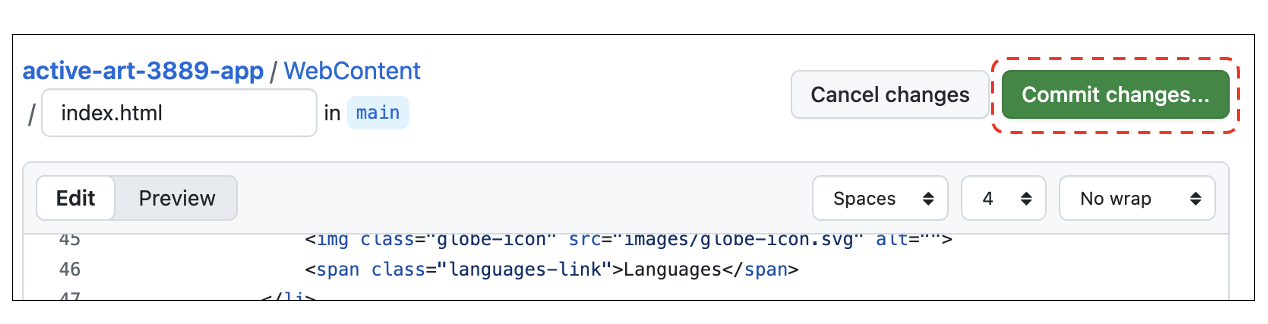
When you’re happy with the change, click the Commit changes button.
In the dialog that opens for you to configure the commit, give the commit a useful description, such as “Added Hursley.”. You want the change to be made in a branch so it can be tested outside the main code branch, so select the option to Create a new branch, and then click Propose changes.
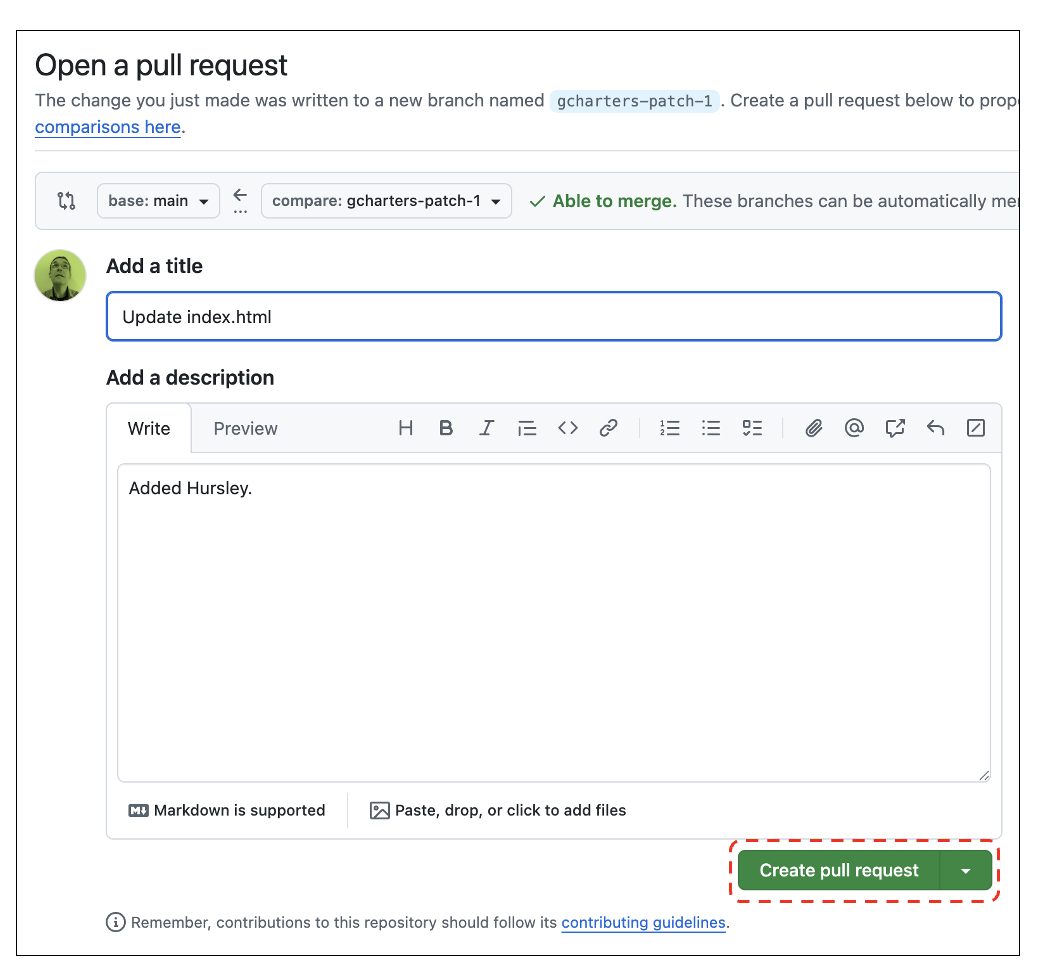
In the Open a pull request page, click Create pull request to create the pull request.
Keep the GitHub browser tab open so that you can easily merge the pull request in the next part of the tutorial.
To view the pull-request build, in your trial EASeJ instance UI, select the hamburger menu in the top left to open the side menu. From this menu, click the Pull request builds menu option.
If you don’t have the UI open from when you set up your instance, look for an email from “IBM SaaS” which will include a link that you can use to get to the EASeJ UI using the IBM SaaS Console.
The pull-request builds page opens, which lists all pull requests. There’s only one because this is a new service instance. The build might be in progress or completed.
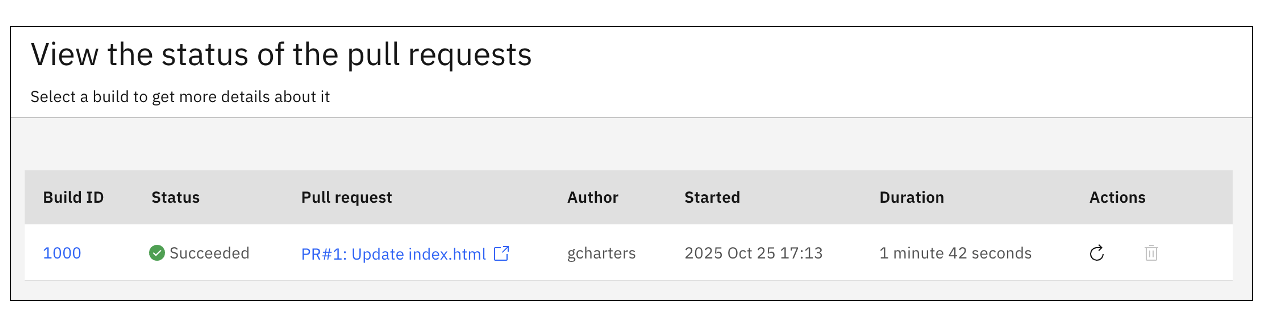
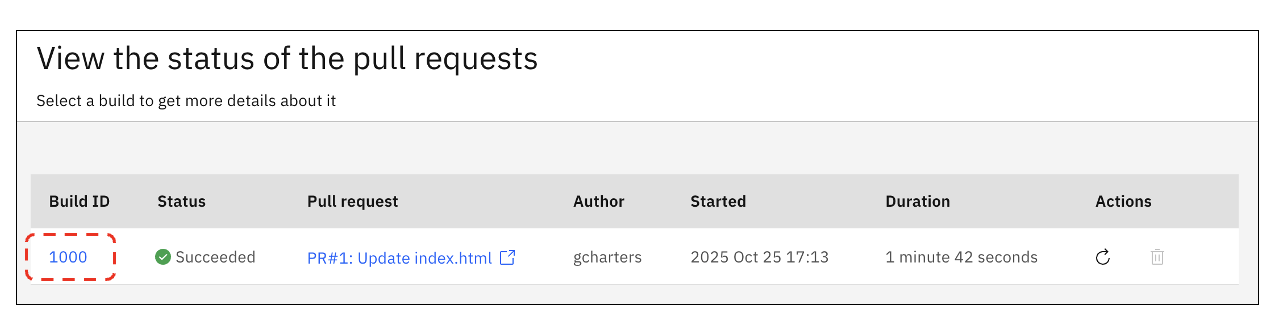
Click the “1000” build ID to open the details page for the pull-request build.
When the build is completed you'll be able to view the logs, tests results, and downloads. You should see that 10 tests were run, and that 9 passed and 1 was skipped.
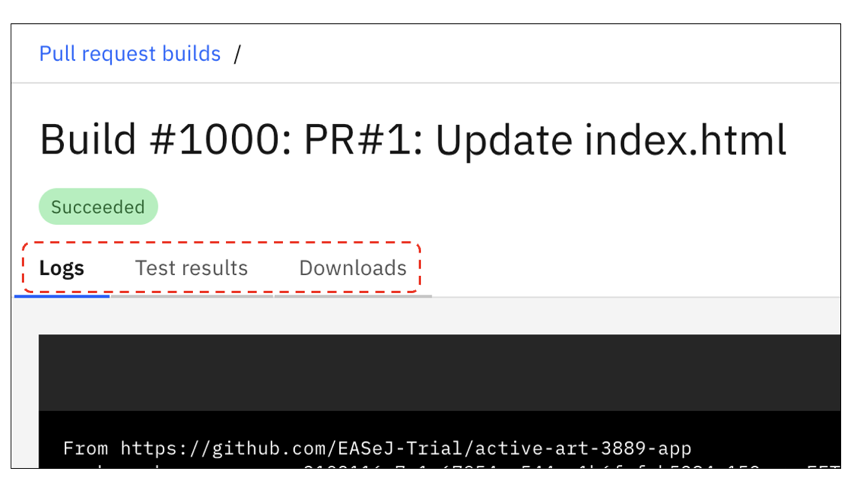
Click IBM Enterprise Application Service for Java at the top of the page to go back to the EASeJ Dashboard.
Step 2: Merge pull-request to deliver, build, and test change
Your code changes built and passed the tests in EASeJ so it's time to merge the pull request into the main code branch. A developer would typically get a peer or team lead to review the pull request and merge it, but in this tutorial, you'll merge your own pull request.
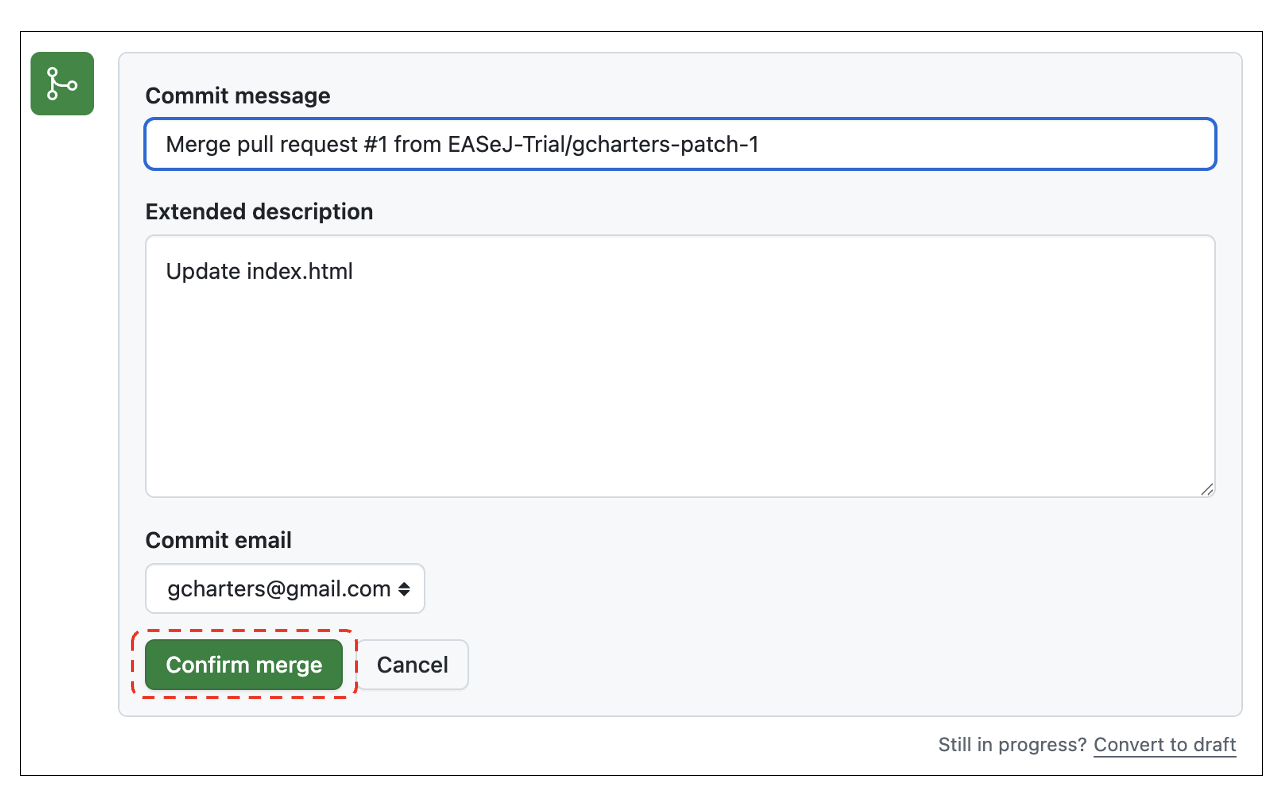
In the GitHub browser tab, you’ll see that the EASeJ build completed successfully. Click the Merge pull request button.

Then, click Confirm merge.
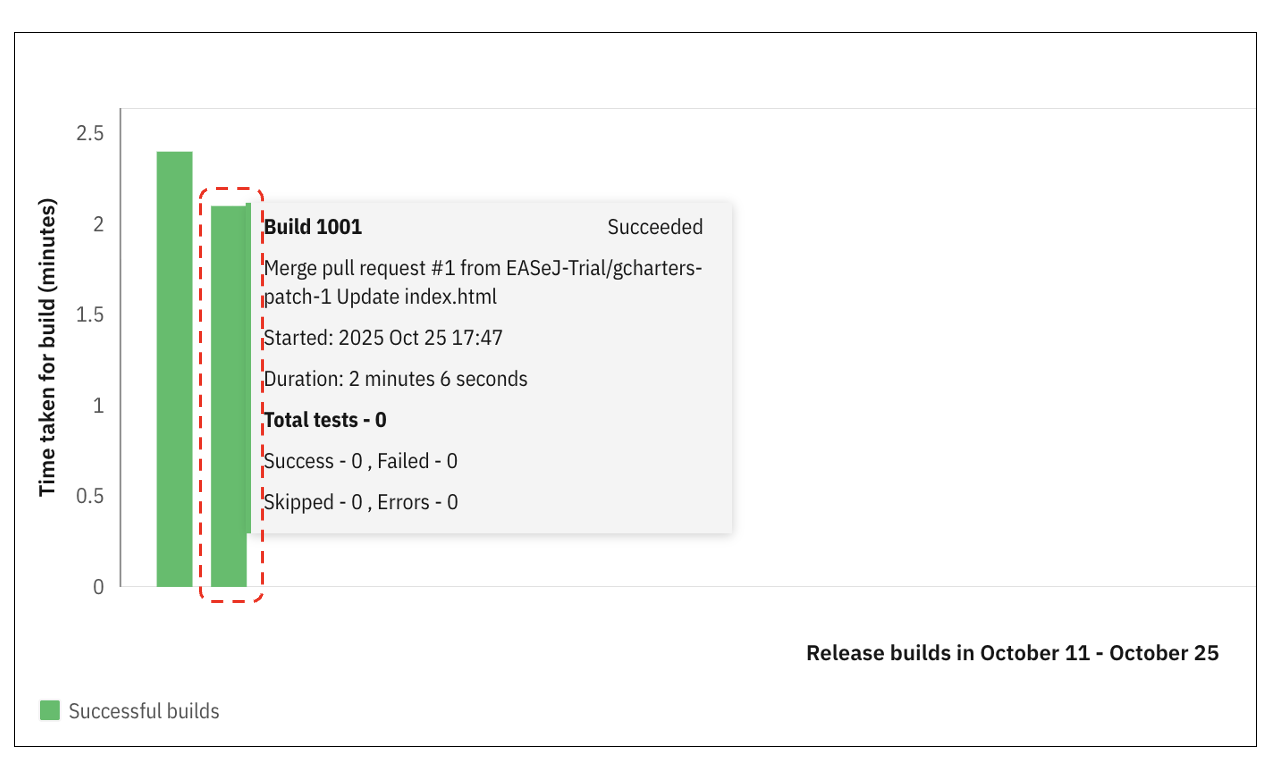
In the EASeJ Dashboard, scroll down to the Release Build section, and you should see a blue or green bar corresponding to the new build. You can hover over it to see the details.
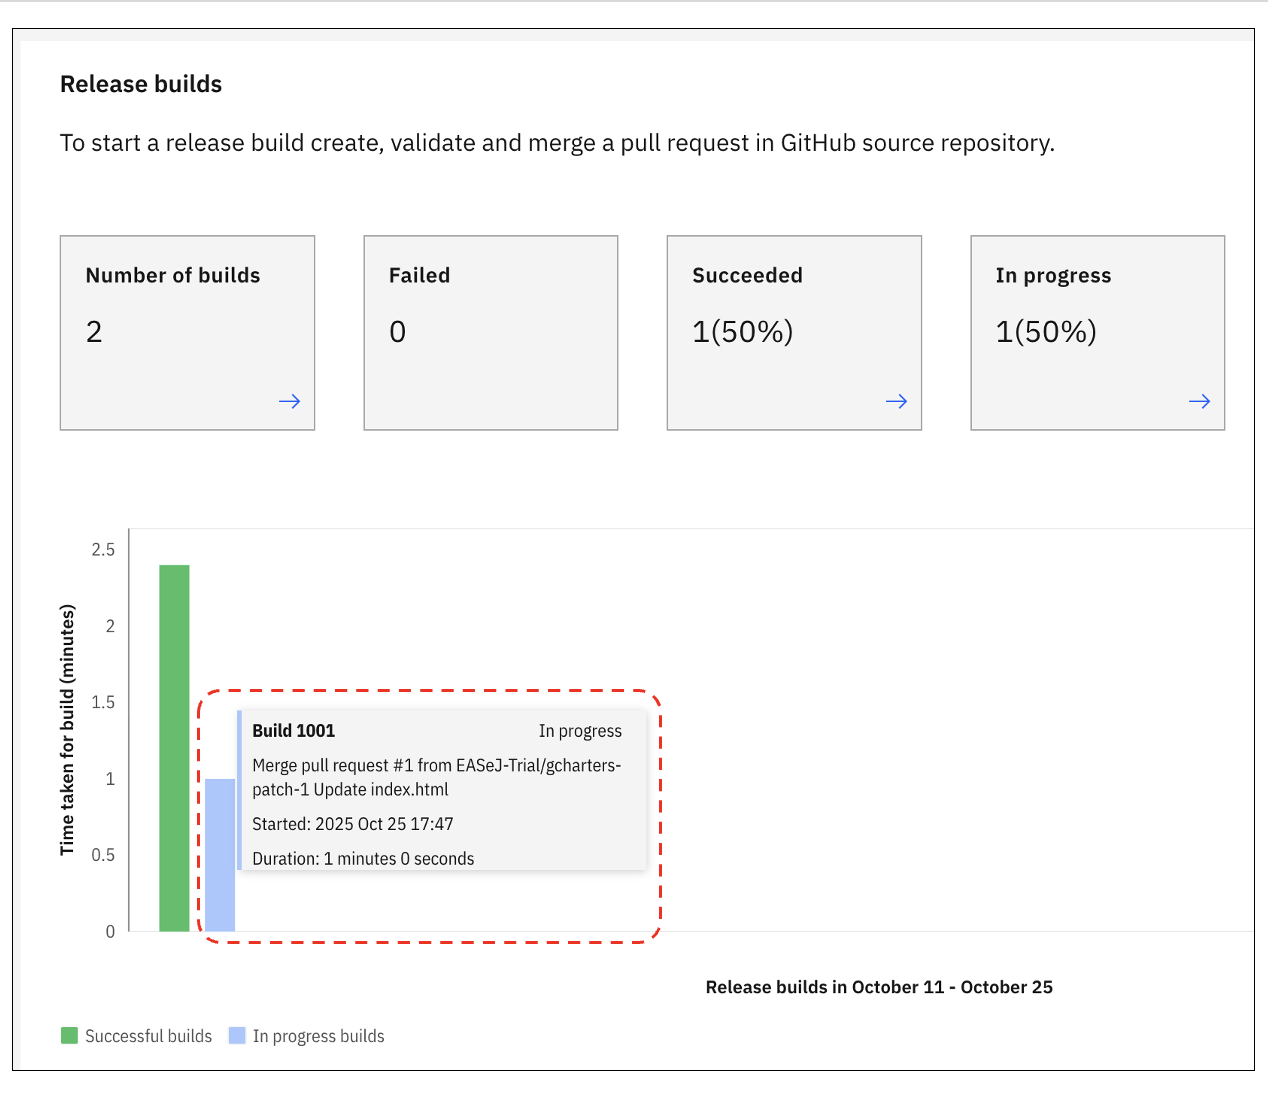
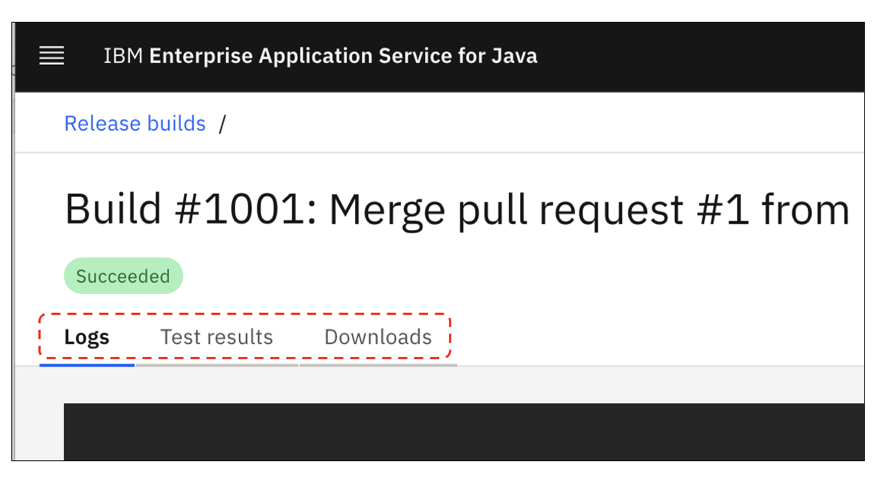
Click the Release Build bar to view the details. When the build is complete, you can view the logs, test results, and downloads. Release builds have more artifacts available than pull-request builds, including an SLSA provenance file that describes the application’s Bill of Materials (BOM). SLSA provenance files are useful when you need to determine whether the application is affected by a supply-chain injection attack.
You've successfully contributed an update to the application. Next, you'll deploy the new release build to the EASeJ Staging environment to verify that it's all working and ready for Production. EASeJ comes with built-in Staging and Production environments where the application is deployed and run.
Step 3: Update Staging deployment configuration and create a pull request
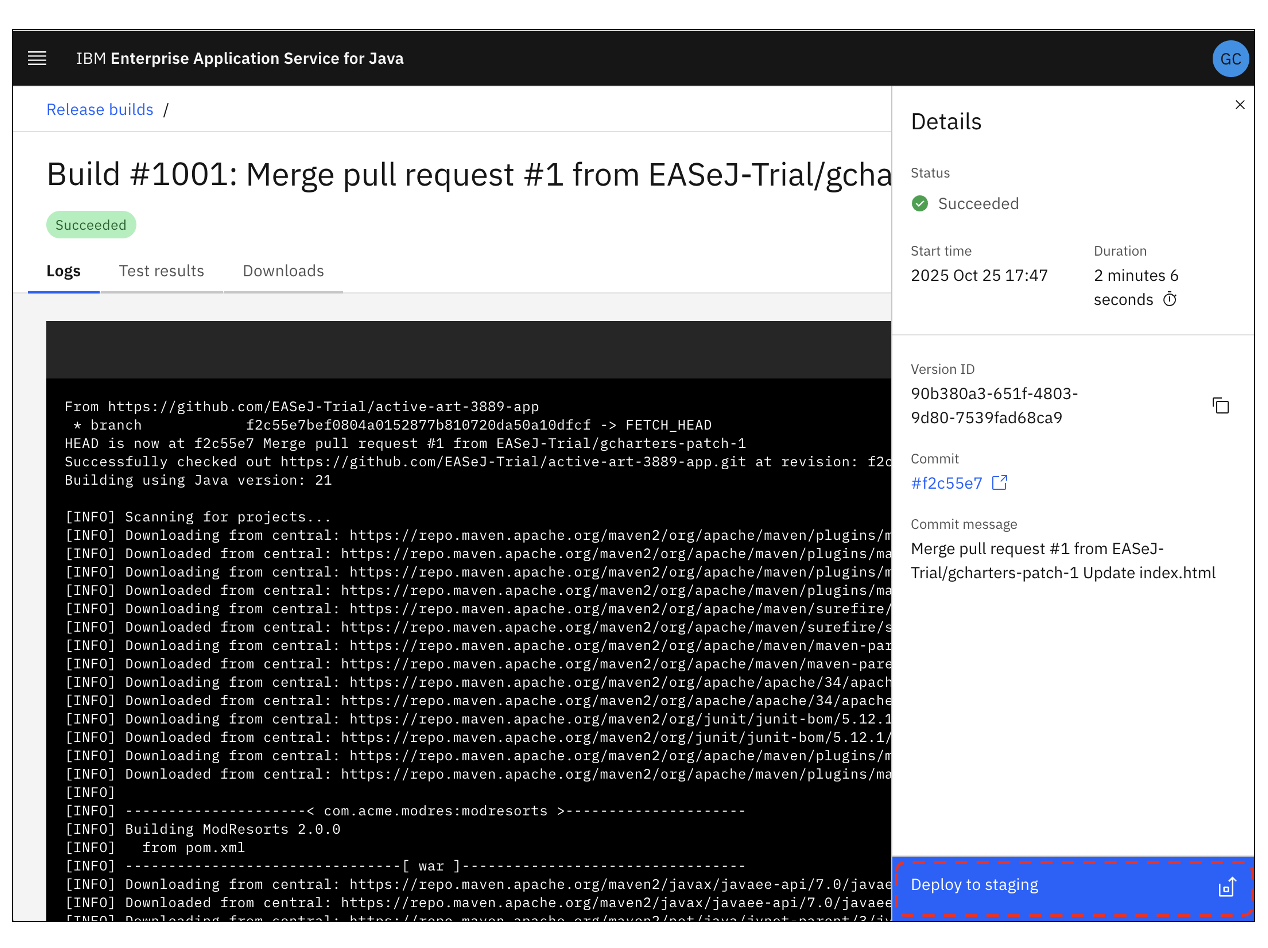
To deploy to Staging, you need to set the version number in a staging environment.yaml file to the version ID of the Release build to be deployed. In the EASeJ Dashboard UI, scroll down to the Release Builds tile, and select the right-most release build. This release build is the one that was run when you merged your pull-request. A release build details page for the release build will open.
On the release build details page, click Deploy to staging.
A tear-sheet will display instructions on how to deploy the release to staging. EASeJ doesn't have write access to the GitHub repositories because many users would not allow this, and so the steps explain how a user can do this using their GitHub ID. The first step is to copy the version ID. Use the copy icon to do this. The instruction conveniently includes a link to the Staging environment.yaml so after you’ve copied the version ID, click the Staging environment.yaml link.
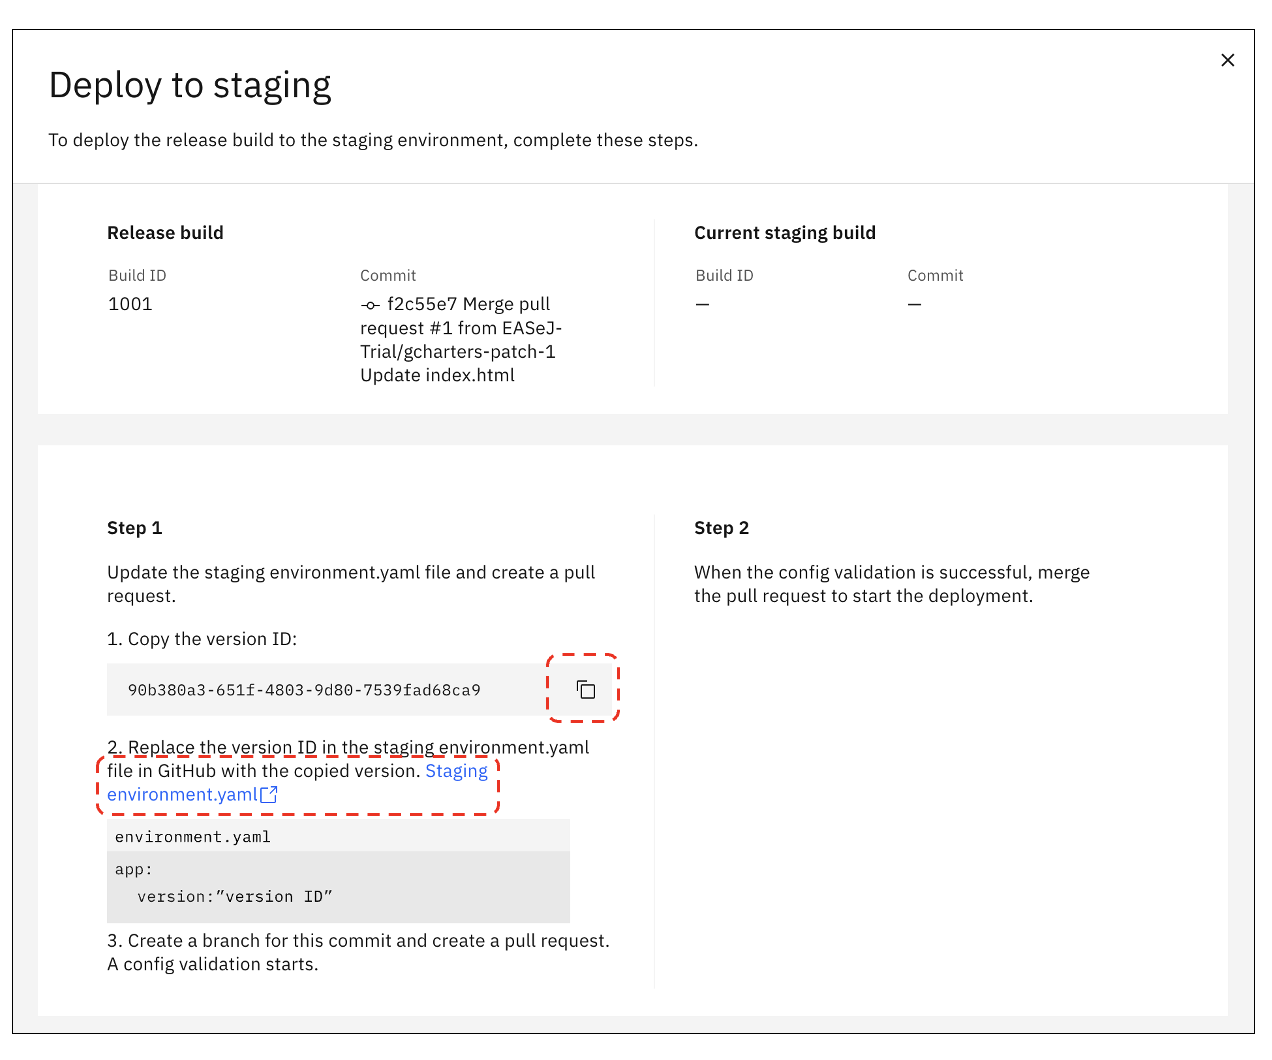
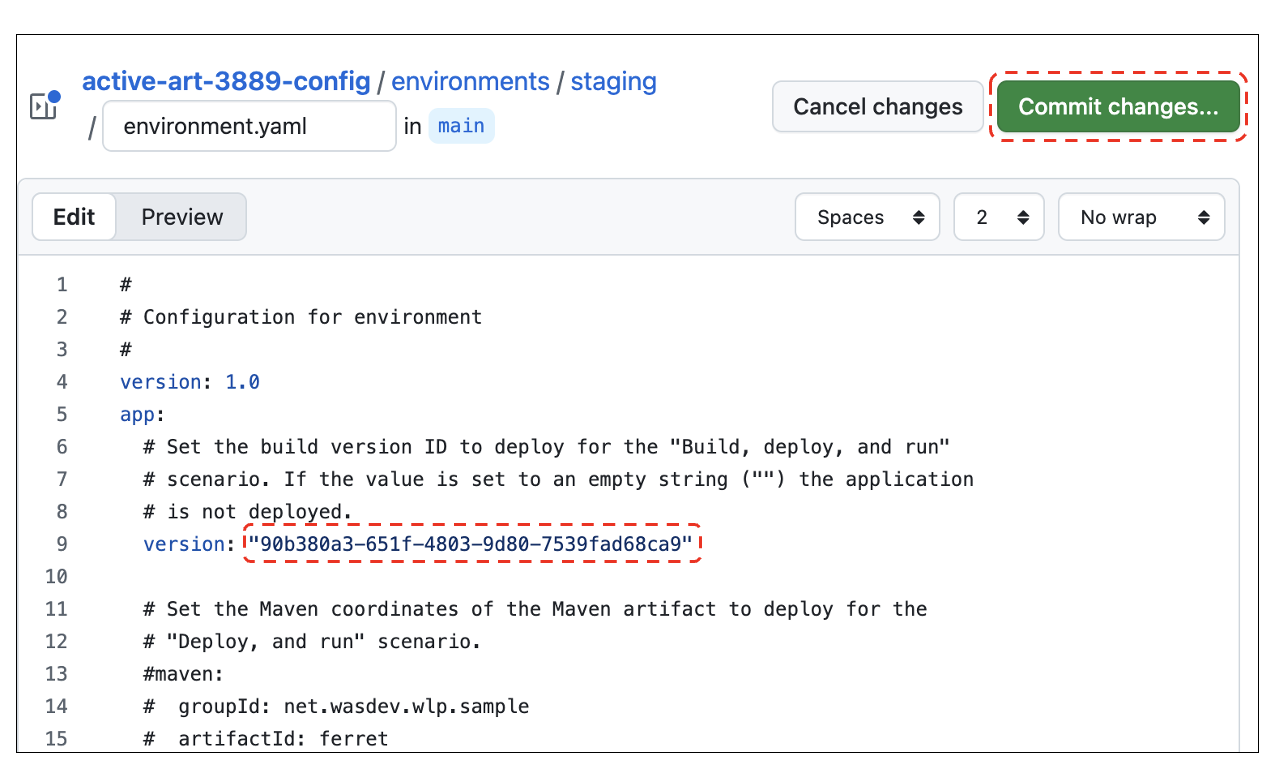
The Staging environment.yaml file is opened and is ready for editing. Paste the version ID that you copied between the empty quotes, and then click Commit changes.
A dialog opens for you to configure the commit. Give the commit a useful description, such as “Deploy
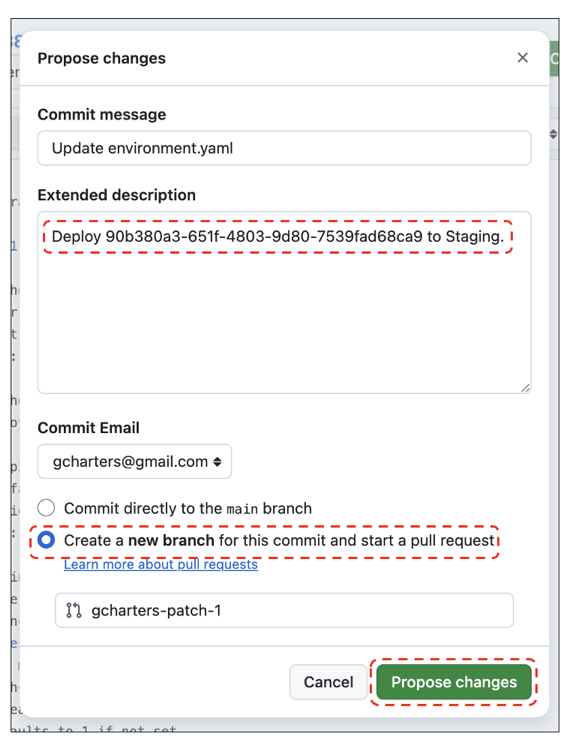
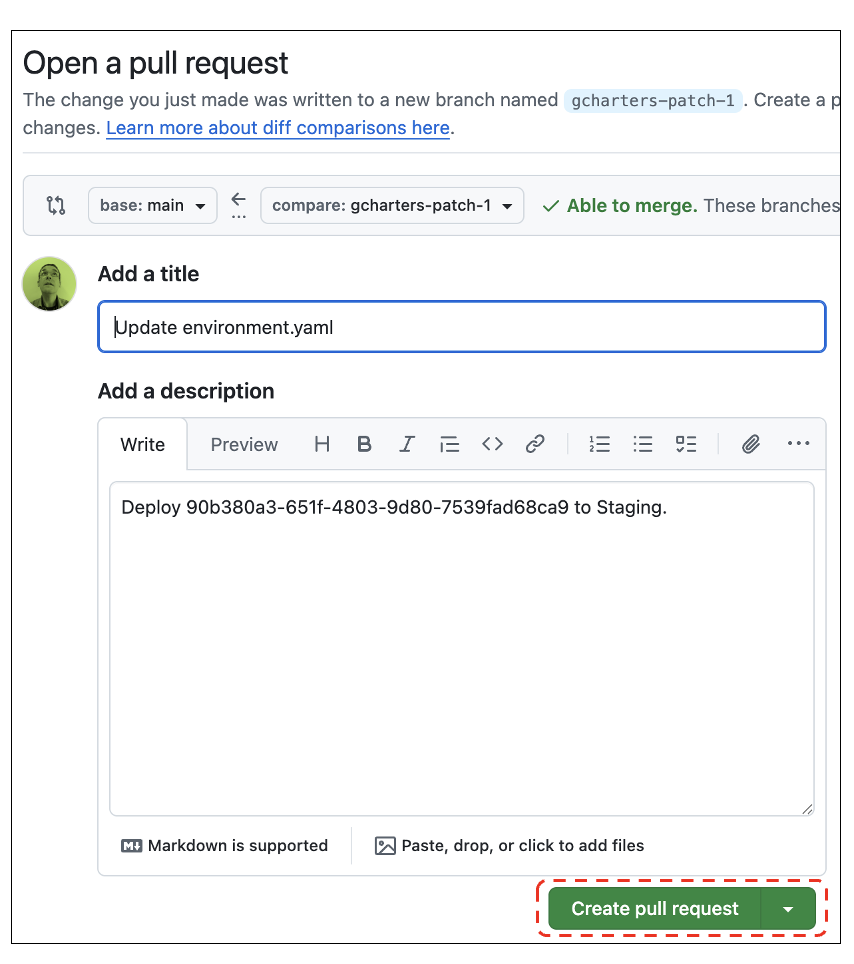
In the Open a pull request page, click Create pull request to create the pull request.
Keep the GitHub browser tab open, as this will make it easier to merge the pull request in the next part of the tutorial.
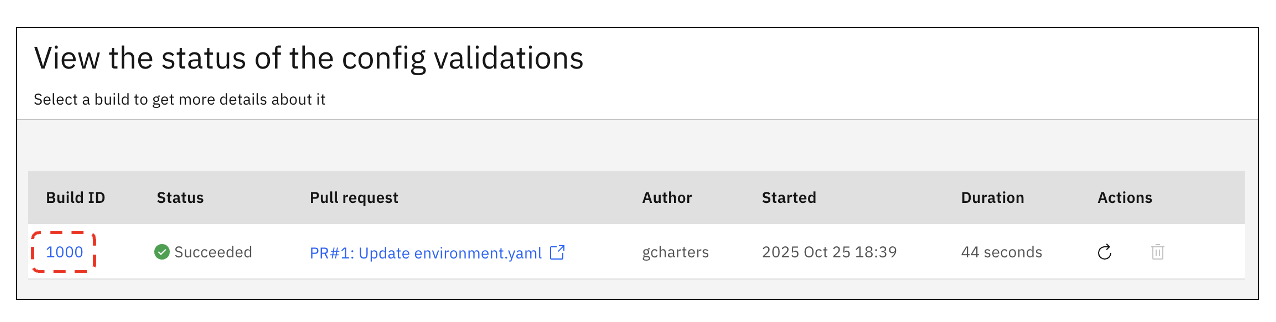
The new pull request is picked up by EASeJ, which then runs a Config validation build. In the EASeJ UI, click the hamburger menu, and then click the Config validations menu option.
You will see a config validation build summary. You can click on the build ID “1000” to view details.
Step 4: Merge the pull request to deploy the change to Staging
You've successfully contributed the configuration update. Next, it will be merged into the main branch to start the Staging deployment. As with the source pull-request merge, this step would normally be done by a peer or team lead to approve and merge the change, but in this tutorial, you will do this.
In the GitHub browser tab, you’ll see that the EASeJ build completed successfully. Click the Merge pull request button.
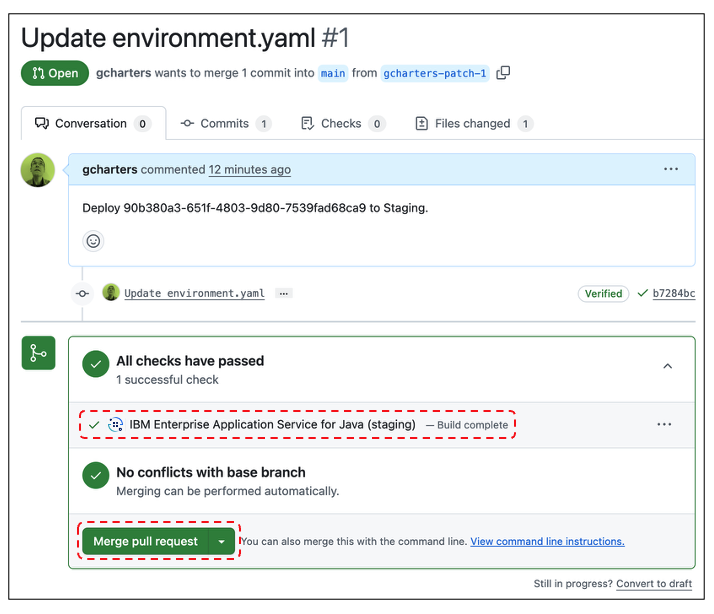
Then, click Confirm merge.

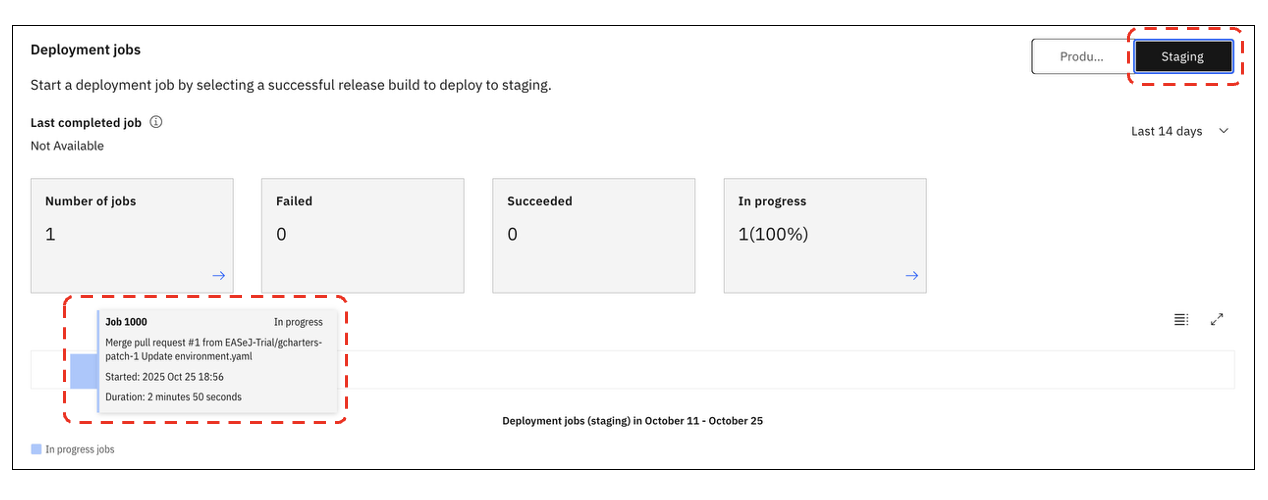
To view the deployment job, go to the EASeJ Dashboard UI and scroll down to Deployment jobs. Select the Staging option to see a summary of staging deployments. A blue bar indicates a deployment in progress, and a green bar indicates a completed deployment. You can hover over the bar to see a summary and click the bar to view details.
Once the deployment job has completed, scroll up in the EASeJ Dashboard UI to view the environments. You will see that the application is running in staging.
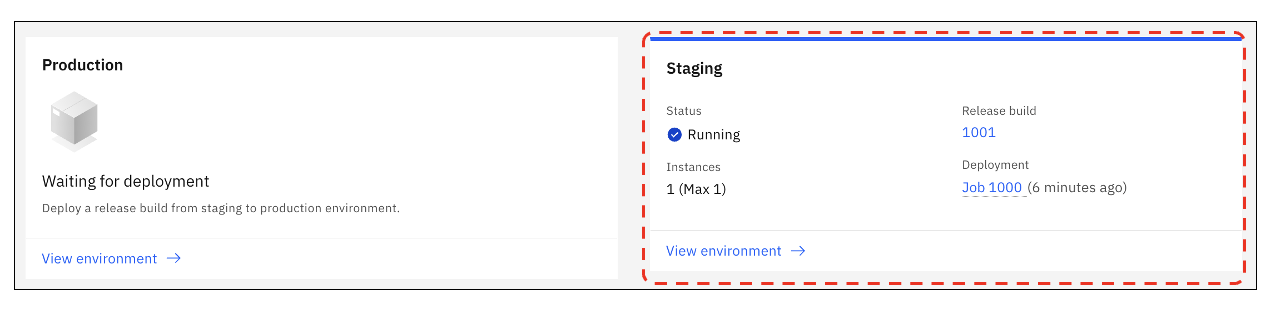
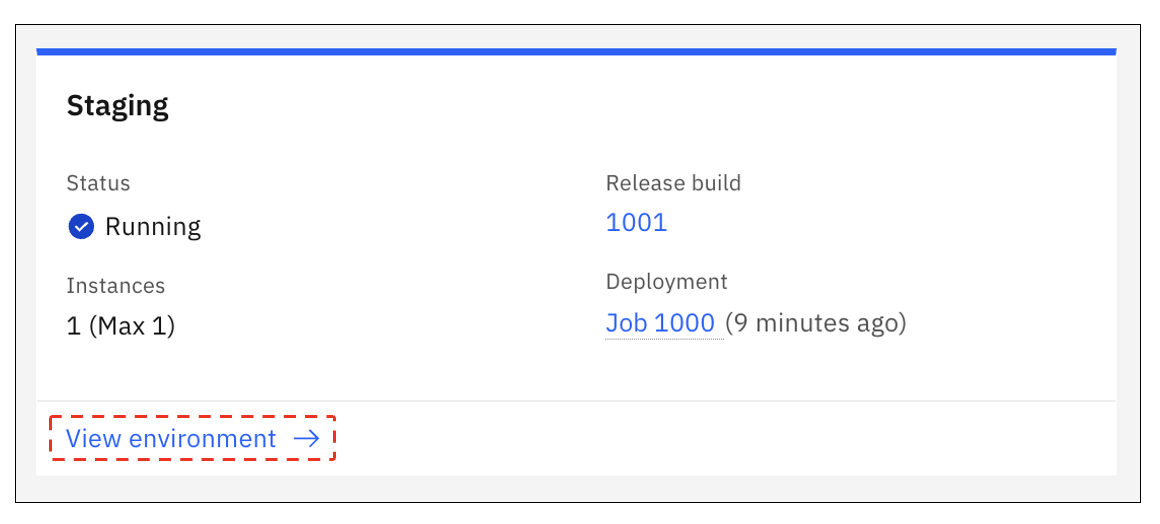
The summary shows the Release Build that's running, the Deployment job that performed the deployment, the number of instances (and max configured), and the status. Click View environment to open the environment details page.
In the environment details page, you can see each instance that's running and the logs from those instances. You can perform diagnostics (capture server dumps and trace logs), you can view integrations (which provide connectivity to external logs and monitoring, Db2, MQ, and so on), and lastly, initiate further actions. Click the Actions menu to see the options, and then choose Open application.
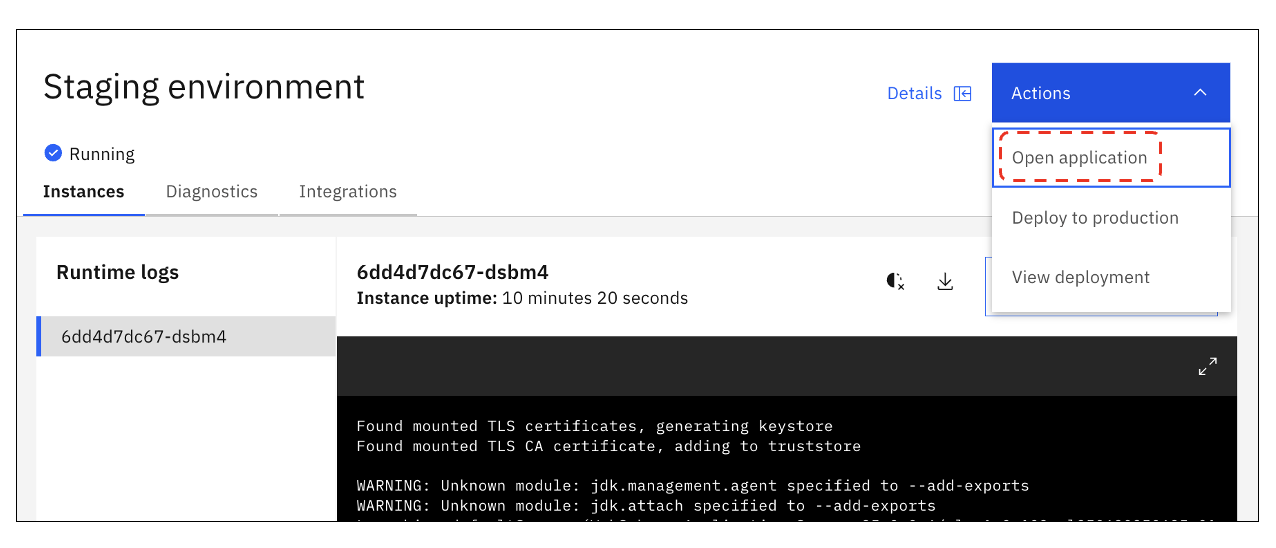
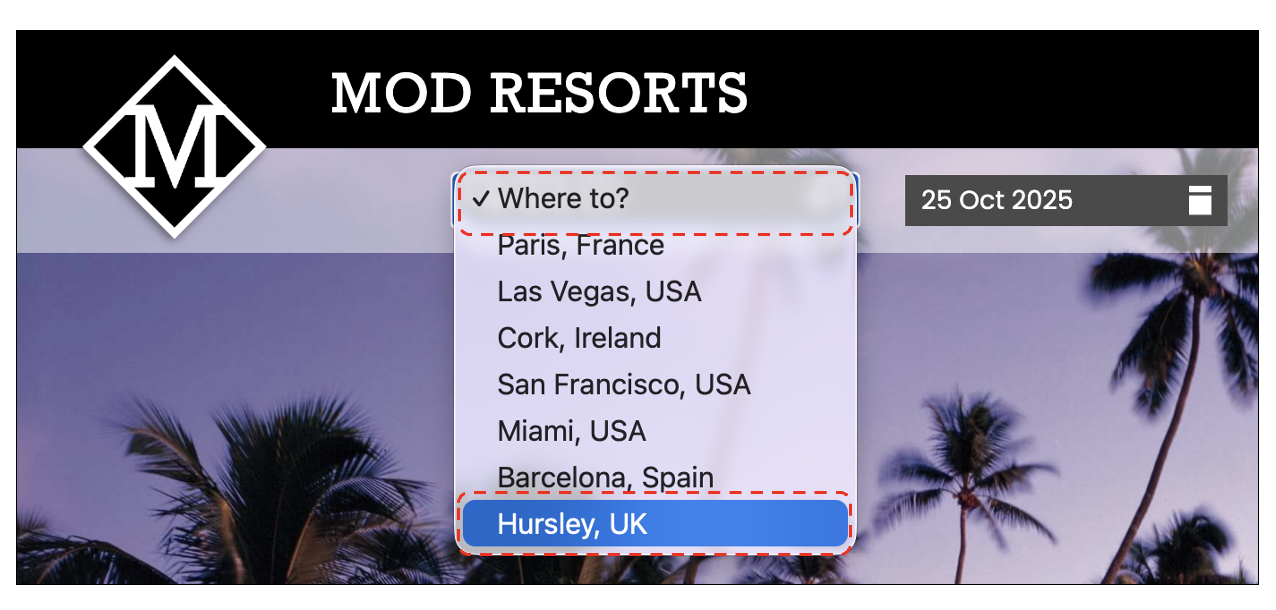
A new browser tab opens where the web application is loaded for you to try it out. Click the Where to? drop-down and you’ll see the new destination that you added earlier.
Conclusion
Congratulations, you’ve successfully taken an application through its delivery cycle, from code change through to running the updated application in the cloud. The EASeJ experience is so simple, it would be easy to miss what EASeJ actually did, so let’s quickly highlight some of the benefits:
- Version control experience. EASeJ integrated seamlessly with GitHub with a best-practice workflow for building and deploying the application based off activity in GitHub.
- Build and Deploy pipelines. EASeJ provided built-in pre-configured Continuous Integration and Continuous Delivery (CI/CD) pipelines meaning you got all the benefits of modern delivery practices without the skills and maintenance overhead.
- Artifact storage. All the artifacts that were created by the builds and deployments were stored by EASeJ and will be retained for when you need them with no need to pay for and configure additional storage. The same would also be true for day-2 diagnostics data such as server dumps and traces.
- Runtime management. EASeJ managed and maintained the Java and Liberty runtime so you didn’t need to even think about it. You just updated and deployed the application.
- Infrastructure management. EASeJ stood up and maintained the infrastructure required to build, deploy, secure, run, and scale the application, you just told it what you needed.
Other Things to Try
Now that you've completed this getting started tutorial, you can try deploying the changes to production or checking out Liberty Tools.
Deploy to Production
Want to put what you’ve learned into practice? Try deploying the application that is currently in Staging into Production. Hint: The Staging environment page's Action menu has a Deploy to production option that will give you instructions.
Try your own application
Happy with how EASeJ works with the sample application? Why not delete the code in the source repository and replace it with a Liberty application of your own. If you don’t have an application, you can use the Liberty Starter to get going. And, there are lots of great guides to help you learn more.
Liberty Tools
The tutorial had you make code changes through the GitHub UI, but in practice, it’s better to develop and test locally before you push code to GitHub. This practice is enabled through the Liberty Tools. Liberty Tools are IDE plugins (available on IntelliJ IDEA, Visual Studio Code and Eclipse IDE) that help with developing and testing Liberty applications. You can use the Liberty Tools at no charge to develop applications to run on EASeJ.
A key feature of Liberty Tools is Dev Mode integration, which enables hot code replacement in a locally running server. You can start Liberty in Dev Mode, make code or configuration changes, and then Dev Mode automatically updates the running application. No need to build, no need to redeploy, no need to restart, it all just happens.