About cookies on this site Our websites require some cookies to function properly (required). In addition, other cookies may be used with your consent to analyze site usage, improve the user experience and for advertising. For more information, please review your options. By visiting our website, you agree to our processing of information as described in IBM’sprivacy statement. To provide a smooth navigation, your cookie preferences will be shared across the IBM web domains listed here.
Tutorial
Implement secure RBAC for MCP server access using context variables and On‑Behalf‑Of (OBO) flow in watsonx Orchestrate
A hands-on guide for enabling secure, role‑aware agent access to MCP tools by combining context variables with Okta‑powered OBO token exchange in watsonx Orchestrate
As agentic AI systems become more embedded in enterprise operations, each system shifts from only answering questions to deciding, starting tasks, and interacting directly with enterprise tools on behalf of users.
This increasing autonomy creates an important responsibility: Enterprises must give each AI agent the correct level of access to resources, no more and no less. securing enterprise AI workflows requires precise control over how agents access tools and sensitive data.
In an agentic AI system, role-based access control (RBAC) ensures each agent works within clear AI guardrails that match business roles, security rules, and compliance requirements. RBAC allows organizations to scale agentic AI with confidence while preserving trust, accountability, auditability, and AI governance.
In this tutorial, you will learn how to implement context‑aware RBAC using OAuth2 On‑Behalf‑Of (OBO) flow to protect Model Context Protocol (MCP) server integrations in IBM watsonx Orchestrate. By combining delegated user identity, dynamic context variables, and secure token exchange, you'll also learn how to build compliant, least‑privilege, production‑ready agentic AI experiences that enforce authorization at every step.
Architecture of context-aware RBAC for agentic AI systems
The following architecture shows how a web application securely connects users to agentic AI capabilities in watsonx Orchestrate. It also shows how the system enforces RBAC and On‑Behalf‑Of (OBO) authorization flow when the agent accesses external tools through an MCP server.

- The user interacts with the secure embedded watsonx Orchestrate chat in the custom web application.
- The web application sends the user query and the context variables to the HR Main Agent’s runtime context. The HR Main agent receives the query and uses the large language models (LLMs) to classify the intent and identify the correct downstream agent or tool.
- The HR Main Agent invokes the plug-in. The plug-in checks whether the user has manager access or general access.
The plug-in uses the context variables that are passed from the embedded chat to make the access decision.
When the user role is General User: The HR Main Agent can access only to the General Agent. The General Agent can use the following MCP toolkit tools:
- mcp_tools_server.get_office_locations: Returns the list of company office locations.
- mcp_tools_server.get_leave_balance: Retrieves the leave balance for the logged-in employee.
- mcp_tools_server.get_holidays: Returns the list of upcoming company holidays.
When the user role is Manager: The HR Main Agent can access both the General Agent and the Manager Agent. The Manager Agent can also use restricted MCP tools that provide sensitive employee information:
- mcp_tools_server.get_employee_salary: Fetches an employee’s salary information in UsD.
- mcp_tools_server.get_team_summary_dashboard: Provides a summary of team dashboard metrics.
The Manager Agent can also use all tools available to the General Agent.
Note: Unauthorized agents are removed from the collaborator list at run time. This means that the system automatically removes the Manager Agent from the HR Main Agent’s collaborator list for a general user. Only the agents that are allowed for that user’s role remain available.
HR Main Agent receives the tool results, formats the response, and sends the response back to the user through the embedded chat interface.
Note: The flow uses secure MCP server access with the On-Behalf-Of (OBO) authorization flow process.
When an MCP tool is invoked:
- watsonx Orchestrate sends the user’s ssO token to the watsonx Orchestrate Connection Manager.
- The On-Behalf-Of (OBO) flow exchanges the ssO token for a scoped access token.
- The MCP server validates the scoped token and applies RBAC policies.
Prerequisites
- An active watsonx Orchestrate instance.
- A running local environment of the watsonx Agent Development Kit (ADK). If you do not have an active ADK instance, review the getting started with ADK tutorial. This tutorial has been tested and validated with ADK version 2.2.0.
- Clone the code base from our GitHub repo. Open the code in VsCode or an editor of your choice and then navigate to the
i-oic-rbac-using-obodirectory. set thei-oic-rbac-using-obodirectory as your current working directory. - Review the folder structure that contains all components used in the steps of the tutorial.
- embed_chat_webapp: Contains the web application code used to load the watsonx Orchestrate agent.
- enable_security_wxo: Contains the files needed to enable security for the watsonx Orchestrate chat.
- hr_agent_automation: Contains the code for agents, connections, and tools that you will deploy in watsonx Orchestrate.
- mcp_server_code: Contains the MCP server code and the instructions to deploy the MCP server on IBM Code Engine.
- okta_setup: Contains the instructions to set up the identity provider for this tutorial.
step 1. set up the identity provider and deploy the MCP server in IBM Code Engine
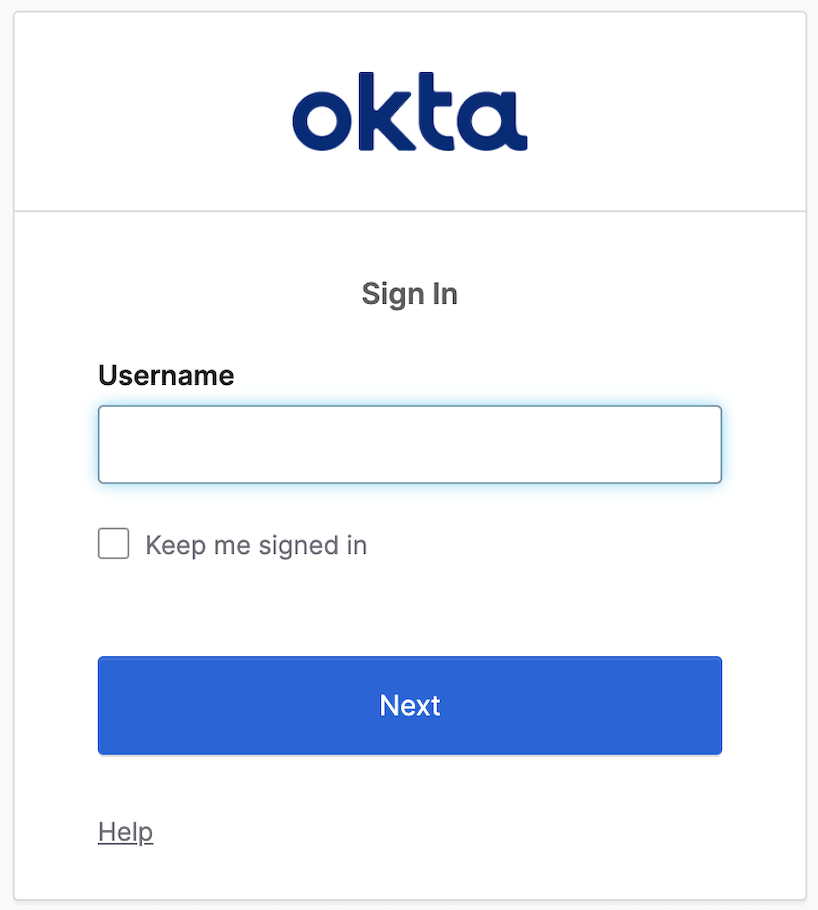
Okta acts as the identity provider (IdP) to authenticate and authorize users. Okta enables single sign‑On (ssO) for the web application so that users can log in once and access the system securely. The same identity provider is also used to secure the MCP tools, ensuring that only authenticated and authorized users can access the application and its resources.
- Complete the Okta OAuth On-Behalf-Of (OBO) flow setup to get the following values:
- OKTA_BAsE_URL
- API_sERVICEs_CLIENT_ID
- API_sERVICEs_CLIENT_sECRET
- sPA_CLIENT_ID
- Complete the deployment of the MCP server in IBM Code Engine. The MCP server contains the tools that the agents use to fetch information based on user authorization. After deployment, you will get the MCP_sERVER_URL. You will use this value later when you import the MCP toolkit into watsonx Orchestrate.
step 2. set up secure MCP integration with watsonx Orchestrate using the On‑Behalf‑Of (OBO) flow
Import the MCP toolkit and create a secure end‑to‑end connection from the embedded chat to the MCP tools using the On‑Behalf‑Of (OBO) flow. The MCP toolkit includes the following tools:
- mcp_tools_server.get_office_locations
- mcp_tools_server.get_leave_balance
- mcp_tools_server.get_holidays
- mcp_tools_server.get_employee_salary
- mcp_tools_server.get_team_summary_dashboard
Update the values in the following command with your values obtained from Okta OAuth On-Behalf-Of (OBO) flow setup in step 1, then run the command to generate the access token. This token, called OKTA_ACCEss_TOKEN, will be used in the next steps to import the MCP toolkit.
Values that you need:
- OKTA_BAsE_URL
- API_sERVICEs_CLIENT_ID
- API_sERVICEs_CLIENT_sECRET
curl -X POsT "<OKTA_BAsE_URL>/oauth2/default/v1/token" \
-H "Accept: application/json" \
-H "Content-Type: application/x-www-form-urlencoded" \
--data-urlencode "grant_type=client_credentials" \
--data-urlencode "client_id=<API_sERVICEs_CLIENT_ID>" \
--data-urlencode "client_secret=<API_sERVICEs_CLIENT_sECRET>" \
--data-urlencode "scope=mcp.read"

step 3. Create the connection in watsonx Orchestrate
Create a connection in watsonx Orchestrate. The MCP tools will use this connection to securely access the MCP server.
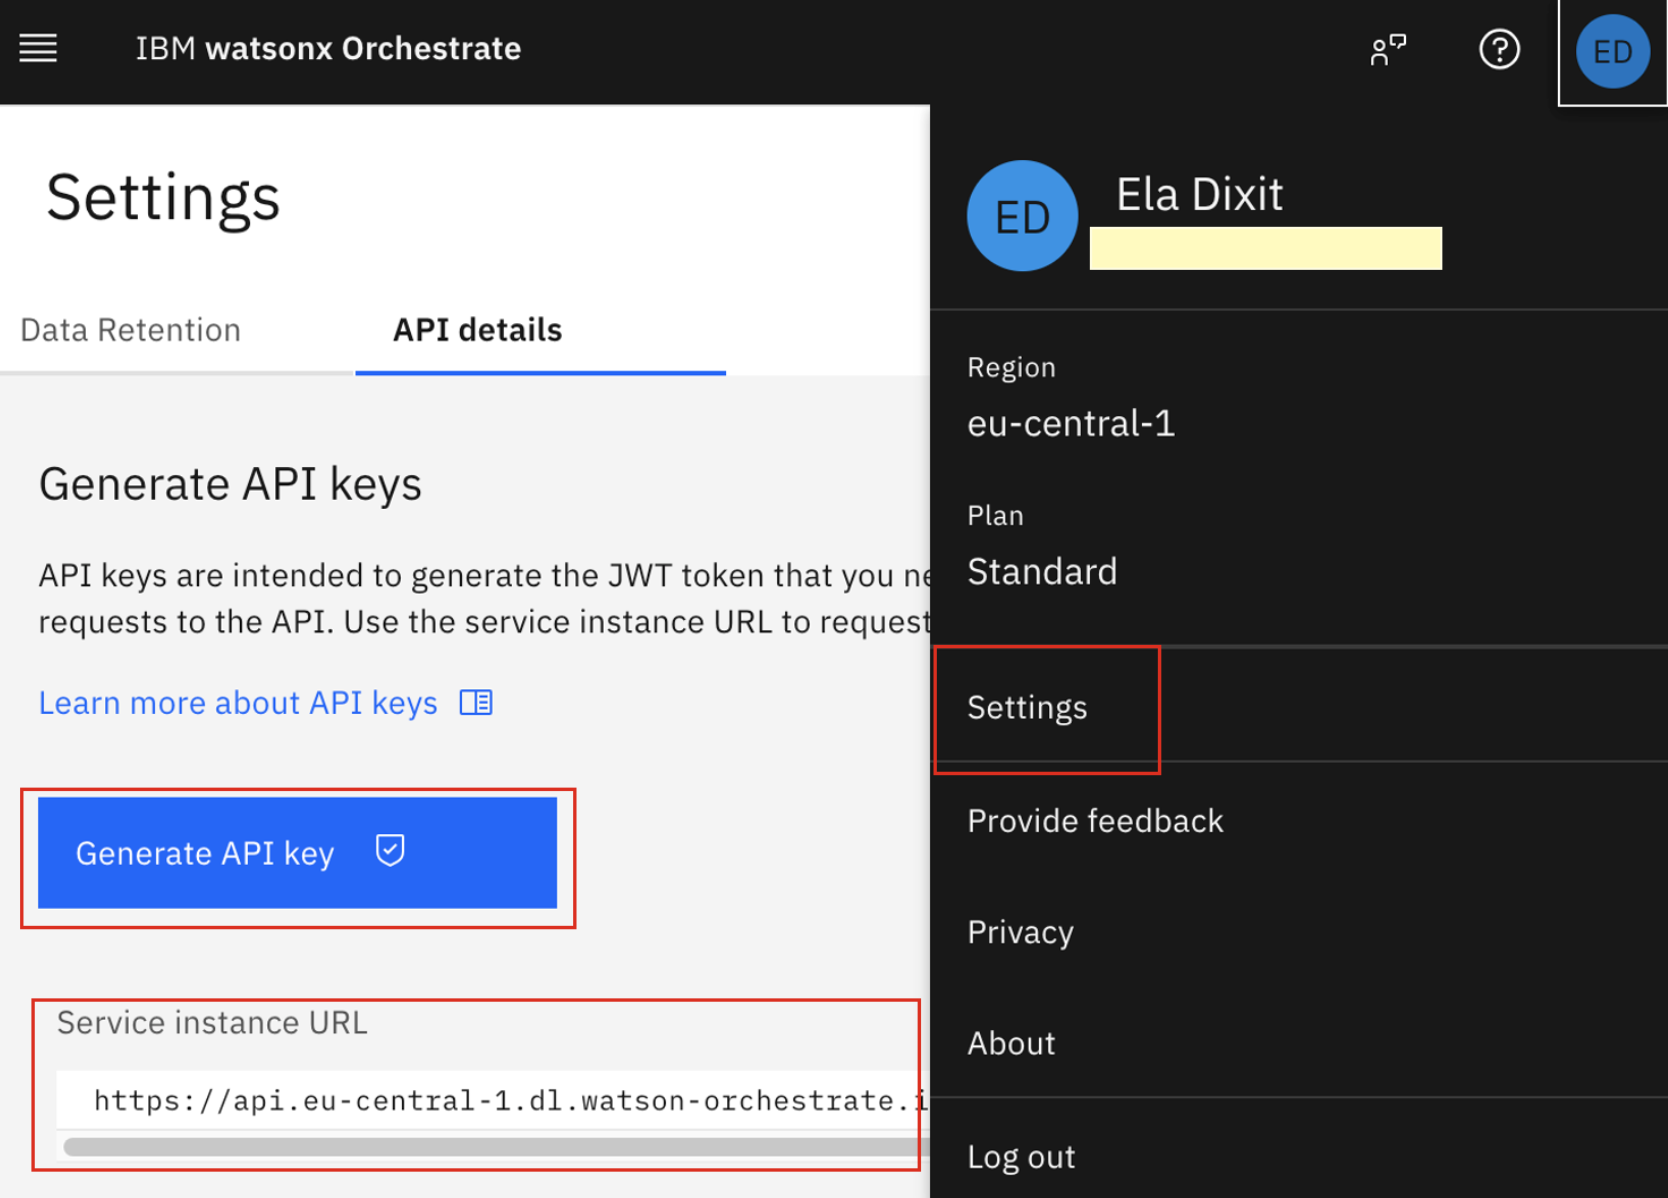
Log in to watsonx Orchestrate. In the upper-right corner, click settings, then click API details. Copy the sERVICE_INsTANCE_URL.
Click Generate API key to create the IAM_API_KEY.
Open a terminal in the Vs Code editor and connect to your watsonx Orchestrate saas instance.
orchestrate env add --name oic_dev --url <sERVICE_INsTANCE_URL> orchestrate env activate oic_dev --api-key <IAM_API_KEY>In the terminal, run the following commands to go the connections folder, and then create and configure the connection.
cd i-oic-rbac-using-obo/hr_agent_automation/connectionsorchestrate connections add -a mcp_connectionorchestrate connections configure \ -a mcp_connection \ --env draft \ --type team \ --kind bearerReplace OKTA_ACCEss_TOKEN in the following command with the token that you generated in step 2, then run it. This bearer token is required to securely import the MCP server into watsonx Orchestrate.
Note: The OKTA_ACCEss_TOKEN generated in step 2 is valid for only 5 minutes. If you try to import the MCP server into watsonx Orchestrate after the token expires, the request will fail with an authentication error. Generate a new token and try the import again if this happens.
orchestrate connections set-credentials \
 -a mcp_connection \
 --env draft \
 --token <OKTA_ACCEss_TOKEN>
Log in to the watsonx Orchestrate user interface to view the new connection.
Note: The MCP server is added to the watsonx Orchestrate instance using a bearer token, so the connection is still in the Draft state. In the next steps, you will convert this connection to an On‑Behalf‑Of (OBO) connection. Then, the connection can be promoted and used in both the Draft and Live environments.

step 4. Import the MCP toolkit into watsonx Orchestrate
Import the MCP toolkit from the MCP server deployed in IBM Code Engine into watsonx Orchestrate.
Update the MCP_sERVER_URL from step 1 in the following command, then run the command in the terminal.
orchestrate toolkits add \
 --kind mcp \
 --name mcp_tools_server \
 --description "MCP toolkit" \
 --url <MCP_sERVER_URL> \
 --transport streamable_http \
 --tools "*" \
 --app-id mcp_connection
Log in to the watsonx Orchestrate user interface to view the newly imported MCP toolkit.

step 6: Configure the On‑Behalf‑Of (OBO) authorization flow
You first used a bearer authentication connection to bring the MCP tools into the watsonx Orchestrate instance. However, the bearer token from Okta expires after 5 minutes. When the token expires, the agent loses access to the MCP tools.
To solve this, you will change the connection from bearer authentication to the On‑Behalf‑Of (OBO) token exchange flow. With OBO, watsonx Orchestrate exchanges the user’s access token at run time to securely reach the MCP server from the web client. Access tokens are fetched dynamically, which removes manual token updates and supports a secure, production‑ready integration.
Go to the connections folder.
cd i-oic-rbac-using-obo/hr_agent_automation/connectionsImport the updated connection. This updates the existing mcp_connection from bearer authentication to the On‑Behalf‑Of (OBO) token exchange flow. The MCP toolkit connection changes, but the MCP tools remain the same.
orchestrate connections import -f connection.yaml

To set the credentials for the On‑Behalf‑Of (OBO) token exchange flow in the Live environment, update the following command with API_sERVICEs_CLIENT_ID, OKTA_BAsE_URL, and API_sERVICEs_CLIENT_sECRET from step 1 and then run the command.
orchestrate connections set-credentials \
 --app-id mcp_connection \
 --env live \
 --client-id <API_sERVICEs_CLIENT_ID> \
 --grant-type urn:ietf:params:oauth:grant-type:token-exchange \
 --token-url <OKTA_BAsE_URL>/oauth2/default/v1/token \
 -t "body:client_secret=<API_sERVICEs_CLIENT_sECRET>" \
 -t "body:subject_token_type=urn:ietf:params:oauth:token-type:access_token" \
 -t "body:scope=mcp.read" \
 -t "body:audience=api://default" \
 -t "body:app_token_key=subject_token"
Verify the connection in the Live environment.
orchestrate connections list --env live | grep mcp_connection
step 7. Import the RBAC plug-in and the agents
Context variables allow the web application to pass user information and environment details from the embedded chat into the agent’s context. This enables agents to make context‑aware decisions based on user identity and role.
In this step, you will import the following plug-in and agents:
RBAC plug-in (tool): This plugin enforces access control by allowing the HR Main Agent to call the Manager Agent based on the user_profile context variable and only when the user_profile.is_manager flag is set to true.
General Agent: This agent handles general queries such as:
- “What are the office locations in India?”
“show me the holiday calendar for 2026 in India.”
These questions apply to all employees and do not require any special role.
Manager Agent: This agent handles sensitive requests such as What is the salary of Jane Doe?
This information requires a manager role. The Manager Agent processes only those queries that need elevated access.
HR Main Agent: This agent is the supervisor agent. It interacts with the user in a secured way and routes each request to the correct collaborator agent based on the user’s role and the RBAC plug-in decision.
To import the following plug-in and agents, complete the following steps:
Import the RBAC plug-in. watsonx Orchestrate runs the RBAC plug-in before calling the Manager Agent to check whether the user’s role allows access to the tools and agents that are linked to that role.
In the terminal, run the following commands to go to the tools folder and to import the rbac_plugin.py tool. This tool will be referenced in the Manager Agent in the following step.
cd i-oic-rbac-using-obo/hr_agent_automation/toolsorchestrate tools import -f rbac_plugin.py -k python
In the terminal, run the following commands to go to the agents folder and run the commands to import the General Agent, Manager Agent, and HR Main Agent (supervisor Agent):
cd i-oic-rbac-using-obo/hr_agent_automation/agentsorchestrate agents import -f general_agent.yaml orchestrate agents import -f manager_agent.yaml orchestrate agents import -f hr_main_agent.yamlorchestrate agents deploy -n hr_main_agent
The RBAC plug-in reads the user_profile context variable and extracts the is_manager attribute. The plug-in runs before the collaborator agents are invoked.
- If is_manager is true, processing continues and the manager_agent remains available to the HR Main Agent.
If is_manager is false, processing stops and the manager_agent is removed from the collaborator list at run time. Only the general_agent remains available to the user.

Note: Before calling the Manager Agent, the HR Main Agent first invokes the Manager Agent’s plug-in and passes the context variables.
- If the plug-in returns true, the HR Main Agent proceeds to call the Manager Agent.
- If the plug-in returns false, the HR Main Agent removes the Manager Agent from its collaborator list.

step 8. Enable security in watsonx Orchestrate
By default, security is enabled in watsonx Orchestrate, but it is not configured for the embedded chat. To activate secure communication, you must configure both the IBM key and the client key-value pairs.
Open the Vs Code terminal. set enable_security_wxo as the current working directory and run the following script.
chmod 755 enable_security.sh ./enable_security.shAfter the script completes running, a keys folder is created with a sINGLE_LINE subfolder. save these mappings for future use:
- client_private_key.pem → CLIENT_PRIVATE_KEY
- client_public_key.pem → CLIENT_PUBLIC_KEY
ibm_public_key → IBM_PUBLIC_KEY

Notes:
- This setup is required only once for each watsonx Orchestrate instance.
- Every time your application connects to the embedded chat, it must use the same client_private_key and ibm_public_key.
- If you run the setup script again, new keys will be generated and the previous keys will no longer work.
step 9. Embed the watsonx Orchestrate chat script in the user interface
You can access the watsonx Orchestrate agent in any custom web application by embedding the chat script. You can retrieve this script using the CLI.
Run the following command in the terminal and copy the embed chat script from the response:
orchestrate channels webchat embed -a hr_main_agent
Note: The agent must be deployed in the Live environment before you can embed it in the user interface.
Note the following values from the embed chat script. You will use them in the next steps.
- orchestrationID
- hostURL
- crn
- agentId
- agentEnvironmentId
Open the embed_chat_webapp folder in your Vs Code editor. This folder contains the user interface application where you will embed the watsonx Orchestrate chat.
Open the .env file and update it as shown in the following screen:
- In section (1), paste the values from the Okta setup in step 1: sPA_CLIENT_ID and OKTA_BAsE_URL
- In section (2), paste the values that are generated in step 8 when you enabled security: CLIENT_PRIVATE_KEY, CLIENT_PUBLIC_KEY, and IBM_PUBLIC_KEY
In section (3), paste the values from the embed chat script: orchestrationID, hostURL, crn, agentId, and agentEnvironmentId

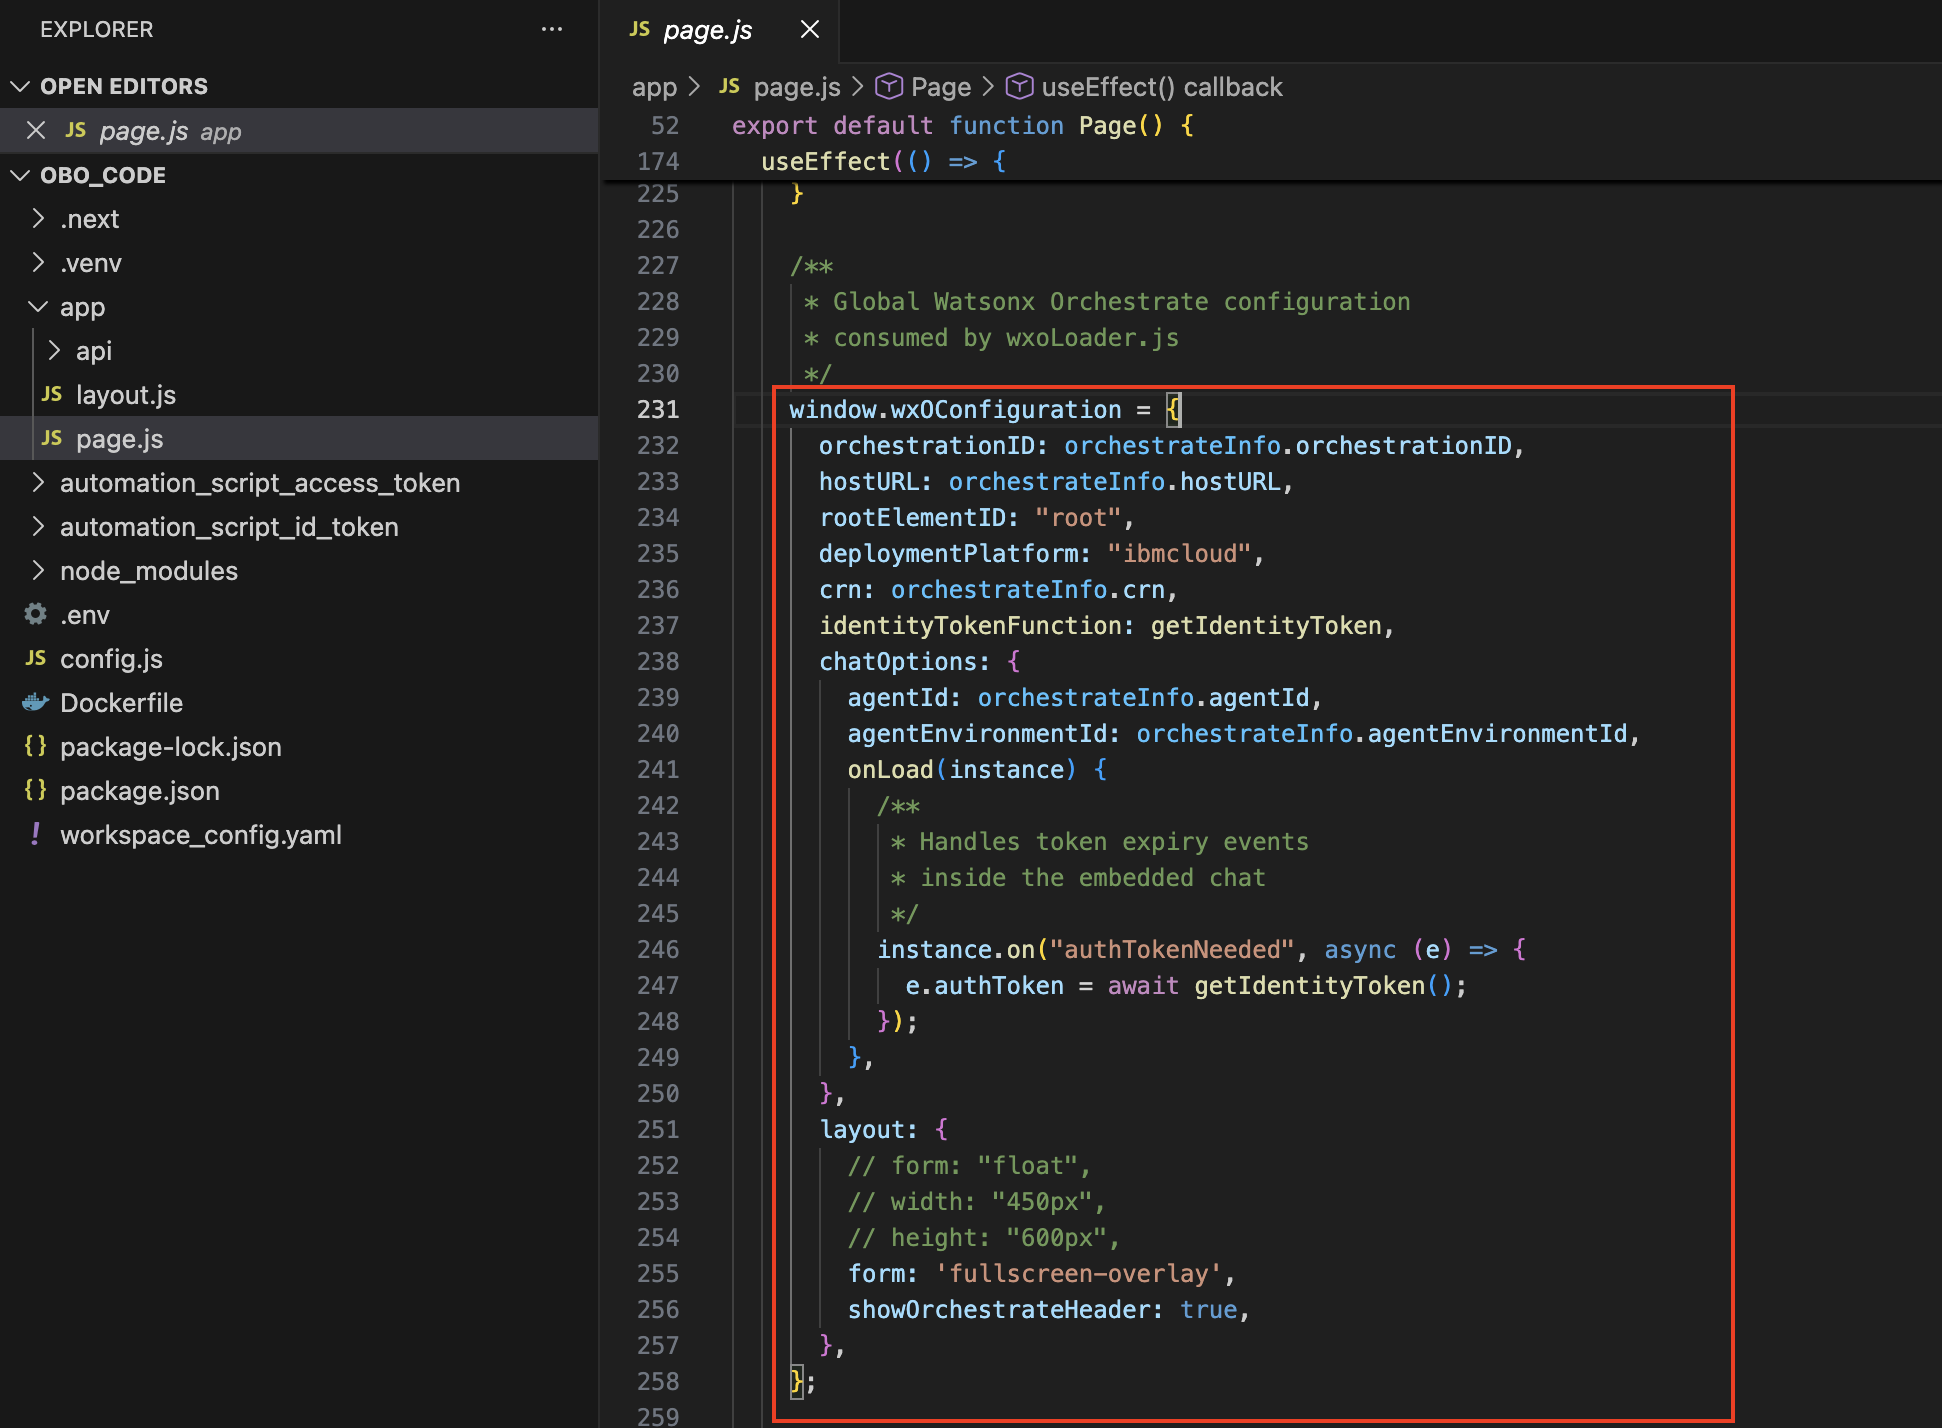
Open page.js. The embed chat script will be included in this file.
In the terminal, run the following commands. These commands ensure that values in the .env file are copied automatically into config.js, which is then used in page.js.
cd embed_chat_webappnpm install && npm install node-rsanpm run devAfter the application starts, open the following URL in your browser. Your user interface will now show the embedded chat icon in the lower‑right corner.
http://localhost:3000
step 10. Validate the agents in watsonx Orchestrate
Validate the hr_main_agent supervisor agent to ensure that the full end‑to‑end orchestration works correctly and also test how users with different roles (general user or manager) can access or are restricted from accessing specific MCP tools.
Log in to the application as a user with a defined role (general user or manager).
Click the chat icon to open the embedded chat interface.
Run test queries. In the chat interface, enter the sample queries in the conversation pane to verify access behavior for each role.
Case 1: Manager-level access
- User Role: Manager
- User Query: What is Madan’s salary?
Expected Agent Response: The agent retrieves and displays Madan’s salary because the user has manager‑level authorization to access salary information.

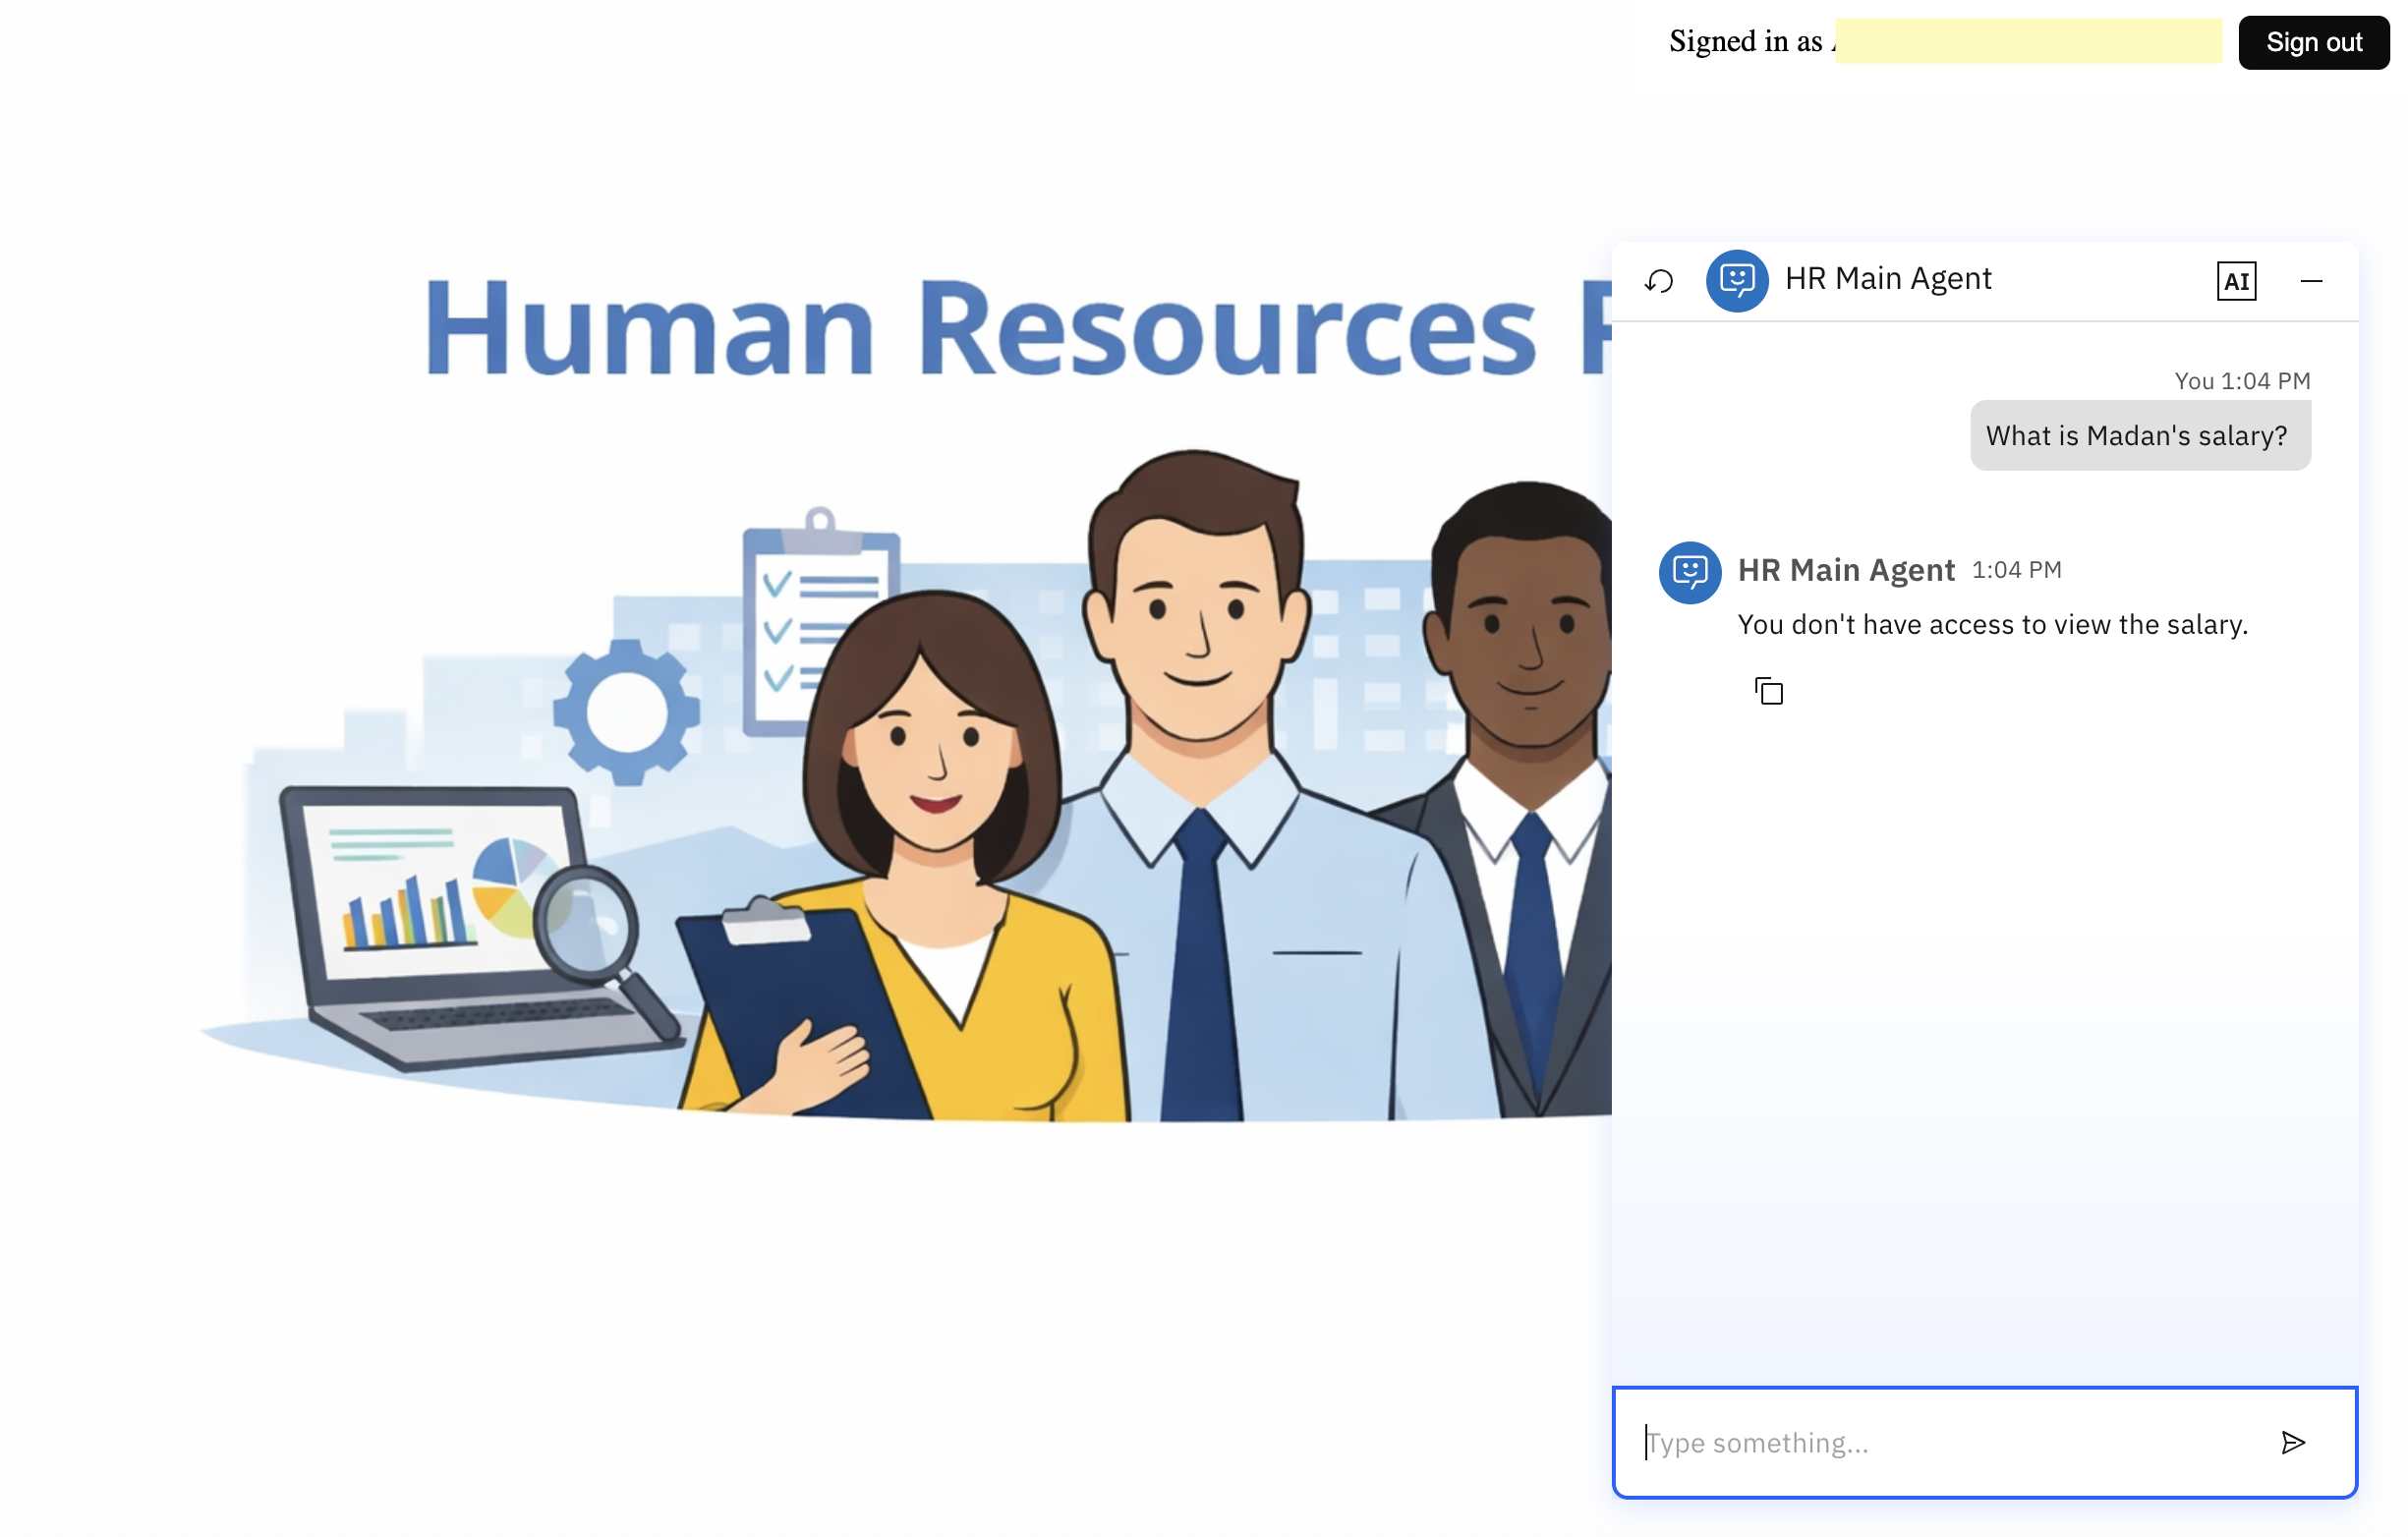
Case 2: General user access (Authorization failure)
- User Role: General user
- User Query: What is Madan’s salary?
Expected Agent Response: The agent blocks the request and returns an authorization message such as: “You don’t have access to view the salary.”
summary
In this tutorial, you learned how to embed watsonx Orchestrate agents into a custom web application and set up secure end‑to‑end communication. You implemented context‑aware role‑based access control using the On‑Behalf‑Of (OBO) flow to ensure that each agent accesses enterprise tools only within the permissions of the authenticated user. This approach supports secure, scalable, and compliant agentic AI interactions across enterprise systems.
Acknowledgments
This tutorial was produced as part of the IBM Open Innovation Community initiative: Agentic AI (AI for Developers and Ecosystem).
The authors deeply appreciate the support of Cristian Alejandro Guillen Mendez, Abhinav Gupta, Debojyoti sinha Roy, srikanta swamy, Arnav satija, Albert sunil D, sreelakshmi Aechiraju, Ahmed Azraq, and Bindu Umesh for reviewing and contributing to this tutorial.