About cookies on this site Our websites require some cookies to function properly (required). In addition, other cookies may be used with your consent to analyze site usage, improve the user experience and for advertising. For more information, please review your options. By visiting our website, you agree to our processing of information as described in IBM’sprivacy statement. To provide a smooth navigation, your cookie preferences will be shared across the IBM web domains listed here.
Tutorial
Integrate crewAI multi-agent framework into IBM watsonx Orchestrate
A hands-on guide for deploying a crewAI microservice on IBM Code Engine and integrating it as an external agent in IBM watsonx Orchestrate for flexible, multi-agent workflows.
On this page
Modern automation scenarios often require specialized reasoning or access to domain-specific data that is outside the built-in capabilities of watsonx Orchestrate. Deploying an external multi-agent service on IBM Code Engine and integrating the service with IBM watsonx Orchestrate exposes a REST endpoint for custom AI logic, domain-specific reasoning, and retrieval augmented generation (RAG). The setup streams real-time responses from the multi-agent framework into enterprise workflows. This approach gives you the flexibility and scalability for advanced automation.
For example, consider a client that has large volumes of product documentation in PDF format, the client might need:
- A RAG agent within the crewAI framework to process and retrieve information from the PDF documents.
- An API-integrated booking agent that connects to the client’s existing booking system.
Both agents can be deployed within the same crewAI framework, allowing seamless utilization within watsonx Orchestrate.
In this tutorial, you will build a lightweight FastAPI microservice that uses crewAI and IBM watsonx.ai. You will also deploy the microservice on IBM Code Engine directly from a GitHub repository and register the microservice as an external agent within IBM watsonx Orchestrate. After integration, watsonx Orchestrate will call the crewAI service in real time, route tasks to the service and stream responses back to the user. This process demonstrates a flexible, enterprise-ready, multi-agent integration model.
Architecture of crewAI agents integration into watsonx Orchestrate
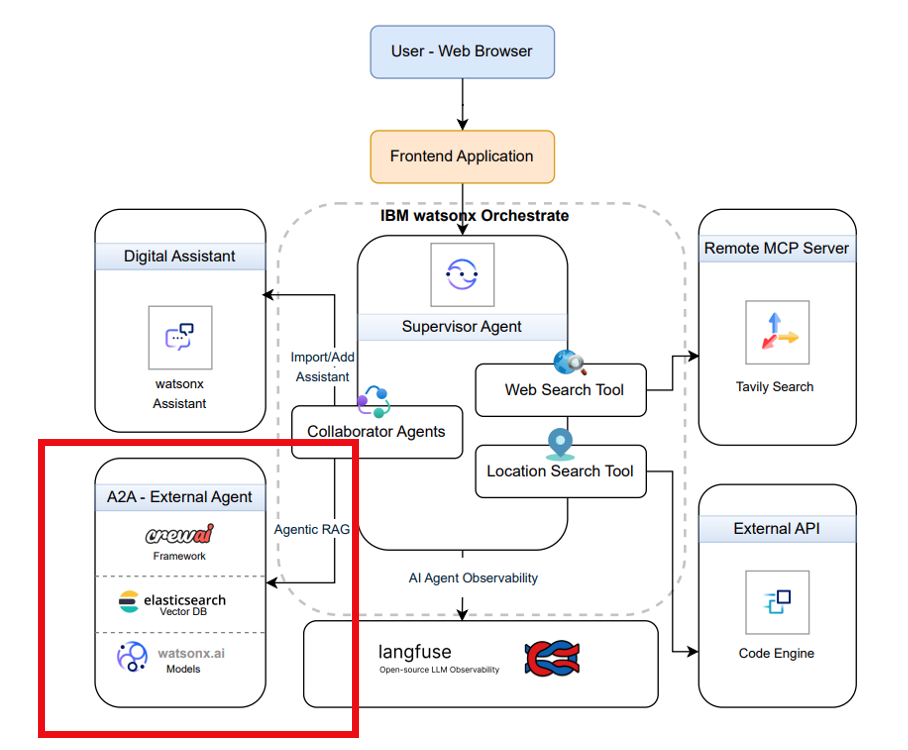
In this architecture, watsonx Orchestrate serves as the central component, while other elements interact with it to enable advanced automation. This tutorial focuses on the Agent-to-Agent (A2A) integration component within the architecture. The A2A integration is part of a broader example that includes governance using Langfuse and the connection of external APIs as tools.
The A2A example demonstrates:
- Invoking IBM watsonx.ai models for AI-driven tasks.
- Querying an Elasticsearch vector database for information retrieval.
Components
The core components used to build and integrate a crewAI service with IBM watsonx Orchestrate follow:
- IBM watsonx Orchestrate (SaaS): An automation and orchestration workflow engine that triggers and coordinates task execution.
- crewAI multi-agent framework: A FastAPI-based microservice that exposes /v1/chat endpoint to enable multi-agent reasoning and collaboration.
- IBM Code Engine: A fully managed containerization platform that builds and deploys the crewAI microservice from a Git repository.
- IBM watsonx.ai: A large language model (LLM) used by crewAI agents for classification, reasoning, and synthesis. These models are invoked through watsonx.ai APIs.
Workflow
- A workflow action or user prompt in watsonx Orchestrate triggers a request to an external crewAI agent.
- The request is routed to the /v1/chat endpoint hosted on IBM Code Engine, along with the relevant context data.
- The crewAI framework processes the request using multiple agents. For this example, the framework follows the supervisor-knowledge-expert model to coordinate reasoning and task execution.
- The response that is generated by crewAI is streamed back to watsonx Orchestrate and displayed to the user.
Prerequisites
Before you begin, ensure that you have the following:
- An IBM Cloud account with access to IBM Code Engine for deploying the microservice. You can also sign up for a trial account.
- Access to watsonx Orchestrate (either SaaS or watsonx Orchestrate Application Development Kit (ADK)). Check out the getting started with ADK tutorial if you don’t have an active instance.
- Python 3.10 or later installed on your local machine for local testing and building of crewAI agent.
- Clone the code base from our GitHub repository. Open the code in VSCode or an editor of your choice and then go to the
crewai-external-orchestrate-agentdirectory. Set thecrewai-external-orchestrate-agentdirectory as your current working directory.
Steps
Step 1: Build a Crew AI Service
The service provides a REST interface around a multi-agent crewAI framework. It uses IBM watsonx.ai as the LLM within crewAI and exposes a /v1/chat endpoint compatible with watsonx Orchestrate’s external agent connection.
The crewAI framework can be developed in the standard way. The GitHub repository contains a sample crewAI project that can be used as an external agent with watsonx Orchestrate.
The following files and example code for each file illustrates an example of a compatible crewAI framework that integrates with watsonx Orchestrate.
.env: To store environment variables such as API keys, project IDs, and credentials. The first section of this example relates to the crewAI service, and the second section relates to Elasticsearch if it is used.
WX_API_KEY = PROJECT_ID = EXPECTED_API_KEY = ES_URL = ES_USER = ES_PASS =The first section of this example relates to the crewAI service, and the second section relates to Elasticsearch if it is used.
app.py: The FastAPI application code, including the
/v1/chatendpoint for handling requests.class ChatRequest(BaseModel): model: str messages: List[Dict[str, Any]] stream: bool = False @app.post("/v1/chat") async def chat_completion(request: ChatRequest, authorization: str = Header(None)): """Handles both standard and streaming chat completions.""" # Basic Bearer token authentication if not EXPECTED_API_KEY or not authorization.startswith("Bearer "): raise HTTPException(status_code=401, detail="Unauthorized") provided = authorization.split("Bearer ")[1].strip() if provided != EXPECTED_API_KEY: raise HTTPException(status_code=403, detail="Invalid API key") # Extract user input user_message = next((m for m in request.messages if m["role"] == "user"), None) if not user_message: raise HTTPException(status_code=400, detail="Missing user input") query = user_message["content"] # If stream=True, use Server-Sent Events if request.stream: return StreamingResponse(stream_response(query), media_type="text/event-stream") else: return {"response": run_rag(query)}Notes:
- The /v1/chat endpoint supports both streamed responses and nonstreamed responses. For this tutorial, the endpoint and route /v1/chat must be used to stream the framework response back to watsonx Orchestrate. If this route is not used, the agent returns only the tool name instead of the full response.
- Agents and tools such as the query cleaner and vector search are defined once in the template.
- Environment variables including API keys and project IDs are stored in the
.envfile. - The bearer token is validated first. It must be set in the
.envfile underORCH_API_KEY. This key is required for connecting watsonx Orchestrate to the agent. Authentication uses either an API key or a bearer token. - An LLM configuration is required to use the crewAI framework. This tutorial uses the
ibm/granite-20b-multilingualmodel. The model configuration is defined in the app.py file and can be changed in that section.
requirements.txt: Lists Python dependencies that are required for the crewAI microservice.
Dockerfile: Defines the container image build instructions for deploying the service on IBM Code Engine.
# Use official Python image
  FROM python:3.11-slim
  # Set working directory
  WORKDIR /app
  # Install Python deps
  COPY requirements.txt .
  RUN pip install --no-cache-dir -r requirements.txt
  # Copy app code
  COPY main.py .
  # Expose FastAPI port
  EXPOSE 8000
  # Run the app with uvicorn
  CMD ["uvicorn", "main:app", "--host", "0.0.0.0", "--port", "8000"]
Step 2: Deploy the FastAPI service to IBM Code Engine
After building the crewAI service, you can deploy it as a container on IBM Code Engine directly from a Git repository. This approach eliminates the need for manual image creation.
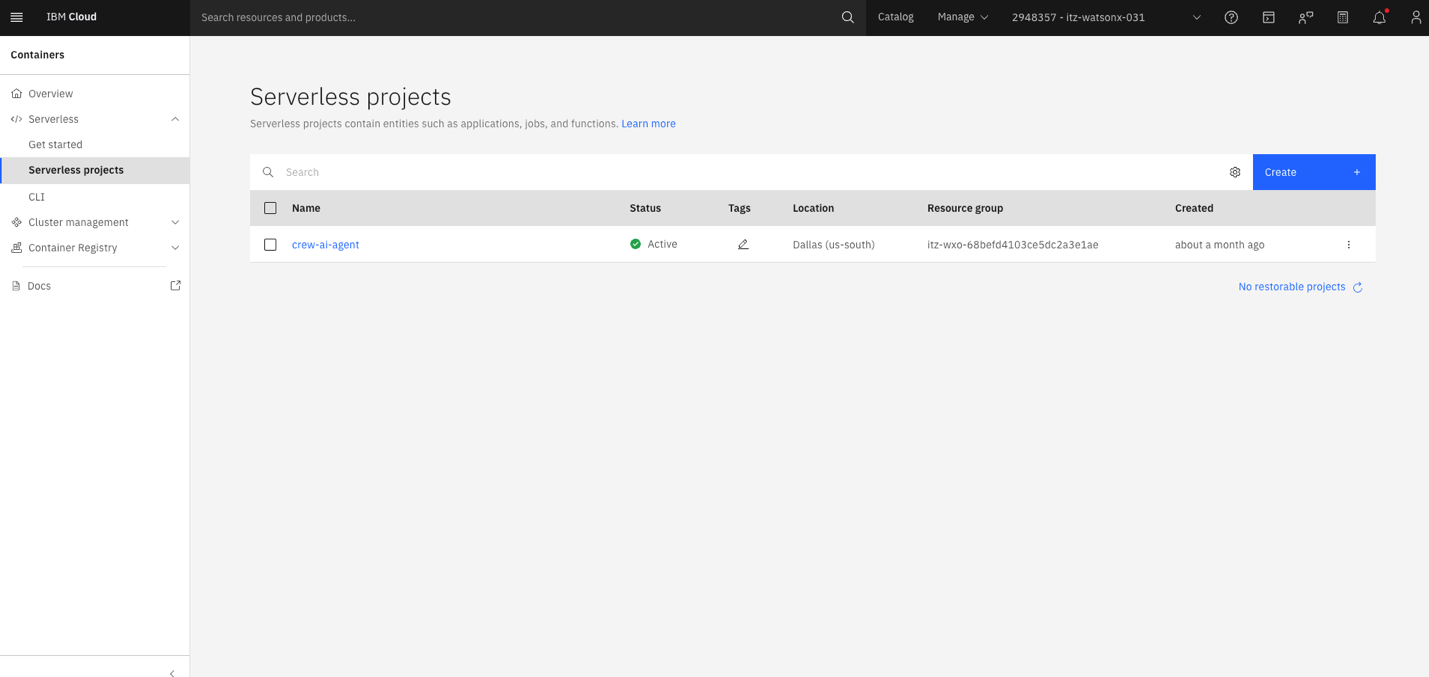
Create Code Engine project.
- Log in to IBM Cloud console.
- In the console, go to Code Engine -> Serverless projects -> Create.
- Enter the project name as crew-ai-agent and click Create.
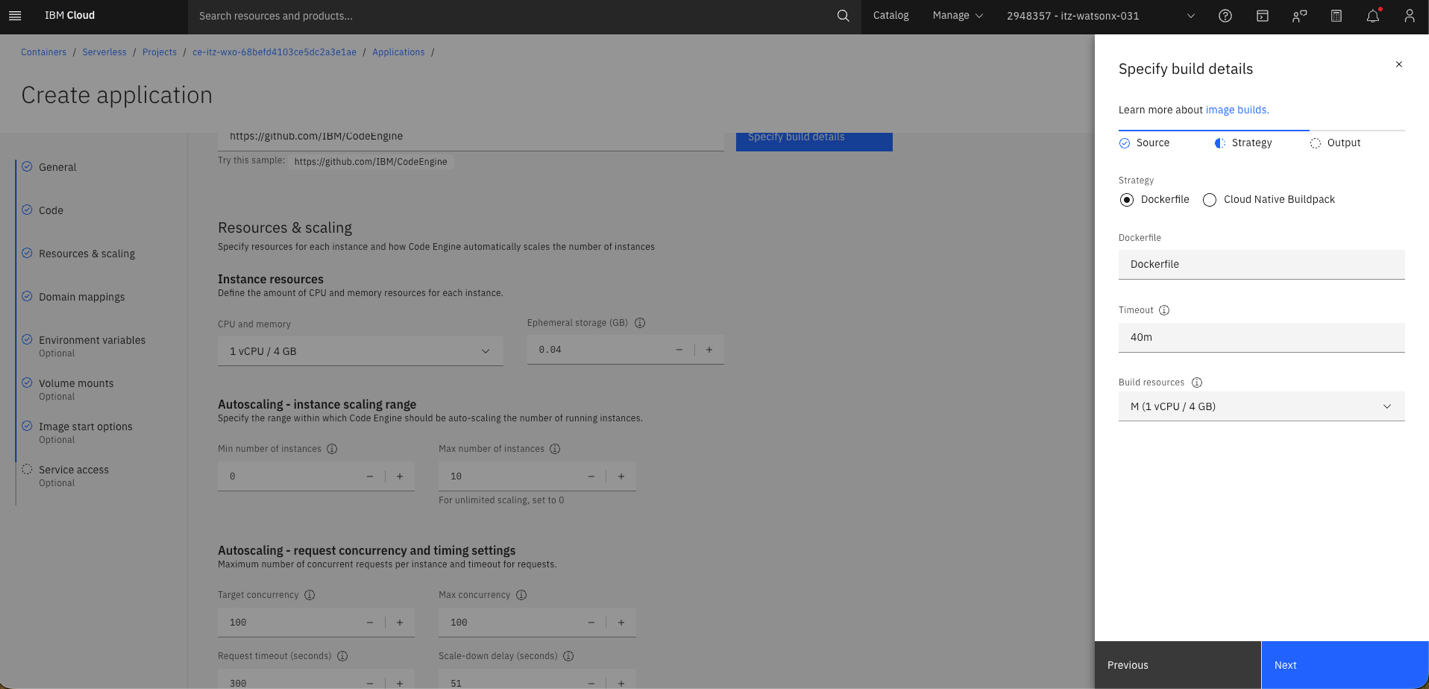
Create the application from source code.
- Click Create application and then select Build container image from source code.
- Enter the GitHub repository URL that contains your crewAI service code. If the repository is private, provide an SSH secret. This secret uses a public key to provide access to your repository.
Configure application settings.
- Ephemeral storage: increase to 4 GB
- Min number of instances: set it to 1
- Environment variables: Add the ORCH_API_KEY (this acts as your bearer token for authenticating watsonx Orchestrate to the API
- Image start options: Set listening port to 8000
- Increase the timeout to 40 minutes or higher (the default 10 minutes is insufficient for long-running builds).
Click Create and build. The build process creates the image and deploys the application. This can take several minutes.
After the deployment is complete test the /v1/chat endpoint using the following cUR command:
curl -X POST \\ -H "Authorization: Bearer <ORCH\_API\_KEY>" \\ -H "Content-Type: application/json" \\ -d '{"model":"watsonx","messages":\[{"role":"user","content":"Hello from Orchestrate"}\]}'If successful, you will receive a JSON response containing the agent’s output.
Step 3: Connect the crewAI service as an external agent
External agents must be registered so that watsonx Orchestrate can call them as a part of the workflow or chat interaction, similar to tools or agent-to-agent flows.
Register the external agent using the watsonx Orchestrate UI (SaaS).
- Open watsonx Orchestrate.
- Go to Agent Builder -> Create an Agent
Enter a name and description for the agent and click Create.
Add External Agent to the created agent. Select Import and then choose External Agent.
Enter the following information:
- Bearer token (use the value of ORCH_API_KEY).
- Instance URL (include /v1/chat at the end of the URL).
- Agent name.
- Description of capabilities.

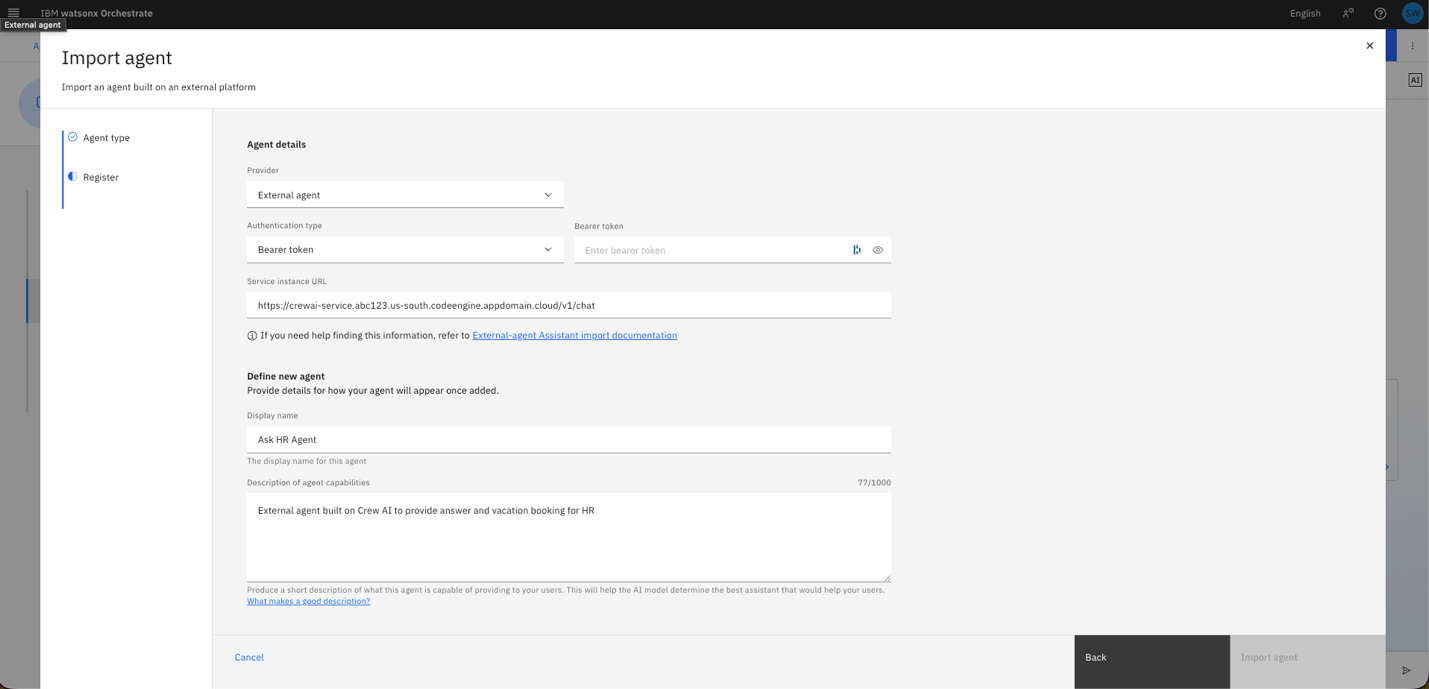
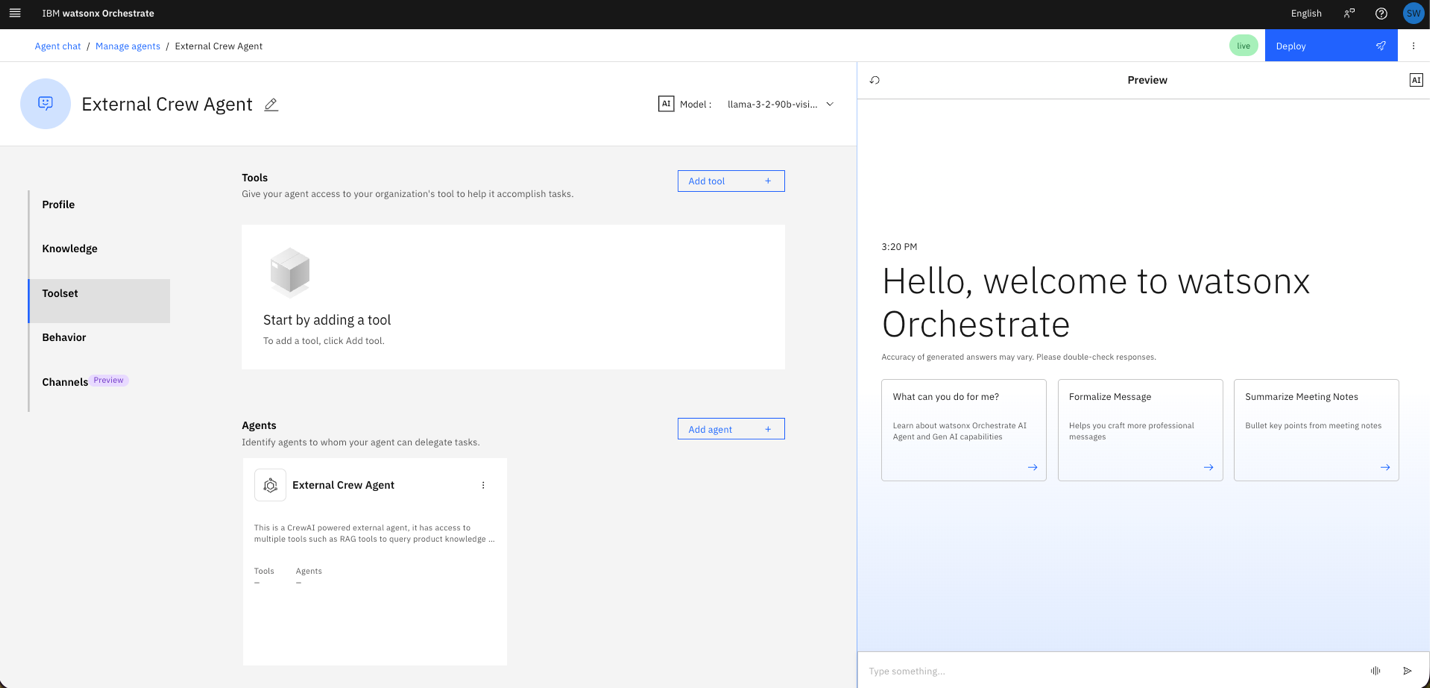
The external crewAI agent is now imported into watsonx Orchestrate.
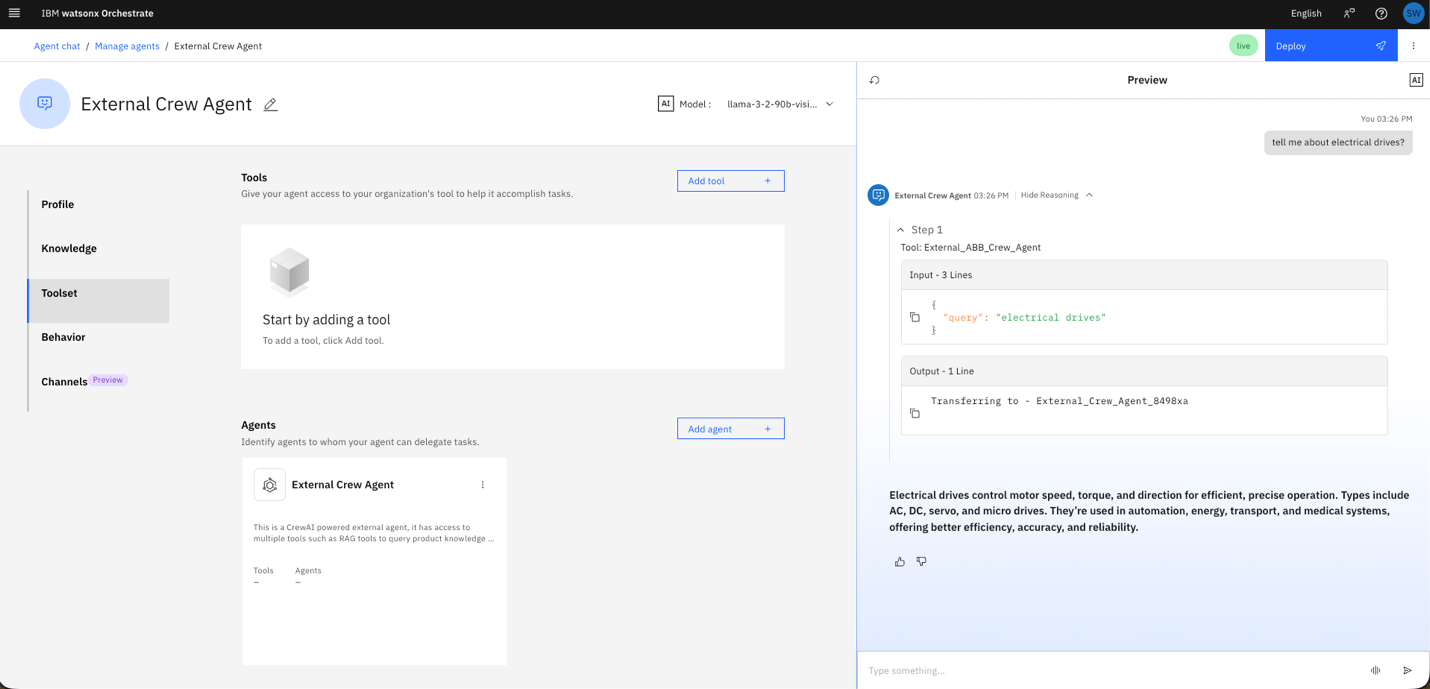
- Use Agent Preview to test the integration.
- Inspect the workflow to confirm that the external agent is called and the response is returned.
- Verify that the live responses stream correctly.
You can also create and register the external agent using the ADK CLI.
adk agent create --name crewai-agent \
--endpoint https://<code-engine-app-url>/v1/chat \
--auth-type bearer --auth-token <ORCH_API_KEY>
Summary
You have successfully deployed a reusable crewAI multi-agent service on IBM Code Engine and connected it to IBM watsonx Orchestrate as an external agent.
This integration pattern enables a powerful extension of IBM watsonx Orchestrate by incorporating your own LLM pipelines, multi-agent frameworks, and domain-specific logic and knowledge.
Next steps
- Integrate tools such as Langfuse, IBM watsonx.governance, or Prometheus to monitor performance and ensure compliance.
- Add additional crewAI tools, agents, or custom workflows to handle more complex tasks.
- Use the watsonx Orchestrate ADK to create advanced workflows and automate multi-agent interactions.
Useful Resources
- IBM Code Engine Documentation
- crewAI’s public GitHub repository
- watsonx Orchestrate Documentation
- watsonx Orchestrate ADK Documentation
Acknowledgments
This tutorial was produced as part of the IBM Open Innovation Community initiative: Agentic AI (AI for Developers and Ecosystem).
The authors deeply appreciate the support of Ela Dixit, Moises Dominguez, and Bindu Umesh for the guidance on reviewing this tutorial.